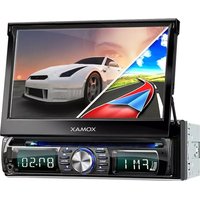
XM-DTSBN932 - Autoradio Xomax - Notice d'utilisation et mode d'emploi gratuit
Retrouvez gratuitement la notice de l'appareil XM-DTSBN932 Xomax au format PDF.


| Type de produit | Autoradio |
| Marque | Xomax |
| Modèle | XM-DTSBN932 |
| Dimensions (L x H x P) | 178 x 50 x 100 mm (1 DIN) |
| Poids | 0,8 kg |
| Alimentation | 12 V CC (véhicule) |
| Puissance de sortie maximale | 4 x 50 W |
| Type d'écran | TFT LCD 7 pouces |
| Radio FM/AM | Oui, avec RDS |
| Bluetooth | Oui, pour appels et streaming audio |
| Port USB | Oui (avant) |
| Entrée AUX | Oui (avant) |
| Lecteur de carte SD | Oui |
| Fonction mains-libres | Oui |
| Compatibilité commandes au volant | Oui (filaire) |
| Égaliseur | Oui, préréglages et manuel |
| Entrée vidéo | Oui (pour caméra de recul) |
| Sortie vidéo | Oui (pour écran externe) |
| Formats audio supportés | MP3, WMA, WAV, FLAC |
| Langues du menu | Multilingue (dont français) |
| Entretien | Nettoyer avec un chiffon doux et sec. Éviter les solvants. |
| Température de fonctionnement | -10 °C à 60 °C |
| Accessoires inclus | Câble d'alimentation, support de montage, vis |
FOIRE AUX QUESTIONS - XM-DTSBN932 Xomax
Questions des utilisateurs sur XM-DTSBN932 Xomax
0 question sur cet appareil. Repondez a celles que vous connaissez ou posez la votre.
Poser une nouvelle question sur cet appareil
Téléchargez la notice de votre Autoradio au format PDF gratuitement ! Retrouvez votre notice XM-DTSBN932 - Xomax et reprennez votre appareil électronique en main. Sur cette page sont publiés tous les documents nécessaires à l'utilisation de votre appareil XM-DTSBN932 de la marque Xomax.
MODE D'EMPLOI XM-DTSBN932 Xomax
XOMAX
CAR AUDIO NAVIGATION SYSTEM
OPERATING INSTRUCTIONS
BEFORE OPERATING THE UNIT, PLEASE READ THIS MANUAL THROUGHLY AND RETAIN IT FOR FUTURE REFERENCE

OWNER'S RECORD
THE MODEL AND SERIAL NUMBERS ARE LOCATED ON THE BOTTOM OF THE UNIT. RECORD THE SERIAL NUMBER IN THE SPACE PROVIDED BELOW. REFER TO THESE NUMBERS WHENEVER YOU CALL UPON YOUR DEALER REGARDING THIS PRODUCT.
CONTENTS
Summarizes the basic functions 1
Precautions 2
Common icon function 3
Radio 3
Video play introduction 4
Main menu 5
AUX 8
DVD 8
Setting 9
GPS 11
Calculator 11
Steering Wheel 12
LOGO 13
Wallpaper- 14
Game 15
Remote 16
Touch screen calibration 22
Simple troubleshooting Guide 23
Summarizes the basic functions
This product uses high-definition digital touch screen, fine bright image, coupled with high-quality audio processing chip, has reached the perfect sensual touching visual effects. Efficient platform multimedia system. Supports one-touch GPS satellite navigation system, Bluetooth phone, Bluetooth, music player and plug-in USB / SD player functions. Intelligent steering wheel control function, the product and the perfect combination of the original car, the operation step, is your ideal choice!
Precautions
To avoid accidents, please read the following precautions before the installation and operation of the head unit.
About Security
- Please observe local traffic rules and regulations.
2.Do not watch or operate the head unit while driving. - Make sure to stop your car before you watch or operate the head unit.
About Installation
- This machine should be installed by the qualified technician or service personnel.
- If you install the head unit by yourself, you should follow the user manual.
If the car is parked under sunlight, do not turn on the head unit until it is cool. Before turning on the machine, make sure the interior temperature is within (+60^) to (0^) .
Avoid using this machine in a magnetic environment (GPS, Bluetooth, digital TV will be affected).
In the rainy or very humid areas, there might be moisture condensation inside the head unit. Under this condition, the head unit will not work properly. You should wait until the moisture has evaporated dehumidifier or before using.
In order to maintain the high quality audio and video, do not splash juice or other liquids on the head unit or CD-ROM.
Before switching off the ignition, turn off the head unit, otherwise it will cause consumption to car's battery.
Make sure the disc entrance is cleaned. If the disc and then disc entrance are dusted, please clean it with soft towel. Otherwise it will bring the dust into the unit and cause unusual of the head unit. If happened, please call for professional person to clean the unit.
Use the product for a long time will affect its service life. In order to extend the product service life, please choose the moderate volume.
Please don't rebuild the model privately. If rebuilding, it is likely to cause an accident.
The lense might be damaged if drive on the bump road or play the non-standard or hardly damaged disc.
This unit can play the following disc
| DISC | Content | SIZE |
| DVD | Sound and video | 12 cm |
| VCD | Sound and video | 12 cm |
| Mp4 | Sound and video | 12 cm |
| CD | Sound only | 12 cm |
| 1. This unit is compatible with DVD、VCD.0/1,1/2,0/3 editions、DVCD、CD-R、CD-RW、MPEG3 Disc.2. The head unit will automatically identify DVD、VCD、CD or MP4.When display, it means the disc is not compatible with the head unit. Please select other functions. About specific operation please find other connected instruction. | ||
Common icon function instruction
 | Play/Pause |  | Stop |
| Previous chapter | Fast backward function | ||
| Next track | Fast forward function | ||
| Click into Blank screen | Disc reject | ||
| Return to previous menu | Return to main menu |
Radio
Click on the menu to enter radio mode
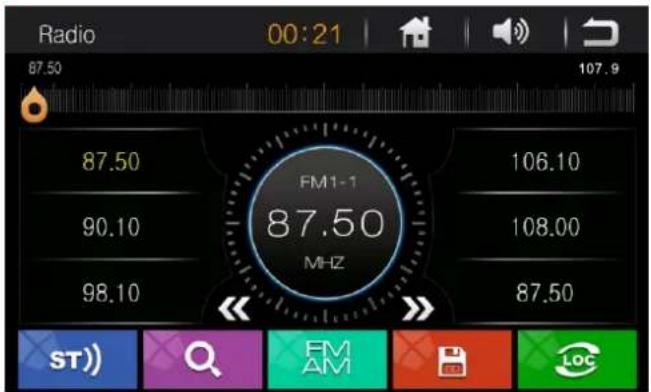
Band Selection
Press turn to radio mode, then press to select different band of programs (FM1/2/3, AM1/2)
Browse / Auto Memory stations
Press it will browse the saved stations on the band(each last for 10 seconds), press in when you browse the station you want,
then it will start to play the selected station.Hold 0 last 3 seconds for storage the stations automatically.
Radio will start to search and storage the stations automatically from the present band. Memorize the strong signal firstly, then the weak signal.
-
Manual search: Press << or >>, can be manually up or down to convert different radio frequency ____
-
Auto search: Hold or can be automatically up or down to search different radio frequency.
Video play introduction
Play
-
Enjoy the disc: Insert the disc into head unit (with logo upside), it will play automatically.
-
Other mode: When there is a disc inside the head unit (Warning: never insert the second disc), press mode to switch to DVD player, it will play the program of disc/SD/USB automatically.
Reject
Press ▲ to reject the disc and take away the disc within 10 seconds. If you do not take the disc in time, the head unit will intake the disc.
Section switch/ Fast forward/Fast backward
Press ◀◀▶▶ to play last or next section. Press ◀◀▶▶ for go fast backward or forward.
Mp3 select tracks player
-
Select tracks method 1: In selecting tracks from the list in MP3 mode, Press ▶▶ for next song, Turn ◀◀ for last song.
-
Select tracks method 2: In MP3 mode directly touch the song of the list you choose on the screen is ok when it is playing, also you can use the Remote Control with (0-9) button or 10+ button to select the track.
USB/SD play
When you connect the USB/SD to the head unit, the system will search all the content of the USB/SD and start to play automatically.
Main menu
Press any button on the panel to turn on the device, then enter into the main menu.

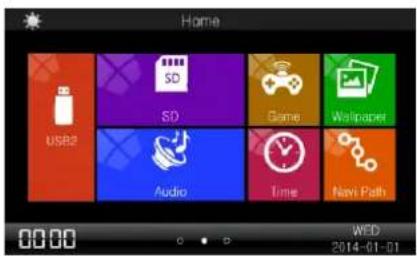

Click 📄 on the main menu, enter into navigation mode (Note: If it is the first time you insert the map card, please follow these steps
Click
-- select Navione.exe file Return.Setting done.)
When it is playing mode, please press
Click on main menu to enter GPS one mode working
Click on the menu to enter radio mode

Click the M to switch between FM/AM.
Click the radio will start with the current frequency to search and storage the stations automatically. Memorize the strong signal firstly, then the weak signal.
Click << or >> can manual up or down searching different stations
Hold << or >> can automatic up or down searching different stations.
Distance range function(Only for FM mode). Switching stereo function(Only for FM mode). For save the station
Bluetooth phone:
Click to the Bluetooth phone mode, as shown:
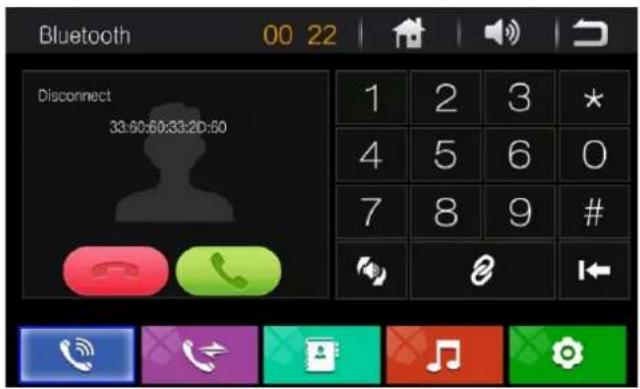

Click the menu to enter the Bluetooth phone function, then using a mobile phone to search for Bluetooth device, connected with the mobile phone (can set up the password yourself, such as 0000), After connected, when there is a phone call coming, Bluetooth system would automatically covert to the Bluetooth hands-free interface, click 📋 for start conversation. When phone call end, the call ends, the unit system will automatically recover the last working status. As shown: (Note: When turn off the original Bluetooth connected, it need about 30 seconds to automatically connected Thus in these 30 seconds, the system are still searching the last connected unit.)
Click on the menu to enter the Bluetooth phone functions directly on the screen, enter the phone number then click to Call.
Note: This feature refers to the Bluetooth phone and Bluetooth connection status
Click ← for delete button
Click for connect and switch off the Bluetooth device.
Click for switch the voice of phone and equipment.
Click for switch to the head unit Bluetooth phone
Click for call record
Click 📌 for Bluetooth music, as follow
Click into Bluetooth password setting

Bluetooth Music pause button
Bluetooth Music last track
Bluetooth Music next track
Bluetooth Music stop button

AUX
Click the menu enter AUX mode, as shown,

DVD
Click on the main menu into DVD mode, as shown,


Last track
Backward
Pause
Stop
Forward
Next
Reject
Next page
Random
Playing list
Menu
Subtitle
Channel switch
Video/Image enlarge
Single track repeat
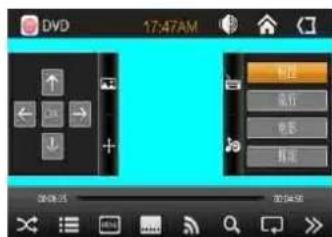


Up/Down/Left/Right move the picture

Sound adjust

Bright/Color/saturation level adjust

Songe select
Setting
Click into setting mode (as show)

Any key power on/off Brake setting on/off Beep on/off Auto enter GPS on/off GPS mix on/off

Click ➤ into steer key setting (as picture 1) Click ➤ into see GPS signal (as picture 2) Click ➤ into factory setting, password is 3368 (as picture 3) Click ➤ into backlight setting (as picture 4) Click ➤ into TCH calibration setting

(Picture 1) According the reminder to complete the steering wheel button learning

(Picture 2) To view the current GPS signal.

(Picture 3) Enter the factory password 3368, then click OK

(Picture 4) Adjust the bright degree of backlight which you want

Click ➤ to see the verson information (as picture 5) Click ➤ into the language setting (as picture 6) OSD time on/off Back time 3 minute /5 minute/10 minute/cancel Auto brightness control

(Picture 5) Current version
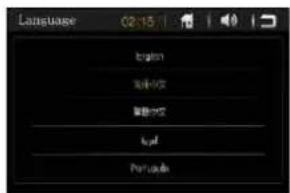
(Picture 6) Language switch
Time setting

Click YEAR then press
Click MON then press
Click DAY then press
Click Format then press
Click Hour then press
Click MIN then press

▼ could up or down drag to adjust the years

▼ could up or down drag to adjust the months.

▲ could up or down drag to adjust the dates

▲could set the hour with 24 hours or 12 hours.

▲ could adjust the correct minutes.

▲could adjust the correct hours.
Voice setting


Driver mode

Passger mode

Back mode

All mode
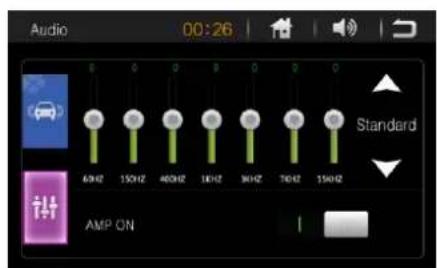

Popular
Soft
Film
Bass
Rock
Classic
Jazz
GPS Navigation
Click into navigation path setting( as show):

When you change the map card, please click to select the path again:
click
select Map main program file Return. Setting done.
Click 📄 on the main menu, enter into navigation mode (Note: If it is the first time you insert the map card, please follow these steps
Click
--select NaviOne.exe file Return.Setting done.)
When it is playing mode, please press
Click 📋 on main menu enter into GPS one mode working
Calculator
Click to enter Calculation (as shown):

Steering Wheel
Click to find steer key as shown optional,

Please follow the steps to finish the setting
LOGO setting
Click into factory setting, put in password 3368, select LOGO click → into LOGO selection

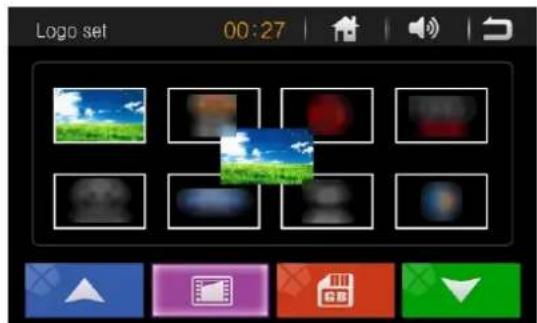
Click could select personalized boot LOGO, format as BMP
Change wallpaper
Click 📄 change into different wallpaper, as follow:

Click could select personalized background, format as BMP.
Game
Click to enter game (as shown):


Remote control functions

- Power on/off
- Mode switch
3.Pause/Playing
4.Mute
5.Band/System switch - Confirm
- Menu switch selection
- Stop/Return
- Stereo/Program
- Repeat playing/ Automatic memorize
- Station selection/Track selection/Fast backward
- LOC control/ Random playing
- Playing time display on/off
14.PBC playing
15.Number buttons - Title and list setting
- Subtitle setting
18.Main menu setting
19.View angle selection
20.Slow playing
21.Volume increase
22.Zoom the display - Audio effect mode conversion
24.Stations selection/Track selection/ Fast forward
25.Volume decrease
26.Sound track switch - Playing time setting
*Aim at the remote control receiver "IR" when you start to use the remote control.

natural_image
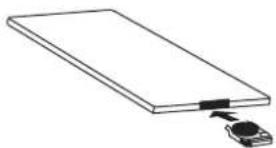
Simple line drawing of a rectangular plate with a curved handle and a small loop at the base (no text or symbols)Take off the isolation film
Battery change
Press the locking button and pull out the battery seat

Pull
Put the battery to the right position (With the mark "2025" up side)

natural_image
Simple line drawing of a rectangular object with a small inset showing a device (no text or symbols)Fix the battery seat to the right position of the remote control
natural_image
Simple line drawing of a rectangular object with a connector and a small attached component (no text or symbols)Instruction of the remote control
Power button ⏻
Press ⏻ to switch on/off
* MODE Mode conversion
Press MODE to converse the mode between TV, BT(phone call),
AUX IN, Radio, DVD, Bluetooth music, GPS, disc box and mode setting.
Mark: When GPS is switch off, it will ignore GPS function
* ▶ Pause/Playing
When it is playing, press ▶11 to pause, press it again to recover to playing
* × Mute button
Press × to shut down the speaker, then press × to recover to playing
* BND/SYS Band/System conversion
When it is on radio, press BND/SYS to converse the band as order: FM1, FM2, FM3, AM1, AM2
When it is on playing, press BND/SYS to converse the system as order: Automatic-NTSC-PAL
* ENTER Confirmation
When you select the item, press ENTER to confirm.
* ◀▶ ▲ ▼ Menu switch selection
Press ◀▶▲▼ to move to the menu you need.
▶ Return to previous menu ◀ go to next menu ▲ return to the up side layer of the menu ▼ go to the down side layer of the menu When you choose the item, press ENTER to enter.
* ■/ ) Stop/Return
When it is on playing, press ■/) to pause, then press it again to recover to playing
* ST/PROG Stereo/Program
A. When it is on radio, press it to switch the stereo.
B. When it is on DVD playing, operate it to program the playing order of the tracks as shown:
When it is playing DVD/VCD/CD, press ST/PROG, it will display as shown:
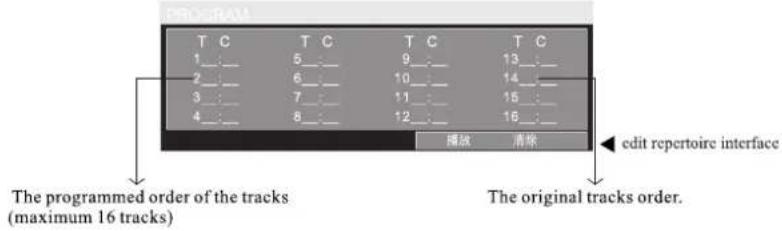
Press ◀▶ ▲▼ to select the tracks you want to program, press ENTER to confirm the items. When the program is finished, confirm to play.
* AMS/RPT Automatic scan/Repeat playing
A. When it is playing DVD, repeat to press AMS/RPT to switch between "chapter repeat", "title repeat", "disc repeat (on)" "disc repeat (off)".
B. When it is playing VCD/CD, repeat to press AMS/RPT to switch between "track repeat", "disc repeat (on)" "disc repeat (off)".
C. When it is playing MP3, repeat to press AMS/RPT to switch between "track repeat", "list repeat ""disc repeat (on)""disc repeat (off)"
D. When it is on radio, it is for stations search and memorize.
Press AMS/RPT to browse the stations.
Hold AMS/RPT to start automatically memorize station function. The radio will search and storage the stations automatically. Memorize the strong signal firstly, then the weak signal.
* SEEK Station selection/track selection/fast backward
When it is on radio, press it to select the 6 FM stations stored.
Hold it to search the stations manually.
When it is on playing, press it for previous track, hold it for fast backward:
Backward X2---backward X 4—backward X 20-play
* LOC/RDM LOC control/Random playing
When it is playing DVD, press LOC/RDM to switch between "random playing on" "random playing off".
* OSD Playing time display on/off
When it is on playing, press OSD to show the information of the playing program (track quantity, playing time).
\* PBC playing PBC
When there is CD in the machine or the first time put the CD into the machine, the machine will automatically sequence.
The CDs must support this function
When playing DVD songs discs, press PBC, the top-right corner of the screen will display the DVD menu, it can cooperate with the ◀▶▲▼ to select the track you need or up (down) the page, then press ENTER to confirm selection. When playing DVD discs, press PBC, the top-right corner of the screen will display PCB On, press number keys directly to select the songs you want. When pressing PBC again, the top-right corner of the screen will display PCB Off, it can press the number keys directly to select the songs at this time.
\* Number Button (0-10+)
In the status press numbers 1 to 6 buttons, to select 6 stations of FM memory. In the status of DVD/USB/SD, cooperate with the number button 10 (0-10+), it can select any songs directly, for example: If you want to choose the 15th songs, it can press 10+ once, press 5 button again, then it plays the 15th song. Noted: Press 10+ is 10+, twice for 20+, the third time for 30+....Number button has no effect in the status of playing PCB、ON.
\* Title selection TITLE
On the DVD mode, press TITLE can return to the title menu, it will display the title menu on the screen.
\* Subtitle Conversion SUB-T
As for the recorded multi-subtitle DVD discs, you can switch the subtitle and language when playing. Noted : Only recording multi-subtitle DVD discs can realize this function.
\* Setup Menu SETUP
On the status of playing the discs, press the SETUP button, it will display the system settings menu on the screen.
\* Perspective Conversion ANGLE
Some DVD discs may have scenes with different perspective at the same time, as for DVD discs of recorded multi-perspective, you can use ANGLE to circularly switch different perspective to enjoy the same scene. Noted: Only recording multi-subtitle DVD discs can realize this function, when play in slow motion, you can't switch the perspective.
\* Slow playing Slow
Press Slow continuously to play slowly. This function has seven levels of slow play. The order is as follows: Slow ahead 1/2 1/3 1/5 1/6 1/7
* Volume VOL+
Press VOL+ increase the volume.
* Zoom ZOOM
When playing DVD/VCD, press ZOOM can enlarge the image. Press ZOOM continuously to switch between "2 x" "3 x", "4 x", "1/2 x", "1/3 x", "1/4 x" "off". Press ◀▶▲▼ to move the image.
* SEL mode SEL
Press SEL could select standard (ordinary style), CLASS (classical style), POPS (pop music), ROCK (ROCK music), the hall and movie six different listening acoustics.
* Channel/Musical Selection/FF SEEK+
Radio mode: press it selects the current six stations FM automatically, hold it is for manually up search the stations. Playing mode: press it is for the next track function
* The volume reduction VOL-
Press VOL- reduce the volume.
*Audio AUDIO
On the statue of VCD/CD playing, repeatedly press AUDIO can change the track and circulate display in the top-left corner of the screen: right channel- left channel – stereo.
* Time Playing Setting GOTO
(1) When playing VCD/CD, press GOTO, it will be displayed the current statue on the screen and could press the number button (0-9) directly, for example, input VCD, track 08/18 PBC 00:25:27, then press ▶II, the machine will automatically play the 8th track content, also it can press ▶II select the playing time, directly press number to select the playing time.
(2) When playing DVDS, press GOTO, the disc will be displayed the current statue on the screen and can be directly inputted the number (0-9) button, for example input DVD, tracks 015/chapters 18 00:25:27 ▶, then press the ▶, the machine will automatically play the 15th contents from the disc.
(3) When playing MP3, press GOTO has no effect.
Touch screen calibration
When the touch screen is abnormal, reset the head unit. Turn on the head unit. Hold the button "MOD" on the control panel. it will show as following.

Click the center of "+" when it move to the 4 corners. The display will show as

The calibration is finished.
Simple Troubleshooting Guide
| Problem | Cause and resolve |
| Power off | 1.Check the power fuse is burn out or not, change it.2.Fail in connection of DC wires, connect them again. |
| Fail in keying | Program disorder, press reset button or turn off the power to restart. |
| Fail in getting stations | Check if the antenna has been inputed, or it is not connected correctly, if it is, please input the antenna or connect it correctly. |
| Bad station receiving effect | 1.Antenna length may not be set up right, check if it reach out completely or is broken down, if it broke down, please change it for new one.2.Or the radio signal is too week.3.Antenna is not grounding rightly, please confirm if it connects the ground wire rightly. |
| Bad ESP effect | 1.There is dust on lens, please find professionals to clean the lens.2.Lens is aged, please change it. |
| Fail to input disc | Loader is with disc |
| “STEREO”flashing | 1.tuning the radio frequency accurately.2.Radio signal is too week.(please press ST button to turn off stereo. |
| Noise, image jumping,no color | 1.disc is damaged or blurry.2.Color system setup is not correct, set the color system for “PAL” or “NTSC” according to the connected TV condition |
| Remote unavailable | 1.The battery of remote control has no power, change the battery.2.The remote control window can’t receive signal, made the remote control aim at model’s remote receiver window. |
| SD/USB no reading | 1.not connected correctly.2.belongs to unsupported card, only supports 2G card at present. |
- XOMAX
- CAR AUDIO NAVIGATION SYSTEM
- OPERATING INSTRUCTIONS
- OWNER'S RECORD
- CONTENTS
- Summarizes the basic functions
- Precautions
- About Security
- About Installation
- Common icon function instruction
- Radio
- Video play introduction
- Play
- Reject
- Section switch/ Fast forward/Fast backward
- Mp3 select tracks player
- USB/SD play
- Main menu
- Bluetooth phone:
- Note: This feature refers to the Bluetooth phone and Bluetooth connection status
- AUX
- DVD
- Setting
- GPS Navigation
- Calculator
- Steering Wheel
- LOGO setting
- Change wallpaper
- Game
- Remote control functions
- Battery change
- Instruction of the remote control
- \* PBC playing PBC
- \* Number Button (0-10+)
- \* Title selection TITLE
- \* Subtitle Conversion SUB-T
- \* Setup Menu SETUP
- \* Perspective Conversion ANGLE
- \* Slow playing Slow
- Touch screen calibration
- Simple Troubleshooting Guide
Marque : Xomax
Modèle : XM-DTSBN932
Catégorie : Autoradio