
SX-P50 - Clavier TECHNICS - Notice d'utilisation et mode d'emploi gratuit
Retrouvez gratuitement la notice de l'appareil SX-P50 TECHNICS au format PDF.


| Type de produit | Clavier numérique |
| Marque | Technics |
| Modèle | SX-P50 |
| Nombre de touches | 88 touches avec toucher lesté |
| Polyphonie | 64 notes |
| Sons intégrés | 128 sons dont piano, orgue, cordes |
| Rythmes | 100 styles d'accompagnement |
| Haut-parleurs | 2 × 15 W |
| Alimentation | Adaptateur secteur 12 V CC |
| Dimensions (L × P × H) | 1350 × 350 × 150 mm |
| Poids | 15 kg |
| Connectique | USB, MIDI In/Out, sortie casque |
| Fonctions principales | Enregistreur, mode leçon, transposition, métronome |
| Entretien et nettoyage | Nettoyer avec un chiffon doux et sec. Ne pas utiliser de solvants |
| Sécurité | Ne pas exposer à l'humidité ni aux sources de chaleur |
| Pièces détachées et réparabilité | Contacter le service client Technics pour les pièces détachées |
| Informations générales | Notice téléchargeable au format PDF sur notice-facile.com |
FOIRE AUX QUESTIONS - SX-P50 TECHNICS
Questions des utilisateurs sur SX-P50 TECHNICS
0 question sur cet appareil. Repondez a celles que vous connaissez ou posez la votre.
Poser une nouvelle question sur cet appareil
Téléchargez la notice de votre Clavier au format PDF gratuitement ! Retrouvez votre notice SX-P50 - TECHNICS et reprennez votre appareil électronique en main. Sur cette page sont publiés tous les documents nécessaires à l'utilisation de votre appareil SX-P50 de la marque TECHNICS.
MODE D'EMPLOI SX-P50 TECHNICS
Technics
SX-P50

WARNING:
TO REDUCE THE RISK OF FIRE, ELECTRICAL SHOCK OR PRODUCT DAMAGE, DO NOT EXPOSE THIS APPLIANCE TO RAIN, SPLASHING, DRIPPING OR MOISTURE.
BEFORE YOU PLAY, PLEASE READ THE CAUTIONARY COPY APPEARING ON PAGE 4.
CAUTION:
This equipment has been tested and found to comply with the limits for a Class B digital device, pursuant to Part 15 of the FCC Rules. These limits are designed to provide reasonable protection against harmful interference in a residential installation. This equipment generates, uses and can radiate radio frequency energy and, if not installed and used in accordance with the instructions, may cause harmful interference to radio communications. However, there is no guarantee that interference will not occur in a particular installation. If this equipment does cause harmful interference to radio or television reception which can be determined by turning the equipment off and on, the user is encouraged to try to correct the interference by one or more of the following measures:
— Reorient or relocate the receiving antenna.
— Increase the separation between the equipment and receiver.
— Connect the equipment into an outlet on a circuit different from that to which the receiver is connected.
— Consult the dealer or an experienced radio/TV technician for help.
Any unauthorized changes or modifications to this equipment would void the user's authority to operate this device.
This device complies with Part 15 of the FCC Rules. Operation is subject to the following two conditions: (1) This device may not cause harmful interference, and (2) this device must accept any interference received, including interference that may cause undesired operation.
The model number and serial number are found underneath the keyboard.
Please note the model and serial numbers in the space provided below and retain this sheet as a permanent record of your purchase to aid identification in the event of theft.
MODEL NUMBER
SERIAL NUMBER
Technics
OWNER'S MANUAL
Contents
Important Safety Instructions 4
Getting started 5
Listen to the demonstration 6
Sounds and effects 8
Organ Presets 10
Mixing two sounds 10
Transpose 11
Tuning 11
Reverb depth 12
String resonance 12
Setting the functions 13
MIDI 13
Symptoms which appear to be signs of trouble 16
MIDI Implementation Chart 17
Specifications 18
Demo Performance List 19
■ Supplied accessory
Please check the supplied accessory.

□ AC adaptor
Music Stand
□ Foot Switch
Important Safety Instructions
WARNING
When using electric products, basic precautions should always be followed, including the following;
- Read all the instructions before using the product.
Safety
- Power Source—The product should be connected to a power supply only of the type described in the operating instructions or as marked on the product.
- Polarization—This product may be equipped with a polarized line plug(one blade wider than the other). This is a safety feature. If you are unable to insert the plug into the outlet, contact an electrician to replace your obsolete outlet. Do not defeat the safety purpose of the plug.
- Periods of Non-use—The power-supply cord of the product should be unplugged from the outlet when left unused for a long period of time.
Installation
- Water and Moisture—Do not use this product near water—for example, near a bathtub, washbowl, kitchen sink, in a wet basement, or near a swimming pool, or the like.
- Cart/Stand—This product should be used only with a cart or stand that is recommended by the manufacturer.
- Ventilation—The product should be located so that its location or position does not interfere with its proper ventilation.
- Heat—The product should be located away from heat sources such as radiators, heat registers, or other products that produce heat.
- Foreign Material—Care should be taken so that objects do not fall and liquids are not spilled into the enclosure through openings.
Listening caution
This product, either alone or in combination with an amplifier and headphones or speakers may be capable of producing sound levels that could cause permanent hearing loss. Do not operate for a long period of time at a high volume level or at a level that is uncomfortable. If you experience any hearing loss or ringing in the ears, you should consult an audiologist.
Service
• Damage Requiring Service—The product should be serviced by qualified service personnel when:
a. The power-supply cord or the plug has been damaged; or
b. Objects have fallen, or liquid has been spilled onto the product; or
c.The product has been exposed to rain; or
d. The product does not appear to operate normally or exhibits a marked change in performance; or
e.The product has been dropped, or the enclosure damaged.
- Servicing—Do not attempt to service the product beyond that described in the user-maintenance instructions.
All other servicing should be referred to qualified service personnel.
Maintenance
- Be sure to switch this unit off after use, and do not switch the unit on and off in quick succession, as this places an undue load on the electronic components.
- To maintain the luster of the keys and buttons, wipe with a clean, damp cloth, and polish with a soft, dry cloth. Polish may be used, but do not use thinners or petro-chemical-based polishes.
- A wax-based polish may be used on the cabinet, although you will find that rubbing with a soft cloth will suffice.
SAVE THESE INSTRUCTIONS
1
Plug the AC adaptor (included) into an outlet.
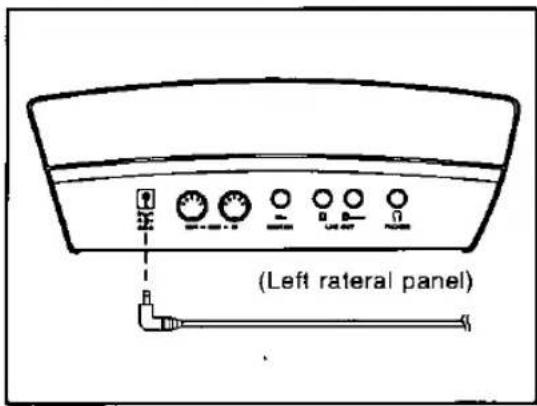
- Connect the connecting plug of the AC adaptor (supplied) to the DC IN terminal of the instrument, and the power-supply plug to a wall outlet.
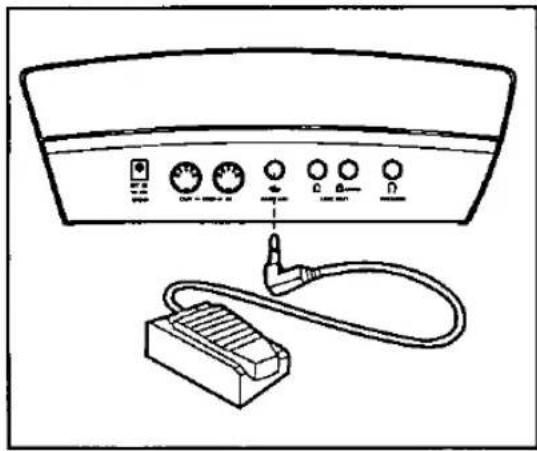
2
Connect the foot switch (included) to the SUS-TAIN terminal.
natural_image
Line drawing of a front panel connected to a power plug and cable (no text or symbols)3
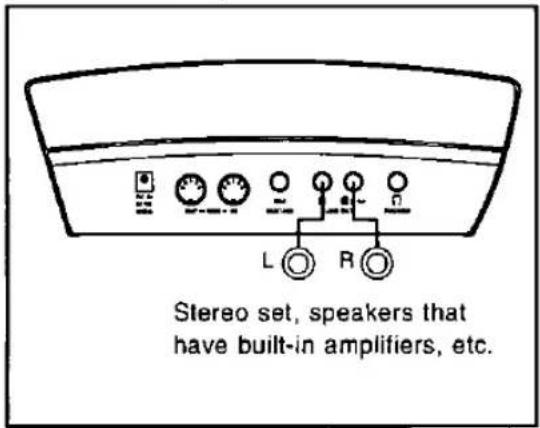
Connect audio equipment to the LINE OUT (L, R/MONO) terminals.
- Since this instrument has no built-in speakers, connect a stereo set and/or speakers that have built-in amplifiers.
- For monaural sound, connect the cord to the R/MONO terminal. (Do not connect the cord to the L terminal.)
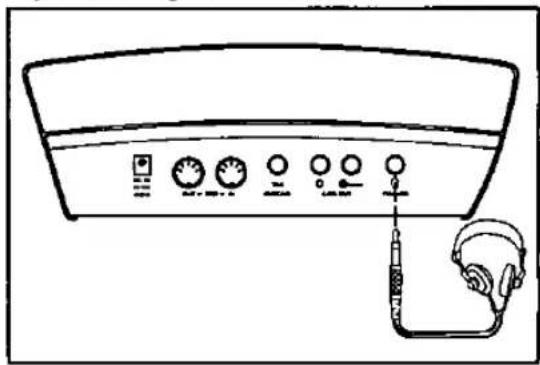
- You can also hear the sound with headphones by connecting them to the PHONES terminal.
natural_image
Line drawing of a front panel with multiple dials and a headset attached to the right (no text or symbols)4
Press the PLAY button on the front panel to turn it on.
- Press the PLAY button of the piano to turn it on, and then turn on the power switch of the connected audio apparatus. (When turning off the power supply of the piano, be sure to turn off the power switch of the connected audio apparatus first.)

- The indicator lamp on the front panel lights up when power is on.
5
Play the keyboard.
- Your piano features Touch Response. You control the volume by playing the keys harder or softer.
6
Set the MAIN VOLUME to an appropriate level.

Automatic performances which introduce you to the sounds are stored in the memory of this piano.
Grand piano demonstration performance
1
Press the DEMO button.
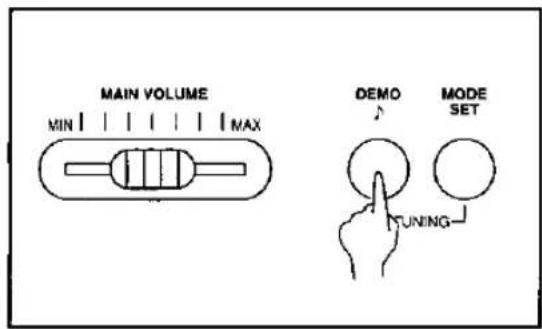
• The indicators for the SOUND buttons flash.
- The display changes to the [- - - ] display.
2
Select CONCERT GRAND.
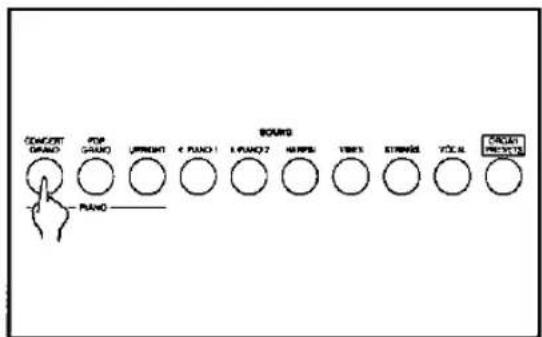
- The SOUND buttons which contain CONCERT GRAND piano demonstration tunes are shown by the flashing indicators.
3
Select a SOUND button (other than CONCERT GRAND) whose indicator is flashing.
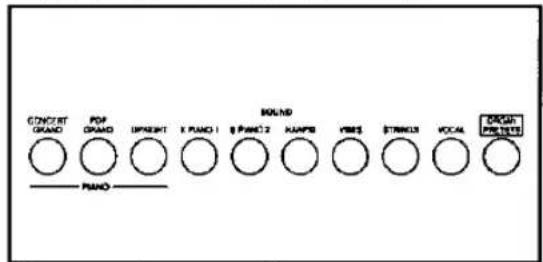
• The demonstration tune starts.
• The indicator of the selected SOUND button flashes.
- If the button for the current demonstration tune is pressed, the demonstration performance stops.
- Listen to the other CONCERT GRAND piano demonstration tunes in the same way.
4
When you are finished listening to the demonstration tunes, press the DEMO button again.

• The display turns off.
Caution
Do not lean this equipment, for example, against a wall. It may fall and cause damage or injury.

Demonstration performances for other sounds
1
Press the DEMO button.
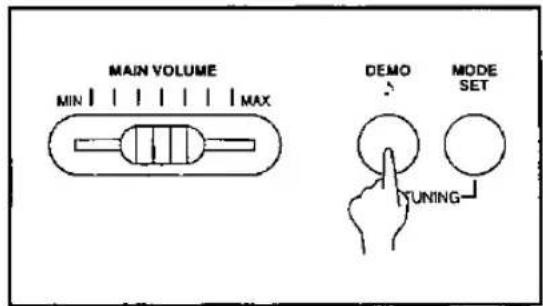
• The indicators for the SOUND buttons flash.
• The display changes to the [-- -] display.
2
Select a sound (other than CONCERT GRAND) you wish to hear.
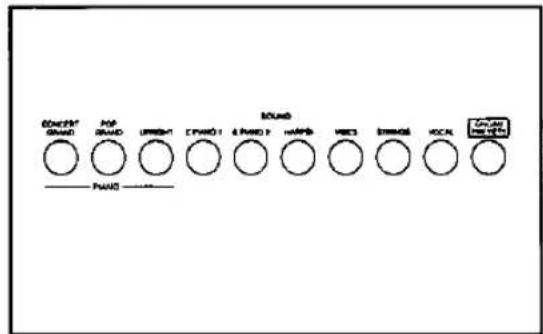
• The demonstration tune starts.
- The indicator of the selected SOUND button flashes and the other indicators go out.
- If the button for the current demo is pressed, the demonstration performance stops.
- Listen to the demonstration tunes for the other sounds in the same way.
- Two different demonstration tunes are available for the ORGAN PRESETS. Press the ORGAN PRESETS button and select one of the buttons with a flashing indicator.
3
When you have finished listening to the demonstration performances, press the DEMO button again.

• The display turns off.
Listen to all the demonstration tunes in order.
Press and hold the DEMO button for a few seconds.

- All the demonstration tunes are automatically played in order.
- If you press the button with the flashing indicator during the demonstration performance, the current tune stops and the next tune begins.
-
The tunes are repeated in order until the DEMO button is pressed again.
-
You can play the keyboard while the demonstration performances are playing.
- Some of the buttons do not function while the demonstration performances are being played.
- Demonstration performances are listed on page 19.
Display
The display shows a variety of different setting values.
• During normal playing, it is turned off.

TOUCH SENSITIVITY
The keyboard touch (Touch Response) can be changed to match your type of playing.
- Choose from LIGHT, NORMAL and HEAVY.
The unit is in the standby condition when the AC adaptor is connected. The primary circuit is always "live" as long as the AC adaptor is connected to an electrical outlet.
- When leaving the product unused for a long time, turn off the PLAY button of the unit and pull the AC adaptor out of the socket for power saving. (The product consumes a power of 3 W even with the PLAY button of the unit turned off.)
Music stand
Insert the music stand in the two holes on the rear panel.
SOUND
Press one of the SOUND buttons to select the desired sound.
Each sound features Touch Response, which increases the volume when the keyboard is played harder.
- The sounds can be mixed when two SOUND buttons are pressed simultaneously. (Refer to page 10.)
- If the ORGAN PRESETS button is pressed, organ sounds are produced. (Refer to page 10.)
- On this piano, the maximum number of notes which can sound simultaneously is 64.
BRILLIANCE
The BRILLIANCE allows you to select the brightness of the sound from 5 settings.
If either of the buttons is pressed once, the current setting value will appear on the display, and it can then be changed.
Pressing the BRIGHT button increases the brightness; when the MELLOW button is pressed, the sound becomes mellower. During setting the brightness is shown on the display (-2 to 2).
- Press both buttons at the same time to return the brightness to 0.
- A short time after the setting is completed, the display will return to the turned-off condition.
- If the BRILLIANCE has been set to a number other than 0, one of the indicators remains lit.

flowchart
graph TD
    A["CONCERT GRAND"] --> B["SOUND"]
    C["POP GRAND"] --> B
    D["UPRIGHT"] --> B
    E["E PIANO 1"] --> B
    F["E PIANO 2"] --> B
    G["HARPSI"] --> B
    H["VIBES"] --> B
    I["STRINGS"] --> B
    J["VOCAL"] --> B
    K["ORGAN PRESETS"] --> B
    L["DIGITAL EFFECT"] --> M["BRILLIANCE"]
    N["Digital REVERB"] --> M
    O["ROOMO STAGE O HALLO CONCERT O"] --> M
    P["other than 0, one of the indicators remains li"]
DIGITAL EFFECT
A celeste effect can be applied to give the sound greater depth.
DIGITAL REVERB
DIGITAL REVERB applies a reverberation effect to the sound. Select from four echo types—ROOM, STAGE, HALL and CONCERT.
- The type and depth of the DIGITAL REVERB can be set for each sound. (Refer to page 12.)
Tuning
Unlike an acoustic piano, your Digital Piano never needs tuning.
- The pitch of this instrument can be adjusted when playing along with other instruments.
Setting the effects for each sound
The DIGITAL EFFECT, BRILLIANCE and DIGITAL REVERB are stored independently for each sound.
When a SOUND button is pressed, the effect settings for the selected sound are recalled.
Organ Presets
You can produce organ sounds when the ORGAN PRESETS button in the SOUND section is on. There are 9 different organ sounds provided for you to choose from.
To produce organ sounds
- Turn on the ORGAN PRESETS button.
![CONCERT GRAND POP GROW UPRINT STRAW1 [PRAT] ROUND WBS STRAW2 VOCAL ON CREAM GREEN PUMO](/content/2026/06/1292203/images/5c96254dd2830e24cf55e8f0ab74f8ed3d1b36c0314aa1eade8d951af63d14a0.jpg)
- Press any key on the keyboard to hear the organ sound.
To select a sound
-
Press and hold the ORGAN PRESETS button for about 3 seconds.
• The indicator Ilashes. -
Use the VALUE (TRANSPOSE) buttons to select an organ sound.

• The name of the sound is shown on the display.
C-1 to C-4: CLASSICAL (PIPE) ORGAN sounds
J-1 to J-5: JAZZ ORGAN sounds
- Play the keyboard to hear the selected sound.
- When the name of an organ sound is indicated, only an ORGAN PRESETS sound can be selected. To select a different sound, press the ORGAN PRESETS button to turn it off.
- To quickly select a sound, while pressing the ORGAN PRESETS button, use the VALUE buttons to select the sound.
- When a JAZZ ORGAN sound is selected, the DIGITAL EFFECT button is used to switch the tremolo speed (on=fast; off=slow).
Mixing two sounds
You can play two different sounds at the same time, thus obtaining a composite sound having a depth not possible in a single sound. The volume balance for each of the sounds can also be adjusted.
Mixing sounds
- Press two SOUND buttons at the same time.

• The indicators of the two selected buttons light up.
2. Press any key on the keyboard to hear the mixed sound.
- The on/off status of the DIGITAL EFFECT is effective for each sound. In addition, the BRILLIANCE and DIGITAL REVERB settings are memorized for each combination of sounds.
Volume balance
- Press the two SOUND buttons continuously for 2 or 3 seconds.
- The indicators for the two sounds flash, and the current volume balance is shown on the display.
- Use the VALUE (TRANSPOSE) buttons to adjust the volume balance.

- Each time the UP button is pressed, the volume of the right-side sound increases, and each time the DOWN button is pressed, the volume of the left-side sound increases. Play the keyboard to hear the volume balance.
- If the two VALUE buttons are pressed at the same time, the volume is equally balanced.
- On the display, the right-side sound is louder when a number 1 to 10 is shown, and the left-side sound is louder when a number -1 to -10 is shown.
- When you have finished adjusting the volume balance, press any SOUND button.
Transpose
Suppose you learn to play a song—in the key of C, for example—and decide you want to sing it, only to find it's either too high or too low for your voice. Your choice is to either learn the song all over again, in a different key, or to use the TRANSPOSE feature.
Use the TRANSPOSE buttons to adjust the key.

- If either of the buttons is pressed once, the current setting value will appear on the display, and it can then be changed.
- When setting the key, the current key is shown on the display.
- If the two buttons are pressed at the same time, the key returns to C.
- If either of the TRANSPOSE indicators remains lit, it indicates that the piano is set to a key other than C.
| Each press of the DOWN button: | Each press of the UP button: | |
| G[-] A^b[-R_b] A[-] B^b[-b] B[-] C[] | D^b[a] D[ ^] E^b[E] E[] F[F] F^b[F] |
[ ] shows the indication on the display.
Tuning
The pitch of the instrument can be adjusted. This capability is useful, for example, for ensemble playing.
- Press the DEMO and MODE SET buttons simultaneously.

• The current tuning is shown on the display.
- Use the VALUE (TRANSPOSE) buttons to adjust the pitch.
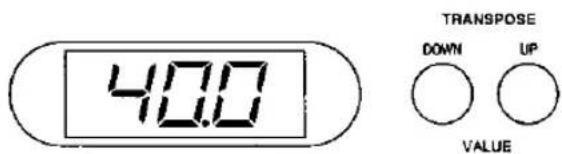
- Press the UP button to raise the pitch and press the DOWN button to lower the pitch (427.3–440.0–453.0 Hz).
- Press and hold either VALUE button to change the pitch quickly.
- The 100's digit (4) is not shown on the display. The decimal can be set to 0, 3 or 6.
-
If both VALUE buttons are pressed at the same time, the pitch returns to 440.0 Hz.
-
When you have finished adjusting the pitch, press either the DEMO button or the MODE SET button.
Reverb depth
The type and depth of the DIGITAL REVERB can be adjusted for each sound.
-
Select a sound.
-
Select a type of DIGITAL REVERB.

- While pressing the MODE SET button, press the DIGITAL REVERB button.
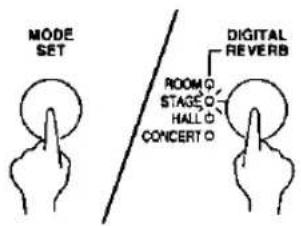
• The indicator for the selected type flashes.
- If the DIGITAL REVERB was off, ROOM is selected.
- Use the VALUE (TRANSPOSE) buttons to adjust the depth of the reverb.

- The current reverb depth (1–10) is shown on the display.
- Each press of the UP button increases the reverb depth, and each press of the DOWN button decreases the reverb depth.
- To return instantaneously to the standard reverb depth, press the two VALUE buttons at the same time.
- When you have finished adjusting the reverb depth, press either the MODE SET button or the DIGITAL REVERB button.
- The selected type and depth are memorized for each sound and are recalled whenever the same sound is selected again.
String resonance
String resonance is the sound heard in an acoustic piano when the struck strings produce a sympathetic resonance of the other unstruck strings. For the CONCERT GRAND, UPRIGHT and POP GRAND sounds, string resonance is produced as long as the sustain pedal (foot switch) is depressed. The amount of string resonance can be adjusted, and is common for all the sounds.
- When the DIGITAL REVERB is on, there is no string resonance.
- Press and hold the CONCERT GRAND button for about 3 seconds.

• The indicator flashes.
- Use the VALUE (TRANSPOSE) buttons to adjust the amount of resonance (0-10).

- Each time the UP button is pressed, the resonance increases. Each time the DOWN button is pressed, the resonance decreases.
- When set to 0, there is no string resonance.
- Pressing both buttons at the same time will return the instrument to the standard resonance.
- When you have finished adjusting the string resonance, press the CONCERT GRAND button again.
Setting the functions
You can set various functions, for example, the type of tuning, or how the sound is produced when the keys are pressed very slowly.
Settings which can be adjusted
| Function | on (when indicator is lit) | off (when indicator is not lit) |
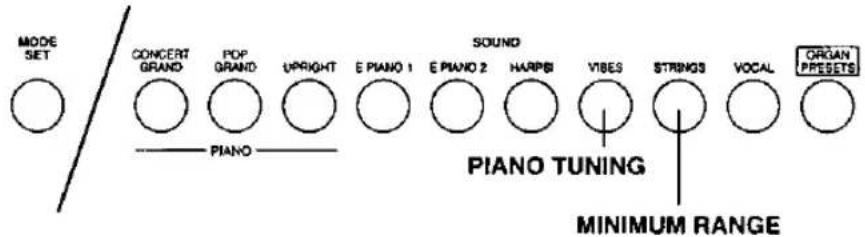
| PIANO TUNING | Standard acoustic piano tuning, in which the lower pitches are tuned slightly lower and the higher pitches are tuned slightly higher (default setting). | Standard equal temperament. |
| MINIMUM RANGE | No sound is produced when a key is played extremely softly (default setting). | Sound is produced regardless of how softly the keys are pressed. |
Procedure
⇒While pressing the MODE SET button, turn the desired function on or off by pressing the relevant button.
- When changing the settings, the panel buttons function as shown in the illustrations.
- While the MODE SET button is depressed, the keyboard keys do not produce sound.
- When the MODE SET button is pressed, the MIDI CHANNEL number (refer to page 14) is shown on the display.
MIDI
MIDI (Musical Instrument Digital Interface) is the international standard for digital communication of electronic musical instrument data. This means that any equipment which has a MIDI terminal—such as electronic musical instruments and personal computers—can easily exchange digital data with other MIDI equipment without resorting to complicated conversions or connections.
About the MIDI terminals

OUT - MIDI - IN
(On the left lateral panel)
IN: The terminal by which this instrument receives data from other equipment.
OUT: The terminal that transmits data from this instrument to other equipment.
- For these connections, use a commercially available MIDI cable. Contact your Technics dealer for more information.
The following kinds of data can be trans- mitted/received.
■ Key note on/off data (keyboard performance data)
■ Pedal on/off data
■ DIGITAL EFFECT on/off data
■ PROGRAM CHANGE (sound selection change) data*, etc.
* Refer to page 15 regarding data transmission.
• DEMO performance data cannot be transmitted.
Assigning the MIDI CHANNEL (MIDI CH)
You can assign a MIDI CHANNEL number (1-16) to this instrument.
- Normally, data can be exchanged only when the channel on the transmitting side matches the channel on the receiving side.
• The default channel setting is 1.
=>While pressing the MODE SET button, use the 16 lowermost keys (see illustration) to assign the desired MIDI CHANNEL number.
- The selected MIDI CHANNEL number is shown on the display.


The following MIDI functions can be set.
The DIGITAL EFFECT button and some of the SOUND buttons, when used in conjunction with the MODE SET button, serve to set the following MIDI functions.
| Function | on (when indicator is lit) | off (when indicator is not lit) |
| MULTI TIMBRE | The piano can be used as a multiple sound generator, and data can be received on each MIDI channel. | This piano cannot be used as a multiple sound generator. Data can be received only on the set MIDI basic channel. In this case, the produced sound corresponds to the selected sound as indicated on the panel (default status). |
• In the initialized slate, the MIDI channel and sound assignment that can be used on this instrument is as shown below (the ORGAN PRESETS becomes the sound that is selected at that time). • When the power is turned on or when this instrument is initialized, the sounds for each channel that were changed by receiving PROGRAM CHANGE numbers return to the sounds indicated on the panel. • When the power is turned on or when this instrument is initialized, the sounds for each channel that were changed by receiving PROGRAM CHANGE numbers return to the sounds indicated on the panel. | ||
| OMNI ON | Data is received for all MIDI channels. | Data is received only on MIDI channels which are matched (default status).• For assigning this instrument's MIDI channels, refer to the section "Assigning the MIDI CHANNEL (MIDI CH)" above. |
| PROGRAM CHANGE | PROGRAM CHANGE data is transmitted/received (default status).• You can also transmit data for any PROGRAM CHANGE number. (Refer to page 15.)• Please refer to page 16 for information about the program change number of each sound button. | PROGRAM CHANGE data is not transmitted/received. |
| PEDAL | Pedal operation data is transmitted/ received (default status). | Pedal operation data is not transmitted/received. |
| EFFECT | The DIGITAL EFFECT on/off status is transmitted/received (default status). | The DIGITAL EFFECT on/off status is not transmitted/received. |
| TRANSPOSE | When this instrument's TRANSPOSE function is active, note numbers of the transposed notes are transmitted. | When this instrument's TRANSPOSE function is active, note numbers of the played keys (non-transposed notes) are transmitted (default status). |
| LOCAL CONTROL | The performance from this instrument also sounds from this instrument (default status).• When the PLAY is turned on, the LOCAL CONTROL is set to on. | The performance from this instrument does not sound from this instrument. Set to off when this instrument is to be used only to transmit data to connected equipment. |
- MULTI TIMBRE and OMNI ON cannot both be turned on at the same time.
Procedure
→While pressing the MODE SET button, turn the desired function on or off by pressing the relevant button.
- When using the MIDI functions, the panel buttons function as shown in the illustrations.

- While the MODE SET button is depressed, the keyboard keys do not produce sound.
Transmitting PROGRAM CHANGE numbers
This piano can be used to transmit desired PROGRAM CHANGE numbers to the connected instrument.
→While pressing the MODE SET button, using the numbers on the keyboard illustration below for reference, press a black key to specify the BANK and a white key to specify the NUMBER. (Refer to the PROGRAM CHANGE number table.)
- PROGRAM CHANGE numbers are transmitted by combining a BANK and NUMBER to specify the desired PROGRAM CHANGE number 0–127.
- The selected PROGRAM CHANGE number is shown on the display.

PROGRAM CHANGE number table
| BANK\NUMBER | 1 | 2 | 3 | 4 | 5 | 6 | 7 | 8 | 9 | 10 | 11 | 12 | 13 | 14 | 15 | 16 |
| 1 | 0 | 1 | 2 | 3 | 4 | 5 | 6 | 7 | 8 | 9 | 10 | 11 | 12 | 13 | 14 | 15 |
| 2 | 16 | 17 | 18 | 19 | 20 | 21 | 22 | 23 | 24 | 25 | 26 | 27 | 28 | 29 | 30 | 31 |
| 3 | 32 | 33 | 34 | 35 | 36 | 37 | 38 | 39 | 40 | 41 | 42 | 43 | 44 | 45 | 46 | 47 |
| 4 | 48 | 49 | 50 | 51 | 52 | 53 | 54 | 55 | 56 | 57 | 58 | 59 | 60 | 61 | 62 | 63 |
| 5 | 64 | 65 | 66 | 67 | 68 | 69 | 70 | 71 | 72 | 73 | 74 | 75 | 76 | 77 | 78 | 79 |
| 6 | 80 | 81 | 82 | 83 | 84 | 85 | 86 | 87 | 88 | 89 | 90 | 91 | 92 | 93 | 94 | 95 |
| 7 | 96 | 97 | 98 | 99 | 100 | 101 | 102 | 103 | 104 | 105 | 106 | 107 | 108 | 109 | 110 | 111 |
| 8 | 112 | 113 | 114 | 115 | 116 | 117 | 118 | 119 | 120 | 121 | 122 | 123 | 124 | 125 | 126 | 127 |
- You can also use the sound buttons to specify the PROGRAM CHANGE number.
The ORGAN PRESETS are assigned numbers 9 to 17 in the CLASSICAL, JAZZ numerical order and change depending on the sound selected at that time.
SOUND

Symptoms which appear to be signs of trouble
| Phenomenon | Remedy |
| No sound is produced when the keyboard is played. | Please connect a speaker system or headphones to hear the sound.No sound is produced if theMAIN VOLUMEis set to MIN.Use the sliding control to set the volume to an appropriate level.If the MIDI LOCAL CONTROL is set to off, set it to on, or turn the power ON after turning it OFF once. (Refer to page 15.) |
| Nothing is shown on the display. | The setting values, etc. are indicated on the display. During normal performance, however, the display is off. |
| Data cannot be exchanged through MIDI terminals. | Match the channels on the transmitting side and the receiving side. (Refer to page 14.) |
■ Backup memory
This instrument's various settings are always maintained as long as the AC adaptor is connected. When the AC adaptor is removed, the settings are remained for about 10 minutes, after which they return to the factory-preset status.
■ Initialized settings
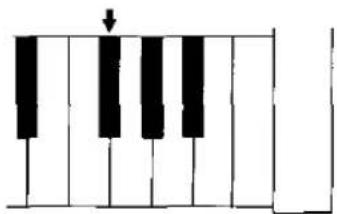
To return this instrument's settings to the factory preset status, with the power ON, while pressing the MODE SET button, press the keyboard key indicated in the illustration below. Or, with the power OFF, while pressing the keyboard key indicated in the illustration below, turn the power ON.
natural_image
Pure electrical circuit lines without any symbolsMIDI Implementation Chart
Digital piano [ SX-P50 ]
| Function | Transmitted | Recognized | Remarks | |
| Basic Channel | DefaultChanged | 1-161-16 | 1-161-16 | |
| Mode | DefaultMessagesAltered | 3×— | 1, 3×— | |
| NoteNumber | True voice | *21-108— | 0-127*0-127 | |
| Velocity | Note ONNote OFF | ○× (9nH: V=0) | ○× | |
| After Touch | Key'sCh's | ×× | ×× | |
| Pitch Bend | × | ○ | ||
| Control Change | 0106,38071011646667919398, 99100,101 | ××××××○××××○××× | **○**○**○**○○×○×○×**○**○ | modulationdata entryvolume (part)panpart expressionsustain pedalsostenuto pedalsoft pedalreverb depthdigital effectNRPN LSB, MSBRPN LSB, MSB |
| Prog Change | True # | ○×0-127 | ○×0-17 | |
| System Exclusive | × | × | ||
| System Common | Song PosSong SelTune | ××× | ××× | |
| System Real Time | ClockCommands | ×× | ×× | |
| Aux Messages | Local ON/OFFAll Notes OFFActive SenseReset | ××○× | ○○○× | |
| Notes | ○× ...... Whether or not the data for each of these items is transmitted or received can be set.* Changes depending on the TRANSPOSE setting.** Effective only in the MULTI TIMBRE mode. | |||
Mode 1: OMNI ON, POLY
Mode 2: OMNI ON, MONO
O: Yes
Mode 3: OMNI OFF, POLY
Mode 4: OMNI OFF, MONO
x : No
Specifications
| SX-P50 | |
| KEYBOARD | 88 KEYS |
| MAX. POLYPHONY | 64 NOTES |
| SOUND | 18 SOUNDS:CONCERT GRAND, POP GRAND, UPRIGHT, E PIANO 1,E PIANO 2, HARPSI, VIBES, STRINGS, VOCAL,ORGAN PRESETS (9 SOUNDS) |
| BRILLIANCE | MELLOW, BRIGHT (5 STEPS) |
| DIGITAL EFFECT | ○ |
| DIGITAL REVERB | ○ (ROOM, STAGE, HALL, CONCERT) |
| TOUCH SENSITIVITY | LIGHT, NORMAL, HEAVY |
| TRANSPOSE | G-C-F! |
| TUNING | 427.3 Hz-440.0 Hz-453.0 Hz |
| DISPLAY | ○ |
| DEMO | ○ |
| MIDI | MULTI TIMBRE, LOCAL CONTROL, OMNI ON, PROGRAM CHANGE,PEDAL, EFFECT, TRANSPOSE |
| MODE SET | PIANO TUNING, MINIMUM RANGE |
| OTHERS | PLAY SWITCH, MAIN VOLUME, MIDI TERMINALS (IN, OUT),SUSTAIN,LINE OUT (R/MONO, L), PHONES, DC IN |
| POWER REQUIREMENT | DC IN 10 V (WITH EXCLUSIVE AC ADAPTOR) |
| POWER CONSUMPTION | 7 W (WHEN POWER IS OFF BY THE PLAY BUTTON: 3 W) |
| DIMENSIONS (W×H×D) | 136.5 cm × 11.5 cm × 29.8 cm (53-3/4" × 4-17/32" × 11-23/32") |
| NET WEIGHT | 16 kg (35.3 lbs.) |
| ACCESSORIES | AC ADAPTOR, MUSIC STAND, FOOT SWITCH |
- Design and specifications are subject to change without notice.
Demo Performance List

| SOUND NAME | SONG TITLE | COMPOSER | |
| CONCERT GRAND | 1 | Polonaise Heroique | Chopin |
| 2 | Clair de Lune (Suite bergamasque) | Debussy | |
| 3 | from Sonata A major (K.331) | Mozart | |
| 4 | Military March | Schubert | |
| 5 | Technics Original | ||
| 6 | Maple Leaf Rag | Joplin | |
| 7 | Danny Boy | Traditional | |
| 8 | Swannee River | Traditional | |
| 9 | Loch Lomond | Traditional | |
| POP GRAND | Beautiful Dreamer | Foster | |
| UPRIGHT | My Lady's-Ride (25 Easy Studies Op.100) | Burgmuller | |
| E. PIANO 1 | Amazing Grace | Traditional | |
| E. PIANO 2 | Tehnics Original | ||
| HARPSI | Prelude in C# majorNo.3 from Book 1 of 48 Preludes & Fugues(BWV.848) | Bach | |
| VIBES | La Paloma | Traditional | |
| STRINGS | Technics Original | ||
| VOCAL | Ave Maria | Burgmuller | |
| ORGAN PRESETS | A | Courante from Suite No.5 in G major(BWV.816) | Bach |
| B | The House of the Rising Sun | Traditional | |
PANASONIC CONSUMER ELECTRONICS COMPANY
DIVISION OF MATSUSHITA ELECTRIC CORPORATION OF AMERICA
One Panasonic Way, Secaucus, New Jersey 07094
Printed in Japan
- Technics
- WARNING:
- CAUTION:
- OWNER'S MANUAL
- Contents
- Important Safety Instructions
- WARNING
- Safety
- Installation
- Listening caution
- Service
- Maintenance
- SAVE THESE INSTRUCTIONS
- 1
- 2
- 3
- 4
- 5
- 6
- Grand piano demonstration performance
- PANO 1
- PANO 2
- Caution
- Demonstration performances for other sounds
- Listen to all the demonstration tunes in order.
- Display
- TOUCH SENSITIVITY
- Music stand
- SOUND
- BRILLIANCE
- DIGITAL EFFECT
- DIGITAL REVERB
- Tuning
- Organ Presets
- To produce organ sounds
- To select a sound
- Mixing two sounds
- Mixing sounds
- Volume balance
- Transpose
- Reverb depth
- String resonance
- Setting the functions
- Settings which can be adjusted
- Procedure
- MIDI
- About the MIDI terminals
- The following kinds of data can be trans- mitted/received.
- Assigning the MIDI CHANNEL (MIDI CH)
- The following MIDI functions can be set.
- Transmitting PROGRAM CHANGE numbers
- Symptoms which appear to be signs of trouble
- ■ Backup memory
- ■ Initialized settings
- MIDI Implementation Chart
- Demo Performance List
Marque : TECHNICS
Modèle : SX-P50
Catégorie : Clavier