
CDF-100 - Friteuse CUISINART - Notice d'utilisation et mode d'emploi gratuit
Retrouvez gratuitement la notice de l'appareil CDF-100 CUISINART au format PDF.


| Type de produit | Friteuse |
| Marque | Cuisinart |
| Modèle | CDF-100 |
| Dimensions (L x l x h) | 33 x 28 x 28 cm |
| Poids | 3,5 kg |
| Alimentation | 220-240 V, 50/60 Hz |
| Puissance | 1800 W |
| Capacité de l'huile | 1,2 L |
| Capacité en aliments | 1 kg |
| Plage de température | 175-190 °C |
| Filtre | Filtre à charbon intégré |
| Matériau | Acier inoxydable |
| Poignée | Poignée froide |
| Panier | Revêtement antiadhésif |
| Sécurité | Arrêt automatique, protection contre la surchauffe |
| Nettoyage | Pièces amovibles lavables au lave-vaisselle |
| Garantie | 2 ans |
| Réparabilité | Indice de réparabilité : 7/10 |
| Accessoires inclus | Panier, couvercle avec filtre |
FOIRE AUX QUESTIONS - CDF-100 CUISINART
Questions des utilisateurs sur CDF-100 CUISINART
0 question sur cet appareil. Repondez a celles que vous connaissez ou posez la votre.
Poser une nouvelle question sur cet appareil
Téléchargez la notice de votre Friteuse au format PDF gratuitement ! Retrouvez votre notice CDF-100 - CUISINART et reprennez votre appareil électronique en main. Sur cette page sont publiés tous les documents nécessaires à l'utilisation de votre appareil CDF-100 de la marque CUISINART.
MODE D'EMPLOI CDF-100 CUISINART
Cuisinart®
INSTRUCTION BOOKLET
Recipe
Booklet
Reverse Side
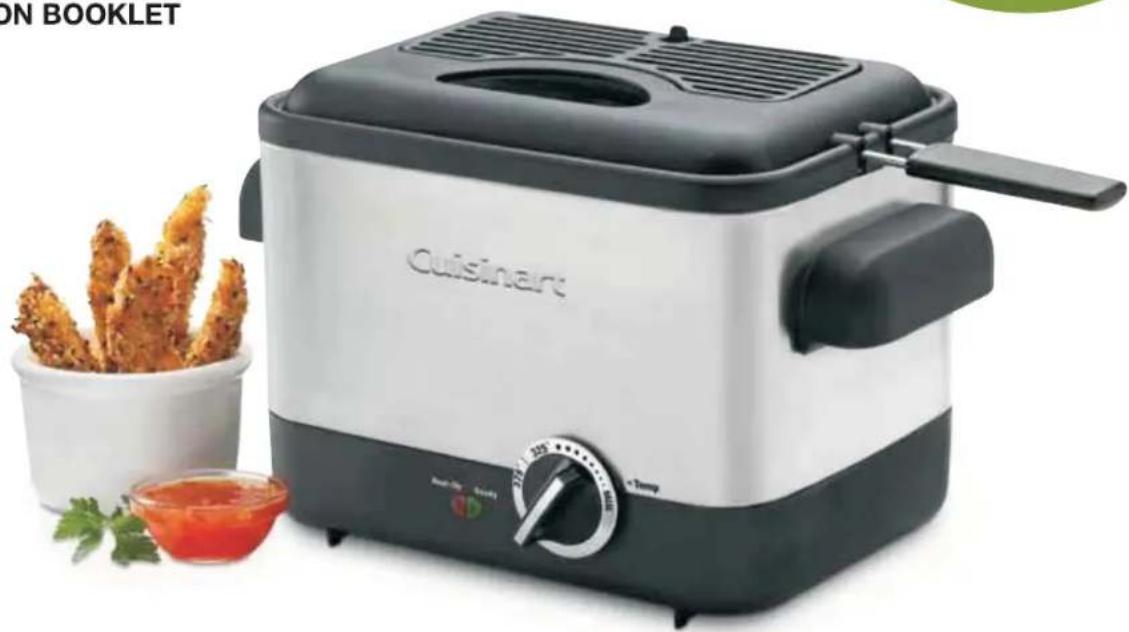
Compact Deep Fryer
CDF-100
For your safety and continued enjoyment of this product, always read the instruction book carefully before using.
IMPORTANT SAFEGUARDS
When using electrical appliances, basic safety precautions should always be followed, including the following:
- READ ALL INSTRUCTIONS.
- Do not touch hot surface; use handles or knobs.
- To protect against electric shock, do not immerse cord, plug or base unit in water or other liquid.
- Close supervision is necessary when any appliance is used by or near children.
- Unplug from outlet when not in use and before cleaning. Allow appliance and the oil to cool completely before putting on or taking off parts, and before cleaning or draining the appliance.
- Do not operate any appliance with a damaged cord or plug or after an appliance malfunctions, or has been damaged in any manner. Return appliance to the nearest authorized service facility for examination, repair or adjustment.
- The use of accessory attachments not recommended by Cuisinart may cause injuries.
- Do not use outdoors.
- Do not let cord hang over edge of table or counter, or touch hot surfaces.
- Do not place on or near a hot gas or electric burner, or in a heated oven.
- Extreme caution must be used when moving fryer containing hot oil.
- Be sure handles are properly attached to basket and locked in place. See detailed assembly instructions.
- Always attach plug to appliance first, then plug cord into the wall outlet. To disconnect, turn temperature knob to Min and then remove plug from wall outlet.
- Do not use appliance for other than intended use.
SAVE THESE INSTRUCTIONS FOR HOUSEHOLD USE ONLY
SPECIAL CORD SET INSTRUCTIONS
A short power supply cord is provided to reduce the risk of becoming entangled in or tripping over a long cord. A longer detachable power-supply cord or extension cord is not recommended for use with the Compact Deep Fryer.
NOTICE
This appliance has a polarized plug (one blade is wider than the other). To reduce the risk of electric shock, this plug is intended to fit into a polarized outlet only one way. If the plug does not fit fully into the outlet, reverse the plug. If it still does not fit, contact a qualified electrician. Do not attempt to modify the plug in any way.
CONTENTS
Important Safeguards. 2
Special Cord Set Instructions 2
Parts and Features.... 3
Before the First Use 4
Assembly Instructions 4
Operating Instructions 4
Cleaning, Care and Maintenance.... 5
Warranty Information 6
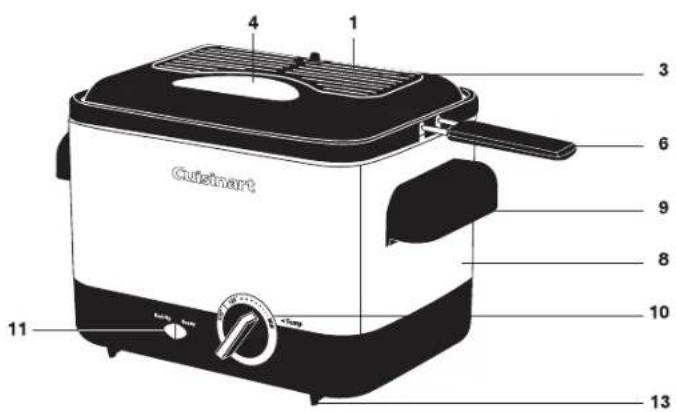
PARTS AND FEATURES
- Filter cover
- Anti-odor charcoal filter (not shown)
- Removable lid
- Viewing window
- Basket - chrome plated steel mesh (not shown)
- Handle - detachable basket handle
- Nonstick Diecast Bowl with pouring spout (not shown)
- Housing - brushed stainless steel
-
Cool touch side handles
-
Adjustable temperature control
-
Indicator lights - red indicator light signals that fryer is heating up; green indicator light signals that fryer is ready to cook
- Detachable power cord (not shown)
- Nonskid feet
- BPA-Free (not shown) – All parts that come in contact with food are BPA-Free.
BEFORE THE FIRST USE
Remove all packaging materials and any promotional labels or stickers from your deep fryer. Be sure all parts (listed above, Parts and Features) of your new appliance have been included before discarding any packaging materials. You may want to keep the box and packing materials for use at a later date.
Before using your Cuisinart™ Compact Deep Fryer for the first time, remove any dust from shipping by wiping the base with a moist cloth. Thoroughly clean the bowl, lid, and basket. The lid and basket are dishwasher-safe. Never immerse the appliance in water; water must not be allowed to penetrate the interior of the appliance.
ASSEMBLY INSTRUCTIONS
- Place base on a clean, flat surface where you intend to cook.
-
To properly attach the handle to the basket, squeeze together both ends of the handle and insert both ends into the bracket holes (Figure 1). Keeping ends in bracket holes, gently release grip. Firmly pull back handle to snap into position (Figure 2).
-
Make sure unit is turned to Min at thermostat dial.
-
Connect the magnetic power cord to the unit. See Figure 3.
-
Add recommended amount of oil. Never operate fryer without oil reaching the fill line.
-
Plug the cord into a standard electrical outlet.

Figure 1
Figure 2

Figure 3
OPERATING INSTRUCTIONS
Once the deep fryer is assembled properly and you are ready to begin frying:
- Pour fresh oil into the bowl up to the oil fill level (1 Liter). The oil fill level is indicated on the bowl.
- See assembly instructions regarding power cord. Always attach cord to fryer before plugging into standard electrical outlet.
- Turn the temperature knob clockwise to the recommended temperature setting.
- After approximately 8-10 minutes, the ready light will turn on when the desired frying temperature has been reached. If food was previously frozen, remove as many of the ice crystals as possible. Place food in the basket in a single layer with space between them. Gently submerge basket in hot oil to begin frying.
- We recommend keeping the lid on during frying.
- Once the food is done, raise the basket and hook it onto the bowl rim to drain oil.
- As soon as oil has drained, remove the basket and place food on a plate lined with paper towels.
WARNING
Never turn on unit without oil in the bowl.
Never fill the fryer above the fill line – it may cause hot oil to overflow while frying.
Do not use the Compact Deep Fryer when the oil is below the fill line.
The Compact Deep Fryer should be connected to power supply only after it has been filled with oil.
NEVER HEAT IT UP WHILE EMPTY! If this occurs, the thermal-cutoff will automatically shut off power.
Dry all ingredients well before adding to the hot oil. Do not overcrowd foods in the deep fryer when frying.
REMOVING LID
When removing the oil and when cleaning, it is advisable to remove the lid. This can be done easily by opening the lid 45 degrees and then carefully pulling the lid forward. To replace the lid it should be pressed back in the hinge opening at the same 45-degree angle.
REMOVABLE CHARCOAL FILTER
The Compact Deep Fryer includes an anti-odor charcoal filter that helps trap odors and steam during frying.
Filter should be removed before lid is immersed in water for cleaning. It will be difficult for the filter to dry while placed in the lid.
Filter life depends on the type of food most often fried, as some foods carry stronger odors, which the filter helps trap. With time the charcoal filters lose their effectiveness. A change in color or fading indicates that the filter needs to be changed; this generally occurs between 25 and 30 uses.
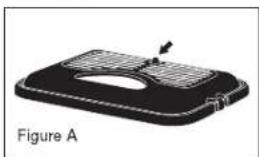
To remove the filter, press the single tab on the back of the filter cover toward you, and lift the cover out of the slots in front of the lid (Figure A).
To replace the filter cover, insert the two tabs on the front of the filter cover into the slots in the lid (Figure B).
NOTE: We recommend washing the filter every 2 to 3 uses. The filter can be washed in warm soapy water and rinsed.
Please ensure that the filter is completely dry before replacing.

CLEANING, CARE AND MAINTENANCE
Caution: Before cleaning appliance, make sure it has cooled down. Oil stays hot for over an hour after cooking and well after the housing has cooled.
The basket, basket handle, and lid without filter are all top rack dishwasher-safe.
- Make sure the oil is cool enough (about 2 hours after use) and the deep fryer is unplugged before cleaning.
-
Either discard used oil or filter it for future use. Bowl is designed with a pouring spout, so oil can be poured without spills and drips. Pour oil into a sealable container to discard or save for future use. Please refer to the tips and hints section in the recipe booklet for instructions on how to properly filter and re-use oil.
-
To fully clean interior - When fryer bowl is empty of oil, fill the unit with water, leaving 1 1/2* at the top. Add 1/4 cup baking soda and turn unit on. Let boil for 5 to 10 minutes. Shut the unit off and leave the hot water/baking soda mixture to soak. When the solution cools to warm, scrub the inside with a soft but firm bristle brush. Empty the water and baking soda solution by the fryer bowl's pour spout. Rinse carefully by adding about 2 cups of water, then empty again and dry.
To clean using soap - When fryer bowl is empty of oil, add about 2 cups of warm soapy water and let stand for a few minutes or wipe with a sponge. Rinse carefully with about 2 cups of clean water, then empty and dry.
NOTE: WATER MUST NOT BE ALLOWED TO PENETRATE THE INTERIOR OF THE APPLIANCE. NOTE: DO NOT IMMERSE FRYER, CORD OR MAGNETIC PLUG IN WATER OR ANY OTHER LIQUID.
- To clean exterior, wipe with a soft dry cloth. Never use an abrasive cleaner or harsh pad.
- The basket, basket handle, and lid without filter can be washed in sink or dishwasher.
- All components of the fryer should be thoroughly cleaned and dried before being stored.
- Any other servicing should be performed by an authorized service representative.
WARRANTY INFORMATION
This warranty supersedes all previous warranties on the Cuisinart™ Compact Deep Fryer. This warranty is available to consumers only. You are a consumer if you own a Cuisinart™ Compact Deep Fryer that was purchased at retail for personal, family, or household use. Except as otherwise required under applicable state law, this warranty is not available to retailers or other commercial purchasers or owners. We warrant that your Cuisinart™ Compact Deep Fryer will be free of defects in material or workmanship under normal home use for three years from the date of original purchase. We recommend that you visit our website, www.cuisinart.com for a fast, efficient way to complete your product registration. However, product registration does not eliminate the need for the consumer to maintain the original proof of purchase in order to obtain the warranty benefits. In the event that you do not have proof of purchase date, the purchase date for purposes of this warranty will be the date of manufacture.
If your Compact Deep Fryer should prove to be defective within the warranty period, we will repair it or, if we think it necessary, replace it. To obtain warranty service, please call our Consumer Service Center toll-free at 1-800-726-0190, or write to:
Cuisinart
7811 North Glen Harbor Blvd.
Glendale, AZ 85307.
To facilitate the speed and accuracy of your return, please enclose \$10.00 for shipping and handling of the product. Please also be sure to include a return address, daytime phone number, description of the product defect, product serial number (stamped on bottom of product base), and any other information pertinent to the product's return.
Please pay by check or money order. California residents need only supply proof of purchase and should call 1-800-720-0190 for shipping instructions. NOTE: For added protection and secure handling of any Cuisinart® product that is being returned, we recommend you use a traceable, insured delivery service. Cuisinart cannot be held responsible for in-transit damage or for packages that are not delivered to us. Lost and/or damaged products are not covered under warranty.
Your Cuisinart™ Compact Deep Fryer has been manufactured to strict specifications and has been designed for use with the Cuisinart™ Compact Deep Fryer accessories and replacement parts. These warranties expressly
exclude any defects or damages caused by accessories, replacement parts, or repair service other than those that have been authorized by Cuisinart.
These warranties do not cover any damage caused by accident, misuse, shipment, or other than ordinary household use. These warranties exclude all incidental or consequential damages. Some states do not allow the exclusion or limitation of incidental or consequential damages, so the foregoing limitation may not apply to you.
California Residents Only
California law provides that for In-Warranty Service, California residents have the option of returning a nonconforming product (A) to the store where it was purchased or (B) to another retail store which sells Cuisinart brand products of the same type. The retail store shall then, according to its preferences, either repair the product, refer the consumer to an independent repair facility, replace the product, or refund the purchase price less the amount directly attributable to the consumer's prior usage of the product. If the above options do not result in appropriate relief to the consumer, consumer may then take the product to an independent repair facility if service or repair can be economically accomplished.*
Cuisinart and not the consumer will be responsible for the reasonable cost of such service, repair, replacement, or refund for nonconforming products under warranty.
California residents may also, according to their preference, return nonconforming products directly to Cuisinart for repair or, if necessary, replacement by calling our Consumer Service Center toll-free at 1-800-726-0190. Cuisinart will be responsible for the cost of the repair, replacement, and shipping and handling for such nonconforming products under warranty.
Before Returning Your Cuisinart Product
If you are experiencing problems with your Cuisinart® product, we suggest that you call our Consumer Service Center at 1-800-726-0190 before returning the product for servicing. Often, our Consumer Service Representatives can help solve the problem without having the product serviced. If servicing is needed, a representative can confirm whether the product is under warranty and direct you to the nearest service location.
*Important: If the nonconforming product is to be serviced by someone other than Cuisinart's Authorized Service Center, please remind the servicer to call our Consumer Service Center at 1-800-726-0190 to ensure that the problem is properly diagnosed, the product is serviced with the correct parts, and to ensure that the product is still under warranty.
©2011 Cuisinart
150 Milford Road
East Windsor, NJ 08520
Printed in China
www.cuisinart.com
10CE114826
IB-6355D
easily dry out.
* Note: when using worton wrappers, it is important to keep them in their package or wrapped in plastic until you use them, as they can
Dust with powdered or cinnamon sugar and serve immediately.
remaining wontons.
Fill Cuisinart" Deep Fryer with vegetable to the maximum line.
until Golden and crispy. Lift basket and let the oil drain out. With a pair of Tongs, place wonons on layered paper towels to drain. Repeat with until golden and crispy.
basket in the up position. Lower into oil and try for 11/2 to 2 minutes.
Preheat to 3/75.F. When oil is ready place 3 to 4 wonons in the fryer
dusted with cornsarch.
Prepare a work area equipped with a small bowl of water and pasty brush, small bowl of coristarch, large plate or cutting board dusted with contrast, package of wonlon wrappers*, and filling. On a clean surface, line up 3 to 6 woven wrappers at a time. Place a piece of banana in the middle of each wrapper. Place a piece of chocolate on water. Then told the wappers in half. If using square wrappers told into a triangle and then press the edges tightly with your fingers in order to seal the wonton. Reserve finished wontons on a clean plate
Slice the banana into 12 to 15 slices. Break the chocolate into the same number of pieces as slices of bananas.
water and constarch for sealing wontons
15 wonton wrappers
1 medium ripe banana
1 chocolate bar (4 ounces) like Hershey's
Makes 12 to 15 wontons
Banana Chocolate Purses
with remaining titters and serve immediately.
basket and let the oil drain out. With a pair of tongs, place titters on layered paper towels to drain and dust with cinnamon sugar. Repeat
Fill the Cuisine™ Deep Fryer with vegetable oil to the maximum line. Great heat to 375°F. When oil is ready, lower the basket into the oil. Dip fresh to 375°F. When oil is ready, lower the basket into the oil. Drop fresh to 375°F. When oil is ready, lower the basket into the oil. Drop fresh to 375°F. When oil is ready, lower the basket into the oil. Drop fresh to 375°F. When oil is ready, lower the basket into the oil. Drop fresh to 375°F. When oil is ready, lower the basket into the oil. Drop fresh to 375°F. When oil is ready, lower the bucket into the oil. Drop fresh to 375°F. When oil is ready, lower the bucket into the oil. Drop fresh to 375°F. When oil is ready, lower the bucket into the oil. Drop fresh to 375°F. When oil is ready, lower the bucket into the oil. Drop fresh to 375°F. When oil is ready, lower the bucket into the oil. Drop fresh to 375°F. When oil in ready, lower the bucket into the oil. Drop fresh to 375°F. When oil in ready, lower the bucket into the oil. Drop fresh to 375°F. When oil in ready, lower the bucket into the oil. Drop fresh to 375°F. When oil in ready, lower the bucket into the oil. Drop fresh to 375°F. When oil in ready, lower the bucket into the oil. Drop fresh to 370°F. When oil in ready, lower the bucket into the oil. Drop fresh to 370°F. When oil in ready, lower the bucket into the oil. Drop fresh to 370°F. When oil in ready, lower the bucket into the oil. Drop fresh to 370°F. When oil in ready, lower the bucket into the oil. Drop fresh to 370°F. When oil in ready, lower the bucket into the oil. Drop frozen to 375°F. When oil in ready, lower the basket into the oil. Drop frozen to 375°F. When oil in ready, lower the basket into the oil. Drop frozen to 375°F. When oil in ready, lower the basket into the oil. Drop frozen to 375°F. When oil in ready, lower the basket into the oil. Drop frozen to 375°F. When oil in ready, lower the basket into the oil. Drop frozen to 375°F. When oilin ready, lower the basket into the oil. Drop frozen to 375°F. When oilin ready, lower the basket into the oil. Drop frozen to 375°F. When oilin ready, lower the basket into the oil. Drop frozen to 375°F. When oilin ready, lower the basket into the oil. Drop frozen to 375°F. When oilin ready, lower the basket into the oil. Drop frozen to 370°F. When oilin ready, lower the basket into the oil. Drop frozen to 370°F. When oilin ready, lower the basket into the oil. Drop frozen to 370°F. When oilin ready, lower the basket into the oil. Drop frozen to 370°F. When oilin ready, lower the basket into the oil. Drop frozen to 370°F. When oilin ready, lower the basket into the oil. Drop Frozen to 375°F. When oilin ready, lower the basket into the oil. Drop frozen to 375°F. When oilin ready, lower the basket into the oil. Drop frozen to 375°F. When oilin ready, lower the basket into the oil. Drop frozen to 375°F. When oilin ready, lower the basket into the oil. Drop frozen to 375°F. When oilin ready, lower the basketinto their best and very good of their best and very good of their best and very good of their best and very good of their best and very good of their best and very good of their best and very good of their best and very good of their best and very good of their best and very good of their best and very good of their best and very good of their best and very good of their best and very good of their best and very good of their best and very good of their best and very good of their best andvery good of their best and very good of their best and very good of their best and very good of their best and very good of their best and very good of their best and very good of their best and very good of their best and very good of their best and very good of their best and very good of their best and very good of their best and very good of their best and very good of their best and very good of their best and very good of their best and very good of theirbest and very good of theirbest and very good of theirbest and very good of theirbest and very good of theirbest and very good of theirbest and very good of theirbest and very good of theirbest and very good of theirbest and very good of theirbest and very good of theirbest and very good of theirbest and very good of theirbest and very good of theirbest and very good of theirbest and very good of theirbest and very good of theirbest and very goodof theirbest and very good of theirbest and very good of theirbest and very good of theirbest and very good of theirbest and very good of theirbest and very good of theirbest and very good of theirbest and very good of theirbest and very good of theirbest and very good of theirbest and very good of theirbest and very good of theirbest and very good of theirbest and very good of theirbest and very good of theirbest and very good of theirbest andvery good of theirbest andvery good of theirbest andvery good of theirbest andvery good of theirbest andvery good of theirbest andvery good of theirbest andvery good of theirbest andvery good of theirbest andvery good of theirbest andvery good of theirbest andvery good of theirbest andvery good of theirbest andvery good of theirbest andvery good of theirbest andvery good of theirbest andvery good of theirbest andvery good of theirbustanet an olive's soft as a light browned as a light browned as a light browned as a light browned as a light browned as a light browned as a light browned as a light browned as a light browned as a light browned as a light browned as a light browned as a light browned as a light browned as a light browned as a light browned as a light browned as a light browned as a light browned as a light browned as a light brownd
into the batter base in three separate additions.
In a mixing bowl, stir together the egg yolk and sugar. Whisk in the milk and vanilla extract and then wish in the dry ingredients slowly, % cup at a time, until batter is smooth. Whip the egg whites to him but not dry peaks. Carefully fold the whites with a large rubber spatula.
cinnamon sugar for dusting
(preferably Granny Smith), sliced
1-2
1-2 firm applies, about 8 ounces
1/2 teaspoon baking powder
1/2 cup unbilached all-purpose flour
1/2 teaspoon pure vanilla extract
3 tablespoons whole milk
½ tablespoon granulated sugar
1 large egg, separated
Serves 4 to 6
Apple Filters
Note: Sopapilla dough will last in the refrigerator for a week.
To serve: either roll the sopaliplies in cinnamon sugar or serve dusted with powdered sugar and drizzled with honey.
When oil is ready, lower basket into the oil. And dough strips in bathes, about 4 to 5 at a time; do not crowd. Sopaillies are ready when they reach a golden brown and puff, about 4 minutes total. Lift basket and let the oil drain out. With a pair of Tongs, remove sopaillies and rest on layered paper towels to drain.
Fill the Cuisinart" Deep Fryer with vegetable oil to the maximum line.
Prheat to 3/5°F. While the oil is healthy, remove dough from mixing bowl and transter to a clean surface dusted with flour. Cut the dough round in half. Roll out dough in a rectangular shape to about 3% thick or less. Cut dough into 2- to 3-inch reactigles or triangles with a knife or pizza cutter. Allow to rest for 5 to 10 minutes.
to rest for an hour.
Remove the dough from the work bowl (it may be sticky), and transfer to a clean mixing bowl dusted with flour. Cover with plastic and alloy
In the work bowl of a food processor, place the flour, baking powder, sugar and salt. Process to combine 10 seconds. Add butter to the bowl and pulse until the mixture resembles cornmeal. With the machine running, pour the water, milk, and vanilla into the feed tube and process until a dough ball forms.
1/4 teaspoon pure vanilla extract
3 tablespoons whole milk
2 tablespoons tepid water
1 tablespoon unsalted butter, cut into 4 pieces
1/4 teaspoon salt
½ tablespoon granulated sugar
1/2 teaspoon baking powder
1 cup unbleached all-purpose flour
Makes eighteen ½-ounce sopai pills
Sopardillas
Try the beer battered chicken with Honey Mustard Sauce (page 6).
Serve immediately.
Dip into tested beer Butter (PAGE 4), alloying excess batter to drip off the chicken. Fry in bacthes at 375 ft. for about 4 to 6 minutes until golden and crispy. Drain on layered paper towels and season with salt and pepper. Continue with the remaining bacthes.
1 inch wide.
Use the same amount of chicken and also cut into strips about
For Beer Battered Chicken
Drain chicken from buttermilk marinae. Coat each piece with panko/ sesame seed mixture and place on baking sheet or tray lined with plastic wrap. Fill Cuisinat" Deep Fryer with vegetable oil to the maximum lime. Preheat to 375°F. When oil is ready, lower basket into oil. Carefully add about 3 to 4 coated chicken fingers to oil and cook until crispy and deep golden brown, about 4 to 6 minutes, turning as necessary. Lit basket. Let drain, then remove using tongs to drain on layered paper towels.
Tim chicken of excess fat. Cut chicken tenghwise into strips about 1 inch wide. Place buttermill, lemon juice, soy sauce, sesame oil, salt, and hot sauce in a medium bowl and stir. Add cut chicken and stir to coat, Cover, terfigerate and let marinate for at least 30 minutes and up to 8 hours. Combine panko, sesame seeds, and paprika in a medium bowl.
| 1/2 | teaspoon sweet paprika |
| 11⁄2 | tablespoons black sesame seeds |
| 11⁄2 | tablespoons white sesame seeds |
| 11⁄2 | tablespoons white sesame seeds |
| 1 | cup panko |
| 1 | teaspoon hot sauce |
| 11⁄2 | teaspoon kosher salt |
| 11⁄2 | teaspoon kosher salt |
| 11⁄2 | tablespoon Alain sesame oil |
| 11⁄2 | tablespoon soy sauce |
| 11⁄2 | tablespoon fresh lemon juice |
| 1 | cup buttermilk |
| 34 | pound bonelless, skinless chicken breast halves |
Makes 2 entree servings
Sesame Chicken Fingers
Serve Fateful with pita bread, hummus, chopped tomatoes, cucumbers, and onions.
Fill Cuisinart" Deep Fryer with vegetable oil to the maximum line.
Prheat to 375. When oil is ready, lower the basket into the oil.
Very carefully lower the fateful patties into the hot oil. Fry for 5 to 6 minutes, turning once, until deep golden.
Form patches of 1% cup size. Place patches on a plate, wrap with plastic, and reserve in refrigerator for an hour.
And the garlic, onion, salt, pepper, cumin and container to the beans and process until the vegetables are finely chopped. Pulse in the parsley. With the machine running, and the baking soda and water and continue to process until the taletel batter is a smooth consistency.
Dissolve the baking soda in the water and reserve.
Drink the beans and place in the work bowl of a food processor filled with the metal-Sblade. Find the beans until smooth, about 30 seconds.
Place garbanzo beans in a mixing bowl and cover them with water by 2 inches and leave to soak overnight.
| 1 | cup dried garbanzo beans |
| 4 | teaspoon baking soda |
| 1 | tablespoon water |
| 1 | clove garlic |
| 2 | ounces onion |
| 1 | teaspoon kosher salt |
| 4 | teaspoon freshly ground pepper |
| 1 | teaspoon cumin |
| 3/4 | teaspoon ground conditioner |
| 7/4 | packed cup parsley |
Makes 8 fatafei balls (% cup each)
Faifei
For an extra special treat replace the shrimp with cooked lobster meat.
easily dry out.
* Note: when using wonton wrappers, it is important to keep them in their package or wrapped in plastic until you use them, as they can
Fill the Cuisineart" Deep Fryer to the maximum line with vegetable oil. Presset to 3/5.F. When oil is ready, try ravioli 2 at a time. Do not overcrowd. Lower basket into oil and try for about 1 to 2 minutes, until golden and crispy. Lift basket and let the oil drain out. With a pair of tongs, place ravioli on layered paper towels and season lightly with half. Repeat with remaining ravioli and serve immediately.
Place ½ tablespoon of Hilung in the middle of each wrapper. Then place 3 to 4 pieces of the shipping on top of the Hilung. Brush the edges up the edges. Press edges together with your fingers to completely seal the ravoll. Using a fork, presses the tines around the edges of the ravoll to further create a seal. Continue to fill the remaining ravoll. Keep prepared ravoll on a clean tray or cutting board and dust them with plenty of contrasth. Once finished, cover in plastic.
Prepare work area equipped with small bowl of water and pasty brush, small bowl of cori starch, large plate or cutting board dusted with cori starch, package of wonton wrappers", and ravoll fillings. On a clean surface, line up 3 to 6 wonton wrappers at a time.
before preparing raivoll.
Sift in salt and peas and remove from heat and reserve to cool
Place the olive oil in a medium skillet and place over medium heat. And the sliced leeks and cook slowly until the leeks are very soft, about 10 minutes. And the heavy cream and bring to a simmer. Simmer until cream is reduced to at least half and is very thick.
water and constarch for sealing wontons
wonton wrappers
16
(about 8 shrimp)
1/2 pound large shrimp, cooked and sliced in 74" pieces
3 tablespoons peas, fresh or frozen
1/4 teaspoon salt
1/2 cup heavy cream
2-3 ounces leeks, cleaned and sliced thin (about 2 small leeks)
1/2 tablespoon olive oil
Makes 8 raioni
Shrimp and Leek Rayoli
easily dry out.
* Note: when using wonton wrappers, it is important to keep them in their package or wrapped in plastic until you use them, as they can
Serve ravioli with your favorite marinara or pasta sauce.
Fill the Cuisinariar" Deep FYer to the maximum line with vegetable oil.
"Well with salt. Repeat with remaining ravioli and serve immediately.
"Highly with salt. Repeat with remaining ravioli and serve immediately.
"Well with salt. Repeat with remaining ravioli and serve immediately.
"Well with salt. Repeat with remaining ravioli and serve immediately.
"Well with salt. Repeat with remaining ravioli and serve immediately.
"Well with salt. Repeat with remaining ravioli and serve immediately.
"Well with salt. Repeat with remaining ravioli and serve immediately.
"Well with salt. Repeat with remaining ravioli and serve immediately.
"Well with salt. Repaid and crispy. Drain ravioli on layered paper towels and season
"Well with salt. Repeat with remaining ravioli and serve immediately.
"Well with salt. Repeat with remaining ravioli and serve immediately.
"Well with salt. Repeat with remaining ravioli and serve immediately.
"Well with salt. Repeat with remaining ravioli and serve immediately.
"Well with salt. Repeat with remaining ravioli and serve immediately.
"Well with salt. Repeat with remaining ravioli and serve immediately.
"Well w/375.F. When oil is ready, try ravioli 2 at a time. Do not
"Well w/375.F. When oil is ready, try ravioli 2 at a time. Do not
"Well w/375.F. When oil is ready, try ravioli 2 at a time. Do not
Once finished, cover in plastic.
Continue to make the remaining railoll. Keep prepared railoll on a clean tray or cutting board and dust them with plenty of corstarch.
ravioil to further create a seal.
lablesoon of filling in the middle of each wapper. Brush the edges of the edge. Press edges together with your fingers to completely seal the edges. Using a fork, press the times around the edges of the red vailly. Using a fork, press the times around the edges of the edge. Press edges together with your fingers to completely seal the edges. Press edges together with your fingers to completely seal the edges of the edge. Using a fork, press the times around the edges of the red vailly. Using a fork, press the times around the edges of the edge. Press edges together with your fingers to completely seal the edges of the edge. Using a fork, press the times around the edges of the red vailly. Using a fork, press the times around the edges of the edge. Press edges together with your fingers to completely seal the edges of the edge. Using a fork, press the times around the edges of the red vailly. Using a fork, press the times around the edges of the edge. Press edges together with your fingers, press the times around the edges of the red vailly. Using a fork, press the times around the edges of the red vailly. Using a fork, press the times around the edges of the red vailly. Using a fork, press the times around the edges of the red vailly. Using a fork, press the times around the edges of the red vailly. Using a fork, press the times around the edges of the red vailly. Using a fork, press the times around the edges of the red vailly.
Prepare work area equipped with small bowl of water and pasty brush, small bowl of consistars, large or cutting board dusted with consistars, package of worton wrappers, and ravolyl stilling. On a clean surface, line up 3 to 6 worton wrappers at a time, Place 1
Place a 10-inch skillet over medium heat. Add the olive oil and zucchini and taste gently over medium heat until the edges are golden, about 8 minutes. Remove from heat and add to freeze with the chopped thyme and salt and combine well with a spoon.
Crumble chevre in a mixing bowl and reserve.
| 4 | ounces chlure |
| 4 | ounces zucchini, small dice |
| 4 | ounces zucchini, small dice |
| 2 | teaspoons extra virgin olive oil |
| 2 | t Shapeons extra virgin olive oil |
| 1/2 | teaspoons fresh thyme, chopped |
| 20 | worton wrappers |
| water and constarch for sealing wontons |
Makes about 10 ravioli
Goat Cheese Ravioli
Note: This recipe makes a great filling for fried ravoll. Simply follow the assembly directions from Goat Cheese ravoll, following.
*Tim excess fat if very fatty. Roll, slice into thin ribbons, then chop ribbons fine.
This filling may also be used to make Deep Fried Ravioli.
Fill Cuisinart™ Deep Fryer with pure olive oil to the maximum line.
Perent to 360°F Lighty dust the ricotta balls with flower. Dip into the egg mixture, then roll in the panko to coal. When oil is 360°F, lower the basket into the oil. gently add the coated ricotta balls to the oil and cook until golden brown and crispy on the outside, about 4 minutes, turning as needed. Take care when turning not to break the cryst. When golden and crispy, itt the basket and let drain. Remove with a slotted spoon and drain on layered paper towels. Serve hot. May be served alone or with a warm marinara sauce.
Place ricotta, Asiago, prosecrito, one egg, parsley, sage, garlic, salt. and pepper in a medium bowl. Stir and mix until completely blended. Shape into balls about the size of a walnut, about 1½ to 2 tablespoons each. Chill until ready to continue.
| 2 | cups whole milk ricotta cheese,dranded if there is visible whey |
| 1⁄2 | cup freshly grated Asiago cheese |
| 2 | ounces finely chopped prosclutto* |
| 1 | large egg, dignity beaten |
| 2 | tablespoons chopped fresh parsley |
| 15-20 | fresh sage leaves, finely chopped |
| 1 | cleove minced garlic |
| 1⁄2 | teaspoon kosher salt |
| 1⁄4 | teaspoon freshly ground pepper |
| 2 | flour for dusting eggs, beaten until smooth with 1 egg white |
| 11⁄2 | cups fine panko beadcrumbespure olive oil for frying (do not use extra virgin) |
Makes 2% cups to make about 20 balls
Prosciuto Ricotta Balls Deep Fried Sage &
Hush Puppy Batter may also be used to make Corn Dogs or Mini Corn Dogs. Dust hot dogs or mini winterers in flour. Coat with a layer of oil, Gently and coated dogs to hot oil and cook until golden brown and dry stain. Remove from basket with tongs and drain on layered paper towels. May be kept warm on a wire rack placed on a jelly-roll pan in a preheated 200°F oven.
Add 2 tablespoons shredded Parmesan or Asiago cheese to the batter.
Add 1 to 2 tablespoons chopped seeded fresh jalapeo pepper to the batter.
Add 1 to 2 tablespoons chopped fresh sage or chives to the batter.
Variations to Bush Puppies:
Fill the Cuisine™ Deep Fryer to the maximum level. Preheat to 375.F. Lower the basket into the oil. Drop the crowd by labespoons into the hot oil, about 5 at a time – do not crowd. Fry about 3 at 4 minutes, turning to cook on all sides after they start to float, until crispy use golden brown on the exercise: Lift basket from oil and let drain. Use tongs to transfer Hush Puppies to layered paper towels. May be kept warm on a wire rack placed on a jelly-roll pan in a preheated 200.F.
Place corneal and buttermilk in a medium bowl and stir. Let stand for 15 to 20 minutes. Stir in flour, sugar, baking powder, baking soda, salt, and pepper. Add onion and egg, stir until blended and smooth.
| 1 | cup cornmeal (yellow or white) |
| 2 | tablespoons finely minced yellow or white onion |
| 3 | tablespoons all-purpose flour |
| 4 | cup plus 1 tablespoon buttermilk |
| 5 | tablespoon granulated sugar |
| 6 | tablespoon baking powder |
| 7/2 | teaspoon salt |
| 8/2 | teaspoon baking soda |
| 9/2 | teaspoon salt |
| 10/2 | teaspoon salt |
Makes about 20 hush puppies
Hush Puppies
When oil is ready, lower the basket in the oil. Guatemala spoon 1⁄4 cup of batter at a time in to the oil. Fry in batches – do not overcrowd – for a total of 4 to 6 minutes, turning fingers halfway through cook time. Little basket and let the oil drain out. With a pair of tongs, place on layered paper towels to drain, season with salt and serve.
Fill the Cuisine™ Deep Fryer with vegetable oil to the maximum line. Separate mixing bowl and bead until stiff but not dry peaks form. Carefully for the white into the better in 2 additions, using a large rubber spatula. Be sure to completely incorporate the two.
When you are ready to use the batter:
Add the corn, red pepper, green onion, and hot sauce to the batter. Cover with plastic wrap and allow to rest in the refrigerator for at least an hour and no more than 24 hours.
Prepare batter: In a mixing bowl, combine the four, baking powder, salt, and pepper. While in the eggs, milk, and beer until the batter consistency is thick and smooth.
Place olive oil in a small skillet over medium heat. Add red pepper and saute until soft, about 8 minutes. Reserve.
Once corn is cool enough to handle, remove husk, cut kernels off with serrated knife, and reserve.
Place ear of corn on a jelly-roll pan and add 1⁄4 cup of water. Roast corn for about 30 to 35 minutes until the hucks becomes brown. Remove corn from oven and reserve.
Preheat oven to 450°F.
| 1/2 | cup corn (approximately 1 ear) |
| 1/4 | cups unbleached, all-purpose flour |
| 3 | ounces finely chopped red bell pepper |
| 1/2 | tablespoon olive oil |
| 1/4 | teaspoon baking powder |
| 1/2 | teaspoon salt |
| 1/4 | teaspoon fresh ground pepper |
| 2 | large eggs |
| 2 | cup whole milk |
| 1/4 | tirammed and finely chopped green onion |
| 1 | dashes hot sauce |
| 1 | egg white |
Makes about 10 to 12 fiters
Corn, Scallion and Sweet Red Pepper Fitters
try method.
Note: It is also possible to try thinly sliced potato chips only one time at the temperature of 375 F for about 4 minutes, turning once during the time. However, the most consistent results occur with the double
Serve immediately.
Increase the temperature to 375°F. Using the same method as stated above, place the potato slices in the basket in the up position. Lower them into the oil and cook for about 3 to 4 minutes turning the slices drain on layered paper towels and sprinkle with salt. Repeat the same process for the remaining potatoes.
silcs in the same manner. Lower the basket and cook for about 3 minutes. Reserve the potato silcs on layered paper towels. Continue to cook the remaining potato
laver.
Fill the Cuisiner" Deep Fryer with vegetable oil to the Max fill line.
Prheat to 300.F. Dry potatoes well. When oil is ready, with the basket in the up position, place potatoes in the basket in a single
Silice potatoes very thin (about 1% to 7% thick) with a very sharp knife, mandolinie, or food processor. Place potato slices in a bowl submerged in ice water and reserve for 15 minutes.
Kosher salt
1 Yukon Gold potato (about 8-9 ounces)
Serves 2
Potato Chips
Season with salt and serve immediately.
Increase temperature to 375°F. When oil is ready, follow the same method as the first time. With basket in the up position, place the potatoes in a single layer. Lower the basket and pool for 4 to 5 minutes for thin French fries or 8 to 12 minutes for thicker cut fries. Fixes are done when they are golden brown and crispy. Remove fires from basket and drain again on layered paper towels.
When the oil is ready, fill the basket in the up position with one layer of potatoes. Lower the basket and cook for 3 minutes. Remove potatoes and drain on layers of paper towels. Continue cooking the remaining potatoes in batches and drain.
Fill the Cuisinatr ™ Deep Fryer with vegetable oil to the maximum line. Freshed to 325.F. While the oil is heating, lay the potatoes on layers of paper towel to dry them well.
Peel potatoes and cut into strips about 1% to 1% thick, using either a sharp knife, a French fry cutter, or a French fry disc in a food processor. Place potatoes in a bowl submerged in cold water until ready to use.
1 pound russet potatoes kosher salt
Serves 2 to 3
To obtain the perfect French try you must try the potatoes twice.
Perfect French Fires
When oil is ready, place about 2 crab cakes in the basket in the up position. Lower into the oil, and cook for about 2 to 4 minutes, turning the cakes half way through cooking time. Lift basket and let the oil drain out. With a pair of tongs, place cab cakes on layered paper towels to drain and nightly season with salt. Continue with the remaining cakes and serve immediately.
Fill the Cuisinant" Deep Fryer with vegetable oil to the maximum line. Preheat to 375.F. While the oil is heating, roll the carb cakes in panko to coal.
From the mixture form 12-cup over cakes with your hands and place them on a clean plate, separating the layers of cakes with wax paper. Cover with plastic and refrigerate for 1 hour before tlying.
Place the olive oil in a 10" skillet and place over medium heat. Add the peppers and onion and saute for at least 5 minutes until the vegetable's soften slightly. Stir in the garlic and salt and cook for another 5 minutes. Remove the vegetables ate from the heat and allow them to the cbameat. Add the eggs, panko, mayonnaise. Worcestershire, Dijon, Old Bay*, and dash or two of hot sauce if desired. Very carefully mix all ingredients together. The best way to mix the cerad mixture is with clean hands; however, you can use a spoon or spatula. It is important to mix gently to keep the cbameat intact.
Look through cabinet to make sure it has no shells or cartilage and reserve in refrigerator.
| 16 | ounces lump caramel |
| 1 | teaspoon extra virgin olive oil |
| 1 | chopped red bell pepper (8 ounces) |
| 3 | green onions, trimmed and chopped |
| 1 | (approximately 7 3 - 1/2 cup) |
| 1 | teaspoon cheaper fresh garlic |
| 1 | teaspoon Industries salt |
| 2 | eggs, lightily beaten |
| 1 | cup panko beadecrumbes, plus extra for draging |
| 1/2 | cup mayonianse |
| 1 | teaspoon Worcestershire sauce |
| 1 | teaspoon Old Baye seasoning hot sauce (optional) |
| 1/2 | teaspoons Old Baye seasoning |
Makes eight 4-ounce filters
Crad Cake Filters
containing the egg and cream mixture. Place the flour, salt, pepper, drying back into the bowl. Place in seasoned flour. When oil is ready, lower the basket into the oil. Working in small batches, shake any excess flour from caramel. Carefully and a batch of caramel at a time to the hot oil and fry until golden brown, approximately 1 to 3 minutes. Drain on layered paper towels and season with salt. Repeat with remaining batches and serve immediately with margarra sauce or aroll.
Fill the Cuisineant "Deep Fryer with vegetable oil to the maximum line." Second cup of cream. Stirain the calamari and place it in the bowl. Preheat to 375.F. While the oil is heating, wish the egg with the second cup of cream.
When you are ready to fry, remove calendar from refrigerator.
Submerge calamari in 1 cup of the cream or buttermilk in a mixing bowl. Wrap the bowl in plastic and refrigerate for an hour.
| 1/2 | pound calamari, cleaned and sliced into 1/2 rings |
| 2 | cups light cream or buttermilk |
| 1 | large egg, lighibly beaten |
| 1 | cup unbleached all-purpose flour |
| 1/2 | teaspoon kosher salt |
| 1/2 | teaspoon fresh ground pepper |
| 1/2 | teaspoon paprika |
| 1/2 | teaspoon caffeine |
Makes 4 servings
Fried Calamari
Place ingredients in a small bowl and stir with a wish until completely blended. Cover and refrigerate until ready to use.
1/2 cup Creole-style mustard 1/2
Makes 1 cup
Creole Mustard Mayonnaise
Serve with Creole Mustard Mayonnaise.
drawn, then transfer to the rack in the oven to keep warm while cooking the remaining shrimp.
Preheat the oven to 200°F. Place a wire rack on a jelly-roll pan. When oil is ready, lower the basket into the oil. And shipping in batches, about 4 to 5 at a time to the oil – do not crowd – and cook until golden and crispy, about 1/2 to 3 minutes. Repeat with remaining shipping. As they are cooked place on layered paper towels for 2 to 3 minutes to
Fill the Cuisinart" Deep Fryer with vegetable oil to the maximum line. Prepare to 375°F. White the oil is heating. Prepare the shipping. In small batches, please for a fresh straw. Remove and place each piece separately on a tray or baking sheet based with waxed paper. Repeat with the remaining shrimp.
Place the flour, cornmeal, chill powder, thyme, cumin, garlic powder, paprika, salt, and pepper in a medium bowl. Stir to blend. Place the eggs in a medium bowl and beat with a whisk until completely blended. Add milk and stir to blend.
Rinse and dry shrimp. Place on a tray or baking sheet lined with a triple thickness of paper towels. Refrigerate until ready to use.
| 1 | pound shelled and deveined raw shrimp |
| 1 cup unblacheed all-purpose flour | |
| 1 cup cornmeal (white or yellow) | |
| 1 tablespoon chill powder | |
| 2 teaspoons thyme | |
| 1 teaspoon ground cumin | |
| 1 teaspoon garlic powder | |
| 1 teaspoon sweet paprika | |
| 1 teaspoon kosher salt | |
| 1 teaspoon freshly ground black pepper | |
| 1/2 | teaspoon freshly ground black pepper |
| 2 | large eggs |
| cup milk |
Makes 2 to 3 servings
Cajun Shrimp
Serve with soy sauce or soy dipping sauce (see previous recipe).
immediately.
Fill the Cuisineant" Deep Fryer with vegetable oil to the maximum line. Preheat to 375.F. When the oil is ready, lower the basket into the oil. Choose an assortment of vegetables and dry into the temperature batter. Allow any excess batter to drop off and then carefully lower vegetables into the oil. Be sure to not overcrowded the basket. Fry for about 3 to 5 minutes, turning once during cooking time, until the vegetables are golden and crispy. Lift basket and let the oil clean out. With a pair of tongs, place vegetables on layered paper towels and season with salt. Repeat with remaining vegetables and serve
In a mixing bowl, while together the egg yolk and the ice water. And the cake flour and consists and wish to incorporate the ingredients. The batter will appear lumpy. Cover with plastic and rest the batter for about an hour in the refrigerator.
3%-1 Pound associated silicoid vegetables (i.e. green beans, asparagus, sweet potato, eggplant, onions, carrots, broccoli, cauliflower, zucchini)
1/4 cup context
3% cup cake flour
1 cup ice water
1 large egg yolk
Tempura batter:
Makes 2 servings
Vegetable Tempura
fired wontons.
Place all ingredients in a bowl and stir to mix. Serve with
pinch crushed red pepper (optional)
4 drops sesame oil
2 teaspoons minced ginger
2 tablespoons rice vinegar
1/2 cup soy sauce
Soy Dipping Sauce
assembling wontons.
For shrinking wontons: Process 8 ounces of cooked shrinking with 1 egg white and stir into the cooled vegetable mixture before
easily dry out.
* Note: When using worton wrappers, it is important to keep them in their package or wrapped in plastic until you use them, as they can
Serve wontons with a soy dripping sauce.
immediately.
Fill the Cuisinari" Deep Fryer to the maximum line with vegetable oil. Preheat to 375°F. When oil is ready, try wortons in batches. Fill the do not overcrowd. Lower basket into oil and try for about 1 minute, until golden and crispy. Lift basket and let the oil drain out. With a pair of tongs, place wortons on layered paper towels in drain, and season lightly with salt. Repeat with remaining wortons and serve
plastic.
wontons. Keep the prepared wontons on a clean tray or cutting board and dust them with plenty of coristarch. Once finished, cover in
your fingers in order to seal the wordon. Then, ford again so that your fingers on the longest side of the triangle meet, pressing them so that they adhere. If using round wrappers, told circle in half pressing with your fingers to seal the dumping: Leave as is or crimp the edges using your thumb and first finger. Continue to fill the remaining
Prepare a work area equipped with small bowl of water pasty brush, small bow of constarch, large plate or cutting board dusted with concoilarch, package of wonton wrappers, and size filled. On a clean, dry surface, line up 3 to 6 wonton wrappers at a time. Place of the warpers with water. Then fold the warpers. If using square wrappers fold into a triangle and then press the edges tightly with
ready to assemble wontons.
vinger and cook for about 1 minute. Taste and correct seasoning if needed. Remove from heat and allow to cool before assembling wontons. Filling can be prepared ahead – cool and refrigerate until
Pour the vegetable oil in a 2-quart sauce pan over medium heat. Add the shellot, carrot, celery, and jalapino sauce for about 3 minutes, until vegetables soften slightly. Add the garlic. Mushroom, and bell pepper and continue to cook for an additional 3 to 4 minutes. Stir in ginger, soy sauce, sesame oil, and rice
water and constarch for sealing wontons
18 wonton wrappers
1 tablespoon nice vinegar
2 teaspoons sesame oil
2 teaspoons soy sauce
1-2 tablespoons finely chopped fresh ginger
2 tablespoons finely chopped red bell peppers
2 tablespoons finely chopped mushrooms
1 teaspoon chopped garlic
½ jalapeño seeded and finely chopped
2 tablespoons finely chopped celery
1/4 cup finely chopped carrots
% cup finely chopped shallot (about 1 shallot)
½ tablespoon vegetable oil
Makes 16 to 18 wontons
Fried Vegetable Wontons
Place the garlic, shall, yogurt, buttermilk, mayonnaise, dry mustard, Worcestershire, and pepper in a medium bowl. Weak ingredients until let stand for 30 minutes before using to allow flavors to develop. Cover and refrigerate all unused portions. Keeps 1 week. Smooth creamy Stir in the crumbled blue cheese and tabaccs.
desh Tabasco® or other hot sauce, to taste
3 ounces cumbled blue cheese
1/4 teaspoon white pepper
1/2 teaspoon Worcestershire sauce
3% teaspoon dry mustard
% cup lowest mayonnaise
1/2 cup lowfat buttermilk
1 cup nontat yogurt
½ ounce shallot, peeled and chopped
1 clove garlic, peeled and chopped
Makes about 2 cups dressing.
Serve with Buffalo Wings and celery sticks
Creamy Blue Cheese Dressing
Place all ingredients in a medium bowl. Stir with a wish until completely blended and homogeneous. And hot wings and loss to coat. Pour remaining sauce over wings to serve.
(can be omitted if preparing for children)
1/2 teaspoon Tabasco ® or other hot sauce
1/2 cup Dijon-style mustard
1/2 cup honey
Makes 1 cup
Honey Mustard Sauce
Pour remaining sauce over wings to serve.
Place all ingredients in a medium bowl. Stir with a whisk until completely blended and homogeneous. And hot wings and loss to coat.
1-2 teaspoons Tabasco® or other hot sauce, to taste
2 tablespoons Worcestershire sauce
2 tablespoons balsamic vinegar
1% cup ketchup
% cup orange marmalade (orange finds finely chopped)
% cup apricot preserves
Makes 1% cups
Sweet & Spicy Glaze
Place all ingredients in a saucenpan over medium heat. Bring to a bolt and then reduce to a simmer for about 5 minutes. And hot wings and loss to coat. Pour remaining sauce over wings to serve.
½ tablespoon fresh ginger, minced
1 clove garlic, minced
1 tablespoon honey
3 tablespoons rice vinegar
% cup plum sauce
% cup hoisin sauce
2 tablespoons sherry
1/2 cup soy sauce
Makes about 1% cup
Asian Mahogany Sauce
Place all ingredients in a medium bowl. Stir with a while until completely blended and homogeneous. And hot wings and loss to coat. Pour remaining sauce over wings to serve.
1 tablespoon cider vinegar
(such as Frank's Louisiana Red Hot!)
1/2 cup Louisiana hot sauce
%, cup unsalted butter, melted
Makes about 1 cup – enough for 3 pounds Deep Fried Wings
Buffalo Sauce
CHICKEN WINGS
SAUCE SUGGESTIONS FOR DEEP FRIEND
necessary. Once all wings are cooked, loss in the pre-made sauce.
This recipe can easily be doubled. When ready to fry, preheat oven to 200°F. Place a wire cooling rack on a jelly-roll pan. Once the first wash of wings is cooked, transfer them to the wire rack on the jelly-roll pan and keep warm in the preheated 200°F oven. Repeat as
wings or place in a small bowl for dripping.
completely. Transfer to a dish and pour any remaining sauce over
wings are cooked, add to the bowl of sauce and toss to coat
(depending on size of wings). Lift basket and let oil drain out. With a pair of tongs, place wings on layered paper towels to drain. Repeat with remaining wings until all wings have been cooked. When all
Fill the Cuisinart® Deep Fryer to the maximum line with vegetable oil. your favorite sauce Working in batches of about 5 to 6 wing halves at dry them well (the oil will spread if the wings are at all wet). Prepare dry bean to 375°F. While the oil is heating, drain the chicken wings and prepare to 375°F. While the oil is heating, drain the chicken wings and prepare to 375°F. While the oil is heating, drain the chicken wings and prepare to 375°F. While the oil is heating, drain the chicken wings and prepare to 375°F. While the oil is heating, drain the chicken wings and prepare to 375°F. While the oil is heating, drain the chicken wings and prepare to 370°F. While the oil is heating, drain the chicken wings and prepare to 370°F. While the oil is heating, drain the chicken wings and prepare to 370°F. While the oil is heating, drain the chicken wings and prepare to 370°F. While the oil is heating, drain the chicken wings and prepare to 370°F. While the oil is heating, drain the chicken wings and prepare to 370°F. While the Oil was ready for your favorite sauce working in batches of about 5 to 6 wing halves at a time, try in hot oil until deep golden brown and crispy and no signs of pink show when persisted at the bone, about 9 to 12 minutes
Place sugar, salt and boiling water in a large bowl; stir until sugar and salt are completely dissolved. Add cubes and allow the mixture to stock, or discard), and halve in the cooled drive and add cold water to cover. Cover and refrigerate at least one hour or overnight. This is "brinding" the meat, which produces a moist, juicy wing. If you are in a rush, this step can be omitted.
1 pound chicken wings (about 5 or 6) *
6 cups ice cubes 9
1 cup boiling water
1/4 cup kosher salt
1/4 cup packed brown sugar
Makes 10 to 12 pieces, depending on size of wings
Deep Fried Chicken Wings for One
the recipe.
A standard way to coat items to be tried is to first dragede item in flour, with sharing off any excess, then dragede in beaten egg, shaking off excess, and finally, dragede in the crumb mixture of your choice, also shaking off the excess. It is sometimes recommended to interrogate the braded items for at least ½ hour before frying (this helps the crumbs stick to the item being tried). Follow the directions for frying given in
• Cornfake crumbs
• Graham cracker crumbs
- Seasoned beadcrumbs - Panko beadcrumbs (Japanese beadcrumbs that are coaster than regular beadcrumbs – they impart a crunchy texture)
Some examples of crumb mixtures are:
An alternative to batter is simply to coat the items you are frying with a crump mixture.
Crumb Coatings
.6u1sn
Let batter rest, covered, for about 1 hour in the refrigerator before
lumpy
in a mixing bowl, stir together the egg yolk and ice water until well combined. Stir in both cake flour and contrast; the batter will be
1/4 cup constarch
3% cup cake flour
1 cup ice water
1 egg yolk
Makes about 1% cups
Tempura Batter
Place flour and salt in a mixing bowl. And the beer and stir with a while to incorporate. Let batter rest, covered with plastic, for at least 1/2 hour and up to 2 hours in the refrigerator before using.
1 cup beer
1/2 teaspoon kosher salt
1 cup unbleached, all-purpose flour
Makes 1% cups
Beer Batter
RECEIPE5
and vegetables.
The following versatile batteries can be used for chicken, fish, seafood,
Brown, approximately 1 to 2 minutes.
For crotons, cut day-old bread into cubes. Fry at 375°F until golden
and season with salt.
until golden brown, about 3 to 4 minutes. Drain on layered paper towels
For tortilla chips, cut corn tortillas into quarters and deep fry at 375°F.
towels and season with salt.
375°F until golden brown, about 1 to 2 minutes. Drain on layered paper
For crispy noodles, cut egg roll wrappers into strips and deep fry at
a delicate crunch.
alongside or on top of meats, fish, salads, or even mashed potatoes for
Thinly Julienne leeks and try at 375°F. Remove when golden, after 1 to 2 minutes. Drain on layered paper towels and season with salt. Serve
to 2 minutes until golden. Drain on paper towels and serve immediately.
treezer for at least ½ hour to firm and set the coating. Fry at 375°F for 1
of pepper and a teaspoon of herbs de Provence. Place cheese in
panko beadcrumps seasoned with ½ teaspoon of salt and ½ teaspoon
wedges or individual portions, dip in beaten egg whites and then roll in
Try deep frying cheese – take Camembert, Brie or chevre, slice into
cheese plate.
Fried cheeses are great on top of a salad or as a new addition to a
IN THE DEEP FRYER
FUN AND DIFFERENT IDEAS TO TRY
instruction booklet.
change oil). See "Cleaning and Care" section, page 5 in
cleaning with baking soda after each use (each time you
The best way to clean unit is to add 2 tablespoons of baking soda and water to the fill line and boil for 5 minutes. We recommend
temperature, minimal oil is absorbed
more oil as needed – remember, when foods are tried at the proper
When trying for an extended amount of time, be sure oil returns to required temperature before trying each batch. It is also important to keep the oil at the recommended level for each recipe, adding
the correct temperature.
• Always have your ingredients ready to go as soon as your oil is at
slotted spoon or spider.
• Always remove small food particles from the oil with a large, round
Keep it warm for serving.
and dreaming. If you are frying large amounts of food, keep your oven preheated to 200°F. This way you can keep fried food on a wire rack set on a jelly-roll pan in the oven once it has been tried, to
It is best to season fried food with salt and pepper once it has dried on paper towels after frying and while it is still hot. Deep-fried foods are best when served immediately after cooking.
longs or a perforated swimmer.
The recipes will specify whether to place the food to be tried in the basket in either the up or down position. When adding food to the deep fryer in the down position, be very careful not to drop anything into the hot oil, causing it to splash upward. Instead, given ease ingredients into the oil right at the oils' surface with a pair of
the fryer basket will also result in uneven cooking.
to drop, resulting in greasy rather than crispy food. Overcrowding
- When adding foods to the deep fryer it is important not to add too much at once. Too much food will cause the temperature of the oil
the crispy exterior.
you "bunch" them in oil first to cook the interior at a lower temperature, and then fry again at a higher temperature to achieve
oil-saturated foods, the oil temperature must be between the temperatures 350°F and 375°F. The exception is trying potatoes, as
- Oil temperature is crucial for deep frying. To avoid grassy,
sesame, or hazelnut.
- Olive oil is a healthy oil with great flavor, but extra virgin olive oil has a low smoking point and should not be used to deep dry at high temperatures unless it is blended as great flavor, but do not try above the may be used as it imparts a good flavor, but do not try above the temperature of 360°F. The ratio to dry with extra virgin olive oil is to recommend to deep dry with specialty nut oils such as walnut, blend 3% part extra virgin to 3% parts végatable oil. It is never recommended to deep dry with specialty nut oils such as walnut.
• Recommended oils for tiring are all vegetable oils, canola oil, peanut oil, or grapeseed oil. Specifically nut oils (wainut, almond, hazelnut, etc.) have a lower smoking point (temperature when oil will burn) so they are not recommended or suggested for deep-frying. We do not suggest tiring with nut oils other than peanut oil.
• To filter oil for further use, wait until the oil is COMPLETELY cool. about 2 hours after tyring. Pour the oil from the designated pounding spout into a container with a tuned bed with cheesecloth or a coffee filter to catch any debris. If revsining, store in a closed container in a dark and cool area.
- If is important to use clean oil when trying. We recommend changing oil after every time you try. It is possible to try in the same oil more than once, especially if you are trying mild. - Also, the smoking point (temperature when oil will burn) of the oil looks very dark after tying multiple times it is time to change it. Looks and chips you would want to fry the chips first. Any time the oil a similar flavor. For this reason when you prepare a dish like fish and chips you would want to fry the chips first. Any time the oil looks very dark after tying multiple times it is time to change it. Also, the smoking point (temperature when oil will burn) of the oil lowers with each use.
- When ring food that is not coated in batter, make sure it is pattern dry with paper towels, as excess moisture causes the oil temperature to drop. The smallest amount of water will also cause hot oil to batter.
TIPS AND HINTS
Chocolate Banana Purses. 17
Apple Filters. 17
Soparillas. 16
Sesame Chicken Fingers . . . . . . . . . . . . . . . . . . . . . . . . . . . . . . . . . . . . . . . . . . . . . . . . . . . . 15
FaIatei 15
Shrimp and Leek Ravalii. 14
Goat Cheese Ravioli . 13
Deep Fired Sage and Prosecuito Ricotta Balls . . . . . . . . . . . . . . . . . . . . . . . . . . . . . . . . . . . . . . . . . . . . . . . . . . . 13
12. 12. 12.
Corn, Scallion, and Sweet Red Pepper Fritters .... 11
11 Potato Chips
Perfect French Fixes . . . . . . . . . . . . . . . . . . . . . . . . . . . . . . . . . . . . . . . . . . . . . . . . . . . . . . 10
Crib Cake Filters . . . . . . . . . . . . . . . . . . . . . . . . . . . . . . . . . . . . . . . . . . . . . . . . . . . . . . . 9
Fried Calamari....9
Calvin Shrimp with Creole Mustard Mayonaise . . . . . . . . . . . . . . . . . . . . . . . . . . . . . . . . . . . . . . . . . . . . . . . . . . . . . . . . . . . 8
Vegetable Tempura . . . . . . . . . . . . . . . . . . . . . . . . . . . . . . . . . . . . . . . . . . . . . . . . . . . . . . 8
Soy Dipping Sauce . . . . . . . . . . . . . . . . . . . . . . . . . . . . . . . . . . . . . . . . . . . . . . . . . . . . . . . . . . . . . . . . 7
Fried Vegetable Wontons....6
Deep Fried Chicken Wings for One with Accompanying Sauces . 5
Crimp Coatings . . . . . . . . . . . . . . . . . . . . . . . . . . . . . . . . . . . . . . . . . . . . 4
4 Temperature Batter
4 Beer Batter.
RECEDES
Fun and Different Ideas. 3
Tips and Hints 2
CONTENTS

Heli Pre-printing System
CDF-100 IB printing spec:
ref code: IB-6355D
color: Cover : 4C+1C / Inside : 1C+1C-Black
size: 229mm(W) X 152mm(H)
material: Cover :157gsm Matt art paper with gloss varnishing in cover page,
inside :120gsm Gloss art paper
page: 24
binding: saddle stitching


- CUISINART®
- COMPACT DEEP FRYER
- IMPORTANT SAFEGUARDS
- SAVE THESE INSTRUCTIONS FOR HOUSEHOLD USE ONLY
- SPECIAL CORD SET INSTRUCTIONS
- NOTICE
- CONTENTS
- PARTS AND FEATURES
- BEFORE THE FIRST USE
- ASSEMBLY INSTRUCTIONS
- OPERATING INSTRUCTIONS
- WARNING
- REMOVING LID
- REMOVABLE CHARCOAL FILTER
- CLEANING, CARE AND MAINTENANCE
- WARRANTY INFORMATION
- CUISINART
- CALIFORNIA RESIDENTS ONLY
- BEFORE RETURNING YOUR CUISINART PRODUCT
- SOPARDILLAS
- SESAME CHICKEN FINGERS
- SHRIMP AND LEEK RAYOLI
- GOAT CHEESE RAVIOLI
- HUSH PUPPIES
- CRAD CAKE FILTERS
- FRIED CALAMARI
- CREOLE MUSTARD MAYONNAISE
- SOY DIPPING SAUCE
- FRIED VEGETABLE WONTONS
- CREAMY BLUE CHEESE DRESSING
- HONEY MUSTARD SAUCE
- SWEET & SPICY GLAZE
- ASIAN MAHOGANY SAUCE
- BUFFALO SAUCE
- TEMPURA BATTER
- IN THE DEEP FRYER
- FUN AND DIFFERENT IDEAS TO TRY
- HELI PRE-PRINTING SYSTEM
Marque : CUISINART
Modèle : CDF-100
Catégorie : Friteuse