
JW102 - Station Météo OREGON SCIENTIFIC - Notice d'utilisation et mode d'emploi gratuit
Retrouvez gratuitement la notice de l'appareil JW102 OREGON SCIENTIFIC au format PDF.


| Type de produit | Station météo sans fil |
| Marque | Oregon Scientific |
| Modèle | JW102 |
| Dimensions (station principale) | Environ 15 x 10 x 5 cm |
| Poids (station principale) | Environ 200 g |
| Alimentation | 2 piles AA (non incluses) ou adaptateur secteur (en option) |
| Affichage | Écran LCD rétroéclairé |
| Température intérieure | Plage de mesure : 0°C à 50°C |
| Température extérieure | Plage de mesure : -20°C à 60°C (via capteur sans fil) |
| Humidité intérieure | Plage : 20% à 95% HR |
| Humidité extérieure | Plage : 20% à 95% HR (via capteur) |
| Prévisions météo | Icônes de prévision (ensoleillé, nuageux, pluvieux, etc.) |
| Signal DCF (radio-piloté) | Réglage automatique de l'heure |
| Fréquence du capteur extérieur | 433 MHz |
| Portée maximale | 30 à 50 mètres en champ libre |
| Mémoire | Enregistrement des valeurs min/max |
| Fonctionnalités supplémentaires | Alarme, affichage de la phase lunaire, tendance barométrique |
| Entretien et nettoyage | Nettoyer avec un chiffon doux et sec. Ne pas utiliser de produits abrasifs. |
| Sécurité | Ne pas exposer à des températures extrêmes ou à l'humidité excessive. Retirer les piles en cas d'inutilisation prolongée. |
| Pièces détachées et réparabilité | Contactez le service client Oregon Scientific pour les pièces de rechange. Réparation par un professionnel recommandée. |
| Informations générales | Garantie 1 an. Fabriqué en Chine. |
FOIRE AUX QUESTIONS - JW102 OREGON SCIENTIFIC
Questions des utilisateurs sur JW102 OREGON SCIENTIFIC
0 question sur cet appareil. Repondez a celles que vous connaissez ou posez la votre.
Poser une nouvelle question sur cet appareil
Téléchargez la notice de votre Station Météo au format PDF gratuitement ! Retrouvez votre notice JW102 - OREGON SCIENTIFIC et reprennez votre appareil électronique en main. Sur cette page sont publiés tous les documents nécessaires à l'utilisation de votre appareil JW102 de la marque OREGON SCIENTIFIC.
MODE D'EMPLOI JW102 OREGON SCIENTIFIC
Oregon
SCIENTIFIC
RADIO CONTROLLED
WIRELESS WEATHER STATION
MODEL:JW102
USER MANUAL
EN
BRIEF INTRODUCTION
Thank you for your purchase of this delicate Wireless Weather Station. The utmost care has gone into the design and manufacture of your clock. Please read these instructions carefully and keep the manual well for future reference.
The multifunctional weather station is equipped with many functions providing thorough weather information to you. The receiver unit has a clear, easy-to-read display that shows the indoor temperature, moon phase, time, month, date as well as the temperature measured and transmitted from the remote sensors. It is able to receive and display readings from up to 3 remote sensors.
The 433 MHz technology means no wire installation is required and you can place the sensors anywhere you like.
With radio controlled function, the current time and date are automatically synchronized with the time signal transmitted from Germany(DCF).
MAIN FEATURES:
WEATHER STATION
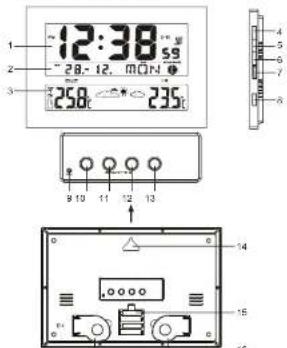
- CLOCK WINDOW:
• Displays time, year, signal strength indicator, daylight savings time (DST), alarm icons.
-
CALENDAR AND MOON PHASE WINDOW: • Displays the month, date, day of the week, alarm time as well as the moon phase.
-
WEATHER FORECAST AND TEMPERATURE WINDOW:
• Shows the current indoor & outdoor temperature, the maximum/minimum temperature as well as the current channel.
4 TIME key
• In normal time mode, press it to enter alarm1 and alarm2 time mode
- Press and hold it for 2 seconds to enter the
normal time setting mode. - In normal time setting mode, press it to step the setting items.
- CHANNEL key:
- Press it to switch among channel 1, 2 and 3. - Press and hold it for 2 seconds to show the channels automatically, and press it once again to exit the automatic display mode.
- MAX/MIN key
- Press it to show the maximum and minimum temperature records.
- Press and hold it for 3 seconds to delete the max. and min. records.
- SNOOZF key
- Press it to stop the current alarm when it is sounding.
- ALARM ON/OFF key:
• In normal time mode, press it to turn on/off alarm 1 & alarm2
• In alarm time mode, press it to turn on/off alarm and temperature pre-alarm.
• In alarm time mode, press and hold it for 2 seconds to enter the alarm time setting mode
- In alarm time setting mode, press it to step the setting items.
- Press it once to stop the current alarm when it is sounding.
- RESET key:
- Press it to reset all values to default values.
- In case of malfunction, the unit may be required to reset.
10 UP key
- In normal time mode, press it to switch between M-D (Month-Date) and D-M (Date-Month) formats.
- In time setting mode, press it to increase the setting values.
- Press and hold it for 3 seconds to receive the RC signal for reception testing.
11 DOWN key
- Press it to switch 12/24-hour format
- In time setting mode, press it to decrease the setting values.
- SYNC key
- Press and hold it for 3 seconds to turn on/off the signal reception of transmitter (433 MHz) manually.
13 °C/°E key
- Press it to switch between Celsius and Fahrenheit.
- WALL-MOUNTING HOLDER:
- Use it to support the main unit in the wall mounting.
15 BATTERY COMPARTMENT
• Accommodates 4 AA size batteries
16 TABLE STAND:
• Use it to stand the clock on the desktop.
TRANSMITTER
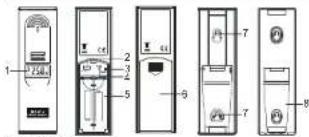
- LCD indicator:
• Displays the current temperature monitored by the remote unit.
2 CHANNEL slide switch
- Assign the transmitter to Channel 1, 2 or 3.
- RESET key:
- Press it to restart the transmitter and return all values to default values.
- "C" F key
• Switchés between Celsius and Fahrenheit.
5 BATTERY COMPARTMENT
• Accommodates 2 AA size batteries
-
BATTERY DOOR
-
WALL-MOUNTING HOLDER
• Use it to support the transmitter on the wall.
8 TABLE STAND:
- Use it to stand the transmitter on the desktop.
RECEPTION OF TRANSMITTER SIGNAL
OPERATING THE WEATHER STATION
-
Remove the battery door and insert 4 AA size batteries into the battery compartment as per the polarity information marked on the battery compartment.
-
Replace the battery door.
- Press "RESET" key to restart the clock.
- Press "CHANNEL" key to set the desired channel.
Note:
-
When the transmitter signal is received, the icon 4▼ will be shown and flash for 3 times
-
The building material and position of receiver and transmitter affect the effective range. So try various locations to obtain the best result.
-
Place the units away from metal objects and electrical appliances to minimize the interference. Position the receiver within the effective transmission range: 30 meters in usual circumstances.
OPERATING THE TRANSMITTER
-
Remove the transmitter from the stand and open the battery door
-
Insert 2 AA size batteries into the battery compartment as per the polarity information marked on the battery compartment
-
Slide 'CHANNEL' switch to synchronize the channel with receiver.
-
Press "RESET" key individually by a pin to confirm the channel setting.
-
Press "C"F key to select the temperature unit
-
Replace the battery door.
Note:
-
To receive the transmitter signal, the channels of receiver and transmitter must be synchronized.
-
The icon "Y" will flash for 3 times when the
-
Once the channel is assigned to a transmitter, you can only change it by removing the batteries or resetting the unit.
RECEPTION OF RADIO CONTROLLED
TIME SIGNAL
The time and date are radio-controlled. The current time and date are automatically synchronized with the signal transmitted from Germany (DCF).
When used for the first time (after inserting the batteries or pressing "RESET" key), the clock will start to receive the signals and the reception display will flash in 8 seconds.
DAYLIGHT SAVINGS TIME (DST)
The clock has been programmed to automatically switch when the daylight savings time is in effect. Your clock will show "DST" during the summe.
SIGNAL STRENGTH INDICATOR
The signal indicator displays signal strength in 4 levels. Wave segment flashing means time signals are being received. The signal quality could be classified into 4 types:

No signal quality

Acceptable signal quality

Weak signal quality

Excellent signal quality
Note:
- The unit will automatically search for the time signal at 2:00 (3:00 or 4:00 is also available if the signal was not received at 2:00), 8:00, 14:00 and 20:00 each day.
- Always place the unit away from interfering sources such as TV set, computer etc.
- Avoid placing the unit on or next to metal plates.
- Closed area such as airport, basement, tower black or factory is not recommended.
- Do not start reception in moving articles such as vehicles or trains.


TIME AND CALENDAR MANUAL SETTING
If you are out of reach of the Radio Controlled transmitter or if the reception is not reachable, the time and calendar can be set manually. As soon as the signal of transmitter is received again, the clock will automatically synchronize with the exact time and calendar.
-
Press and hold "TIME" key for 2 seconds until the Year digit flashes.
-
Press "UP" or "DOWN" key to change its value.
-
Press "TIME" key once until the Month digit flashes.
-
Press "UP" or "DOWN" key to change its value.
-
Repeat the above operations (point 3, 4) to set the below items in this order. Date > Hour > Minute > Second > Day language > +/-23 hours time difference.
-
Press "TIME" key to save and exit the setting mode, or let it exit automatically 30 seconds later without pressing any key.
Note:
- Through "+/-23 hours time difference" setting, the precise time of another area will be shown.
- The 5 languages weekday settings are represented by the below abbreviations: GB=English FR=French DE=German ES=Spanish IT=Italian.
| English | French | German | Spanish | Italian |
| SUN | DIM | SON | DOM | DOM |
| MON | LUN | MON | LUN | LUN |
| TUE | MAR | DIE | MAR | MAR |
| WEO | MER | MIT | MIE | MER |
| THU | JEU | DON | JUE | GIO |
| FRI | VEN | FRE | VIE | VEN |
| SAT | SAM | SAM | SAB | SAU |
ALARM TIME SETTING
-
In normal time mode, press *TIME* key to enter the alarm1 (alarm2) time mode.
-
Press and hold 'ALARM ON/OFF' key for 2 seconds until the alarm Hour digit flashes.
-
Press "UP" or "DOWN" key to change its value.
-
Press "ALARM ON/OFF" key once until the alarm Minute digit flashes.
-
Press "UP" or "DOWN" key to change its value.
- Press "ALARM ON/OFF" key to save and exit the setting mode, or let it exit automatically 30 seconds later without pressing any key.
Not
-
The alarm will be automatically turned on when you set the alarm time.
-
The dual-alarm (alarm1 & alarm2) design of this unit provides you with more convenience, and you can set two-alarm time if needed.
USING ALARM & TEMPERATURE
PRE-ALARM FUNCTIONS
-
Set the alarm time as the above section with alarm1 (alarm2) turned on when you set the alarm time.
-
In alarm1 (alarm2) time mode, press "ALARM ON/OFF" key once to turn on the temperature pre-alarm with the icon "*" displayed.
-
Press it again to turn off both of them until the icons disappear.
Note:
- To turn on temperature pre-alarm, ALARM must be on
- The temperature pre-alarm can sound 30 minutes earlier than the alarm only when the outdoor temperature is below -3°C (26°F).
- If no key is pressed during the alarm period, the clock will enter the snooze mode automatically. Besides, you can also press "SNOOZE" key once to stop the current alarm and activate the snooze function.
- Once the snooze function is activated, the 4-step crescendo alarm will sound 13 times in 5-minute interval. The alarm duration is 60 seconds.
VIEWING THE CHANNEL
The default channel is Channel 1. Press "CHANNEL" key to view the channels from 1 to 3.
Besides, press and hold 'CHANNEL' key for 2 seconds to show the channels automatically; press it once again to exit the automatic display mode.
HOW TO READ TEMPERATURE RECORD
Change the temperature unit to °C for Celsius or °F for Fahrenheit by pressing "°C/°F" key.
Note:
- If no signals are received or the transmission is interfered, “---” will appear on the LCD.
- Relocate the c lock or transmitter in other positions and make sure the transmission is within the effective range of 30 meters approx.
- After several trials in vain, please reset the clock thoroughly. Try out where your multifunctional alarm clock receives the signals best
CHECKING AND DELETING MAX./MIN. TEMPERATURE RECORDS
-
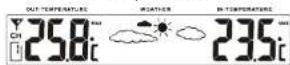
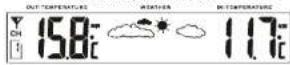
Press "MAX/MIN" key once to check the maximum temperature records. Press it twice to check the minimum records. Press it again to exit.
-
Press and hold "MAX/MIN" key for 3 seconds to delete the max. and min. temperature records.
MAX. Temperature records
MIN. Temperature records
WEATHER FORECAST INDICATOR
The built-in barometer can notice atmosphere pressure changes. Based on the data collected, it can predict the weather conditions in the forthcoming 12-24 hours.
Note:
- The accuracy of a general pressure-based weather forecast is about 70% to 75%.
- The weather forecast is meant for next 12 to 24 hours. It may not necessarily reflect the current situation.
- The "Rainy" and "Stormy" icons are different only in the dropping frequency of the rain. The rain dropping frequency in "Stormy" icon is faster than that in "Rainy" icon.
- The "Snowy" weather forecast is not based on the atmosphere pressure but on the outdoor temperature. When the outdoor temperature is below -3°C (26°F), the "Snowy" icon will be displayed on the LCD.
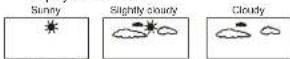
Rainy Stormy Snowy

ABOUT THE MOON PHASE
The unit has 8 different moon phases. It will change according to the lunar calendar.
New moon Waxing crescent First quarter Waxing gibbous

Full moon Waning gibbous Last quarter Waning crescent

BATTERY REPLACEMENT
If the LCD becomes dim, it means that you should replace batteries of the clock immediately. If the low battery indicator * appears in the WEATHER FORECAST AND TEMPERATURE window
of the clock (" [☐]) or on the LCD of transmitter, you should replace batteries of transmitter at once.
Transmitter's low battery indicator (shown on the transmission) Transmitter's low battery indicator (shown on the main unit)

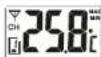
Note:
Attention! Please dispose of used unit or batteries in an ecologically safe manner.

USING THE TABLE STAND OR WALL-MOUNTING STAND
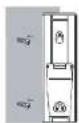
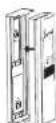
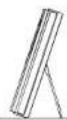
The receiver and transmitter have both the desktop and wall-mounting structures. For the receiver, place the screw on the desired wall and hang the receiver by the recessed hole in the back of it or just simply place it on the desktop by its table stand.
For the transmitter, fix the separate wall-mounting stand outside in the area protected from direct rain by the screw. Once the stand is mounted, place the transmitter into the stand on the wall. Besides, you can also place it on the desktop by its table stand.
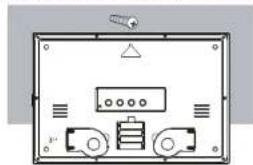
natural_image
Back view diagram of a device with labeled ports and a sensor (no text or symbols)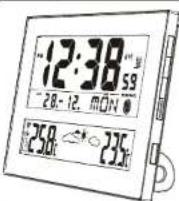
SPECIFICATIONS
| TYPE | DESCRIPTION |
| MAIN UNIT | |
| L x W x H | 430 (W) x 33 (D) x 288 (H) mm(16.93 x 1.3 x 11.34 in) |
| Weight | |
| Signal frequency | 433 MHz |
| Temperature range | 0 °C to 45 °C (2 °F to 113 °F) |
| Moon phase scanner range: | from year 2000 to 2099 |
| Power | 4 x AA 1.5V batteries |
REMOTE UNIT
| L x W x H | 40 (30.6 (D) x 128 (H) mm(1.57 x0.504 in) |
| Weight | |
| Signal frequency | 433 MHz |
| Number of channel | 3 |
| Transmission range | 30 m (98 ft) unobstructed |
| Temperature range | -20 °C to 55 °C-4 °F to 131 °F |
| Power | 2 x AA 1.5V batteries |
Note We recommend that you use alkaline batteries with this product for longer usage and lithium batteries in temperatures below freezing.
PRECAUTIONS
- Do not subject the unit to excessive force, shock, dust, temperature or humidity.
- Do not cover the ventilation holes with any items such as newspapers, curtains etc.
- Do not immerse the unit in water. If you spill liquid over it, dry it immediately with a soft, lint-free cloth
- Do not clean the unit with abrasive or corrosive materials.
- Do not tamper with the unit's internal components. This invalidates the warranty.
- Only use fresh batteries. Do not mix new and old batteries.
- Images shown in this manual may differ from the actual display.
- When disposing of this product, ensure it is collected separately for special treatment and not as normal household waste.
- Placement of this product on certain types of wood may result in damage to its finish for which Oregon Scientific will not be responsible. Consult the furniture manufacturer's care instructions for information.
- The contents of this manual may not be reproduced without the permission of the manufacturer.
- Do not dispose old batteries as unsorted municipal waste. Collection of such waste separately for special treatment is necessary.
- Please note that some units are equipped with a battery safety strip. Remove the strip from the battery compartment before first use.
Note The technical specifications for this product and the contents of the user manual are subject to change without notice.
ABOUT OREGON SCIENTIFIC
Visit our website (www.oregonscientific.com_) to learn more about Oregon Scientific products. If you're in the US and would like to contact our Customer Care department directly, please visit: www2.oregonscientific.com/service/support OR Call 1-800-853-8883.
EU-DECLARATION OF CONFORMITY
Hereby, Oregon Scientific, declares that the Indoor / Outdoor Thermometer (Model JW102) is in compliance with the essential requirements and other relevant provisions of Directive 1999/5/EC.
A copy of the signed and dated Declaration of Conformity is available on request via our Oregon Scientific Customer Service.


COUNTRIES RTTE APPROVAL COMPLIED
ALL EU countries, Switzerland
CH
and Norway N
- Oregon
- RADIO CONTROLLED
- WIRELESS WEATHER STATION
- MODEL:JW102
- USER MANUAL
- EN
- BRIEF INTRODUCTION
- MAIN FEATURES:
- RECEPTION OF TRANSMITTER SIGNAL
- OPERATING THE WEATHER STATION
- Note:
- OPERATING THE TRANSMITTER
- RECEPTION OF RADIO CONTROLLED
- TIME SIGNAL
- DAYLIGHT SAVINGS TIME (DST)
- SIGNAL STRENGTH INDICATOR
- TIME AND CALENDAR MANUAL SETTING
- ALARM TIME SETTING
- Not
- USING ALARM & TEMPERATURE
- PRE-ALARM FUNCTIONS
- VIEWING THE CHANNEL
- HOW TO READ TEMPERATURE RECORD
- CHECKING AND DELETING MAX./MIN. TEMPERATURE RECORDS
- WEATHER FORECAST INDICATOR
- ABOUT THE MOON PHASE
- BATTERY REPLACEMENT
- USING THE TABLE STAND OR WALL-MOUNTING STAND
- PRECAUTIONS
- ABOUT OREGON SCIENTIFIC
- EU-DECLARATION OF CONFORMITY
Marque : OREGON SCIENTIFIC
Modèle : JW102
Catégorie : Station Météo