
MC802 - Machine à coudre JATA - Notice d'utilisation et mode d'emploi gratuit
Retrouvez gratuitement la notice de l'appareil MC802 JATA au format PDF.


| Marque | JATA |
| Modèle | MC802 |
| Type de produit | Machine à coudre |
| Utilisation | Domestique |
| Dimensions (L x P x H) | 40 x 18 x 30 cm |
| Poids | 6,8 kg |
| Alimentation électrique | 220-240 V, 50/60 Hz |
| Puissance moteur | 90 W |
| Vitesse maximale | 800 points par minute |
| Nombre de points | 12 points intégrés |
| Points de base | Point droit, point zigzag, point arrière |
| Boutonnière | Automatique en 1 étape |
| Enfile-aiguille | Intégré |
| Bobine | Enrouleur de canette automatique |
| Bras libre | Oui |
| Marche arrière | Oui |
| Éclairage | Lampe LED intégrée |
| Pédale | Pédale de vitesse variable |
| Entretien et nettoyage | Nettoyer la zone de la canette après chaque projet ; huiler les mécanismes internes régulièrement |
| Sécurité | Débrancher avant nettoyage ; ne pas utiliser en extérieur |
| Pièces détachées | Aiguilles, canettes, plaques à aiguille, pieds presseurs disponibles |
| Réparabilité | Réparation possible par un technicien agréé |
| Garantie | 2 ans |
FOIRE AUX QUESTIONS - MC802 JATA
Questions des utilisateurs sur MC802 JATA
0 question sur cet appareil. Repondez a celles que vous connaissez ou posez la votre.
Poser une nouvelle question sur cet appareil
Téléchargez la notice de votre Machine à coudre au format PDF gratuitement ! Retrouvez votre notice MC802 - JATA et reprennez votre appareil électronique en main. Sur cette page sont publiés tous les documents nécessaires à l'utilisation de votre appareil MC802 de la marque JATA.
MODE D'EMPLOI MC802 JATA

Supra
802
Mod. MC802
MANUAL DE INSTRUCCIONES
INSTRUCTION MANUAL
MANUAL DE INSTRUÇÕES

PROTECCION DEL MEDIO AMBIENTE
- En su calidad de consumidor, cuando desee desprenderse del aparato depositelo para su posterior tratamiento en un centro de recogida de residuos o contenedor destinado a tal fin.
- Proceda de igual forma cuando tenga que eliminar las pilas usadas.
- Nunca tire el aparato ni las pilas a la basura. De esta manera estará contribuyendo al cuidado y mejora del medio ambiente.
- Dispose the appliance according to the local garbage regulations.
- Dispose the batteries according to the local garbage regulation.
- Never throw it away to the rubbish. So you will help to the improvement of the environment.
ENVIRONMENT PROTECTION
PROTECÇÃO DO MEIO AMBIENTE
- Na sua qualidade de consumidor, quando desejar desfazer-se do aparelho deposite-o, para o seu posterior tratamento, num centro de recolha de resíduos ou contentor destinado para tal efeito.
- Proceda de igual forma quando tiver que eliminar as pilhas usadas.
- Nunca deite o aparelho, nem as pilhas, para o lixo. Desta forma estará contribuindo para o cuidado e a melhoria do meio ambiente.
Índice · Index · Índice
Identificación de la máquina
Accesorios
Quitar la tapa delantera
Una máquina de coser libre
Reempla
máquina
Preparación de la máquina
Control por pedal
Interruptor corriente/luz
Devanado de la canilla
Colocar la bobina
Enhebrado del hilo superior
Empleo del enhebrador
automático de la aguja
Recogida del hilo de la canilla
Cambio del prénsatelas
Esquema de ajuste de la máquina
Puntada recta
Cómo fijar la costura
Inserción de cremalleras
Ribetes
Ajuste de la tensión del hilo
superior
Tabla de hilo, aguja y tela
Punto de zig-zag
Puntada de relleno
Puntada invisible
Puntada de lenceria
Costura y sobrehilado en uno
Dobladillo de concha
Zig-zag de tres puntadas
Puntada de acción
Fagoting (Diento de rata)
Puntadas elásticas
Puntada recta triple
Ajuste fino puntada elástica
Punto ric-rac
Puntada overlock
Puntada overlock elástica
Puntada avispero
Puntada overlock elástica
Puntada overlock doble
Puntada espiga
Cambiar el pie prensatelas al pie
de ojales
Procedimiento
Ojales con cordoncillo
Cuidado de su máquina
6 Machine identification
7 Accessories
8 Removing Front Cover
8 Replacing the covers on the
machine
10 Setting up your machine
14 Food control, Power/light switch
14 Winding bobbin
14 Setting the bobbin
16 Threading top thread
18 Using automatic needle
20 threader
Picking up bobbin thread
22 Changing presser feet
24 Machine setting chart
26 Straight stitch
28 Securing se
32 Inserting zippers and piping
34 Adjusting thread tension
34 Changing the needle, thread and
34 fabric ch
Zigzag stitch
36 Satin stitch
38 Blind stitch
41 Shell stitch
41 Multi-stitch zigzag
42 Double-action stitch
44 Faggoting
44 Adjusting stretch stitch
44 balance
46 Triple straight stitch
48 Ric-rac stitch
48 Stretch overlock stitch
50 Overlock stitch
50 Honeycomb stitch
50 Elastic overlock stitch
52 Double overlack stitch
52 Herringbone stitch
52 Buttonholes
54 Procedure
54 Corded buttonhole
56 Caring for your machine
6 Identificação da máquina
7 Acessórios 7
9 Retirar a tampa da frente 9
Uma máquina de coser livre 9
1 Substituir as tampas da máquina 11
15 Preparação da máquina 15
15 Controlo por pedal, Interruptor 15
17 corrente/luz 15
19 Enrolamento da bobina 17
21 Colocar a bobina 19
Enfiamento da linha superior 21
22 Uso do enfiador de agulha 23
25 Recolha da linha da canilla 25
27 Mudança do pé prensa-tecidos 27
29 Esquema de ajuste da máquina 30
3 Ponto recto 33
35 Como fixar a costura 35
35 Inserção de fechos eclair e de vivos 35
37 Ajuste da tensão da linha superior 37
Tábua de linha, agulha e material 39
39 Ponto zig-zag 41
1 Panto de enchimento 41
Ponto invisível 43
3 Ponto de lingerie 45
14 Zig-zag de très puntos 47
17 Ponto de acção dupla 49
19 Fagoting (Dente de rato) 49
49 Ajuste fino ponto elástico 51
Ponto recto triplo 51
51 Ponto zig-zag a duas agulhas 53
51 Ponto overlack 53
53 Ponto overlock elástica 53
53 Ponto cruzado em zig-zag 55
53 Ponto overlock elástica 55
55 Ponto overlock duplo 57
55 Ponto espiga 57
57 Confeção de casas para botões 59
57 Procedimento 61
69 Casas com cordão 63
61 Cuida da sua máquina 65
Instrucciones importantes de seguridad
Esta máquina de coser está diseñada y fabricada exclusivamente para uso doméstico. Por favor lea todas las instrucciones antes de su utilización y siga las precauciones de seguridad básicas que se detallan.
ATENCION
Para evitar el riesgo de choque eléctrico:
No deje desatendida en ningún momento su máquina y desconéctela de la toma de corriente siempre que no vaya a ser usada o se proceda a su limpieza.
- Desconecte el aparato antes de cambiar la bombilla. Utilice siempre recambios de 15W.
ADVERTENCIA
Para reducir el riesgo de quemaduras, incendio o lesiones personales:
- Haga funcionar la máquina de coser solamente cuando esté montada sobre su mesa de trabajo.
- Este aparato no está destinado para su uso por personas (incluidos niños) con capacidades físicas, sensoriales o mentales reducidas, o falta de experiencia y conocimiento, a no ser que reciban supervisión o instrucciones concretas sobre el uso del aparato por una persona responsable de su seguridad.
- Use este aparato solamente para el fin para el que fue diseñado y utilizando exclusivamente los accesorios recomendados por el fabricante, como se indica en este manual.
- Nunca haga funcionar este aparato si el cable o el enchufe estuvieran dañados. Si no funcionara adecuadamente, si se hubiera caído o dañado, o si se hubiera caído al agua, contacte con su distribuidor o con el centro de servicio autorizado más cercano para que lo revisen, reparen o hagan los ajustes eléctricos o mecánicos debidos.
- Nunca use este aparato con alguna de las salidas de ventilación bloqueadas. Mantenga las rejillas de ventilación y el controlador del pedal limpios, sin acumulaciones de pelusa, polyn o tela suelta.
- Nunca deje caer o inserte objetos en las aberturas.
- No la use al aire libre.
• No la use donde se estén usando productos de aerosol (sprays) o donde se esté suministrando oxígeno. -
Para desconectarla, ponga todos los controles en la posición de apagado ("0") y desconecte el enchufe de la toma de corriente.
-
Desconéctela siempre por la clavija, no tire del cable.
- Mantenga los dedos de las manos alejados de las piezas en movimiento. Se requerirán precauciones especiales cerca de la aquía.
• Siempre use la placa adecuada para la aguja. Usar una placa errónea podría causar la rotura de la aguja. - No use aqujas dobladas.
• Evite tirar o empujar el tejido con la mano mientras cose, ya que su transporte lo efectúa la misma máquina. Forzar el recorrido solo causará la rotura de la aquja. - Desconecte la máquina de coser al hacer cualquier ajuste en el área de la aguja, como al enhebrarla o cambiar la aguja, hacer la canilla, cambiar el prensatelas, etc.
- Siempre desconecte la máquina de coser de la toma de corriente al quitar la cubierta, al lubricar o al hacer cualquier otro ajuste de servicio mencionado en este manual de instrucciones.
GUARDE ESTAS INSTRUCCIONES
Important safety instructions
This sewing machine is intended for household use only. Read all instructions before using and follow all the basic safety precautions detailed bellow:
DANGER
To reduce the risk of electric shock:
- An appliance should never be left unattended when plugged in. Always unplug this appliance from the electric outlet immediately after using and before cleaning.
• Always unplug before replacing the bulb with same type rated 15 watts.
WARNING
To reduce the risk of burns, fire, electric shock, or injury to persons:
Operate sewing machine only when mounted in sewing machine table, case, and the like.
- This appliance is not intended for use by persons (including children) with reduced physical, sensory or mental capabilities, or lack of experience and knowledge, unless they have been given supervision or instruction concerning use of the appliances by a person responsible for their safety.
- Use this appliance only for its intended use as described in this manual. Use only attachments recommend
• Never operate this appliance if it has a damaged cord or plug, if it is not working properly, if it has been dropped or damaged, or dropped into water. Return the appliance to the nearest authorized dealer or service center for examination, repair, electrical or mechanical adjustment.
- Never operate the appliance with any air openings blocked. Keep ventilation openings of the sewing machine and foot controller free from the accumulation of lint, dust, and loose cloth.
- Never drop or insert any object into any opening.
- Do not use outdoors.
- Do not operate where aerosol (spray) products are being used or where oxygen is being administered.
- To disconnect, turn all controls to the off ("0") position, then remove plug from outlet.
- Do not unplug by pulling on cord. To unplug, grasp the plug, not the cord.
- Keep fingers away from all moving parts. Special care is required around the sewing machine needle.
• Always use the proper needle plate. The wrong plate can cause the needle to break.
- Do not use bent needles.
- Do not pull or push fabric while stitching. It may deflect the needle causing it to break.
- Unplug the sewing machine when making any adjustments in the needle area, such as threading needle, changing needle, threading bobbin, or changing presser foot, etc.
- Always unplug sewing machine from the electrical outlet when removing covers, lubricating, or when making any other user servicing adjustments mentioned in the instruction manual.
SAVE THESE INSTRUCTIONS
Instruções importantes de segurança
Esta máquina de costura foi concebida e fabricada exclusivamente para uso doméstico. Por favor leia todas as instruções antes da sua utilização e siga os cuidados de segurança básicos que seguem em pormenor.
ATENÇÃO
Para evitar o risco de chogue eléctrico:
- A máquina nunca deve ser deoada sozinha e des-ligue-a da corrente eléctrica sempre que a não for utilizar ou a vá limpar.
- Desligue o aparelho antes de mudar a lâmpada. Utilize sempre lâmpadas de substituição de 15W.
ADVERTÊNCIA
Para reduzir o risco de queimaduras, incêndio ou lesões:
- Faça funcionar a máquina de costura somente quando estiver montada sobre a sua mesa de trabalho.
- Este aparelho não é destinado para ser usado por pessoas (induindo crianças) com capacidades físicas, sensoriais ou mentais reduzidas; falta de experiência e conhecimento, a não ser que sejam supervisionadas ou recebam instruções concretas sobre a utilização do ana-
reliho por uma pessoa responsável pela sua segurança. - Use este aparelho somente para o fim para o qual foi concebido, utilizando exclusivamente os acessórios recomendados pelo fabricante, como se indica neste manual.
- Nunca faça funcionar este aparelho se o cabo ou a ficha estiverem danificados. Se não funcionar adequadamente, se tiver caído, estiver danificado ou se tiver apanhado água, contacte o distribuidor ou o centro de serviço técnico autorizado mais próximo para que o verifiquem, reparem ou façam os ajustes eléctricos ou mecânicos necessários.
- Nunca use este aparelho com alguma das saídas de ventilação bloqueadas. Mantenha as grelhas de ventilação e o pedal limpos, sem acumulações de pelos, pó ou fios de tecido soltos.
• Nunca deixe cair, ou insira objectos nas aberturas.
• Não a use ao ar livre. - Não a use onde estiverem a ser usados produtos em ae-
rossal (sprays) ou onde esteja a ser libertado oxigénio. - Para a desligar, coloque todos os controlos na posição "Apa-qado" ("0") e deslique a ficha da tomada da corrente.
- Desligue-a sempre puxando pela ficha e nunca pelo cabo.
- Mantenha os dedos das mãos afastados das peças em movimento. Necessitam-se cuidados especiais perto da aquilha.
- Use sempre a chapa adequada à agulha. Usar uma chapa errada poderá provocar a quebra da agulha.
• Não use aquilhas tortas. - Evite puxar, ou empurrar, o tecido com a mão enquanto cose, já que o seu movimento é efectuado pela própria máquina. Forçar o processo só provocará a quebra da aquilha.
- Desígue a máquina de costura ao fazer qualquer ajuste perto da agulha como enfiar, ou mudar, a agulha, encher a bobina, trocar o pé-calcador, etc.
- Desligue sempre a máquina de costura da tomada de corrente para retirar a tampa, ao lubrificar, ou ao fazer qualquer outro ajuste de serviço mencionado neste manual de instruções.
GUARDE ESTAS INSTRUÇÕES
Piezas principales · Machine identification · Peças principais
- Disco tensor del devanador de
canilla
-
Guía hilo
-
Primera guía del bilo
-
Cubierta frontal
-
Cubierta
-
Guía hilo
-
dula mio
-
Plancha gruia
-
Flancha aguja
-
Tapa de canilla
-
Narmacia de anterior
-
Almacenaje de acceso
-
Eix devanadas enilla
-
Eje devanador canilla
-
1ope devanador canilla
-
Pasador carrete
-
Volante
-
Selector de puntadas
-
Interruptar corriente/luz
-
Toma de corriente
-
Palanca del prensatelas
-
Fortador de hilo
-
Enbehrador anui
-
Enincador aguja
-
Palanca para soltar el prensatelas
-
Tornillo pie prensatelas
-
Transporte de dientes
-
Transporte de
-
Guía hilo
-
Gula mio
-
Tercille
-
Tornillo de sujeción aguja
-
Aguja
-
Pie prensatelas
-
Transporte de dientes
-
Cubierta extensible
-
Bobbin winder tension disc
-
Thread guide
-
First thread guide
-
Face cover
-
Thread guide
-
Thread guide
-
Needle plate
-
Needle plate
-
Robinson cover plate
-
Bobbin cover plate
-
Accessory storage
-
Bobbin Winder shaft
-
Bobbin Winder star
-
Bobbin Winder stop
-
Spool pin
-
Hand wheel
-
Stitch selector
-
Power/light switch
-
Plug socket
-
Presser foot lever
-
Thread cutter
-
Automatic needle threader
-
Foot release lever
-
Presser font screw
-
Feed dogs
-
Thread guide
-
Needle clamp screw
24 Needle
- Needle
-
Dressar
-
Fresser tout
-
Foot control
-
Foot Lantior
-
Extension table
-
Extension table
-
Disco tensor do enrolamento da bobina
-
Guia linha
-
Primeira guia linha
-
Cobertura frontal
-
Cubertal frontal
-
Guia linha
-
Gold mills
-
Farm agull
-
Rembaguindo
-
Tammy de lo
-
Tampa de dojima
-
Almazenamento de acessorios
-
Los enelados de haber
-
Edo enrolador da Dubina
-
Tara evolados de bahias
-
Topo enrolador da podina
-
Passador carrete
-
Volante
-
Selector de pontos
-
Interruptor corrente/ñuz
-
Ficha do controlo por pedal
-
Alavanca pé prensa-tecidos
-
Cortador de linha
-
Enfiador de agulha
-
Alavanca de desprendimento prensa-
tecidos
-
Parafuso pé prensa tecidos
-
Transporte de dentes
-
Guia linha
-
Parafusos de sujeição aquilha
-
Anulha
-
Aquima
-
Dó pmp
-
Reprensa teudus
-
Tavuanta de dar
-
Transporte de dentes
-
Cobertura extensiva

Accesorios · Accessories · Acessórios
Al abrir la caja de accesorios
levantando la tapa, y encontrará
varips accesprios en el interior.
-
Pie puntada recta
-
Pie para sobrebilado
-
Pie para sus enmados
-
Pie do cíjlos
-
Pie de újales
-
Die de croma
-
Pie de crenmalleras
-
Cenillas
-
Canillas
-
Agujas
-
Tapa del eje del carrete (pequeno)
-
Tapa del eje del carrete (grande)
-
Abridor de ojales
-
Destornillador (grande)
-
Destornillador (pequeño)
-
Prensatelas para la costura de
botones
- Tapa del alimentador
Open the accessory box And you
will find a variety of accessories
inside. They are listed below
-
Straight stitch foot
-
Overcasting font
-
Overcasting foot
-
Buttonhole foot
-
Buttunhole
-
Tinnerfoot
-
Zipper foot
-
2019
-
BODDINS
-
Needles
-
Spool pin cap (small)
-
Spool pin cap (large)
-
Buttonhole opener with brush
10.Screwdriver (large)
1.Screwdriver (small)
-
Button sewing foot
-
Feed cover
Abrir a caixa de acessórios
levantando a tampa, encontrará
vários acessórios no interior
-
Pé ponto recto
-
Pé para overlocado
-
PE para enlocado
-
Propra- tocidos de casas
-
PRENSA TECUOS DE CASAS
-
Drosos toridos de fecha
-
Prensá-tecidos de lechos eclair
-
Poligos
-
Bobinas
-
Agulhas
-
Tampa do passador carretel (pequeno)
-
Tampa do passador carretel (grande)
-
Abridor de casas para botões
-
Chave de fendas (grande)
-
Chave de fendas (pequeno)
-
Prensa-tecidos para a costura de
bataes
- Placa rammendo

natural_image
Technical line drawing of a mechanical component or bracket (no text or symbols)
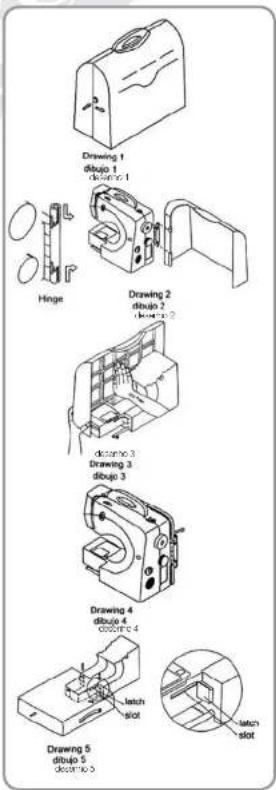
QUITAR LA TAPA DELANTERA.
UNA MÁQUINA DE COSER LIBRE
La tapa exterior de la máquina ha sido diseñada para funciones muy variadas. Es una máquina de coser portátil en donde no sólo se pueden guardar los artículos de mercería sino también se puede utilizar la tapa trasera como una extensión de la mesa para coser.
PARA ABRIR LA TAPA DELANTERA.
- Apretar el botón en el lado izquierdo de la caja para poder abrirla. (Véase el dibujo 1)
- Gire la tapa hacia la derecha, encontrará una bisagra en la parte derecha de la máquina.
- Empuje la clavija de la parte superior de la bisagra hacia abajo y encájela en la ranura. Empuje la clavija de la parte inferior de la bisagra hacia arriba, encájela en la ranura. Retire la tapa delantera (Véase el dibujo 2).
QUITAR LA TAPA TRASERA:
- Coloque sus manos a través de la zona de costura de la máquina y empuje la tapa hacia el lado trasero hasta que se suelte (Véase el dibujo 3).
- Levante la tapa trasera hacia arriba y suéltela desde el asa permanente de la máquina. (Véase el dibujo 3)
LA TAPA TRASERA SE CONVIERTE EN LA ZONA EXTEN-DIDA DE TRABAJO.
Baje el soporte hacia dentro de la correa. Deslice la tapa por las ranuras o rieles del brazo libre. Al final de los rieles levante la tapa y asegúrela con el pasador (Véase el dibujo 5).
REMOVING FRONT COVER LIBERTY MACHINE
The machine's hard cover is designed for multiple functions. It is a portable case that has storage for your sewing notions and it can also be used as an extension table for more sewing surface.
TO OPEN THE COVER:
- Press the button on the left side of the cover. (Drawing 1)
- Swing the front cover to the right. You will see a hinge at the right rear side of machine.
- Press down on the upper pin located at the hinge and push into the side slot. Push up on the lower pin and push into the side slot. Remove the cover from the machine. (Drawing 2)
REMOVE REAR COVER:
- Place your hand through the sewing area of the machine and push rear cover to the back until it is released. (Drawing 3)
- Lift the back cover upward and remove from the permanent handle of the machine. (Drawing 4)
REAR COVER AS AN EXTENSION TABLE:
Lower the back metal support leg. Slide the cover into the slots located on the sides of the free arm. At the end of the slots lift up on the cover and place cover on the latch. (Drawing 5)
RETIRAR A TAMPA DA FRENTE
UMA MAQUINA DE COSER LIVRE
A tampa exterior da máquina foi desenhada para funções muito variadas, É uma máquina de coser portátil que permite guardar artigos de retrosaria e a tampa traseira ser utilizada como uma mesa estendida para coser.
PARA ABRIR A TAMPA DA FRENTE.
- Apertar o botão no lado esquerdo da caixa para a poder abrir. (Ver o desenho 1)
- Rode a tampa para o lado direito, encontrará uma dobradiça no lugar da costura com um braço que a une com a máquina.
- Empurre a cavilha da parte superior da dobradiça para baixo e para baixo da ranhura, assim a tampa da frente já pode ser separada da máquina. (ver o desenho 2)
RETIRAR A TAMPA TRASEIRA:
- Ponha as suas mãos trespassando a tábua de coser da máquina e empurre a tampa para o lado traseiro até que se solte. (Ver o desenho 3)
- Levante a tampa traseira para cima e retire-a a partir da asa permanente da máquina, (Ver o desenho 3)
A TAMPA TRASEIRA É APLICADA COMO A MESA ESTENDIDA DE TRABALHO.
Desça um pouco o suporte para dentro da correia. Empurre a tampa traseira deslizando para os dois lados da ranhura do trilho na costura com braço da máquina, quando chegar ao fim do trilho, levante um pouco a tampa traseira para que encaixe bem na máquina, (Ver desenho 5)

flowchart
graph TD
    A["spool pin"] --> B["Drawing 6\ndibujo 6\ndibujo 8"]
    B --> C["Drawing 7\ndibujo 7\ndibujo 7"]
    C --> D["Carring handle"]
    D --> E["Drawing 8\ndibujo 8\ndibujo 8"]
    E --> F["Drawing 9\ndibujo 9\ndibujo 9-1"]
    F --> G["Drawing 9-1\ndibujo 9-1"]
REEMPLAZAR LAS TAPAS DE LA MAQUINA
- Empuje el eje del carrete hacia debajo de la máquina de coser.(Véase el dibujo 6)
- Quite la tapa trasera del brazo libre (ahora usada como zona extendida de trabajo), levantándola y quitándole el pasador. (Véase el dibujo 7)
- Coloque la tapa trasera sobre el asa de la máquina y encájela en la parte trasera de la máquina (Véase el dibujo 8).
- Alinee la tapa delantera con las bisagras. Deslice la bisagra superior en la tapa y luego deslice la bisagra inferior en ella (Véase el dibujo 9-1).
- Vuelve a colocar la tapa delantera y ciérrela (Véase el dibujo 9).
REPLACING THE COVERS ON THE MACHINE:
Replacing the rear cover:
1. Push down the spool pin at the back of the machine for storage. (Drawing 6)
2. Remove the rear cover from the free arm (used as an extension table) by lifting up and removing from the latch. Slide the rear cover away from the free arm. (Drawing 7)
3. Place the rear cover over the handle of the machine and snap the cover into place on the back of machine. (Drawing 8)
4. Align the front cover at the hinges. Release the top hinge into the cover then release the bottom hinge into the cover. (Drawing 9-1)
5. Swing the front cover to the front and close. (Drawing 9)
SUBSTITUIR AS TAMPAS DA MÁQUINA
-
Empurre a cavilha do carretel para baixo da máquina de coser. (Ver o desenho 6).
-
Retire a tampa traseira (agora serve como mesa estendida de trabalho), assim a tampa pode ser retirada do suporte da tábua plana é empurre a tampa traseira para fora. (Ver o desenho 7)
- Volte a colocar a tampa traseira na máquina encaixando desde a parte de cima onde há uma asa e feche a tampa a partir do lado traseiro da máquina. (Ver desenho 8).
- Alinhar a tampa da frente na dobradiça. Substitua a dobradiça superior na caixa junto com a grelha da máquina e empurre com força sobre a tampa traseira, assim a tampa pode voltar a ser encaixada com a máquina. (Ver desenho 9.1)
- Volte a colocar a tampa da frente do lado dianteiro e feche-a bem. (Ver desenho 9)
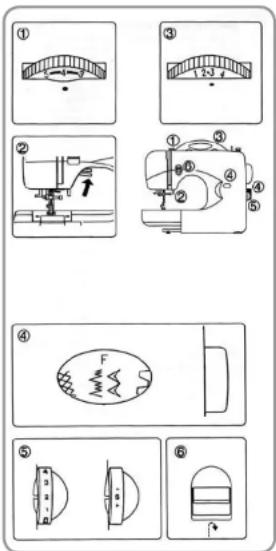
1. AJUSTE DE LA TENSIÓN DEL HILO SUPERIOR
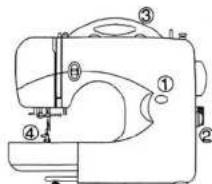
Aumente o disminuya la tensión del hilo superior usando este controlador. Cuanto mayor sea el número, mayor será la tensión.
2. PALANCA DEL PRENSATELAS
Su prensatelas tiene tres posiciones.
- Baje el prensatelas para coser.
- Levante la palanca a la posición media para insertar o mover la tela.
- Levante a la posición más alta para cambiar el prensatelas o para mover telas gruesas.
3. SELECTOR ANCHO PUNTADA
La anchura de las puntadas de esta máquina se puede modificar haciéndolas más anchas o estrechas con el control de la anchura de puntadas.
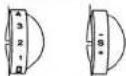
Al coser puntadas rectas, se pueden elegir varias posiciones de la aguja, desde 0 (la posición derecha de la aguja) hasta 5 (la posición izquierda de la aguja). La marca triangular entre el número 2 y el 3 marca la posición central.
4. SELECTOR DE PUNTADAS E INDICADOR
- Para seleccionar una puntada asegúrese de que la aquía esté fuera del tejido y en su posición más alta.
- Girar el selector hasta que la puntada requerida aparezca en el panel indicador.
5. CONTROL DEL LARGO DE PUNTADA Y PUNTADA SÚPER (ELASTICA)
El largo de puntada puede ser seleccionado fácilmente en función del tipo de material y su grosor. Se pueden seleccionar los modelos de puntadas super (elásticas) girando el mismo mando de control hasta la marca S, en donde se podrá hacer un ajuste más fino.
6. PALANCA DE RETROCESO
Al empezar o finalizar las costuras se recomienda realizar diversas puntadas con el retroceso (o marcha-atrás) para reforzar la costura. Mientras está accionada esta palanca, la máquina cose hacia atrás.

1. ADJUSTING TOP THREAD TENSION
Decrease or increase the tension of the top thread by using this control. The higher the number, the tighter the tension.
2. PRESSER FOOT LEVER
There are three positions for your presser foot.
1. Lower the presser foot to sew.
2. Raise the lever to the middle position to insert or remove fabric.
3. Lift it to its highest position to change the presser foot or to remove thick fabric.
3. STITCH WIDTH/NEEDLE POSITION DIAL
The width of all the stitches produced on this machine can be made narrower or wider by adjusting the stitch width control.
When sewing straight stitching, you can select various needle positions from 0 (right needle position) to 5 (left needle position) with the same control dial. The triangle marking between 2 and 3 shows the center position.
4. STITCH SELECTOR AND INDICATOR
- To select a stitch, be sure needle is out of fabric at its highest position.
- Then turn the selector until the required stitch is indicated on the indicator panel.
5. STITCH LENGTH/SUPER (STRETCH) STITCH DIAL
Stitch length can be selected easily according to thickness and type of fabric.
Super (stretch) stitch patterns can be selected by turning the same dial to S mark where fine adjustment can be made.
6. REVERSE STITCH LEVER
It is recommended to begin, or end seams with several stitches in reverse for reinforcement. As long as you are pressing down this lever while sewing, the machine will continue to feed the fabric backwards.
1. CONTROLADOR DA TENSÃO DA LINHA SUPERIOR
Aumentar ou diminuir a tensão da linha superior usando este controlador. Maior é o número, mais apertada é a tensão.
2. ALAVANCA PÉ PRENSA-TECIDOS
O seu prensa-tecidos tem três posições,
1. Descer o prensa-tecidos para coser,
2. Levantar a alavanca para a posição média para inserir ou mover o tecido.
3. Levantar à posição mais alta para mudar o prensatecidos ou para mover o material grosso.
3. SELECTOR LARGURA PONTO
A largura dos pontos que cosem nesta máquina pode ser trabalhada com pontos mais largos ou estreitos através do ajuste do controlo da largura de pontos.
Quando caserem os pontos rectos, pode-se escolher várias posições da agulha, de grau 0 (a posição da agulha direita) até 5 (a posição da agulha esquerda) com o mesmo controlo do mesmo lado. O sinal triangular entre o número 2 e o 3 serve para medir a posição central.
4. SELECTOR E INDICADOR DE PONTOS
- Para seleccionar um ponto verificar se a agulha está fora do tecido e na sua posição mais alta,
- Então rodar o selector até que o indicador apareça no ponto requerido.
5. MARCADOR COMPRIDO DE PONTO E PONTO SUPER (ELÁSTICO)
O comprimento do ponto pode ser seleccionado facilmente de acordo com o tipo de material e a sua grossura.
Ó grupo de pontos super (elásticos) podem ser seleccionados rodando o mesmo disco até à marca S onde se poderá fazer um ajuste mais fino.
6. ALAVANCA DO PONTO DE RETROCESSO
Ao começar ou finalizar as costuras recomenda-se realizar diversos pontos com o retrocesso para o reforço da costura. Enquanto se está a pressionar para baixo esta alavanca durante a costura, a máquina continuará a transportar para trás o tecido.
MANUAL DE INSTRUCCIONES • INSTRUCTION MANUAL • MANUAL DE INSTRUÇÕES

MANUAL DE INSTRUCCIONES • INSTRUCTION MANUAL • MANUAL DE INSTRUÇÕES

PREPARACIÓN DE LA MÁQUINA
Asegúrese de limpiar cualquier aceite sobrante del área de la plancha de aguja, antes de usar por primera vez la máquina.
CONTROL POR PEDAL
Conecte el enchufe del pedal a la toma de la máquina y a la toma de corriente de la pared tal como se ve en el dibujo.
INTERRUPTOR CORRIENTE/LUZ
La máquina no funcionará hasta que se conecte el interruptor de corriente/luz. El mismo interruptor controla la corriente y la luz. Cuando se está utilizando la máquina, o se están cambiando agujas o bombillas u otros elementos, la máquina se debe desconectar de la toma de corriente de la pared.

SETTING UP YOUR MACHINE
Be sure to wipe off any surplus oil from needle plate area before using your machine the first time.
FOOT CONTROL
Connect the plug of the foot control into the machine socket ^4 and your wall outlet ^35 as illustrated.
POWER/LIGHT SWITCH
Your machine will not operate until the power/light switch is turned on. The same switch controls both the power and the light.
When servicing the machine, or changing needles or lamps, etc., machine must be disconnected from the wall outlet.
PREPARAÇÃO DA MÁQUINA
Limpe qualquer óleo em excesso da área do ferro de agulha, antes de usar, pela primeira vez, a máquina.
CONTROLO POR PEDAL
Ligue o pedal à máquina(1) e a ficha à tomada de corrente (2) tal como se vê no desenho.
INTERRUPTOR CORRENTE/LUZ
A máquina não funcionará até se ligar o interruptor de corrente/luz.. O mesmo interruptor controla a corrente e a luz. Quando se está a utilizar a máquina, ou se estiverem a mudar agulhas ou bobinas, etc., a máquina deve ser desligada dos principais fornecimentos.
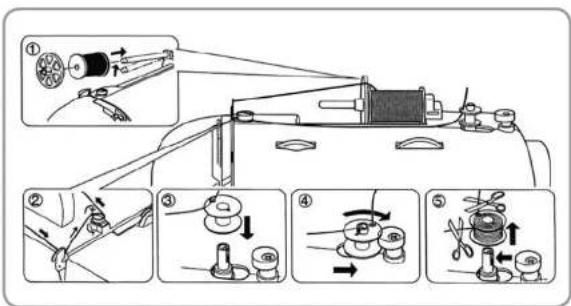
DEVANADO DE LA CANILLA
- Pivote el eje del carrete hacia su posición más horizontal y nase el bilo en el carrete de la anilla.
- Coloque un carrete de hilo en el portacarretes. Asegúrelo con la tapa portacarretes, para garantizar una salida suave del hilo.
- Pase el hilo desde el carrete, a través del guía hilo, tal como está mostrado.
- Pase el extremo del hilo, a través del agujero de la canilla, tal como está mostrado.
- Asegúrese de que el eje del devanador de la canilla está en su posición izquierda. Coloque la canilla en el eje, y saque el extremo del hilo la parte superior de la canilla .Empuje el eje del devanador hacia la derecha hasta que se oiga un clic. Sostenga el extremo del hilo.
- Ponga en marcha la máquina. El hilo que está retenido se soltará o puede cortarse con una tijera. La canilla cesará de girar cuando se haya llenado por completo. Empujar hacia la izquierda el eje para sacar la canilla.
WINDING BOBBIN
- Pivot spool pin into highest horizontal spool pin position.
- Pass a spool of thread on the spool pin. Secure to place a spool of thread on the pin. Secure it with the spool cap to ensure smooth flow of thread.
- Pass thread from spool through thread guides as shown.
- Pull end of thread through hole in bobbin as shown.
- Make sure the bobbin winder shaft is in left position.
Place bobbin onto shaft with end of thread coming from top of bobbin. Push bobbin winder shaft to right until it clicks. Hold onto end of thread. - Start machine. The thread that is held will snap or may be trimmed with a scissors. Bobbin will cease turning when completely filled. Push shaft to left to remove bobbin.
ENROLAMENTO DA BOBINA
- Rodar o carretel da anilha para o ponto mais alto da posição horizontal e passe a linha no carretel da anilha.
- Verifique se colocou um carrinho de linha no porta-carrinhos, Segurá-lo com a tampa porta-carrinhos, para garantir uma saída suave da linha.
- Passar a linha do carrinho, através do guia linhas, tal como é mostrado.
- Esticar o extremo da linha, através do buraco na bobina, tal como é mostrado,
- Verifique se o eixo do enrolador está na posição esquerda, coloque bem a bobina no eixo, e a linha sai pelo extremo da parte superior da bobina Empurre o eixo do enrolador para a direita até que se oica um golpe seco.
Segure bem o extremo da linha. - Ponha em funcionamento a máquina. A linha que está retida soltar-se-á. A bobina cessará de girar quando tiver enchido por completo. Empurre para a esquerda o eixo para retirar a bobina.
MANUAL DE INSTRUCCIONES • INSTRUCTION MANUAL • MANUAL DE INSTRUÇÕES

MANUAL DE INSTRUCCIONES • INSTRUCTION MANUAL • MANUAL DE INSTRUÇÕES

COLOCAR LA BOBINA
Levante la palanca del prensatelas.
1. Levante la aguja hasta su posición más alta girando el vlante hacia usted.
2. Abra la tapa de la canilla pulsando el botón de
anertura que hay a la derecha.
3. Coloque la bobina, asegurándose que gire en sentido contrario a las aquias del reloi.
4. Lleve el hilo por la abertura A y después hacia la izquierda, y deje entonces unos 15 cm. del hilo.
5. Vuelva a cerrar la tapa.

SETTING THE BOBBIN
Raise the presser foot.
1. Raise the needle to its highest position by rotating the handwheel towards you.
2. Remove the bobbin cover plate by pressing down on the lower left corner of the bobbin cover plate while pressing the latch to the right that holds the bobbin cover in place. (See fig. 2)
3. Insert the bobbin making sure the bobbin rotates counter clockwise with the thread off the top of bobbin to the left.
4. Pull thread through the slot ^AM and then to the left. Leave about 6 inches (15cm) of thread.
5. Replace the bobbin cover plate onto the needle plate.
COLOCAR A BOBINA
Levante a alavanca do prensa tecidos.
1. Levante a agulha até à sua posição mais elevada girando o volante para si
2. Abra a tampa da bobina premindo no botão de abertura que existe à direita
3. Coloque a bobina, verificando se gira em sentido contrário ao das agulhas do relógio.
4. Leve a linha pela abertura A e depois para a esquerda e deixe então uns 15 cm. de linha.
5. Volte a fechar a tampa.
MANUAL DE INSTRUCCIONES • INSTRUCTION MANUAL • MANUAL DE INSTRUÇÕES

MANUAL DE INSTRUCCIONES • INSTRUCTION MANUAL • MANUAL DE INSTRUÇÕES
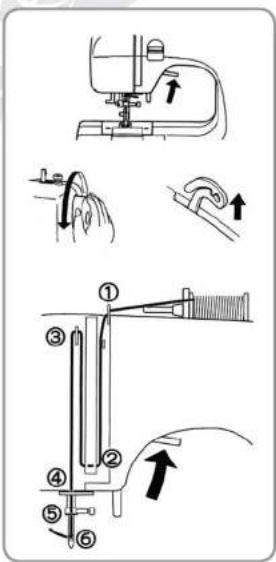
ENHEBRADO DEL HILO SUPERIOR
- Levante la palanca prensatelas.
- Levante la aguja a su posición más elevada girando elvalente de la máquina hasta vested
- Enhebre la máquina siguiendo el orden de la ilustración

THREADING THE TOP THREAD
- Raise the presser foot lever.
- Raise the needle to its highest position by rotating the hand wheel towards you.
- Thread the machine in the order as illustrated.
ENFIAMENTO DA LINHA SUPERIOR
- Levante a alavanca prensa-tecidos.
- Levante a agulha para a posição mais elevada
- Enfiar a máquina seguindo a ordem da ilustração,


EMPLEO DEL ENHEBRADOR AUTOMÁTICO DE LA AGUJA
Levante la aguja a su posición más elevada girando el volante de la máquina hacia usted.
- Baje la palanca y enganche el hilo en la guía como indica la ilustración. Siga empujando la palanca hasta que el extremo del hilo unido al garfio pase por el ojo de la aguja.
- Gule el hilo hacia el gancho y levántelo.
- Suelte la palanca y la aguja se enhebrará automáticamente. Coloque el bucle de hilo hacia la parte trasera de la máquina.
NOTA: Para conseguir un enhebrado correcto, se recomienda poner el selector de la máquina en puntada recta (posición central).
USING AUTOMATIC NEEDLE THREADER
Raise the needle to its highest position by rotating the hand wheel towards you.
- Pull down lever and ho'ok thread to thread guide as illustrated Continue to push lever until the hooked end passes through the needle eye.
- Guide thread into hooked end and pull it upward.
- Release the lever and needle will be threaded automatically. Pull loop of thread to back of machine.
NOTE: For smooth threading it is recommended to set the machine at straight stitching (middle position) when using needle threader.
USO DO ENFIADOR DA AGULHA
Levante a agulha para a posição mais elevada girando o volante da máquina para si
-
Descer a alavanca e enfie a linha no guia linha como indica a ilustração. Descer a alavanca segurando o extremo da linha.
-
Colocar a linha na forquilha de engate e esticá-lo para cima.
-
Suba a alavanca e a agulha passa auto-maticamente. Coloque a linha para o lado de trás da máquina.
Nota: Para conseguir um enfiamento correcto com o enfiador, recomenda-se colocar o selector da máquina em ponto recto (posição central).
natural_image
Mechanical assembly diagram showing a sewing machine needle inserted into a workpiece (no text or symbols visible)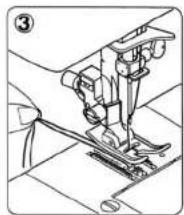
natural_image
Technical line drawing of a sewing machine needle and base mechanism (no text or symbols)RECOGIDA DEL HILO DE LA CANILLA
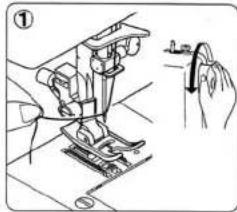
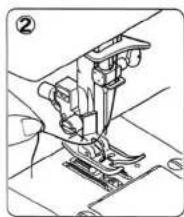
- Alzar la palanca del prensatelas. Manteniendo flojo el hilo de la aguja con la mano izquierda, girar hacia Vd. el volante con la mano derecha, hasta que la aguja alcance su posición más alta.
- Suavemente tire del hilo de la aguja. Esta habrá formado un lazo con el hilo de la canilla.
- Tirar de ambos hilos juntos hacia la parte de atrás de la máquina, por debajo del pie prensatelas, dejando alrededor de 15 cm. de hilo.
PICKING UP BOBBIN THREAD
- Raise the presser foot lever. Holding needle thread loosely with your left hand, turn hand wheel towards you one revolution with your right hand until the needle comes to its highest position.
- Lightly pull up on the needle thread. This will pull a loop of bobbin thread through the needle plate slot.
- Pull both top and bobbin threads together towards back of machine under the presser foot, leaving about 6 inches (15cm) clear
RECOLHA DA LINHA DA BOBINA
- Eleve a alavanca do pé prensa-tecidos. Mantendo frouxa a linha da agulha com a mão esquerda, gire para si o volante com a mão direita, até que a agulha alcance a sua posição mais alta.
- Suavemente puxe do fio da linha da agulha, este fio forma uma urdidura com a linha da bobina.
- Puxar de ambas as linhas juntas, para trás da máquina, por baixo do pé prensa-tecidos, deixando perto de 15 cm. de linha.
MANUAL DE INSTRUCCIONES • INSTRUCTION MANUAL • MANUAL DE INSTRUÇÕES

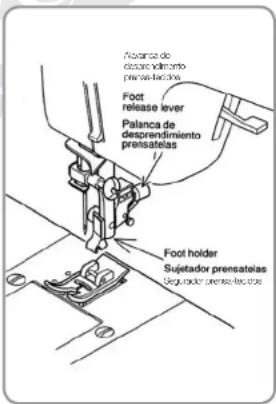
CAMBIO DEL PRENSATELAS
Asegúrese de que la aguja está en su posición más alta.
- Levante la palanca del prensatelas y suba la palanca para soltar el prensatelas.
- Coloque el prensatelas deseado debajo de la porta- prensatelas, de forma que el alfiler del prensatelas quede alineando con la abertura del soporte del prensatelas.
- Baje la palanca de prensatelas, de manera que el porta-prensatelas se enganche en el prensatelas

MANUAL DE INSTRUCCIONES • INSTRUCTION MANUAL • MANUAL DE INSTRUÇÕES
CHANGING PRESSER FEET
Make sure the needle is in the highest position.
- Raise the presser foot lever. Press foot release lever to remove foot.
- Place presser foot below presser foot holder so that the presser foot pin is aligned with the slit in the presser foot holder.
- Lower the presser foot so that the presser foot holder snaps onto the foot.
MUDANÇA DO PRENSA-TECIDOS DE UMA MÁQUINA DE COSER
Verifique se a agulha, esta na posição superior. Eleve a alavanca do prensa-tecidos
- Elevar a alavanca de desprendimento de prensatecidos para a retirar.
- Coloque o prensa-tecidos desejado debaixo da porta-prensa-tecidos (o ferro das agulhas), alinhando com a abertura de agulha do porta-prensa-tecidos.
- Descer a alavanca do prensa-tecidos, de forma que o porta-prensa-tecidos feche de repente no prensa-tecidos.

-
SEÑALIZADOR

-
CONTROL LONGITUD
-
SELECTOR ANCHO PUNTAD

-
PIE PRENSATELAS


R.
Prancatielas para la
costura de bolones


G.
Placca rammendo
| PUNTADA | 1.SEÑALIZADOR | 2.CONTROLLONGITUD | 3.SELECTORANGIDEPUNTADA | 4.PIERENUELAS | ||||
| L,R | A,B | |||||||
| RECTA | ---- | A | ↓ | 1-4 | 1-5 | B | ||
| ZIG-ZAG | ---- | B | ↓ | 0.5-4 | ||||
| INVISIBLE | VVVVVV | C | ↓ | 1-4 | ||||
| VVVVVVVVVVVVVVVVVVVVVVVVVVVVVVVVVVVVVVVVVVVVVVVVVVVVVVVVVVVVVVVVVVVVVVVVVVVVVVVVVVVVVVVVVVVVVVVVVVVVVVVVVVVVVVVVVVVVVVVVVVVVVVVVVVVVVVVVVVVVVVVVVVVVVVVVVVVVVVVVVVVVVVVVVVVVVVVVVVVVVVVVVVVVVVVVVVVVVVVVV | F | ↓ | ||||||
| LENCERIA | VVVVVVVVVVVVVVVVVVVVVVVVVVVVVVVVVVVVVVVVVVVVVVVVVVVVVVVVVVVVVVVVVVVVVVVVVVVVVVVVVVVVVVVVVVVVVVVVVVVVVVVVVVVVVVVVVVVVVVVVVVVVVVVVVVVVVVVVVVVVVVVVVVVVVVVVVVVVVVVVVVVVVVVVVVVVVVVVVVVVVVVVVVVVVVVVVVVVV | |||||||
| ZIG ZAG TRES PUNTADAS | VVVVVVVVVVVVVVVVVVVVVVVVVVVVVVVVVVVVVVVVVVVVVVVVVVVVVVVVVVVVVVVVVVVVVVVVVVVVVVVVVVVVVVVVVVVVVVVVVVVVVVVVVVVVVVVVVVVVVVVVVVVVVVVVVVVVVVVVVVVVVVVVVVVVVVVVVVVVVVVVVVVVVVVVVVVVVVVVVVVVVVVVVVVVVVVVVVVVWWVVVVVVVVVVVVVVVVVVVVVVVVVVVVVVVVVVVVVVVVVVVVVVVVVVVVVVVVVVVVVVVVVVVVVVVVVVVVVVVVVVVVVVVVVVVVVVVVVVVVVVVVVVVVVVVVVVVVVVVVVVVVVVVVVVVVVVVVVVVVVVVVVVVVVVVVVVVVVVVVVVVVVVVVVVVVVVVVVVVVVVVVVVVVVVVVVVVVVVWWV | |||||||
| DOBLE ACCION | VVVVVVVVVVVVVVVVVVVVVVVVVVVVVVVVVVVVVVVVVVVVVVVVVVVVVVVVVVVVVVVVVVVVVVVVVVVVVVVVVVVVVVVVVVVVVVVVVVVVVVVVVVVVVVVVVVVVVVVVVVVVVVVVVVVVVVVVVVVVVVVVVVVVVVVVVVVVVVVVVVVVVVVVVVVVVVVVVVVVVVVVVVVVVVVVVVVVWWW | |||||||
| FAGOTING | VVVVVVVVVVVVVVVVVVVVVVVVVVVVVVVVVVVVVVVVVVVVVVVVVVVVVVVVVVVVVVVVVVVVVVVVVVVVVVVVVVVVVVVVVVVVVVVVVVVVVVVVVVVVVVVVVVVVVVVVVVVVVVVVVVVVVVVVVVVVVVVVVVVVVVVVVVVVVVVVVVVVVVVVVVVVVVVVVVVVVVVVVVVVVVVVVVVVW | |||||||
| PUNTADA TRIPLE | ---- | A | ↓ | S | C | A,B | ||
| WWWWWWWWWWWWWWWWWWWWWWWWWWWWWWWWWWWWWWWWWWWWWWWWWWWWWWWWWWWWWWWWWWWWWWWWWWWWWWWWWWWWWWWWWWWWWWWWWWWWWWWWWWWWWWWWWWWWWWWWWWWWWWWWWWWWWWWWWWWWWWWWWWWWWWWWWWWWWWWWWWWWWWWWWWWWWWWWWWWWWWWWWWWWWWWWWWWWWWWWWWW | L,R | B | ||||||
| ZIG-ZAG | WWWWWWWWWWWWWWWWWWWWWWWWWWWWWWWWWWWWWWWWWWWWWWWWWWWWWWWWWWWWWWWWWWWWWWWWWWWWWWWWWWWWWWWWWWWWWWWWWWWWWWWWWWWWWWWWWWWWWWWWWWWWWWWWWWWWWWWWWWWWWWWWWWWWWWWWWWWWWWWWWWWWWWWWWWWWWWWWWWWWWWWWWWWWWWWWWWWWWWWWWWWWWWWWWWWWWWWWWWWWWWWWWWWWWWWWWWWWWWWWWWWWWWWWWWWWWWWWWWWWWWWWWWWWWWWWWWWWWWWWWWWWWWWWWWWWWWWWWWWWWWWWWWWWWWWWWWWWWWWWWWWWWWWWWWWWWWWWWWWWWWWWWWWWWWWWWWWWWWWWWWWWWWWWWWWWWWWWWWWWWWWWWWWWWWWWWWWWWWWWWWWWWWWWWWWWWWWWWWWWWWWWWWWWWWWWWWWWWWWWWWWWWWWWWWWWWWWWWWWWWWWWWWWWWWWWWWWWWWWWWWWWWWWWWWWWWWWWWWWWWWWWWWWWWWWWWWWWWWWWWWWWWWWWWWWWWWWWWWWWWWWWWWWWWWWWWWWWWWWWWWWWWWWWWWWWWWWWWWWWWWWWWWWWWWWWWWWWWWWWWWWWWWWWWWWWWWWWWWWWWWWWWWWWWWWWWWWWWWWWWWWWWWWWWWWWWWWWWWWWWWWWWWWWWWWWWWWWWWWWWWWWWWWWWWWWWWWWWWWWWWWWWWWWWWWWWWWWWWWWWWWWWWWWWWWWWWWWWWWWWWWWWWWWWWWWWWWWWWWWWWWWWWWWWWWWWWWWWWWWWWWWWWWWWWWWwwwwwwwwwwwwwwwwwwwwwwwwwwwwwwwwwwwwwwwwwwwwwwwwwwwwwwwwwwwwwwwwwwwwwwwwwwwwwwwwwwwwwwwwwwwwwwwwwwwwwwwwwwwwwwwwwwwwwwwwwwwwwwwwwwwwwwwwwwwwwwwwwwwwwwwwwwwwwwwwwwwwwwwwwwwwwwwwwwwwwwwwwwwwwwwwwwwwwwwwwwwwwwwwwwwwwwwwwwwwwwwwwwwwwwwwwwwwwwwwwwwwwwwwwwwwwwwwwwwwwwwwwwwwwwwwwwwwwwwwwwwwwwwwwwwwwwwwwwwwwwwwwwwwwwwwwwwwwwwwwwwwwwwwwwwwwwwwwwwwwwwwwwwwwwwwwwwwwwwwwwwwwwwwwwwwwwwwwwwwwwwwwwwwwwwwwwwwwwwwwwwwwwwwwwwwwwwwwwwwwwwwwwwwwwwwwwwwwwwwwwwwwwwwwwwwwwwwwwwwwwwwwwwwwwwwwwwwwwwwwwwwwwwwwwwwwwwwwwwwwwwwwwwwwwwwwwwwwwwwwwwwwwwwwwwwwwwwwwwwwwwwwwwwwwwwwwwwwwwwwwwwwwwwwwwwwwwwwwwwwwwwwwwwwwwwwwwwwwwwwwwwwhwwwwwwwwwwwwwwwwwwwwwwwwwwwwwwwwwwwwwwwwwwwwwwwwwwwwwwwwwwwwwwwwwwwwwwwwwwwwwwwwwwwwwwwwwwwwwwwwwwwwwwwwwwwwwwwwwwwwwwwwwwwwwwwwwwwwwwwwwwwwwwwwwwwwwwwwwwwwwwwwwwwwwwwwwwwwwwwwwwwwwwwwwwwwwwwwwwwwwwwhwwwwwwwwwwwwwwwwwwwwwwwwwwwwwwwwwwwwwwwwwwwwwwwwwwwwwwwwwwwwwwwwwwwwwwwwwwwwwwwwwwwwwwwwwwwwwwwwwwwwwwwwwwwwwwwwwwwwwwwwwwwwwwwwwwwwwwwwwwwwwwwwwwwwwwwwwwwwwwwwwwwwwwwwwwwwwwwwwwwwwwwwwwwwwwwwwwwwwwwwwwwwwwwwwwwwwwwwwwwwwwwwwwwwwwwwwwwwwwwwwwwwwwwwwwwwwwwwwwwwwwwwwwwwwwwwwwwwwwwwwwwwwwwwwwwwwwwwwwwwwwwwwwwwwwwwwwwwwwwwwwwwwwwwwwwwwwwwwwwwwwwwwwwwwwwwwwwwwwwwwwwwwwwwwwwwwwwwwwwwwwwwwwwwwwwwwwwwwwwvwwwwwwwwwwwwwwwwwwwwwwwwwwwwwwwwwwwwwwwwwwwwwwwwwwwwwwwwwwwwwwwwwwwwwwwwwwwwwwwwwwwwwwwwwwwwwwwwwwwwwwwwwwwwwwwwwwwwwwwwwwwwwwwwwwwwwwwwwwwwwwwwwwwwwwwwwwwwwwwwwwwwwwwwwwwwwwwwwwwwwwwwwwwwwwwwwwwwwwwwWWWWWWWWWWWWWWWWWWWWWWWWWWWWWWWWWWWWWWWWWWWWWWWWWWWWWWWWWWWWWWWWWWWWWWWWWWWWWWWWWWWWWWWWWWWWWWWWWWWWWWWWWWWWWWWWWWWWWWWWWWWWWWWWWWWWWWWWWWWWWWWWWWWWWWWWWWWWWWWWWWWWWWWWWWWWWWWWWWWWWWWWWWWWWWWWWWWWWWW | |||||||
MACHINE SETTING CHARTESQUEMA DE AJUSTE DE LA MAQUINA
-
STITCH INDICATOR

-
LENGTH DIAL

-
STITCH WIDTH DIAL

-
PRESSER FOOT


Buttonhole foot

Zipper foot

F.
Button sewing foot

G.
Feed cover
| STITCH | 1.STITCH INDICATOR | 2.LENGTH DIAL | 3.STITCH WIDTH DIAL | 4.PRESSER FOOT | |
| STRAIGHT | ——— | A | 1-4 | C | A,B |
| L,R | B | ||||
| ZGZAG | ~~~~~~~ | B | 0.5-4 | 1-5 | B |
| BJND | YYYYYY | C | 1-4 | ||
| WWWWWW | F | ||||
| SHELL | ~~~~~~ | D | |||
| MULTI-STITCH ZGZAG | ~~~~~~~ | E | |||
| DOUBLE ACTION | VVVVVV | G | |||
| FAGGOTING | ~~~~~~~ | H | |||
| TRIPLE STRAIGHT | ——— | A | $ | C | A,B |
| L,R | B | ||||
| RIC-RAC | WWWWW | B | 1-5 | B | |
| STRETCH OVERLOCK | ~~~~~~~ | C | B,C | ||
| OVERLOCK | ~~~~~~~ | D | |||
| HONEYCOMB | ~~~~~~~ | E | B | ||
| ELASTIC OVERLOCK | ~~~~~~~ | F | |||
| DOUBLE OVERLOCK | ~~~~~~~ | G | B,C | ||
| HERRINGBONE | ~~~~~~~ | H | B | ||
| BUTTONHOLE | ——— | 1 | 3-5D | ||
| INSERTING ZIPPERS | ——— | A | 1-4 | C | E |
| BUTTON SEWING | ●● | B | 0 | 1-5 | F |
ESQUEMA DE AJUSTE DA MÁQUINA

| PONTO | 1. SMALLIZADOR | 2. CONTROLO CONTINUENTE | 3. SELECTOR LARGURA PONTO | 4. PC PRÉMIA TEIXAS | |
| RETO | ——— | A | 1 - 4 | C | A, B |
| L, R | B | ||||
| ZIG-ZAG | ——— | B | 0.5 - 4 | 1 - 5 | B |
| INSIVEL | YYYYYY | C | 1 - 4 | ||
| YYYYWW | F | ||||
| UNCERE | YYYYW | D | |||
| ZIG-ZAG TRÊS PONTOS | YYYYWW | E | |||
| DUPLA ACOÃO | YYYYWW | G | |||
| FAGOTING | YYYYWW | H | |||
| PONTO TRÍPLC | ——— | A | $ | C | A, B |
| L, R | B | ||||
| ZIG-ZAG | YYYYWW | B | 1 - 5 | B | |
| OVERLOCK ELASTICO | XXXXXXX | C | B, C | ||
| OVERLOCK | YYYYWW | D | |||
| CRUZADO EM ZIG-ZAG | XXXXXX | E | B | ||
| OVERLOCK ELASTICO | XXXXXX | F | |||
| OVERLOCK DÚBLIO | XXXXXXX | G | B, C | ||
| ESPULA | XXXXXX | H | B | ||
| CASAS | ——— | 1 | <1 | 3 - 5 | D |
| INSERCAO DE RECHOS SOLAR | ——— | A | 1 - 4 | C | E |
| COSTURA DE SOXISI | ●● | B | 0 | 1 - 5 | F |

PUNTADA RECTA
La puntada recta se usa frecuentemente para cualquier aspecto de la costura. Aprenda el uso correcto de su máquina siguiendo los pasos que se detallan a continuación:
1. CONFIGURACIÓN
Indicador de puntadas -A
Longitud del punto - 2 - 3
Ancho puntada-▼ (2-3)
Tensión del hilo
Levante la palanca de tira-hilos a la posición más
alta girando el volante hacia Ud.
A- Palanca de tira-hilos
B- Marcador de tensión del hilo superior
C- Controlador de ancho de punto
D- Indicador de puntada
E- Selector de puntadas
F-Volante
G- Control longitud puntada
H- Interruptor corriente/luz
I- Palanca puntada de retroceso
J- Palanca elevadora del prensatelas
- Pase ambos hilos por debajo del prensatelas hacia la
parte trasera de la máquina.
- Coloque la tela debajo del prensatelas y baje la
palanca del prensatelas.
- Gire el volante hacia Ud, hasta que la agua entre en
la tela
- a. Empiece a coser.
b. Guje la tela suavemente con la mano.
c. Cuando llegue al borde de la tela, pare la máquina.
a. Girar el volante para levantar la agua.
b. Levante el prensatelas empujando la palanca
hacia arriba.
c. Use el cortador de hilo que está cerca del
prensatelas para cortar el hilo que sobra.
. Tire de ambos hilos hacia abajo y hacia atrás del
prensatelas, deiando 10 cm de hilo.

Aguja posicionada para hacer una puntada recta
- Para hacer una puntada recta con la aguja posicionada a la izquierda, colocar hacia abajo la
- Para hacer una puntada recta con la aguja posicionada en el centro, colocar el selector de puntada en »▼«.
Para hacer una puntada recta con la aguja posicionada a la derecha, colocar hacia abajo la palanca de bloqueo o el selector de puntada en "O".

STRAIGHT STITCHES
Straight stitch is most frequently used for every aspect of sewing. Learn the correct method of your machine following the steps below.
1. SETTINGS
Stitch indicator - A
Stitch length -2-3
Stitch width- ▼ (2-3)
Thread tension - 3
Raise the take-up lever to its highest position by turning the hand wheel toward you.
A-Take-up level
B-Tension dial
C- Stitch width/needle position dial
D- Stitch indicator
E-Stitch selector
F-Hand wheel
G- Stitch length dial
H- Power/light switch
I- Reverse stitch lever
1- Presser font lever
-
Pull both threads under the presser foot toward the back of the machine.
-
Place the fabric under the presser foot and lower the presser foot lever.
-
Turn the hand wheel toward you until the needle enters the fabric.
-
a. Start to sew stepping on the foot control.
b. Guide the fabric gently with your hand.
c. When you reach the end of the fabric, stop the
machine by releasing the foot control.
- a. Turn the hand wheel toraise the needle.
b. Raise the presser foot by pushing the lever up
c. Use the thread cutter above the presser foot to cut off excess threads.
d. Pull both threads under and to the back of the presser foot, leaving 4 inches (10 cm) clear.
Needle position for straight stitching
- Straight stitch at left needle position with needle position dial at "5".
- Straight stitch at middle needle position with needle position dial set at ▼
- Straight stitch at right needle position with needle position dial at "0".
PONTO RECTO
Ponto recto é usado mais frequentemente para coser qualquer coisa. Aprenda o uso correcto da sua máquina.
1. 1. FIXAÇÃO
Indicador de puntos -A
Comprimento do ponto -2-3
Largura do ponto- ▼ (2-3)
Tensão da linha-3
Levantar a alavanca de puxa-linhas para a posição mais alta girando o volante para si.
A- Alavanca de puxa-linhas
B- Marcador de tensão da linha superior
C- Controlador de larqura de ponto
D- Indicador de ponto
E- Selector de pontos
F-Volante
G- Controlo comprimento ponto
H-Interruptor corrente/luz
I- Alavanca ponto de retrocesso
I- Alavanca né prensa-tecidos
-
Puxar ambas as linhas por baixo do prensa-tecidos para a parte traseira da máquina
-
Colocar o tecido debaixo do prensa-tecidos e descer a alavanca do prensa-tecidos.
-
Girar o volante para si até que a agulha entre no material.
5. Comece a coser
a.Guiar o material suavemente com a mão.
b.Quando chegar ao bordo do material, parar a máquina.
- a. Girar o volante para levantar a agulha.
b. Levantar o prensa-tecidos empurrando a alavanca para cima.
c. Usar o cortador da linha que está perto do prensatecidos para cortar a linha de excesso,
d.Puxar ambas as linhas para baixo e para o lado posterior do prensa-tecidos deixando 10 cm.
Agulha posicionada para fazer um ponto recto
- Para fazer um ponto recto com a agulha posicionada à esquerda, colocar para baixo a alavanca d bloqueio ou o selector de ponto em "5".
- Para fazer um ponto recto com a agulha posicionada no centro, colocar o selector de ponto em ▼
- Para fazer um ponto recto com a agulha posicionada à direita, colocar para baixo a alavanca de bloqueio ou o selector de ponto em "0".
MANUAL DE INSTRUCCIONES • INSTRUCTION MANUAL • MANUAL DE INSTRUÇÕES

MANUAL DE INSTRUCCIONES • INSTRUCTION MANUAL • MANUAL DE INSTRUÇÕES
CÓMO FUAR LA COSTURA
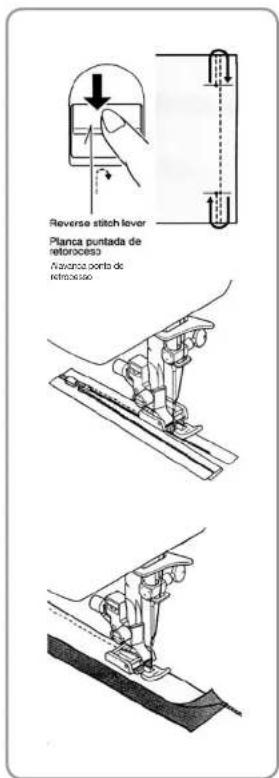
Asegure la costura dando los primeros pocos puntos hacia atrás. Después, cosa hacia adelante. Al finalizar las costuras, cosa también unas puntadas hacia atrás. Para coser hacia atrás, baje la palanca de retroceso
INSERCIÓN DE CREMALLERAS
Para coser el lado derecho, enganche el lado izquierdo del prensatelas de cremalleras al soporte del pie prensatelas, de manera que la agua pase a través de la abertura del lado izquierdo del prensatelas. Para coser el lado izquierdo, enganche el lado derecho del prensatelas al soporte del prensatelas.
RIBETES
Para ribetear tejidos de decoración, cubra el cordón con una cinta de tejido al bies y sujétela con un alfiler. Enganche el lado derecho del prensatelas de cremalleras al soporte del prensatelas, de manera que la agua pase a través de la abertura en el lado derecho del prensatelas.

SECURING SEAMS
Secure your seams by taking the first few stitches in reverse. Then allow the machine to go forward. This is called back tacking. Reverse the machine at the end of your seams as well.
Lower the reverse lever for back tacking.
INSERTING ZIPPERS
To sew down the right side, attach left side of zipper foot to presser foot holder so that the needle passes through the opening on the left side of the foot. To sew down the left side, attach right side of foot to foot holder.
PIPING
To pipe soft furnishings, cover cord with a bias strip of fabric and pin or tack it to the main piece of fabric. Attach right side of zipper foot to foot holder so that needle passes through the opening on the right side of the foot.
COMO FIXAR A COSTURA
Segurar a costura tomando os primeiros poucos pontos para trás. Depois, coser adiante. No bordo do material, coser para trás um pouco.
Descer a alavanca ponto de retrocesso para coser para
INSERÇÃO DE FECHOS ECLAIR
Para coser o lado direito, aplicar o lado esquerdo do prensa-tecidos de fechos ao segura-pé prensa-tecidos, de forma que a agulha passe através da abertura no lado esquerdo do prensa-tecidos.
Para coser o lado esquerdo, aplicar o lado direito do prensa-tecidos ao segura-prensa-tecidos.
FAZER "VIVOS"
Para fazer "vivos" em artigos moles, cobrir o cordão com uma cinta de tecido em viés e segurá-la com um alfinete ou até-la à peça principal de tecido.
Aplicar o lado direito do prensa-tecidos de fechos ao segura prensa-tecidos, de forma que a agulha passe através da abertura no lado direito do prensa-tecidos.

MANUAL DE INSTRUCCIONES • INSTRUCTION MANUAL • MANUAL DE INSTRUÇÕES

MANUAL DE INSTRUCCIONES • INSTRUCTION MANUAL • MANUAL DE INSTRUÇÕES

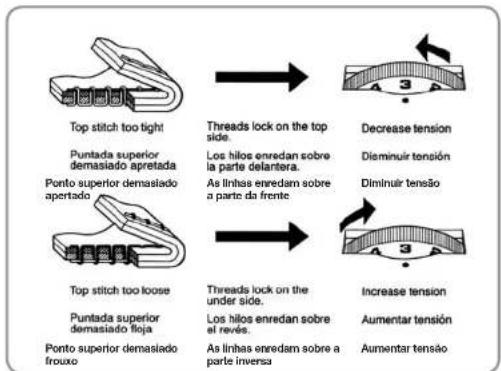
AJUSTE DE LA TENSIÓN DEL HILO SUPERIOR
El buen aspecto de la costura generalmente viene determinado por la tensión equilibrada de ambos hilos, superior e inferior. La tensión está bien equilibrada cuando ambos hilos "se cierran" en la mitad de la capa de la tela que se está cosiendo.

ADJUSTING STRAIGHT STITCH THREAD TENSION
The good looking appearance of your stitching is largely determined by the balanced tension of both top and bobbin threads. The tension is well balanced when these two threads 'lock' in the middle of layers of fabric you are sewing.
AJUSTE DA TENSÃO DA LINHA SUPERIOR
O bom aspecto da costura geralmente é determinado pela tensão equilibrada de ambas as linhas superior e inferior
flowchart
graph LR
    A["Top stitch too tight"] --> B["Puntada superior demasiado apertada"]
    B --> C["Ponto superior demasiado apertado"]
    C --> D["Top stitch too loose"]
    D --> E["Puntada superior demasiado flüja"]
    E --> F["Ponto superior demasiado fruxo"]

    A --> G["Threads lock on the top side."]
    B --> H["Los hilos enredan sobre la parte delantera."]
    C --> I["As linhas enredam sobre a parte da frente"]

    G --> J["Decrease tension"]
    H --> K["Diminuir tensión"]
    I --> L["Diminuir tensão"]

    D --> M["Threads lock on the under side."]
    E --> N["Los hilos enredan sobre el revés."]
    F --> O["As linhas enredam sobre a parte inversa"]

    M --> P["Aumentar tensión"]
    N --> Q["Aumentar tensão"]
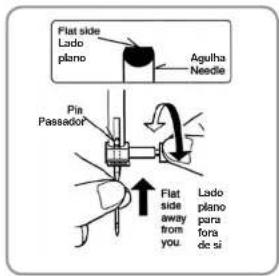
TABLA DE HILO, AGUJA Y TELA
Su tela determinará la selección de la aguja y el hilo. Esta tabla es una guía práctica para la selección de aguja y hilo. Antes de coser una tela nueva haga referencia a ella. Use siempre el mismo tipo y tamaño de hilo inferior e hilo superior.
Cambio de la aguja
- Levante la aguja a su posición más alta girando el volante hacia Ud.
- Afloje el tornillo que sujeta la aguja girándolo hacia Ud.
- Quite la agua sacándola hacia abajo.
- Inserte la aguja nueva en la brida porta-aguja con el lado plano hacia la parte posterior.
- Empuje la aguja lo más amiba posible.
- Apriete el tornillo firmemente con el destornillador.
NEEDLE, THREAD AND FABRIC CHART
Your fabric will determine the choice of a needle and thread. The following table is a practical guide to needle and thread selection. Always refer to it before a new sewing project. And be sure to use the same size and type of thread in the bobbin as in the top thread supply.
Changing the needle
- Raise the needle bar to its highest position by turning the hand wheel toward you.
- Loosen the needle clamp screw by turning it toward you.
- Remove the needle by pulling it downward.
- Insert the new needle into the needle clamp with the flat side away from you.
- Push the needle up as far as it can go.
- Tighten the needle clamp screw firmly with the screw driver.
TABELA DE LINHA, AGULHA E MATERIAIS
O seu material determinará a seleção de agulha e linha. Esta tabela é guia prática para a seleção de agulha e linha. Referi-lo sempre antes de coser o material novo. Usar a linha inferior do mesmo tamanho e tipo com a linha superior.
Mudança de agulho
- Levantar a barra da agulha para a posição mais alta girando o volante para si.
- Afrouxar o parafuso que segura a agulha girando-o para si
- Retirar a aquilha retirando-a para baixo.
- Inserir a agulha nova na brida porta-agulha com o lado plano para a parte posterior.
- Empurrar a agulha o mais acima possível.
- Apertar o parafuso firmemente com a chave de fendas.

natural_image
Abstract floral-like pattern with six symmetrical petals (no text or symbols)
bar
* No usar sobre el material estirado.
| FABRICS | THREAD | NEEDLES | |
| The fabrics below can be of any fiber: cotton, Iran, silk, wool, synthetic, rayon, brands. They are listed as examples of weight. | SIZE | ||
| Light-Weight | Batiste | Cotton-wrapped | 12/80 |
| Chilton | Polyester | ||
| Crepe | 100% Polyester | ||
| * Mercerized Size 60 | |||
| Medium-Weight | Corduroy | Cotton-wrapped | 14/90 |
| Flannal | Polyester | ||
| Gabardine | 100% Polyester | ||
| Gingham | * Mercerized Size 50 Nylon | ||
| Linen | |||
| Muslim | |||
| Wool Crepe | |||
| Medium-Heavy | Bonded Wovens | Cotton-wrapped | 16/100 |
| Cannes | Polyester | ||
| Coating | 100% Polyester | ||
| Damm | * Mercerized Size 40 | ||
| Duck | * Heavy Duty* | ||
| Salidoth | |||
| Knits | Bonded Knits | Cotton-wrapped | Ball point |
| Double Knit | Polyester | 12/80+14/50 | |
| Jersey | Polyester | ||
| Tricot | Nylon | ||
* Do not use on stretch fabrics.

bar
MATERIAL LINHA AGULHAS | Category | Value | |---|---| | Peso Equino | 12/90 | | Peso media | 14/90 | | Mito posedo | 16/100 | | pontos | 12/90 + 14/90 |não-use: sobre o material artizado
MANUAL DE INSTRUCCIONES • INSTRUCTION MANUAL • MANUAL DE INSTRUÇÕES

MANUAL DE INSTRUCCIONES • INSTRUCTION MANUAL • MANUAL DE INSTRUÇÕES


PUNTO DE ZIGZAG
PUNTADA DE RELLENO
Esta es una puntada atractiva compactamente espaciada, usada para encajes, hilvanados, etc.. Para la puntada de relleno afloje ligeramente la tensión del hilo superior. Para evitar el armugado en telas finas, utilice en el revés un papel tejido o entretela.
ZIGZAG STITCHING
This is a closely spaced attractive stitch used for applique, bar-tacking, etc. Slightly loosen top thread tension for satin stitching.
Use a backing of tissue paper or interfacing for the sheer materials to avoid puckering.
PONTO DE ZIG-ZAG
PONTO DE ENCHIMENTO
Este é um ponto atractivo compactamente espaçado, usado para aplicações, atacados. etc..
Para o ponto de enchimento anotar a tensão da linha superior. Para evitar o enrugamento em materiais finos, utilizar no interior um papel tecido ou entretela.
Dependiendo del hilo, tela, y velocidad de costura, el hilo superior puede aparecer en la parte trasera, pero el hilo inferior (el de la canilla) nunca debe aparecer en parte delantera de la tela.
The top thread may appear on the under side depending on the thread, fabric and sewing speed, but the bobbin thread must never appear on the top of the fabric.
A linha superior pode aparecer sobre a parte da frente depende da linha, material e velocidade do cosido, mas a linha inferior nunca tem de aparecer sobre a parte da frente.
PUNTADA INVISIBLE
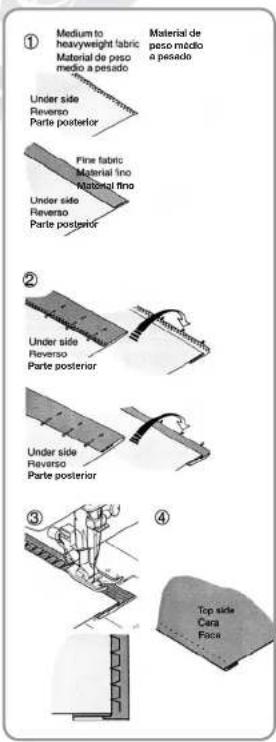
- rimero termine el borde. Para ello, dóblelo sobre telas finas, o haga un sobrehilado en telas más gruesas. Entonces doble el dobladillo en la deseada profundidad y sujételo con un alfiler.
- Doblar la tela como se indica.
c ≤ Puntada invisible regular para telas normales
Puntada invisible elástica para telas delicadas, elásticas,...
3. Coloque la tela bajo el prensatelas con el doblez de la tela colocado de forma que la aguja traspase el doblez cuando la aguja oscila a la izquierda. Utilice el control de ancho de puntada para afinar la posición exacta de la aguja.
4. Una vez terminado, los puntos son casi invisibles en el lado derecho de la tela.
BLIND STITCH
- First finish the raw edge. Do this by turning it under on fine fabrics and overcasting it on medium to heavyweight ones. Then turn the hem up the required depth, press and pin in place.
- Now fold the fabric as illustrated.
c ≤ Regular blind stitch for normal fabrics
F 3 Elastic blind stitch for soft, stretchable fabrics - Place the fabric under the foot with the fold of the fabric positioned so that the needle just pierces the fold when the needle swings to the left. Use stitch width control to fine tune exact position of needle.
- When completed, the stitching is almost invisible on the right side of the fabric.
PONTO INVISÍVEL
- Primeiro terminar o bordo. Para isso, dobrá-lo sobre o material fino e fazer uma margem sobre o material de peso médio pesado. Então dobrá-lo segundo a profundidade e pressão necessárias.
- Agora dobrar o material como é ilustrado.
c ≤ Ponto invisível regular para os tecidos normais
F 2 Ponto invisível super elástico para os tecidos suaves, elástico
3. Colocar o material debaixo do prensa-tecidos para que a agulha justamente trespassa a dobra quando a agulha oscila à esquerda.
4. Depois de terminado, os pontos são quase invisíveis sobre o lado direito do material.
MANUAL DE INSTRUCCIONES • INSTRUCTION MANUAL • MANUAL DE INSTRUÇÕES

MANUAL DE INSTRUCCIONES • INSTRUCTION MANUAL • MANUAL DE INSTRUÇÕES

natural_image
Simple line drawing of a rectangular object with a vertical chain of circular elements on top (no text or symbols)PUNTADA DE LENCERÍA
La puntada de lencería se utiliza para coser y sobrehilar en una operación tejidos finos y suaves. También produce un dobladillo delicado en lencería y otras prendas finas.
COSTURA Y SOBREHILADO EN UNO
Coloque los derechos de los tejidos juntos y póngalos debajo del prensatelas, de manera que la parte del zigzag de la puntada cosa justo sobre el borde del tejido.
DOBLADILLO DE CONCHA
Gire hacia abajo el horde del tejido y presionar. Colaque el derecho del tejido arriba, de manera que la parte del zigzag de la puntada cosa sobre el borde doblado, estirando el tejido y formando un dobladillo de concha. Recorte el tejido sobrante cerca de la línea de puntadas.

SHELL STITCH
Shell stitch is for seaming and overcasting sheer, soft fabrics in one operation. It also produces a delicate shell hem on lingerie and other fine garments.
SEAM AND OVERCAST IN ONE
Place the right sides of the fabric together and position under the presser foot so that the zig-zag part of the stitch sews just over the raw edge.
SHELL TUCKS
Turn under the raw edge and press. Place the fabric right side up so that the zigzag part of the stitch sews just over the folded edge, pulling the fabric in to form a shell hem. Trim away excess fabric close to the stitching line.
PONTO DE LINGERIE
O ponto de lingerie é para coser e coser pela arla para não esfiapar numa operação em tecidos finos e suaves. Também produz uma bainha de concha delicada em roupa interior e outras peças finas.
COSTURA E COSTURA PELA ORLA PARA NÃO ESFIAPAR EM UM
Colocar os direitos do tecido juntos e posicionar debaixo do prensa-tecidos de forma que a parte do zig-zag do ponto cosa sobre o bordo do tecido.
BAINHA DE CONCHA
Girar para baixo o bordo do tecido e passar a ferro. Colocar o direito do tecido para cima, de forma que a parte do zig-zag do ponto cosa sobre o bordo dobrado, esticando o tecido e formando uma bainha de concha. Recortar o tecido excedente perto da linha de pontos.
MANUAL DE INSTRUCCIONES • INSTRUCTION MANUAL • MANUAL DE INSTRUÇÕES


natural_image
Technical line drawings of mechanical components and a schematic diagram (no text or symbols)
MANUAL DE INSTRUCCIONES • INSTRUCTION MANUAL • MANUAL DE INSTRUÇÕES
ZIG-ZAG DE TRES PUNTADAS
Esta es una puntada fuerte ya que, como su mismo nombre indica, realiza múltiples puntadas cortas donde el ziq-zaq normal sólo realiza una.
Por esta razón es muy recomendada para el sobrehilado de todo tipo de tejidos.
También es ideal para zurcir desgarrones, parches, coser toallas, remiendos y aplicación de elástico plano.
MULTI-STITCH ZIGZAG
This is a strong stitch because as its name implies, it makes multiple short stitches where the normal zigzag makes only one.
For this reason it is highly recommended for overcasting all types of fabrics.
It is also ideal for mending tears, patching, sewing towelling, patch-work and attaching flat elastic.
At 0 stitch length the Multi-stitch Zigzag makes an excellent bartack.
ZIG-ZAG DE TRÊS PONTOS
Este é um ponto forte, já que como o seu nome implica, realiza três pontos curtos onde o zig-zag normal só realiza um.
Por esta razão é muito recomendado para coser pela orla para não esfiapar todo o tipo de tecidos.
Também é ideal para cerzir desgarres, remendos, coser toalhas e aplicação de elástico plano.
MANUAL DE INSTRUCCIONES • INSTRUCTION MANUAL • MANUAL DE INSTRUÇÕES


natural_image
Technical diagram showing a sewing machine on a sloped surface and a close-up of a vertical screw mechanism (no text or symbols present)PUNTADA DE ACCIÓN DOBLE
La puntada de acción doble es ideal para producir costura plana solapada en casi todo tipo de tejidos y conseguirá un efecto llamativo al coser con hilos que contrasten.
FAGOTING (DIENTE DE RATA)
Esta es una puntada muy popular (usada en mangas o delanteras de blusas y vestidos). Para sujetar dos piezas separadas de tejido dejar un pequeño espacio entre ellas. Para juntar dos piezas de tela, deje un pequeño espacio entre ellas.
Para preparar el tejido: Doble el tejido por las costuras de los bordes y presione. Hilvane hacia abajo y presione. Hilvane los bordes doblados al papel de seda, dejando un espacio de 0,3 cm aproximadamente. Cosa por encima del espacio de 0,3 cm cogiendo con la aguja la tela doblada por ambos lados. Saque los hilvanes y el papel.

MANUAL DE INSTRUCCIONES • INSTRUCTION MANUAL • MANUAL DE INSTRUÇÕES
DOUBLE-ACTION STITCH
Double-action stitch is ideal for producing flat overlapped seams on almost any type of fabric and a bolder effect will result from sewing with contrasting thread.
FAGGOTING
This is a popular decorative stitch (used in sleeves or fronts of blouses and dresses). To attach two separate pieces of fabric together, leave a little space in between. To prepare the fabric: Fold under the seam allowances on the cut edges, and press. Baste folded edges to tissue paper with about 1/8 inch (0.3 cm) space between. Stitch over the 1/8 inch (0.3 cm) allowance, just catching the fabric fold on both sides with needle. Remove bastings and paper press.
PONTO DE ACCÃO DUPLA
Ponto de acção dupla é ideal para produzir costura plana dobrada sobre quase todos os tipos de tecidos e efeito de bordo resultará de cosido com linhas contrastes.
FAGOTING (DENTE DE RATA)
Este é um ponto muito popular (usado em mangas ou frentes de blusas e vestidos).
Para segurar duas peças separadas de tecido deixar um pequeno espaço entre elas, Para preparar o tecido: Dobrar o tecido para baixo e pressioná-lo. Alinhavar os bordos dobrados ao papel de sedar deixando um espaço de 1/8". Coser por cima do espaço de 1/8", apanhando com a agulha o género dobrado por ambos os lados. Retirar os alinhavos e o papel; passar a ferro.
MANUAL DE INSTRUCCIONES • INSTRUCTION MANUAL • MANUAL DE INSTRUÇÕES

| 1 | 2 | 3 | 4 | 5 | 6 | 7 | 8 |
-
PUNTADA TRIPLE 1. TRIPLE STRAIGHT 1. PONTO TRIPLO
-
ZIG-ZAG 2. RK-RAC 2. ZIG-ZAG
-
OVERLOCK ELASTICO3. STRETCH OVERLOCK OVERLOCK ELASTICO
-
OVERLOCK 4. OVERLOCK 4. OVERLOCK
-
ANISPRED 3. HONEYLINES 5. CRUHIDOTEN ZIE-ZING 6. OVERTLOCK ELECTRON ELECTRIC OVERLOCK OVERLOCK ELECTRON
-
OVERTOCK ELASTIC, ELASTIC OVERTOCK, OVERTOCK ELASTIC
-
OVERTOCK DOUBLE, 2. DOUBLE OVERTOCK OVERTOCK DUPPLY
-
ESPICA 8. HEROINGBONE 8. ESPICA
PUNTADAS ELÁSTICAS
Las puntadas elásticas se utilizan principalmente en adornos o en telas elásticas, pero también se puede usar en telas tejidas.
PUNTADA RECTA TRIPLE
La puntada recta triple es mucho más fuerte que la puntada recta corriente, ya que entrelaza tres veces hacia adelante, hacia atrás y hacia adelante.
Es particularmente adecuada para reforzar las costuras de prendas deportivas de tejidos elásticos y no elásticos y para costuras curvas que requieren una gran resistencia.
Utilice también esta puntada para sobrecoser solapas redondeadas, cuellos y puños, ya que proporciona un acabado profesional a las prendas.
AJUSTE FINO PUNTADA ELÁSTICA
El mando del largo de puntada/súper (elástica), debe estar en la marca S para la mayoría de tejidos. Dependiendo del tipo de tela a coser, usted deberá ajustar este marcador para conseguir igualar las puntadas elásticas hacia adelante con las puntadas hacia atrás. Si las puntadas son demasiado abiertas, gire el mando a la posición +; si las puntadas se solapan, gire el mando a la posición -.
natural_image
Simple line drawing of two hands holding a piece of paper (no text or symbols)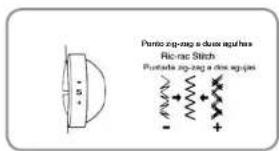

MANUAL DE INSTRUCCIONES • INSTRUCTION MANUAL • MANUAL DE INSTRUÇÕES
STRETCH STITCHES
Stretch stitches are mainly for use on knit, or stretch fabrics, but can also be sewn on woven fabrics.
TRIPLE STRAIGHT STITCH
Triple straight stitch is far stronger than ordinary straight stitch because it locks three times - forwards, backwards and forwards.
It is particularly suitable for reinforcing the seams of sportswear in stretch and non-stretch fabrics, and for curved seams which take a lot of strain.
Use this stitch also to top-stitch around lapels, collars and cuffs to give a professional finish to your garments.
ADJUSTING STRETCH STITCH BALANCE
Stitch length/super (stretch) stitch dial should be at S mark for most materials. Depending upon the type of fabric used, you may need to adjust this dial to match forward stitches of stretch sewing with reverse motion stitches. If the stitches are too open, turn the dial to + position; if the stitches overlap, turn the dial to - position -.
PONTOS ELÁSTICOS
Os pontos elásticos são utilizados principalmente nos géneros de malha ou de materiais elásticos, mas também pode ser usado em materiais de coser na fábrica de têxtil.
PONTO RECTO TRIPLO
O ponto recto triplo é muito mais forte que o ponto recto corrente, já que entrelaça três vezes para a frente, para trás e para a frente.
E particularmente adequado para reforçar as costuras de peças desportivas de tecidos elásticos e não elásticos e para costuras curvas que requerem uma grande resistência.
Utilizar também este ponto para coser por cima solapas arredondadas, golas e punhos, já que proporciona um acabamento profissional às peças.
AJUSTE FINO PONTO ELASTICO
O marcador do comprimento do ponto/super (elástico), deve estar na marca S para a maioria de materiais. Dependendo do tipo de material a coser, você deverá ajustar este marcador para conseguir igualar os pontos para a frente com os pontos de trás. Se os pontos são demasiado abertos girar o marcador à posição +; se os pontos se sobrepõem, girar o marcador para a posição -.

natural_image
Technical line drawings of sewing machine stitching (no text or symbols)PUNTO RIC-RAC
El punto Ric-Rac es una forma fácil de finalizar un borde y de darle a la prenda un toque decorativo al mismo tiempo. Es ideal para finalizar el borde del cuello con una cinta, sisas, mangas y dobladillos.
PUNTADA OVERLOCK
Las costuras overlock elásticas y los sobrehilados producen una costura estrecha y ágil particularmente adecuada para prendas de baño, prendas deportivas, camisetas, prendas de niños de nylon elástico, toallas elásticas, jerseys y jerseys de algodón.
PUNTADA OVERLOCK ELÁSTICA
Este es el mismo tipo de puntada que utiliza la industria de la confección en la fabricación de prendas deportivas —la costura se forma y se acaba en una sola operación—. Es muy efectiva para el uso en la reparación de bordes gastados de prendas usadas.
RIC-RAC STITCH
Ric-rac is a quick method of finishing a raw edge and providing a decorative top-stitch in one operation. It is ideal for edging neck-bands, armholes, sleeves and hems.
OVERLOCK STITCH
Stretch overlook seams and overcasts in one to produce a narrow, supple seam, particularly suited to swimwear, sportswear, T-shirts, babywear in stretch nylon, stretch towelling, jersey and cotton jersey.
STRETCH OVERLOCK STITCH
This is the same type stitch used by the garment industry in making sportswear - it forms and finishes the seam in one operation. It's very effective for use in repairing raw or worn edges of older garments.
PUNTADA Z1G-ZAG A DUAS AGULHAS
O zig-zag é um método rápido de acabamento de um bordo e proporciona uma sobre-costura decorativa numa operação. É ideal para decotes, cavas, mangas e bainhas.
PONTO OVERLOCK
As costuras overlock elásticas produzem uma costura estreita e elástica particularmente adequada para peças de banho, peças desportivas, t-shirt. peças de crianças, de elástico, toalha elástica. Camisolas e algodão.
PONTO OVERLOOK ELASTICO
Este é o mesmo tipo de ponto usado pela indústria da confecção no fabrico de peças. Forma-se e acaba a costura numa operação. É muito efectiva para o uso na reparação de bordos gastos de peças usadas,
MANUAL DE INSTRUCCIONES • INSTRUCTION MANUAL • MANUAL DE INSTRUÇÕES

MANUAL DE INSTRUCCIONES • INSTRUCTION MANUAL • MANUAL DE INSTRUÇÕES

natural_image
Technical illustration showing a mechanical assembly with a magnified view of a fiber-like structure (no text or symbols present)PUNTADA AVISPERO
El aspecto agradable de esta puntada permite su uso en la costura de alta gama, o en la inserción de encaje en la lenceria.
PUNTADA OVERLOCK ELÁSTICA
Utilice preferentemente esta puntada antes que el overlock normal para sobrehilar tejidos elásticos o adornos en telas donde se necesita fuerza y flexibilidad.

HONEYCOMB STITCH
The pleasing appearance of this stitch enables it to be used for top stitching, or attaching lace or inset panels when making lingerie. It is also ideal for quilting application and faggoting
ELASTIC OVERLOOK STITCH
Use this stitch in preference to regular overlock stitch for overcasting stretch or knit fabrics where strength and flexibility are required.
PONTO CRUZADO EM ZIG-ZAG
O aspecto agradável deste ponto permite o seu uso como adorno ou a aplicação de renda ou painéis internos em roupa interior.
PONTO OVERLOCK ELÁSTICO
Utilize preferentemente este ponto antes que o overlock normal para operações em géneros elásticos ou de malha, onde se requer força e flexibilidade.
MANUAL DE INSTRUCCIONES • INSTRUCTION MANUAL • MANUAL DE INSTRUÇÕES


natural_image
Three-step line drawings of a sewing machine needle, showing hand positioning and stitching process (no text or symbols)PUNTADA OVERLOCK DOBLE
El overlock doble tiene varios usos. Es perfecto para juntar elástico plano al hacer o reparar lenceria. También es ideal para sobrehilar una sola capa de tela, o coser y sobrehilar en un paso telas ligeramente elásticas y no-elásticas como el lino, el tweed y el algodón medio a pesado.
PUNTADA ESPIGA
Es una puntada versátil, usada para unir piezas de tela y para el bordado.

MANUAL DE INSTRUCCIONES • INSTRUCTION MANUAL • MANUAL DE INSTRUÇÕES
DOUBLE OVERLOOK STITCH
Double overlook has a number of uses. It is perfect for attaching flat elastic when making or repairing lingerie. It is ideal for overcasting a single layer of fabric or seaming and overcasting in one step on slightly stretch fabric and non-stretch fabrics such as linen, tweed and medium to heavy-weight cotton. It may also be used for couching over narrow ribbon or yarn or for drawn thread work.
HERRINGBONE STITCH
It is a versatile stitch used for joining fabric pieces and embroidery.
PONTO OVERLOCK DUPLO
Overlock duplo tem três principais usos. É perfeito para juntar elástico plano ao fazer ou reparar roupa interior; e para coser pela orla para não esfiapar e para costura e sobre os tecidos ligeiramente elásticos e os não-elásticos como filho, mistura de lá, algodão de peso médio a pesado.
PONTO ESPIGA
Ponto versátil que se utiliza para unir peças de género e bordado.
MANUAL DE INSTRUCCIONES • INSTRUCTION MANUAL • MANUAL DE INSTRUÇÕES

MANUAL DE INSTRUCCIONES • INSTRUCTION MANUAL • MANUAL DE INSTRUÇÕES

CAMBIAR EL PIE PRENSATELAS AL PIE DE OJALES
Deslice la guía de ojales hacia usted. Afloje el tornillo (A). Coloque el botón entre el soporte (B) y el soporte (C). Fije el botón apretando el tornillo (A). Quite el botón. En ese momento puede obtener el tamaño exacto del ojal.
Marque cuidadosamente la longitud del ojal en la prenda. Coloque el tejido con el ojal marcado debajo del pie de ojales. Deslice hacia adelante el pie prensatelas, de manera que la aguja atraviese la tela al principio del ojal.
Ajuste de la longitud (densidad) y anchura de la puntada
también puede cambiar la densidad de la puntada según se desee, dentro de la zona ojal azul, marcada en el control de longitud puntada.

BUTTONHOLES. CHANGE THE PRESSER FOOT TO BUTTONHOLE FOOT.
Slide the buttonhole guide forward. Loosen screw (A). Place the button between support (B) and support (C). Fix the button tightening screw (A). Remove the button. Then you can obtain exact size of buttonhole.
Carefully mark the buttonhole length on your garment. Place the fabric with the buttonhole marked under the buttonhole foot. Slide the foot forward so that the needle pierces the fabric at the beginning of the buttonhole.
Adjusting stitch length (density) and width
You can also change stitch density to your preference, within the buttonhole zone marked on stitch length dial.
Narrow buttonholes may be sewn by adjusting the stitch width dial.
MUDAR O PÉ PRENSA-TECIDOS AO PÉ PRENSA-TECIDOS DE CASAS
Deslizar a guia de casas para si. Afrouxar o parafuso. Colocar o botão entre suporte (B) e suporte (C). Fixe o botão apertando o parafuso (Ao retirar o botão. Então, pode obter o tamanho exacto de casas.
Marcar cuidadosamente o comprimento da casa na peça. Colocar o tecido com a casa marcada debaixo do pé prensa-tecidos de casas.
Deslizar para a frente o pé prensa-tecido, de forma que a agulha atravesse o tecido no princípio da casa.
Ajuste do comprimento ponto (densidade)
Também se pode mudar a densidade do ponto segundo se queira, dentro da zona casa azul, marcada no controlo do comprimento ponto.

natural_image
Stylized gray flower illustration with six petals and a central dot (no text or symbols)
PROCEDIMIENTO
- Cosa hacia delante hasta el final de la marca del ojal. Pare de coser en la puntada izquierda y levante la aguja.
- Haga una presilla de 4 ó 5 puntadas. Pare de coser en la puntada izquierda y levante la aguja a su posición más alta.
- Cosa hacia delante hasta el final de la marca del ojal para completarlo.
- Dé 4 ó 5 puntadas de presilla. Pare de coser en la puntada derecha y levante la aguja.
PROCEDURE
- Stitch forward to the end of buttonhole mark. Stop sewing at the left stitch and raise needle.
- Bartack 4 or 5 stitches. Stop sewing at the left stitch and raise needle to its highest position.
- Stitch forward to the end of buttonhole mark to complete buttonhole.
- Bartack 4 or 5 stitches. Stop sewing at the right stitch and raise needle.
PROCEDIMENTO
- Coser para a frente até ao final da marca da casa. Parar de coser à esquerda e elevar a agulha.
- Atacar 4 ou 5 pontos. Parar de coser à esquerda e levantar a agulha até à posição mais alta.
- Pespontar para a frente até ao final da marca da casa até completá-lo.
- Atacar 4 ou 5 pontos. Parar de coser à direita e elevar a agulha.
MANUAL DE INSTRUCCIONES • INSTRUCTION MANUAL • MANUAL DE INSTRUÇÕES


OJALES CON CORDONCILLO
Enganche el cordoncillo de relleno al saliente y estire de ambos extremos de la cuerda hacia delante y abajo del prensatelas. Cosa el ojal de forma que las puntadas en zigzag cubran el cordoncillo.
Cuando termine, suelte la cuerda del prensatelas estire de los extremos del cordón hacia delante y corte el sobrante.
Ajuste de la longitud (densidad) y anchura de la puntada
También puede cambiar la densidad de la puntada según se desee, dentro de la zona ojal azul, marcada en el control de longitud puntada.

MANUAL DE INSTRUCCIONES • INSTRUCTION MANUAL • MANUAL DE INSTRUÇÕES
CORDED BUTTONHOLES
Hook filler cord (crochet thread or buttonhole twist) to the spur and pull both ends of the cord forward under the foot. Sew buttonhole so that zigzag stitches cover the cord.
When completed, release the cord from foot, pull ends of cord forward and snip off extra length.
Adjusting stitch length (density) and width
You can also change stitch density to your preference, within the buttonhole zone marked on stitch length dial.
Narrow buttonholes may be sewn by adjusting the stitch width dial.
CASAS COM CORDÃO
Engatar o cordão de enchimento no saliente do pé prensa-tecidos e esticar ambos os extremos do cordão para a frente, por baixo da guia. Coser a casa de forma que os pontos de zig-zaq cubram o cordão.
Quando tiver terminado, soltar o cordão, puxar para a frente os extremos e cortar o excedente.
Ajuste do comprimento ponto (densidade)
Também se pode mudar a densidade do ponto segundo se queira, dentro da zona casa azul, marcada no controlo de comprimento do ponto.
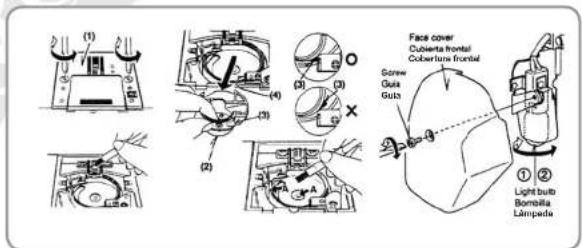
CUIDADO DE SU MÁQUINA
Para garantizar el mejor funcionamiento de su máquina, es necesario mantener todas las partes principales limpias en todo momento. Desconecte siempre la máquina de la toma de corriente sacando el enchufe de la toma.
Limpieza del área de alimentación y lanzadera
- Levante la aguja a su posición más alta
- Quite la placa de aguja (1)
- Quite la cápsula de la canilla (2)
- Limpie los dientes de la alimentación y el área de la lanzadera con un cepillo de hilachas NOTA: Eche una gota de aceite para máquinas de coser en la lanzadera como se indica con las florchas A
- Vuelva a colocar la cápsula de la canilla y posicione el saliente frente al muelle (4). Coloque la placa de aguja.
Cambio de la bombilla
- Quite la tapa frontal. Empuje ligeramente hacia arriba la bombilla y desenrósquela en sentido horario.
- Coloque una nueva bombilla, empújela hacia arriba y gire en sentido contrario al horario. Vuelva a poner la tapa frontal.
Desconecte la máquina de la red eléctrica antes de cambiar la bombilla. No use una bombilla de más de 15 watts.
CARING FOR YOUR MACHINE
To ensure the best possible operation of your machine, it is necessary to keep the essential parts clean at all times. Always disconnect the machine from power supply by removing the plug from the socket-outlet.
Cleaning the feed dogs and hook area
- Raise the needle to its highest position.
- Remove the needle plate (1).
- Remove the bobbin case (2).
- Clean the feed dogs and hook area with the lint brush. NOTE: Put a drop of sewing machine oil on the hook race as indicated by the arrows A.
- Replace the bobbin case with the projection (3) positioned against the spring (4). Replace the needle plate.
Changing light bulb
- Remove the face cover. Push up the bulb slightly and turn clockwise.
- Insert new bulb, push up and turn counterclockwise. Replace the face cover.
Disconnect the machine from power supply before changing a bulb. Do not use a bulb of more than 15 watts.
CUIDE DA SUA MÁQUINA
É necessário manter as peças essenciais limpas sempre, para obter um funcionamento eficaz da sua máquina Desligar sempre desligando o cordão da corrente eléctrica.
Limpar a área do transportador e a lançadeira
- Levantar a agulha para a posição mais elevada.
- Retire a placa agulha (1)
- Retire a cápsula (2)
- Limpar a área do transportador e da lançadeira com a escova de fiapos.
ATENÇÃO: Deitar uma gota de óleo para máquina de coser pelo eixo central de lançadeira e o carril de lançadeira como está indicado com as setas. - Volte a colocar a cápsula com o ressalte (3) contra a mola (4). Coloque de novo a placa agulha.
Mudança da lâmpada
- Retirar a tampa frontal, desenroscar a lâmpada.
- Roscar firmemente uma nova. Voltar a colocar a tampa frontal.
Desligar a corrente antes de mudar a lâmpada. Não usar uma lâmpada de mais de 15 watts.
MANUAL DE INSTRUCCIONES • INSTRUCTION MANUAL • MANUAL DE INSTRUÇÕES


MANUAL DE INSTRUCCIONES • INSTRUCTION MANUAL • MANUAL DE INSTRUÇÕES

natural_image
Abstract floral pattern with six petal-like shapes radiating from a central dot (no text or symbols)

natural_image
Abstract floral-like pattern with six petal-like petals and a central dot (no text or symbols)

- Supra
- 802
- MANUAL DE INSTRUCCIONES
- INSTRUCTION MANUAL
- MANUAL DE INSTRUÇÕES
- PROTECCION DEL MEDIO AMBIENTE
- ENVIRONMENT PROTECTION
- PROTECÇÃO DO MEIO AMBIENTE
- Índice · Index · Índice
- Instrucciones importantes de seguridad
- ATENCION
- Para evitar el riesgo de choque eléctrico:
- ADVERTENCIA
- Para reducir el riesgo de quemaduras, incendio o lesiones personales:
- GUARDE ESTAS INSTRUCCIONES
- Important safety instructions
- DANGER
- To reduce the risk of electric shock:
- WARNING
- To reduce the risk of burns, fire, electric shock, or injury to persons:
- SAVE THESE INSTRUCTIONS
- Instruções importantes de segurança
- ATENÇÃO
- Para evitar o risco de chogue eléctrico:
- ADVERTÊNCIA
- Para reduzir o risco de queimaduras, incêndio ou lesões:
- GUARDE ESTAS INSTRUÇÕES
- Piezas principales · Machine identification · Peças principais
- Accesorios · Accessories · Acessórios
- QUITAR LA TAPA DELANTERA.
- UNA MÁQUINA DE COSER LIBRE
- PARA ABRIR LA TAPA DELANTERA.
- QUITAR LA TAPA TRASERA:
- LA TAPA TRASERA SE CONVIERTE EN LA ZONA EXTEN-DIDA DE TRABAJO.
- REMOVING FRONT COVER LIBERTY MACHINE
- TO OPEN THE COVER:
- REMOVE REAR COVER:
- REAR COVER AS AN EXTENSION TABLE:
- RETIRAR A TAMPA DA FRENTE
- UMA MAQUINA DE COSER LIVRE
- PARA ABRIR A TAMPA DA FRENTE.
- RETIRAR A TAMPA TRASEIRA:
- A TAMPA TRASEIRA É APLICADA COMO A MESA ESTENDIDA DE TRABALHO.
- REEMPLAZAR LAS TAPAS DE LA MAQUINA
- REPLACING THE COVERS ON THE MACHINE:
- SUBSTITUIR AS TAMPAS DA MÁQUINA
- AJUSTE DE LA TENSIÓN DEL HILO SUPERIOR
- PALANCA DEL PRENSATELAS
- SELECTOR ANCHO PUNTADA
- SELECTOR DE PUNTADAS E INDICADOR
- CONTROL DEL LARGO DE PUNTADA Y PUNTADA SÚPER (ELASTICA)
- PALANCA DE RETROCESO
- ADJUSTING TOP THREAD TENSION
- PRESSER FOOT LEVER
- STITCH WIDTH/NEEDLE POSITION DIAL
- STITCH SELECTOR AND INDICATOR
- STITCH LENGTH/SUPER (STRETCH) STITCH DIAL
- REVERSE STITCH LEVER
- CONTROLADOR DA TENSÃO DA LINHA SUPERIOR
- ALAVANCA PÉ PRENSA-TECIDOS
- SELECTOR LARGURA PONTO
- SELECTOR E INDICADOR DE PONTOS
- MARCADOR COMPRIDO DE PONTO E PONTO SUPER (ELÁSTICO)
- ALAVANCA DO PONTO DE RETROCESSO
- PREPARACIÓN DE LA MÁQUINA
- CONTROL POR PEDAL
- INTERRUPTOR CORRIENTE/LUZ
- SETTING UP YOUR MACHINE
- FOOT CONTROL
- POWER/LIGHT SWITCH
- PREPARAÇÃO DA MÁQUINA
- CONTROLO POR PEDAL
- INTERRUPTOR CORRENTE/LUZ
- DEVANADO DE LA CANILLA
- WINDING BOBBIN
- ENROLAMENTO DA BOBINA
- COLOCAR LA BOBINA
- SETTING THE BOBBIN
- COLOCAR A BOBINA
- ENHEBRADO DEL HILO SUPERIOR
- THREADING THE TOP THREAD
- ENFIAMENTO DA LINHA SUPERIOR
- RECOGIDA DEL HILO DE LA CANILLA
- PICKING UP BOBBIN THREAD
- RECOLHA DA LINHA DA BOBINA
- CAMBIO DEL PRENSATELAS
- CHANGING PRESSER FEET
- PUNTADA RECTA
- CONFIGURACIÓN
- Aguja posicionada para hacer una puntada recta
- STRAIGHT STITCHES
- SETTINGS
- Needle position for straight stitching
- PONTO RECTO
- 1. FIXAÇÃO
- Comece a coser
- Agulha posicionada para fazer um ponto recto
- CÓMO FUAR LA COSTURA
- INSERCIÓN DE CREMALLERAS
- RIBETES
- SECURING SEAMS
- INSERTING ZIPPERS
- PIPING
- COMO FIXAR A COSTURA
- INSERÇÃO DE FECHOS ECLAIR
- FAZER "VIVOS"
- AJUSTE DE LA TENSIÓN DEL HILO SUPERIOR
- ADJUSTING STRAIGHT STITCH THREAD TENSION
- AJUSTE DA TENSÃO DA LINHA SUPERIOR
- TABLA DE HILO, AGUJA Y TELA
- Cambio de la aguja
- NEEDLE, THREAD AND FABRIC CHART
- Changing the needle
- TABELA DE LINHA, AGULHA E MATERIAIS
- Mudança de agulho
- PUNTO DE ZIGZAG
- PUNTADA DE RELLENO
- ZIGZAG STITCHING
- PONTO DE ZIG-ZAG
- PONTO DE ENCHIMENTO
- PUNTADA INVISIBLE
- BLIND STITCH
- PONTO INVISÍVEL
- PUNTADA DE LENCERÍA
- COSTURA Y SOBREHILADO EN UNO
- DOBLADILLO DE CONCHA
- SHELL STITCH
- SEAM AND OVERCAST IN ONE
- SHELL TUCKS
- PONTO DE LINGERIE
- COSTURA E COSTURA PELA ORLA PARA NÃO ESFIAPAR EM UM
- BAINHA DE CONCHA
- ZIG-ZAG DE TRES PUNTADAS
- MULTI-STITCH ZIGZAG
- ZIG-ZAG DE TRÊS PONTOS
- PUNTADA DE ACCIÓN DOBLE
- FAGOTING (DIENTE DE RATA)
- DOUBLE-ACTION STITCH
- FAGGOTING
- PONTO DE ACCÃO DUPLA
- FAGOTING (DENTE DE RATA)
- PUNTADAS ELÁSTICAS
- PUNTADA RECTA TRIPLE
- AJUSTE FINO PUNTADA ELÁSTICA
- STRETCH STITCHES
- TRIPLE STRAIGHT STITCH
- ADJUSTING STRETCH STITCH BALANCE
- PONTOS ELÁSTICOS
- PONTO RECTO TRIPLO
- AJUSTE FINO PONTO ELASTICO
- PUNTO RIC-RAC
- PUNTADA OVERLOCK
- PUNTADA OVERLOCK ELÁSTICA
- RIC-RAC STITCH
- OVERLOCK STITCH
- STRETCH OVERLOCK STITCH
- PUNTADA Z1G-ZAG A DUAS AGULHAS
- PONTO OVERLOCK
- PONTO OVERLOOK ELASTICO
- PUNTADA AVISPERO
- HONEYCOMB STITCH
- ELASTIC OVERLOOK STITCH
- PONTO CRUZADO EM ZIG-ZAG
- PONTO OVERLOCK ELÁSTICO
- PUNTADA OVERLOCK DOBLE
- PUNTADA ESPIGA
- DOUBLE OVERLOOK STITCH
- HERRINGBONE STITCH
- PONTO OVERLOCK DUPLO
- PONTO ESPIGA
- CAMBIAR EL PIE PRENSATELAS AL PIE DE OJALES
- Ajuste de la longitud (densidad) y anchura de la puntada
- BUTTONHOLES. CHANGE THE PRESSER FOOT TO BUTTONHOLE FOOT.
- Adjusting stitch length (density) and width
- MUDAR O PÉ PRENSA-TECIDOS AO PÉ PRENSA-TECIDOS DE CASAS
- Ajuste do comprimento ponto (densidade)
- PROCEDIMIENTO
- PROCEDURE
- PROCEDIMENTO
- OJALES CON CORDONCILLO
- CORDED BUTTONHOLES
- CASAS COM CORDÃO
- CUIDADO DE SU MÁQUINA
- Limpieza del área de alimentación y lanzadera
- Cambio de la bombilla
- CARING FOR YOUR MACHINE
- Cleaning the feed dogs and hook area
- Changing light bulb
- CUIDE DA SUA MÁQUINA
- Limpar a área do transportador e a lançadeira
- Mudança da lâmpada
Marque : JATA
Modèle : MC802
Catégorie : Machine à coudre