
DJX 10i - Table de mixage SCOTT - Notice d'utilisation et mode d'emploi gratuit
Retrouvez gratuitement la notice de l'appareil DJX 10i SCOTT au format PDF.


| Type de produit | Table de mixage |
| Marque | Scott |
| Modèle | DJX 10i |
| Dimensions (L x l x H) | Environ 200 x 150 x 50 mm |
| Poids | Environ 1 kg |
| Alimentation | 12 V DC via adaptateur secteur (non inclus) |
| Nombre de canaux | 10 entrées (4 micro, 4 ligne, 2 stéréo) |
| Fonctions principales | Mixage audio, égalisation 3 bandes, effets DSP intégrés, sortie casque, sortie enregistrement |
| Entrées micro | 4 x XLR combo avec alimentation fantôme +48V |
| Sorties | 2 x XLR main, 2 x RCA record, 1 x Jack casque |
| Égalisation | 3 bandes par canal (aigus, médiums, graves) |
| Effets intégrés | 16 effets numériques (réverbération, délai, chorus, etc.) |
| Entretien et nettoyage | Nettoyer avec un chiffon doux et sec. Ne pas utiliser de produits chimiques. |
| Sécurité | Ne pas exposer à l'humidité, à la poussière ou aux températures extrêmes. Débrancher avant nettoyage. |
| Pièces détachées et réparabilité | Contacter le service après-vente Scott ou un technicien agréé. Ne pas ouvrir l'appareil. |
| Accessoires inclus | Câble d'alimentation, manuel d'utilisation, câble USB (pour mise à jour firmware) |
FOIRE AUX QUESTIONS - DJX 10i SCOTT
Questions des utilisateurs sur DJX 10i SCOTT
0 question sur cet appareil. Repondez a celles que vous connaissez ou posez la votre.
Poser une nouvelle question sur cet appareil
Téléchargez la notice de votre Table de mixage au format PDF gratuitement ! Retrouvez votre notice DJX 10i - SCOTT et reprennez votre appareil électronique en main. Sur cette page sont publiés tous les documents nécessaires à l'utilisation de votre appareil DJX 10i de la marque SCOTT.
MODE D'EMPLOI DJX 10i SCOTT
SCOTT
POWERED BY DJ-Tech
DJX 10 i / iDANCE ZERO
2CH DJ MIXER WITH IPOD DOCKING

USER MANUAL
www.my-scott.com
1 IMPORTANT SAFETY INSTRUCTIONS
- Read these instructions.
- Keep these instructions.
- Heed all warnings.
- Follow all instructions.
- Do not use this apparatus near water.
-
Clean only with dry cloth.
-
Do not block any ventilation openings. Install in accordance with the manufacturer's instructions.
-
Do not install near any heat sources such as radiators, heat registers, stoves, or other apparatus (including amplifiers) that produce heat.
-
Do not defeat the safety purpose of the polarized plug. A polarized plug has two blades with one wider than the other. The wide blade is provided for your safety. If the provided plug does not fit into your outlet, consult an electrician for replacement of the obsolete outlet.
-
Protect the power cord from being walked on or pinched particularly at plugs, convenience receptacles, and the point where they exit from the apparatus.
-
Only use attachments/accessories specified by the manufacturer.
-
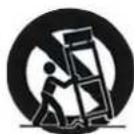
Use only with the cart, stand, tripod, bracket, or table specified by the manufacturer, or sold with the apparatus. When a cart is used, use caution when moving the cart/apparatus combination to avoid injury from tip-over.
-
Unplug this apparatus during lightning storms or when unused for long periods of time.
-
Refer all servicing to qualified service personnel. Servicing is required when the apparatus has been damaged in any way, such as power-supply cord or plug is damaged, liquid has been spilled or objects have fallen into the apparatus, the apparatus has been exposed to rain or moisture, does not operate normally, or has been dropped.
-
WARNING: To reduce the risk of fire or electric shock, do not expose this apparatus to rain or moisture.
-
Where an appliance coupler is used as the disconnect device, the disconnect device shall remain readily operable.
-
The ventilation should not be impeded by covering the ventilation openings with items, such as newspapers, table-cloths, curtains, etc.
-
No naked flame sources, such as lighted candles, should be placed on the apparatus.
-
The apparatus should be used in moderate climate.
-
The apparatus shall not be exposed to dripping or splashing and that no objects filled with liquids, such as vases, shall be placed on the apparatus.
1 IMPORTANT SAFETY INSTRUCTIONS
CAUTION
DO NOT OPEN
RISK OF ELECTRIC SHOCK
CAUTION: To reduce the risk of electric shock, do not remove any cover. No user-serviceable parts inside. Refer servicing to qualified service personnel only.
The lightning flash with arrowhead symbol within the equilateral triangle is intended to alert the use to the presence of un-insulated "dangerous voltage" within the product's enclosure that may be of sufficient magnitude to constitute a risk of electric shock.

The exclamation point within the equilateral triangle is intended to alert the user to the presence of important operation and maintenance (servicing) instructions in the literature accompanying this appliance.
CAUTION
To prevent electric shock, do not use this polarized plug with an extension cord, receptacle or other outlet unless the blades can be fully inserted to prevent blade exposure.
2 PART NAME AND FUNCTIONS
Section 1
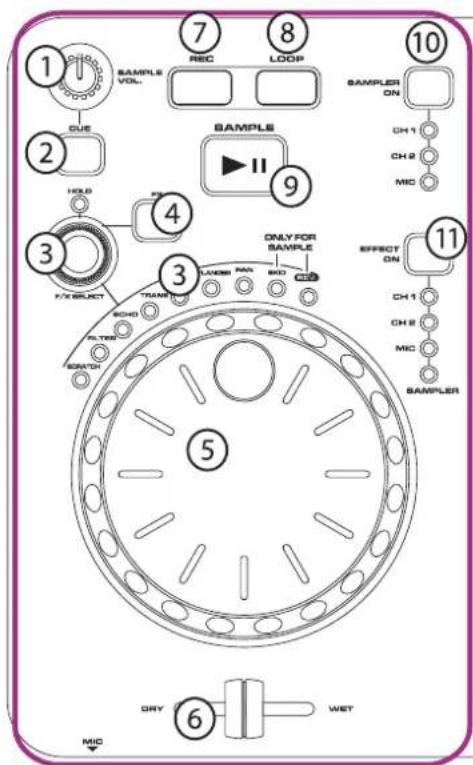
Section 2
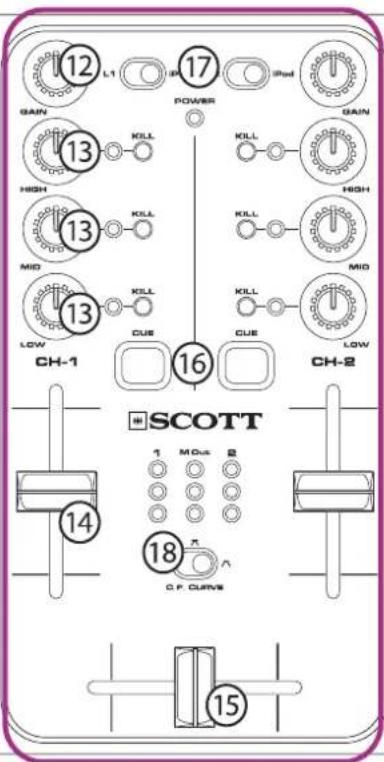
Section 3
Section 1
-
Sample volume - Control sampler output volume when playing sampler.
-
Cue - Pressing the CUE button during playback immediately return to the start point of sampler.
-
FX select - Used to select desired effects.
| · Scratch | The Scratch effect simulates real time turntable scratching. Once the Scratch effect has been activated, the jog wheel may be used in the same fashion a turntable platter is used. Use the jog wheel to simulate the scratch motion on a turntable platter and to manipulate playback. |
| · Filter | When the Filter effect is selected it will tweak the original sound to add different tonal definition. |
| · Echo | When the Echo effect is selected, it will add an echo to your output signal. |
| · Trans | When the Trans effect is selected, it will simulate a real-time mixer transformer effect. |
| · Phase | When the Phase effect is selected, phase shifting effect will be added to the output. |
| · Flanger | When the Flanger effect is selected, it distorts the output signal and creates an effect similar to frequencies phasing in and out of each other. |
| · Pan | When the Pan effect is selected, the effect will automatically pan the output from the left channel to the right channel. |
| · Skid | When the Skid effect is selected, the start time and stop time of sample PLAY/ PAUSE action will be prolonged. This function can be engaged only when effect is on sampler mode. Operation on sampler PLAY/PAUSE can activate the skid effect. |
| · Rev. | When the Rev effect is selected, the sampler will play in reversed direction. This function can be engaged only when effect is on sampler mode. |
Hold LED - Hold LED can be toggled ON/OFF by pressing the FX select. When the hold function is activated (hold LED turned on), the unit will memorize the parameter set with the jog wheel on the current effect. The memorized parameter will be re-called when users switch back to that effect.
-
FX button - This button functions as an effect Master on/off button and is used to activate and deactivate the effects.
-
Jog wheel - Used to simulate vinyl scratching and tune effect parameter.
-
Dry/Wet Fader - Used to change the mix ratio between original and effected signal.
-
Rec button - This button is used to record a sample from sampler source which is decided by "SAMPLER ON" switch.
-
A sampler can be made only when sampler is in "PAUSE" mode or power on state.
• The sampler length is about 25secs at maximum
Section 1
- Loop button - When LOOP light is on, sampler will be played in loop mode. Otherwise sampler playback will stop at the end of sampler.
- Play/pause button - Press this button to toggle the Play/ Pause action of the sampler.
- Sampler ON button - Use this button to select sampler source for sample making.
- Effect ON button - Use this button to select desired channel to be passed to effect processor.
Section 2
-
Channel Gain - Used to adjust the input level for each channel.
-
EQ - Adjusts the high/mid and low frequency levels of the input channels for good sound.
-
Channel fader - Adjust the volume for CH1 and CH2.
-
Crossfader - Used to mix the sound from the 2 channels.
-
Cue button - Sends the channel signal to headphones for monitoring. As well as the sampler signal.
-
Source input selector switch - These switches are used to select the input source assigned to each channel. Each channel may only be assigned one input source at the same time.
-
C.F curve - Used to select the rising curve patterns for the crossfader function.
-
When switch to left position, a slowly rising curve response is selected
- When switch to center position, a middle rising curve response is selected
- When switch to right position, a rapidly rising curve response is selected
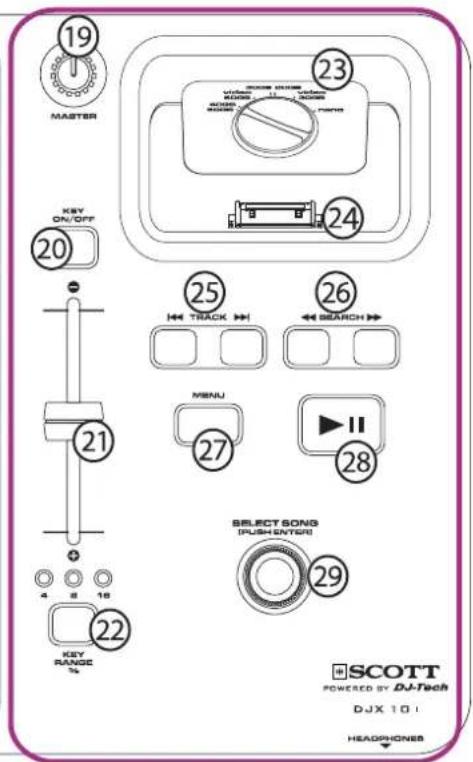
Section 3
- Master Volume - Used to control the volume of the master output.
- Key ON/OFF - Used to toggle ON/OFF the Pitch Shifting function on the Channel passing through the effect processor.
- Pitch Fader - Used to set the amount of pitch shifting. 0% pitch shift when the fader is at the middle position.
- Key Range - Used to switch between the ranged (4%, 8% and 16%) for Pitch Shifting.
- Adjustable Universal iPod docking - Adjust (with a coin) to corresponding position to fit different version of iPods.
- 30-Pin iPod Connector - Connected to iPod. Please make sure the iPod is inserted completely to the connector.
- Previous/ Next Buttons - Press to select the previous/ next song in iPod.
- FF/ FB Buttons - Press to enable Fast-Forward or Fast-Backward action on the playing song.
Section 3
- Menu - The same function as the Menu button in iPod
- Play/ Pause - The same function as the Play/ Pause button in iPod
- Search Encoder - Used to simulate the function Click Wheel in iPod. It can be used to scroll up/down in the menu by turning this encoder. Users can also press the encoder for a confirmation action.
Rear Panel

- Power in - Connected to Power Adaptor included.
- Power switch - Turn this unit power ON/OFF.
- USB iPod sync - When the iDance Zero is turned off, it can be connected to a computer thought a USB cable and synchronize the iPod which is connected to the iDnace Zero.
- iPod Video out - This Composite Video output can be connected to a external display (e.g. TV) to play the video in the iPod.
- USB to PC - Connect to a computer with a USB cable. Computer will recognize the unit as a USB audio device. Master output of the unit will be sent to computer for recording or other purpose.
- Master output - Here you can plug in your main stereo system, for example an amplifier or active speakers.
- Input connection - You can connect a playback device to this input, such as turntables or CD players in order to integrate external medias to your setup.
- GND terminals - Connect each of your turntable ground leads to either of the two ground terminals.
- LN/PH switches - These switches are used to change the mode of input jacks. When connecting turntable to these jacks, be sure the switch is in the phono position, and when using line level input devices, please select LN. Always be sure main power is shut off before changing the position of the LN/PH selector switch.
Front Panel

- Mic Input Jack - Used for microphone input.
- Mic Level - This knob is used to adjusts microphone level.
- Mic Tone - This knob is used to adjust the tone of the microphone.
- Monitor Tone - This knob is used to adjust the tone of headphone.
- Monitor Level -This knob is used to adjust the headphone output level.
- Monitor Headphone Jack - Connect to a pair of headphones to preview selected channel and sampler.
3 FEATURES
• 2 Ch DJ mixer with iPod docking
• Play Music from your iPod Directly
- Charging during playback
- Scratch, Sample, and Add Effects to your iPod
• Universal Dock for iPod with adjustable amount
• Multi Function Jog wheel with Scratch Function
• 9 Digital Effects with adjustable parameter:
• SCRATCH, FILTER, ECHO, TRANS, PHASER, FLANGER, PAN, REV, SKID
• 25 Sec Sampler built-in with Effect on Sampler
• SEAMLESS LOOP for Sampler Playback
• Adjustable Pitch Shifter range: 4,8,16%
• 3 bands EQ with Kills and gain control on both channels
• 4 input with Sampler Playback, 2 Phono/line inputs switchable
• Dedicated microphone input with Tone and Level Control
• USB 2.0 Audio output + USB iPod Sync port
• Crossfader with adjustable curve
• Headphones output with Tone and Level Control
4 SPECIFICATIONS
| Maximum input: (1KHz, THD= 1%, EQ Flat, FX OFF, Master at 10 o'clock, Master output, Load= 100K ohm) | ||
| Line | More than +6dBV | |
| Phono | More than -29dBV | |
| Mic | More than -28dBV | |
| Maximum output: (EQ Flat, Maximum gain, FX OFF, THD=1%, Load=100K ohm) | ||
| Master | More than +10dBV (3.16V) | |
| Phones | More than +3dBV (1.4V) load=32 ohm | |
| S/N RATIO: (Maximum gain, EQ Flat, W/20KHz LPF, A-weighted, FX OFF, Master output) | ||
| Line | More than 75dB | |
| Phono | More than 75dB | |
| Mic | More than 75dB | |
| Crosstalk: (Maximum gain, EQ Flat, FX OFF, W/20KHz LPF, A-weighted, Master output) | ||
| Line, Phono | More than 65dB @1KHz between L and R channel | |
| More than 70dB @1KHz between channels | ||
| Power supply: | DC6V, 2A | |
| Dimensions: | 360 x 206.5 x 65.7mm | |
| Weight: | 1.4 Kg | |
Should you have any questions/doubts on operating the unit, please send an e-mail to djtech@first-audio.com
5 DISPOSAL
Disposal of waste electrical & electronic equipment (applicable in the European Union and other European countries with separate collection systems).
This symbol on the product or on its packaging indicates that this product must not be treated as household waste. Instead it must be handed over to the applicable collection point for the recycling of electrical and electronic equipment. By ensuring this product is disposed of correctly, you will help prevent potential negative consequences for the environment and human health, which could otherwise be caused by inappropriate waste handling of this product. The recycling of materials will help to conserve natural resources. For more detailed information about recycling of this product, please contact your local authorities, your household waste disposal service or the shop where you purchased the product.


Marque : SCOTT
Modèle : DJX 10i
Catégorie : Table de mixage