
CDX 650 - Lecteur/enregistreur de cd SCOTT - Notice d'utilisation et mode d'emploi gratuit
Retrouvez gratuitement la notice de l'appareil CDX 650 SCOTT au format PDF.


| Type de produit | Lecteur/enregistreur de CD |
| Marque | SCOTT |
| Modèle | CDX 650 |
| Dimensions (L x H x P) | 430 x 100 x 300 mm |
| Poids | 4,0 kg |
| Alimentation | 230 V ~ 50 Hz, 20 W |
| Fonctions principales | Lecture et enregistrement de CD audio, fonctions Pause, Stop, Skip, Repeat, Random, Programmation de pistes |
| Entretien et nettoyage | Nettoyer la lentille avec un disque de nettoyage spécial CD. Essuyer le boîtier avec un chiffon doux et sec. |
| Sécurité | Ne pas démonter l'appareil, éviter tout contact avec des liquides, débrancher en cas d'orage ou de non-utilisation prolongée. |
| Pièces détachées et réparabilité | Pièces disponibles via le service après-vente SCOTT. Réparation par un professionnel recommandée. |
| Informations générales | Utiliser des CD de bonne qualité pour une lecture et un enregistrement optimaux. |
FOIRE AUX QUESTIONS - CDX 650 SCOTT
Questions des utilisateurs sur CDX 650 SCOTT
0 question sur cet appareil. Repondez a celles que vous connaissez ou posez la votre.
Poser une nouvelle question sur cet appareil
Téléchargez la notice de votre Lecteur/enregistreur de cd au format PDF gratuitement ! Retrouvez votre notice CDX 650 - SCOTT et reprennez votre appareil électronique en main. Sur cette page sont publiés tous les documents nécessaires à l'utilisation de votre appareil CDX 650 de la marque SCOTT.
MODE D'EMPLOI CDX 650 SCOTT
CLOCK RADIO WITH CD PLAYER

INSTRUCTION MANUAL
CE
WARNING
CLASS 1 LASER PRODUCT
CLASS 1 LASER PRODUCT APPAREIL A LASER DE CLASSE 1 PRODUCTO LASER DE CLASE 1
CAUTION
INVISIBLE LASER RADIATION WHEN OPEN AND INTERLOCKS DEFEATED AVOID EXPOSURE TO BEAM

This product contains a low power laser device.
Warning : Do not touch the lens.
PRECAUTIONS
Follow the advice below for safe and appropriate operations.
INSTALLATION
- Do not use the unit in places which are extremely hot, cold, dusty, or humid.
• Place the unit on a flat and even surface. - Do not restrict the airflow of the unit by placing it in a place with poor airflow, by covering it with a cloth, or by placing it on a carpet.
• Do not place naked flame sources such as lighted candles on the apparatus.
• Use the apparatus only in moderate climates (not in tropical climates).
• Do not expose the apparatus to dripping or splashing.
• Do not place objects filled with liquids, such as vases, on the apparatus.
SAFETY
- When connecting and disconnecting the AC power cord from the AC mains outlet, pull the plug and not the cord itself. Pulling the cord may damage it and may be dangerous.
• The mains plug must remain readily operable. - When you are not going to use the unit for a long period of time, disconnect the AC power cord from the AC mains outlet.
AC VOLTAGE
• Before use, check that the rated voltage of your unit matches your local voltage.
CONDENSATION
- When there is condensation inside the unit, it may not function normally.
- Unplug the unit for 1 to 2 hours before turning the power back on, or gradually heat the room up and dry the unit before use.
- Ensure a minimum distance of 5 cm around the apparatus for sufficient ventilation.
- Do not impede the ventilation by covering the ventilation openings with items such as newspapers, tablecloths, curtains, etc.
BATTERIES
• Pay attention to the environmental aspects of battery disposal.
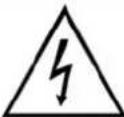 |  |  |
| The lightning flash with an arrowhead symbol within a triangle is awarning sign alerting the user to the presence of dangerous voltage inside the unit. | ATTENTION: To reduce the risk of Electric shock,do not remove the cover. There are no user serviceable parts inside the unit.Refer all servicing to Qualified personnel. | The exclamation mark within a triangle is a warning sign alerting the user to the presence of important instructions accompanying the product. |
TABLE OF CONTENTS
| WARNING | 1 |
| PRECAUTIONS | 1 |
| TABLE OF CONTENTS | 2 |
| BOX CONTENTS | 2 |
| LOCATION OF CONTROLS | 3 |
| INSTALLING THE BATTERY | 4 |
| BASIC OPERATION | 4 |
| RADIO OPERATION | 6 |
| CD OPERATION | 6 |
| MAINTENANCE | 7 |
| TROUBLESHOOTING GUIDE | 7 |
| TECHNICAL SPECIFICATIONS | 8 |
BOX CONTENTS
-
Main unit
-
Instruction manual
LOCATION OF CONTROLS
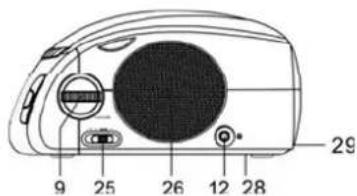
- HR (HOUR)/NEXT ▶▶ button
- DISPLAY button
- PROG (program) button
- CD compartment
- ON/STANDBY ⏻ button
- SNOOZE button
- AL1 (alarm 1) button
- TIME button
- TUNING dial
- AL 2 (alarm 2) button
- PM indicator. This indicator only appears when the time is set to the 12-hour display
- Headphones jack
- SLEEP indicator
- VOL (volume) dial
- MIN/◀◀ (set minutes/previous)
- PLAY/ PAUSE ▶ II button
- STOP button
- Tuning indicator
- Radio frequency scale
- AL 1/AL 2 indicators
- LED display
- REP/PROG
(repeat/programmed play) indicators
- SLEEP button
- REP/RAN (repeat/random) button
- FM ST (stereo) /FM button
- Speaker
- CD/RADIO/BUZZER switch
- Clock back-up battery compartment
- FM antenna/AC power cord


INSTALLING THE BATTERY
Installing the clock back-up battery
Clock back-up
The clock and alarm time can be maintained against power failure with a 9V "6F22" battery (not supplied). During a power interruption, the clock time may gain or lose a few minutes per hour and may require resetting.
Battery insertion
- Remove the battery compartment cover on the bottom of the unit.
- Insert a 9V "6F22" battery (an alkaline battery is recommended) into the battery compartment, following the correct polarities marked inside the battery compartment.
- Replace the battery compartment cover.
Note: For optimum performance, the battery should be replaced every 6 months.
Precautions when using batteries
- Use only the size and type of battery specified.
- Ensure you follow the correct polarities when installing the battery (see the battery compartment). A reversed battery may cause damage to the unit.
- An exhausted battery must be removed to prevent possible battery leakage.
- Dispose of batteries properly according to environmental regulations.
Note on clock back-up battery
Please note that this unit will not operate fully on battery power alone. The battery provides a back-up system only in the event of an interruption of the AC power supply.
BASIC OPERATION
Connecting the power supply
Insert the AC power cord into the AC mains outlet with a 230V AC \~ 50Hz power source. The LED display will flash.
Clock and alarm time setting
12/24 hour display
Press and hold down the TIME button to switch between 12/24-hour display.
Set the clock
- Press the TIME button and the LED display will flash. Press the HR/▶ button to set the hours.
- Press the MIN button to set the minutes.
- Press the TIME button to confirm.
Set the alarm times
- Press the AL1 or AL2 button to enable alarm 1 and/or alarm 2 respectively, and the alarm time will flash. Press the HR/▶ button to set the hours.
- Press the MIN button to set the minutes.
- Press the corresponding AL1 or AL2 button to confirm.
Alarm operation
The unit allows you to wake up by buzzer, radio or CD.
- To enable the alarm function and adjust the dual alarm times, follow the steps in "Set the dual alarm times". The corresponding AL1 or AL2 indicator on the LED display lights up.

- To select buzzer, radio or CD mode, slide the CD/RADIO/BUZZER switch to the desired source.
- When the preset alarm time is reached, the alarm will sound in the selected alarm mode. For CD alarm mode, the playback will begin from the first track. If the CD source is not available at the alarm time, it will automatically switch to the buzzer alarm.
- To stop the alarm, press the ⏻, AL1 or AL2 button. The alarm will sound again the next day. To disable the alarm function, press the corresponding AL1 or AL2 button again.
Note: While the buzzer alarm volume is fixed and cannot be adjusted, the radio and CD alarm volume can be adjusted to your desired level using the VOL dial. To select the station, refer to "RADIO OPERATION".
Snooze function
When the alarm sounds, press the SNOOZE button to stop the alarm temporarily. The AL1 or AL2 indicator will flash and it will sound again after 6 minutes. To cancel the SNOOZE function and repeat the alarm the next day, press the ⏻ button.
Sleep function
This function allows you to listen to CD or the radio up to 90 minutes and after that, the CD or radio turns off automatically.
- In standby mode, press the SLEEP button, and "90" is displayed. The CD player or radio turns on. (Note: The CD/RADIO/BUZZER switch must be set to the desired source). The "SLEEP" indicator lights up.
Note: The sleep function does not work in ON mode.
- Press the SLEEP button repeatedly to select the duration: 90, 60, 15 and 0 minutes.
- When the preset sleep duration elapses, the radio or CD player turns off automatically.
- To cancel the sleep function before the preset sleep duration elapses, press the Ⓗ button to turn off the radio immediately.
ON/ Standby mode
After connecting the power supply, the unit goes to standby mode. Press the ⏻ button to turn on the unit and press it again to go to standby mode.
Selecting the source
When the unit is switched on, slide the CD/RADIO/BUZZER switch to select the source.
Volume control
Turn the VOL dial to adjust the volume level.
Connecting headphones
Plug in headphones (not supplied) to the headphones jack at the back of the unit for private listening. The speaker output will be shut off automatically.
RADIO OPERATION
Listening to the radio
- When the unit is switched on, slide the CD/RADIO/BUZZER to select radio mode.
- Turn the TUNING dial to receive a station. The tuning indicator shows the selected frequency.
FM Stereo
In FM mode, slide the FM ST/FM button to select stereo or mono sound. When the FM signal is weak and sound distortion occurs, it is better to select mono sound.
Achieving optimum reception
In FM mode, extend and position the FM antenna to achieve optimum reception.
CD PLAYER OPERATION
Start playback
- Open the CD compartment. Insert a disc with the label side facing up.
- Close the CD compartment.
- When the unit is switched on, slide the CD/RADIO/BUZZER switch to select "CD". The unit will read the disc and after reading, the total number of tracks will be displayed for a short moment before returning to the clock display.
- Press the ▶||button to start playback from the first track. During playback, press the DISPLAY button to view the current track number for a short moment before returning to the clock display.
Pause playback
Press the ▶ button to pause the playback. The track number will flash. Press this button again to resume playback.
Stop playback
Press the ■ button to stop playback. Press the ▶||button to start playback from the first track.
Search function
Skip to the next/ previous track
- Press the ▶▶ button to skip to the next track.
- Press the ◀ button once to skip to the beginning of the current track. Press it twice to skip to the previous track.
Search within a track
During playback, hold down the ◀◀ or ▶▶ button to go fast backwards or forwards. Release the button when you reach the desired point. Normal playback will resume from that point.
Repeat/Random playback
During playback, press the REP/RAN button repeatedly to select the playback mode in the following sequence:
Repeat One (REP indicator flashes), Repeat All (REP indicator lights up), Random, Normal.
Programmed playback
In CD mode, you can program up to 20 tracks.
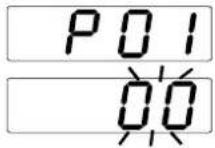
- In stop mode, press the PROG button. The program number "P01" will be displayed for a short moment and then "00" flashes.
- Press the ◀◀/▶▶ button to select the track number.
- Press the PROG button to confirm.
- Repeat steps 2 and 3 above to program the other tracks.
- To start programmed play, press the ▶II button.
- To clear the program, press the ■ button or open/close the CD compartment or go to standby mode.
MAINTENANCE
Care and maintenance
To clean the unit, unplug it and wipe off dust and stains with a soft cloth moistened with a mild soap and water solution only. Do not use benzene, thinner or similar chemicals to clean the unit.
Cleaning CD discs
If the music skips or does not play, the disc may need cleaning. Before playback, wipe the disc from the center out with a clean cloth. After use, store the disc in its case.

If at any time in the future you should need to dispose of this product, please note that waste electrical products should not be disposed of with household waste. Please recycle where facilities exist. Check with your local authority or retailer for recycling advice (Waste Electrical and Electronic Equipment Directive).
TROUBLESHOOTING GUIDE
| Problems | Recommendations |
| 1. The player or display does not work properly. | 1.1 Press the ON/STANDBY button to go to standby mode and press it again to turn on the unit.1.2 Reset the unit by unplugging the AC power cord for few seconds, then plug it back in. |
| 2. The disc does not play. | 2.1 Place the disc with the label side facing up.2.2 Ensure that the disc is free from scratches and fingerprints.2.3 Check that the discs/file formats are compatible; refer to "TECHNICAL SPECIFICATIONS".2.4 Clean the disc. |
| 3. Noise or distorted sound in radio mode. | 3.1 FM mode: extend and position the FM antenna to achieve the best reception. |
TECHNICAL SPECIFICATIONS
CD
Compatible discs and files CD, CD-R/RW, CD-DA
Radio
Tuning range FM: 87.5 - 108 MHz
Antenna FM: telescopic antenna
General
Output power (RMS) 2 x 1.2 W
Power consumption 14 W
Speakers 2.25" diameter, 8
Power source AC 230V \~ 50Hz
Dimensions 100 (H) x 165 (W) x 207 (D) mm
Weight 1.2 Kg
Note: Due to continuing improvements, the technical specifications are subject to change without notice.


- WARNING
- CLASS 1 LASER PRODUCT
- PRECAUTIONS
- INSTALLATION
- SAFETY
- AC VOLTAGE
- CONDENSATION
- BATTERIES
- BOX CONTENTS
- LOCATION OF CONTROLS
- INSTALLING THE BATTERY
- INSTALLING THE CLOCK BACK-UP BATTERY
- CLOCK BACK-UP
- BATTERY INSERTION
- PRECAUTIONS WHEN USING BATTERIES
- BASIC OPERATION
- CONNECTING THE POWER SUPPLY
- CLOCK AND ALARM TIME SETTING
- 12/24 HOUR DISPLAY
- SET THE CLOCK
- SET THE ALARM TIMES
- ALARM OPERATION
- SNOOZE FUNCTION
- SLEEP FUNCTION
- ON/ STANDBY MODE
- SELECTING THE SOURCE
- VOLUME CONTROL
- CONNECTING HEADPHONES
- RADIO OPERATION
- LISTENING TO THE RADIO
- FM STEREO
- ACHIEVING OPTIMUM RECEPTION
- CD PLAYER OPERATION
- START PLAYBACK
- PAUSE PLAYBACK
- STOP PLAYBACK
- SEARCH FUNCTION
- SKIP TO THE NEXT/ PREVIOUS TRACK
- SEARCH WITHIN A TRACK
- REPEAT/RANDOM PLAYBACK
- PROGRAMMED PLAYBACK
- MAINTENANCE
- CARE AND MAINTENANCE
- CLEANING CD DISCS
- TECHNICAL SPECIFICATIONS
- CD
- RADIO
- GENERAL
Marque : SCOTT
Modèle : CDX 650
Catégorie : Lecteur/enregistreur de cd