
HX-DU010EB - Disque dur externe SAMSUNG - Notice d'utilisation et mode d'emploi gratuit
Retrouvez gratuitement la notice de l'appareil HX-DU010EB SAMSUNG au format PDF.


| Type de produit | Disque dur externe |
| Capacité de stockage | 1 To (1000 Go) |
| Format | 2,5 pouces |
| Interface | USB 2.0 |
| Dimensions (L x l x h) | 111 x 82 x 19 mm |
| Poids | Environ 160 g |
| Alimentation | Par port USB (sans adaptateur secteur) |
| Vitesse de rotation | 5400 tr/min |
| Température de fonctionnement | 5°C à 55°C |
| Température de stockage | -20°C à 65°C |
| Systèmes d'exploitation compatibles | Windows, macOS |
| Câble inclus | Câble USB 2.0 |
| Logiciel inclus | Logiciel de sauvegarde Samsung (selon version) |
| Fonctions principales | Stockage portable, sauvegarde de données, transfert de fichiers |
| Entretien et nettoyage | Nettoyer avec un chiffon doux et sec. Éviter les chocs et l'humidité. |
| Sécurité | Aucune fonction de sécurité intégrée (mot de passe ou chiffrement logiciel possible) |
| Pièces détachées et réparabilité | Non réparable par l'utilisateur. Aucune pièce détachée disponible. |
| Informations générales | Marque : Samsung, Modèle : HX-DU010EB, Catégorie : Disque dur externe |
FOIRE AUX QUESTIONS - HX-DU010EB SAMSUNG
Questions des utilisateurs sur HX-DU010EB SAMSUNG
0 question sur cet appareil. Repondez a celles que vous connaissez ou posez la votre.
Poser une nouvelle question sur cet appareil
Téléchargez la notice de votre Disque dur externe au format PDF gratuitement ! Retrouvez votre notice HX-DU010EB - SAMSUNG et reprennez votre appareil électronique en main. Sur cette page sont publiés tous les documents nécessaires à l'utilisation de votre appareil HX-DU010EB de la marque SAMSUNG.
MODE D'EMPLOI HX-DU010EB SAMSUNG
STORY Station
External Hard Disk Drive
User's manual

natural_image
Illustration of a Samsung Story electronic device with no visible text or symbols on the bodyRead Me First
About this Manual
Your product comes with a quick installation guide and a user's manual.
Following the instructions and precautions of this manual will ensure easier and more enjoyable use of your STORY Station External Hard Disk Drive.
Quick Installation Guide
An installation guide is provided with the purchase of STORY Station External Hard Disk Drive.
The Quick Installation Guide explains product components and provides simple instructions on how to install the product.
User's Manual
The User's Manual contains detailed information about features and instructions on using your STORY Station External Hard Disk Drive.
Using this Manual
Carefully read and understand the "Handling Precautions" section before using the product.
Failure to follow all the instructions as outlined in the Handling Precautions section could result in damage to you or to your STORY Station External Hard Disk Drive.
■ Refer to the Troubleshooting section first if you experience a problem with the product.
Icon Guide
| Icon | Meaning |
 | Precautions These must be read thoroughly before using any of the functions. |
 | Caution This contains must-know information about functions. User must be careful. |
 | Note This contains useful information about the functions. |

Software and user manuals are available for download at the Samsung Hard Disk Drive website (www.samsunghdd.com). The content of this User's Manual may change without prior notice for product improvement purposes.
Handling Precautions
The following information serves to ensure user's safety and prevent damage to user's properties. Carefully read the information provided and use your product correctly.
Handling Precautions
This product must be connected to a USB port or USB supporting system that is equipped with a compatible power supply unit.

Always Backup your Important Data
The external HDD manufacturer does not guarantee data stored in the external HDD and will not assume responsibility for any mental or material damage incurred during data recovery.
Backup: Storing the original and a copy on two or more separate and accessible storage media.
Humidity
Moisture reacts with the oil on the surfaces of the disk and the head inside the HDD, contaminating the affected parts and components and even corrupting the stored data. In addition, prolonged exposure to moisture can corrode various parts and components.
Disassembly and Label Removal
Unauthorized disassembly of the product and unauthorized removal of the labeling will void your warranty.
Electrostatic
Do not touch the circuitry with your hands. Your HDD contains highly sensitive internal components. Passing on static electricity to the circuitry will cause irreparable damage to the head.
Shock
Protect the HDD from impact:
Your external HDD is very portable and is therefore highly vulnerable to damage from impact.
Protect the HDD from being dropped or tipped over during both use and storage.
Impact can make the read/write head to collide with the disk so it may cause bad sectors.
Depending on their location, bad sectors can cause various and potentially terminal disk read/write errors.
Magnets
Magnetic objects can cause various types of damage to the HDD, including data corruption.
Keep magnets and magnetic objects away from the HDD.
Regular Virus Scanning
Frequently scan the device for viruses and protect the device from virus infection.
Safely Remove Hardware
Always use the Safely Remove Hardware feature before shutting down the HDD or disconnecting the USB cable.
1MB=1,000,000bytes and 1GB=1,000,000,000bytes 1TB=1,000,000,000,000bytes
The storage capacity may differ depending on the drive formatting method, partition arrangement, and the type of operating system used.
Table of Contents
Read Me First
2 About this Manual
2 Quick Installation Guide
2 User's Manual
2 Using this Manual
2 Icon Guide
Handling Precautionst
3 Always Backup your Important Data
3 Humidity
3 Disassembly and Label Removal
3 Electrostatic
4 Shock
4 Magnets
4 Regular Virus Scanning
4 Safely Remove Hardware
Specifications
6 System Requirements
7 Components
7 Overview
Connecting your STORY Station
8 Installation
9 Windows
10 Macintosh
Using your STORY Station
11 Copying/Moving Files
11 Removable Disk Method
13 Safely Removing your STORY Station
13 For Windows
14 For Macintosh
STORY Station Software
15 STORY Station External Hard Disk Drive Software
15 Samsung Auto Backup
15 Samsung Auto Backup Installation
17 Data Backup using Samsung Auto Backup
23 Quick Backup
24 Restoring Backup Data
27 Samsung SecretZone™
28 Virtual Drive with Samsung SecretZone™
Troubleshooting
30 FAQ
Appendix
31 Partitioning and Changing File System Type
31 Reformat to FAT32
32 Reformat to NTFS
32 Format in Macintosh
33 Product Certifications
33 FCC
34 Warranty Information
Introduction
The STORY Station External Hard Disk Drive is a high-performance external hard disk drive that supports USB 2.0. Unlike conventional desktop disk drives, the STORY Station External Hard Disk Drive makes it possible for you to instantaneously add greater storage capacity to your system without having to take the computer apart.
This means that your STORY Station External Hard Disk Drive comes fully partitioned and formatted for your use and you can instantly access to the drive by simply plugging it into your computer through a USB port. Rebooting and other cumbersome steps are not necessary.
SecretZone™, which is part of the software bundle that comes with your STORY Station External Hard Disk Drive, allows you to protect and manage your private data.
Specifications
| Category | Specification |
| Interface | High Speed USB 2.0 |
| Transfer Rate | 480 Mbps Max. |
| Power | DC +12V, 2.0A |
| Operating System | Windows 2000 Pro / XP / Vista |
| Mac OS X 10.4.8 or Later | |
| Hard Disk Capacity | 500GB, 750GB, 1TB , 1.5TB |
| Dimensions (W x H x L) | 119.5mm X 41.85mm X 192.8mm |
| Color | Dark Gray |
| Format System | FAT32 |
System Requirements
• PC : Windows® 2000 Pro / XP / Vista
• Macintosh : Mac OS X 10.4.8 or Later
- Upgrade your operating system to the latest version to enjoy better performance and reliability.
Components
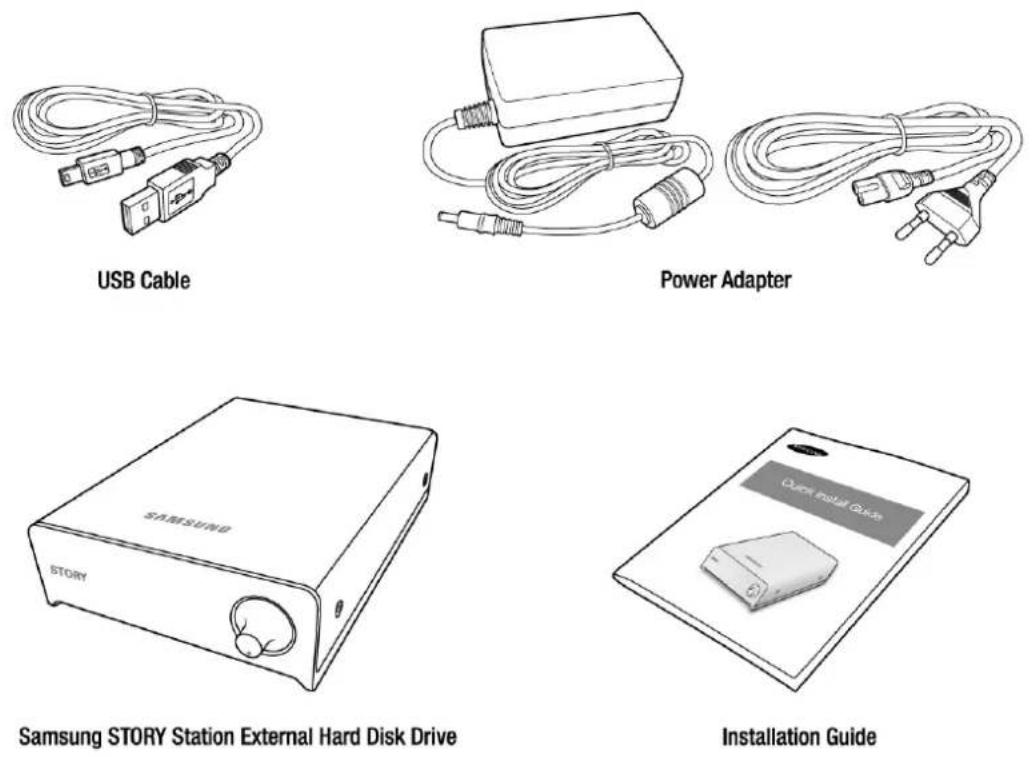
※ When you purchase a STORY STATION External Hard Disk Drive, make sure that all components have been included in your product package.
Overview


How to Operate the Power Dial
1) Power ON / OFF : Turn the dial to operate ON / OFF. (A clicking sound can be heard when shifting between ON and OFF.)
2) LOW LED Operation : Turn the dial to the right when the power is turned ON, and the LED gets brighter.
Connecting your STORY Station
Installation
Verify that the computer meets the minimum system requirements as outlined in #System Requirements.
Insert the USB cable to the desktop/laptop computer as shown in Figures 1 and 2:
● Figure 1. Connecting a STORY Station
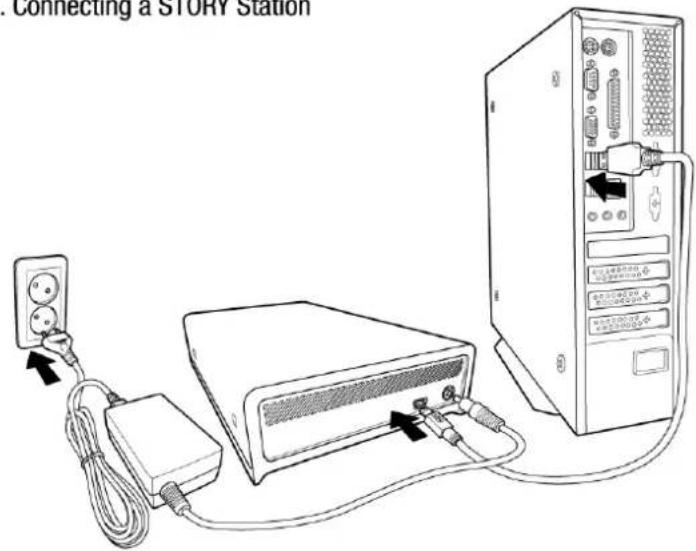
- Plug in the power adapter and connect the USB cable to the corresponding port on your desktop PC or notebook PC.
● Figure 2. Power on a STORY Station
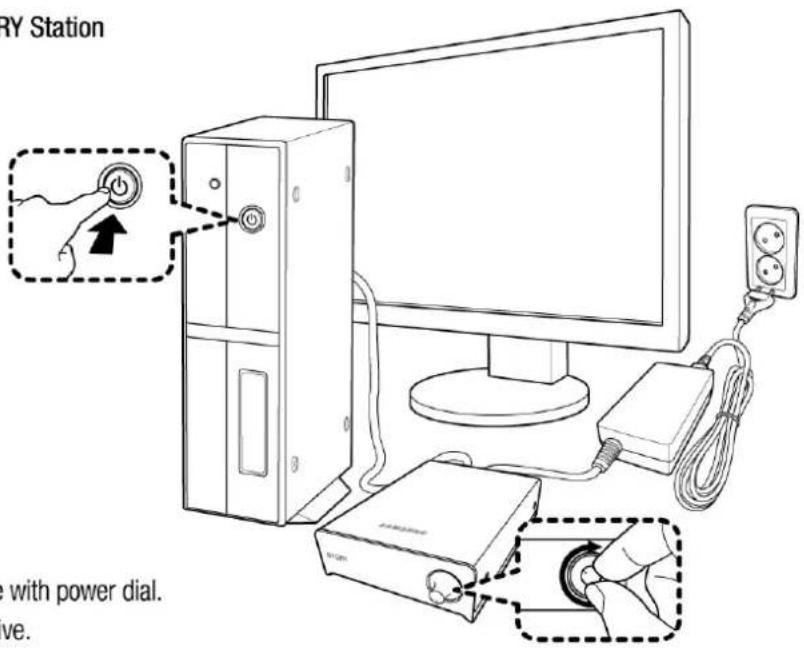
■ Turn the power on your drive with power dial. Now you can enjoy your drive.
Your STORY Station External Hard Disk Drive will automatically activate once connected to the computer.
Windows
When you connect the STORY Station External Hard Disk Drive to the computer a small icon will appear in the system tray at the lower right corner of the screen.
● Figure 3. System Tray indicating an external device

The operating system will recognize and display "Samsung" drive under "My Computer."
● Figure 4. In the Windows Explorer, you will see a new Samsung drive

You are now ready to use the Samsung STORY Station External Hard Disk Drive.
Macintosh
Connect your STORY Station External Hard Disk Drive to the computer. Your Macintosh operating system will then generate a SAMSUNG.
Figure 5. Macintosh External HDD connection icon

Finder
File
Edit
View

SAMSUNG
After clicking the SAMSUNG icon, the following folder will appear.
● Figure 6. Macintosh Folders
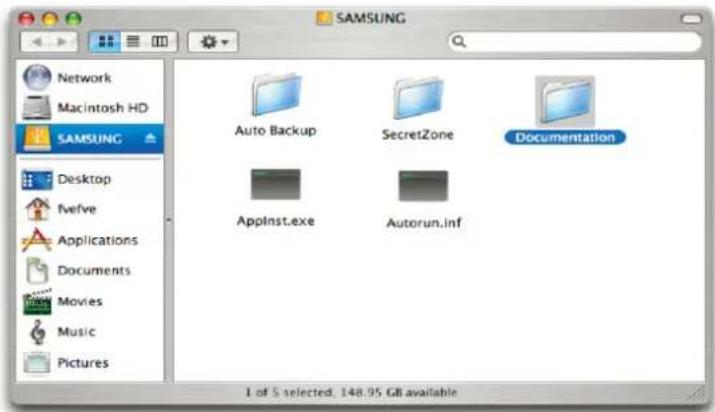

You are now ready to use the Samsung STORY Station External Hard Disk Drive. (Software included with your STORY Station External Hard Disk Drive does not support the Mac operating environment.)
Using your STORY Station
Copying / Moving Files
Now that you have successfully installed your new STORY Station External Hard Disk Drive, you copy or move files or whole folders from your new STORY Station to your computer and vice-versa.

It is important to understand the difference between Copy and Move.
Copy : is to make a duplicate folder or file and store it so that you have two copies.
Move : is to take a folder or file from one location and put it into another.
WHEN YOU MOVE A FOLDER OR FILE, YOU NO LONGER HAVE A BACKUP COPY.
Copy and paste files from the computer to the STORY Station External Hard Disk Drive (Removable Disk Method).
Removable Disk Method
For the purposes of this manual, we will make a copy of the Temp folder on the C drive of your computer and copy it to the STORY Station External Hard Disk Drive.
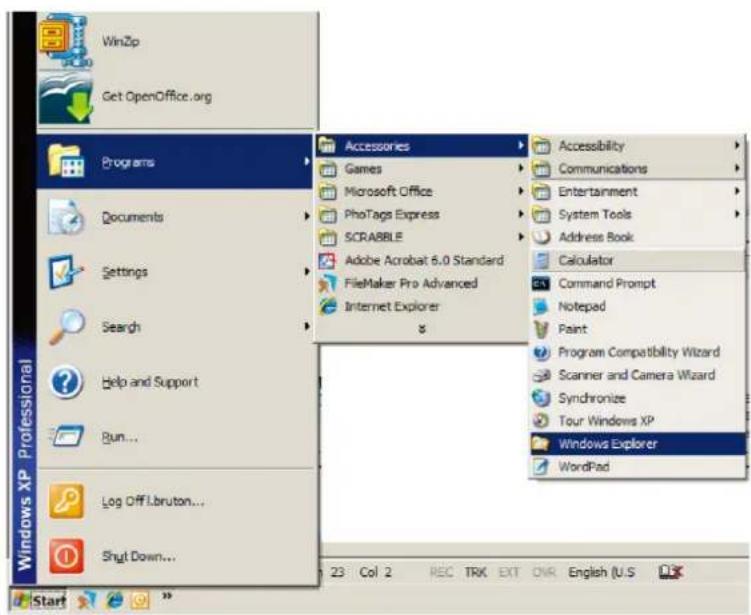
From the Windows Desktop click:
Start → Programs → Accessories → Windows Explorer
● Figure 7. Getting to the Windows Explorer
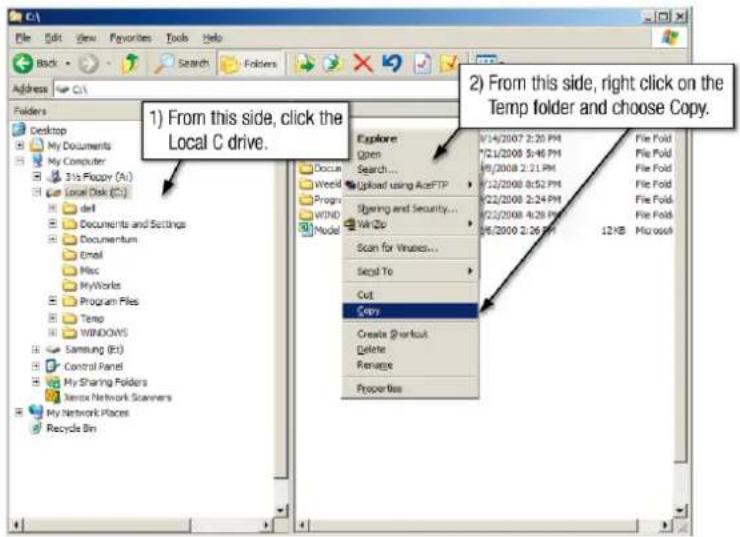
From the Windows Explorer, you will see various drive letters; A, C, your C drive is your local Hard Disk Drive. The STORY Station Drive will most likely be the E drive however, it could be any drive letter. For the purposes of this manual, we will assume that the STORY Station drive is the E drive. As well, for practice copying folders and files, we will copy the Temp folder onto the STORY Station drive.
From the Windows Explorer screen:
Click Local Disk C
From the right-hand pane:
Right-click the Temp folder → Click Copy
● Figure 8. When you Right-Click on a file or folder, you get another menu.
Now, we will copy the Temp folder from the Local C drive, to the Samsung E drive. From the left pane in the Windows Explorer : Right Click Samsung E → Click Paste
Figure 9. Using a Right-Click again, we can paste the Temp file onto the STORY Station drive.


NOTE : Detaching the USB cable while file transfer is in progress can damage your computer and/or STORY Station External Hard Disk Drive. If you need to disconnect the USB cable, wait for the transfer process to complete first and then disconnect using the "Safely Remove Hardware" option.
Safely Removing your STORY Station
For Windows
Right-click the arrow icon from the system tray at the lower right corner of your screen.
● Figure 10. The taskbar is located at the bottom-right of the screen.

Click "Safely Remove Hardware."
Figure 11. The 'Safely Remove Hardware' prompt will list every device that is attached to your system.
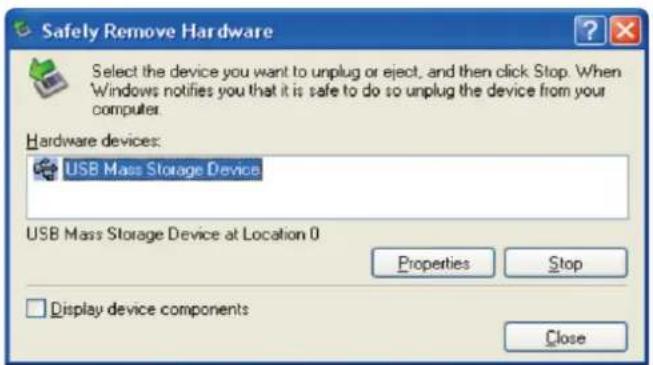
Click 'Samsung STORY Station USB Device'
Figure 12. This prompt will list all of the Mass Storage Devices like your Local Hard drive and your STORY Station Hard drive

When you see the "Safely Remove Hardware" message, you may safely remove the device from the system.
For Macintosh
Click the external hard disk drive icon and select "Eject "SAMSUNG."
Figure 13. For the Macintosh click the USB icon and choose Eject "SAMSUNG"

This safely disconnects the drive. It is now safe to detach the drive from the computer.

Do not disconnect STORY Station External Hard Disk Drive's USB cable from the computer while file transfer is in progress. Interrupting the file transfer could lead to data corruption and / or damage to your STORY Station External Hard Disk Drive.
STORY Station Software
STORY Station External Hard Disk Drive Software
Samsung STORY Station External Hard Disk Drive comes with Samsung Auto Backup and Samsung SecretZone™. These applications support the Windows only.
Connecting your STORY Station External Hard Disk Drive to the computer will automatically activate the installation wizard.
Select "Run Program" to install the applications.
Samsung Auto Backup and Samsung SecretZone™ will only be available when STORY Station External Hard Disk Drive is connected to your computer.
For further information, please refer to the Auto Backup and SecretZone™ user's manuals that accompanied your STORY Station External Hard Disk Drive.
Samsung Auto Backup
Samsung Auto Backup is a personal backup solution that enables you to backup individual files.
The application provides both manual and automatic (scheduled) backup features and includes various backup options such as backup in compressed file format and use of filters for backup files.
Samsung Auto Backup Installation
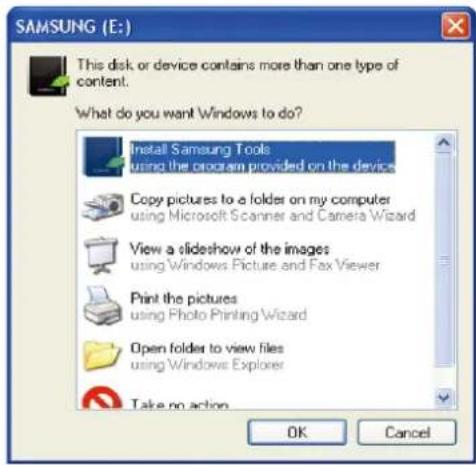
- You will see this dialog the first time you connect your STORY Station External Hard Disk Drive to the computer.
- Select "Install Samsung Tools" and the click "OK."

- Select "Install Samsung Auto Backup" to start the installation process.

- Once the preparation process is complete, InstallShield Wizards' greeting dialog will display.
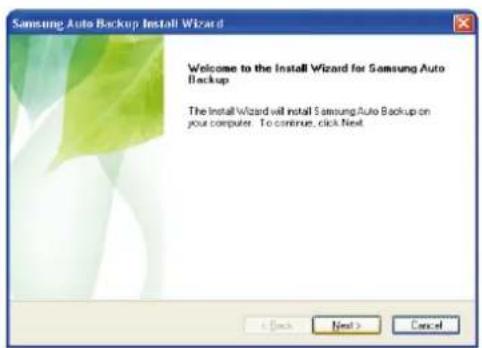
- Click "Next."
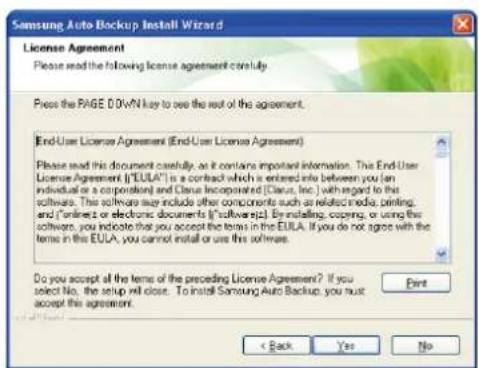
- The dialog will display the end user license agreement. Carefully read the agreement. Select "Yes".

- Select the destination for Samsung Auto Backup installation and then click "Next."

- Select the folder under which you wish the Samsung Auto Backup icon to be registered. Then, click "Next."
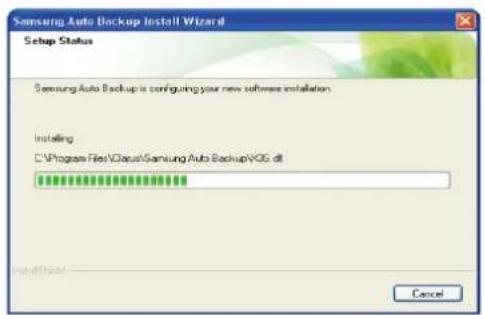
- The dialog will then display the installation progress.
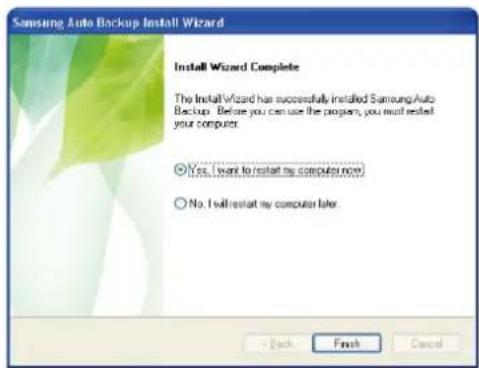
- Once the installation process is complete, a dialog requesting your decision on whether to reboot now or later will prompt. Click "Finish" to exit the installation wizard.
Select "Yes, I want to restart my computer now" and then exit the installation wizard in order to finalize Samsung Auto Backup installation.
Data Backup using Samsung Auto Backup
There are two ways to backup data:
■ Data Backup Options
■ Manual Backup
Quick Backup
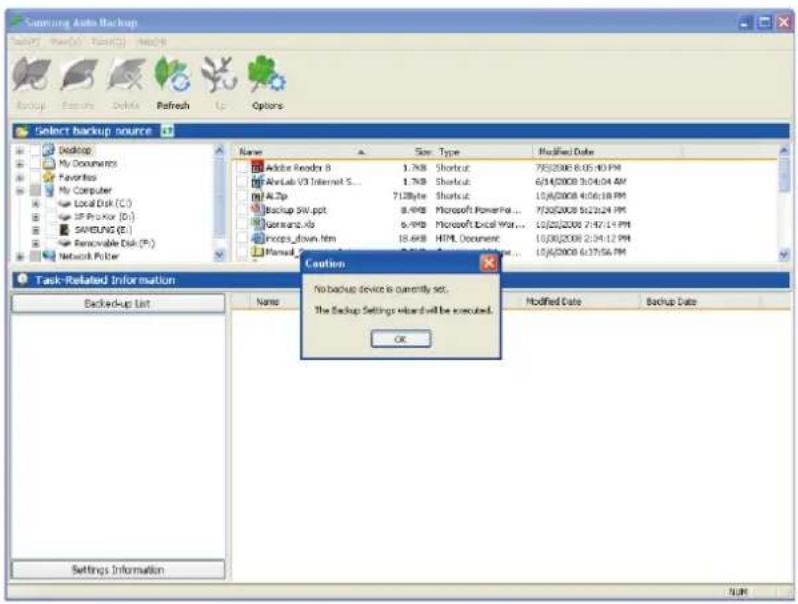
You will need to first configure backup options before using Samsung Auto Backup.
Launch Samsung Auto Backup by clicking Start → Programs → Samsung → Samsung Auto Backup.
Figure 14. Samsung Auto Back Screen
● Figure 15. Backup Destination Selection Dialog
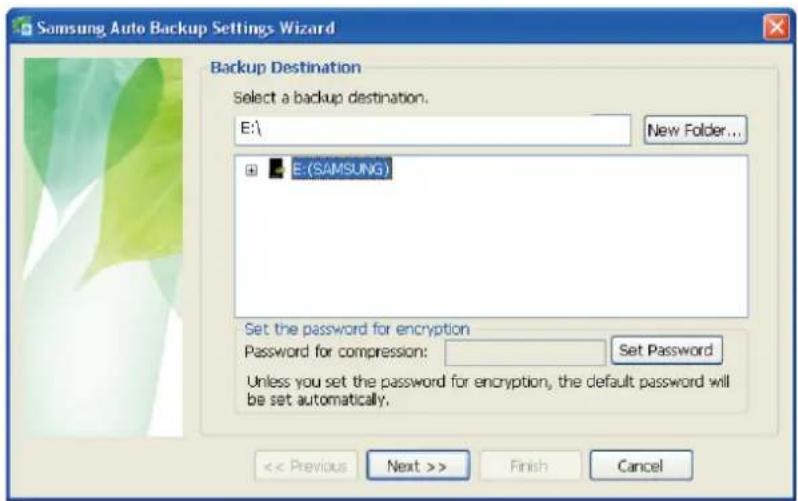
Designate the path to the backup device and then click "Next."
• Figure 16. Optional Settings Dialog

Configure the various backup options.
● Figure 17. File Filter Configuration Dialog
![Samsung Auto Backup Settings Wizard File Filter Specify the types of files to filter. File grouping Extension [Office File] [Document File] [Photo and Picture File] [Music File] [Movie and Video File] [Compressed files] Include only files with the following extensions. [All Files] Exclusion of the following only Add Change Delete > Finish Cancel](/content/2026/06/1279079/images/a24f960220fa7628b78547370c294e8dfa87e00058853a60a82527ac44ebcc29.jpg)
From the File Filter Configuration dialog, you will be able to select types of files you wish to backup and you wish to be excluded from the backup process. You can define these files by grouping or by specific file extensions. For file groups, the application provides preconfigured groups and the ability to add user-defined groups.
Clicking "Next" without making any change in this dialog sets the application to backup all types of files from the source.
● Figure 18. Backup Scheduling Dialog
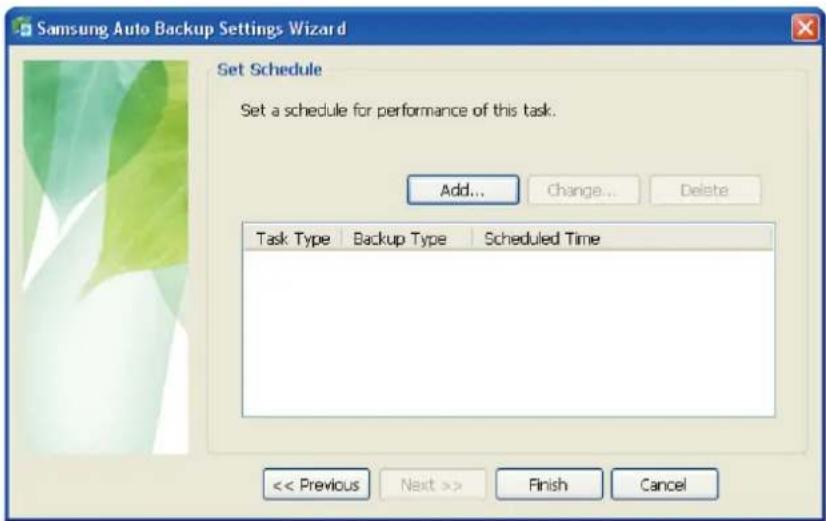
It's even possible for the user to schedule automatic backups. Click "Add" to configure and add a new Auto Backup schedule. Clicking the "Add" button will prompt the New Schedule dialog.
● Figure 19. New Schedule Dialog
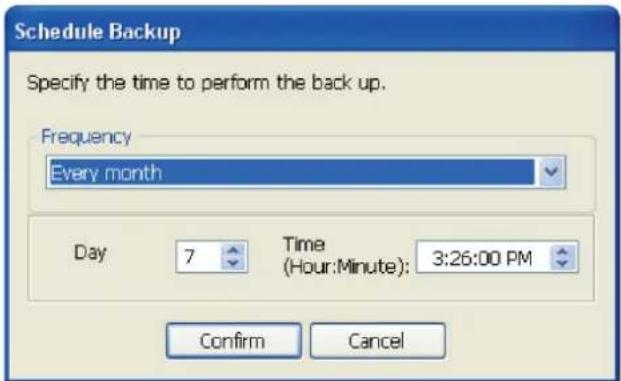
Select how often and when you wish Auto Backup to be performed and then click "OK."
From the Backup Scheduling dialog, click "Finish" to exit the backup configuration wizard. You are now ready to backup your data.
Samsung Auto Backup is configured to perform real time backup by default. Therefore, the application will automatically back up the content of "My Documents" after you exit the backup configuration wizard.
● Figure 20. Initial Application Screen

Once you have successfully configured Auto Backup, a new icon will appear on your system tray.
In this icon, the red section of the bar indicates the amount of storage device space used and the green section indicates the amount of space available.
Figure 21. System Tray

Double-click the icon to view detailed information about the device's space use.
● Figure 22. Device Information Screen

Select original file(s) you wish to back up by checking the file(s) and/or folder(s) from the Original File Selection window.
● Figure 23. Original File Selection Screen – Manual Backup

Select "Backup" from the "Task" menu or click "Backup" from the toolbar.
● Figure 24. Backup Completion Dialog

Quick Backup
Select file(s) and/or folder(s) you wish to back up. Right-click on your selection and then select "Quick Backup" from the context menu.
● Figure 25. Original File Selection Screen – Quick Backup

● Figure 26. Backup Completion Dialog


Quick Backup will only function with the backup device properly configured. Files and folder that have been backed up with Quick Backup are automatically stored as backups of originals.
Restoring Backup Data
You can restore your backup data using Samsung Auto Backup.
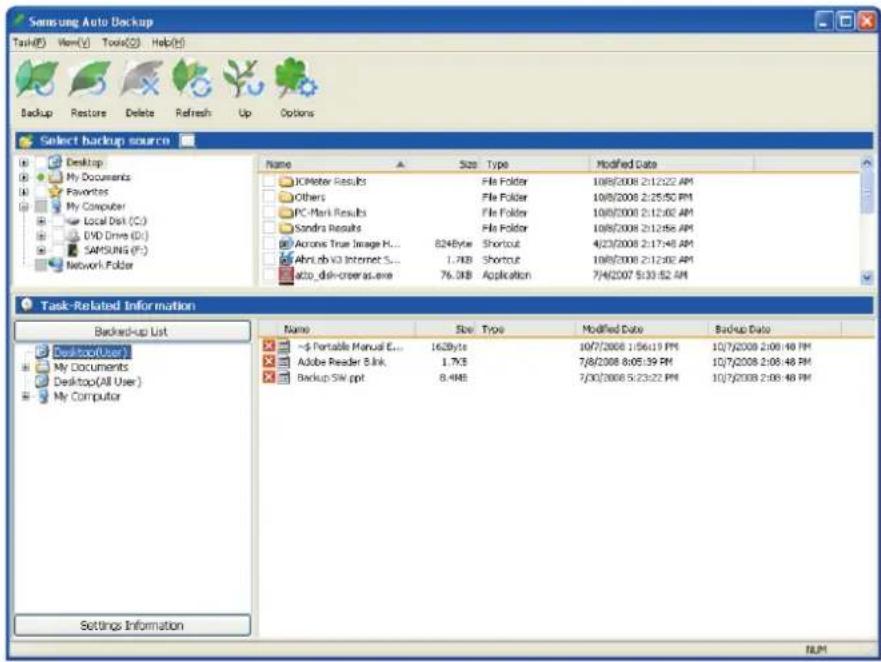
To restore your backup data using Samsung Auto Backup, you will need to launch the restore wizard. There are three ways of doing this. First, select the file(s) and/or folder(s) you with to restore and:
Right-click on selected files and select "Restore."
Select "Restore" from the "Task" menu.
Click on "Restore" from the toolbar.
● Figure 27. Restore Selection Screen
● Figure 28. Restore Destination Selection Screen
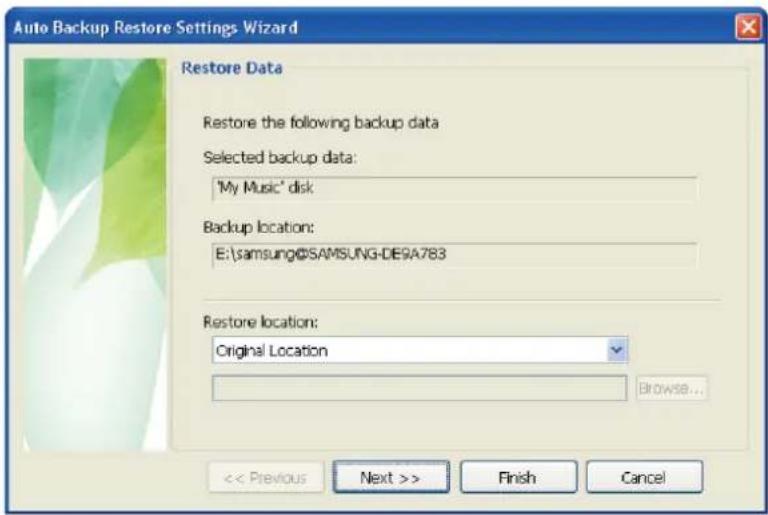
Restore wizard's first screen will prompt you to select the restore backup file destination.
There are two options available to you, which are:
Restore backup files to their original folder or
Designate a new destination folder to restore backup files to.
● Figure 29. Restore Options Screen
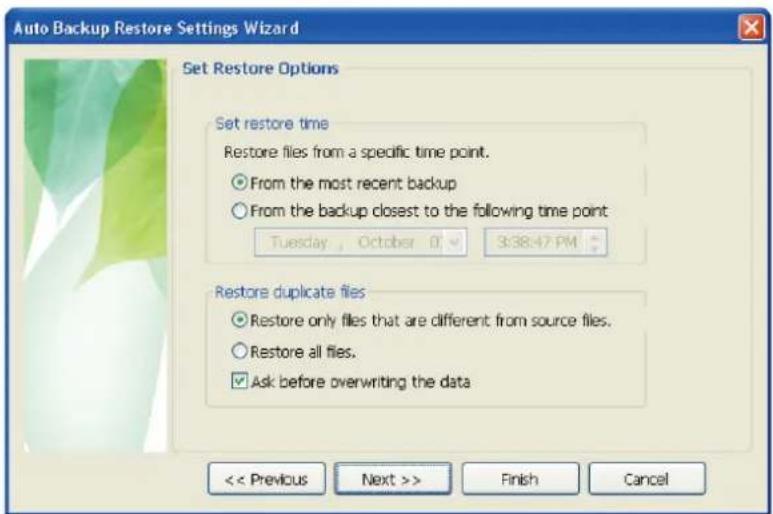
Restore wizard will then present restore time and duplicate file restoring options.
You will be able to choose to restore backup files from the most recent backup or from the closest backup to a specified date and time.
As for duplicate backup files, you have the option to restore backup files that are different from their originals only or to restore all the files.
● Figure 30. File Filter Screen
![Auto Backup Restore Settings Wizard File Filter Specify the types of files to filter. File grouping Extension [Office File] [Document File] [Photo and Picture File] [Music File] [Movie and Video File] [Compressed files] Include only files with the following extensions. [All Files] Exclusion of the following only Add Change Delete > Finish Cancel](/content/2026/06/1279079/images/6b0ec2b7023346063f7b825dc230cb4a9c10e667be46cf492f887a5c9326d0ff.jpg)
Restore file filter wizard lets you designate the types of files you wish to restore.
Designate the types of file extensions and/or file groups you wish to restore or exclude from restoring and then click "Finish." Clicking "Finish" without making any change in this dialog sets the application to restore all file types.
After configuring the options, click "Finish" to start restoring backup files.
Samsung Auto Backup Engine window will prompt and display the restore progress.
This engine ignores duplicate files and restores only those files with different data or creation date, resulting in much faster processing times.
Once the process is complete, the following screen will display:
● Figure 31. Restore Completion Screen

Samsung SecretZone™
Samsung SecretZone™ is an information privacy software application operating in the Windows environment.
Samsung SecretZone™ enables you to save and protect important and private data from others with ease.
Samsung SecretZone™ Installation
-
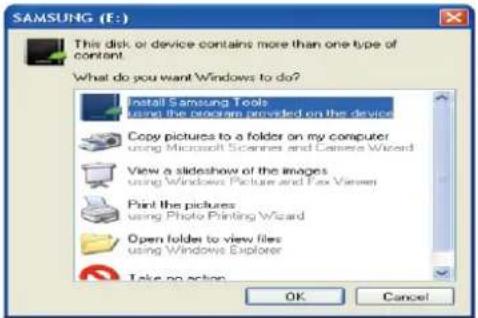
You will see the following dialog the first time you connect your STORY Station External Hard Disk Drive to the computer.
-
Select "Install Samsung Tools" and then click "OK."
-
Select "Install Samsung SecretZone™".


- Once the preparation process is complete, InstallShield Wizard's greeting dialog will display.

- Click "Next."

- You will then be asked to enter an administrator password. Enter the password and then click "Next" to continue.

Samsung SecretZone™ is a security software and will not allow you access to protected data without a proper ID and password. Be careful not to lose your ID and password.
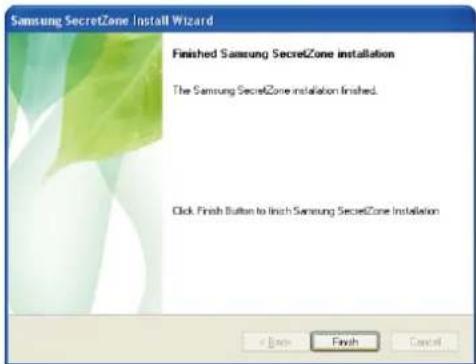
- Click "Finish" to complete the installation process.
Virtual Drive with Samsung SecretZone™

- If select "Creation" of "File" menu or "Creation" icon of icon bar, Volume Image Cration Wizard will be displayed.
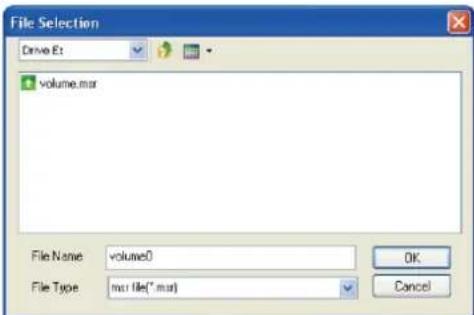
- Click "Browse" and designate the file you wish to create.

- Designate the size of the volume image you wish to create.

Software limitations require that when using a FAT32 file system the maximum volume image size is 2 gigabytes. Using the NTFS file system allows for a volume image size of up to 2 terabytes

- Designate the drive to connect with, the file system, label, accessibility, and idle session limit.

- Designate the volume's password and algorithm.
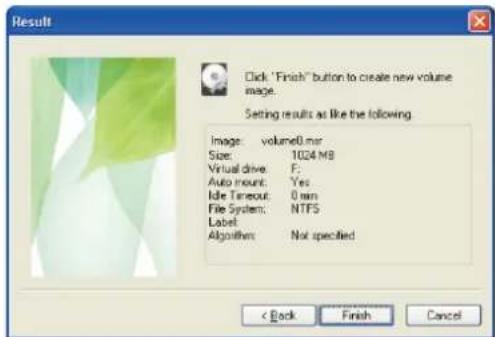
- Verify your virtual image settings.

- If the settings are correct, click "Finish" to generate the volume image.
You've now created a virtual drive.
Troubleshooting
- Check the USB cable connection.
- Check the LED light on the HDD.
- Check the power supply to STORY Station External Hard Disk Drive.
■ Ticking noise is an indication of insufficient power.
- If the drive is not being recognized, try plugging it into a different USB port.
FAQ
Q1. File transfer takes too long.
A1. You will experience slow file transfer speeds if your computer does not support USB 2.0 or if you do not connect STORY Station External Hard Disk Drive to a USB 2.0 port. Try connecting STORY Station External Hard Disk Drive to a different port or, if your computer does not support USB 2.0, purchase a separate USB 2.0 port.
Q2. The actual storage capacity of STORY Station External Hard Disk Drive is different than the capacity shown on the packaging.
A2. Type of file system used for the drive, partitioning arrangement, type of operating system, and various other factors can affect the actual storage capacity displayed by your computer. (1MB=1,000,000bytes and 1GB=1,000,000,000bytes. 1TB=1,000,000,000,000bytes)
Q3. I connected my STORY Station External Hard Disk Drive, and the computer seems to recognize it, but the drive won't show up under Windows Explorer.
A3. STORY Station External Hard Disk Drive is by default formatted to FAT32 and will work normally when you connect it to your computer. However, if the partition has been erased or the file system has been changed to a one that's not recognized by Windows, the drive will not appear under Windows Explorer. Try formatting the drive to FAT32 or NTFS. (Caution: Formatting will erase all data stored in the drive.)
Q4. I am using Windows XP and cannot format the drive to FAT32.
A4. Windows operating systems that followed Windows NT have limited FAT32 formatting to 32GB. Therefore, if you wish to format your STORY Station External Hard Disk Drive to FAT32, you will need to download a format utility from our website. (Caution: Formatting will erase all data stored in the drive. We recommend that you back up your data before proceeding.)
Q5. My computer will not boot up properly.
A5. If you boot up your system with STORY Station External Hard Disk Drive connected to the computer, it's possible that your system's BIOS is attempting to boot from the external HDD. Change the BIOS booting sequence or disconnect the external HDD from the system and then try booting again.
Q6. I formatted my STORY Station External Hard Disk Drive and lost all the bundle software.
A6. Bundle applications that came with your STORY Station External Hard Disk Drive are available for download at Samsung Electronics' customer support website.
Q7. I am using a Mac, and I can't copy files.
A7. This could be a file system compatibility issue. By default, STORY Station External Hard Disk Drive is formatted to FAT32 for cross platform compatibility. If the drive has been formatted to NTFS, data stored in the drive can only be read by Mac systems.
Q8. What is the maximum settable size for a security zone?
A8. The FAT32 file system limits the size of any file on the drive to a maximum of 4GB. To ensure reliable operation under FAT32, SecretZone™ limits each virtual drive's size to a maximum of 2GB. Windows PC owners who wish to utilize capacity greater than 2GB should re-format their external drive to NTFS in the Windows operating system.
Appendix

WARNING – PARTITIONING AND FORMATTING YOUR DRIVE WILL PERMANENTLY ERASE ALL THE FILES ON THE DRIVE. DO NOT ATTEMPT TO DO THIS UNLESS ALL OF YOUR FILES HAVE BEEN BACKED UP AND CHECKED FOR RELIABILITY AND READABILITY.
Partitioning and Changing File System Type
It's possible to partition your STORY Station External Hard Disk Drive and change the file system type.
• Reformat to FAT32
- Reformat to NTFS
• Reformat in Macintosh
Reformat to FAT32
- Use Samsung USB Format Utility to format your STORY Station External Hard Disk Drive to FAT32.
(Samsung USB Format Utility is a Windows application and is available for downloaded from Samsung's online Customer Support page.)
• Figure 32. FAT format utility page

Reformat to NTFS
Following describes formatting to NTFS in Windows XP:
- Connect STORY Station External Hard Disk Drive to the computer.
- Click "Start" from the lower left corner of your screen.
- Right-click "My Computer" and then select "Manage."
- From the "Computer Management" tool, select "Disk Management."
- Right-click the drive you wish to format and then select "Delete Partition."
- Once drive partition has been deleted, right-click the drive you wish to format and then select "New Partition" as shown in the diagram below.
- From Create Partition Wizard, select "Primary Partition" and then enter the desired size of the partition.
- From the "File System" menu, select "NTFS" and format

WARNING – PARTITIONING AND FORMATTING YOUR DRIVE WILL PERMANENTLY ERASE ALL THE FILES ON THE DRIVE. DO NOT ATTEMPT TO DO THIS UNLESS ALL OF YOUR FILES HAVE BEEN BACKED UP AND CHECKED FOR RELIABILITY AND READABILITY.
Format in Macintosh
Following describes formatting in Mac OS X:
- Launch Mac OS X's "Disk Utility" tool.
- Open the main drive folder from the desktop. Open the "Applications" folder and then the "Utilities" folder.
- Select the "Disk Utility" file.
- Select the drive you wish to reformat.
- Select the "Partition" menu and then, from the "Options" menu, the type of partition you wish to create.
- Select the drive volume from the "Name" menu and the desired format from the "Format" menu.

Once formatting is complete, the drive will appear on your desktop.
Product Certifications
CE (European Union/Community)
VCCI (Voluntary Control Council for Interference by Information)
FCC (Federal Communications Commission)
C-TICK
KCC (Korea Communications Commission)
BSMI (Bureau of Standards, Metrology and Inspection)
cUL (C- Underwriter's Laboratories, Inc)
TUV (Technischer Überwachungs Verein)
CB
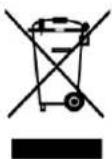
This marking on the product, accessories or literature indicates that the product and its electronic accessories (e.g. charger, headset, USB cable) should not be disposed of with other household waste at the end of their working life. To prevent possible harm to the environment or human health from uncontrolled waste disposal, please separate these items from other types of waste and recycle them responsibly to promote the sustainable reuse of material resources.
Household users should contact either the retailer where they purchased this product, or their local government office, for details of where and how they can take these items for environmentally safe recycling.
Business users should contact their supplier and check the terms and conditions of the purchase contract. This product and its electronic accessories should not be mixed with other commercial wastes for disposal.
The Names and Content of Toxic and Hazardous Substances or Elements
| Parts | Toxic and hazardous substances or elements | |||||
| Pb | Hg | Cd | Cr^6+ | PBB | PBDE | |
| Printed Circuit Assemblies | X | O | O | O | O | O |
| Head Disk Assemblies | X | O | O | O | O | O |
| PBA | X | O | O | O | O | O |
| HDA | X | O | O | O | O | O |
| Cable | X | O | O | O | O | O |
| Plastic | X | O | O | O | O | O |
| Gum | X | O | O | O | O | O |
| ○ Indicates that the concentration of the hazardous substance in all homogeneous materials in the parts is below the relevant threshold of the SJ/T11363-2006 standard.× Indicates that the concentration of the hazardous substance of least one of all homogeneous materials in the parts is above the relevant threshold of the SJ/T11363-2006 standard. | ||||||
FCC
| CAUTION: Changes or modifications not expressly approved by the part responsible for compliance could void the user's authority to operate the equipment. | |
| Class B | Note: This equipment has been tested and found to comply with the limits for a Class B digital device, pursuant to part 15 of the FCC Rules. These limits are designed to provide reasonable protection against harmful interference in a residential installation. This equipment generates uses and can radiate radio frequency energy and, if not installed and used in accordance with the instructions, may cause harmful interference to radio communications. However, there is no guarantee that interference will not occur in a particular installation. If this equipment does cause harmful interference to radio or television reception, which can be determined by turning the equipment off and on, the user is encouraged to try to correct the interference by one or more of the following measures:- Reorient or relocate the receiving antenna.- Increase the separation between the equipment and receiver.- Connect the equipment into an outlet on a circuit different from that to which the receiver is connected.- Consult the dealer or an experienced radio/TV technician for help. |
Warranty Information
The following limited warranty applies to the Samsung external hard disk drive but does not supersede regional and national laws and regulations.
Limited Warranty
Samsung makes the following limited warranties during the warranty period: (a) the Products will function properly under normal use; (b) the Products will be free from defects in materials or workmanship; (c) the Products will conform to the published specifications; and (d) the Products will conform to any additional specifications agreed to in writing by the parties.
Samsung warranties do not cover any problem that is caused by (a) commercial use; accident; abuse; neglect; shock; electrostatic discharge; heat or humidity beyond product specifications; improper installation; operation; maintenance or modification; or (b) any misuse contrary to the instructions in the user's manual; or (c) lost passwords; or (d) malfunctions caused by other equipment.
Our limited warranties are void if a product is returned with removed, damaged, or tampered labels or any alterations (including removal of any component or external cover). Our warranties do not cover data loss – back up the contents of your drive to a separate storage medium on a regular basis. Also, consequential damages; incidental damages; and costs related to data recovery, removal and installation are not recoverable under our warranties.
Warranty Period
The warranty period for product is three (3) years from the documented date of purchase from Samsung or a Samsung' authorized reseller.
Customer Service
To request warranty service, please contact the place of purchase, or visit our web site (www.samsunghdd.com) for information on obtaining service or an RMA (Return Material Authorization) number. Submit your phone number, e-mail, address, name, product model, and serial number(s) and an RMA number with all pertinent information will be provided to you for returning product to Samsung. When you return the product to Samsung, the product must be properly packaged in original packing with a traceable forwarder and freight prepaid to the return address listed on the RMA. Remember to write the RMA number on the out side of box, or the shipment will be refused and returned to you at freight collect.
Samsung, or an authorized Samsung service center, will replace your product with a functionally equivalent product. Samsung will not return your original drive and data recovery is not included.
It is highly recommended that you backup your data. Once your drive is received at Samsung, the ownership of the product and all content therein will be transferred to Samsung.
Please contact Samsung with any comments or inquiries at www.samsunghdd.com
SAMSUNG
Samsung Electronics Co., Ltd.
STORAGE SYSTEM DIVISION
HEAD OFFICE: 416, MAETAN-3 DONG, YEONGTONG-GU, SUWON SI, GYEONGGI-DO, KOREA, 443-742
FAX: 82-31-200-3536
Copyright
Samsung Electronics reserves all copyrights to the content of this manual. Copyright laws prohibit reproduction of this manual in part or whole by any third party without the explicit consent of Samsung Electronics.
Samsung Electronics does not assume any patent responsibility for the use of information contained in this manual.
Disclaimer
This user's manual has been subjected to thorough reviews and verifications to ensure accuracy of its content and contains information that's pertinent to the model and series it describes at the time of publication. However, content of this manual and/or product specifications are subject to change without prior notice and with no direct or indirect liability on Samsung Electronics' part concerning such change.


- STORY Station
- External Hard Disk Drive
- User's manual
- Read Me First
- About this Manual
- Quick Installation Guide
- Using this Manual
- Handling Precautions
- Always Backup your Important Data
- Humidity
- Disassembly and Label Removal
- Electrostatic
- Shock
- Magnets
- Regular Virus Scanning
- Safely Remove Hardware
- Table of Contents
- Handling Precautionst
- Specifications
- Connecting your STORY Station
- Using your STORY Station
- STORY Station Software
- Troubleshooting
- Appendix
- Introduction
- System Requirements
- Components
- Overview
- How to Operate the Power Dial
- Installation
- Windows
- Macintosh
- Copying / Moving Files
- It is important to understand the difference between Copy and Move.
- Removable Disk Method
- Safely Removing your STORY Station
- For Windows
- For Macintosh
- STORY Station External Hard Disk Drive Software
- Samsung Auto Backup
- Samsung Auto Backup Installation
- Data Backup using Samsung Auto Backup
- Quick Backup
- Restoring Backup Data
- Samsung SecretZone™
- Samsung SecretZone™ Installation
- Virtual Drive with Samsung SecretZone™
- FAQ
- Partitioning and Changing File System Type
- Reformat to FAT32
- Reformat to NTFS
- Following describes formatting to NTFS in Windows XP:
- Format in Macintosh
- Following describes formatting in Mac OS X:
- Product Certifications
- Warranty Information
- Limited Warranty
- Warranty Period
- Customer Service
- SAMSUNG
- Copyright
- Disclaimer
Marque : SAMSUNG
Modèle : HX-DU010EB
Catégorie : Disque dur externe