
EM-SL30 - Four à micro-ondes SANYO - Notice d'utilisation et mode d'emploi gratuit
Retrouvez gratuitement la notice de l'appareil EM-SL30 SANYO au format PDF.


| Type de produit | Four à micro-ondes |
| Marque | Sanyo |
| Modèle | EM-SL30 |
| Capacité | 20 litres |
| Puissance micro-ondes | 800 W |
| Puissance grill | 1000 W |
| Dimensions (L x P x H) | 450 x 350 x 280 mm |
| Poids | 12 kg |
| Alimentation | 230 V, 50 Hz |
| Puissance consommée | 1200 W |
| Fonctions | Micro-ondes, grill, décongélation, combinaison |
| Type de commande | Électronique avec affichage numérique |
| Minuterie | Oui, jusqu'à 99 minutes |
| Plateau tournant | Oui, en verre |
| Sécurité | Verrouillage enfant, arrêt automatique |
| Entretien et nettoyage | Nettoyer avec un chiffon humide, ne pas utiliser de produits abrasifs |
| Pièces détachées et réparabilité | Plateau tournant, guide d'ondes disponibles |
| Informations générales | Notice d'utilisation de 48 pages disponible en PDF |
FOIRE AUX QUESTIONS - EM-SL30 SANYO
Questions des utilisateurs sur EM-SL30 SANYO
0 question sur cet appareil. Repondez a celles que vous connaissez ou posez la votre.
Poser une nouvelle question sur cet appareil
Téléchargez la notice de votre Four à micro-ondes au format PDF gratuitement ! Retrouvez votre notice EM-SL30 - SANYO et reprennez votre appareil électronique en main. Sur cette page sont publiés tous les documents nécessaires à l'utilisation de votre appareil EM-SL30 de la marque SANYO.
MODE D'EMPLOI EM-SL30 SANYO
INSTRUCTION MANUAL
EM-SL30
Microwave Oven With Super Showerwave, Fan Oven And PowerGrill
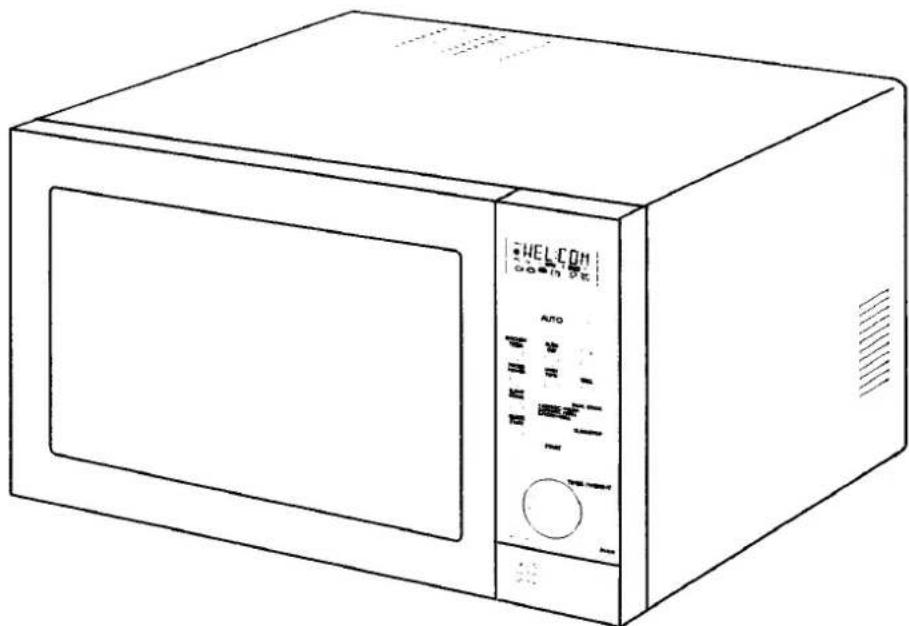
"Every good chef needs a shower"
Gary Rhodes
TABLE OF CONTENTS
Oven Specification 4
Safety Instructions
How To Use Your Oven Safely 4
Other Important Safety Instructions 5
Setting Up & Getting To Know Your Oven
Installation 6
Oven Parts and Accessories 7
Oven Control Panel 8
Setting The Language 9
Setting The Clock 10
Child Lock / Demonstration Mode 10
Kitchen Timer 11
Quick Start 11
MAFF Rating 11
Suitable Cookware 12-13
Operating Instructions
Quick Reference Guide to 8 Way Cooking 14
Manual Operation
Microwave Cooking 15
Grill Cooking and Thermal Grill Cooking 16
Convection Cooking 17
Dual Cooking 18-19
Multi Stage Cooking 20
Automatic Operation
Auto Weight Defrost & Charts 21-24 Direct Access Cooking, Charts & Recipes 25-35 Slow Cooking & Recipes 36-43
Care Of Your Microwave Oven
Questions and Answers 44
Care and Cleaning 45
Before Calling For Service 45
Imperial to Metric Conversion Table 46
Warranty 46
Min. / Max. Weights to use with 47
Direct Access Programs
Easy Use Chart 48
SPECIFICATIONS
| EM-SL30 | |
| Power Source | 230 - 240 V |
| Maximum Output Power | 900 W* |
| Power Grill | 1200 W |
| Convection Heater | 1200 W |
| Oven Capacity | 0.8 cu. ft. |
| Outside Dimensions (W x D x H) | 490 x 430 x 322 |
| Net Weight | 18 Kg |
| MAFF Rating | 900 / E |
*According to IEC 705 test procedures.
HOW TO USE YOUR OVEN SAFELY (MICROWAVE)
- When boiling water or other liquids, be sure to use a wide mouthed container, this will allow air bubbles to escape freely and prevent boiling over. Overheating the liquid beyond boiling point can occur without the evidence of bubbling. This could result in a sudden boil over of the hot liquid.
- Do not attempt to operate the oven while empty as this will cause damage.
- Do not deep fry in the microwave oven as the temperature of the oil cannot be controlled and it may overheat.
- Never completely seal containers in the microwave oven. Coverings are necessary but containers must not be airtight.
-
Small quantities of food with low moisture content or high fat or sugar content can burn, dry out or catch fire if cooked or re-heated too long. Please note that the heating / cooking period required is extremely short: for example it only takes approximately 15 seconds to heat one mince pie or similar.
-
Always pierce food which has a skin or membrane, for example, eggs, potatoes, tomatoes, apples, sausages etc. If you don't pierce them steam will build up inside and they may explode.
- When disposable containers of plastic, paper or other combustible materials are used to reheat food, it is advisable to check from time to time during the cooking cycle.
NOTE
It is quite normal for steam to be emitted around the door, for misting to occur on the door, or even for water droplets to appear below the door during the cooking cycle. This is merely condensation from the heat of the food and does not affect the safety of your oven. The door is not intended to seal the oven cavity completely but its special SANYO design contributes to the complete safety of the appliance.
ALTHOUGH YOUR OVEN IS PROVIDED WITH SAFETY FEATURES, IT IS IMPORTANT TO OBSERVE THE FOLLOWING:
a. Do not tamper with safety interlocks.
b. Do not place any object between the oven and the door or allow any food residue to accumulate on sealing surfaces. Wipe the door sealing area frequently with a mild detergent, rinse and wipe dry. Never use abrasive powders or pads.
c. When opened, the door must not be subjected to strain, for example, a child hanging on an opened door may cause the oven to fall forward resulting in injury.
d. If any damage is apparent, do not operate the oven. Contact your nearest SANYO SERVICE CENTRE.
e. Children may use the appliance only without supervision as long as instructions had been given which enables the child for safe operation and makes the child aware of the dangers of false operation.
OTHER IMPORTANT SAFETY INSTRUCTIONS
The following safety precautions should be followed when using this appliance:
- Read all instructions before first use.
- When using the grill and / or convection function for the first time, smoke and odour may be given off for a few minutes. This is normal during first operation, and is no cause for alarm.
- As with most cooking appliances, close supervision is necessary.
If a fire should start:
* Keep the oven door closed.
* Turn the oven off.
* Disconnect the power cord or shut off the power at the mains.
Other Important safety points to remember are:
WHEN COOKING BY MICROWAVE:
- Do not use wire ties in the oven. Be sure to inspect purchased items for wire ties and remove before placing food in the oven.
- It is important to keep the oven interior clean. Food particles left on the oven walls reduce the efficiency of the microwaves.
-
Do not heat foods or liquids in bottles or jars with lids on. Air must be allowed to escape from the container.
-
Milk or food for babies should be heated on 450W. It should then be stirred thoroughly and tested to ensure that it is at the correct temperature before giving it to the baby.
- Care must be taken when removing cups of hot liquid from the turntable. Cups should be lifted not slid to the edge of the turntable to prevent tipping.
- Never microwave eggs in the shell since they may explode. The egg yolk may pop because of a build-up of steam inside the membrane. To prevent this, pierce the membrane before cooking it.
WHEN COOKING BY GRILL / CONVECTION:
- Take care not to spill water on the glass viewing window during or immediately after cooking as it may crack.
- Be sure to use an oven glove when loading and unloading the oven. Care should be taken to avoid touching cavity walls inside oven.
- Be careful not to touch the viewing window when loading or unloading the oven.
- The top of the cabinet gets very hot, therefore do not place items on the oven.
WARNING
(a) Do not adjust or repair microwave oven yourself. Do not operate the oven if it is damaged, until it has been repaired by a service engineer trained by the manufacturer.
(b) It is dangerous for anyone other than a properly qualified engineer trained by the manufacturer to carry out adjustments or repairs.
(c) If the power supply cord is damaged, it must be replaced by the manufacturer or its service agent or a similarly qualified person in order to avoid a hazard.
(d) On no account remove or interfere with any parts or screws. THIS COULD PROVE VERY DANGEROUS.
SAVE THESE INSTRUCTIONS
INSTALLATION
CONNECTING TO THE MAINS
Before you use your oven, check that the voltage shown on the data label located on the face of the oven conforms with your mains supply. The mains lead is fitted with a 13 amp plug containing a 13 amp fuse. If the fuse requires replacing at any time, the fuse cover should be removed using a small screw-driver to lever it out. The old fuse should be replaced by a 13 amp fuse and the fuse cover must be refitted before the plug is used again.
If the plug supplied on the mains lead is not suitable for the socket in your home, it should be cut off and disposed of safely, or destroyed, to avoid any possible shock hazard resulting from the plug being inserted into a 13 amp socket elsewhere in the house. A suitable replacement plug should then be fitted. (If a 13 amp plug and socket are not used, the circuit supplying the oven should contain a 13 amp fuse).
If the fuse cover is lost or damaged, the plug must not be used until a replacement is obtained. Replacement fuse covers are available from SANYO SERVICE CENTRES. It is important that the colour of the replacement fuse cover corresponds with the coloured insert or as embossed in words on the base of the plug.
WARNING - THIS APPLIANCE MUST BE EARTHED
IMPORTANT The wires in this mains lead are coloured in accordance with the following code: Green-and-yellow: Earth. Blue: Neutral. Brown: Live.
As the colours of the wires in the mains lead of this appliance may not correspond with the coloured markings identifying the terminals in your plug, proceed as follows:
The wire which is coloured green-and-yellow must be connected to the terminal in the plug which is marked with the letter E or by the earth symbol ⊥ or coloured green or green-and-yellow.
The wire which is coloured blue must be connected to the terminal which is marked with the letter N or coloured black.
The wire which is coloured brown must be connected to the terminal which is marked with the letter L or coloured red.
OVEN POSITIONING
- Install the oven on a flat, level surface strong enough to safely bear the weight of the oven.
- Do not locate the oven near areas where heat and moisture are generated as this may lower oven efficiency.
- Covering the air vents may lead to malfunctioning, therefore a minimum clearance of 5cm is required to each side, and to the rear and 5cm above.
- This oven conforms to EMC Radio interference Directive 89/336/EEC, however some interference may occur if it is placed too close to a radio or TV, so keep them as far apart as possible.
- Microwave oven must be installed at a minimum height of 85 cms above floor level.

OVEN PARTS AND ACCESSORIES
Your oven is supplied with the following accessories:
| Turntable | 1 | Instruction manual | 1 |
| Turntable roller rest | 1 | Cook book | 1 |
| Metal rack | 2 | Drip tray | 1 |

TURNTABLE INSTALLATION

- Place the roller rest on the cavity bottom.
- Place the turntable on top of the roller rest as shown in the diagram. Make sure the turntable hub is securely locked in the turntable shaft. Never place the turntable upside down.
- Both turntable and roller rest must always be used during cooking.
- All food and containers of food are always placed on this turntable for cooking.
- This turntable rotates clockwise and anticlockwise; this is normal.
- This turntable returns to its original starting position when cooking is finished.
OVEN CONTROL PANEL

- Display Window. Cooking mode and short messages are displayed.
- Function Indicator.
- Kitchen Timer Display.
- Auto Program Key.
-
Auto Defrost.
-
More / Less key:- Allows you to slightly increase or decrease cooking time of automatic programs.
- Kitchen Timer key.
- Micro Power.
- Oven Temperature.
-
Grill.
-
Slow Cook.
- Dual Cook.
- Quick Start.
- Clear / Stop.
- Start.
- Rotary Dial - For setting time and weight.
SETTING THE LANGUAGE
Your new microwave oven comes with a five language Word Prompt system. Languages available are English, German, Spanish, Portuguese and French.
When your oven is plugged in for the first time or when power resumes after a power interruption, the display will show "WELCOME TO SANYO - REFER TO INSTRUCTIONS BEFORE USE."
By pressing "Start" it is possible to select the different languages.
When you have selected your required language press "Clear / Stop" to hold that language, the numbers in the display then reset to 0: and you will be prompted to set the time of day.
To set English:
1.

This oven is preset to English therefore it is only necessary to touch "Clear / Stop" once.
To set German:
1.
Touch "Start" key once, the display will show "HERZLICH WILLKOMMEN -VOR GEBRAUCH DIESES GERAETES BITTE DIE GEBRAUCHSAN-LEITUNG LESEN."
2.
Touch "Clear / Stop" once to select and hold language.
To set Spanish:
1.

Touch "Start" key twice, the display will show "BIENVENIDO A SANYO - ANTES DE UTILIZAR EL HORNO LEER EL MANUAL DE INSTRUCCIONES."
2.
Touch "Clear / Stop" once to select and hold language.
To set Portuguese:
1.
Touch "Start" key three times, the display will show "BEMIVINDO A SANYO - LEIA AS INSTRUCOES ANTES DE USAR"
2.

Touch "Clear / Stop" once to select and hold language.
To set French:
1.

Touch "Start" key four times, the display will show "BIENVENU CHEZ SANYO - VEUILLEZ LIRE LE MODE DEMPLOI AVANT DUTILISERVOTRE FOUR"
2.

Touch "Clear / Stop" once to select and hold language.
SETTING THE CLOCK
When your oven is plugged in for the first time or when power resumes after a power interruption, the display resets to setting the language procedure on Pg 9.
To set the clock follow adjacent procedure.
Example: To set 4:30:
2.


4.
After setting the language 0: and "SET HOUR" shows in display and the clock symbol flashes. Turn "Rotary Dial" until 4: is indicated in the display window.
"PRESS START" shows in display and the start symbol flashes. Touch "Start" Key. This locks in the hour setting. "SET MINUTES" shows in display and time indicator begin to flash.
To set the minutes turn "Rotary Dial" until 4:30 is indicated in the display window.
"PRESS START" shows in display and the start symbol flashes. Touch "Start" Key to lock in the time and start the clock running.
CHILD LOCK-OUT AND DEMONSTRATION MODE
Child Lock-Out:
This oven has a safety feature which prevents the accidental running of the oven by a child.
Demonstration Mode:
After the demonstration mode has been set, the oven will appear to operate normally if the keys are pressed. However the oven will produce NO actual microwave power. When in demonstration mode, you can work through the cooking procedure.
To set child lock-out.
Press and hold "Clear / Stop" Key for 3 seconds. Indicator LOCK is indicated. Now the oven cannot be operated.
To cancel child lock simply repeat setting procedure. Indicator LOCK disappears and clock display reappears. After 3 seconds the oven will beep twice, this indicates that the child lock is cancelled and the oven is now fully operational again.
To set demonstration mode.

Press and hold "More / Less" Key for 3 seconds. Indicator L lights up and clock display reappears.
To cancel demonstration mode simply repeat setting procedure. Indicator L disappears and clock display reappears. The oven is now fully functional once again. After 3 seconds the oven will beep twice, this indicates that the demonstration mode is cancelled and the oven is now fully operational again.
HOW TO USE THE KITCHEN TIMER
The oven may be used as a useful automatic kitchen timer. It may be set from 10 secs to 90 mins. This function operates independently of the cooking functions, therefore the oven may be operated at the same time as the kitchen timer. The cooking time and kitchen timer will be indicated in the display window.
Example: To set kitchen timer for 5mins 30secs:
1.

Touch "Kitchen Timer". Kitchen timer display flashes.
2.

Turn "Rotary Dial" until 5:30 is indicated in the display window.
3.

Touch "Start" Key. The Kitchen Timer will begin counting down. To cancel kitchen timer press "Clear / Stop". If the start key is not pressed immediately the Kitchen Timer will begin counting down after 10 seconds.
Note:
To cancel the kitchen timer whilst the oven is operating, press "Kitchen Timer" followed by "Clear/Stop".
QUICK START
The Quick Start function allows the oven to begin cooking immediately on full power 900W.
NOTE:
The Quick start key has been pre-programmed to increase in increments of 30 secs. up to a maximum time of 10 minutes.
Example: Set oven to start cooking on Full Power 900W for 2 minutes.
1.

Touch "Quick Start" Key 4 times. The microwave indicator lights up and the oven begins to operate immediately.
MAFF RATING
Explanation of the heating category label for microwave ovens and small packs of food (up to 500g / 1lb 2oz, typical of ready meals for 1 or 2 people) as agreed by MAFF (the Ministry of Agriculture, Fisheries and Food) in conjunction with food and microwave oven manufacturers.

The microwave power output of the oven in watts, based on an international agreed standard (IEC 705).
This letter represents the heating category of the oven to be used when microwaving small food packs.
oven heating catergory
power output
| B | D | 650W | 750W |
| 6 | 5 | 6 | 5 |
minutes minutes
Always follow instructions found on food packaging. The higher the power output and heating category of the oven, the less heating time is required.
Always ensure that food is piping hot before serving.
SUITABLE COOKWARE
| MATERIAL | MICROWAVE | GRILL / THERMAL GRILL ONLY | CONVECTION ONLY |
| Turntable | Yes | Yes | Yes |
| Metal Racks | No | Yes | Yes |
| Metal Drip Tray | No | Yes | Yes |
| Heat & Grill Resistant Ceramic & Glass | Yes | Yes | Yes |
| China - Without Metal Decoration. | Yes | Yes | Yes |
| Plastic-microwave proof cookware. | Yes | No | No |
| Plastic cling film, microwave wrap, microwave roasting bags. (Do not use metal twist ties.) | Yes - With care.Pierce film.Do not fit film skin tight.Do not allow film to touch food. | No | No |
| Metal Cookware e.g baking tins, trays | No | Yes | Yes |
| Aluminum Foll | Yes - With care.Small pieces may be used for shielding.Over use may cause arcing. | Yes | Yes |
| Paper Greaseproof paper,Kitchen Paper,plates or cups. | Yes - With care.Paper may be used to absorb moisture or fat.Overheating could cause fire. | No | Yes - With care.Greaseproof paper may be used to line dishes. |
| Wood / Straw | Yes - With care.For warming food for a very short time only. | No | No |
| MATERIAL | DUAL COOKING GRILL & MICROWAVE | DUAL COOKING CONVECTION & MICROWAVE | DUAL COOKING CONVECTION & GRILL |
| Turntable | Yes | Yes | Yes |
| Metal Racks | Yes | Yes | Yes |
| Metal Drip Tray | Yes | Yes | Yes |
| Heat & Grill Resistant Ceramic & Glass | Yes | Yes | Yes |
| China - Without Metal Decoration. | Yes | Yes | Yes |
| Plastic-microwave proof cookware. | No | No | No |
| Plastic cling film, microwave wrap, microwave roasting bags. (Do not use metal twist ties.) | No | No | No |
| Metal Cookware e.g baking tins, trays | Yes - With care.Do not place metal cookware on metal racks or on metal drip tray. | Yes - With care.Do not place metal cookware on metal racks or on metal drip tray. | Yes |
| Aluminum Foil | Yes - With care.Small pieces may be used for shielding.Over use may cause arcing. | Yes - With care.Small pieces may be used for shielding.Over use may cause arcing. | Yes |
| Paper Greaseproof paper Kitchen Paper, plates or cups. | No | Yes - With care.Greaseproof paper may be used to line dishes. | No |
| Wood / Straw | No | No | No |
QUICK REFERENCE GUIDE TO 8 WAY COOKING
| COOKING MODE | ACCESSORIES TO USE | SUGGESTED USE |
| Microwave Only80, 150, 300, 450,750 & 900W. | Place dish directly on turntable. | Defrosting, reheating, cooking vegetables, rice, pasta, fish,casserole, sponge puddings. |
| Grill 1 Grill Only(1 Setting) | Place high rack on metal drip tray on turntable. | For toasting bread, muffins etc. |
| Grill 2 Thermal Grill(1 Setting) | Place high rack on metal drip tray on turntable. | For cooking small chops,sausages, fish fingers etc. |
| Convection Only(40 - 250°C) | Place dish directly on turntable or on low rack. | For cooking meringues, biscuits,scones, bread, Yorkshire Puddings, pastry items e.g pies,tarts etc. |
| 2 Level Convection | Place dishes, trays directly on low & high rack. Change over halfway through cooking. | For batch baking of biscuits,scones, cakes etc on two levels. |
| Dual 1Convection & Microwave(Variable combinations of convection temperature and microwave power.)100 - 250°C convec. +80, 150, 300, 450W micro. | Place dish directly on turntable or on low rack. | For faster cooking of many traditionally baked foods e.g baked potatoes,pizza, roast poultry / joints, roast potatoes, some cakes, au gratin dishes, frozen crispy crumb convenience foods. For crisp reheating of pastry items. |
| Dual 2Convection with Grill(210 - 250°C) | Place metal drip tray on high rack. | For fast cooking and crisping of small items e.g frozen potato products, fish fingers, chicken nuggets etc. |
| Dual 380,150, 300, 450WMicrowave &Thermal Grill | Place high or low rack on metal drip tray on turntable. | For faster cooking of traditionally grilled foods e.g chops, sausages,chicken pieces etc. |
MICROWAVE COOKING
This basic microwave cooking method allows you to cook food for a desired time. In addition to the maximum power level, you can select different microwave power from 5 other levels, 80W to 750W for the foods that require slower cooking.
Foods with high moisture content should be cooked on maximum power, as this is the fastest cooking method and best maintains the natural flavour and texture of the foods.
Manual Defrosting
For manual defrosting (without using Auto Defrost features), use 150W. To speed up the defrosting of dense foods over 450g (1lb), the oven may start on full power for 1-3 minutes, then be reduced to 150W until defrosting is complete.
NOTE:
The time increments are as follows:
| TIME | INCREMENT |
| 0-5 min. | 15 secs. |
| 5-10 min. | 30 secs. |
| 0-30 min. | 1 min. |
| 0-90 min. | 5 min. |
Example: To cook at 450W for 1 min 30 secs
1.

Touch "Clear / Stop".
Touch "Power" Key 3 times. "450W SET TIME-" shows in display.
2.

Turn "Rotary Dial" until 1.30 is indicated in the display window. "PRESS START" shows in display.
3.

Touch "Start".
To set the variable cooking levels the Power key should be touched as follows:
| 900W | ONCE |
| 750W | 2 TIMES |
| 450W | 3 TIMES |
| 300W | 4 TIMES |
| 150W | 5 TIMES |
| 80W | 6 TIMES |
| POWER SETTING | SUGGESTED USE |
| 80 W | Softening cream cheese. |
| 150 W | Keeping foods warm, defrosting. |
| 300 W | Completing the cooking cycle of pot roasts.Completing the cooking cycle of some casserole and stews.Baked custards and cheese cakes. |
| 450 W | Roasting meats. |
| 750 W | Baking cakes.Reheating precooked foods. |
| 900 W | Boiling liquids.Baking fish, vegetables. |
GRILL COOKING
Grill 1 - Grill Only
This method is ideal for toasting bread or muffins. Remember the oven will be hot. Place all food on high grilling rack. Grill cooking time can be set to a maximum of 90 minutes.
Example: Set oven to Grill for 15 minutes.
1.

Touch "Clear / Stop".
2.

Touch "Grill" key. The Grill indicator lights up "GRILL 1 - SET TIME" shows in display.
3.

Turn "Rotary Dial" until 15.00 is indicated in the display window. "PRESS START" shows in display.
4.

Touch "Start".
THERMAL GRILL COOKING
Grill 2 - Thermal Grill
During thermal grill cooking, both fan and grill element operate together to circulate hot air around the food to assist the cooking process.
This method is ideal for small items such as sausages which you would usually grill. Place food on the high grill rack on the metal drip tray. Do not use thermal grill for toasting bread as the result will be rather dry. The thermal grill cooking time can be set to a maximum of 90 minutes.
Example: Set oven to Thermal Grill for 15 minutes.
1.
Touch "Clear / Stop".
2.

Touch "Grill" key twice. "GRILL 2 - SET TIME" shows in display.
3.
Turn "Rotary Dial" until 15.00 is indicated in the display window. "PRESS START" shows in display.
4.
Touch "Start".
CONVECTION COOKING
This oven can be used as a conventional oven by using the fan assisted convection function. The temperature range is 40 - 250°C.
Best results are obtained if the oven is preheated first.
Note:
When preheating is completed. Immediately place the food in the oven, set the convection cooking temperature, time and begin cooking.
Convection cooking is ideal for cooking meringues, biscuits, scones, bread, Yorkshire puddings, large fruit cakes and all pastries. It can also be used for proving bread at 40°C. The convection cooking time can be set for a maximum of 90 minutes.
Place heatproof cookware directly on the low rack. As previously stated best results are obtained if the oven is preheated before convection cooking. However it is possible to begin convection cooking without preheating, ie for proving bread at 40°C. Simply omit steps 3. and 4.
As there is no microwave energy being used you can place metal tins directly onto the metal racks with no danger of arcing.
Example: Set oven to Preheat to 200°C.
(The oven is preheated before the food is added)
1.

Touch "Clear / Stop".
2.

Press "Oven Temp" key twelve times. The Convection indicator lights up and "200 C - SET TIME" is displayed.
3.

Press "Start". The oven will now preheat. When the correct temperature is reached the oven will beep 3 times and "PREHEATING COMPLETED - 200 C" will appear in the display. You may now place the food in the oven, set the convection cooking temperature and time as below and begin cooking immediately.
Example: To then set the preheated oven to cook using Convection for 20 minutes, at 200°C.
4.

Touch "Clear / Stop", once. "200 C - SET TIME" shows in display place food on the low rack in the oven.
5.

Turn "Rotary Dial" until 20.00 is indicated in the display window.
6.

Touch "Start".
DUAL COOKING
This oven offers you a choice of three methods of Dual cooking;
Dual 1. Convection + Microwave - For baking and roasting.
Dual 2. Convection + Thermal Grill - For fast crisping.
Dual 3. Microwave + Thermal Grill - For fast grilling.
Dual 1. Convection + Microwave
This function allows you to combine convection operation (100°C - 250°C) with any one of the four (80W, 150W, 300W, 450W) microwave power levels to produce traditional baked or roasted results in less time. This function has many uses, particularly roasting meat and poultry, cooking pizza, baked potatoes, roast potatoes, baking some cakes, frozen and crispy crumb foods and reheating pastries.
When cooking with dual convection + microwave it is not necessary to preheat the oven.
Food should be placed on the low rack or on the turntable.
Do NOT place metal cookware directly on the low rack when using this function as arcing may occur.
The Dual Convection + Microwave function can be set for a maximum of 90 minutes.
Example: Set oven to Dual Convection + Microwave for 15 minutes, at 210°C and 450W microwave power.
1.

Touch "Clear / Stop".
2.
Press "Dual Cook" key once. The Convection and Micro indicator light up and "DUAL I 200C 450W - SETTIME" is displayed.
3.
Press "Oven Temp." once until "210°C" is displayed.
4.

Turn "Rotary Dial" until 15.00 is indicated in the display window.
5.

Touch "Start".
DUAL COOKING (CONT.)
Dual 2. Convection with Thermal Grill
This function allows you to combine convection operation (210 - 250°C) with the thermal grill, and is ideal for cooking small foods which require crisping e.g frozen potato products such as oven chips, potato croquettes or waffles, fish fingers, chicken nuggets, beefburgers and sausages.
Food should be placed on the high rack on the metal drip tray which is on the turntable. Alternatively food maybe placed on the metal drip tray on the high rack.
The Dual Convection + Thermal Grill function can be set for a maximum of 90 minutes.
Example: Set oven to Dual Convection with Thermal Grill for 15 minutes, at 220°C.
1.

Touch "Clear / Stop".
2.

Press "Dual Cook" key twice. The Grill and Convection indicators light up and "DUAL 2 210 C GRILL 2 - SET TIME" is displayed.
3.

Press "Oven Temp." key once "220 C" is displayed.
4.

Turn "Rotary Dial" until 15.00 is indicated in the display window.
5.

Touch "Start".
Dual 3. Microwave + Thermal Grill
This oven has four settings:
Thermal Grill + 80W
Thermal Grill + 150W
Thermal Grill + 300W
Thermal Grill + 450W
This function allows you to combine the speed of a microwave with the browning and crisping of a grill. Ideal for all foods that would usually be grilled e.g sausages, chops, chicken pieces etc.
The Dual Thermal Grill + Microwave function can be set for a maximum of 90 minutes.
Example: Set oven to Dual Microwave with Thermal Grill for 15 minutes, at 300W microwave power.
1.

Touch "Clear / Stop".
2.

Press "Dual Cook" key three times. The Grill and Microwave power indicators light up and "DUAL 3 GRILL 2 450W - SET TIME" is displayed.
3.

Press "Micro Power" key once. "300W" is indicated.
4.

Turn "Rotary Dial" until 15.00 is indicated in the display window.
5.
Touch "Start".
MULTI-STAGE COOKING
Multi stage cooking is ideal for sequential cooking. It allows you to cook at different power levels and with different cooking modes for a set time.
Up to three stages may be set.
All the stages should be set before starting the oven.
The following table shows the combinations possible when cooking with multi-stages:
| 1st | 2nd | 3rd |
| Micro | Micro | Micro |
| Micro | Micro | - |
| Micro | Micro | Grill |
| Micro | Micro | Thermal grill |
| Micro | Micro | Convection |
| Micro | Micro | Dual |
| Micro | Grill | - |
| Micro | Thermal grill | - |
| Micro | Convection | - |
| Micro | Dual | - |
NOTE:
Dual cook - This is microwave with grill or convection at the same time, or convection with grill at the same time.
After grill, thermal grill, convection or dual cooking it is NOT possible to set microwave.
For three stage cooking, follow same procedure as shown, simply insert third stage after step 5, then press start.
Example: To set the oven to microwave on 450W for 10 minutes, and then Grill for 5 minutes.
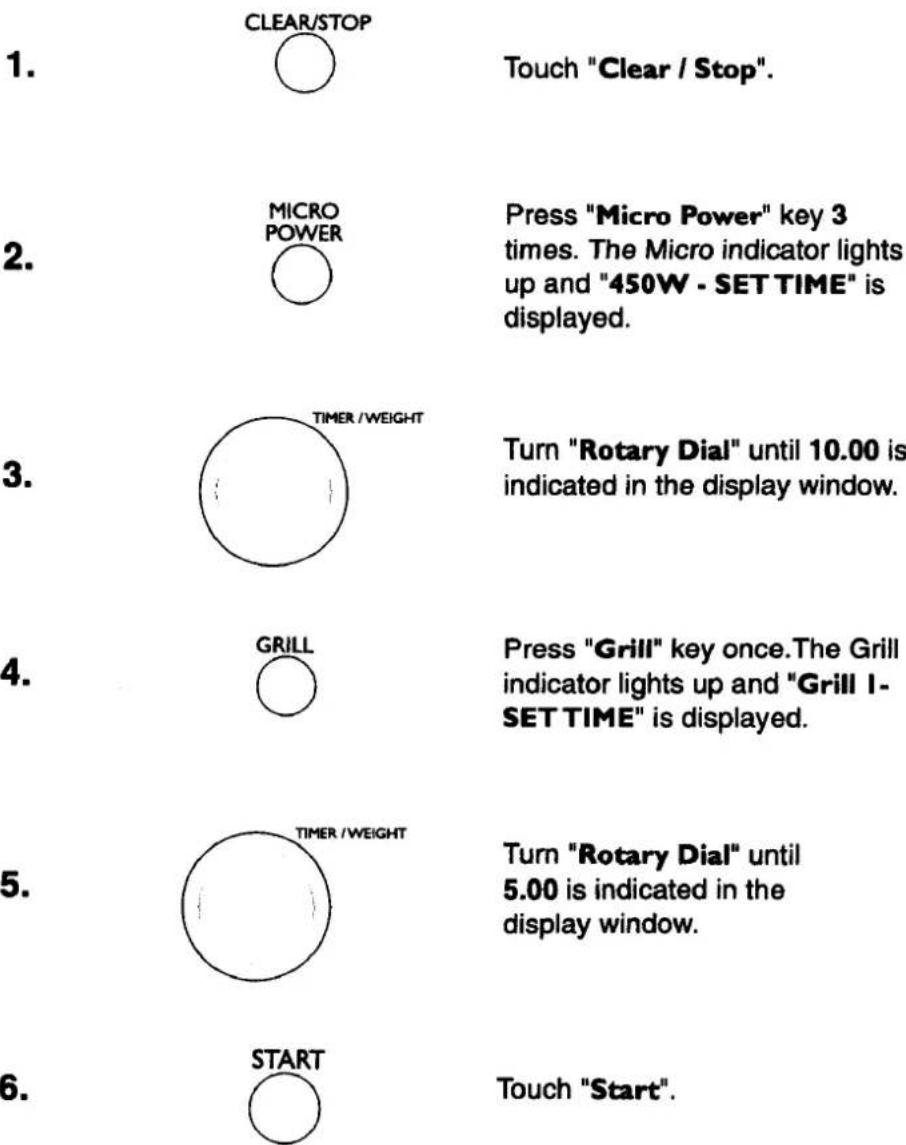
1.
Touch "Clear / Stop".
2.
Press "Micro Power" key 3 times. The Micro indicator lights up and "450W - SET TIME" is displayed.
3.
Turn "Rotary Dial" until 10.00 is indicated in the display window.
4.
Press "Grill" key once. The Grill indicator lights up and "Grill I-SET TIME" is displayed.
5.
Turn "Rotary Dial" until 5.00 is indicated in the display window.
6.
Touch "Start".
AUTO WEIGHT DEFROST
This feature allows you to accurately defrost meat, poultry, fish or bread. Simply enter the weight of the food and the oven will select the correct defrosting time. Ari adjust +/- key may be used to increase or decrease the defrosting time as necessary.
The chart below indicates the maximum / minimum weights for use with Auto Weight Defrost Programs;
| Defrost Program | Min. Weight | Max. Weight |
| 1. Meat | 100 g | 2000 g |
| 2. Poultry | 100 g | 2000 g |
| 3. Fish | 100 g | 1000 g |
| 4. Bread | 100 g | 900 g |
On page 22 are some hints and tips for getting the best performance from these programs, however always refer to the Auto Weight Defrost Chart for full details.
Important: WHEN USING FOIL FOR SHIELDING IT IS IMPORTANT THAT THE FOIL DOES NOT TOUCH THE WALLS OF THE OVEN.
Auto Weight Defrosting chart appears on pages 23-24.
Example: To Defrost a 1000g Chicken using adjust "More"
1.

Touch "Clear / Stop".
2.
Touch "Auto Defrost" twice. "POULTRY DEFROST - SET WEIGHT" shows in display.
3.
Turn "Rotary Dial" until 1000 G is indicated in the display window. "PRESS START" shows in display.
4.

Touch "More / Less" key once to increase defrosting time as desired. A Δ is indicated in the display window and the Start prompt flashes.
5.

Touch "Start".
6.
PAUSE
The Auto Weight Defrost programs have a built-in pause function to allow for checking and rearranging of food. On commencing Auto Weight Defrosting the time for the first defrost period will countdown in the display.
At the pause rearrange the food as recommended in the defrost table, close the door and press "Start". The defrost time for the second defrost period will countdown in the display.
If you do not open the door at the pause, the oven will restart after approximately 2 minutes and commences the second defrost period.
AUTO WEIGHT DEFROST - HINTS & TIPS FOR BEST RESULTS
1. MEAT:
For defrosting meat joints, minced meat, chops, steaks etc.
Meat Joints - Use of Adjust More is recommended.
To prevent over defrosting meat joints will require shielding around fatty areas with a smooth piece of foil. Joints will require at least 40 minutes standing time after defrosting to ensure that the centre is thoroughly defrosted, large joints will require longer standing times.
Steaks / Chops - Adjust key is not usually required.
Particularly delicate outer areas of steaks / chops may require shielding with smooth foil.
Minced or Cubed meat. Use of Adjust Less is recommended.
Minced or Cubed meat should be broken up as soon as possible and any defrosted parts removed.
Sausages / Spare Ribs / Bacon - Use Adjust Less recommended for these delicate meats.
Chops / sausages etc should be arranged in a single layer, and turned / rearranged at the pause. Most meats, with the exception of joints will require a standing time of at least 15 minutes.
2. POULTRY:
For defrosting whole poultry and poultry pieces.
Whole Poultry - Use of Adjust More is recommended.
Shielding of thin leg and wing areas and back bone is recommended. Begin defrosting breast side down and turnover at the pause. Whole poultry will require a standing time of at least 40 minutes to ensure that the centre is defrosted, large poultry will require longer standing times.
Chicken Pieces - Adjust key is not usually required.
Particularly delicate or thin parts may require shielding with smooth foil. Arrange pieces with the thicker parts to the outside and rearrange at the pause.
3. FISH:
For defrosting all types of fish.
Fillets - Adjust key is not usually required.
Whole Fish / Fish Steaks / Prawns - Use of Adjust Less is recommended for these more delicate types of fish. Arrange fish in single layer, overlap thin areas and shield delicate areas such as heads and tails with small, smooth pieces of foil. (It is important that this foil does not touch the oven side.) Rearrange fish at the pause. Allow standing time of at least 10 minutes.
4. BREAD
For defrosting small bread items e.g rolls, bun and slices required for immediate use.
Remove all packaging and place the bread on a plate, at the pause it is very important to separate the rolls / slices (a knife may be useful). Rearrange with the most frozen parts to the outside, remove any defrosted pieces. (When rearranging slices it is vital to ensure that the turntable can still turn.) Note that immediately after defrosting bread may feel warm. Allow 5-10 mins standing time. The defrosting process can be speeded up by cutting rolls in half as soon as possible. Loaves may be defrosted using Adjust More, at least 15 mins standing time will be required. Begin defrosting whole loaves on their side, cut in half and turn over at the pause. It is important to cut whole loaves on their side, cut in half or into slices as soon as possible to speed up the defrosting process.
This program is not suitable for defrosting cakes, gateaux or cheesen cakes.
AUTO WEIGHT DEFROST CHART
Remove all packaging and place the food on a microwavesafe plate on the turntable.
For best results follow the recommendations below.
| FOOD MORE / LESS PREPARATION | PAUSE DIRECTIONS | STANDING TIME | ||
| KEY | ||||
| 1. MEAT | ||||
| Meat Joint + (MORE) | Shield back fat and any thin areas with smooth foil.Begin defrosting best side down. | Turnover and remove foil from back fat. Leave foil on warm, thin or delicate areas | Min 40 mins. | |
| Chops / Steaks | NO | If frozen in a block separate as soon as possible. Arrange in a single layer with thin ends of chops to the centre. Shield any delicate or thin outer areas with small pieces of smooth foil. | Turnover, rearrange and remove foil. | 15 mins. |
| Minced / Cubed Meat | - (LESS) | Break apart as soon as possible. | Break apart and remove any defrosted parts. | 15 mins. |
| Sausages / Spare Ribs / Bacon | - (LESS) | Arrange in a single layer.Separate as soon as possible. | Separate and rearrange.Remove any defrosted parts. | 15 mins. |
| 2. POULTRY | ||||
| Whole Poultry | + (MORE) | Shield thin leg, wing areas and back bone. Begin defrosting breast side down. | Turnover and remove foil.Leave foil on any warm, thin or delicate areas. | Min 40 mins. |
| Poultry Pieces | NO | Shield thin areas.Arrange in a single layer with thicker parts to the outside. | Turnover, rearrange and remove foil. | 15 mins. |
| 3. FISH | ||||
| Fillets | NO | Arrange in an even layer.If frozen in a block separate as soon as possible. Overlap thin areas. | Turnover and rearrange. | 10 mins. |
| Steaks | - (LESS) | Arrange in an even layer with thicker parts to the outside, shield outer edges of steaks with smooth pieces of foil. | Turnover and remove foil. | 10 mins. |
| Whole | - (LESS) | If more than one fish arrange head to tail. Shield ends with smooth pieces of foil. | Turnover and remove foil. | 10 mins. |
| Prawns | - (LESS) | Arrange in an even layer. | Stir. | 10 mins. |
| FOOD | MORE / LESS KEY | PREPARATION | PAUSE DIRECTIONS | STANDING TIME |
| 4. BREAD | ||||
| Whole Loaf | + (MORE) | Place loaf on its side. | Cut in half if possible and turn over. | 15 mins. |
| Rolls / Slices | NO | Arrange evenly on plate. | Separate and rearrange with frozen parts to the outside. Remove any defrosted pieces. | 10 mins. |
| Croissants / Crumpets | - (LESS) | Arrange evenly on plate. | Separate and rearrange with frozen parts to the outside. Remove any defrosted pieces. | 10 mins. |
DIRECT ACCESS (BY WEIGHT)
The Direct Access Cooking feature allows you to simply and accurately cook or reheat a range of foods. Your oven offers the following Direct Access (Auto) programs:
| Auto 1 | Frozen Reheat |
| Auto 2 | Chilled Reheat |
| Auto 3 | Liquid Reheat |
| Auto 4 | Baked Potato |
| Auto 5 | Potato Gratin |
| Auto 6 | Roast Potatoes |
| Auto 7 | Frozen Pizza |
| Auto 8 | Fresh Pizza |
| Auto 9 | Whole Chicken |
| Auto 10 | Chicken Pieces |
| Auto 11 | Beef joint |
| Auto 12 | Pork joint |
| Auto 13 | Lamb joint |
| Auto 14 | Steamed fish |
| Auto 15 | Baked fish |
Operation is very easy, simply select the appropriate program, enter the weight of the food and press "Start". The oven will automatically select the appropriate cooking time and cooking mode for that food.
The "More / Less" key can be used to adjust the end cooked results to personal taste.
Please follow the guidelines in the information chart.
PAUSE
Please be aware that the Roast Potatoes, Roast Meat Joint - Beef, Pork and Lamb programs all have a built-in pause.
On commencing cooking with any of these programs, the time for the first cooking period will countdown in the display. At the pause turnover etc. as recommended in the Direct Access Cooking Chart close the door and press "Start". The cooking time for the second cooking period will countdown in the display.
VERY IMPORTANT
For best results, please follow the guidelines in the Direct Accesscooking chart on pages 26-28.
Example: To cook a Beef Joint, by Direct Access
1.
CLEAR/STOP

2.

3.
4.
▽ +

5.
START

Touch "Clear / Stop".
Touch "Auto" key 11 times to select "Beef Joint". "BEEF JOINT- SET WEIGHT" is displayed. Place meat best (fat) side down on the low rack on the drip tray on the turntable.
Turn "Rotary Dial" to enter weight of food.
Touch "More / Less" key if required.
Touch "Start". At the pause turnover etc. as recommended. Close the door and press "Start".
Choose the required food category by touching the appropriate key several times as detailed below.
Please take note of the minimum and maximum food weights which you may use. Note 0 g can be selected, but the oven will not operate.
| Direct Access Programs | Auto Program No. | Food Category | Cooking Mode** | Minimum weight of food | Maximum weight of food | Increment |
| Reheat | 1 =2 =3 = | Frozen ReheatChilled ReheatLiquid Reheat | MMM | 100 g100 g100 g | 600 g600 g1000 g | 50 g50 g100 g |
| Potato | 4 =5 =6 = | Baked PotatoPotato GratinRoast Potatoes | C / M C / M C / M | 100 g200 g200 g | 1700 g1900 g900 g | 100 g100 g100 g |
| Pizza | 7 =8 = | Frozen PizzaFresh Pizza | C / M C / M | 100 g100 g | 600 g600 g | 50 g50 g |
| Chicken | 9 =10 = | Whole ChickenChicken Pieces | C / M C / M | 800 g100 g | 2000 g1000 g | 100 g100 g |
| Meat Joint | 11 =12 =13 = | Beef JointPork JointLamb Joint | C / M C / M C / M | 500 g500 g500 g | 2000 g2000 g2000 g | 50 g50 g50 g |
| Fish | 14 =15 = | Steamed FishBaked Fish | MC / M | 100 g100 g | 1000 g1000 g | 50 g50 g |
** NOTE
C / M = Convection with microwave operation
M = Microwave only operation
DIRECT ACCESS COOKING CHART
| PROGRAM | WEIGHT RANGE | COOKING PROCEDURES |
| REHEAT | ||
| AUTO 1. FROZEN REHEATFor reheating one purchased frozen savoury ready meal e.g in one or two part microwavesafe container or one or two bag mealsAdjust + for compact foods e.g lasagnaAdjust - for delicate foods e.g fish(This program is not recommended for reheating frozen puddings.) | 100 - 600 g | 1. Remove outer packaging. Piece film lid or if there is no film lid cover with microwave wrap. For meals contained in bags make two small slits in the top of the bag. (It is not necessary to make slits in rice / pasta bags which are perforated.)2. Place on a microwavesafe plate on the turntable.3. Touch “AUTO” once to select “Frozen Reheat”, enter weight of food and press “Start”. (When reheating two bag meals, remove the rice / pasta bag halfway through the cooking time.)4. After heating allow to stand for two minutes then shake or stir well before serving. ENSURE FOOD IS PIPING HOT BEFORE SERVING. |
| AUTO 2. CHILLED REHEATFor heating one purchased chilled ready meal.e.g in a microwavesafe containerAdjust + for compact foods e.g lasagnaAdjust - for delicate foods e.g fish or puddings | 100 - 600 g | 1. Remove outer packaging. Pierce film lid or if there is no film lid cover with microwave wrap.2. Place on a microwavesafe plate on the turntable.3. Touch “AUTO” twice to select “Chilled Reheat”, enter weight of food and press “Start”.4. After heating allow to stand for two minutes then shake or stir well before serving. ENSURE FOOD IS PIPING HOT BEFORE SERVING. |
| AUTO 3. LIQUID REHEATFor reheating soups, drinks, milk etc.Adjust + for soupNo adjust for beverages, consommé style soupsAdjust - milk. | 100 - 1000 g | 1. Note the total weight of the liquid to be heated. Place liquid into microwavesafe cups or bowl(s). For best results ensure that the liquid is evenly distributed between cups. Arrange cups evenly around edge of turntable. If reheating liquid in one large container, place this in the centre of the turntable. When heating soup cover with microwave wrap to avoid splatters.2. Touch “Auto” 3 times to select “Liquid Reheat”, enter total weight of liquid and press “Start”.3. After heating stir well. |
| POTATO | ||
| AUTO 4. BAKED POTATOFor cooking medium sized baked potatoes.Each potato 200 - 250 g. | 100 - 1700 g | 1. Wash and dry potatoes. Prick several times with a fork. Note the weight of the potatoes.2. Place the potatoes around the edge of the low rack on the turntable.3. Touch “AUTO” 4 times to select “Baked Potato”, enter weight of food and press “Start”. Turnover halfway through cooking time if you wish.4. After cooking allow to stand for 2 minutes. |
| AUTO 5. POTATO GRATINFor cooking fresh home made potato gratin. | 200 - 1900 g | Please refer to the recommended recipe on pg 29. Place the dish on the turntable. |
| AUTO 6. ROAST POTATOESFor cooking roast potatoes | 200 - 900 g | Please refer to the recommended recipe on pg 30. Place the dish on the low rack on the turntable. |
| DIRECT ACCESS COOKING CHART | ||
| PROGRAM | WEIGHT RANGE | COOKING PROCEDURE |
| PIZZA | ||
| AUTO 7. FROZEN PIZZAFor cooking frozen purchased pizza.Adjust + for frozen deep pan pizzas. | 100 - 600 g | 1. Remove all packaging and ensure topping is evenly spread. Note weight of pizza.2. Place pizza on low rack on drip tray on turntable.3. Touch “AUTO” 7 times to select “Frozen Pizza”, enter weight and press “Start”. |
| AUTO 8. FRESH PIZZAFor cooking fresh purchased pizza. | 100 - 600 g | 1. Remove all packaging and ensure topping is evenly spread. Note weight of pizza.2. Place pizza on low rack on drip tray on turntable.3. Touch “AUTO” 8 times to select “Fresh Pizza”, enter weight and press “Start”. |
| CHICKEN | ||
| AUTO 9. ROAST WHOLE CHICKENFor roasting a whole, fresh chicken, unstuffed. | 800 - 2000 g | 1. Wash and dry chicken, ensure giblets are removed. Note weight of chicken.2. Place chicken breast side up on the low rack on the metal drip tray on the turntable. Brush with melted butter or vegetable oil. Season.3. Touch “AUTO” 9 times to select “Whole Roast Chicken”, enter weight and press “Start”.4. After cooking allow the chicken to stand in foil for 10 - 15 minutes before serving.(A recommended recipe is given on pg 31) |
| AUTO 10. CHICKEN PIECESFor cooking roast chicken pieces e.g portions, drumsticks. | 100 - 1000 g | 1. Wash and dry chicken pieces. Note the weight.2. Place chicken pieces skin side up on the low rack on the metal drip tray on the turntable. Arrange with the thicker parts to the outside. Brush with melted butter or vegetable oil.3. Touch “AUTO” 10 times to select “Chicken Pieces”, enter weight and press “Start”.(Recommended recipes are given on pg 31 - 32.) |
| MEAT JOINT | ||
| AUTO 11. BEEF JOINTFor cooking fresh joints of beef.Adjust + for a well done result.Adjust - for a more rare result. | 500 - 2000 g | 1. Wash and dry joint. Note weight.2. Place joint with the best (fat) side down on the low rack on drip tray on turntable. Brush with melted butter or oil.3. Touch “AUTO” 11 times to select “Beef Joint”, enter weight, press “Start”.4. At the pause remove any excess liquid, turn the joint over and baste if you wish. Shield any over cooking areas with small smooth pieces of foil.5. After cooking allow to stand in foil for 15 - 20 mins. |
DIRECT ACCESS COOKING CHART
| PROGRAM | WEIGHT RANGE | COOKING PROCEDURES |
| MEAT JOINT (CONT.) | ||
| AUTO 12. PORK JOINTFor cooking fresh joints of pork.Adjust + for large leg or shoulder joints.No adjust required for loin joints. | 500 - 2000 g | 1. Wash and dry joint. Note weight.2. Place joint with best (fat) side down on low rack on drip tray on turntable. Brush with melted butter or oil.3. Touch “AUTO” 12 times to select “Pork Joint”, enter weight, press “Start”.4. At the pause remove any excess liquid, turn the joint over and baste if you wish. Shield any overcooking areas with small smooth pieces of foil.5. After cooking allow to stand in foil for 15 - 20 minutes. |
| AUTO 13. LAMB JOINTFor cooking fresh joints of lamb.Adjust + for a well done result.Adjust - for a more rare result. | 500 - 2000 g | 1. Wash and dry joint. Note weight.2. Place joint with best (fat) side down on low rack on drip tray on turntable. Brush with melted butter or oil.3. Touch “AUTO” thirteen times to select “Lamb Joint”, enter weight, press “Start”.4. At the pause remove any excess liquid, turn the joint over and baste if you wish. Shield any overcooking areas with small smooth pieces of foil.5. After cooking allow to stand in foil for 15 - 20 minutes. |
| FISH | ||
| AUTO 14. STEAMED FISHFor cooking fresh, chilled fish e.g fillets, steaks, whole fish Adjust - for delicate fish e.g salmon steaks. | 100 - 1000 g | 1. Remove from packaging, wash and dry fish. Note weight.2. Place fish in a microwavesafe dish with 2 - 3 tblsps of liquid e.g white wine, water or milk. Cover the dish with a lid or microwave wrap.3. Touch “AUTO” 14 times to select “Steamed Fish”, enter weight and press “Start”. (Please see recommended recipes on pg 33) |
| AUTO 15. BAKED FISHFor cooking fresh, chilled fish e.g fillets, steaks, whole fish & crispy coated fillets.Adjust + for very crispy fish Adjust - for delicate fish e.g salmon steaks | 100 - 1000 g | 1. Remove from packaging, wash and dry fish. Prepare as necessary e.g stuff etc. Note weight of prepared fish.2. Place the fish in a dish on the low rack on the turntable. Dot with a little butter. (For a more crispy result e.g for breaded fillets, place the fish directly on the low rack on the drip tray on the turntable.)3. Touch “AUTO” 15 times to select “Baked Fish”, enter weight and press “Start”. (Please see recommended recipes on pg 33-34) |
DIRECT ACCESS RECIPES
Potato Programs
Auto Program 5 Potato Gratin Recipe Details
| Ingredients | 1 Serving | 2 Servings | 4 Servings | 6 Servings |
| Butter | 2.5g | 5g | 10g | 15g |
| Potatoes, peeled and thinly sliced. | 150g | 300g | 600g | 900g |
| Onion, peeled and finely chopped | 1/4 onion | 1/2 onion | 1 onion | 1 1/2 onions |
| Streaky Bacon, chopped | 1/2 rasher | 1 rasher | 2 rashers | 3 rashers |
| Single Cream | 50 mls | 100 mls | 200 mls | 300 mls |
| Grated Cheese | 25g | 50 g | 100g | 150g |
| Salt and Pepper | to taste | to taste | to taste | to taste |
| Tomato Slices | a few | a few | a few | a few |
| Parsley, chopped | a little | a little | a little | a little |
| Approx. Total Weight of Food (excluding dish) | 0.3 kg | 0.5 kg | 1.1 kg | 1.6 kg |
Suggested Cookware
Microwave safe, heatproof shallow casserole or deep flan dish.
Method
- Use some of the butter to grease the inside of the dish.
| Quantity | Dish size |
| 1 serving | 1.0 | dish (10-15cm dia.) |
| 2 servings | 1.5 | dish (15-20cm dia.) |
| 4 servings | 1.5 - 2.5 | dish(20-25cm dia.) |
| 6 servings(Use of Adjust +recommended) | 2.5 - 3.5 | dish(25cm dia.) |
-
Place half of the potato slices in the dish, add the onion, bacon and half of the cheese. Place the remaining potatoes on the top.
-
Pour over the cream and sprinkle on the remaining cheese. Dot with any remaining butter.
-
Place the dish on the turntable.
-
Touch "Auto" 5 times to select Potato Gratin. Enter the weight of the potato gratin (excluding the dish).
A guide to the approximate food weight obtained if the recommended recipes are used is given above. Select Adjust + for a more well done finish, (particularly for the 4 and 6 serving sizes)
- After cooking garnish with chopped parsley and tomato slices.
DIRECT ACCESS RECIPES
Auto Program 6 Roast Potatoes Recipe Details
| Ingredients | Serves 2 | Serves 4 | Serves 6 |
| Medium sized potatoes, peeled and quartered. | 300 g | 500 g | 800 g |
| Vegetable oil | 15 mls / 1 tblsp | 30 mls / 2 tblsps | 45 mls / 3 tblsps |
| Butter, cut into small pieces | 15 g | 25 g | 35 g |
Suggested Cookware
A shallow microwave safe and heatproof dish. Place on turntable.
Method
- Dry the potatoes thoroughly. Place in the dish with the oil and butter. Turn the potatoes in the oil in the dish so well covered.
- Place the dish on the turntable. Touch "AUTO" 6 times to select Roast Potato program and enter the weight of the potatoes. Press "Start".
- At the pause quickly turn the potatoes over. Take care as the dish will be very hot. After cooking serve immediately.
DIRECT ACCESS RECIPES
Chicken Programs
Choice of 2 programs
The Chicken program offers a choice of 2 programs for cooking either a whole chicken or pieces of chicken.
All recipes are for about 4 servings and are detailed on pgs 31 - 32.
Auto Program 9. Roast Whole Chicken
For cooking an unstuffed whole chicken.
Recommended recipe for;
Traditional Roast Chicken - Pg 31
Auto Program 10. Chicken Pieces
For cooking chicken wings, thighs, drumsticks, etc.
Recommended recipes for;
Chinese Style Chicken Drumsticks - Pg 31
Barbecue Style Chicken - Pg 32
Tandoori Chicken - Pg 32
Auto Program 9. Roast Whole Chicken: Traditional Roast Chicken
Ingredients
1100 - 1400 g whole chicken, washed, without giblets.
Marinade
25 g / 1 oz butter, melted
1 onion peeled, whole
1 lemon wedge
Streaky bacon rashers (optional)
Suggested Cookware
Low circular rack on drip tray on turntable.
Method
-
Place peeled onion & lemon wedge in body cavity. Brush chicken with melted butter. Place bacon rashers over breast.
-
Place chicken breast side up on low rack on the drip tray, on the turntable. Touch "Auto" 9 times to select Roast Whole Chicken. Enter the weight of the prepared chicken and press "Start".
-
Remove from oven, and stand for 10 - 15 minutes.
Auto Program 10. Chicken Pieces: Spicy Chinese Chicken Drumsticks
Ingredients
600 - 800g chicken drumsticks
Marinade
2 tbsp / 30ml dark soy sauce
2 tsp / 10ml grated ginger
2 cloves garlic, crushed
1 tbsp / 15ml rice wine or chinese wine
1 tbsp / 15ml honey
1 tsp / 5ml five-spice powder
1 tsp / 5ml sesame oil
1/2 tsp / 2.5 ml chilli powder
Suggested Cookware
Circular low rack on drip tray on turntable.
Method
-
Combine marinade ingredients in a bowl. Add chicken drumsticks and marinate for 2 hours.
-
Place chicken on the low rack on drip tray on turntable.
-
Touch "Auto" 10 times to select Chicken Pieces. Press "Adjust Less" and enter weight of chicken. Press "Start".
-
Remove from oven.
DIRECT ACCESS RECIPES (CONT.)
Auto Program 10. Chicken Pieces: Barbecue Style Chicken Drumsticks
Ingredients
600 - 800g chicken pieces (thighs or drumsticks)
Marinade
2 tbsp / 30ml tomato ketchup
1 tbsp / 15ml clear honey
2 tsp / 10ml worcester sauce
dash of mustard
Cookware
Circular low rack on drip tray on turntable.
Method
- Pierce chicken skin with a fork.
- Combine marinade ingredients in a bowl. Add chicken pieces and marinate for 1 hour.
- Place chicken pieces skin side up on low rack on the drip tray on the turntable. Brush with marinade. Touch "Auto" 10 times to select Chicken Pieces. Press "Adjust Less", enter weight of chicken. Press "Start".
- Remove from oven.
Auto Program 10. Chicken Pieces: Tandoori Chicken
Ingredients
600 - 800g chicken breasts, skinless
Marinade
300mls / 1/2 pint plain yogurt
3 tsps / 15mls garam masala
2 tsps / 10mls paprika
1 tsp / 5mls ground ginger
1/2 tsp / 2.5mls each chilli powder and turmeric
(Alternatively a bought tandoori marinade may be used, and chicken prepared in the same way).
Cookware
Circular low rack on drip tray on turntable.
Method
- Make a few slashes in the flesh of the chicken.
- Combine marinade ingredients in a bowl. Add chicken breasts and marinate for 4 hours or overnight in the refrigerator.
- Place chicken breasts on low rack on drip tray on the turntable. Touch "Auto" 10 times to select Chicken Pieces. Press "Adjust Less", enter weight of chicken. and press "Start".
- Remove from oven.

DIRECT ACCESS RECIPES (CONT.)
Fish Programs
The fish program offers a choice of 2 programs for cooking steamed or baked fish.
All recipes are detailed in pages 33 - 34
Auto Program 14. Steamed Fish
Recommend recipes for;
Steamed White Fish - Pg 33
Salmon Steaks - Pg 33
Auto Program 15. Baked Fish
Recommend recipes for;
Trout with Almonds - Pg 34
Stuffed Baked Fish - Pg 34
Auto Program 14. Steamed Fish: Steamed White Fish
Ingredients
450g / 1lb white fish fillets or steaks
2 - 3 tblsps / 30-45 mls white wine / milk / water or lemon juice
Cookware
Microwave-safe shallow dish.
Method
- Wash and dry the fish.
- Arrange the fish in the dish.
( Overlap thin ends of fillets and roll very thin fillets to avoid overcooking. Arrange fish steaks in a circle with the thicker parts to the outside.)
Sprinkle with wine, milk, or lemon juice.
- Cover dish with microwave wrap or a lid and place on turntable. Touch "Auto" 14 times to select Steamed Fish, enter weight of fish, and press "Start".
- Stand covered for 2 minutes after cooking.
Auto Program 14. Steamed Fish: Salmon Steaks
Ingredients
4 salmon steaks
(approx. 150g / 6oz each)
salt and freshly ground black pepper
2 tbsps / 30mls white wine
2 tbsps / 30mls lemon juice
12 1/2 g / 1/2oz butter
Cookware
Microwave-safe shallow dish.
Method
- Wash and dry the salmon steaks.
- Arrange the salmon steaks in a circle in the dish with the thickest parts to the outside. Sprinkle with wine, lemon juice, salt and pepper. Dot with butter.
- Cover dish with microwave wrap or a lid and place on turntable. Touch "Auto" 14 times to select Steamed Fish. Press "Adjust Less", enter weight of fish and press "Start".
- Stand covered for 2 minutes after cooking. Garnish with lemon slices and dill. Serve with hollandaise sauce.
DIRECT ACCESS RECIPES (CONT.)
Auto Program 15. Baked Fish
Trout with Almonds
Ingredients
1 - 4 medium trout, washed and gutted
lemon juice
a few flaked almonds
butter
salt and pepper to taste
Cookware
Microwave safe heatproof dish.
Method
-
Place prepared fish in dish and sprinkle with lemon juice, flaked almonds, salt and pepper. Dot with butter.
-
Place uncovered dish on turntable and press "Auto" 15 times to select Baked Fish. Enter weight of fish and press "Start".
Auto Program 15.Baked Fish
Stuffed Baked Fish
Ingredients
1 - 4 medium whole fish, washed and gutted lemon juice
butter
salt and pepper to taste
1 quantity of stuffing (see recipes on next page)
Cookware
Microwave safe heatproof dish.
Method
-
Place stuffing into body cavity. Secure with cotton tied around fish (or secure with wooden cocktail sticks).
-
Place prepared fish in dish and sprinkle with lemon juice, salt and pepper. Dot with butter.
-
Place uncovered dish on turntable and press "Auto" 15 times to select Baked Fish. Enter weight of fish and press "Start".
-
After cooking remove cotton and serve. (Note; Fish fillets maybe used in place of whole fish. Place stuffing on fillet and carefully roll up. Secure with cotton)
DIRECT ACCESS RECIPES (CONT.)
Stuffings for Baked Fish
The recipes below make sufficient stuffing for 3-4 medium whole fish.
Simply mix all the ingredients together well and bind with the milk.
Prawn Stuffing
100g / 4oz fresh white breadcrumbs
1 level tblsp finely chopped fresh parsley
(or 1/2 to 1 tsp dried)
1/2 tsp finely grated lemon rind
50g / 2oz peeled prawns, coarsely chopped
1/2 tsp salt
25g / 1oz melted butter
milk to bind
Orange and Herb Stuffing
1 small onion, very finely chopped or grated finely grated rind and juice if 1 medium orange
2 level tblsps finely chopped parsley (or 1 tsp dried)
1/2 tsp salt
25g / 1oz melted butter
milk to bind
100g / 4oz fresh white breadcrumbs
Apple and Herb Stuffing
100g / 4oz fresh white breadcrumbs
1 eating apple - peeled, cored and finely chopped
finely grated rind and juice of 1 lemon
2 level tsp finely chopped fresh parsley (or 1 tsp dried)
25g / 1 oz melted butter
milk to bind
Celery and Tomato Stuffing
100g / 4oz fresh white breadcrumbs
2 level tblsps finely chopped celery
2 skinned and chopped tomatoes
1/2 tsp salt
dash of lemon juice
25g / 1oz melted butter
milk to bind
Lemon and Herb Stuffing
100g / 4oz fresh white breadcrumbs
1 level tblsp finely chopped fresh parsley (or 1/2 tsp dried)
1 level tsp finely grated lemon rind dash of lemon juice
1 level dstsp fresh thyme (or 1/2 tsp dried)
1/2 tsp salt
pinch of white pepper
25g / 1oz melted butter
milk to bind
SLOW COOKING
A choice of two slow cook programs are available;
Slow Cook High - 300W - for the first stage of the slow cooking process.
Slow Cook Low - 150W - for continuing the slow cooking process by gently simmering the food.
This feature is convenient for busy life styles and is ideal for cooking soups, casseroles and stews.
Slow Cook Low (150W) may also be used for keeping food which is already piping hot warm.
Do not attempt to slow cook meals using only Slow Cook Low (150W), always begin cooking on Slow Cook High (300W) to bring food to simmering temperature and then continue gently cooking using Slow Cook Low (150W).
Maximum Cooking Time
1 Stage Slow Cooking - 12 hrs 2 Stage Slow Cooking - 24 hrs
You can set the slow cook cooking time in increments of 10 minutes.
For example:
0H20 indicates 20 minutes 5H00 indicates 5 hours 10H40 indicates 10 hrs 40 mins.
Example: To cook a casserole using slow cook function: Slow Cook High for 30 minutes, followed by Slow Cook Low for 8 hours.
1.

Press "Clear / Stop".
2.

Press "Slow Cook" once. SLOW COOK HIGH - SET TIME is displayed.
3.
Turn "Timer" until 0H30 appears in the display window.
4.
Press "Slow Cook" once. SLOW COOK LOW - SET TIME is displayed.
5.
Turn "Timer" until 8H00 appears in the display window.
6.

Press "Start".
SLOW COOKING (CONT.)
Important Tips for Best Results When Slow Cooking
Suitable foods for slow cooking; Liquid dishes e.g casseroles and stews containing cubed meat or chicken joint pieces, soups, rice puddings. Root vegetables are particularly useful for slow cooking - cut into even sized pieces, the larger the size of the vegetables the longer cooking time they will require.
Most casseroles or soups are best cooked using 2 stage Slow Cooking - generally cook on Slow Cook High (300W) for the initial 25 - 40 minutes, then simmer very gently on Slow Cook Low (150W) for several hours, usually a minimum of around 5 hours is required. You may stir if you wish but this is not essential.
Always ensure that the dish is covered by a close fitting lid to avoid drying out. Always ensure the dish is recovered after stirring.
Use sufficient liquid. Liquid may include water, stock, wine, fruit juice, beer or cider. The meat and vegetables should be immersed in the cooking liquid for best results and to avoid drying out.
Always use a large enough cooking dish - a large bowl covered with a microwave proof plate is ideal, this makes for easier mixing of ingredients and avoids the possibility of spillage.
Combine thickening agents e.g flour with the meat at the start of the cooking process or alternatively mix 1 - 2 tblsps of cornflour to a smooth paste with a little cold water and stir in 10 - 15 minutes before the end of cooking.
If adding cream or milk always do so at the end of cooking. Stir well after cooking.
Advantages of cooking casseroles / soups by Slow Cook:
You can start the cooking process early in the day, then go off to do other things and return to a cooked meal - there is little chance of the dish spoiling if your mealtime is a little delayed.
It is not essential to stir due to the gentle heating involved. (You may stir if you wish, it can only improve the cooking process). Due to the long, slow cooking process, tough meat is tenderised and flavours have time to fully develop.
Convenience and flexibility - meals are ready when you are - once food is thoroughly cooked and piping hot it can be kept warm using Slow Cook Low (150W).
Suggested Recipes
All recommended recipes for use with the Slow Cook feature, are detailed on the following pages.
French Onion Soup - pg 38 Tomato and Lentil Soup - pg 38 Winter Vegetable Soup - pg 39
Beef Casserole (serves 3 - 4) - pg 39 Beef Casserole (serves 2 - 3) - pg 40 Hungarian Beef Goulash - pg 40 Lamb and Vegetable Hotpot - pg 41 Chicken, Bacon and Tomato Casserole - pg 42 Pork Casserole with Cider - pg 43
Rice Pudding - pg 43
SLOW COOKING RECIPES
French Onion Soup
(Serves 6 - 8)
Ingredients
25g / 1oz butter
450g / 1lb onions, peeled and thinly sliced
900mls / 1 1/2 pints hot beef stock
5ml / 1 tsp worcester sauce
5ml / 1 tsp sugar
1 clove garlic, crushed - optional
30ml / 2tblsp flour
salt and pepper
1 bay leaf
5ml / 2 tsps dry sherry (optional)
Cookware
Large bowl covered with a plate. Place on turntable.
Method
-
Place the butter into a large mixing bowl, melt on '900W' power for 30 seconds. Stir in the onions and garlic, cover and cook on '900W' for 4 minutes. Stir in the flour and mix well. Pour on boiling stock and seasoning, except sherry. Mix well.
-
Cover and cook using 2 Stage Slow Cook - Slow Cook High for 30 - 35 minutes, followed by Slow Cook Low for 5 - 8 hours.
-
After stage 1 you may stir the soup, but this is not essential. Recover the dish and return to the oven.
-
After cooking stir well, remove bay leaf and stir in sherry.Serving idea; Sprinkle a little grated cheese onto slices of toasted french bread. Brown under grill. Add a slice of toast to each bowl of soup and serve immediately.
Variation
Cream of onion - stir in 150 mls / 1/4 pint double cream after cooking.
Tomato and Lentil Soup
(Serves 6 - 8)
Ingredients
25g / 1 oz butter
1 onion, peeled and finely chopped
2 rasher of streaky bacon, cut into small pieces
2 sticks celery, chopped
150g / 6 oz split red lentils
600mls / 1 pint hot vegetable or chicken stock
450mls / 3/4 pint tomato juice
2 carrots, peeled and chopped salt and pepper
1 bay leaf
1 bouquet garni
Cookware
Large bowl covered with a plate. Place on turntable.
Method
-
Place the butter into a large mixing bowl, melt on '900W' for 30 seconds. Stir in onion and bacon, cover and cook on '900W' for 2 minutes. Stir in all remaining ingredients. Mix well.
-
Cover and cook using 2 Stage Slow Cook - Slow Cook High for 30 - 35 minutes, followed by Slow Cook Low for 6 - 9 hours.
-
After stage 1 you may stir the soup, but this is not essential. Recover the dish and return to the oven.
-
After cooking stir well, remove bay leaf and bouquet garni. Serve with fresh crusty bread. If a smoother result is required the soup may be liquidised after cooking.
SLOW COOKING RECIPES (CONT.)
Winter Vegetable Soup
(Serves 6 - 8)
Ingredients
Suggested Vegetables;
2 - 3 sticks celery, washed and chopped
1 large onion, peeled and sliced
2 - 3 carrots, peeled and sliced
1/2 swede, peeled and diced (approx. 1 - 1 1/2 cm cubes)
1 potato, peeled and diced (approx. 1 - 1 1/2 cm cubes)
50g / 2oz butter
50g / 2oz plain flour
400g / 16oz canned chopped tomatoes
750mls / 1 1/2 pints hot chicken stock
1 bay leaf
1 bouquet garni
1/2 tsp dried mixed herbs (optional)
salt and white pepper
Note:-
The total weight of the prepared vegetables should be approx. 900g / 2lb. Any winter root vegetables may be used and the proportions of each may be varied according to taste provided the total prepared weight remains around 900g / 2lb.
Cookware
Large microwave proof bowl e.g mixing bowl covered with a plate. Place on turntable.
Method
- Melt the butter in a large microwave proof bowl on '900W' for 30 seconds. Add the prepared vegetables and mix well, so all vegetables are coated with butter. Stir in the flour and mix well so vegetables are evenly coated with flour. Stir in the tomatoes, seasoning and stock - stir well.
- Cover the bowl with microwave proof plate (to act as a lid). Place on turntable. Cook using 2 Stage Slow Cook - Slow Cook High for 40 minutes, followed by Slow Cook Low for 5 - 8 hours.
- After stage 1 you may stir the soup, but this is not essential. Recover the dish and return to the oven.
- After cooking stir well and remove bouquet garni and bay leaf before serving.
Basic Beef Casserole
(Serves 3 - 4)
Ingredients
350g / 3/4lb braising steak, cubed 40g / 1 1/2oz seasoned flour (seasoned with an oxo cube, salt and pepper)
1 onion, peeled and sliced 1 carrot, peeled and sliced 400g / 16oz canned chopped tomatoes 300 mls / 1/2 pint hot beef stock (or 1/4pint beef stock +1/4pint red wine)
15mls / 1 tblsp tomato puree 1 bouquet garni
1 bay leaf salt and pepper to taste
Cookware
Large microwave proof casserole dish with lid, or a bowl covered with a plate. Place on turntable.
Method
- Toss the beef in the seasoned flour until well covered.
- Place all the ingredients into a large microwave proof casserole dish or large bowl, stir well and cover with lid. Cook using 2 Stage Slow Cook - Slow Cook High for 40 minutes, followed by Slow Cook Low for 5 - 8 hours.
- After stage 1 you may stir the casserole, but this is not essential. Recover the dish and return to the oven.
- After cooking stir well and remove bouquet garni and bay leaf before serving.
SLOW COOKING RECIPES (CONT.)
Basic Beef Casserole
(Serves 2 - 3)
Ingredients
225g / 1/2lb braising steak, cubed
25g / 1oz seasoned flour
(seasoned with an oxo cube, salt and pepper)
1 onion, peeled and sliced
1 carrot, peeled and sliced
200g / 8oz canned chopped tomatoes
300mls / 1/2 pint hot beef stock
1 tblsp / 15mls tomato puree
1 bouquet garni
1 bay leaf
salt and pepper to taste
Cookware
Large microwave proof casserole dish with lid, or a large bowl covered with a plate. Place on turntable.
Method
-
Toss the beef in the seasoned flour until well covered.
-
Place all the ingredients into a large microwave proof casserole dish or large bowl, stir well and cover with lid. Cook using 2 Stage Slow Cook - Slow Cook High for 30 - 35 minutes, followed by Slow Cook Low for 5 - 8 hours.
-
After stage 1 you may stir the casserole, but this is not essential. Recover the dish and return to the oven.
-
After cooking stir well and remove bouquet garni and bay leaf before serving.
Hungarian Beef Goulash
(Serves 3 - 4)
Ingredients
350g / 3/4lb braising steak, cubed
40g / 1 1/2 oz seasoned flour
(seasoned with an oxo cube, salt and pepper)
1 onion, peeled and sliced
1 small green pepper, deseeded and chopped
400g / 16oz canned chopped tomatoes
2 tsp / 10mls paprika
300 mls / 1/2 pint hot beef stock
(or 1/4 pint beef stock + 1/4 pint red wine)
1 tblsp / 15mls tomato puree pinch of nutmeg
1 bouquet garni
salt and pepper to taste
100mls sour cream (optional)
Cookware
Large microwave proof casserole dish with lid, or a large bowl covered with a plate. Place on turntable.
Method
-
Toss the beef in the seasoned flour until well covered.
-
Place all the ingredients (except sour cream) into a large microwave proof casserole dish or large bowl, stir well and cover with lid. Place on turntable. Cook using 2 Stage Slow Cook - Slow Cook High for 30 - 35 minutes, followed by Slow Cook Low for 5 - 8 hours.
-
After stage 1 you may stir the goulash, but this is not essential. Recover the dish and return to the oven.
-
After cooking stir well and remove bouquet garni before serving. If you wish you may stir in 100mls of sour cream just before serving.

SLOW COOKING RECIPES (CONT.)
Lamb and Vegetable Hotpot
(Serves 4)
Ingredients
350g / 3/4lb lean lamb, cubed
25g / 1oz seasoned flour
1 large onion, peeled and chopped
1 leek, chopped
2 carrots, peeled and chopped
1/2 small turnip, peeled and diced
1 bouquet garni
1 bay leaf
salt and pepper
30mls / 2 tblsps chopped parsley to garnish
1 potato
400g / 16oz chopped tomatoes
450mls / 3/4 pint hot stock
Cookware
Large microwave proof casserole dish with lid or a large bowl covered with a plate. Place on turntable.
Method
-
Toss the lamb in the seasoned flour until well covered.
-
Place all the ingredients into a large microwave proof casserole dish or large bowl, stir well and cover with a lid.
-
Cook using 2 Stage Slow Cook - Slow Cook High for 40 minutes, followed by Slow Cook Low for 6 - 8 hours.
-
After stage 1 you may stir the casserole, but this is not essential. Recover the dish and return to the oven.
-
After cooking stir well, remove bouquet garni and bay leaf. Garnish with fresh chopped parsley.
SLOW COOKING RECIPES (CONT.)
Chicken, Bacon and Tomato Casserole
(Serves 4)
Ingredients
4 chicken portions, skinned, total weight approx. 800g - 900g
5 rashers of streaky bacon, chopped
1 large onion, peeled and chopped
15g / 1/2 oz butter
1 clove garlic, crushed
400g / 16oz canned chopped tomatoes
1 small green pepper, deseeded and chopped
2 sticks celery, chopped
1 bouquet garni
pinch of mixed herbs salt and pepper
30 mls / 2 tblsps cornflour, mixed to a smooth paste with a little cold water
30 mls / 2 tblsps chopped parsley to garnish
450 mls / 3/4 pint hot chicken stock
Cookware
Large microwave proof casserole dish with lid or a large bowl covered with a plate. Place on turntable.
Method
- Arrange the chicken portions in a large casserole dish.
- Melt the butter in a large microwave proof bowl for approx. 30 seconds. Stir in the bacon and onion, cover and cook on '900W' microwave power for 3 - 4 minutes.
Sprinkle over the chicken. - Add all other remaining ingredients (except the cornflour) to the chicken and mix well.
- Cover the dish and cook using 2 Stage Slow Cook - Slow Cook High for 40 minutes, followed by Slow Cook Low for 5 - 8 hours.
- After stage 1 you may stir the casserole, but this is not essential. Recover the dish and return to the oven.
- 10 minutes before the end of cooking, stir in the cornflour paste, and cook for the remaining few minutes.
- After cooking stir well, remove bouquet garni and garnish with fresh chopped parsley.
Variations
Replace the green pepper with 100g / 4oz button mushrooms or 1-2 carrots, sliced.

SLOW COOKING RECIPES (CONT.)
Pork Casserole with Cider
(Serves 4)
Ingredients
350g / 3/4lb lean pork, cubed
1 large onion, peeled and chopped
1 green pepper, deseeded and chopped
100g / 4oz mushrooms, peeled and sliced
1 tblsp tomato puree
400g / 16oz canned, chopped tomatoes
150mls / 1/4 pint cider
150mls / 1/4 pint hot stock
1 bay leaf
pinch mixed herbs
salt and pepper
30mls / 2 tblsps cornflour mixed to a smooth paste with a little cold water.
30mls / 2 tblsps chopped parsley to garnish
Cookware
Large microwave proof casserole dish with lid or a large bowl covered with a plate. Place on turntable.
Method
-
Place all the ingredients (except cornflour) into a large microwave proof casserole dish or large bowl, stir well and cover with a lid.
-
Cook using 2 Stage Slow Cook - Slow Cook High for 40 minutes, followed by Slow Cook Low for 5 - 8 hours.
-
After stage 1 you may stir the casserole, but this is not essential. Recover the dish and return to the oven.
-
10 minutes before the end of cooking, stir in the cornflour paste, and cook for the remaining few minutes.
-
After cooking stir well, remove bay leaf. Garnish with fresh chopped parsley.
Rice Pudding
(Serves 4)
Ingredients
50g / 2oz pudding rice
600mls / 1 pint milk
25g / 1oz sugar
1 strip of lemon rind
pinch of nutmeg
Cookware
Large microwave proof casserole dish with lid or a large bowl covered with a plate. Place on turntable.
Method
-
Place rice, milk, sugar and lemon rind into a large microwave proof dish or bowl. Stir together.
-
Cover and cook using 2 Stage Slow Cook - Slow Cook 'High' for 30 minutes, followed by Slow Cook 'Low' for 3 - 4 hours.
-
For best results stir well after stage 1.
-
After cooking stir well and sprinkle with nutmeg.
Variations
Creamy Rice Pudding - Replace 1/2 pint of the milk with 1/2 pint full cream evaporated milk. Vanilla Rice Pudding - Replace the lemon with a few drops of vanilla essence. Orange Rice Pudding - Add the grated rind and juice of 1 orange. Honey and Sultana Rice Pudding - Add 1 tblsp / 15mls honey and 25g / 1oz sultanas.
QUESTIONS AND ANSWERS
OPERATION
Q. What is wrong when the oven light does not function?
A. Either:
- The door is not firmly closed. or:
• The light bulb has burned out.
Q. Why does steam come out of the air exhaust vent?
A. Steam is normally produced during cooking. The microwave oven has been designed to allow this steam to escape.
Q. Can the microwave oven be damaged if it is operated empty?
A. Yes. Never operate the oven while empty or without the turntable positioned correctly on the roller rest.
Q. Why does my oven produce smoke when I use grill, convection or dual cooking?
A. Any dirt or grease that builds up on the walls and roof of the oven will begin to smoke if not cleaned. Therefore it is vital to wipe out your oven after cooking.
Q. Instructions for aluminium foil use are confusing. When should foil be used?
A. It should be used to shield portions of food from becoming overcooked or over defrosted. Use small flat pieces of foil for shielding.
Q. Why is standing time recommended after the cooking operation has been completed?
A. Standing time is very important. With microwave cooking, the heat is in the food, not in the oven. Many foods build-up enough internal heat to allow the cooking process to continue, even after the food is removed from the oven. Standing time for joints of meat, large vegetables and cakes is to allow the inside to cook completely, without overcooking the outside.
Q. Why do sparks and crackling (arcing) occur in the oven?
A. There may be several reasons why sparks and crackling within cavity (arcing) occur.
* A dish with metal parts or trim is being used. (silver or gold).
* A metal utensil has been left in the oven.
* Too much metal foil is being used.
* A metal twist-tie is present in the oven.
Q. Why does condensation appear in the oven?
A. This is normal and occurs because the food is cooking faster than the moisture can be removed from the oven. Always wipe out oven after use.
FOODS
Q. Can I check the preset oven temperature when cooking by convection?
A. Yes, you can check the set temperature by pressing "Oven. Temp." key. The temperature will then be shown in the display for 2 seconds.
Q. Why are scrambled eggs sometimes a little dry after cooking?
A. Eggs dry out if they are overcooked. You may need to vary the cooking time or power level for one of the following reasons:
* Eggs vary in size.
* The initial temperature of the egg may vary depending on where it is stored.
* The shape of cooking utensils vary, which makes it necessary to vary cooking time.
* Eggs continue cooking during standing time.
Q. How are liquids, soups or casserole prevented from boiling over?
A. Use a larger utensil than usual for cooking. If you open the oven door or press "Clear / Stop", the food will stop boiling.
Q. Why does the dish become hot when I microwave food in it?
A. As the food becomes hot it will conduct the heat into the dish. Use oven gloves to remove food after cooking.
Q. Does the density of a food affect its cooking time in the microwave?
A. Yes. A dense food such as meat will take longer to cook, reheat or porous, light and airy food such as bread, puddings and cakes. This is because microwaves cannot penetrate as deeply into denser, heavier foods.
CARE AND CLEANING
It is important that no liquid food or grease particles are left in the oven as this ensures the correct performance of your oven and reduces the risk of corrosion. After use always wipe out your oven thoroughly and dry.
INTERIOR OF THE OVEN
It is essential to keep your oven clean at all times. The oven cavity should be cleaned and wiped dry after each use. Please ensure that the oven is cool before cleaning. Wipe out with a mild detergent solution, paying particular attention to the microwave outlet cover (see illustration opposite) and the door seal area. Take particular care not to allow water to seep through the small holes in the oven walls. Wipe dry with a soft cloth. Never use abrasive cleaning materials as these can damage the oven cavity. When grilling, using convection or dual cooking grease may splash onto oven walls, if this is not removed after cooking it can accumulate and cause the oven to smoke. Such stains are also more difficult to remove if allowed to become "baked on".

Do not use any type of oven cleaner on your microwave oven as this can cause severe damage.
REMOVABLE PARTS
The glass turntable, turntable support, metal drip tray and grill racks can be removed for easy cleaning. Wash in warm soapy water and dry. It is important to clean the metal drip tray after use to prevent deterioration of the non-stick surface.
EXTERIOR OF OVEN
Johnson Wax "Mr Muscle" window and glass cleaner is recommended for light cleaning of the stainless steel exterior of your oven (i.e to remove finger prints). Do not use cleaners containing chlorine.
BEFORE CALLING SERVICE
You can often correct operating problems yourself. If your microwave oven fails to work properly, locate the operating problem in the chart below and try the solutions marked for each problem.
If the microwave oven still does not work properly, contact the nearest SANYO SERVICE CENTRE.
PROBLEMS

IMPERIAL TO METRIC CONVERSION TABLE
| Mass (Weight) | Metric | Imperial |
| 15 grams | 1/2 oz | |
| 25 g | 1 oz | |
| 50 g | 2 oz | |
| 100 g | 4 oz | |
| 200 g | 8 oz | |
| 300 g | 12 oz | |
| 450 g | 1 lb | |
| 1 kilo | 2 lb |
ELECTRICAL APPLIANCE GUARANTEE (WARRANTY)
Note: Nothing in this express warranty affects the statutory right available to the consumer. Sanyo (the Company) WARRANTS to the user that if this Microwave Oven (the Product) is or becomes defective and the defect results from faulty materials and or workmanship and not in any way from accident, misuse or mishandling by the user, the Company shall, at its sole option, repair or replace such defective Product or part there of free of charge on the following basis:—
- In the case of components parts and of workmanship- for a period of 12 months from the date of purchase by the user: and
- Provided that the glass tray and light bulbs shall be excluded absolutely from this warranty.
The dealers / retailers dated bill of sale or delivery ticket shall be evidence of the date of purchase. This Warranty is valid in the United Kingdom only and is not transferable.
The Warranty shall be null and void if the Product is tampered with, misused or abused, or if the serial number is defaced or removed.
IMPORTANT NOTICE:
This model in the Sanyo range of Microwave Ovens is recommended for DOMESTIC USE ONLY. Its use in a commercial capacity will render this guarantee inoperative.
To obtain service under guarantee, you are advised to contact either the dealer from whom the product was purchased. Should this not be possible, please contact Service Administration at:
SANYO EUROPE LIMITED
Otterspool Way, Watford, Herts, WD2 8JX
Telephone: Watford (01923) 246363
SANYO IRELAND LIMITED
41 Western Parkway Business Centre, Ballymount Road, Dublin 12, Ireland.
Service Tel No : Dublin 4503400 / 4568910
Direct Access (Auto) Programs
| Direct Access Programs | Auto Prog. No. | Food Category | Cooking Mode | Minimum weight of food | Maximum weight of food | Increment |
| Chicken | 9 | Whole Chicken | C / M | 800 g | 2000 g | 100 g |
| 10 | Chicken Pieces | C / M | 100 g | 1000 g | 100 g | |
| Meat Joint | 11 | Beef Joint | C / M | 500 g | 2000 g | 50 g |
| 12 | Pork Joint | C / M | 500 g | 2000 g | 50 g | |
| 13 | Lamb Joint | C / M | 500 g | 2000 g | 50 g | |
| Fish | 14 | Steamed Fish | M | 100 g | 1000 g | 50 g |
| 15 | Baked Fish | C / M | 100 g | 1000 g | 50 g |
| Direct Access Programs | Auto Prog. No. | Food Category | Cooking Mode | Minimum weight of food | Maximum weight of food | Increment |
| Reheat | 1 | Frozen Reheat | M | 100 g | 600 g | 50 g |
| 2 | Chilled Reheat | M | 100 g | 600 g | 50 g | |
| 3 | Liquid Reheat | M | 100 g | 1000 g | 100 g | |
| Potato | 4 | Baked Potato | C / M | 100 g | 1700 g | 100 g |
| 5 | Potato Gratin | C / M | 200 g | 1900 g | 100 g | |
| 6 | Roast Potato | C / M | 200 g | 900 g | 100 g | |
| Pizza | 7 | Frozen Pizza | C / M | 100 g | 600 g | 50 g |
| 8 | Fresh Pizza | C / M | 100 g | 600 g | 50 g |
Important: Always refer to the instruction manual when using direct access programs.
EASY USE CHART
SETTING THE CLOCK
After setting the language.
- Turn "Rotary Dial" to set hour.
- Press "Start".
- Turn "Rotary Dial" to set minutes.
- Press "Start".
TIME COOKING
- Press "Clear Stop".
- Press "Micro Power", 1-6 times to set power level.
- Turn "Rotary Dial" to set cooking time.
- Press "Start".
GRILL/THERMAL GRILL COOKING
- Press "Clear Stop".
- Press "Grill" once or twice.
- Turn "Rotary Dial" to set cooking time.
- Press "Start".
MULTI-STAGE COOKING
- Press "Clear Stop".
- Press "Micro Power" 1-6 times to set power level for 1st stage.
- Turn "Rotary Dial" to set cooking time for 1st stage.
- Press "Micro Power" 1-6 times to set power level for 2nd stage.
- Turn "Rotary Dial" to set cooking time for 2nd stage.
- Press "Start".
DUAL COOKING
- Press "Clear Stop".
- Press "Dual Cook" key once, twice or three times. Select Micro Power and Convection temperature as required.
- Turn "Rotary Dial" to set cooking time.
- Press "Start".
CONVECTION COOKING
- Press "Clear Stop".
- Press "Oven.Temp." to select preheat temperature.
- Press "Start".
- When preheating is completed. Press "Clear Stop" once.
- Turn "Rotary Dial" to set cooking time.
- Press "Start".
AUTO WEIGHT DEFROST
- Press "Clear Stop".
- Press "Auto Defrost".
- Turn "Rotary Dial" to enter weight of food.
- Place the food in the oven.
- Press "More" or "Less" to adjust defrosting time if required.
- Press "Start".
- At the pause, rearrange food as required. Close the door and press "Start".
DIRECT ACCESS COOKING
- Press "Clear Stop".
- Press AUTO key required number of times.
- Place the food in the oven.
- Turn "Rotary Dial" to enter weight of food.
- Press "More" or "Less" to adjust cooking time if required.
- Press "Start".
- At the pause (certain programs only), rearrange food as required. Close the door and press "Start".
IMPORTANT NOTE - USE OF AUTO PROGRAMS (PAUSE)
Please be aware that the Auto Defrost programs and the Direct Access Roast Potatoes, Roast Meat Joint programs have a built-in pause. On commencing use of any of these programs the first defrosting / cooking time will countdown in the display. At the pause turnover etc. as required, close the door and press "Start". The cooking time for the second period will countdown in the display.
EM-SL30EUK
- MICROWAVE OVEN WITH SUPER SHOWERWAVE, FAN OVEN AND POWERGRILL
- HOW TO USE YOUR OVEN SAFELY (MICROWAVE)
- NOTE
- ALTHOUGH YOUR OVEN IS PROVIDED WITH SAFETY FEATURES, IT IS IMPORTANT TO OBSERVE THE FOLLOWING
- OTHER IMPORTANT SAFETY INSTRUCTIONS
- WHEN COOKING BY MICROWAVE
- WHEN COOKING BY GRILL / CONVECTION
- WARNING
- SAVE THESE INSTRUCTIONS
- INSTALLATION
- CONNECTING TO THE MAINS
- WARNING - THIS APPLIANCE MUST BE EARTHED
- OVEN POSITIONING
- OVEN PARTS AND ACCESSORIES
- TURNTABLE INSTALLATION
- OVEN CONTROL PANEL
- SETTING THE LANGUAGE
- TO SET ENGLISH
- TO SET GERMAN
- TO SET SPANISH
- TO SET PORTUGUESE
- TO SET FRENCH
- SETTING THE CLOCK
- EXAMPLE: TO SET 4:30
- CHILD LOCK-OUT AND DEMONSTRATION MODE
- CHILD LOCK-OUT
- DEMONSTRATION MODE
- TO SET CHILD LOCK-OUT
- TO SET DEMONSTRATION MODE
- HOW TO USE THE KITCHEN TIMER
- EXAMPLE: TO SET KITCHEN TIMER FOR 5MINS 30SECS
- QUICK START
- MAFF RATING
- MICROWAVE COOKING
- MANUAL DEFROSTING
- EXAMPLE: TO COOK AT 450W FOR 1 MIN 30 SECS
- 1
- 2
- 3
- GRILL COOKING
- GRILL 1 - GRILL ONLY
- EXAMPLE: SET OVEN TO GRILL FOR 15 MINUTES
- 4
- THERMAL GRILL COOKING
- GRILL 2 - THERMAL GRILL
- EXAMPLE: SET OVEN TO THERMAL GRILL FOR 15 MINUTES
- CONVECTION COOKING
- 5
- 6
- DUAL COOKING
- DUAL 1. CONVECTION + MICROWAVE
- DUAL COOKING (CONT.)
- DUAL 2. CONVECTION WITH THERMAL GRILL
- DUAL 3. MICROWAVE + THERMAL GRILL
- MULTI-STAGE COOKING
- AUTO WEIGHT DEFROST
- EXAMPLE: TO DEFROST A 1000G CHICKEN USING ADJUST "MORE
- PAUSE
- AUTO WEIGHT DEFROST - HINTS & TIPS FOR BEST RESULTS
- MEAT
- POULTRY
- FISH
- BREAD
- AUTO WEIGHT DEFROST CHART
- DIRECT ACCESS (BY WEIGHT)
- VERY IMPORTANT
- EXAMPLE: TO COOK A BEEF JOINT, BY DIRECT ACCESS
- DIRECT ACCESS RECIPES
- POTATO PROGRAMS
- AUTO PROGRAM 5 POTATO GRATIN RECIPE DETAILS
- SUGGESTED COOKWARE
- METHOD
- CHICKEN PROGRAMS
- CHOICE OF 2 PROGRAMS
- AUTO PROGRAM 9. ROAST WHOLE CHICKEN
- AUTO PROGRAM 10. CHICKEN PIECES
- AUTO PROGRAM 9. ROAST WHOLE CHICKEN: TRADITIONAL ROAST CHICKEN
- INGREDIENTS
- MARINADE
- AUTO PROGRAM 10. CHICKEN PIECES: SPICY CHINESE CHICKEN DRUMSTICKS
- DIRECT ACCESS RECIPES (CONT.)
- AUTO PROGRAM 10. CHICKEN PIECES: BARBECUE STYLE CHICKEN DRUMSTICKS
- COOKWARE
- AUTO PROGRAM 10. CHICKEN PIECES: TANDOORI CHICKEN
- FISH PROGRAMS
- AUTO PROGRAM 14. STEAMED FISH
- AUTO PROGRAM 15. BAKED FISH
- AUTO PROGRAM 14. STEAMED FISH: STEAMED WHITE FISH
- AUTO PROGRAM 14. STEAMED FISH: SALMON STEAKS
- TROUT WITH ALMONDS
- AUTO PROGRAM 15.BAKED FISH
- STUFFED BAKED FISH
- STUFFINGS FOR BAKED FISH
- PRAWN STUFFING
- ORANGE AND HERB STUFFING
- APPLE AND HERB STUFFING
- CELERY AND TOMATO STUFFING
- LEMON AND HERB STUFFING
- SLOW COOKING
- MAXIMUM COOKING TIME
- EXAMPLE: TO COOK A CASSEROLE USING SLOW COOK FUNCTION: SLOW COOK HIGH FOR 30 MINUTES, FOLLOWED BY SLOW COOK LOW FOR 8 HOURS
- SLOW COOKING (CONT.)
- IMPORTANT TIPS FOR BEST RESULTS WHEN SLOW COOKING
- ADVANTAGES OF COOKING CASSEROLES / SOUPS BY SLOW COOK
- SUGGESTED RECIPES
- SLOW COOKING RECIPES
- FRENCH ONION SOUP
- VARIATION
- TOMATO AND LENTIL SOUP
- SLOW COOKING RECIPES (CONT.)
- WINTER VEGETABLE SOUP
- BASIC BEEF CASSEROLE
- HUNGARIAN BEEF GOULASH
- LAMB AND VEGETABLE HOTPOT
- CHICKEN, BACON AND TOMATO CASSEROLE
- VARIATIONS
- PORK CASSEROLE WITH CIDER
- RICE PUDDING
- QUESTIONS AND ANSWERS
- OPERATION
- FOODS
- CARE AND CLEANING
- INTERIOR OF THE OVEN
- REMOVABLE PARTS
- EXTERIOR OF OVEN
- BEFORE CALLING SERVICE
- ELECTRICAL APPLIANCE GUARANTEE (WARRANTY)
- IMPORTANT NOTICE
- SANYO EUROPE LIMITED
- SANYO IRELAND LIMITED
- EASY USE CHART
- TIME COOKING
- GRILL/THERMAL GRILL COOKING
- DIRECT ACCESS COOKING
- IMPORTANT NOTE - USE OF AUTO PROGRAMS (PAUSE)
Marque : SANYO
Modèle : EM-SL30
Catégorie : Four à micro-ondes