
HF-248S - Congélateur HAIER - Notice d'utilisation et mode d'emploi gratuit
Retrouvez gratuitement la notice de l'appareil HF-248S HAIER au format PDF.


| Type de produit | Congélateur |
| Marque | Haier |
| Modèle | HF-248S |
| Capacité nette | 248 litres |
| Dimensions (L x P x H) | 105 x 60 x 85 cm |
| Poids net | 48 kg |
| Alimentation | 220-240 V, 50 Hz |
| Classe énergétique | F (selon norme EU 2019) |
| Consommation annuelle | 280 kWh |
| Niveau sonore | 41 dB(A) |
| Type de dégivrage | Manuel |
| Température réglable | -24°C à -12°C |
| Fonction congélation rapide | Oui |
| Alarme de porte ouverte | Oui |
| Éclairage intérieur | LED |
| Type de compresseur | Inverter |
| Réfrigérant | R600a |
| Nombre de paniers | 1 panier métallique |
| Entretien et nettoyage | Nettoyer avec un chiffon doux et de l'eau tiède savonneuse. Ne pas utiliser de produits abrasifs. |
| Sécurité enfant | Verrouillage de porte (clé incluse) |
| Pieces détachées et réparabilité | Indice de réparabilité de 7,6/10. Pièces disponibles sur le site Haier. |
FOIRE AUX QUESTIONS - HF-248S HAIER
Questions des utilisateurs sur HF-248S HAIER
0 question sur cet appareil. Repondez a celles que vous connaissez ou posez la votre.
Poser une nouvelle question sur cet appareil
Téléchargez la notice de votre Congélateur au format PDF gratuitement ! Retrouvez votre notice HF-248S - HAIER et reprennez votre appareil électronique en main. Sur cette page sont publiés tous les documents nécessaires à l'utilisation de votre appareil HF-248S de la marque HAIER.
MODE D'EMPLOI HF-248S HAIER
Haier
HF-103
HF-103/A
HF-116NR
HF-116V
HF-116R
HF-128
HF-188
HF-248
HF-120T
HF-120TA
HF-150T/A
HF-180T
HF-180TA
HF-240T/A
HF-240T
HF-240TA
HF-248S
HF-128AE
HF-188AE
HF-248AE
HF-103AE
HF-116AE
HF-298AE
HF-116KA
HF-116KAME
HF-116HME
HF-338KA
HF-338KAME
HF-346KA
HF-346KAME
HF-286KA
HF-286KAME
HF-346KASS
GB
Freezer
GB
Instruction for use
CE
GB
DECLARATION OF CONFORMITY
The manufacturer of the product/s described herein, to which this description refers, declares on its sole responsibility that the product/s meet the relevant fundamental safety, health and protection requirements of the relevant EU guidelines and that the corresponding test reports are available for examination by the relevant authorities and can be requested from the seller of the appliance, especially with regard to CE Declaration of Conformity issued by the manufacturer or with the manufacturer's approval.
Moreover, the manufacturer declares that the parts of the appliance described in this user manual, which come into contact with fresh food, do not contain any toxic substances.
English
Contents
CE - Declaration of conformity. Inside Cover sheet
1 Protecting the environment and advice for disposal 2
2 Deciding where to locate your fridge / freezer.... 2
3 Installing your appliance 2
Danger warnings 2/3/4/6/7
4 Rating plate.... 3
5 Connecting up your appliance to the mains 3
6 Using your appliance 3
Switching on/off and selecting the temperature 3
Pilot lights 3
Warning buzzer 3
7 Starting up the freezer 4
8 Freezing/storing of fresh food....4
Labelling
Maximum capacity 4
Storage time
Refrigerating storage battery 5
Precautions and advice 5
9 Cleaning and maintenance 5
Switching off the appliance 5
Defrosting 5
10 Troubleshooting guide. 6
What to do when .... / Please check 6
11 Getting your appliance serviced....7
12 Guarantee....7
13 Built in the appliance in a fitted kitchen. 7
Food storage guide. 8
Please read these user instructions carefully to understand, quickly and thoroughly, how to use your new fridge/freezer. Underline any parts you consider particularly important. Look after this document so that you may consult it in future or pass it on to any future owners.
You have purchased a reliable appliance which will serve you for many years if it is used and maintained correctly. The detailed illustrations can be found on the last pages of this user manual
Important!
This appliance is designed for domestic use. If it is installed for professional or commercial use, the standards applicable to the respective trade must be observed.
The appliance has been tested against leakage in compliance with the relevant legal safety standards.
Should you have bought your new fridge / freezer to replace an old appliance, please make sure that all existing latch- or bolt-locks on the old appliance are destroyed, before you dispose of it.
This will ensure that a child cannot get trapped inside.
Please have the old appliance ecologically disposed of by a company specialised in environmental protection, since the appliance may contain harmful components in the refrigerant and this must be removed with special equipment. Please check with your dealer or with your local authority
Make sure that the refrigerating system containing the refrigerant, especially the heat exchanger at the back of the appliance, is not damaged during transportation to the disposal or collection site, so that you can be sure that the refrigerant does not leak out. Details concerning the type of refrigerating/isolating agent used can be found on the appliance's rating plate.
After installation of the appliance, the plug should be easily accessible.
If the power cable is damaged, an approved cable provided by a manufacturer or a service agent must be used for replacement
Warning: Keep the appliance well ventilated; remove any transport supports from cavity.
Warning: Do not use hard objects to remove frost.
Warning: Ensure the refrigeration pipeline cannot be damaged.
Warning: Do not use electric appliances within the food storage compartment except for models recommended by the manufacturer.
English
User instructions
The user instructions apply to several models, for this reason there may be some differences in the details given, according to the type of the appliance.
1 Protecting the environment / advice for disposal
Packing
serves to protect the appliance during transportation and recyclable materials have been used for packaging.
Corrugated board/cardboard (mainly from waste paper)
■ shaped parts in PS (foamed CFC-free polystyrene)
■ foils and bags in PE (polyethylene)
■ strapping tapes in PP (polypropylene)
Please hand over all packaging to the nearest official collection point, so that all the different materials can be re-used or recycled as far as possible and any illegal depositing of such materials is thus avoided.
2 Deciding where to locate your appliance
In order to avoid any damage or injury to persons or things, the appliance should be unpacked by two people and placed in the chosen location
Before positioning it, check that your new appliance has no visible outer damage.
On no account should you start up your appliance if it is damaged.
Check the appliance carefully for:
■ Damage to the packaging which might indicate that the appliance has been mishandled during transportation.
■ Damage to the outer casing
■ Any visible damage to the cable / plug
If in any doubt let the customer service department check the appliance.
It must at all costs be avoided that any environmentally damaging refrigerant leaks out by starting up the appliance.
3 Installing your appliance
a) Unpack the fridge / freezer.
b) In order not to unnecessarily waste raw materials, the handles (requiring smaller packaging) have not been mounted onto the separate parts of the appliance.
Mount the door handles and at the same time any other enclosed parts according to the relevant instructions enclosed separately.
c) Remove any objects from inside the appliance.
d) Carefully remove all film and adhesive tape from the casing from the door
e) Remove any polystyrene pieces from around the compressor (if present).
f) Remove all documents and accessories from inside the appliance.
Instruction for use
g) Clean the inside of the appliance with lukewarm water and vinegar and dry it thoroughly with a soft cloth.
Do not use washing liquids, sharp or abrasive household products or any other cleaning agents containing soda.
■ Make sure that the pipes for the circulation of the refrigerant are not damaged in any way during installation of the appliance.
■ The appliance must only be used for the purpose for which it is intended.
The appliance must be placed on a firm, level surface. This is the only way to ensure that the refrigerant can circulate freely and thus ensure that your appliance will work efficiently.
■ If possible, place your appliance in a cool, well aired, dry room.
■ Do not place your appliance in direct sunlight, nor in a room at high temperature.
Do not place your appliance in the vicinity of any sources of direct heat such as heating, ovens, cooking stove etc. (This would mean the compressor would have to work harder and as a result the power consumption would be considerably higher).
If installation near a direct heat source cannot be avoided, we recommend fitting a suitable insulation plate between the appliance and the heat source (do not use asbestos), or at least the following minimum distances must be observed:
■ from a gas or electric cooker 3 cm
■ from a radiator or oven etc. 30 cm
■ from another refrigerating appliance 2 cm
■ Do not place any appliances, such as microwaves, toasters etc. which give off heat on the appliance.
Never obstruct the ventilation grille.
Always pull out the plug itself and never pull the cable when cutting the appliance off from the mains supply.
WARNING!
Leave the appliance standing in its final position for at least 2 hours before switching it on, so that the circulation of the refrigerant stabilises and no operating problems occur.
Before connecting up the appliance, make sure that it is absolutely dry inside - especially in the corners.
Danger warnings
Depending on its composition, the refrigerant can be easily inflammable. The refrigerant circuit has been hermetically sealed and has been tested many times for possible leaks.
Any inexpert interference might well create a fire hazard. Make sure nothing mechanically effects the circulation of the refrigerant, nor, in particular, the accessible parts around the compressor.
Only expert professional personnel should intervene on the refrigerating system.
English
Warning!
Any refrigerant spilling out can injure your eyes. In the event of eye contact with the refrigerant, wash your eyes instantly under plenty of running water and call/consult a doctor (an eye specialist) immediately.
The appliance, according to its climate category, is meant for use at certain room temperatures.
These temperatures should not be exceeded! The climate category for your particular appliance is marked on the rating plate. The categories are:
| name of climate category | suitable room temperatures |
| SN | + 10°C to + 32°C |
| N | + 16°C to + 32°C |
| ST | + 18°C to + 38°C |
| T | + 18°C to + 43°C |
4 Rating plate
The rating plate with the technical data is located on the side of the appliance inner wall or outside, on the rear side of the unit.
Take a note of the technical data
Copy here below the technical data from the rating plate so that it is easily accessible without having to move the appliance.
| Model / Type N°. | |
| Gross capacity | Litres |
| Net capacity | Litres |
| Operating voltage | V-50 Hz |
| Maximum absorbed power (W) | Watt |
| Safety fuse (A) | Amp |
| Power consumption | kWh/24h |
| Freezing capacity | kg/24h |
5 Connecting up your appliance to the mains
Your appliance must be connected only to a grounded power socket which complies to relevant standards and has been installed by an authorised specialist. Before you plug in your appliance to the power socket, make absolutely sure that the voltage (V) and the safety fuse (A) for the main fuse box stated on the appliance's rating plate match your electrical supply. If these do not match, notify the nearest service department or your dealer immediately.
The appliance must not be connected up to an inverse rectifier (eg. solar panels).
6 Using your appliance
Switching on / off and Selecting the Temperature Temperature dial (Thermostat)
The temperature dial switches the appliance on and off and sets the cooling temperature.
To switch on :
Turn the temperature dial to the right.
The appliance has been switched on.
Instruction for use
The compressor is activated until the set temperature inside the appliance has been reached.
When setting the temperature for the freezer compartment, it is best to use a coin or a screwdriver.
Temperature settings:
Turn dial left to lowest setting = slight cooling Turn dial right to highest setting=lowest temperature The temperature must be set according to:
■ the appliance's room temperature
■ quantity of stored food
■ how often the appliance is opened
We recommend a medium setting. You will soon learn, through observation, which is the most suitable setting for your requirements.
Switching off: Turn the dial as far to the left as possible.
■ The compressor has been switched off
Pilot lights
If your appliance is equipped with pilot lights, they indicate the following:
■ green = CONTROL the appliance is connected to the electrical supply and is operating.
■ yellow = the SUPERFREEZE SWITCH is on and the thermostat has been deactivated. The compressor continues to refrigerate, until the SUPERFREEZE SWITCH is switched off again.
■ red = . ALARM the temperature in the freezer compartment is too warm i.e. has gone up.
The green pilot light - when present - must always remain on when the appliance is connected up to the electrical supply and is switched on. It is very important to pay attention to this because in the event of a power failure, the red and yellow pilot lights stop operating and no longer provide a warning.
If the red pilot light comes on there may be several reasons for this, namely:
■ The freezer is being started up for the first time
■ It is being restarted after defrosting
■ The freezer has been refilled with fresh food
In these cases it is quite normal for the red pilot light to be on. It goes off automatically when the temperature inside reaches approximately - 18°C.
Switch on (if provided) the SUPER FREEZE SWITCH (switch off again no more than 24 hours later or when the red light goes off). If possible, do not open the freezer compartment until the red light has gone off. If the red pilot light continues to remain on after 12 to 24 hours, there may be a serious problem.
In this case consult the chapter. "What to do when..." (Troubleshooting guide) at the end of this user manual.
Warning buzzer
If your appliance is equipped with a buzzer, it will sound when the red pilot light goes on.
English
This will be automatically silenced, when you switch on the SUPER-FREEZE SWITCH.
7 Starting up the freezer
- Switch on the freezer by turning the temperature dial to the right (for the time being turn the dial fully to the right to the maximum position) (the green and red lights - if provided - go on)
- If equipped with a SUPER FREEZE SWITCH turn it on (the yellow light will also come on).
- Do not open the door of the freezer compartment for about 4 hours, or for as long as the red light is on, so that the temperature in the freezer can drop to the necessary level.
- You can now fill the freezer with any amount of frozen food (food which has been bought ready frozen). The SUPER FREEZE SWITCH should be switched off again after 24 hours at the latest
- If you want to freeze fresh, unfrozen food, consult the chapter "Freezing / Storing fresh food".
Warning!
■ Do not store any bottled liquids in the freezer. Liquids expand when frozen and the bottle may explode.
■ Never keep explosive substances or aerosol cans, with inflammable propellants such as butane, propane, pentane etc. in the freezer. Any escaping gases could be ignited by electrical components. Such aerosol cans can be recognised by the list of contents or by the inflammable symbols printed on the can itself.
■ When storing ready frozen food, you must follow the manufacturer's instructions on the food packaging.
Deep frozen ice-cream and ice-lollies must not be eaten until a few minutes after being taken from the freezer to avoid injury to lips and tongue (danger of skin detachment). For the same reason, avoid touching the frozen inside walls of the freezer with wet hands.
■ Defrosted or slightly frozen products should be used immediately. As a rule, such products are not suitable for re-freezing.
■ Packaging should be dry to avoid things freezing together.
■ Ready frozen foods should be stored so that they do not come into contact with newly added foods which have not yet frozen.
8 Freezing / Storing fresh food
Almost all fresh products are suitable for freezing and storing in the freezer.
For the most common of these products, a storage guide with details of acceptable storage times and the most suitable packaging is provided. (see "Food storage guide" at the back of this user manual).
Label fresh products clearly as they are not easy to identify when deep frozen in transparent freezer bags. We recommend using commercially available labels for frozen foods.
Instruction for use
Pack fresh products in portions suitable for your needs to avoid defrosting quantities that are too big for you to use up in one day. Label the portions with at least the following information:
■ Product name (e.g. beef fillet)
■ Weight of the Portion
■ Quantity (number of pieces)
Freezing date
■ Use by date (see "Food storage guide")
Then continue as follows:
a) Berries, fruits with peel, herbs etc. should be laid out loose for freezing on the freezing tray (not all models are supplied with this) in the upper part of the freezer and then put into freezer bags after about 12 hours. Store the filled freezer bags in one of the available drawers.
Fresh food should be placed in the top drawer and moved down to one of the lower drawers after approx. 24 hours.
Avoid putting fresh foods directly in contact with deep frozen food. The deep frozen food could defrost and may not last out the normal storage time.
b) Within a period of 24 hours fill up the freezer only with the adequate quantities of fresh food for the freezing capacity of your freezer.
Consult the information on the rating plate (XX kg/24h).
c) If your freezer is equipped with a SUPER FREEZE SWITCH, switch it on (the yellow light will come on) this is not strictly necessary when filling up with already frozen foods (e.g. deep frozen foods).
WARNING Switch off the SUPER FREEZE SWITCH after 24 hours at the latest (the yellow light will go off).
d) Set the temperature dial to a medium to high setting
e) Keep the temperature in the freezing compartment under control preferably by placing a suitable thermometer with a scale range of up to -26°C. The storage temperature must always be at least -18°C.
Refilling the freezer compartment with fresh (not frozen) food
Make sure that you wait at least 24 hours before refilling with fresh food, in adequate quantities for the freezing capacity of your freezer (XX kg/24h).
Maximum capacity
In order to ensure correct storage of frozen food, never fill the drawers up to the top.
Set the temperature dial strictly according to the filling capacity.
To save energy in normal room temperatures ( +18^ to +22^ ) we recommend setting the temperature dial to a medium setting.
Storage lime
The storage time for ready deep-frozen products depends on the type of product and on its ingredients.
English
For this reason, you should strictly follow the producer's instructions on the packaging.
When you want to freeze fresh foods yourself, consult the Food storage guide at the back of this user manual.
Once frozen foods have been defrosted, they should be used up within between 12 to 24 hours.
Do not eat any food beyond its storage time, this could lead to food poisoning.
Refrigerating storage battery
(not supplied with all appliances) Refrigerating storage batteries serve two functions:
In the event of a power cut, the storage battery prevents the temperature inside the appliance from going up too much – this preserves the quality of the food for longer.
- Put storage batteries with the flat side in contact with the uppermost evaporation panel or in the top compartment.
■ Storage batteries can also be used to keep foods cool in a cool box.
■ Storage batteries reach their maximum refrigerating
capacity after they have been in the freezer for about 24 hours at -18°C or lower and are then placed in one of the cool boxes that are commercially available.
Precautions and advice
■ Whenever cleaning or defrosting, remove the power plug or switch off the main fuse.
■ After closing the freezer door, do not open it immediately and do not force it open under any circumstances. The vacuum created by the sealing of the door is dispersed after about 1 - 2 minutes, so that the door can be opened normally again.
To prevent condensation and ice forming, allow cooked food to cool down to room temperature before closing the lid of the dish and before storage.
Leave the freezer door open as briefly as possible to avoid wasting energy and to prevent an excessive amount of ice forming in the freezer compartment.
If the red pilot light comes on unexpectedly or stays on for a long period of time, do not open the door on any account and take appropriate measures immediately (see "What to do when...." at the back of the user manual)
■ Never use a screwdriver or any other sharp-edged metal tool to remove the layers of ice. The inside walls are very delicate and can be easily damaged by sharp edges. Use only plastic or wooden scrapers with no sharp edges.
Instruction for use
9 Cleaning and maintenance
As a firm rule, unplug the power plug or switch off at the mains.
For the upkeep of the external appearance of your fridge / freezer, clean the outside every now and again with furniture polish or with an enamel protecting product (never, on any account use it inside). Clean the door seal with warm water now and again but do not use any cleaning products.
Clean your appliance regularly.
The various parts inside the fridge / freezer are generally not suitable for dishwashers. These should be washed by hand with warm water and a little washing-up liquid. Never use the cleaning agent meal and on no account use any abrasive or acid, i.e. chemical cleaning products. A general all purpose pH neutral cleaning agent is recommended.
The rating plate inside or outside your appliance should not be damaged and should never be removed - this is essential for servicing. Make sure, when cleaning, that no water runs onto any electrical parts inside the appliance.
If there is a heat exchanger -called condenser- on the back of your fridge / freezer, this should be cleaned regularly. Dust and dirt impede the release of heat from the inside and considerably increase energy consumption. For best results, use a soft brush or a duster to remove dust from the condenser.
Switching off the appliance
If your appliance is going to be switched off for longer periods (such as during holidays), it should be left open to prevent odours from building up inside. If your appliance has a lock, set the lock in the "closed" position with the doors open and keep the key well away from small children to prevent accidents.
Ice and frost layers which build up to a certain thickness on the inside walls, act as insulation and prevent the dispersion of the coldness. These must be removed from time to time. To remove the layers of ice from the inside walls, use a plastic or wood scraper with no sharp edges.
When doing this, remove the drawers and lay a cloth on the bottom of the appliance to catch the ice as it is scraped off so that it can be easily removed.
The method least likely to damage your appliance when removing the layers of ice is to defrost it.
Defrosting
In normal circumstances (opening the freezer 4 - 5 times a day) the freezer compartment should be defrosted once or twice a year (more often in other circumstances).
The fridge compartment is defrosted automatically.
English
Danger warnings
Never use electrical appliances to defrost your appliance, such as a hair dryer, fan heater, dehumidifiers, de-icing sprays or anything with a naked flame (e.g. candles).
The plastic inside of your appliance could melt and the escaping gas or foam could be ignited by sparks or by the naked flame.
On no account should a steam cleaning device be used to defrost the layers of ice in the appliance (great risk of an electric shock).
Proceed as follows to defrost your appliance:
-
Provide a suitable non-metallic container (a plastic container or wash-basket)
-
Make absolutely sure that you remove the plug from the power socket.
-
Dry your hands thoroughly to prevent skin damage from contact with ice (it is advisable to use gloves).
-
Remove all frozen food from the freezer and roll it firmly in newspaper place it in the container already prepared and place the container in a cool, dry room.
-
Cover the container all around with a thick blanket.
-
Remove the drawers by pulling them as far out as possible and then raising them slightly
-
As described previously, scrape the thickest ice carefully from inside the freezer and put it in the kitchen sink.
-
If your appliance is equipped with a drip duct at the bottom of the appliance, pull it out and place a bowl to catch the dripping water underneath it.
-
If necessary, speed up defrosting by placing a large bowl of warm (not too hot) water on the bottom of the appliance and close the door.
-
If your appliance is not equipped with a drip duct, place an absorbent cloth underneath the front of the appliance and wipe up the defrosting water with a sponge.
-
Thoroughly clean the inside. Wipe it out with warm water and a little vinegar and then rinse it out with clear water.
-
Dry it thoroughly with a soft cloth and air it for 3-4 minutes.
-
Close the door and plug the appliance back in.
-
Reset the temperature dial to the maximum setting. (if your appliance is equipped with green and red pilot lights, these will come on) and if the SUPER FREEZE SWITCH is provided, switch it on the yellow light will also come on).
-
Now refill the drawers with the frozen food - the oldest items at the top.
To prevent the frozen food from defrosting, carry out the steps described above within two hours at the most.
- When the red pilot light goes off, reset the temperature dial to a medium setting. If provided, switch off the SUPER FREEZE SWITCH after about 12, but no later than 24 hours (the yellow light will go off).
Instruction for use
Switching the fridge off
If the fridge has to be switched off for a long period of time, the temperature dial should be set to "0" and the fridge cleaned as instructed above.
While the fridge is off, leave the doors open to prevent odours from building up.
10 Troubleshooting guide
High quality manufacturing processes and the use of the latest refrigerating and freezing technology will basically ensure the trouble-free functioning of your appliance.
If you suspect any fault, before contacting your nearest service department directly or via your dealer, make sure you have followed all instructions and advice given in this user manual.
Please note:
The compressor (also known as the refrigerating motor) must not operate continuously.
It is controlled by a thermostat which you set on the temperature dial and switches on automatically when the set temperature in the appliance is exceeded and switches off automatically when it is reached again.
Noise can be heard in every compressor - refrigerating system when it is switched on. These noises are produced when the motor in the compressor is running and by the refrigerant flowing through the refrigerating system circuit. These noises are normal and do not indicate any fault in the functioning of your appliance.
In unheated rooms and in cold weather conditions, condensation can build up on the outer walls of the appliance.
This does not mean there is a fault and it will disappear when the temperature increases.
Only call the service department, if after analysis of the possible fault factors, you cannot find any cause for the defect or you are not able to eliminate the fault.
Therefore first check under: "what to do when ....."
What to do when ....:
a) The appliance does not function (it's not running).
Please check:
Is the plug in good order and is it plugged in the socket properly?
Is the electricity coming through? (check this by possibly plugging in a small appliance such as a hand mixer or hair dryer etc.).
■ Is the appliance switched on? (Temperature dial should not be set to "0").
Warning!
In the event of a fault or of a power failure, the insulation of the appliance's walls provides 12 to 15 hours storage time for the frozen foods after the beginning of such failures.
English
Considerably more time is granted in specially insulated appliances. Ask your dealer what is the relevant: "Storage time in an emergency." If it takes longer to eliminate a problem, the frozen food in the appliance begins to defrost. Therefore, take prompt action to eliminate the problem and, if necessary, move the frozen food to another freezer (perhaps to a neighbour).
b) Your appliance is not cooling sufficiently. The freezing process is taking too long. The compressor is running too often.
Please check:
Did you make sure that the fridge / freezer was left to stand for at least 2 hours before switching it on? (To stabilise the circulation of the refrigerating fluid) see: "starting up".
If not; unplug your appliance and lift it to one side, with the door closed, for a short while, i.e. tilt it and then place it back down on its feet again. After 2 hours plug it back in. Do not open the door again for about 12 hours (i.e. until the red light - if provided - has gone off).
■ The door does not close tightly and is not sealing properly.
Test: place a sheet of paper between the seal and the casing and close the door. It should be difficult to pull out the sheet of paper on all sides.
If the paper slides out easily on one or more sides, call your nearest service department.
■ Heavy ice formation on the inside walls of the freezer compartment (see: "cleaning and maintenance").
The appliance is exposed to direct sunlight or is sited near a direct heat source (oven, radiator etc.). Protect the appliance against direct sunlight / check the distance from the heat source / place an insulation plate between the appliance and the source of heat (see "Choosing where to install your appliance").
The freezer has been filled up with a quantity of fresh food which does not comply with the freezing capacity indicated on the rating plate (XX kg /24h).
Is the ventilation working properly, the ventilation grille covered or is the condenser on the outer rear wall full of dust?
c) Your appliance is excessively noisy.
Please check:
■ Is the cabinet standing level and steady, are any nearby objects or items of furniture being vibrated by
the cabinet? Make sure everything at the rear is free, carefully bend back any parts touching.
Note: slight bubbling noises are normal for this type of refrigeration system.
Instruction for use
Warning
On no account should you undertake any technical interventions or attempts at repair on your appliance.
11 Getting your appliance serviced
Any repairs or interventions on the appliance should only be carried out by your nearest service department, as otherwise the user may run considerable risks and the guarantee may no longer be valid.
Consult the enclosed guarantee card or the separately enclosed list of after sales centres, to see which company is responsible for servicing your appliance.
If there is no indication of the nearest service department in the documentation provided, then contact your dealer.
Repairs by the service department to eliminate faults which have occurred because of non-adherence to the information and advice given in this user manual, have to be charged to the customer and are not covered by your dealer's guarantee.
In order to receive immediate help, make sure you have ready the following essential data to identify your appliance:
■ Appliance type and model (see the rating plate)
Date of purchase
■ Name and place of your dealer
■ Description of the fault
12 Guarantee
The general terms and duration of the guarantee are those stated on the guarantee card here enclosed, or supplied by your dealer at the time of purchase.
13 Built in the appliance in a fitted kitchen
If your appliance can be built in a fitted kitchen, the relevant instructions are included among the other appliance documentation.
The manufacturer works constantly at the further development of all products. Please therefore bear this in mind as the form, set up and technology are subject to change, without prior notice.
English
Storage table
| Food Symbols | Description | Storage time |
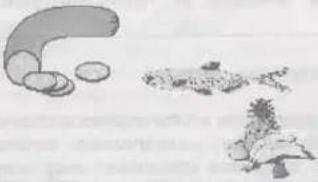 | Mincemeat (ground meat)SausagesSmall fishInnards (liver/heart)Ice-creamFruit | 2 - 3 monthsin polyethylene freezer bagsIce-cream and fruitin plastic container |
 | CheeseBreadLarge fishCakes/biscuits | 4 monthsin polyethylene freezer bags<< in glass container |
 | PorkBeefRabbitLamb | 6 monthsin aluminium wrap |
 | Mushrooms/asparagusFruit (sliced)StrawberriesGateaux | 6 monthsin polyethylene freezer bags<< aluminium wrap |
 | Chicken/turkeyDuckGoose | 8 monthsin aluminium wrap |
| CauliflowerBeansPeppers | 10 - 12 monthsin polyethylene freezer bags | |
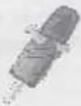 | Preserved foodFruits preservesIce-lollies | 10 - 12 monthsin glass container<< in aluminium wrap |
English
Components of the appliance


The refrigerator you purchased could vary from the one shown in the pictures
A Indicator light GREEN
B Indicator light YELLOW
© Indicator light RED
D Super Freeze Switch
E Temperature control (On/Off)
Availability depending on Mod./Type
① Ventilation grille
② Worktop/Cover
③ Control panel
4 Freezer/Storage Compartment
5 Berry drawer
6 Door seal
⑦ Defrost water collection tray
8 Backwall condenser
9 Compressor


The symbol on the product or on its packaging indicates that this product may not be treated as household waste. Instead it shall be handed over to the applicable collection point for the recycling of electrical and electronic equipment. By ensuring this product is disposed of correctly, you will help prevent potential negative consequences for the environment and human health, which could otherwise be caused by inappropriate waste handling of this product. For more detailed information about recycling of this product, please contact your local city office, your household waste disposal service or the shop where you purchased the product.
- Haier
- CE
- DECLARATION OF CONFORMITY
- English
- Contents
- Important!
- User instructions
- Protecting the environment / advice for disposal
- Packing
- Deciding where to locate your appliance
- Installing your appliance
- Instruction for use
- Do not use washing liquids, sharp or abrasive household products or any other cleaning agents containing soda.
- WARNING!
- Danger warnings
- Rating plate
- Take a note of the technical data
- Connecting up your appliance to the mains
- Using your appliance
- Switching on / off and Selecting the Temperature Temperature dial (Thermostat)
- To switch on :
- Temperature settings:
- Switching off: Turn the dial as far to the left as possible.
- Pilot lights
- Warning buzzer
- Starting up the freezer
- Freezing / Storing fresh food
- Then continue as follows:
- Consult the information on the rating plate (XX kg/24h).
- Refilling the freezer compartment with fresh (not frozen) food
- Maximum capacity
- Storage lime
- Refrigerating storage battery
- Precautions and advice
- Cleaning and maintenance
- As a firm rule, unplug the power plug or switch off at the mains.
- Switching off the appliance
- Defrosting
- Proceed as follows to defrost your appliance:
- Switching the fridge off
- Troubleshooting guide
- Please note:
- Please check:
- b) Your appliance is not cooling sufficiently. The freezing process is taking too long. The compressor is running too often.
- c) Your appliance is excessively noisy.
- Warning
- Getting your appliance serviced
- Guarantee
- Built in the appliance in a fitted kitchen
Marque : HAIER
Modèle : HF-248S
Catégorie : Congélateur