
M-770 DP - Lecteur DVD portable MUSE - Notice d'utilisation et mode d'emploi gratuit
Retrouvez gratuitement la notice de l'appareil M-770 DP MUSE au format PDF.


| Type de produit | Lecteur DVD portable |
| Marque | Muse |
| Modèle | M-770 DP |
| Écran | Écran LCD 7 pouces |
| Résolution d'écran | 480 x 234 pixels |
| Formats supportés | DVD, CD, MP3, JPEG, DivX |
| Alimentation | Batterie rechargeable intégrée, adaptateur secteur 9V |
| Autonomie batterie | Environ 2 à 3 heures |
| Dimensions (L x l x h) | 200 x 150 x 30 mm |
| Poids | 0.5 kg |
| Connectique | Sortie AV, prise casque, entrée DC |
| Fonctions principales | Lecture DVD, CD, fichiers multimédia, écran LCD, haut-parleurs intégrés |
| Entretien et nettoyage | Nettoyer avec un chiffon doux sec. Éviter l'humidité. |
| Sécurité | Ne pas exposer à l'eau. Ne pas ouvrir le boîtier. |
| Pièces détachées disponibles | Télécommande, adaptateur secteur, câble AV |
| Réparabilité | Réparation par un technicien qualifié recommandée |
| Informations générales | Lecteur DVD portable avec écran rabattable |
FOIRE AUX QUESTIONS - M-770 DP MUSE
Questions des utilisateurs sur M-770 DP MUSE
0 question sur cet appareil. Repondez a celles que vous connaissez ou posez la votre.
Poser une nouvelle question sur cet appareil
Téléchargez la notice de votre Lecteur DVD portable au format PDF gratuitement ! Retrouvez votre notice M-770 DP - MUSE et reprennez votre appareil électronique en main. Sur cette page sont publiés tous les documents nécessaires à l'utilisation de votre appareil M-770 DP de la marque MUSE.
MODE D'EMPLOI M-770 DP MUSE
MUSE
M-770 DP / M-770 DPW
Portable DVD Player
User Manual

natural_image
Black square electronic device with open top and front panel, no visible text or symbols on the device bodyPlease read the instruction carefully before operating the unit.


WARNING: Disconnect this car power adaptor when not in use. Not for use in 24V vehicles.
Curtions:
• Use only the included 12V car power adaptor. Use of any other 12V car power
adaptor could damage the unit. • The 12V car power adaptor included is for use with this unit only. Do not use it
with any other equipment.
- In the interest of traffic safety, drivers should not operate the unit or view videos while driving.
- Make sure the unit is fastened correctly to prevent from falling in the vehicle in the event of an accident.
- When the inside of the cigarette lighter socket is dirty with ashes or dust, the plung section may become hot due to noise contact. Do give to clean the cigarette
plug section may become not due to poor contact. Be sure to clean the cigarette lighter socket before use.
- After use, disconnect the car power adaptor from both the unit and cigarette lighter socket.
Using the Built-in battery
The unit has a built-in rechargeable battery (lithium-polymer). Charge the built-in
battery before using it for the first time. For new or exhausted rechargeable battery pack, we recommend it be recharged for 4 hours. It can be recharged at any
time regardless of whether it is fully or partially discharged. The charging light will change from PED sales to GREEN sales when the built-in battery becomes fully
change from RED color to G charged.
GB-5 GB-6 GB-7 GB-8 GB-9
DAP-3289 IB MUSE 001 REVO-GB. inl
LOCATION OF CONTROLS
Main Unit
.
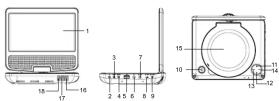
- LCD screen Note: The LCD screen is connected to the main body of the player via a rotatable
axis which can be rotate horizontally clockwise 180 degree. Do not over rotate the screen or you will destroy the unit
-
▶Ⅲ : To start and pause the playback. Long press to return to upper page.
-
SETUP : To enter the Setup menu
-
SOURCE : To select between DVC
-
SOURCE : TO select between DVD or USB mode.
-
USB port
-
Earphones jac
-
AV OUT jack
-
ON/OFF switch
-
DC IN 9-12V ja
-
△ (OPEN) button
-
◄️ / ▲ : Long press to access previous chapters(DVD)/tracks(CD). Move up during menu navigation.
12.▶▶/▼: Long press to access next chapters(DVD)/tracks(CD). Move down during menu navigation
-
VOL- / ← : Long press to decrease volume; Short press to go to previous page.
-
VOL+ / ▶: Long press to increase volume ; Short press to go to next page.
-
Disc door
-
© Power ON indicator : When the unit is switched ON, the light will illuminate.
-
Remote sensor
- Charging indicator: The charging light will change from RED to GREEN
when the battery becomes fully charged.
GB-1
Warnings:
*To charge the battery, just connect the AC adaptor.
*Recharge the built-in battery when you are ready to use it again.
*While using the built-in battery, the environmental temperature is
- While using the battery, the environmental temperature should be 5°C (41°F) to 35°C (95°F).
• To get the longest service life of the built-in battery, charge at indoor-temperature. • The built-in battery in this device may present a risk of fire or chemical burn if
- The built-in battery in this device may present a risk of life or chemical burn - mistreated. Do not disassemble, heat above 100°C (212°F), or incinerate.
• The unit should not be exposed to excessive heat such as sunshine, fire or the like.
- When discarding the unit, environmental problems must be considered and local rules or laws governing the disposal of such products must be strictly followed.
- When the built-in battery power is low, will blink on display.
CONNECTIONS
Disconnect all devices from the mains supply before connecting.
Connecting to TV

Remote control
-
ZOOM: To access the zoom function
-
ZOOM: To access the zoom function
- SEARCH : To search for a desired
title, chapter, Time or Track.
- MOTE: To mute or restore sound.
-
SOURCE: To select between
-
SOURCE : To select between DVD or USB mode
-
0,1,2...9,10+: Number entry
-
STEP: To play frame by frame
-
STEP. To play frame by frame
-
SUBTITLE: To change the subtitle
-
SUBTITLE: To change the database setting
-
ANGLE: To access the camera angle function for DVD disc
-
AUDIO: To change the audio
setting
-
MENU: To access disc menu. To turn PBC mode on/off for VCD
-
TITLE :To access the disc title
menu
- ■: Press once to pre-stop (resume with ▶ button), press again to
with ▶ button), press again to stop playback.
-
▶:To start and pause the playback
-
◀, ▶, ▲, ▼: To navigate through the on-screen menu
ENTER: To confirm the
during menu navigation
- RETURN: To return to upper page.
-
SETUP: To enter the Setup menu.
-
SETUP: To enter the Setup menu
-
VOL-/+ : To adjust the volume
-
REPEAT : To repeat playback
-
AB: To repeat section A to B
-
PROGRAM: To program play
-
PROGRAM : To program playback sequences
-
DISPLAY : To show status information on the :
-
▶▶ /◀◀ : To directly access the next or previous chapter (DVD) or track (CD).
-
◀️ ➤️: To start reverse or forward accelerated playback. Note: " ⊗" will be displayed if the function you select is not any
Note:
The remote control operates on 1pc "CR2025" lithium
battery (included). To power up the remote control, remove the invulsion lab from the back of unit.
Remove the insulation lab from the back of unit.

GB-2 GB-3
USING HEADPHONES / EARPHONES
Maximum output voltage ≤ 150m)
HEADPHONE VOLUME WARNING
Connect earphones with the volume set low and increase it if required. Pro-
longed listening through some earphones at high volume settings can result in hearing damage. When headphones/earphones are connected, no sound will be
Hearing damage from the reception of a connected, he stands in an emitted from the unit's speaker.
Caution: Avoid listening to sound at levels which may be harmful to your ears.
A
Continuous use of earphones at high volume can damage the user's hearing.
(No text)
DISC PLAYBACK
Region Management Information
Region Management Information: This unit is designed and manufactured to
respond to the Region Management Information that is encoded on DVD discs. If the Region number printed on the DVD disc does not correspond to the Region
the Region number printed on the DVD disc does not correspond to the Region number of this unit, this unit cannot play that disc.
The region number of this unit is 2.
Basic Playback
1.Slide ON/OFF switch to turn ON the unit. The power ON indicator will go on.
-
Press △ button to open the disc door.
-
Insert a disc with label facing up.
-
Close the disc door, it takes a fl
-
Close the disc door. It takes a short while for your unit to load the disc. After loading, the unit will automatically bring you to the main menu of the DVD or start
playing the DVD. If the unit does not automatically start playing the DVD, press
the ▶||.
Accelerated play
While the disc is playing, press ◀ or ▶one or more times to vary the speed
and direction of the accelerated play. Press ▶|| to resume normal playback.
Frame advance (DVD)
-
While the disc is playing, press STEP once.
-
Press STEP a number of times to advance forward image by image 3. Press >10 to assume normal slvboot:
-
Press ▶ to resume normal playback.
Changing chapter/track
While the disc is playing, press ▶▶ or ◀◀ do go immediately to the next or previous chapter(PVD), as to the next or previous track(CD).
ous chapter(DVD), of to the next of previous track(CD).
REPLACING BATTERY FOR THE REMOTE CONTROL
- Push the button toward right.
-
Push the button toward right.
-
Pull the battery loader out.
-
Insert one "CR2025" size battery with the positive side (+) facing up.
-
Replace the co


Before throwing any batteries away, consult your distributor who may
be able to take them back for specific recycling.
NOTES:
- Never recharge the batteries, apply heat to them or take them apart.
- In order to avoid leakage, always remove the batteries when unit will not be used for a long period of time.
- If the remote control is not going
to avoid damage caused by battery leakage corrosion.
CAUTION: Danger of explosion if battery is incorrectly replaced. Replace only
CAUTION: Banger of explosion with the same or equivalent type
V
If at any time in the future you should need to dispose of this product
please note that Waste electrical products should not be disposed of with household waste. Please verify where facility quiet Check with
with household waste. Please recycle where facilities exist. Check with your Local Authority or retailer for recycling advice.(Waste Electrical and
Electronic Equipment Directive)
ACCESSORIES
Remote control x1
AC/DC adaptor x1
Car plu
Car mounting bag x1 Earphones x1
,
[Non-Text]
[Non-Text]
[Non-Text]
Zoom (DVD, JPEG)
While a disc is playing, press ZOOM until you reach the zoom size you want. The button swles through 2x, 3x, 4x and then zooms out to 1/2x, 1/3x and 1/4x.
The button cycles then returns to no
ADVANCED FUNCTIONS
ADVANCED F
On screen display
While the disc is playing, press DISPLAY button repeatedly to show the playback information.
Search a desired section
The user can access a specific location or a specific track by keying in the target time as the track number.
- Press SEARCH button
DVD TT 1/01 CH 0 13/019 00:54:29
CDDA TRK 01/03 OFF 00:01:09
- Use ◀, ▶ and number buttons to input. Then press ENTER button to jump to the target location immediately.
PLAY MODES
- 2017年1月1日
Repeat playback While the disc is playing, press the REPEAT button repeatedly to select a play.
mode:
DVD: Repeat Chapter, Repeat Title , Rep CD: Repeat one, Repeat All, Repeat Off
CD: Repeat one, Repeat Air, Repeat Off, MP3: Repeat one, Repeat directory, Rep
(1) 2017年1月1日,公司与上海浦东发展银行股份有限公司签订了《关于使用部分闲置募集资金进行现金管理的协议》。
A-B repeat
To repeat a sequence between two points A and B, press the AB button at the
beginning of the sequence you want to repeat. Then press the AB button again at the end of the sequence. Then the sequence is played repeatedly until you
at the end of the sequence press AB to resume norms
Note: Some DVD discs do not allow A-B repeat function
POWER SUPPLY
Using the AC adaptor
The AC adaptor operates on AC between 100V- and 240V-
The supplied AC adaptor is suitable for use on AC mains supplies of 100-240V\~ and should only be connected to a mains supply within these parameters.
and should only be connected to a matrix supply within these parameters.

Cautions:
*The AC adaptor included with this unit is for its use only. Do not use it with other
equipment. *Turn off the unit
Turn on the unit before unplugging the AC adaptor from the unit so as to avoid the unit being damaged.
*When the unit is not of
from the AC outlet.
* Be sure to use it
curs, disconnect the plug from the wall outlet at once.
*AC adaptor is used as the disconnect device. It shall remain readily operable
and should not be obstructed during intended use. To be completely disconnected the apparatus from supply mains, the AC adaptor of the apparatus shall
he disconnected from the mains socket outlet completely
*Never use an AC adaptor that is damaged, route power lead in a safe manner
and make sure it is not subjected to trapping or pinching. If the power lead is damaged refer to a qualified service agent.
damaged refer to a qualified service agent
GB-4
Program playback
With this option, you choose and program the playback order. You can store up to18 trakes.
to tracks.
-
Insert a disc.
-
In playing mode, press the PROGRAM button. The Program menu appears.
DVD

- Use the number buttons and ◀, ▶, ▲, ▼ button to enter the title number and
then the chapter number
-
Use ◀, ▶, ▲, ▼ button moving to the next input. Repeat step 3 until programming is completed.
-
Highlight the "PLAY" icon, then press ENTER button to start program play.
-
Press ■ button once to pre-stop and cancel program play.
-
To clear the program memory, in program menu select "CLEAR" icon and press ENTER to confirm
press ENTER to confirm.

2012-19
9 15:35:50

-
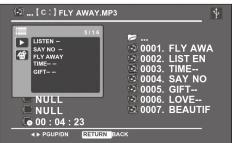
Use ▲, ▼ button to select a track displayed on the right column on the display, then press ENTER button to confirm. The selected track will be shown on the program menu.
-
Repeat step 3 until programming is completed.
-
Use ◀, ▶, button to select "▶" icon in the program menu to start program play.
-
Press ■ button once to pre-stop and cancel program play.
- To clear the program memory, in program menu select 🔒 icon and press ENTER to confirm.
USB PLAYBACK
You can connect a USB flash drive (not included) to the USB connector port on the unit to play MP3/DivX/JPEG/TXT files.
- Plug the USB flash drive into the USB port on the unit.
- Press SOURCE button, then press ▶ to select USB logo, then press ENTER to confirm.

For operation of playing files on the USB flash drive, please refer to the section "PLAYING MP3/DivX/JPEG/TXT FILES"
Notes:
Note: - It is recommended USB flash drive when the unit is in OFF mode.
*There are many USB devices in the market. We cannot guarantee to support all different models. Please try another USB device if your device is not supported.
PLAYING MP3/DIVX/JPEG/TXT FILES
This unit can play MP3, DivX, JPEG and TXT files recorded on CD-R/CD-RW
discs or USB flash drive. To select the file types that you want to play, press RETURN button to enter main menu, press ◀, ▶ to select the corresponding icon as shown below and press ENTER to confirm.


AUDIO ( mp3/ wav )
JPEG (jpeg/ bmp)
GB - 10 GB - 11 GB - 12 GB - 13 GB - 14
STANDBY SETTING

This function allows you to select the standby setting:
OFF: The unit will not switch to standby mode. 3 HOURS : If no button is pressed within 3 hours, the unit will switch to standby mode automatically.
4 HOURS : If no button is pressed within 4 hours, the unit will switch to standby mode automatically.
VIDEO SETUP
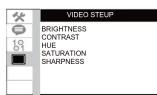
BRIGHTNESS: To adjust the video brightness level on a scale of 0 to 12. CONTRAST: To adjust the video contrast level on a scale of 0 to 12. HUE: To adjust the color hue level on a scale of -6 to +6.
SATURATION: To adjust the color saturation level on a scale of 0 to 12. SHARPNESS: To adjust the sharpness of video output on a scale of 0 to 8
GB - 15 GB - 16 GB - 17 GB - 18 GB - 19
DAP-3289 IB MUSE 001 REVO-GB.in2 2 2012-10-9 15:36:22

:VIDEO (mpeg2/ mp4/avi/DivX)

E-BOOK (txt)
MP3 files / DivX files
Use ▲, ▼ button to select a file and press ENTER to confirm. Playback starts automatically.
IRES
-
Use ▲, ▼ button to select a file and press ENTER to confirm. Playback starts automatically.
-
During playback, press ◀, ▶, ▲, ▼ to rotate the current photo.
-
Press PROGRAM button repeatedly to select the slide show mode
TXT files
Use ▲, ▼ button to select a file and press ENTER to confirm. It will start to review the content of selected file. Press ▲, ▼ to press up or down
view the content of selected file. Press ▼ or ▶ to go page up of down.
Note: For playing files on USB flash drive, you should plug in the USB flash drive when the unit is in OFF mode. Turn ON the unit and press SOURCE button to select USB mode.
Notes:
- Avoid long file names! It is suggested to name the file names using 11 or fewer
- The total number of flies on the disc should not exceed 254
- The maximum number of directories should not exceed 32. - The maximum depth level of directories should not exceed 4
- 付账
Supporting format: M23-32/ksr 320/ksr
MFS:32Kbps-320Kbps IREGup to 8000X60
MPEG :MPEG-1 (ISO/IEC 11172-2), MPEG-2 (ISO/IEC 13818-2), MPEG-4 ASP(DivX)
AVI:up to 720X576 VOR(DVD):720 x 480i, 720 x 576i, 720 x 480o, 720 x 576o
DivX:3.11/4.0/5.0
SAFETY INSTRUCTION

ATTENTION: To reduce the risk of electric shock, do not
remove the cover or back. There are no user serviceable parts inside, the unit. Refs all servicing to qualified per
parts inside the unit. Refer all servicing to qualified personnel,

The lightning flash with arrowhead symbol within the triangle is a warning
sign alerting the user of "dangerous voltage" inside the unit.

The Automation point within the ladder is a warning sign plating the

The explanation point within the triangle is a warning sign alerting the user of important instructions accompanying the product.

WE TO REVENUE TIPS OF CHOC VARIERS TO NOT THESUS
WARNING: TO PREVENT FIRE OR SHOCK HAZARD, DO NOT EXPOSE THIS APPLIANCE TO RAIN OR MOISTURE.
CAUTION: Invisible laser radiation when open and interlocks defeated. Avoid
exposu


IMPORTANT SAFETY INSTRUCTIONS
NEVER fit make shift stands as long with woodcrum. Line only approved run
NEVER fit make shirt stands of legs with woodstrews. Os ports and fasteners specially designed for the equipment.
NEVER let anyone, especially children, push objects into holes, ventilation slots
or any other opening; this could result in fatal electric shock! ALWAYS disconnect the AC adaptor when you are not going to use the unit for
always discolored long period of time
ENSURE that all electrical connections (including the mains plug, extension
leads and interconnections between pieces of equipment) are properly made in
accordance with the instructions given. Switch off the main supply when making or changing connections
CONSULT your dealer if you are ever in doubt about the installation, operation or
safety of your equipment.
DON'T continue to operate the equipment if it is damaged in any way or if it does not function normally. Disconnect the AC adaptor and consult your dealer.
DON'T leave equipment switched on when it is unattended unless it is par
it's normal function to operate in your absence, for example a video cassette re-
border with timed recording facility.
LISTEN to headphones at moderate volume levels, high volume levels can permanently damage your hearing.
(1) 2023年 ,公司实现扭亏为盈
SETUP MENU
Navigating the setup menu
-
Press SETUP to display the setup main menu.
-
Press ▲, ▼ to select a menu icon.
-
Press ▶ and then ▲, ▼ to select one of the available options under a menu
Icon. 4. Dress ▶ to access the ordinary and ▲ ▼ In select an option
- Press ▶ to access the submenu and ▲, ▼ to select an option.
-
Press ENTER to confirm your selection.
-
Press ◀ to return to a previous menu.
-
Press SETUP to exit from the setup menu.
SYSTEM SETUP

* TV SYSTEM
•To select your TV system between PAL or NTSC
* LAST MEMORY
When the disc door is opened during DVD playback, the player will memorize the
last scene of the playback. When the disc is loaded again playback will continue from the last scene.
from the last scene.
ON: Activate the last memory function. OFF: Deactivate the last memory function.
3.1.1 Dedesivate the last memory function
* TV TYPE
4:3 PANSCAN
- When wide-screen video is played, this mode clips the right and left sides of the image as that it can be viewed on a conventional screen.
Image so that it can be viewed on a conventional screen. Some wide screen DVDs that do not permit Pan Soon mode playback are auto.
- Some wide-screen DVDs that do not permit Fair Scair mode platically displayed in letterbox mode (block hands top and bottom).
matically played in let
4:3 LB (LETTERBOX)
- When wide-screen video is played in this mode on a conventional screen, black
bands appear at the top and bottom of the screen
WARNING:
- AC adaptor is used as the disconnect device. It shall remain readily operable
and should not be obstructed during intended use. To be completely discon-
nected the apparatus from supply mains, the AC adaptor of the apparatus shall be disconnected from the mains rocket outlet completely.
- Never use an AC adaptor that is damaged, route power lead in a safe manner
and make sure it is not subjected to trapping or pinching. If the power lead is
damaged refer to a qualified service agen
- Place the unit on a flat and even surface.
- Do not restrict the air flow of the unit by placing it in a
by covering it with a cloth, or by placing it on carpeting.
- To avoid magnetized, do not place the unit near speaker or magnet. - Do not use this unit in direct sunlight or leave the unit in a closed automobile (or
Do not use this drill in direct sunlight or leave this drill in a closed automobile (or yacht, etc) where it would be exposed to high temperatures above 40°C.
- It also should not be placed in temperatures less than 5°C or greater than 35°C.
• No naked flame sources such as lighted candles should be placed on the AC
adaptor and main unit.
*Do not use the unit immediately after transportation from a cold place to a warm
place, condensation problem may result.
- The ventilation should not be impeded by covering
items such as newspapers, table-cloths, curtains, etc.
- No naked flame sources, such as lighted candles, should be placed on the
apparatus
- The use of apparatus in moderate climates
- The apparatus should not be exposed to dripping or splashing. Ensure a minimum distance of 5cm around the apparent for surf
- Ensure a minimum distance of 3mm around the apparatus for sufficient ventilation - Do not place objects filled with liquids, such as vases, on the apparatus
- DO NOT PLACE OBJECTS LINED WITH LIQUIDA, SUCH AS VASES, ON THE AT - The marking plate is located on the bottom of unit
- Attention should be drawn to the environmental aspects of bat
- Do not throw batteries in fire!
- Battery shall not be exposed to
- Excessive sound pressure from earphones and headphones can cause hearing loss.
- Under the influence of electrical fast transient or/and electrostatic phenomenon,
the produc
MAINTENANCE
MAINTENANCE
Be sure to turn the unit off and disconnect the AC adaptor before maintain-
ing the unit.
- Use a soft, dry, clean cloth. Regularly dust the vents at the back or sides.
- Using solvents, abrasive or alcohol-based products risks damaging the appliance
-If an object or liquid enters inside the appliance, unplug it immediately and have it checked by an authorized engineer.
it checked by an authorized engine
16:9 (Wide screen)
• This is the correct mode for playing wide-screen videos on a wide-screen TV.
Notes
•The visible picture size is preset on the DVD disc. Therefore the playback pic-
ture of some DVD discs may not conform to the picture size you select.
- When you play DVD discs recorded in the 4:3 aspect ratio, the playback picture
will always appears in the 4:3 aspect ratio regardless of the TV shape setting in
the function setup menu.
*PASSWORD
This item is for locking or unlocking the rating level of the Parental Control. The
defaulted state is locked. If the password has not been set yet after you pur
chase this unit, it is "1369".
To set a new password, use ▲ or ▼ button to select "PASSWORD", then press
button to highlight " ----" Input the initial original password 1369, and then
press ENTER to unlock it ( is displayed). Press ▶ button to highlight " ----"
then input a 4-digit new password and press ENTER to confirm.
*RATING
Some DVD discs are equipped with a password function and are rated according
to their content. The contents allowed by parental lock level and the way a DVD
disc is controlled may vary from disc to disc. For example, if the disc allows, you
could lock-out violent scenes unsuitable for children or you could lock out play-
back
We are based on THE S. and the United States, which is also included
You cannot play DVD discs rate cancel the parental lock function
The parental look levels are equivalent to the following retinps
The parental rock Level 1: Kid Safe
Level 2 : G
Level 3: PG
Level 4 : PG-13
Level 5 : PG-R
Level 6 : R
Level 7: NC17
Level 8: Adult
"DEFAULT
To reset all settings to their initial factory state, except for parental level and
to robot o password
password.
[Non-Text]
[Non-Text]
[Non-Text]
[Non-Text]
[Non-Text]
[Non-Text]
[Non-Text]
Note on disc
* Do not use irregular shape CDs (example: heart-shaped, octagonal ones). If
may result in malfunctions.
* Do not place more than one disc in the disc compartment
* Do not try to open the disc compartment during playing.
* Do not touch the lens. Doing so may cause malfunction.
*If there is a scratch, dirt or fingerprints on the disc, it may cause tracking error.
Before playing, clean the disc with a cleaning cloth. Wipe the disc from the cen-
ter but. Don't store discs in places with high temperatures of can become vested. After playing, store the disc in its case
can D
Important Note
- Before transporting the unit, remove the disc from the disc compartment
Before it
MOUNTING BAG INSTALLATION
2.3.1. 2017年1月1日
SAFETY WARNING!
On no account should this unit be used by the driver of a moving motor vehicle.
or left unsecured in the vehicle whilst driving. If this unit is being used by a pas-
senger in your vehicle, be sure that it is secured or held safely, and does no
obstruct any safety device (i.e. airbag, seat belt etc.) that is fitted.
广力云智慧零售收银系统


LANGUAGE SETUP
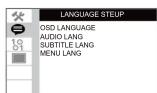
* OSD LANGUAGE
•To select the language of unit's menus.
*AUDIO LANG(Language)
AUDIO LANG(Language) To select the dialog language
•If the selected language is not available on the disc, the disc's language will be
In the selected language is not available on the side, the second language will be used instead.
•To change the dialog language during playback, press AUDIO on the remote
control.
* SUBTITLE LANG(Language)
•To select the language of the DVD subtitles. Select "OFF" to turn off the sub-
titles.
- If the selected language is not available on the disc, the disc's language will be
used instead.
•To change
mote control.
* MENU LANG(DISC MENU)
-To select the language of the DVD menus
•If the selected language is not available on the disc, the disc's language will be
used instead
[Non-Text]
[Non-Text]
[Non-Text]
[Non-Text]
[Non-Text]
[Non-Text]
[Non-Text]
[Non-Text]
[Non-Text]
[Non-Text]
[Non-Text]
[Non-Text]
-
Insert the unit into hop as shown
-
Insert the unit into bag as shown.
-
Take straps and hook up the neck headrest of the seat as shown.
-
Adjust the
-
Connect the 12V car plug as shown
[Non-Text]
CAUTION: Using other car plugs could damage the unit.
The Ground Truth image displays a single, solid horizontal line. According to Rule 2 (UNDERSCORE & LINE RULES), if the GT contains lines used for stylistic emphasis or as background elements (like ruled paper), the OCR result must ignore them. The OCR content provided is "____", which represents four underscores. This is incorrect because underscores are not equivalent to a solid line and are not permitted under the “Stylistic/Background Lines (Ignore)” rule. The OCR has hallucinated text (underscores) where none should exist, violating the rule to ignore stylistic lines. Therefore, the OCR result is inconsistent with the Ground Truth.
TROUBLE SHOOTING
m = 311
No power
No power. • Ensure th
- Ensure the AC adaptor is connected - Make sure that the unit is turned on
Monto Suro
The remote control does not function.
• Make sure the infrared remote sensor is not blocked
• Point the remote directly at the infrared remote sensor on the unit.
- Replace the
(No text)
Very little or no sound is coming from
•Make sure that the unit is turned ON.
• Make sure the unit is not paused. Press ▶III.
• Make sure
• Make sure that the connections are correct. * Make sure the MUTE function is not on
Make sure
The player does not start playback
• Insert the disc with the printed side facing up
• Check that the disc can actually be played by this device.
- Check that the disc's regional code matches the player's regional code. This
player's regio
- Clean the d
[Non-Text]
The picture is not clear.
• The DVD is dirty. Gently clean the disc
• The disc is
- Please adjust the LCD's brightness and contrast in SETUP MENO
Forget Pass
I forget Password If you forget your
If you forget your own password, enter "1905" to react.
Specifications and appearance are subject to change without notice.


DAP-3289 IB MUSE 001 REVO-GB.in2 2 2012-10-9 15:36:22



- LOCATION OF CONTROLS
- CONNECTIONS
- USING HEADPHONES / EARPHONES
- ACCESSORIES
- DVD TT 1/01 CH 0 13/019 00:54:29
- CDDA TRK 01/03 OFF 00:01:09
- PLAY MODES
- POWER SUPPLY
- USB PLAYBACK
- PLAYING MP3/DIVX/JPEG/TXT FILES
- STANDBY SETTING
- VIDEO SETUP
- SAFETY INSTRUCTION
- IMPORTANT SAFETY INSTRUCTIONS
- SETUP MENU
- SYSTEM SETUP
- MAINTENANCE
- MOUNTING BAG INSTALLATION
- LANGUAGE SETUP
- TROUBLE SHOOTING
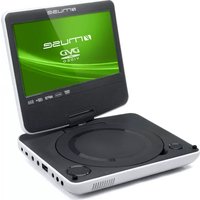
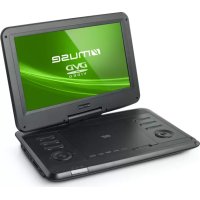
Marque : MUSE
Modèle : M-770 DP
Catégorie : Lecteur DVD portable