LE TRANCHEUR 190 - Trancheur MAGIMIX - Notice d'utilisation et mode d'emploi gratuit
Retrouvez gratuitement la notice de l'appareil LE TRANCHEUR 190 MAGIMIX au format PDF.

| Type de produit | Trancheur électrique |
| Caractéristiques techniques principales | Lame en acier inoxydable, réglage d'épaisseur de coupe, système de sécurité intégré |
| Alimentation électrique | 230 V, 50 Hz |
| Dimensions approximatives | Longueur : 35 cm, Largeur : 25 cm, Hauteur : 25 cm |
| Poids | 3,5 kg |
| Compatibilités | Idéal pour trancher viandes, fromages, pains et légumes |
| Fonctions principales | Tranchage précis, réglage de l'épaisseur de 0 à 15 mm |
| Entretien et nettoyage | Lame amovible pour un nettoyage facile, nettoyage à la main recommandé |
| Pièces détachées et réparabilité | Disponibilité de pièces détachées via le service après-vente Magimix |
| Sécurité | Système de verrouillage de sécurité, pieds antidérapants |
| Informations générales | Garantie de 3 ans, notice d'utilisation incluse |
FOIRE AUX QUESTIONS - LE TRANCHEUR 190 MAGIMIX
Questions des utilisateurs sur LE TRANCHEUR 190 MAGIMIX
0 question sur cet appareil. Repondez a celles que vous connaissez ou posez la votre.
Poser une nouvelle question sur cet appareil
Téléchargez la notice de votre Trancheur au format PDF gratuitement ! Retrouvez votre notice LE TRANCHEUR 190 - MAGIMIX et reprennez votre appareil électronique en main. Sur cette page sont publiés tous les documents nécessaires à l'utilisation de votre appareil LE TRANCHEUR 190 de la marque MAGIMIX.
MODE D'EMPLOI LE TRANCHEUR 190 MAGIMIX
magimix®
LeTrancheur190
MODE D'EMPLOI P.2
GEBRUIKSAANWIJZING P.5
INSTRUCTIONS FOR USE P.8
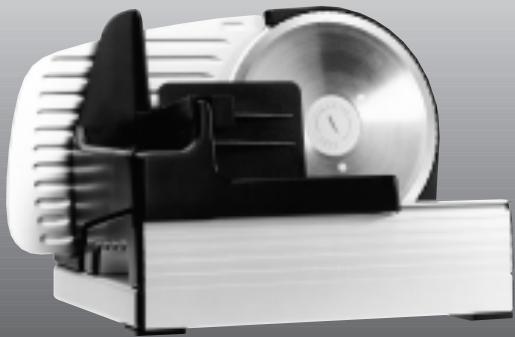
DESCRIPTIF DE L'APPAREIL BESCHRIJVING VAN DE MACHINE TECHNICAL CHARACTERISTICS
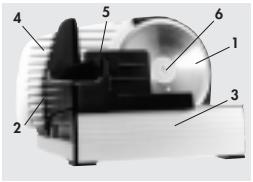
- Lame dentée 09 19 cm en acier inoxydable
- Chariot inclined to 10^ Course of 18cm
- Table de coupe
- Pari d'épaissier de coupe
- Guide alimentes
- Vis de démontage
- Poignée de réglage de coupe
- Interrupter marche/arret
-
Cordon
-
Gekarteld snijblad 0 19 cm van roestvrij staal
- Onder een hoek van 10^ schuin staande slede. Slaglengte 18 cm.
- Snijtafel
- Verstelbare aanslag-ptaat
- Resthoulder
- Demontagebout
- Stelknop voor snijdikte
- AAN/UIT schakelaar
-
Snoer
-
Stainless-steel serrated blade (diam.: 19cm )
- Tilted tray (10^) Slide length: 18cm
- Slicer base
- Back plate
- Food grip
- Removal screw
- Thickness adjuster knob
- On/off switch
- Cord
SAFETY ADVICE
Always follow these safety instructions
- Never immerse the appliance in water.
- Never leave the appliance within reach of children and never let them use it.
- Never touch the blade while the Slicer is in operation.
Always place the appliance on a flat surface. - Use the food grip for small quantities of food.
- Unplug the appliance before cleaning and each time after use.
- Never pour water onto the appliance.
After each use, return the back plate to position "O", in line with the blade.
If the appliance is dropped or the cord damaged, make sure it is checked by a specialist. - The blade is extremely sharp. Handle it with care.
- If the appliance fails to operate correctly, take it to a Magimix approved after-sales service agent.
SETTING UP AND USING THE APPLIANCE
Before plugging in the appliance, check that the voltage indicated on the appliance corresponds to your mains supply.
- Only use the Slicer when the tray (2) and the food grip (5) are in position.
- Place the food to be sliced on the tray, pressing it against the back plate (4).
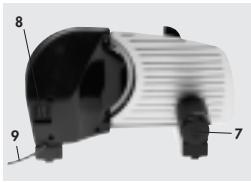
- Adjust the thickness by turning the thickness adjuster knob (7).
- Hold the food in place and switch the appliance on, using the on/off switch (8) located at the back of the appliance.
- Slide the tray (2) backwards and forwards along the slicer base(3).
- Check that the first slice is the right thickness. If necessary, alter the setting using the adjuster knob (7).
- This appliance is guaranteed for 1 year from date of purchase and is not guaranteed for commercial use.
To collect the slices more easily, place a flat plate behind the appliance, between the on/off switch and the adjuster knob. This way, the slices will fall directly onto the plate as you cut them.
REMOVING THE TRAY
To remove the tray, slide it towards the left as far as it will go. Raise the plastic tab situated underneath the tray, at the lowest end. Pull the tray free from the slide. To replace the tray, insert the two plastic tabs into the slide, underneath the slicer base. Slide the tray towards the right, then raise the tab at the lowest end to lock it into position.
REMOVING, CLEANING AND REPLACING THE BLADE
- Unplug the appliance.
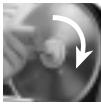
- Using a coin, loosen the screw (6) at the centre of the blade, turning it in a clockwise direction.
- Handle the blade with care - if possible, wear protective gloves.
- Remove the washer located behind the removable screw. When putting it back, check that it is correctly aligned.
- Wipe the blade, the tray, the food grip and the appliance with a damp cloth. Never use or poor water on the appliance.
- Replace the blade, the washer and the screw, holding them in place with your finger, then tighten the screw in an anticlockwise direction using a coin.
Electrical Instructions
WARNING: a plug with a bared flexible cord is hazardous if engaged in a live socket. If the fitted plug has been cut from the power supply cord, it should be destroyed and replaced with a three pin plug in accordance with the following code:
BLUE: neutral · BROWN: live · GREEN/YELLOW: earth
The wire which is coloured BLUE must be connected to the terminal in the plug which is marked with the letter "N" or coloured BLUE or BLACK.
The wire which is coloured BROWN must be connected to the terminal in the plug which is marked with the letter "L" or coloured BROWN or RED.
The wire which is coloured GREEN/YELLOW should be connected to the terminal marked with the letter "E", or by the earth symbol - or coloured GREEN or GREEN/YELLOW.
Always replace the fuse cover of the fitted plug, never use the plug with the fuse cover omitted. If a replacement fuse cover is required, ensure it is the same as the one visible on the pin face of the plug (i.e. RED or ORANGE).
Fuse covers are available from VOLEX PENCON or C.W.A. (depending on the manufacturer's name written on the plug)
VOLEX PENCON
Elizabeth Street - Leigh
Lancashire WNT 3AE
Phone:0942603412
C.W.A.
Ripley Close - Normanton
West Yorkshire WK6 ITB
Phone:0924891157
Use a 13A fuse approved by ASTA to BS1362, marked thus

UNITED KINGDOM AND IRELAND
19 Bridge Street - Godalming, Surrey GU7 1HY
Telephone: 01483 427411 - Fax: 01483 427414