
GS 508 - Détecteur de fumée HAMA - Notice d'utilisation et mode d'emploi gratuit
Retrouvez gratuitement la notice de l'appareil GS 508 HAMA au format PDF.


| Type de produit | Détecteur de fumée |
| Marque | Hama |
| Modèle | GS 508 |
| Capteur | Optique (détection de fumée par faisceau lumineux) |
| Alimentation | Pile 9V (incluse) |
| Autonomie de la pile | Environ 1 an |
| Volume sonore | 85 dB à 3 mètres |
| Zone de couverture | Jusqu'à 40 m² |
| Dimensions | Ø 85 mm x 40 mm |
| Poids | 150 g (sans pile) |
| Fonction test | Bouton de test pour vérifier le fonctionnement |
| Fonction silence | Bouton pour désactiver temporairement l'alarme en cas de fausse alerte |
| Indicateur lumineux | LED rouge clignotante en fonctionnement normal, fixe en alarme |
| Installation | Au plafond, à au moins 50 cm des murs et des coins |
| Entretien | Dépoussiérer tous les mois avec un aspirateur ou un chiffon doux |
| Nettoyage | Utiliser un aspirateur avec une brosse douce pour les fentes |
| Sécurité | Conforme à la norme EN 14604 |
| Garantie | 2 ans |
| Pièces détachées | Pile 9V (disponible dans le commerce) |
| Réparabilité | Remplacement de la pile par l'utilisateur |
| Indice de protection | IP20 (usage intérieur uniquement) |
FOIRE AUX QUESTIONS - GS 508 HAMA
Questions des utilisateurs sur GS 508 HAMA
0 question sur cet appareil. Repondez a celles que vous connaissez ou posez la votre.
Poser une nouvelle question sur cet appareil
Téléchargez la notice de votre Détecteur de fumée au format PDF gratuitement ! Retrouvez votre notice GS 508 - HAMA et reprennez votre appareil électronique en main. Sur cette page sont publiés tous les documents nécessaires à l'utilisation de votre appareil GS 508 de la marque HAMA.
MODE D'EMPLOI GS 508 HAMA
hama®
THE SMART SOLUTION
00
108875
Smoke Detector
"GS 508"
Rauchmelder
Operating Instructions
Bedienungsanleitung
GB
D


GB Operating instruction
Thank you for choosing a Hama product. Take your time and read the following instructions and information completely. Please keep these instructions in a safe place for future reference. If you sell the device, please pass these operating instructions on to the new owner.
1. Explanation of Warning Symbols and Notes

Warning
- This symbol is used to indicate safety instructions or to draw your attention to specific hazards and risks.

Note
• This symbol is used to indicate additional information or important notes.
2. Package Contents
• Photoelectronic smoke alarm with VdS test mark
- Base plate
- Mounting equipment
• 3 volt CR123A battery Lithium (already fitted)
• These operating instructions
3. Safety Notes
- Do not use the device in the immediate vicinity of heaters or other heat sources or in direct sunlight.
- Do not drop the device and do not expose the device to major shocks.
- Do not forcibly open the device.
- Replace the smoke alarm if the functionality is impaired.
• To ensure the device functions correctly, follow the mounting and installation information given in these operating instructions. - Create an emergency escape plan (information can be found in these operating instructions).
-
Attention: hearing damage possible. The alarm is extra loud. Do not test the smoke alarm close to the ear.
-
Do not attempt to service or repair the device yourself. Leave any service work to qualified experts.
- Smoke alarms have limitations. Smoke alarms are not foolproof and are not warranted to protect lives or property from fire. Smoke alarms are not a substitute for insurance.

Note - Battery
Since the battery is integrated and cannot be removed, you will need to dispose of the product as a whole. Do this in compliance with the legal requirements.
4. Mounting Location

Note
- In each apartment, place smoke alarms at least in every bedroom and nursery, as well as in the halls leading to these rooms and along escape routes.
- Smoke and combustion by-products rise upward towards ceilings before spreading horizontally. The ideal installation site is on the ceiling in the middle of a room.
- A single smoke alarm is only permitted for rooms of up to 60 m 2 . If the room is larger than 60 m 2 , use additional smoke alarms.
- A single smoke alarm is only permitted for installation at heights of up to 6 m. If the ceiling is higher than 6 m, use additional smoke alarms at different heights.


Installation
Typical single-floor installation

Typical multi-floor installation
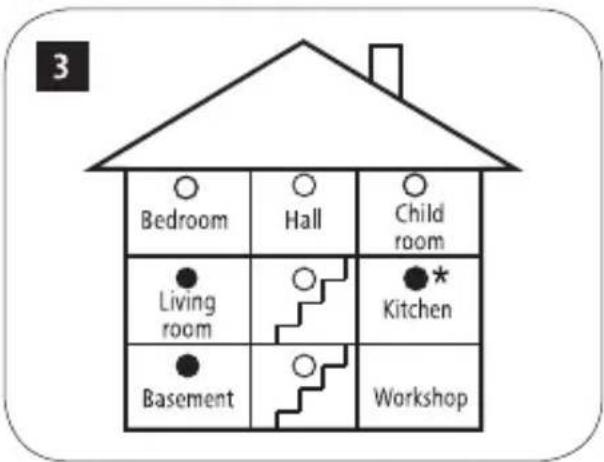
- Keep bedroom emergency exits clear, as these rooms are commonly furthest away from outdoor exits.
- If bedrooms are located in more than one section of the house, use additional smoke alarms accordingly.
- In stairways, install the smoke alarm at the top of the stairs as a chimney effect often occurs, rapidly drawing smoke into the upper floors.
- For your personal safety, it is best to mount a smoke alarm on every floor of the building.
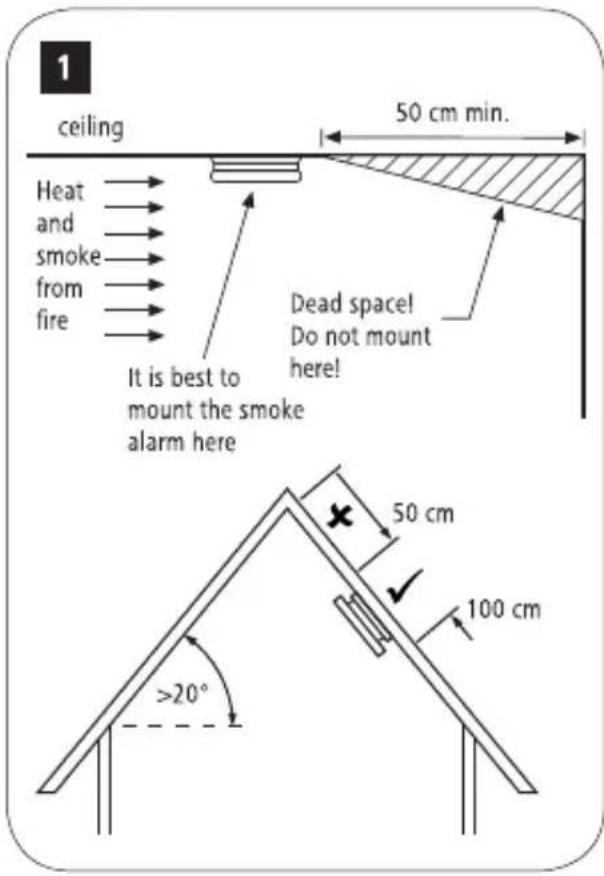
- Ensure that the smoke alarm is installed at least 50 cm from each side wall (see Figure 1).
4.1 Mounting Locations with restrictions
- Smoke alarms should only be installed in kitchens and damp rooms if the restrictions from Fig. 1 are observed and false alarms caused by steam can be prevented.
- Do not install smoke alarms in garages – the combustion by-products/exhaust caused by starting a car can trigger false alarms.
- Do not install smoke alarms in bathrooms – the steam can cause false alarms.
- For peaked roofs with an angle >20° , the smoke alarm should be installed at a distance of at least 50 cm and no more than 1 m from the gable peak; see Fig. 1. Roofs with angles of ≤ 20° can be handled the same as horizontal ceilings. Rooms where temperatures fall below 5 °C or rise above 38 °C are not suitable for the smoke alarm.
- Do not mount a smoke alarm on the ceilings of trailers or similar areas. In such areas, sunlight heats the air quickly, which can prevent any smoke from penetrating and triggering the smoke alarm.
5. Emergency Escape Plan
- Create a plan for you flat/house which shows all doors and windows and which includes at least two escape routes from each room (if possible).
- Windows on upper floors require an emergency ladder.
- Discuss the emergency escape plan with your family and explain to each family member or guest what to do in case of fire.
- Specify a location outside of your house as a meeting point in case of a fire.
- Demonstrate the smoke alarm's warning signal to each person and explain that they must leave the house upon hearing it.
- Conduct regular fire drills. These exercises help you, and in particular your children, to exit the house as quickly and directly as possible in the event of real fire.
• Each person must know what to do in case of a real emergency. Remember that you might not be able to help your children in a real emergency; your children must be able to exit the house on their own.
6. Behaviour When Alarm Sounds
- Leave the house immediately. Every second counts. Do not waste any time getting dressed or collecting valuables.
- When exiting the house, avoid opening any door that feels hot or underneath which smoke can be seen emanating. Use an alternative emergency exit.
- If the surface of the door feels cool, open it slightly. Be prepared to shut it quickly, however, if there is smoke or fire behind the door.
- Stay down close to the floor if the air is filled with smoke.
-
Breathe through a moistened towel.
• After leaving the house, go to your prearranged meeting place and ensure that all persons have left the house. -
Call the fire department from a neighbour's house – not from your own house if at all possible!
- Do not re-enter your house until the fire department allows you to do so.

Note - False alarm
- Cigarette smoke will generally not trigger the alarm unless the smoke is blown directly in the smoke alarm.
- Steam caused by cooking can trigger an alarm if the smoke alarm is located close to a cooking area.
• If an alarm is triggered, verify whether or not a genuine emergency situation exists. - If fire or smoke is present, call the fire department and behave in the manner described under Item 6.

Warning
- If the cause of an alarm is unclear, you must assume that a fire is present.
• Leave the building immediately in this case.
7. Mute mode (Hush function)
If a false alarm was triggered, press the smoke alarm's test button to mute the alarm signal for approx. 10 minutes. The red LED will then flash every 8 seconds to indicate that the smoke alarm is in mute mode.
Smoke alarms are designed to minimise false alarms. However, combustion particles caused by cooking, for example, can trigger the alarm if the smoke alarm is located near the cooking area. Extractor hoods with ventilation functions (not recirculating models) effectively remove combustion particles from the air in the kitchen. The alarm stop function (test button) is very useful in kitchens or other areas susceptible to false alarms. Only use the mute function if you know what caused the false alarm, e.g. smoke from cooking.


Pressing the alarm stop button (Hush function) on the cover of the smoke alarm desensitises it. The alarm goes mute to indicate that the smoke alarm is temporarily desensitised. The red LED also flashes every 8 seconds. The smoke alarm is reset automatically after approx. 10 minutes. If smoke particles are still present after this time, the alarm will sound again. You can mute the alarm (Hush function) repeatedly until the air is cleaned and the particles that triggered the alarm are no longer in the air.

Warning
- Before you activate the alarm stop function, identify the cause of the smoke and ensure that there is no other danger!
- If the alarm sounds (and you are not currently testing the unit), that means that the smoke alarm has detected smoke. When an alarm sounds, you must pay attention and take action immediately.
8. Mounting the Base Plate
- Hold the base plate of the smoke alarm against the ceiling – the two mounting holes can be used to mark the position of the drill holes.
- With a wooden ceiling or beams, drill approx. 20 mm deep using a 2.5 mm drill bit. Use the supplied screws without anchors.
- For cement or brick, use a bit with max. 5 mm diameter (measure the supplied anchors before) and drill approx. 25 – 30 mm deep so that the anchors can be inserted.
- Insert the anchors (for cement or brick).
- Attach the base plate of the smoke alarm using the screws supplied.

9. Startup and Operation
Activate the smoke detector by pressing and holding the test button for more than 3 seconds until the LED lights, then release it within 2 seconds. The device generates a "beep" that indicates activation and working mode. In case of proper function, the red LED flashes for a short time every 40 seconds. If combustion by-products are detected in the air, a loud alarm tone sounds. The alarm stops as soon as the air is free of smoke. Decibel level in alarm mode: min. 85 dB.
- Attach the smoke alarm to the base plate, which is mounted on the ceiling, by guiding the snap-in hooks into the intended openings and rotating the smoke alarm clockwise.


- Check that the smoke alarm is securely attached to the base plate. After installing the smoke alarm, check that it is functioning properly. To do so, press the test button for approx. 5 seconds; see also Sec. 10.

Note
• You have to activate the smoke alarm before use.
- High or low temperatures, as well as high humidity, can reduce the battery's service life.
• Note – Battery cannot be replaced
10. Care and Maintenance
- Test:
Press the test button on the smoke alarm until the alarm sounds. The alarm sounds if the electronics, sensor, horn and battery are all functioning properly.

Note
It is recommended to test the device on a weekly basis in order to ensure that it functions properly.
• Battery/Replacing the smoke alarm
The 3V Lithium battery in this smoke alarm will last ten years. The smoke alarm indicates that the battery is dead by emitting an audible and visible signal (every 40 seconds). Please replace the alarm when this occurs.
- Care
In rooms and areas where large amounts of dust accumulate, clean the smoke alarm regularly using a vacuum. If you are painting your flat, ensure that no paint gets on the smoke alarm.
11. Warranty Disclaimer
Hama GmbH & Co. KG assumes no liability and provides no warranty for damage resulting from improper installation/mounting, improper use of the product or from failure to observe the operating instructions and/or safety notes.
12. Service and Support
Please contact Hama Product Consulting if you have any questions about this product. Hotline: +49 9091 502-115 (German/English) Further support information can be found here: www.hama.com
13. Recycling Information
Note on environmental protection:

After the implementation of the European Directive 2002/96/EU and 2006/66/EU in the national legal system, the following applies: Electric and electronic devices as well as batteries must not be disposed of with household waste. Consumers are obliged by law to return electrical and electronic devices as well as batteries at the end of their service lives to the public collecting points set up for this purpose or point of sale. Details to this are defined by the national law of the respective country. This symbol on the product, the instruction manual or the package indicates that a product is subject to these regulations. By recycling, reusing the materials or other forms of utilising old devices/Batteries, you are making an important contribution to protecting our environment.
14. Manufacturer and Licensee:
Ningbo Siterwell Electronics Co., Ltd No.76 Haichuan Road, Chuangye Zone B, Jiangbei, Ningbo, China
Hama GmbH & Co KG
86652 Monheim/Germany
www.hama.com
CE 0786 0786-CPR-21388
VdS G 214063


D Bedienungsanleitung
Vielen Dank, dass Sie sich für ein Hama Produkt entschieden haben!
Nehmen Sie sich Zeit und lesen Sie die folgenden Anweisungen und Hinweise zunächst ganz durch. Bewahren Sie diese Bedienungsanleitung anschließend an einem sicheren Ort auf, um bei Bedarf darin nachschlagen zu können. Sollten Sie das Gerät veräußern, geben Sie diese Bedienungsanleitung an den neuen Eigentümer weiter.
1. Erklärung von Warnsymbolen und Hinweisen

Warnung
Wird verwendet, um Sicherheitshinweise zu kennzeichnen oder um Aufmerksamkeit auf besondere Gefahren und Risiken zu lenken.

Hinweis
Wird verwendet, um zusätzlich Informationen oder wichtige Hinweise zu kennzeichnen.
2. Packungsinhalt
• photoelektronischer Rauchmelder mit VdS Prüfzeichen
- Grundplatte
- Montagematerial
- Batterie 3Volt Typ CR123A Lithium (bereits eingebaut)
- diese Bedienungsanleitung
3. Sicherheitshinweise
- Betreiben Sie das Gerät nicht in unmittelbarer Nähe der Heizung, anderer Hitzequellen oder in direkter Sonneneinstrahlung.
- Lassen Sie das Gerät nicht fallen und setzen Sie das Gerät keinen heftigen Erschütterungen aus.
- Öffnen Sie das Gerät nicht gewaltsam.
-
Beachten Sie für eine korrekte Funktion die in dieser Bedienungsanleitung angegebenen Montage- und Installationshinweise.
-
Bei funktionsrelevanter Beschädigung ist der Rauchmelder auszutauschen.
- Erstellen Sie für den Notfall einen Fluchtplan (Hinweise dazu hier in der Bedienungsanleitung).
- Warnung vor Hörschäden! Der Signalton ist sehr laut. Rauchmelder nicht direkt neben dem Ohr testen.
- Versuchen Sie nicht, das Gerät selbst zu warten oder zu reparieren. Überlassen Sie jegliche Wartungsarbeit dem zuständigen Fachpersonal.
- Einschränkungen von Rauchmeldern. Rauchmelder sind nicht fehlerfrei, daher keine Garantie zum Schutz von Leben und Besitz. Rauchmelder stellen keinen Ersatz für eine Versicherung dar.

Hinweis – Batterie
Die Batterie ist fest eingebaut und kann nicht entfernt werden, entsorgen Sie das Produkt als Ganzes gemäß den gesetzlichen Bestimmungen.
4. Montageort

Hinweis
- Platzieren Sie Rauchmelder pro Wohnung mindestens in jedem Schlaf- und Kinderzimmer sowie in den Fluren die zu diesen Räumen führen und auf Rettungswegen.
- Rauch und Verbrennungsrückstände steigen nach oben an die Zimmerdecke und verbreiten sich dann erst horizontal. Der ideale Montageort ist an der Decke, in der Mitte des Zimmers.
- Ein Rauchmelder ist nur für Raumgrößen bis max. 60 m 2 zugelassen. Übersteigt die Raumgröße 60 m 2 , verwenden Sie zusätzliche Rauchmelder.
- Ein Rauchmelder ist nur für Einbauhöhen bis max. 6 m zugelassen. Übersteigt die Raumhöhe 6 m, sind zusätzliche Rauchmelder in mehreren Ebenen anzubringen.
Installation

Typische Einzel-Etageninstallation
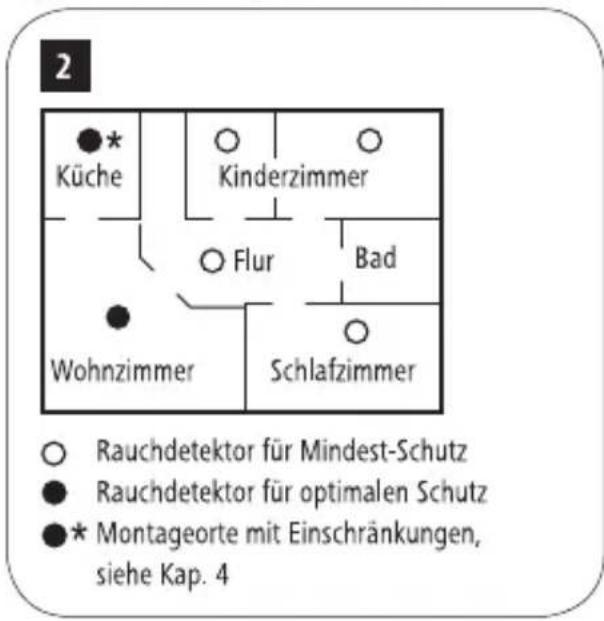
Typische Multi-Etageninstallation

- Halten Sie Fluchtwege von Schlafzimmern frei, da diese Räume gewöhnlich am weitesten von Ausgängen entfernt sind.
- Sollte mehr als ein Schlafbereich vorhanden sein, verwenden Sie entsprechend weitere Rauchmelder.
- Bringen Sie den Rauchmelder in Treppenhäusern ganz oben an, da hier eine Kaminwirkung vorhanden sein kann, die den Rauch schnell in die oberen Stockwerke ziehen lässt.
- Zu ihrer Sicherheit sollte je ein Rauchmelder auf jeder Etage eines Gebäudes installiert werden.
- Achten Sie bei der Montage darauf, dass der Rauchmelder mindestens 50 cm von jeder Seitenwand entfernt ist (siehe Bild 1).
4.1 Montageorte mit Einschränkungen
- In Küchen und Nassräumen sind Rauchmelder nur dann anzubringen, wenn die Einschränkungen aus Abb.1 eingehalten, und gleichzeitig Fehlalarme durch Küchen- und Wasserdampf ausgeschlossen werden können.
- Bringen Sie keine Rauchmelder in Garagen an – die beim Starten eines Kraftfahrzeugs entstehenden Verbrennungsrückstände/Abgase können Fehlalarme auslösen.
- Bringen Sie keine Rauchmelder in Badezimmern an – der Wasserdampf kann Fehlalarme auslösen. Bei Spitzdächern mit einer Dachneigung >20° ist der Rauchmelder in einer Entfernung von mind. 50 cm und max. 1 m von der Giebel-


spitze anzubringen, siehe Bild 1. Dachneigungen ≤ 20° sind wie horizontale Decken zu behandeln. Ungeeignet sind Räume, in denen die Temperaturen unter 5°C fallen oder über 38°C steigen.
- Befestigen Sie den Rauchmelder z. B. nicht an der Decke eines Wohnwagens oder in ähnlichen Räumen. Sonnenstrahlen erwärmen hier die Luft schnell, so dass möglicher Rauch dadurch abgehalten wird, an den Rauchmelder zu gelangen und Alarm auszulösen.
5. Der Fluchtplan
- Erstellen Sie einen Plan Ihrer Wohnung/Haus, der alle Türen und Fenster aufzeigt und mindestens (wenn möglich) zwei Fluchtwege aus jedem Raum beinhaltet.
- Fenster in höheren Stockwerken benötigen eine Fluchtleiter.
- Besprechen Sie mit Ihrer Familie den Fluchtplan und zeigen/erklären Sie jedem Familienmitglied oder Besucher, was im Falle eines Brandes zu tun ist.
- Bestimmen Sie einen Ort außerhalb Ihres Hauses als Treffpunkt im Falle eines Feuers.
- Führen Sie jedem das Alarmsignal des Rauchmelders vor und erklären Sie, dass bei diesem Signal das Haus zu verlassen ist.
- Führen Sie regelmäßig einen Probealarm durch. Diese Übungen helfen Ihnen und besonders Ihren Kindern im Ernstfall das Haus schnell und auf dem kürzesten Weg zu verlassen.
- Jeder muss wissen was im Ernstfall zu tun ist. Denken Sie daran, dass Sie evtl. Ihren Kindern im Ernstfall nicht helfen können, deshalb sollten Ihre Kinder in der Lage sein, das Haus selbständig zu verlassen.
6. Verhalten im Alarmfall
- Verlassen Sie sofort das Haus! Jede Sekunde zählt, verschwenden Sie keine Zeit durch Ankleiden oder Mitnehmen von Wertgegenständen.
- Beim Verlassen des Hauses öffnen Sie möglichst keine Tür, die sich heiß anfühlt oder unter der Rauch hervorquillt. Benutzen Sie einen alternativen Fluchtweg.
- Sollte sich die Oberfläche der Tür kühl anfühlen, öffnen Sie diese leicht. Seien Sie aber bereit die
Tür schnell zu schließen, wenn sich Rauch oder Feuer hinter der Tür befindet.
- Halten Sie sich nah am Boden auf, wenn die Luft rauchig ist.
- Atmen Sie durch ein angefeuchtetes Tuch.
- Gehen Sie nach Verlassen des Gebäudes zu Ihrem vereinbarten Sammelplatz und stellen Sie sicher, dass alle Personen das Haus verlassen haben.
- Rufen Sie die Feuerwehr vom Nachbarn aus an, möglichst nicht von Ihrem Haus!
- Betreten Sie Ihr Haus nicht eher, bis es Ihnen Ihre Feuerwehr erlaubt.

Hinweis – Falscher Alarm
- Zigarettenrauch wird normalerweise den Alarm nicht auslösen, außer der Rauch wird direkt in den Rauchmelder geblasen.
- Wasserdampf, der beim Kochen entsteht, kann einen Alarm auslösen, wenn sich der Rauchmelder in der Nähe von Kochstellen befindet.
- Sollte ein Alarm ausgelöst werden, prüfen Sie, ob es sich tatsächlich um einen Ernstfall handelt.
- Ist Feuer oder Rauch vorhanden, rufen Sie die Feuerwehr bzw. verhalten Sie sich wie in Pkt. 6 dieser Bedienungsanleitung beschrieben.

Warnung
- Wenn die Ursache eines Alarms unklar ist, muss von einem Brand ausgegangen werden.
- In diesem Fall ist das Gebäude umgehend zu verlassen!
7. Stummschaltmodus (Hush-Funktion)
Wird ein Fehlalarm ausgelöst, drücken Sie die Prüftaste des Rauchwarnmelders, um das Alarmsignal für ca. 10 Minuten stumm zu schalten. Die rote LED wird dann einmal alle 8 Sekunden blinken, um anzuzeigen, dass sich der Alarm des Rauchwarnmelders im Stummschaltmodus befindet.


Rauchwarnmelder sind so ausgelegt, dass Fehlalarme minimiert werden. Verbrennungspartikel, die durch z.B. Kochen entstehen, können den Alarm auslösen, wenn der Rauchwarnmelder in der Nähe des Kochbereichs platziert wird. Durch Verwendung einer Dunstabzugshaube mit Ablufteinrichtung (kein Umluft-Typ) können Verbrennungspartikel effektiv aus der Küchenluft entfernt werden. Die Alarm-Stopp-Funktion (Prüftaste) ist sehr nützlich in der Küche oder in anderen Bereichen, die anfällig für Fehlalarme sind. Die Stummschaltfunktion sollte nur dann verwendet werden, wenn der Auslöser für den Fehlalarm, wie Rauch vom Kochen, bekannt ist.
Durch Drücken der Alarm-Stopp-Taste (Hush-Funktion) an der Abdeckung des Rauchwarnmelders wird dieser desensibilisiert. Das Verstummen des Alarms zeigt an, dass sich der Rauchwarnmelder vorübergehend in einem desensibilisierten Zustand befindet. Zusätzlich blinkt die rote LED einmal alle 8 Sekunden. Der Rauchwarnmelder wird nach ca. 10 Minuten automatisch zurückgesetzt. Falls nach diesem Zeitraum immer noch Rauchpartikel vorhanden sind, wird der Alarm erneut ertönen. Die Stummschaltung des Alarms (Hush-Funktion) kann wiederholt betätigt werden, bis die Luft gereinigt und vom Auslöser des Alarms befreit wurde.

Warnung
- Bevor Sie die Alarm-Stopp-Funktion aktivieren, klären Sie die Ursache für die Rauchentwicklung und vergewissern Sie sich, dass keine weitere Gefahr besteht!
- Wenn der Alarm ertönt (und nicht gerade geprüft wird), bedeutet dies, dass das Gerät Rauch erkennt. Das Ertönen des Alarms erfordert Ihre sofortige Aufmerksamkeit und die Ergreifung von Maßnahmen.
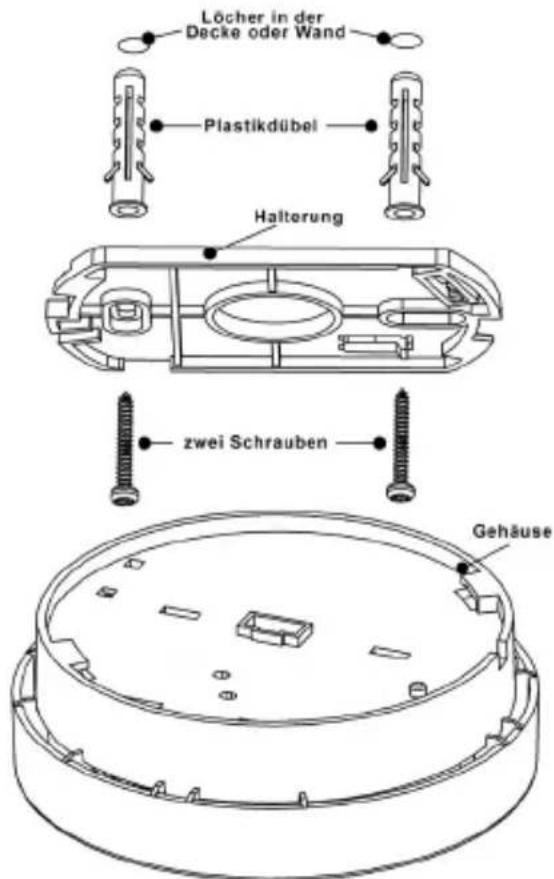
8. Montage der Grundplatte
- Halten Sie die Grundplatte des Rauchmelders an die Decke - die beiden Befestigungslöcher dienen als Schablone zum Anzeichnen der Bohrlöcher.
- An einer Holzdecke oder Balken bohren Sie mit einem 2,5 mm Bohrer ca. 20 mm tief. Verwenden Sie die beiliegenden Schrauben ohne Dübel.
- Bei Beton oder Mauerwerk benutzen Sie max. einen 5 mm Bohrer (beiliegende Dübel vorher ausmessen) und bohren Sie ca. 25 – 30 mm tief vor, um die Dübel einsetzen zu können.
- Setzen Sie die Dübel ein (Beton oder Mauerwerk).
- Befestigen Sie die Grundplatte des Rauchmelders mit den beigelegten Schrauben.


9. Inbetriebnahme und Betrieb
Aktivieren Sie den Rauchmelder, indem Sie den Test-Knopf für länger als 3 Sek. gedrückt halten, bis die LED aufleuchtet.
Lassen Sie dann innerhalb von 2 Sekunden den Knopf los. Der Rauchmelder „piept“ dann einmal und signalisiert damit, dass er sich im Arbeitsmodus befindet. Bei ordnungsgemäßer Funktion blinkt die rote LED ca. alle 40 Sekunden kurz auf. Wenn Verbrennungsprodukte in der Luft aufgespürt werden, ertönt ein lauter Alarmton. Der Alarm hört automatisch auf, sobald die Luft wieder rauchfrei ist. Schallpegel im Alarmmodus: min. 85 dB.
- Befestigen Sie den Rauchmelder auf der an der Decke angebrachten Grundplatte, indem Sie die Rasthaken in die vorgesehenen Öffnungen einführen und den Rauchmelder im Uhrzeigersinn drehen.
- Kontrollieren Sie, ob der Rauchmelder sicher auf der Grundplatte befestigt ist.
- Nach der Installation muss der Rauchmelder auf Funktion geprüft werden. Drücken Sie dazu den Testknopf für ca. 5 Sekunden, siehe auch Kap. 10.

Hinweis
- Der Rauchwarnmelder muss vor Gebrauch aktiviert werden
- Hohe oder niedrige Temperaturen, sowie hohe Luftfeuchtigkeit kann die Lebensdauer der Batterie reduzieren
- ACHTUNG – Batterie nicht auswechselbar
• Batterie/Austausch des Rauchmelders
Die Betriebsdauer der 3V Lithiumbatterie in diesem Rauchmelder beträgt zehn Jahre. Der Rauchmelder signalisiert eine verbrauchte Batterie über ein akustisches und optisches Signal (alle 40 Sekunden). Bitte ersetzen Sie dann den Rauchmelder.
• Pflege
Reinigen Sie den Rauchmelder in Räumen und Bereichen mit hohem Staubaufkommen regelmäßig durch absaugen.
Achten Sie bei einer Wohnungsrenovierung darauf, dass keine Farbe auf dem Rauchmelder aufgetragen wird.
11. Gewährleistungsausschluss
Die Hama GmbH & Co. KG übernimmt keinerlei Haftung oder Gewährleistung für Schäden, die aus unsachgemäßer Installation, Montage und unsachgemäßem Gebrauch des Produktes oder einer Nichtbeachtung der Bedienungsanleitung und/oder der Sicherheitshinweise resultieren.
12. Service und Support
Bitte wenden Sie sich bei Fragen zum Produkt gerne an die Hama-Produktberatung.
Hotline: +49 9091 502-115 (Deu/Eng)
Weitere Supportinformationen finden sie hier: www.hama.com
10. Wartung und Pflege
- Test:
Drücken Sie den Testknopf am Rauchmelder bis der Alarm ertönt. Der Alarm ertönt, wenn Elektronik, Sensor, Horn und Batterie funktionieren.

Hinweis
Es wird empfohlen, das Gerät wöchentlich zu testen, um eine ordnungsgemäße Funktion zu gewährleisten.


13. Entsorgungshinweise
Hinweis zum Umweltschutz:

Ab dem Zeitpunkt der Umsetzung der europäischen Richtlinien 2002/96/EG und 2006/66/EG in nationales Recht gilt folgendes: Elektrische und elektronische Geräte sowie Batterien dürfen nicht mit dem Hausmüll entsorgt werden. Der Verbraucher ist gesetzlich verpflichtet, elektrische und elektronische Geräte sowie Batterien am Ende ihrer Lebensdauer an den dafür eingerichteten, öffentlichen Sammelstellen oder an die Verkaufsstelle zurückzugeben. Einzelheiten dazu regelt das jeweilige Landesrecht. Das Symbol auf dem Produkt, der Gebrauchsanleitung oder der Verpackung weist auf diese Bestimmungen hin. Mit der Wiederverwertung, der stofflichen Verwertung oder anderen Formen der Verwertung von Altgeräten/Batterien leisten Sie einen wichtigen Beitrag zum Schutz unserer Umwelt.
14. Hersteller und Genehmigungsinhaber
Ningbo Siterwell Electronics Co., Ltd No.76 Haichuan Road, Chuangye Zone B, Jiangbei, Ningbo, China
Hama GmbH & Co KG 86652 Monheim / Germany www.hama.com
CE0786 0786-CPR-21388
VdS G 214063


hama®
Hama GmbH & Co KG 86652 Monheim/Germany www.hama.com
CE
All listed brands are trademarks of the corresponding companies. Errors and omissions excepted, and subject to technical changes. Our general terms of delivery and payment are applied.

- HAMA®
- THE SMART SOLUTION
- SMOKE DETECTOR
- GS 508
- RAUCHMELDER
- GB OPERATING INSTRUCTION
- EXPLANATION OF WARNING SYMBOLS AND NOTES
- WARNING
- NOTE
- PACKAGE CONTENTS
- SAFETY NOTES
- NOTE - BATTERY
- MOUNTING LOCATION
- 4.1 MOUNTING LOCATIONS WITH RESTRICTIONS
- EMERGENCY ESCAPE PLAN
- BEHAVIOUR WHEN ALARM SOUNDS
- NOTE - FALSE ALARM
- MUTE MODE (HUSH FUNCTION)
- MOUNTING THE BASE PLATE
- STARTUP AND OPERATION
- CARE AND MAINTENANCE
- TEST
- BATTERY/REPLACING THE SMOKE ALARM
- CARE
- WARRANTY DISCLAIMER
- SERVICE AND SUPPORT
- RECYCLING INFORMATION
- NOTE ON ENVIRONMENTAL PROTECTION
- MANUFACTURER AND LICENSEE
- D BEDIENUNGSANLEITUNG
- ERKLÄRUNG VON WARNSYMBOLEN UND HINWEISEN
- WARNUNG
- HINWEIS
- PACKUNGSINHALT
- SICHERHEITSHINWEISE
- HINWEIS – BATTERIE
- MONTAGEORT
- 4.1 MONTAGEORTE MIT EINSCHRÄNKUNGEN
- DER FLUCHTPLAN
- VERHALTEN IM ALARMFALL
- HINWEIS – FALSCHER ALARM
- STUMMSCHALTMODUS (HUSH-FUNKTION)
- MONTAGE DER GRUNDPLATTE
- INBETRIEBNAHME UND BETRIEB
- BATTERIE/AUSTAUSCH DES RAUCHMELDERS
- PFLEGE
- GEWÄHRLEISTUNGSAUSSCHLUSS
- SERVICE UND SUPPORT
- WARTUNG UND PFLEGE
- ENTSORGUNGSHINWEISE
- HINWEIS ZUM UMWELTSCHUTZ
- HERSTELLER UND GENEHMIGUNGSINHABER
- CE
Marque : HAMA
Modèle : GS 508
Catégorie : Détecteur de fumée