
UT362 - Anémomètre Uni-T - Notice d'utilisation et mode d'emploi gratuit
Retrouvez gratuitement la notice de l'appareil UT362 Uni-T au format PDF.


| Type de produit | Anémomètre numérique |
| Marque | Uni-T |
| Modèle | UT362 |
| Dimensions | 135 × 65 × 30 mm |
| Poids | 200 g (avec piles) |
| Alimentation | 3 piles AAA (1,5 V) |
| Plage de mesure de la vitesse du vent | 0,3 à 30 m/s |
| Plage de mesure de la température | -10 °C à 50 °C |
| Unités de vitesse du vent | m/s, km/h, ft/min, noeuds, mph |
| Fonctions principales | Mesure de la vitesse du vent, température, valeur max/min, rétroéclairage, maintien des données |
| Affichage | Écran LCD numérique rétroéclairé |
| Autonomie des piles | Environ 200 heures |
| Arrêt automatique | Oui, après 10 minutes d'inactivité |
| Indication de batterie faible | Oui, icône sur l'écran |
| Accessoires inclus | Piles, manuel d'utilisation, étui de transport |
| Entretien et nettoyage | Nettoyer avec un chiffon doux et sec. Ne pas utiliser de solvants. |
| Sécurité | Ne pas exposer à l'eau ou à des environnements explosifs. Utiliser uniquement comme décrit. |
| Pièces détachées et réparabilité | Contacter le service client Uni-T. Pas de pièces détachées fournies. |
| Informations générales | Certifié CE, RoHS. Garantie 1 an. |
FOIRE AUX QUESTIONS - UT362 Uni-T
Questions des utilisateurs sur UT362 Uni-T
0 question sur cet appareil. Repondez a celles que vous connaissez ou posez la votre.
Poser une nouvelle question sur cet appareil
Téléchargez la notice de votre Anémomètre au format PDF gratuitement ! Retrouvez votre notice UT362 - Uni-T et reprennez votre appareil électronique en main. Sur cette page sont publiés tous les documents nécessaires à l'utilisation de votre appareil UT362 de la marque Uni-T.
MODE D'EMPLOI UT362 Uni-T
UT361/362
Operating Manual
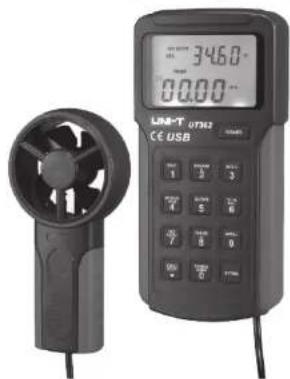
Anemoscopes
Overview
UT361 and UT362 Anemoscopes are designed with built-in high precision thermistor as air temperature sensor and a highly durable ruby vane ring to maintain accurate and stable measurements, and also offer 8-digit microprocessor for data processing. The instrument measures real-time air velocity (m/s, km/h, ft/min, mph, knots), air flow(CFM, CMM) and air temperature(°C). It also comes with remarkable features: dual display (Vel+Temp, Flow+Temp). Max/Min/Average, data hold, data storage up to 2044 sets, auto power off, PC communication (UT362 only).
This Operating Manual covers information related to the safe operation of the Anemoscope. Please read the relevant information carefully and observe all the Warnings and Notes strictly.
Warning
To avoid electric shock or personal injury, read the "Safety Information" carefully before using the Anemoscope.
Unpacking Inspection
Open the package case and take out the Meter. Check the following items carefully for any missing or damaged part:
| Item | Description | Qty |
| 1 | English Operating Manual | 1 pc |
| 2 | USB Interface Cable (UT362) only | 1 pc |
| 3 | Software (UT362) only | 1 pc |
| 4 | 9 V Battery Software | 1 pc |
In the event you find any missing or damaged item, please contact your dealer immediately.
Safety Information
In this manual, a Warning identifies conditions and actions that pose hazards to the user, or may damage the anemoscopes or the equipment under test. A Note identifies the information that user should pay attention to.
Warning
To avoid possible electric shock or personal injury and to avoid possible damage to the anemoscopes or to the equipment under test, adhere to the following rules - Before using the anemoscopes inspect the case, do not use the anemoscopes if it is damaged or the case (or part of the case) is removed. Look for cracks or missing plastic. Pay attentions to the insulation around the connections.
- Do not touch the vane of the fan and the temperature sensor that are all sensitive parts of the anemoscope, for it may affect normal operation of the instrument.
- Replace the battery as soon as the battery indicator 📄 appears
- If the anemoscope works abnormally, please stop using it and have it serviced by nearby service center.
- Do not use the anemoscopes in an environment of explosives, humidity, inflam -mables. The performance of the anemoscopes may deteriorate after campened
- Use the specific authorized replacement part if you need to repair the anemoscopes
- Do not use the anemoscope with the housing or cover opened.
- Note the battery " + " and " - "pole when installing the battery.
The following conditions or actions may cause damage to the anemoscope, please take caution when using the anemoscope. - Select the appropriate wind speed before use, it may avoid overloading damage to the vane of the anemoscope fan(0\~30m/s) under the unknown scenarios.
- Select the temperature meaning in 0°C to 40°C in order to avoid any fan damage caused by the high temperature.
- Do not try to recharge the battery.
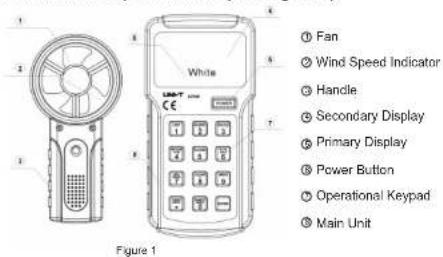
The Anemoscope Structure (See Figure 1)
Display Symbols (See Figure 2)

Figure 2
The table below offers information about the display symbols.
| Number | Sign | Meaning |
| 1 | MAX | Display of Maximum Reading |
| 2 | MIN | Display of Minimum Reading |
| 3 | Data Hold is on | |
| 4 | AVE | Display of Average Reading |
| 5 | READ | Reading Recorded Data is in Progress |
| 6 | REC NO. | Recording Data Number |
| 7 | USB | USB is on |
| 8 | VEL | Air Velocity Measurement |
| 9 | The battery is Low | |
| 10 | 2500 | Secondary Data Display |
| 11 | 2525 | Primary Data Display |
| 12 | f/min | Air Velocity Unit - Feet Per Minute |
| 13 | m/s | Air Velocity Unit - Meter Per Second |
| 14 | F/°C | Temperature Unit |
| 15 | CFM | Cubic Feet Per Minute |
| 16 | CMM | Cubic Meter Per Minute |
| 17 | KNOTS | Knots Per Hour |
| 18 | MPH | Miles Per Hour |
Keypad Description (See Figure 3)
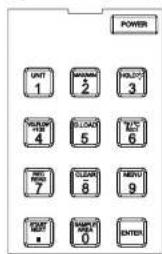
Figure 3
| Function Key | Description |
| POWER | Long press to power on; Short press to power off. |
| To switch the units for air velocity and flow. In velocity mode, press the button to switch from m/s of 1/min 1 knots→km/h→mph units. In air flow mode, press to select between CFM and CMM units. |
| Function Key | Description |
| In air velocity mode, it is used to switch from Max, Min to Real-Time values;In air flow mode, it is used to switch from Max to Min. Average, 2/3V Max. and Real-Time values;In setup status, it is to add quickly. | |
| Press ones to enter the Hold mode. Press it again to exit Hold mode. Long press press to open the backlight. | |
| To switch between air velocity and flow measurement modes.When viewing record data, it jumps on every 100 sets of data. | |
| Download data through USB port (For UT362 only) | |
| To switch from "Fand" "Temperature unit. When viewing data in the memory, it's used to obtain the first recorded data. | |
| Short press to record current measured reading; Long press to read the data in the memory. | |
| Press and hold the button while turning on the anemoscope, all recorded data in the memory will be cleared; When viewing the recorded data, it's used to subtract quickly. | |
| It is a functional menu button. Press and Hold it to configure the anemoscope. | |
| In air flow mode, it's used to move the decimal point randomly when entering the Area value. START refers to decimal point after the first input digit. NEXT is to move the decimal point for next digit. | |
| To set up the Area in air flow mode. | |
| Confirmation key. See "Setting the Anemoscope" |
Note:0-9 numeric buttons are used to key in Area value settable within 0.000 -9999 during air flow measurement.
Setting the Anemoscope
Under air velocity and flow modes, press and hold Button 9(MENU) to enter menu setup. press MENU to access next menu option.
A. USB setup
Press button 8 from USBO —USB1. The unit defaults at *USB0 "every time at power-on status.
B. Auto Power Off
Press button 8 from AP00 → AP01, the setting is saved even after power-off. The unit defaults at the saved setting when powering on, no need to reset again.
C. Auto Record Interval
Effective auto recording is settable within 0.5\~25s, REC displays on upper part of LCD, and the lower part shows the set time (0.5\~255). Press Button 2 to increment or long press to increment quickly; press Button 8 to decrement the time or long press to decrement quickly. The setting will be automatically saved after power off. The unit defaults at the set status and needs no resetting again.
D. Resetting to Factory Default
DEF flashes on LCD.
Press Button 2 to restore to factory settings: USBO, APO1,60s and clear all recorded data.
Press MENU to cancel factory settings and enter into air velocity measurement.
Using the Anemoscope
• Power On: Long press POWER button to turn on the Anemoscope.
- Select Air Velocity/Flow: Press VEL/FLOW button to switch between air velocity and air flow measurements.
- Data Hold: Press Hold to freeze the data, press again to disable the function. - Select Air Velocity Units: Under air velocity mode, press UNIT button to switch from m/s→0/min→knols→km/h→mph units, press again to repeat.
- Select Air Flow Units: under air flow mode, press UNIT to switch from CMM →CME units
• Key in Duct Area:
-
To measure air flow, you need to input duct area first.
-
After entering air flow mode, the area is automatically set to 1.0 s.c.m.
-
Select a proper air flow unit, then press SAMPLE, LCD displays KEYIN and shows blank on upper part.
-
Key in 4-digit area data, gives it the format, then the numeric value shows on LCD.
Example:
Enter 1, 0, 0, 0 Mean 1000 LCD display "1000"
Enter 1, .. 0, 0, 0 Mean 1.000 LCD display \~ 1.000
Enter 1, ENIET Mean 1.0 LCD display "1.000
Enter 1, ENTET Mean T LCD display * 1,000
Enter 0, 0, 0, 1 Mean 600+ LCD display = 1.000 Enter 0, 0, 1 Mean 281+ LCD display = 0.991
Enter . , 0, 0, 1 Mean . 60 PCD display . 0.50
For the same area value, it will probably to have a different input methods but finally it has one display. Data Input Range: 0.000\~9999
- Select Temperature Unit: Under air velocity mode, pres°F/°C to switch between °F and °C units
- Max. Air Velocity, Temp: Under air velocity mode, press MAX/MIN to switch from Normal to Max.
- Max. 2/3, AVG Air Flow: Under air flow mode, press MAX/MIN to switch from Normal →2/3→AVG.
- Data Storage:
-
If no data is saved, LCD displays "NO DATA";
-
If the memory is full, LCD shows "the clock", indicating no more data can be saved.
-
Manual Recording: Press Button 7 and the data displayed on LCD will be saved, accompanied by REC icon display. The REC icon disappears in 0.5s. Press Button 7 again to save to next location.
-
Auto Recording: Press Button7, REC shows. Before the icon disappears, press again(two times) to enter auto mode which is accompanied by flashing REC icon, then the data will be recorded at a interval set previously. If the memory is full, the anemoscope exits the function automatically.
-
Clear all data: Method 1: Press and hold Button 8 while turning on the anemoscope until CLR ....shows on LCD.
Method 2: Reset to factory default (See "Setting the Anemoscope")
- View Data: Under air velocity or flow mode, long press Button 7 to access READ function and automatically display the last recorded data. The upper part of
LCD shows the recording number or data, if it is RECNO, it represents the recording number; otherwise it is the recorded data.
- Press Button 2 to increase the Record No., long press to increase quickly.
- Press Button 8 to decrease the Record No., long press to decrease quickly
- Press Button 4 to increment 100 sets every time (for large amount of reco -rdings), max, recorded data up to 2044.
- Long press Button to exit READ function.
Measuring Air Velocity (Air Temperature)(See Figure 4)
Note: Place the anemoscope in the air with velocity above 10m/s for 1-2min before making the measurement.

To carry out anemoscopes, follow the following procedure:
- Long press POWER button to turn on the anemoscope.
- Press VEL/FLOW (Button 4) to set to VEL, accompanied by VEL or FLOW icon on LCD.
- Press UNIT (Button 1) to select the velocity unit.
- As shown in Figure 4, place the anemoscope in a direction as marked on inner side of the fan. And secure the handle with a screw (the user needs to buy the screw on his/her own).
- Wait for 2 seconds for the anemoscope to stabilize the reading.
- To obtain a accurate reading, please hold the anemoscope horizontally as in the Figure 4, the angle deviation should be <200.
- The air temperature is also measured simultaneously in air velocity mode, the temperature shows on secondary display.
- Press Button 6 to select F / °C unit.
- The primary display shows the velocity value.
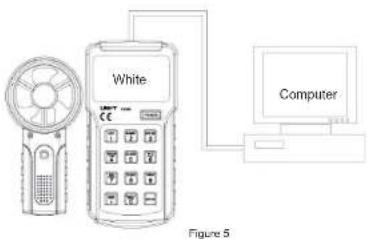
Computer Connectivity (For UT362 only)(See Figure 5)
When the anemoscope (UT362) communicates with PC, use USB cable to connect the instrument to the USB port of PC. See Figure 5.
Maintenance
A. General Service
1) Periodically wipe the case with a damp cloth and mild detergent. Do not use abrasives or solvents.
2) Take out the battery when it is not using for a long time.
3) Do not use or store the Meter in a place of humidity, high temperature, explosive, inflammable and strong magnetic field.
B. Replacing The Battery
To avoid false reading, which could read to possible electronic shock or personal injury, replace the battery as soon as the battery indicator " ➕" appears.
To replace the battery
1) Turn the anemoscope off and remove all the connections from the input terminals
2) Turn the anemoscope's front case down
3) Remove the screw from the battery compartment and separate the battery compartment from the case bottom
4) Take out the old battery and replace with a new 9V battery (6LF22)
5) Rejoin the case bottom and the battery compartment and reinstall the screw.
C. Service And Repairing
The Anemoscope is a highly intelligent and precision instrument and adopts auto calibration technique. Unless otherwise specified, do not replace all components randomly to avoid the accuracy bias.
Do not attempt to repair or service your anemoscope unless you are qualified to do so and have the relevant calibration, performance test, and service information
Technical Specification
| Function | Range | Accuracy | ||
| UT361 | UT362 | |||
| Air Velocity | 2-10m/s | ±(3%+0.5) | ±(3%+0.5) | |
| 10-30m/s | ±(3%+0.8) | ±(3%+0.8) | ||
| Air Flow | CMM | 0.001~9999×100 | √ | √ |
| CFM | 0.001~9999×100 | √ | √ | |
| Temperature | Main Unit Working Temp. | 0°C ~40°C | ±3°C | ±3°C |
| 32°F ~ 104°F | ±4°F | ±4°F | ||
| Sensor Working Temp. | 0°C ~40°C | ±3°C | ±3°C | |
| 32°F ~ 104°F | ±4°F | ±4°F | ||
Power 6F22 9V Battery
Weight 0.375kg
Dimensions 166(H)x80(L)x34.4(W)mm
Working Temperature 0°C\~50°C (32°F\~122°F)
Relative Humidity---- 0-75%, non-condensing
Storage Temperature-20℃\~65℃(-4F\~149F)
Air Pressure 500MB\~2Bar
CE Compliances:
• EN61326:2006
• EN55022: 1998+A1+A2
• EN55024: 1998+A1+A2
"END"
This operating manual is subject to change without notice.
UNI-T.
UNI-TREND TECHNOLOGY (CHINA) CO., LTD.
No6. Gong Ye Bei 1st Road
Songshan Lake National High-tech Industrial Development Zone, Descentan City
Guangdong Province, China
Tel: (86-769) 8572 3888
http://www.uni-trend.com
- OVERVIEW
- WARNING
- UNPACKING INSPECTION
- SAFETY INFORMATION
- SETTING THE ANEMOSCOPE
- USB SETUP
- AUTO POWER OFF
- AUTO RECORD INTERVAL
- RESETTING TO FACTORY DEFAULT
- USING THE ANEMOSCOPE
- KEY IN DUCT AREA
- EXAMPLE
- FOR THE SAME AREA VALUE, IT WILL PROBABLY TO HAVE A DIFFERENT INPUT METHODS BUT FINALLY IT HAS ONE DISPLAY. DATA INPUT RANGE: 0.000\~9999
- DATA STORAGE
- MEASURING AIR VELOCITY (AIR TEMPERATURE)(SEE FIGURE 4)
- COMPUTER CONNECTIVITY (FOR UT362 ONLY)(SEE FIGURE 5)
- MAINTENANCE
- GENERAL SERVICE
- REPLACING THE BATTERY
- SERVICE AND REPAIRING
- CE COMPLIANCES
- UNI-T
Marque : Uni-T
Modèle : UT362
Catégorie : Anémomètre