
ML-60 IP - Station d'accueil MUSE - Notice d'utilisation et mode d'emploi gratuit
Retrouvez gratuitement la notice de l'appareil ML-60 IP MUSE au format PDF.


| Marque | MUSE |
| Modèle | ML-60 IP |
| Type de produit | Station d'accueil |
| Compatibilité | Appareils mobiles, tablettes, smartphones |
| Dimensions (L x l x h) | Environ 150 x 100 x 50 mm |
| Poids | Environ 300 g |
| Alimentation | USB-C 5V 2A (adaptateur secteur non inclus) |
| Puissance de charge | Jusqu'à 10 W |
| Connectique | 1 x USB-C (entrée), 1 x USB-A (sortie charge), 1 x jack 3,5 mm |
| Fonctions principales | Recharge, support inclinable, sortie audio auxiliaire |
| Matériau | Plastique ABS, base antidérapante |
| Entretien et nettoyage | Essuyer avec un chiffon doux et sec. Ne pas utiliser de produits abrasifs. |
| Sécurité | Protection contre les surcharges, les surtensions et les courts-circuits |
| Pièces détachées et réparabilité | Indisponibles. En cas de panne, contacter le service après-vente. |
| Température de fonctionnement | 0°C à 40°C |
| Certifications | CE, RoHS |
| Contenu de l'emballage | Station d'accueil, câble USB-C, guide de démarrage rapide |
| Garantie | 2 ans |
FOIRE AUX QUESTIONS - ML-60 IP MUSE
Questions des utilisateurs sur ML-60 IP MUSE
0 question sur cet appareil. Repondez a celles que vous connaissez ou posez la votre.
Poser une nouvelle question sur cet appareil
Téléchargez la notice de votre Station d'accueil au format PDF gratuitement ! Retrouvez votre notice ML-60 IP - MUSE et reprennez votre appareil électronique en main. Sur cette page sont publiés tous les documents nécessaires à l'utilisation de votre appareil ML-60 IP de la marque MUSE.
MODE D'EMPLOI ML-60 IP MUSE
MUSE
ML-60 IP
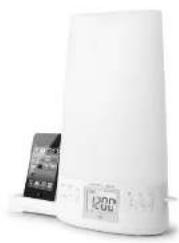
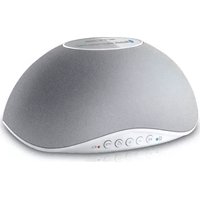
Lighting Audio System with iPod-iPhone Docking
natural_image
White digital water heater with digital display and control panel (no visible text or symbols)Please read the instruction carefully before operating the unit.
English
UNPACKING YOUR UNIT
When you unpack your new iPhone/iPod clock radio, make sure that you have removed all the accessories and information papers:
- Man unit AC aders
- AC adapol - Remple contro
- 5 pieces iPhone/iPod interchangeable adaptors
- User manual
LOCATION OF CONTROLS
Main Unit
-
Light diffuser
-
ON/OFF bullen
-
□▶ (iPhone-iPhone)
-
EM button
5 Nature
-
Brightness control but
-
Light control button
-
VOLUME +/- but
-
◆◀ / ▶▶ button
-
ALARM 1 button
-
ALARM 2 button
-
RESET button
-
SLEEP Bitter
-
LCD display
-
LCD display
-
Remote sensors
-
SNOOZE:DIMMER
button
-
AUX IN jack
-
DC IN jack
-
iPhone-iPad drawer
-
Battery compartment
-
Speakers
Front View

Back View
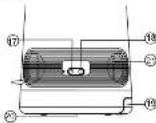
CE-1
Remote Control
B1. ⑨ button
R2. Light control button
R3. VOLUME -1-bull
R4. 同 button (route)
R5. Brightness control button
R8. ▶ (Pod-Phone) PLAYPA
DUNOH P7 EM by
R. PM DUMA RH Natu
R9. SLEEP button
R10.
R11. ▲ /▼ button (navigate menu in
iPhone iPod mode)
R12.0K button (confirm)
iPhone/Pod mode)
R13.MENU button (return to previous menu in iPhone/Star mode)
Menu in iPhone/Pod mode) P14M.PET bulles
R14.MSET BUTTON R15.Alarm 1/2 hutto
R16.SNOOZEODIMMER button
Remove the spacer tab before use
Remove the spacer tab when you use the remote control for the first
use the remote center for the first line. To remove the lab call it in the
direction of the arrow in the illustration
as show.

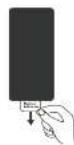
GB-2
Replacing battery for the remote control
-
Press the stopper and pull out the battery holder
-
Install the CR2025 battery according to the polarity diagram on the battery compartment
-
Insert the battery holder into the remote control.

LCD DISPLAY
D1. Phone iPod mode
playback
D2. - radio made
D3. AUX IN mode
D4. RMT natural sound mode
D5. -g-brightness level indicator
Dr. 劳面搜索-53th Tawke to radio/llbero-lRed / buzzer
natural sound
- 为图解 - sburu 2 wake to D13- Sleep FMSTADAMMADH-D13
radio / iPhone-Pod / buzzer
natural sound
-
M - memory indicator
-
BB-memory digit
D10. PM - displays in 12hr time mode
D11. Time or radio frequency
D12. sleep indicator D13. FLUSTINATION - radio, mode & frequency unit
GE·1
POWER SUPPLY
Using the AC adaptor
This AC adaptor operates on AC-100-240V-5060Hz. The supplied AC adaptor is suitable for use on
The 100-240V-50/60Hz and should only be connected to a mains supply within 3000imeters.
- Use the supplied AC adaptor only. Using any other AC adaptor could damage the unit.
Cautions:
- The included AC adaptor is for use with this unit only. Do not use it other equipments.
- When the unit is not going to be used for long time, disconnect the adaptor from the AG outlet.
- Be sure to use it near the well outlet. If a malfunction occurs, disconnect the
- When the AC adaptor is plugged in, the apparatus is not completely clean
nacted from the main power source, even when the unit is turned off. - AC adaptor is used as the disconnect device. It shall remain readily
operable and should not be obstructed during intended use. To disconnect the apparatus from sup p/y mains, completely disconnect the AC adapter of the apparatus from the mains socket outlet.
Battery backup system
DC power: 2x1.5V, battery type AAA/R03UM4(nat provident) for clock a alarm time backup system.
An alkaline type battery is recommended. For optimum performance, the battery should be replaced every 6 months.
BACKUP SYSTEM: All clock settings will be kept in memory; however, the clock time may require adjustment for exact accuracy. If the lockup battery is not installed, the display will show the clock flashing to indicate that you have to reset the time and the alarm.
NOTE: When the battery backup is functioning, the display has no backlight.
BASIC OPERATION
Turn on the unit
The unit is in standby mode with clock display when it's plugged in. Pres ON/OFF to switch on/off the audio function (radio, iPhone/ iPod, natural sound or auxiliary input).
Operating mode selection
- Press □▶to select playing iPod/Phone and control play/pause when this function is ON
FUNCTION IS ON.
Please find to select radio mode.
Among 8 kinds of natural sound.
- Press 9. to control brightness of white light (20 levels for cheese) or set over light when life is a prior kind made after him on the light by
- Press - to switch between 3 states in loop: Light Off - White Light - Color Light...
Sound Volume
Press VOLUME +/- button to adjust sound level. There are a total of 30 volume levels.
Press 📄 button to cut off the sound temporarily, press this button again to
Resume the sound
Display Dimmer
When the unit is NOT in alarm mode, press 📄 button repeatedly to set sunlight brightness or display. 3 levels for choose: low, medium and high.
SLEEP (Automatic turn off)
In sleep mode, the unit will turn off automatically after a specified time. You can select duration in minutes before the unit turns off automatically. Press SLEEP button repeatedly to select 120-110-100...0 minutes. 6
seconds after, display will resume to current time.
Note: Sleep time can be only set when the unit is turned ON.
- DURING SLEEP OPERATION, PRESS SLEEP BUTTON TO display the remaining sleep time.
- To turn off the unit before the SLEEP activates, press ON/OFF button, or press SLEEP button repeatedly until value is adjusted to '00'. The sleep function is cancelled and 'SLEEP' iron will not disclaimed.
- If the playing time from your iPhone or other player is shorter than the se
ected sleep time, the music will stop at the end of the playing time.
Sleep with digressive light
If while light or color light is ON during SLEEP function, the light will turn OFF with digressive brightness when the SLEEP time is reach.
TIME SETTING
When used for the first time, or if the mains plug has been removed with no battery batteries inside. The clock discals will blink for selling.
Banks, Sector, Funds, and Other Stocks, MI Limited for Solving.
Selling sequence: Hour → Minute → 24v12h.
- In standby mode, long press MSFT button to enter the current time setting
mode. "HH" digits flash for hour setting
-
Press ▶ ▶ to set the hour time
-
Press MSET button to validate the hour value, minute digits flash for adjust
-
Press 🖼️/▶▶ to set the minute time
-
Press MSET button to confirm time setting.
-
"24H" flashes for setting. Press → to set, and press M/S complete two time settings.
Complete 48 days 36:17
NOTE:
- At first use of the set, the time setting sequence will start by 24h12h selection.
Any following sequence, if the time has been entered already, will start by
Hour (HH) selection.
- With clock display blinking, if no button is pressed within 8 seconds, it will return to previous clock display.
ALARM SETTING
This unit can be set for two different wake up times which you can choose to use independently or simultaneously ALARM1, ALARM2 or both ALARM1 and ALARM 2
Alarm 1 or Alarm 2 setting
In standby mode
- Long press ALM.1 bullon, hour digit of alarm 1 flash. Press
adjust four times, then press ALM.1 button again to confirm. 2. Minute dot of alarm 1 flash. Press. 📄. 📋. 📋. 📋. 📋. 📋. 📋. 📋. 📋. 📋. 📋. 📋. 📋. 📋. 📋. 📋. 📋. 📋.
ALM.1 button to confirm time setting
-
- flash for setting progressive light time before alarm time reach
Press . . . . . . . . . . . . . . . . . . . . . . . . . . . . . . . . . . . . . . . . . . . . . . . . . . . . . . . . . . . . . . . . . . . . . . . . . . . . If "00" is selected, the white light will switch ON at wake-up time.)
- Alarm 1 wake up source indicator flash. Press ⚡️ ⚠️ H select wake up
source among 10 or 11 or 12
- Press A.M.: to confirm action setting.
Note:
(7) If wake up by 📄 is chose, kind of natural sound flashes for select by next step. Passes are left to select
(2) Progressive light is using WHITE light with progression to the maximum
brightness. - If the COLOR light is ON at the lines of progressive light start, color light will
If this light is on at this time of progressive light start, the light will switch OFF before progressive light start.
- If the WHITE light is ON at the time of progressive light to start, it keeps and no progressive light.
. Same operation for Alarm 2 setting
To check the alarm setting
In standby mode, press ALM.1 or ALM.2 for 2 times to show the alarm time and alarm source. Display will resume to current time after 2 seconds.
To turning off alarm
The alarm is programmed to run for 59 minutes and triggers progressively. Once the alarm 1 or alarm 2 is activated, corresponding alarm source indicator 1 or 2 or 3 or 4 or 5 will flash on display.
- In wake up mode, to temporarily stop alarm, press - button, the alarm will resume to the previous playing mode after 9 minutes. Alarm source in dicators will keep flashing on display.
CH-4
CH-3
CH-N
同
- To stop the alarm for 24 hours, press ON/OFF button. alarm source indica
Iors remain displayed. The alarm will trigger at the present time one
-
To two of the same contemporary years, 1954, as a whole
-
To turn for the alarm, permanently, press ALN 1 or 2 billion in state mode until alarm source indicators disassesses.
NOTE:
- You can adjust the wake up sound level by VOL+! button in wake up
iPhone/iPod or radio modes.
- But since this is a progressive alarm, the sound will be louder and louder.
You can decrease the volume after the alarm reaches to 8 max volume level.
(1) 2017年1月1日,公司与上海浦东发展银行股份有限公司签订了《关于使用部分闲置募集资金进行现金管理的协议》。
LIGHTING
Your clock radio is equipped with a saving energy LED main light and multicolor ambience light.
Main light
- Press 📋 button once to turn on the main light. The current level
brightness will show on display for 5 seconds.
- Press button repeatedly to adjust the level of brightness (from 01 to
20).
Color light
- Press button twice to turn on the color light, then it will start to cycle in
different colors
- Press 8 button to stop at current color press this button again
resurns the cycle.
- Press 📄: Euton again to turn of the light
NATURAL SOUNDS
- In steady mode press, human to trigger natural sound function
- 01 will show on display
-
Press 📋 button repeatedly to select a kind of natural sound among six.
-
Press VOLUME +/- to adjust the volume level.
-
2015-12-2016 - 12. 2015-12-2017
CE 8
| iPod/iPhone Model | Play & Charge Compatibility | Included Bracket |
Made for iPod and iPhone
Made for
iPod iPhone
"Mode for iPod," "Mode for iPhone," and "Mode for iPad" mean that an electronic accessory has been designed to connect specifically to iPod, iPhone, or iPad, respectively, and has been certified by the developer to most Apple performance standards. Apple is not responsible for the operation of this device or its compliance with safety and regulatory standards. Please note that the use of this accessory with iPod, iPhone or iPad may affect wireless performance.
CR-12
LISTENING TO THE RADIO
Manual operation
-
Press ON/OFF button to turn on the unit.
-
Press FM button to select RADIO mode, " shows on display.
-
Press 1 to tune to a desired station step by step.
Note: Press FM button directly in standby mode also can enter RADIO mode.
Automatic search operation
The automatic searching operation locates strong stations. Press and hold
button to start automatic searching in the chosen direction. Press
again to stop
searching. A station with a weak signal can be tuned manually.
NOTE: During the search operation the sound level will be muted
Sundversically
Program preset stations
This unit is able to store 20 FM radio stations in memory.
-
Select a radio station either by manual or automatic search.
-
Press INSET button once, "M" and preset number will flash on display.
-
Press ALM. 1 or ALM. 2 button to change preset number
-
Press MSET button again to save the radio station in the selected preset.
channel
- Repeat steps 1-4 to store more stations.
When you memorize a station on a preset, the previous station is erased and
mplaced by
Listening to the preset stations
Press ALM.1 or ALM.2 button directly to select a preset station.
NOTE: For a better reception in FM, extend the antenna. If a stereo
broadcast is received, "FM(ST)" is displayed.
GB 2 GB 11
AUXILIARY
This unit includes the AUX IN jack to allow you to connect external devices.
such as MP3 player, and listen to the music of your external device through
the speakers of this unit
-
Connect the external device to the AUX IN jack at the back of the unit.
-
Please ON/OFF button, AUX icon shows on the display, and function mode
SMITHIE AUXILIARY. 3. Elast le pleuvene et all
- Sits to play your vocabulary source.
-
Adjust the volume to desired level
-
To stop playback press ON/OFF button or disconnect your external
device from the AUX IN lack
SPECIFICATIONS
GENERAL
Power source AC 100-240V - 50/60Hz
DC 3V, 2x1.5V 'AAA'ROGUM4" size batteries (not included) or
equivalent for memory backup
Dimension 120 W*312 H*178 L mm
TUNER
Frequency range: FM: 87.5 - 109 MHz
AUDIO SECTION
AUDIO SECTION Power Consumption 15W
Speaker Importance, John
MORE INFORMATION
CAUTION ATTENTION: To reduce the risk of electric shock, do
- (4) 300 remove the cover. There are no user serviceable parts
inside the unit. Refer all servicing to qualified personnel.

The lightning flash with arrowhead symbol within the triangle is a
warning sign sterling the user of "dangerous voltage" inside the unit.
(四) 2017年1月1日,公司召开2017年第二次临时股东大会,审议通过了《关于使用部分闲置募集资金进行现金管理的议案》。

The exclamation point within the triangle is a warning sign sclaring
the user of important instructions accompanying the product
CR-13
LISTEN TO YOUR iPhone/iPod
IMPORTANT
The docking station in this system follows the Apple "Universal Dock" design.
This system can be fitted to different iPhone or iPod model.
Play your iPhone/iPod on the main unit
-
Correct your iPhoneEnd to the secret of the unit
-
Press the ON/OFF bullon in turn on the up
-
Press to select iPhone/iPod mode. The display indicates * □/▶
-
Press □ button to play or pause. Press and hold this button for 5
seconds to enter the iPod/Phone sleep mode
- Select the previous or next track by pressing. 🖼️ button press and
held on the unit to play review or fast forward.
- Press VOL + ) - buttons to adjust sound level.
Other iPhone/iPad functions MENU, OK (Select), ▲ (UP) and ▼ (DOWN)
are performed by the remote control.
MENU button: Press to return to previous page of menu.
▲ or ▼ button: press to select a menu item.
OK button press to confirm a selection /open a folder or start playing a
selected track)
iPhone call pick up
-
When phone call coming in, the music from the desktop iPhone will arrive
-
Which phone call coming in, the first automatically
-
Inversion call ring cross mark put [you the unit square]
-
meeting/calling so much out from the drill speaker.
-
You can take place from the unit and pick up above call.
-
After finish your call, connect back the iPhone in the series, it will mean
-
All the best your call, I am too much as if I think the picture of them.
the proposal is +100m.
Charge your iPhone!Pod
While your iPhone/iPod is docked on the system, its battery recharges
automatically until fully charged.
Clock Time Synchronization
The first time when your unit connected with iPhone, the clock time of your
unit will be synchronous with the iPhone
After the first time, you are required to press and hold MSFT button for 5
later the first time, you are required to press and mail into Sunday, last a seconds to set your unit synchronous with iPhone.
iPhone/iPod interchangeable adapter
This system includes 5 different adapters designed to allow you to securely
connect are "dockable" iPhone!Pod model in the docking station. Refer to
the chart below to select the proper integer for your particular iPhone!
The chart includes to be seen and proper advice for your particular moment of model and respect that extracts the dealing-rising factors representing you.
Hindi and Insert that adapter into the docking station before connecting your iPhonePod
GB 10
WARNING - To reduce the risk of fire or electric shock, do not expose this appliance to rain or moisture.

For indoor use only
Class 1 LED product.
IMPORTANT
- Do and hours batteries in fire!
- Do not place the product in closed bookcases or racks without proper
ventilation.
- If the external flexible cable or cord of this luminaire is damaged, it shall be
exclusively revised by the manufacturer or his service agent or a similar
qualified person in order to avoid a hazard.
- Attention should be drawn to the environmental aspects of battery disposal.
- The marking information is located at the bottom of apparatus.
- Ensure a minimum distance of 5cm around the apparatus for sufficient
ventilation.
- Ensure that the ventilation is not impeded by covering the ventilation
openings with items, such as newspapers, table-clothes, curtains, etc.
- Do not place naked flame sources, such as lighted candles on the
apparatus.
- Use the apparatus only in moderate climates.
- Do not be exposed to dripping or splashing. And that no object filled with
liquids, such as vases, shall be placed on the apparatus.
- Do not use your set immediately after transport from a cold place to a warm
place, there may be condensation problems.
- Make sure that you keep your set away from water and high temperatures.
- Clean the player with a soft cloth, or damp chemols leather. Never use
solvent.
- To be completely disconnected the power input, the mains plug of the
apparatus shall be disconnected from the mains completely.
- The maps plan should not be obstructed or should be easily accessed
during intended use.
- Where the results plan is useful as the disconnected device, the decrease
doona shall remain readily operable.
- Under the influence of electrical fast transversal oxidized electrostatic
phenomenan, the product may malfunction and require user to power reset.
For example, the 2017-2018 period of the first year, the annual estimate for the compound estimate is \$4.50 million.
NOTE: No adapter is provided for the 3G (third generation) iPod.
Please use the adapters which were included with your IPoi at the time of
purchase. They will fit properly into the docking station of this system.
| iPod/iPhone Model | Pay & Charge Compatibility | Included Bracket | |
| Podcast4.0 4.0B | ● | ||
| Pred 15 generations2.003 | ● | 10 | |
| Pred 15 generations4.003 | ● | 10 | |
| Pred 15 generations (optional display)2.004 and 2.005 | ● | 10 | |
| Pred 15 generations (optional display)2.006 and 2.007 | ● | ||
| Podcast 15 generations1.0 2.0 4.0B | ● | 5 | |
| Pred 15 generations (optional)2.002 | ● | 10 | |
| Pred 15 generations (optional)4.002, 4.008 | ● | 10 | |
| Podcast 15 generations (optional)The call tool | ● | 8 | |
| Podcast 4.008, 12.003 | ● | 10 | |
| Podcast 15class | ● | 10 | |
| Podcast 15class | ● | 10 | |

If at any time in the future you should need to dispose of this product please note that Waste electrical products should not be disposed of with household waste. Please recycle where facilities exist. Check with your Local Authority or retailer for recycling advice (Waste Electrical and Electronic Equipment Directive)


- MUSE
- ML-60 IP
- UNPACKING YOUR UNIT
- LOCATION OF CONTROLS
- LCD DISPLAY
- POWER SUPPLY
- BASIC OPERATION
- SLEEP (Automatic turn off)
- TIME SETTING
- ALARM SETTING
- LIGHTING
- Main light
- Color light
- NATURAL SOUNDS
- LISTENING TO THE RADIO
- Manual operation
- Automatic search operation
- Program preset stations
- Listening to the preset stations
- AUXILIARY
- SPECIFICATIONS
- TUNER
- AUDIO SECTION
- MORE INFORMATION
- LISTEN TO YOUR iPhone/iPod
- IMPORTANT
- Play your iPhone/iPod on the main unit
- iPhone call pick up
- the proposal is +100m.
- Charge your iPhone!Pod
- iPhone/iPod interchangeable adapter
- Class 1 LED product.
Marque : MUSE
Modèle : ML-60 IP
Catégorie : Station d'accueil