
C-Go 1 - Caméscope E-flite - Notice d'utilisation et mode d'emploi gratuit
Retrouvez gratuitement la notice de l'appareil C-Go 1 E-flite au format PDF.


| Type de produit | Caméscope numérique compact |
| Marque | E-flite |
| Modèle | C-Go 1 |
| Dimensions (L x l x h) | Environ 100 x 60 x 30 mm |
| Poids | Environ 200 g (avec batterie) |
| Alimentation | Batterie lithium-ion rechargeable (incluse) |
| Autonomie de la batterie | Environ 1 heure d'enregistrement continu |
| Résolution vidéo | Full HD 1080p à 30 images par seconde |
| Capteur photo | 5 mégapixels (interpolé) |
| Zoom optique | 5x |
| Stabilisation d'image | Électronique |
| Écran | LCD 2,7 pouces (orientable) |
| Stockage | Carte mémoire SD/SDHC (jusqu'à 32 Go, non incluse) |
| Connectivité | USB 2.0, HDMI mini |
| Entretien et nettoyage | Nettoyer avec un chiffon doux et sec. Éviter les solvants. |
| Sécurité | Ne pas exposer à l'humidité, aux chocs ou aux températures extrêmes. |
| Pièces détachées et réparabilité | Batterie, chargeur, câble USB disponibles. Réparation par centre agréé. |
FOIRE AUX QUESTIONS - C-Go 1 E-flite
Questions des utilisateurs sur C-Go 1 E-flite
0 question sur cet appareil. Repondez a celles que vous connaissez ou posez la votre.
Poser une nouvelle question sur cet appareil
Téléchargez la notice de votre Caméscope au format PDF gratuitement ! Retrouvez votre notice C-Go 1 - E-flite et reprennez votre appareil électronique en main. Sur cette page sont publiés tous les documents nécessaires à l'utilisation de votre appareil C-Go 1 de la marque E-flite.
MODE D'EMPLOI C-Go 1 E-flite
TABLE OF CONTENTS
1 ...... Table of contents
1 ...... System requirements (Windows)
2 ...... System requirements (Mac)
2 Technical specifications
3 Introduction
3 ...... Overview
5 ...... Getting started
7 ...... Default camera settings
7 ...... Powering ON and OFF
8 ...... Camera modes
8 ...... Video
9 ...... Photo
9 ......Transferring files
10 ......CGO1 smartphone FPV app
11 Using ST24 to control CGO1
12 ......CGO1 LED Status
14 ...... Safety warnings
18 Warranty
19 .... About the quickstart manual
SYSTEM REQUIREMENTS (Windows)
Windows XP (Service Pack 2 or later) or Vista
3.2GHz Pentium 4 or faster
Minimum 1GB of system RAM
Mac OS ^® X 10.4.11 or later
2.0GHz Intel Core Duo or faster
Minimum 1GB of systemt RAM
TECHNICAL SPECIFICATIONS
| Dimensions LxWxH (with lens): | 64.10x44.60x43.80mm |
| Weight: | 72g |
| Battery: | 1050mAh 1-Cell 3.7V Li-Po |
| Working Voltage: | 3.7-4.2V |
| Operating Time Per Charge: | 60min – 90min (based on Wi-Fi Environment) |
| MicroSD HCSD Class 4: | 4GB – 32GB |
| Optical Zoom: | Fixed focus |
| Photo Resolution/Format : | 2MP/JPEG |
| Resolution/FPS Video Recording: | 1080p/30FPS |
| Downlink Resolution/FPS/Latency: | 720p/30FPS/200ms |
| Video Format: | AVI (H.264) |
| Audio Format: | AAC |
| Internal-Microphone: | Included |
| Wi-Fi Frequency: | 5.8GHz dual-band |
| Wi-Fi Power: | 15dB |
| Antenna: | Ext. -Mushroom Type |
| Communication Distance: | ~1,700 feet with ST24 |
CGO1 is a high-resolution camera (1080p / 30 FPS) specifically developed by Yuneec for small UAVs. The compact and lightweight CGO1 is suitable for high quality first person view (FPV) for an array of flying platforms. CGO1 includes long range and low-latency digital Wi-Fi video link, providing users with a high definition, portable real-time video solution.
CGO1 can be remotely controlled by Yuneec FREE iOS and Android smart phone applications without the use of extra components. When paired with Yuneec Personal Ground Stations - ST24 / ST15, CGO1's video downlink performance reaches nearly 1,700 feet!
OVERVIEW

Video/Photo Indicator Light (Red; Solid for video mode, Flashing for photo mode)
Wi-Fi Indicator Light (Blue; On for Wi-Fi Active, Off for Wi-Fi Inactive

Wi-Fi ON/OFF Button
Wi-Fi Antenna Socket

natural_image
Technical line drawing of a mechanical component with dashed circular annotation (no text or symbols)3mm Mounting Hole
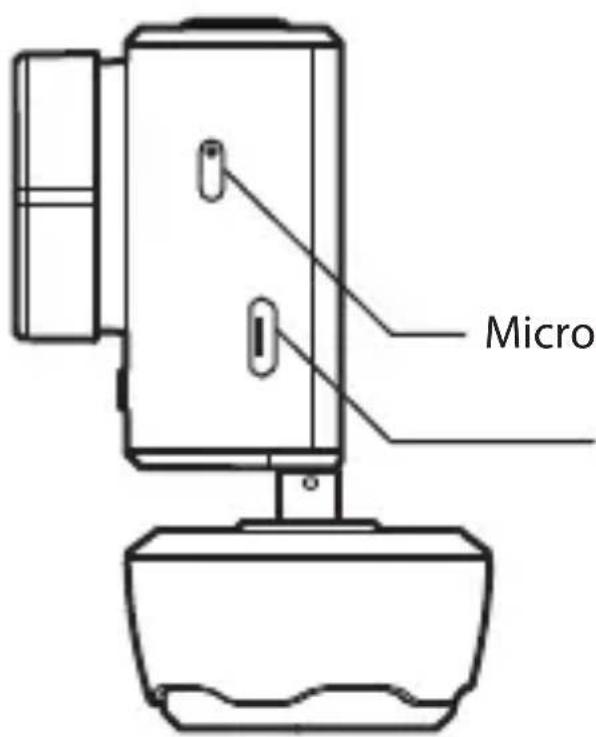
Microphone
Micro-B USB Port (Supports PC connection and battery charging)
MicroSD Card Slot (SD card not included)


natural_image
Simple line drawing of a circular object with concentric rings and a small protrusion (no text or symbols)Mushroom shaped WiFi Antenna
GETTING STARTED
Before using your CGO1 for the first time:
- Remove camera door by applying light pressure on the 'Yuneec' logo.
- Insert a MicroSD card into the card slot with the label facing forward toward the front of the camera.
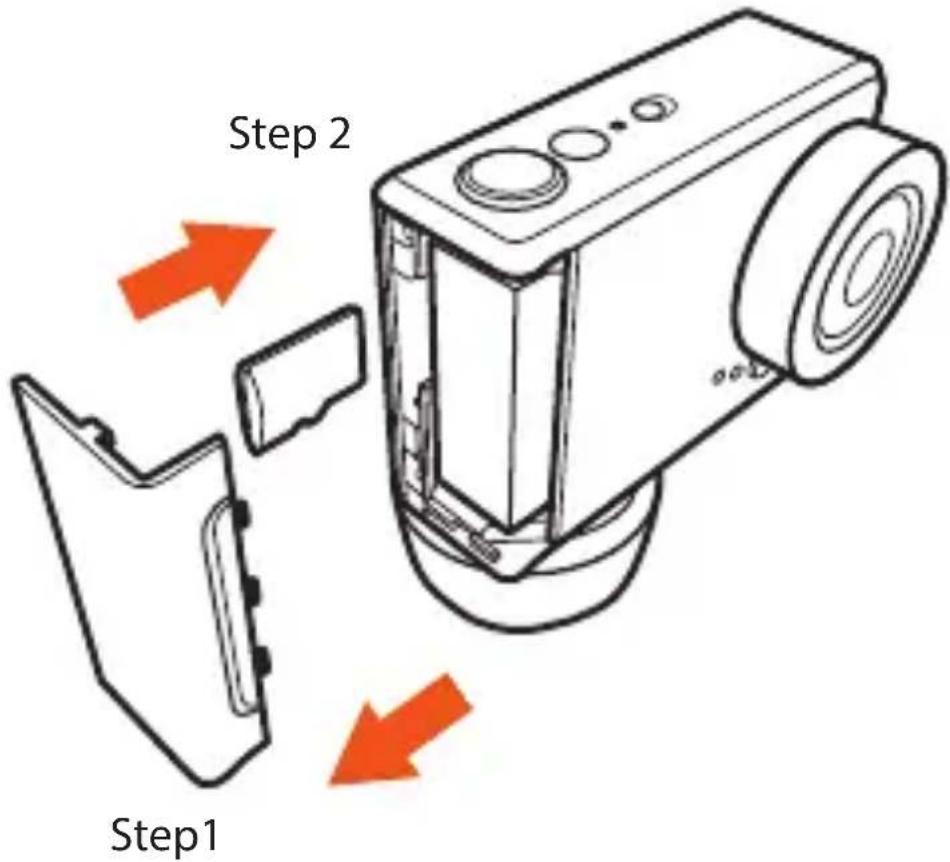
- Insert battery.
- Replace camera door.
- Charge battery. The included Li-Po battery comes partially charged. To charge, connect the included USB cable to the Micro-B USB port on camera and connect the other end of the cable to a suitable USB power source such as a computer.
Charger Indicator Light when camera is OFF while charging:
- Charger Indicator Light is pink when charging.
- Charger Indicator Light is blue when charging is complete.
The CGO1 Camera powers on with following default settings:
Video Resolution: 1080p 30fps
Photo Resolution: 2MP (Megapixels)
Wi-Fi: ON
Video MODE: ON
Photo MODE: OFF
POWERING ON AND OFF
natural_image
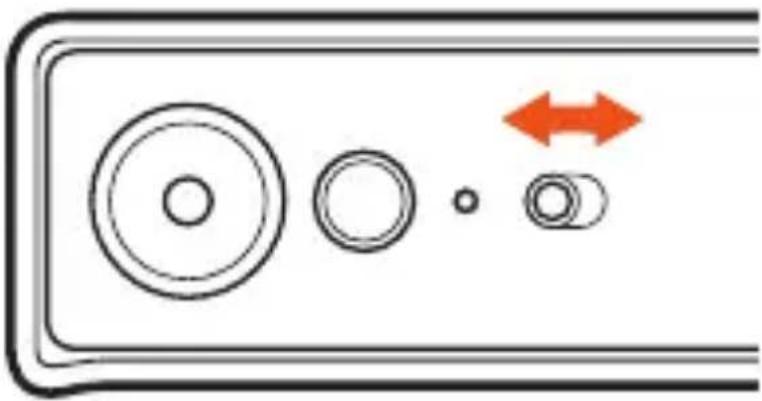
Diagram showing four circular components with arrows indicating bidirectional movement (no text or symbols)To Power ON:
Slide the Power Switch to the right toward the MODE Button. The red Video/Photo Indicator Light and blue Wi-Fi Indicator Light will flash several times and then stay on.
Notice: Before powering off your CGO1, we strongly recommend pressing and holding the SHUTTER Button for 2 seconds until the Video/Photo and Wi-Fi
indicator lights flash. This step will increase the life of your Micro-SD card and help preserve your precious photo/video files
To Power OFF:
Slide the Power Switch to the left, away from the MODE Button. All indicator lights will turn off.
Warning Indicators:
Low Battery: Video/Photo and Wi-Fi Indicator Lights flash simultaneously.
MicroSD Card Full or MicroSD Card Problem: Video/Photo and Wi-Fi indicator Lights flash alternately.
CGO1 CAMERA MODES
Video:
Once you power on your CGO1, the camera defaults to Video Mode. The red Video/Photo Indicator Light will glow solid red.
To Start Recording:
Press and release the SHUTTER BUTTON. The red Video/Photo Indicator Light will flash while recording video.
To Stop Recording:
Press and release SHUTTER BUTTON. The red Video/Photo
Indicator Light will glow solid red, indicating CGO1 is no longer recording and is in Video Mode.
Photo:
In the Video Mode, press and release MODE BUTTON to enter Photo Mode. The red Video/Photo Indicator Light will flash, indicating CGO1 is in Photo Mode.
To Take a Photo:
Press and release SHUTTER BUTTON. The Video/Photo Indicator Light will glow solid red for a moment. Repeat this action for more photos.
IMPORTANT NOTE:
Please make sure that the camera is powered off when you remove the MicroSD card. Removing the MicroSD card prior to powering the camera off may lead to file loss or corruption.
TRANSFERRING FILES
Follow the steps to transfer video and photo files to a computer:
On a PC:
- Connect CGO1 to the computer using the included USB cable.
- Slide the power switch to the right toward the MODE
button to switch on the CGO1.
- Double click 'My Computer', locate and double click 'Removable Disk'.
- Double click 'DCIM' folder icon to view all Photo and Video files.
- Copy your precious files to the computer.
On a Mac:
- Connect the CGO1 to the Mac using the included USB cable.
- Slide the power switch to the right toward the MODE button to switch on the CGO1.
- Icon will appear on desktop. Double click the icon to view all Photo and Video files.
- Copy your precious files to the Mac.
CGO1 SMARTPHONE FPV APP
- Download the Free CGO1 App to your smartphone or tablet at the Apple App Store or Google Play.
- Power on CGO1 (slide the power switch toward the 'Mode' button).
- Open your device's Wi-Fi settings and connect to the CGO1_****** network.
- Enter the password 'key' located on the CGO1.
- Open the CGO1 App on your smartphone or tablet. Now, you will be able to control the camera with your
smartphone or tablet, plus adjust settings.
IMPORTANT NOTE:
Please make sure that the camera is powered off when you remove the MicroSD card. Removing the MicroSD card prior to powering the camera off may lead to file loss or corruption. Also make sure to 'stop recording' prior to powering off your CGO1 to ensure your video is properly stored in the MicroSD card. Additionally, before powering off your CGO1, we recommend pressing and holding the SHUTTER Button for 2 seconds until the Video/Photo and Wi-Fi indicator lights flash. This step will help increase the life of your MicroSD card and help preserve your precious photo/video files.
USING ST24 TO CONTROL CGO1
The CGO1 is directly compatible with Yuneec Personal Ground Stations (PGS ST24 / ST15) with integrated FPV capability and unique capacitive touch screen Android user interface. For more information, please visit Yuneec.com
- Power on CGO1 (slide the power switch toward the 'Mode' button).
- Select 'PAD' from the ST24's 'Home Settings'. Enter Wi-Fi settings and connect to the CGO1_***** network.
- Enter the password 'key' located on the CGO1.
-
When network connection is successful, Via 'Home Settings', enter FPV and press Take Off to connect video.
-
Press and release SHUTTER BUTTON on the left-hand side of the transmitter. ST24 will emit an audible tone one time, and Start capture/Capture complete appears at the top of screen.
- Press RECORD BUTTON on the right-hand side of the transmitter. "Start record" will appear at the top of the screen, along with record time displayed on the right side of the screen.
- Press RECORD BUTTON again. Stop record" will appear at the top of the screen.
- Check the Video Recording via ST24:
Press Landing Button > System Settings > FPV Quick Review
IMPORTANT NOTE:
Please make sure to 'stop recording' prior to powering off your CGO1 to ensure your video is properly stored in the MicroSD card. Additionally, before powering off your CGO1, we recommend pressing and holding the SHUTTER Button for 2 seconds until the Video/Photo and Wi-Fi indicator lights flash. This step will help increase the life of your MicroSD card and help preserve your precious photo/video files.
CGO1 LED STATUS
Video/Photo Indicator Light: Red
WiFi Indicator Light:
Power On(default):
Blue
Red Video/Photo Indicator Light is ON, 10 seconds after, blue WiFi Indicator Light flash-
| shes 3 times, red Video/Photo Indicator Light flashes 2 times, and then both are on (Record Mode, WiFi open). | |
| Video Mode: | Red Video/Photo Indicator Light is on |
| During Recording: | Video/Photo Indicator Light flashes every 0.5s |
| Photo Mode: | Video/Photo Indicator Light flashes (on for 0.1s, and off for 1.4s) |
| Photo Taken: | Video/Photo Indicator Light on for 1s and off |
| Charging: | Both red Video/Photo Indicator Light and blue WiFi Indicator Light are on. When charging is complete, red Video/Photo Indicator Light is off, and the blue WiFi Indicator Ligh is on. |
| Low Battery: | Both red Video/Photo Indicator Light and blue WiFi Indicator Light flash every 1s |
| WiFi on: | WiFi Indicator Light is on |
| WiFi off: | WiFi Indicator Light off |
| SD card full, no SD card or | Both red Video/Photo Indicator |
SD card Problem:
Light and blue WiFi Indicator Light flash alternantly (on for 0.25s, and offfor 0.25s)
Reject SD card:
Both red Video/Photo Indicator Light and blue WiFi Indicator Light flash alternatively, showing rejection success.
SAFETY WARNINGS
Make sure the camera is powered off while charging.
Please avoid directly touching the aluminum alloy back cover. When CGO1 is working with Wi-Fi on, the camera body may become hot to touch because of the high-performance nature of the product. CGO1's aluminum alloy back cover is specially designed to help dissipate heat under normal operating conditions.
CAUTION: Risk of explosion if CGO1 battery is replaced by an incorrect battery. Use only Yuneec's CGO1 battery that is specially developed for the CGO1. Dispose of batteries according to your local laws.

natural_image
Symbol of a trash bin crossed with no text or labelsThis symbol means that according to the local laws and regulations your product should be disposed of separately from household waste.
When this product reaches its end of life, take
it to a collection point designated by local authorities. Some
collection points accept products for free. The separate collection and recycling of your product at the time of disposal will help conserve natural resources and ensure that it is recycled in a manner that protects human health and the environment.
This device complies with Industry Canada licence-exempt RSS standard(s). Operation is subject to the following two conditions:
- This device may not cause interference and
- This device must accept any interference, including interference that may cause undesired operation of the device.
Charge current:
Charge current should not more than the maximum charge current specified in the Product Specification (normally 500mA\~1A or lower). Charging with higher current may damage the cell or even lead to safety problem, e.g. overheating or leakage.
Charge voltage:
Charge voltage shall not be more than that specified in the Product Specification (4.2V/cell). 4.25V is the maximum charging voltage for each cell. Never charge the battery in series and be sure that each single cell has a separated charging circuit with a max. Charging voltage of 4.25V or the battery may be overcharged, and lead to fire or explosion. The user is fully responsible to the result of misusing the battery.
Charge temperature:
The cell should be charged within the range of temperatures specified in the Product Specification. Stop charging immediately when the surface temperature of the battery is over 50°C.
Reverse charging:
Please make sure the polarities of cells are connected properly before charging, reverse charging is strictly prohibited. Reverse charging cannot charge the cells but will deteriorate their charging/discharging and safety characteristics, or even lead to fire or explosion.
Discharge current:
The cell shall be discharged at the current no more than the maximum discharging current specified in the Product Specification. Over current discharging may damage the battery and cause over-heat.
Operation temperature:
Use the battery within the temperature range specified in the Product Specification. Stop using when temperature is over 70°C.
Over-discharge:
Over-discharge will deteriorate the cell's performance and characteristics. Do not over dis-charge a battery below 2.75V/cell.
Battery Specification Model:
SDL- 103228 - 1050 mAh - 1S1P
Storage:
If you intend to keep the battery for a long time (3 months or longer), it is strongly recommended that the battery shall be stored under the environment with temperature 10-25°C, low humidity and without corrosive gas. The battery should be charged every six months to ensure that each cell's storage voltage is 3.6\~3.9V.
Other:
The aluminum packing foil is very soft that it will be easily left scratches. Please do not hit the cell with any sharp edge parts. Don't fall, hit or bend the battery. It may cause fire or explosion.
Short circuit the battery is strictly prohibited; it may damage the battery seriously.
Never disassemble the battery. It may cause fire.
Never dispose of the battery in fire. It is very dangerous and strictly prohibited.
To immerge the battery into liquid such as water is strictly prohibited.
Avoid vibration, shock or extrude the battery. Handle carefully when moving it.
Limited Warranty:
Yuneec warrants that for a period of one (1) year from original date of purchase, the product will be free from defects in materials and workmanship under normal use. In the event of a defect, please contact Yuneec Customer Support (www.Yuneec.com) for assistance. Yuneec's sole obligation under this warranty will be, at its option, to repair or replace the product. This warranty does not apply to products damaged by misuse, accident, water damage, or normal wear and tear. Yuneec disclaims all other expressed or implied warranties or conditions. To the extent not prohibited by law, in no event will Yuneec be liable for any loss of data, revenue or profit, or for any special, indirect, consequential, incidental or punitive damages, however caused, arising out of or related to the use of or inability to use the product, even if Yuneec has been advised of the possibility of such damages. In no event will Yuneec's liability exceed the amount paid by you for the product. Some jurisdictions do not allow limitations on how long an implied warranty lasts, or the exclusion or limitation of incidental or consequential damages, so the above limitations or exclusions may not apply to you. This warranty gives you specific legal rights, and you may also have other rights, which vary by jurisdiction.
ABOUT THE QUICK START MANUAL
Yuneec reserves the right to update manuals, quick start guides and warranty information at any time. For the latest manual and quick start information, as well as warranty information, please visit YUNEEC.COM

- TABLE OF CONTENTS
- SYSTEM REQUIREMENTS (Windows)
- OVERVIEW
- GETTING STARTED
- Charger Indicator Light when camera is OFF while charging:
- The CGO1 Camera powers on with following default settings:
- POWERING ON AND OFF
- To Power ON:
- To Power OFF:
- Warning Indicators:
- CGO1 CAMERA MODES
- Video:
- To Start Recording:
- To Stop Recording:
- Photo:
- To Take a Photo:
- IMPORTANT NOTE:
- TRANSFERRING FILES
- On a PC:
- On a Mac:
- CGO1 SMARTPHONE FPV APP
- USING ST24 TO CONTROL CGO1
- CGO1 LED STATUS
- SD card Problem:
- Reject SD card:
- SAFETY WARNINGS
- Charge current:
- Charge voltage:
- Charge temperature:
- Reverse charging:
- Discharge current:
- Operation temperature:
- Over-discharge:
- Battery Specification Model:
- Storage:
- Other:
- Limited Warranty:
- ABOUT THE QUICK START MANUAL
Marque : E-flite
Modèle : C-Go 1
Catégorie : Caméscope