
Versatis F200 Duo - Téléphone ALCATEL - Notice d'utilisation et mode d'emploi gratuit
Retrouvez gratuitement la notice de l'appareil Versatis F200 Duo ALCATEL au format PDF.

Questions des utilisateurs sur Versatis F200 Duo ALCATEL
0 question sur cet appareil. Repondez a celles que vous connaissez ou posez la votre.
Poser une nouvelle question sur cet appareil
Téléchargez la notice de votre Téléphone au format PDF gratuitement ! Retrouvez votre notice Versatis F200 Duo - ALCATEL et reprennez votre appareil électronique en main. Sur cette page sont publiés tous les documents nécessaires à l'utilisation de votre appareil Versatis F200 Duo de la marque ALCATEL.
MODE D'EMPLOI Versatis F200 Duo ALCATEL
ALCATEL
Versats Versats Versats F200 / F200 Duo / F200 Trio /
Versats Versats Versats F250 / F250 Duo / F250 Trip
In keeping with our environmental preservation and
compliance commitment, we include mini-guides in our packaging. More complete instructions and online assistance are available on our website;
www.atlinks.com

natural_image
Black and white photo of a classic mobile phone with keypad and front panel (no visible text or symbols)
Ecologic attitude
BEFORE TO USE YOUR PHONE, PLEASE READ ALL THIS USER'S GUIDE
- KNOWING YOUR PHONE
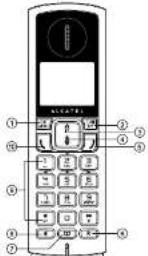
1.1. Handset Overview (Versatis F200 Only)
1.
In Idle mode: Press to access the main menu In sub-menu mode: Press to confirm the selection During a call: Press to access Intercom/Phonebook/Redial List/Call List
- [13] In main menu mode: Press to go back to idle screen In sub-menu mode: Press to go back to previous level In sub-menu mode: Press and hold to go back to idle screen In editing/predialling mode: Press to clear a character/digit In editing/predialling mode: Press and hold to delete all the characters/digits
During a call: Press to mute/unmute the microphone In Idle mode: Press to Intercom another handset In ringing: Press to suppress handset ringer
- A In Idle mode: Press to access the call list In menu mode: Press to scroll up the menu items In Phonebook list/Redial list/Call List: Press to scroll up the list
During a call: Press to increase the volume
- In Idle mode: Press to access the redial list In menu mode: Press to scroll down the menu items In Phonebook list/Redial list/Call list: Press to scroll down the list
During a call: Press to decrease the volume
-
During a call: Press to end a call and go back to idle screen In menu/editing mode: Press to go back to previous menu In menu/editing mode: Press and hold to go back to idle screen In Idle mode: Press and hold to power off the handset In Idle mode: Press and hold to power on/off the handset
-
R In Idle/predialing mode: Press to insert a flash During a call: Press to dial a flash
-
In Idle mode: Press to access the phonebook list 8.
In Idle mode: Press to access the redial list 9. ALPHANUMERIC KEYPAD, 2, 17. * key in Idle mode: Press and hold to enable or disable the keypad lock * key in Idle mode: Press and hold to turn on/off the finger * key in call list mode: Press to review caller's number if applicable
0 key in predalling/number editing mode: Press and hold to
insert a pause
1, 2, 3 key in idle/off hook mode, press and hold to dial the stored direct memory number
- (S) In idle/predicting mode: Press to make a call In Redial list/Call List/Phonebook entry: Press to make a call to the selected entry in the list During ringing: Press to answer a call
1.2. Handset Overview (Versatis F250 only)

1.
In idle mode: Press to access the main menu In sub-menu mode: Press to confirm the selection During a call: Press to access Intercom/Phonebook/Redial List/Call List
2.
In main menu mode: Press to go back to idle screen
In sub-menu mode: Press to go back to previous level
In sub-menu mode: Press and hold to go back to idle screen
In editing/preciating mode: Press to clear a character/digit.
In editing/preciating mode: Press and hold to delete all the characters/digits
During a call: Press to mute/unmute the microphone
In idle mode: Press to intercom another handset.
In ringing: Press to suppress handset ringer
- △
In idle mode: Press to access the call list In menu mode: Press to scroll up the menu items In Phonebook list/Redial list/Call List: Press to scroll up the list During a call: Press to increase the volume In ringing: Press to increase the ringer volume
- In idle mode: Press to access the redial list In menu mode: Press to scroll down the menu items In Phonebook list/Redial list/Call List: Press to scroll down the list During a call: Press to decrease the volume In ringing: Press to decrease the finger volume
-
I j During a call: Press to end a call and go back to Idle screen In menu/editing mode: Press to go back to previous menu In menu/editing mode: Press and hold to go back to Idle screen In idle mode: Press and hold to power off the handset In idle mode: Press and hold to power on/off the handset
-
In idle/predicting mode: Press to insert a flash During a call: Press to dial a flash
-
In idle mode: Press to access the phonebook list
8.
During a call: Press to turn on/off the speakerphone In Idle mode/Predialing mode/Redial list/Call List/Phonebook entry: Press to make a call with speakerphone During ringing: Press to answer a call with speakerphone
* key in idle mode: Press and hold to enable or disable the keypad lock
x^2 key in idle mode: Press and hold to turn on/off the finger x^3 key in call list mode: Press to review caller's number if applicable 0 key In predailing/number editing mode: Press and hold to insert a pause
1, 2, 3 key in Idle/off hook mode, press and hold to dial the stored direct memory number
10.1 In Idle/precailing mode: Press to make a call In Redial list/Call List/Phonebook entry: Press to make a call to the selected entry in the list During ringing: Press to answer a call
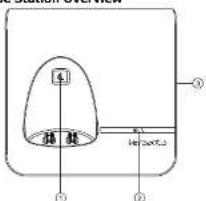
1.3. Base Station Overview
1.
Press ☑ on the base station to page your handset. It will ring for approximately 60 seconds. Press and hold ☑ on the base station for about five seconds, the base station is entered into registration mode and allows handset registration.
-
Steadily on while the handset is charging or in use. (Applicable only when the LED I/O switch is slid to "1") Flash when receiving an incoming call. (Applicable only when the LED I/O switch is slid to "1")
-
LED I/O SWITCH (Bottom of the Base) Slide the switch to "O" position to turn off the base LED Slide the switch to "T" position to turn on the base LED when the handset is charging on the base or in use
1.4. Display Icons and Symbols
The LCD display gives you information on the current status of the telephone.

Steadily on when the handset is in range of the base. Flash when out of range of the base or not registered to the base.
→ Steadily on when an intercom is in progress. Flash when there is an incoming internal call.
Indicate a call is in progress.
(Versabis F250 only) Indicate that handsfree is being used.
Steadily on when an alarm is set. Flash when the alarm time set before reaches.
- Indicate that the keyed is locked.
Indicate when there are received new Voice Message Waiting (VMW1) not yet read. Disappear when all the voice messages have been read. (Network service dependent)
Indicate that the ringer is switched off.
Indicate when the battery is fully charged. Whole icon flashes when the battery performs initial charging. Internal block icon flashes when the battery is in final charging stage.
☐ Indicate when the battery needs charging. Flash when low battery power level is detected.
Indicate when more characters are existed before the text currently displayed.
▶ Indicate when more characters are existed after the text currently displayed.
★ Indicate when new call is received. Turn off when new call has been read.
▲ Scroll up/down the menu items/Phonebook list/Redial list/Cell List.
- PRECAUTIONS
The signal quality will depend on the location and environment of the base and handset.
Position your Versatis F200/Versatis F250 away from sources of excessive heat (radiator, direct sunlight, etc.) and protect it from vibrations and dust. Never allow your telephone to come into contact with water or other liquids, or with aerosols. To reduce the risk of interference and optimize reception, take particular care not to install the base in the immediate vicinity of windows, large metal objects, reinforced concrete, televisions, music centres, VCR or DVD players, halogen lamps or heating devices, fluorescent lighting, burglar alarms, microwave ovens, computers, etc.
This telephone requires an electrical power supply in order to function.
To clean your Versatis F200/Versatis F250, use an antistatic cloth lightly moistened with water.
NB: Your Versatis F200/Versatis F250 is a DECT ^** standard appliance designed to receive and transmit telephone calls. It is designed for connection to the public telecommunications network.
- INSTALLING YOUR PHONE
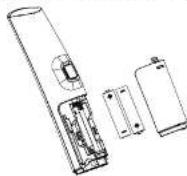
3.1. Installing and Charging the Batteries
- Slide down to open the battery compartment cover.
-
Place the 2 supplied AAA rechargeable batteries as indicated. Pay extra attention to direction of polarity.
-
Slide the battery compartment cover back.
- Put the handset on the base and charge for 15 hours before using the handset for the first time. The handset will give a beep when it is properly placed on the base or charger.
Notes:
- Use only the supplied NiMH rechargeable batteries.
- If the handset will not be used for a long time, disconnect and remove the batteries to prevent possible leakage.
3.2. Connecting the Base Station
-
Plug one end of the telephone line cord into the telephone jack on base bottom.
-
Plug the small end of power adapter into a power jack on base bottom
-
Connect the power supply plug to the base jack horizontally, and route the power supply cord through the slot.
-
Plug the large end of power adapter into a wall power outlet.
-
Plug the other end of the telephone line cord in to the telephone inch or micro filles
-
Always use the cables provided in the box.
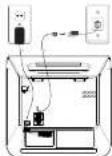
If you have broadband service, a micro-filter (not included) is required.
3.3. Connecting the Charger(s) (for Duo/Trio models) Plug the power adapter into mains socket.
If you have a Broadband line
If you connect your telephone to a line with a broadband connection, you will need to insert a micro-filter between the telephone and the telephone line, otherwise you may get interference between the telephone and the broadband, which could cause problems.
In a home with broadband, every telephone must have a microfilter connected, not just the one at the telephone point that your modem is connected to. If you need more broadband microfilters, contact your broadband supplier.

www.atlinks.com
ATLINKS Europe
22 qual Galloni 92150 Surespres, France
© ATLINK5 2012 - Reproduction prohibited.
The Manufacturer reserves the right to modify the specifications of its products in order to make technical improvements or
comply with new regulations.
ALCATEL and ATLINKS are registered trademarks. The Alcatel logo and Alcatel name are trademarks of Alcatel and used under licence by ATLINKS.
F200/F200 Dup/Tria LA
F250/F250 Dub/Tria LA
A/W No.: 1000421 REV.0 (EN) Printed in China
4. USING YOUR PHONE
4.1. Make a Call
4.1.1. Preparatory Dialing
Enter the phone number and press ☐ or ☑ (Versatis F250 Only) to dial the number. Press 1/2 to clear the entry.
4.1.2. Direct Dialing
Press (L) or □ (Versatis F250 Only) to take the line and enter the phone number.
4.1.3. Dial from Direct Memory Keys
In idle or off hook mode, press and hold 1/8/2 to dial the direct memory number. You have to store number to the related key first. See section 7.4 for reference.
4.1.4. Call from the Redial List
Press ▲ (Versatis F200 Only) or ▼ (Versatis F250 Only) to access the redial list and press ▲/▼ to select the desired redial number. Press (L) or ▲ (Versatis F250 Only) to dial out to the selected redial number.
4.2. Handset Speakerphone (Versatis F250 Only)
During a call, you can press ☐ to alternate between handsfree and normal handset use.
5. PRIVATE PHONEBOOK
Your phone can store up to 50 private phonebook entries with names and numbers. Each phonebook entry can have a maximum of 20 digits for the phone number and 12 characters for the name. You can also select different ringtones for your phonebook entries. Phonebook entries are stored alphabetically by name.
7.2. Set the Ringer Volume
-
Press | UK/ and A/▼ to select HS SETTINGS.
-
Press |c| and ▲/▼ to select RING SETUP
-
Press 16 and / to select RING VOLUME
-
Press [5] and ▲/▼ to select the desired ringer volume (a
total of 6 ringer volume levels including VOLUME OFF).
Note: The respective ringer volume will be played during your
selection
IF VOLUME OFF is selected. # icon will display
- Press 16 to confirm.
7.3. Adjust Earpiece and Handsfree (Versatis F250
Only) Volume
There are 5 levels (VOLUME 1 to VOLUME 5) to choose from for each of earpiece and handsfree (Versatis F250 Only) volume.
During a call:
Press ▲/▼ to select volume 1-5. The current setting is shown. When you end the call, the setting will remain at the last selected level.
7.4. Store Direct Memory Access Number
You can store three direct access numbers into digit KEY 1, KEY 2 and KEY 3, which will be convenient for you to dial to these numbers directly.
-
Press [16] and ▲/▼ to select HS SETTINGS.
-
Press □ and △/▼ to select DIRECT MEM.
-
Press | and ▲/▼ to select any one from KEY 1, KEY 2
and KEY
- Press [OK] and then enter the number you would like to store,
or edit the number existed before.
- Press | 16/48
Note: Press and hold ☐, ☑ or ☒ to call the stored number.
10. TROUBLESHOOTING
If you have difficulty with your phone, please try the suggestions listed below.
As a general rule, if a problem occurs, remove the batteries from all the handsets in your installation for about 1 minute, then disconnect and reconnect the power supply to the base and reinstall the handset batteries.
| Problem Cause Solutions | ||
| No dialing tone when pressing [L] key | a. The connection cord of the base station is not plugged in.b. The adapter cord is not plugged in correctly in the base station.c. The line is busy, as another handset is used.d. Wrong connection cord. | a. Check the connections. Unplug and plug back in the mains. Check that the telephone line cord has been plugged into the base station and the phone socket.b. Check the base station plug and the AC plug (remove and plug-in).c. Wall until the line is unoccupied.d. Use the original connection cord. |
| 'OUT OF RANGE' is displayed. | a. Base station out of range.b. Base station is not connected to mains. | a. Reduce the range.b. Connect base station to mains. |
| The call does not work. | Service not activated or wrong operator. | Check your Subscription with network. |
| No display. Empty battery. Recharge battery. | ||
The store where you bought your telephone can also provide you with information and after-sales support.
5.1. Add a New Phonebook Entry
In id
- Press ☐ to access the phonebook.
OR
Press US/ and ▲/▼ to select PHONEBOOK main menu item and then press OK to access the phonebook.
-
Press % to select ADD.
-
Press 95: to enter the name.
-
Press 36: to enter the number.
-
Press 3K and △/▼ to select the desired ringtone for your
phonebook entry.
- Press 30 to store the phonebook entry
5.2. Call from the Phonebook
In [M]
- Press ☑ to access the phonebook.
OR
Press 95/ and ▲/▼ to select PHONEBOOK main menu item
and then press OK? to access the iphonebook
and then press (w) to access the phonebook. 2. Press 1 or □ (Versatic E250 Only) to dial out to the
- Press _i or (versets 1230 Only) to dial out to the selected abovebank prices.
selected phonebook entry.
6. CALLER DISPLAY (NETWORK DEPENDENT)
This feature is available if you have subscribed the Caller Line Identification service with your telephone service provider. Your phone can store up to 20 received calls with date/time information in the Call List. The number will be shown on the LCD when the phone is ringing. If the number matches with one of the entries in your Private Phonebook, the caller's name stored in the private phonebook will be displayed alternatively with the number. The handset will ring with the melody associated with that phonebook entry.
If the caller number is disabled to send caller information,
"WITHHELD" will display.
If the caller number is not provided, "OUT OF AREA" will display.
In standby. If three unanswered calls are received. "3 NEW
CALLS ^v will be displayed.
8. REGISTRATION
Your handset and base station is pre-registered. Up to five
handsets can be registered to a single base station.
If for some reason, the handset is not registered to the base
station (at flashes even when the handset is near the base station).
register your handset according to the following procedure.
- Press and hold [4] on the base station for about five seconds.
the base station is entered into registration mod
-
Press PK7 and A/B to select REGISTRATION.
-
Press is / and you are requested to enter the 4-digit system
-
Pass [系统] and you are too DTN (in-Cell DTN in 0000)
PIN (default PIN is 0000).
-
Enter the 4-digit syst
-
Press | 载 | to confirm
If the handset registration is successful, you will hear a confirmation tone and the all will stop flashing. The handset will automatically be allocated the next available handset number. This handset number is shown in the handset display in standby mode. If the handset registration is unsuccessful, the all will still flash.
11. SAFETY
In the event of an electrical hazard, the mains adapter acts as AC power isolating device. It should therefore, as a precaution, be installed close to the appliance and be easily accessible. To disconnect the device from the primary power source, the mains adapter must be removed from the AC socket.
If the mains adapter fails, it must be replaced by an identical model.
If not connected to the mains power or if there is a mains power failure, telephones that use cordless handsets will not work.
You will then be unable to make or receive calls in the event of an emergency.
This is why we recommend that you also keep a conventional telephone – one that doesn't require a power supply – as a backup.
! Do not use your telephone to notify a gas leak when standing in the vicinity of the leak.
It is recommended that you avoid using this device during electrical storms. Do not attempt to open the batteries, as they contain chemical substances. In the event of leakage, avoid contact with the skin, eyes, nose and mouth. In the event of contact, rinse the affected part for about twenty minutes with running water and seek urgent medical attention. Clean the product with absorbent paper or a dry cloth and contact your reseller for replacement batteries.
6.1. View the Call List
All received calls are saved in Call List with the latest call putting at the top of the list. When the call list is full, the oldest call will be replaced by a new call. The unanswered call which has not been read is marked with a ★ at the centre of the bottom line of the display.
- Press ▲ to access the call list.
OR
Press 36, and ▲/▼ to select CALL LIST.
-
Press ▲/▼ to select the desired entry.
-
Press 'Y' to view the caller's number if applicable.
6.2. Call from the Call List
In [4]
- Press ▲ to access the call list.
OR
Press 35 and ▲/▼ to select CALL LIST.
- Press 1 or □ (Versatis F250 Only) to dial out to the
selected phonebook entry.
7. PHONE SETTINGS
7.1. Set the Ringer Melody for Internal/External Calls
-
Press 367 and ▲/▼ to select HS SETTINGS
-
Press _0 and A/▼ to select RING SETUP
-
Press 387 and ▲/▽ to select INT RING or EXT RING.
-
Press, 3K; and A/7 to select the desired finger melody from
-
Press lit and the melody list
Note: The respective finger melody will be played while browsing
Note: The respective finger melody will be played while browsing the melody list.
-
Press ^NR to confirm
-
11358 盈 to confirm.
9. TECHNICAL DETAILS
| Free Field Range Up to 300 metres* | |
| Indoor Range Up to 50 metres* | |
| Handset Battery Life (average values) | 10 hours Talk Time**100 hours standby** |
| Number of Handsets Up to 5 | |
| Intercom Mode Yes | |
| Three-Way Conference (1 outside correspondent + 2 internal correspondents) | Yes |
| Electrical Connection/Base Mains Adaptor/Charger | Base main adaptor:Input: 100-240 W/50-60 Hz/0.15 AOutput: 6 V DC/450 mACharger adaptor:Input: 100-240 W/50-60 Hz/0.15 AOutput: 6 V DC/450 mAOnly use the adaptors supplied with the telephoneCaution: The network voltage is classified as a hazard by the criteria of this standard. |
| Telephone Connection Appliance designed for connection to a TNV3 class (telecommunications network voltage) analogues telephone line. | |
| Batterless AAA - 1.2 V - 400 mA | Only use the batteries supplied with the telephone.Use any other type of battery presents a risk of explosion.Used batteries must be disposed of in compliance with current environmental protection regulations. |
| Operating Temperature From 5°C to 40°C | |
§ Values may vary according to environment
Values may vary according to environment. ** Depending on initial battery charge.
Depending on initial battery charging
12. ENVIRONMENT
This symbol means that your inoperative electronic appliance must be collected separately and not mixed with the household waste.
This appliance has been designed and manufactured with high quality materials and components that can be recycled and reused. Electrical and electronic appliances are liable to contain parts that are necessary in order for the system to work properly but which can become a health and environmental hazard if they are not handled or disposed of in the proper way. Consequently, please do not throw out your inoperative appliance with the household waste.
If you are the owner of the appliance, you must deposit it at the appropriate local collection point or leave it with the vendor when buying a new appliance.
- If you are a professional user, please follow your supplier's
instructions.
- If the appliance is rented to you or left in your care, please contact your service provider.
Keon to preserve the environment, ATLINK5 has equipped this appliance with a switching power supply, offering better energy efficiency. The advantages include not only very low electricity consumption, but also a more compact format than the conventional power supply units used by the previous range.
The used batteries from your telephone (If it has batteries) must be disposed of in compliance with current environmental protection regulations. Comply with your local regulations. Return your batteries to your reseller or dispose of them at an approved recycling centre.
Help us protect the environment in which we live!
- ALCATEL
- # #
- USING YOUR PHONE
- Make a Call
- Preparatory Dialing
- Direct Dialing
- Dial from Direct Memory Keys
- Call from the Redial List
- Handset Speakerphone (Versatis F250 Only)
- PRIVATE PHONEBOOK
- Set the Ringer Volume
- Adjust Earpiece and Handsfree (Versatis F250
- Only) Volume
- During a call:
- Store Direct Memory Access Number
- TROUBLESHOOTING
- Add a New Phonebook Entry
- In id
- Call from the Phonebook
- In [M]
- CALLER DISPLAY (NETWORK DEPENDENT)
- REGISTRATION
- SAFETY
- ! Do not use your telephone to notify a gas leak when standing in the vicinity of the leak.
- View the Call List
- Call from the Call List
- In [4]
- PHONE SETTINGS
- TECHNICAL DETAILS
- ENVIRONMENT
Marque : ALCATEL
Modèle : Versatis F200 Duo
Catégorie : Téléphone