
Marine Digital Media MR1315WUA - Autoradio BOSS - Notice d'utilisation et mode d'emploi gratuit
Retrouvez gratuitement la notice de l'appareil Marine Digital Media MR1315WUA BOSS au format PDF.


| Type de produit | Autoradio marin numérique compatible MP3 |
| Marque | BOSS |
| Modèle | MR1315WUA |
| Alimentation | 12 V CC (11-15 V) |
| Consommation électrique | Moins de 10 A |
| Sortie audio | 2 canaux line out |
| Réponse en fréquence | 20 Hz - 20 kHz |
| Rapport signal/bruit | 50 dB (JIS) |
| Plages de fréquences radio | FM : 87,5-108 MHz (Europe) / 87,5-107,9 MHz (USA) ; AM : 522-1620 kHz (Europe) / 530-1710 kHz (USA) |
| Entrées audio | USB, SD/MMC, AUX avant, iPod (câble dédié) |
| Fonctions RDS | AF, TA, PTY, PI Seek |
| Contrôle iPod/iPhone | Prise en charge complète avec affichage des titres |
| Dimensions (approx.) | 1 DIN standard (environ 180 x 50 x 160 mm) |
| Poids (approx.) | Environ 1 kg |
| Entretien et nettoyage | Essuyer avec un chiffon doux et sec ; ne pas utiliser de produits liquides ou abrasifs |
| Sécurité | Installation antivol avec manchon de montage métallique ; fusible de protection |
| Pièces détachées et réparabilité | Contacter le service client BOSS pour les pièces et réparations |
| Informations générales | Autoradio entièrement marinisé, compatible MP3, avec télécommande incluse |
FOIRE AUX QUESTIONS - Marine Digital Media MR1315WUA BOSS
Questions des utilisateurs sur Marine Digital Media MR1315WUA BOSS
0 question sur cet appareil. Repondez a celles que vous connaissez ou posez la votre.
Poser une nouvelle question sur cet appareil
Téléchargez la notice de votre Autoradio au format PDF gratuitement ! Retrouvez votre notice Marine Digital Media MR1315WUA - BOSS et reprennez votre appareil électronique en main. Sur cette page sont publiés tous les documents nécessaires à l'utilisation de votre appareil Marine Digital Media MR1315WUA de la marque BOSS.
MODE D'EMPLOI Marine Digital Media MR1315WUA BOSS
MR1315WUA MR1315BUA
FULLY MARINIZED
FULL iPod® CONTROL
MP3-COMPATIBLE DIGITAL MEDIA RECEIVER
WITH USB AND SD MEMORY CARD PORTS AND FRONT PANEL AUX INPUT
11.2011
BOSS®
AUDIO SYSTEMS
3451 Lunar Court • Oxnard, CA 93030
www.bossaudio.com
800.999.1236
tech support: www.bossaudio.com/support

CE e1
iPod® is a trademark of Apple, Inc.
registered in the U.S. and other countries.
USER'S MANUAL
MR1315WUA
MR1315BUA
FULLY MARINIZED
FULL iPod® CONTROL
MP3-COMPATIBLE DIGITAL MEDIA RECEIVER
WITH USB AND SD MEMORY CARD PORTS AND FRONT PANEL AUX INPUT
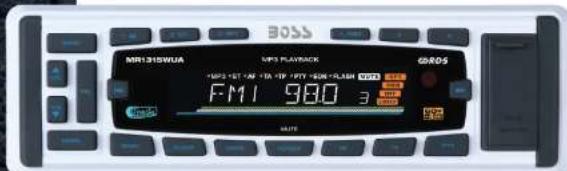
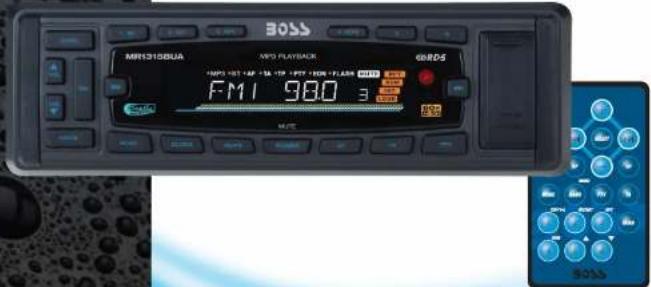
BOSS®
AUDIO SYSTEMS
Bone Audio Systems is not affiliated with Apple, Inc.
LOCATION AND FUNCTION OF CONTROLS
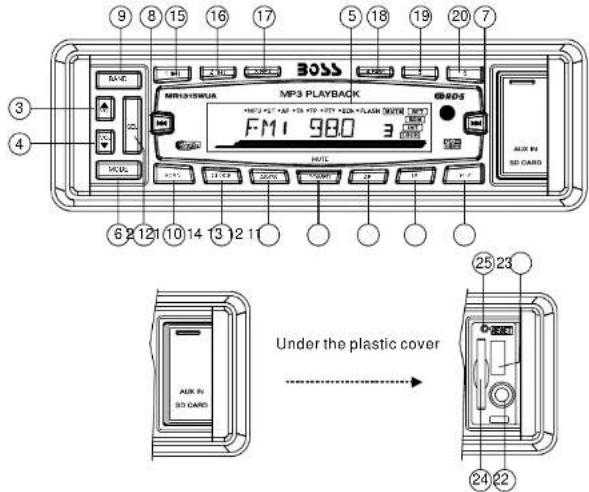
1. POWER BUTTON
When the unit is powered off, it will switch on by pressing any button except the RELEASE button.
2&3&4. SEL BUTTON (Select) AND VOL CONTROL BUTTON
a) Press the SEL button briefly, it is activated as selecting each mode of E. VOL. ->VOLUME ->BASS ->TREBLE ->BALANCE ->FADER -> When selecting a desired audio mode, press the VOL+ or VOL- button to adjust the audio effect. In each mode, the waiting time is about 5 seconds, and when the waiting time is over, it returns to the last display mode. The control mode of E.VOL is operated with following numeric display. - VOL: (MIN) 01,....46,(MAX). - BASS/TRE: -07, -06,...,00,...+06,+07 - BAL: 0LR9, 1LR9, ..., 9LR9,..., 9LR1, 9LR0 - FAD: 0FR9,1FR9,..., 9FR9,..., 9FR1, 9FR0
b) Press SEL button and hold for more than 2 seconds to turn on TA SEEK/TA ALARM mode, then press SEL button briefly and repeatedly to select PI SOUND/Pi MUTE, RETUNE L/RETUNE S, MASK DPI/MASK ALL, BEEP ON/BEEP OFF, USER SET (FLAT/CLASSIC/ROCK/POP), VOL LAST/VOL DEFA, STEREO/MONO(In RADIO mode), LOUD OFF/LOUD ON, DX/LOCAL (in RADIO mode), CLK ON/CLK OFF; CLK 12/24 mode. After selecting the desired mode, press the VOL- or VOL+ button to select one setup item of the desired mode.
Page1
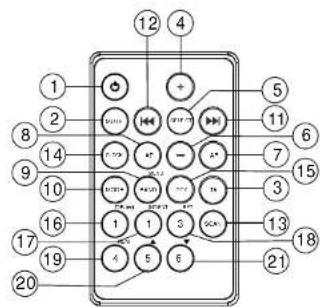
OPERATION OF REMOTE CONTROL
- Power On/Off.
- Mute Button
- Loudness Button
- Audio Level & Menu UP(+) Button
- SEL/MENU Button
- Audio Level & Menu Down(-) Button
- MO/ST Button
8.A.P Button
9.Band Button
During radio mode, Press and hold this button and press the pass word:543 (the pass word can not be reset) to the Text Mode. then press the VOL+ button to select as: EUROPE->MID EAST->AUST->RUSSIA->AMERICA1->AMERICA2->AMERICA3Frequency Coverage and then press SEL button to confirm the selecting mode and switch on the unit again. During IPOD mode, press BAND button to MEMU select, press 5 and 6 to up and down, and then press 2 to confirm the selecting.
-
Mode Button
-
Tune/Seek Up And Track Skip Up/FF Button
- Tune/Seek Down And Track Skip Down/REW Button
13.SCAN Button - Clock Display /Setting Button
- LOC/DX Button
- CD Track TOP/>||/Radio Preset 1
- CD Track INT/Radio Preset 2
- CD Track RPT/Radio Preset 3
- CD Track RDM/Radio Preset 4
- Radio Preset 5
- Radio Preset6
Specifications
| Supply voltage | : 12V DC(11V-15V) |
| Current consumption | : Less than 10A |
| Audio Signal Output | : 2ch line out |
| Characteristics | :(1) Frequency Response: 20Hz-20KHz(2) S/N Ratio: 50 dB(JIS) |
| (Europe) | (U.S.A.) | |
| FM | FM | |
| Frequency Coverage: | 87.5 to 108Mhz | 87.5 to 107.9Mhz |
| IF | 10.7Mhz | 10.7Mhz |
| Sensitivity (S/N = 30dB): | 20dBu | 20dBu |
| AM | AM | |
| Frequency Coverage: | 522 to 1620Khz | 530 to 1710Khz |
| IF | 450Khz | 450Khz |
| Sensitivity (S/N = 20dB) : | 45dBu | 45dBu |
NOTE:
Specifications and design are subject to modification, without notice, due to improvements in technology.
1) TA SEEK/TA ALARM:
TA SEEK mode: when newly tuned station does not receive TP information for 5 seconds, the radio returns to next station which has a different PI to the last station, but has the TP information.
When TP information gets lost at the current station for return time which is set by RETUNE SHORT(90 seconds) or RETUNE LONG(150 seconds), the radio starts to return to next same PI station. When same PI station does not receive in 1 cyclic search, the radio returns to next station with TP information.
TA ALARM mode: when this mode is selected, any automatic return mode is not activated. Only double beep sound(ALARM) will be heard.
When newly tuned station does not have TP information for 5 seconds, beeps are sounded.
When TP information gets lost at the current station for retune time, the beep sound will be heard.
When newly tuned station has no RDS signal, PI SEEK is suppressed.
2) PI SOUND/ PI MUTE:
PI SOUND mode: if a car cruises between buildings that could cause reflecting signals, a phenomenon may occur, due to different PI codes being received from the same AF source. when different PI sounds (DIP) are heard occasionally, this will happen for less than 1 second.
PI MUTE mode: under above same situation, a mute sound will be heard for less than1 second.
3) RETUNEL/RETUNES:
The initial time of automatic TA search or PI SEARCH mode is selected. When PI information is not received for return interval, the radio starts to return to next same PI station.
When same PI station does not receive 1 cyclic search, the radio goes to last station and waits for 4-5 minutes until PI code is received.
RETUNE L mode: selected as 150 seconds.
RETUNE S mode: selected as 90 seconds.
4) MASK DPI/MASK ALL
MASK DPI mode: masks only the AF which has different PI.
MASK ALL mode: masks the AF which has different PI and NO RDS signal with high field strength.
5) BEEP ON/BEEP OFF
BEEP ON mode: The beep is generated when any key is pressed. BEEP OFF mode: The beep sound is disabled.
6) VOL LAST/VOL DEFA
VOL LAST: The radio switches on at the actual volume it had when it was last switched off.
VOL DEFA: After pressing SEL button, AVOL will be displayed. Then you can pre-select a constant switch-on volume by using the VOL knob.
7) CLK ON/OFF
CLK ON: Clock will always show on the display when power off.
CLK OFF: Clock will disappear on the display when power off.
5. LCD Display
6. MODE BUTTON
Press it to select RADIO, CARD(after inserting MMC/SD card), USB(after inserting USB stick), IPOD (after connect IPOD cable) and AUX mode.
7&8. TUNE, SEEK, TRACK, SKIP UP / DOWN BUTTONS
a) During RADIO mode:
Press the >>| or |<< button briefly to manual tune up/down for the desired radio
station frequency step by step
Press and hold the >>| or |<< button for longer 0.5 seconds, to automatically tune
up/down for the radio station frequency of strong signal.
b) During SD/MMC & USB or IPOD mode:
Press the >>| button briefly to play next track.
Press the |<< button briefly to play the previous track.
Press the >>| or |<< button and hold to skip forwards or backwards. release to
resume normal playback.
9. BAND BUTTON
During radio mode, press the BND button briefly to select the radio broadcasting
band you would like to hear. The AM/FM band is toggled cyclically through the
tuning bands: ->FM 1->FM 2->FM 3->MW 1->MW 2->.
Press and hold this button and press the pass word:543(the pass word can not be
reset) to the Test Mode then press the VOL+ button to select as: EUROPE-> MID EAST
->AUST->RUSSIA->AMERICA1->AMERICA2->AMERICA3Frequency Coverage
and then press SEL button to confirm the selecting mode and switch on the unit again.
10. CLOCK BUTTON
Press the CLK button briefly to display time for 5 seconds on the display, and then returns to its previous display unless the button is pressed again.
Then press the CLK button and hold for more than 1 seconds until the real time
flashes on the display. Then you can adjust HOUR or MINUTE by pressing the VOL or VOL+ button.
11. PTY (PROGRAM TYPE) BUTTON
Press it briefly and repeatedly to select one of the following mode:
POP M--NEWS
While selecting PTY TYPE, its selection is implemented by preset buttons as described in preset key. (press one of the 6 preset buttons shortly and repeatedly to select the PTY TYPE in the preset button) When POP M or NEWS is on, the previous PTY program and PTY word is displayed on LCD. If there are no keys entered for 2 seconds, previously selected PTY is searched. During 1 loop, if desired PTY is not found, NO PTY is flashed, then return to previous normal radio and PTY icon goes off.
12. TA [TRAFFIC ANNOUNCEMENT] BUTTON
When pressing this button, TA mode is switched on or off.
When TA mode is on(TA is displayed on LCD), it will begin to seek TA station and TA
SEEK will be displayed on LCD for a while.
When traffic announcement is transmitted:
1). If the unit is in MMC/SD, USB,IPOD mode, it will switch to radio mode temporarily.
2). If volume level is below 20, volume level is raised to 20, and returns to its previous
mode and volume level when the traffic announcement is over.
If volume is adjusted during traffic announcement, only the traffic announcement
volume is valid
* TA interruption function:
The current traffic announcement is cancelled by pressing this key. But the TA mode
will not be off.
Wiring connection diagram
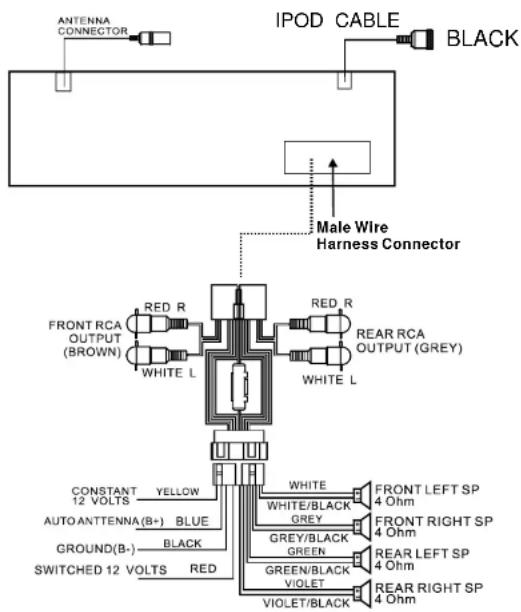
TROUBLE SHOOTING
Before using the check list please make all the connections first. If you still have questions after going through the checklist, please consult your local customer service representative.
| Common Symptoms | Cause | Solution |
| There is no power. | The car ignition is switched off. | If the power supply is properly connected to the car accessory, switch the ignition key to "ON" or "ACC". |
| The fuse has blown. | Replace another fuse according to the wiring diagram. | |
| There is no sound. | The volume control is set too low. | Turn up the volume properly. |
| The device has not been correctly connected. | Check the power and earth connection according to the wiring diagram. | |
| The operation keys do not work | The built-in microcomputer is not operating properly due to noise | Switch the device off and on again. Or press the RESET button to resume the program. |
| No radio reception. | The antenna cable is not connected. | Insert the antenna cable firmly into the antenna socket of the device. |
| In automatic search mode the radio does not stop at a transmitting station. | The transmission signals are too weak. | Tune in to a radio station manually. |
- When TA is on, SEEK, (SCAN), AUTO MEMORY function can be received or saved only when traffic program identification code has been received. When TA is ON, traffic program identification code is not received during specified time.
13. AF [ALTERNATIVE FREQUENCIES] BUTTON
When pressed briefly, AF switching mode is selected and the state of AF switching mode is displayed by AF segment in display.
Segment off: AF switching mode off.
Segment on: AF switching mode on, and has RDS Information.
Segment flashing: AF switching mode on, but RDS information is not received yet. When AF switching mode is selected, the radio checks the signal strength of AF all the time. The interval of checking time of each AFs depends on the signal strength of current station, from a few minutes for a strong station to a few seconds for weak station. Every time that new AF is stronger than current station, it switches over to that frequency for very short time, and NEW FREQUENCY is displayed for 1-2 seconds.
Because the mute time of AF switching or checking time is very short, it is almost inaudible in case of normal program.
During FM mode, when AF is on, SEEK. (SCAN), AUTO-MEMORY function can only receive and save RDS program.
14. AS/PS BUTTON (Auto-storage /Preset scan) During radio mode:
1) When pressing and holding for more than 1 second, the radio searches from the current frequency and checks the signal strength level until 6 station are found. And then the 6 stations are preset to the corresponding preset memory numbered bank. The auto-storage operation is implemented in each selected band. When the auto-storage operation is finished, the radio executes the Preset scan.
2) When briefly pressing, the radio searches for each preset station in the current band and holds at that preset number for 5 seconds while releasing mute, and then searches again.
During SD/MMC or USB mode:
Press the AS/PS button, this activates TRACK SEARCH mode:
In TRACK SEARCH mode, the LCD will display TRK T "0" and flashes the biggest digit 0 that the SD/MMC card or USB stick contains.
Then press the VOL+ or VOL- button to select the number of the flashing digit from 0 \~ 9. Then press SEL button to confirm the number and flash next smaller digit 0. With the same means, select the number of the flashing digit with VOL+/-.
After finishing selecting the number of all flashing digit, press SEL button to play the track of the selected serial number.
Press the AS/PS button twice, this activates TRACK SEARCH mode:
In FIRST CHARACTER SEARCH mode, the LCD will display A--....., If there are files names its first character A: the ..... is the first file name, its first character Is A by the order of A\~Z and 0\~9; otherwise, the ..... is NONE. (If there are some songs in character A, press the >>I and I<< to select your favourite.) Then press the VOL+ or VOL- button to select file's first character by the order of A\~Z and 0\~9. Press the AS/PS button thrice, this activates TRACK SEARCH mode:
In DIRECTORY SEARCH mode, the LCD will display the root folder(if there is no root folder, it will find a root folder named ROOT). Then press the VOL+ or VOL-button to select your desired folder and then press >> | or |<< button to select your desired track in the folder.
15-20. PRESET STATION MEMORY AND TOP/>||, INT, RPT, RDM BUTTONS
a) During radio mode:
When pressed briefly, these buttons select a preset station directly. If the six buttons are pressed for more than 2 seconds, the station currently being listened to is memorized into the selected preset button.
b) During SD/MMC & USB mode:
Press the TOP/>|| button briefly to interrupt the playback of the SD/MMC card or USB stick.
Press again to resume normal playback.
Press the INT button to play the first 10 seconds part of each track, and the LCD will display INT ON.
Press again to stop scan, while the currently selected track will be played, and the LCD will display INT OFF.
Press the RPT button to play the current track repeatedly, and the LCD will display RPT ONE.
Press again to cancel this function, and the LCD will display RPT OFF.
Press the RPT button twice continuously to play the tracks in the current folder repeatedly and the LCD display will show RPT ABM.
Press the RDM button to play all tracks in random order, and the LCD will display RDM ON.
Press again to cancel this function, and the LCD will display RDM OFF.
Press the radio preset button 6 and 5 button to move up and down10 tracks at a time. When the remaining total tracks are less than 10, then both buttons are inactive.
C) During IPOD mode:
Press the TOP/>|| button briefly to interrupt the playing track.
Press again to resume normal playback.
Press the RPT button to play the current track repeatedly,
Press again to cancel this function.
Press the RDM button to play all tracks in random order.
Press again to cancel this function.
press BAND button to MEMU select, press 5 and 6 to up and down, and then press 2 to confirm the selecting.
- SCAN BUTTON
Press the SCAN button to scan the radio frequency. If a valid signal has been detected, the current frequency will hold and beginblinking for 5 seconds, then press SCAN again to stop scan and remain on the current frequency; otherwise, the radio will go on to scan the other radio frequency 5 seconds later.
22.AUX INPUT JACK
Press the mode button to select auxiliary input playing mode. You can connect any matched external audio device to the auxiliary input jack. Use the volume control to adjust volume.
- USB SOCKET
When needing to play the file in the USB stick, insert the USB stick into the USB socket. The system will change into the USB mode automatically, and then play the first file in the USB.
- SD CARD SLOT
When you need to play the file in the MMC/SD card, Insert the MMC/SD card into the MMC/SD card slot. The system will change into the MMC/SD mode automatically, and then play the first file in the MMC/SD.
Note:
When MMC/SD card and USB stick are both inserted into their slot or socket, the system will change into the playback mode of the latter one.
- RESET BUTTON
Before operating the unit for the first time, or after replacing the car battery or changing the connections. You must reset the unit.
Press this button with a cuspidal object. This operation will erase the clock setting and some stored contents.
INSTALLATION METHOD
This is an anti-theft installation method.
The main unit has a METAL MOUNTING SLEEVE.
Please connect the wiring, eg, the Power Supply, the Speakers and the Antenna according to the requirements of this Instruction Manual, then install the metal mounting sleeve into the car as per the diagram illustrated below.
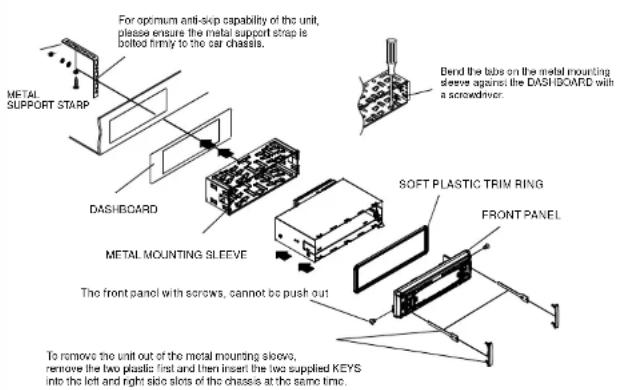
- POWER BUTTON
- 2&3&4. SEL BUTTON (Select) AND VOL CONTROL BUTTON
- OPERATION OF REMOTE CONTROL
- NOTE:
- 1) TA SEEK/TA ALARM:
- 2) PI SOUND/ PI MUTE:
- 3) RETUNEL/RETUNES:
- 4) MASK DPI/MASK ALL
- 5) BEEP ON/BEEP OFF
- 6) VOL LAST/VOL DEFA
- 7) CLK ON/OFF
- LCD Display
- MODE BUTTON
- 7&8. TUNE, SEEK, TRACK, SKIP UP / DOWN BUTTONS
- BAND BUTTON
- CLOCK BUTTON
- PTY (PROGRAM TYPE) BUTTON
- TA [TRAFFIC ANNOUNCEMENT] BUTTON
- TROUBLE SHOOTING
- AF [ALTERNATIVE FREQUENCIES] BUTTON
- AS/PS BUTTON (Auto-storage /Preset scan) During radio mode:
- INSTALLATION METHOD
Marque : BOSS
Modèle : Marine Digital Media MR1315WUA
Catégorie : Autoradio