Elite CDP - Lecteur/enregistreur de cd QUAD - Notice d'utilisation et mode d'emploi gratuit
Retrouvez gratuitement la notice de l'appareil Elite CDP QUAD au format PDF.


| Type de produit | Lecteur/enregistreur de CD |
| Marque | QUAD |
| Modèle | Elite CDP |
| Dimensions (L x H x P) | 430 x 100 x 320 mm |
| Poids | 8 kg |
| Alimentation | 230 V ~ 50 Hz |
| Consommation électrique | 25 W |
| Formats supportés | CD-Audio, CD-R, CD-RW |
| Fonctions principales | Lecture et enregistrement de CD, programmation de pistes, lecture aléatoire et répétée |
| Type de tiroir | Mécanisme à chargement par tiroir motorisé |
| Sorties audio | Analogique RCA, numérique optique et coaxial |
| Entrées audio | Analogique RCA, numérique optique et coaxial |
| Rapport signal/bruit | Supérieur à 105 dB |
| Distorsion harmonique | Inférieure à 0,003 % |
| Entretien et nettoyage | Utiliser un chiffon doux et sec. Ne pas utiliser de solvants. Nettoyer la lentille avec un disque de nettoyage spécifique. |
| Sécurité | Ne pas obstruer les fentes de ventilation. Ne pas exposer à l'humidité. Débrancher avant nettoyage. |
| Pièces détachées et réparabilité | Contacter un centre de service agréé QUAD. Indice de réparabilité : 7,5/10. |
| Accessoires fournis | Câble d'alimentation, télécommande, câble audio RCA, manuel d'utilisation |
| Informations générales | Appareil de la série Elite, finition argent ou noir. Garantie 2 ans. |
FOIRE AUX QUESTIONS - Elite CDP QUAD
Questions des utilisateurs sur Elite CDP QUAD
0 question sur cet appareil. Repondez a celles que vous connaissez ou posez la votre.
Poser une nouvelle question sur cet appareil
Téléchargez la notice de votre Lecteur/enregistreur de cd au format PDF gratuitement ! Retrouvez votre notice Elite CDP - QUAD et reprennez votre appareil électronique en main. Sur cette page sont publiés tous les documents nécessaires à l'utilisation de votre appareil Elite CDP de la marque QUAD.
MODE D'EMPLOI Elite CDP QUAD
Elite series
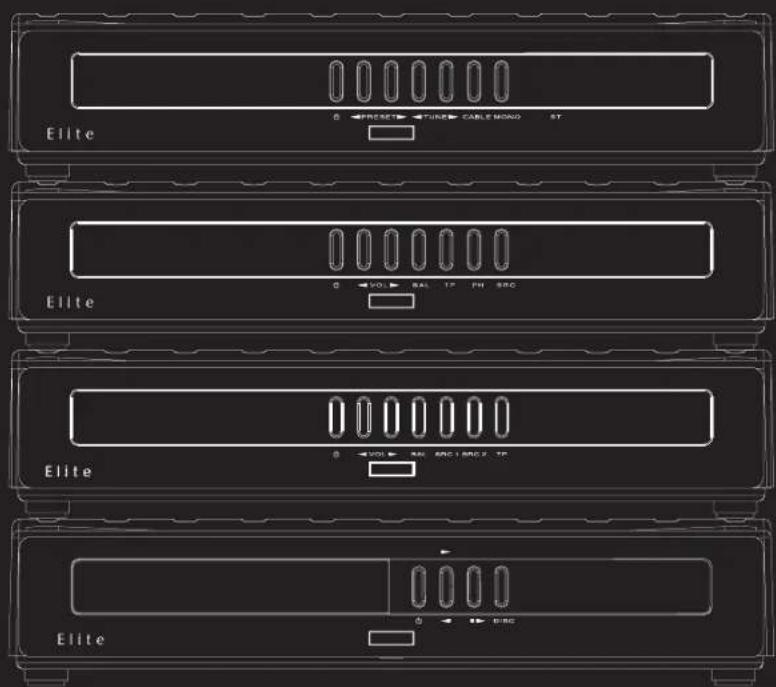
FM Stereo Tuner
Stereo Pre-Amplifier
Integrated Amplifier
CDP CD Pre-Amplifier
CDS Compact Disc Player
Owner's Manual
QUAD
the closest approach to the original sound


p_a.pdf 2011-8-29 12:26:41


IMPORTANT SAFETY INFORMATION

CAUTION!
RISK OF ELECTRIC SHOCK DO NOT OPEN

TO REDUCE THE RISK OF ELECTRIC SHOCK DO NOT REMOVE COVER (OR BACK) NO USER-REMOVEABLE PARTS INSIDE REFER SERVICING TO QUALIFIED PERSONNEL
ADVERTISSEMENT: RISQUE DE CHOC ELECTRIQUE-NE PAS OUVRIR

This symbol indicates that there are important operating and maintenance instructions in the literature accompanying this unit.

This symbol indicates that dangerous voltage constituting a risk of electric shock is present within this unit.
Read these instructions.
Keep these instructions.
Heed all warnings.
Follow all instructions.
Do not use this apparatus near water.
Clean only with dry cloth.
Do not block any ventilation openings.
Install in accordance with the manufacturer's instructions.
Do not install near any heat sources such as radiators, heat registers, stoves, or other apparatus (including amplifiers) that produce heat.
Do not defect the safety purpose of the polarized or grounding type plug. A polarized plug has two blades with one wider than the other. A grounding type plug has two blades and a third grounding prong. The wider blade or the third prong is provided for your safety. If the provided plug does not fit into your outlet, consult an electrician for replacement of the
ELECTRICAL INFORMATION
MAINS SUPPLY AND SAFETY
Mains Supply: The mains operating voltage of all QUAD Elite series units is shown on the rear panel. If this voltage does not match the mains voltage in your area, consult your QUAD dealer about converting the unit.
The mains supply fuse on the rear panel is accessible when the IEC mains plug has been removed. In the rare event that it has broken, check for any obvious cause before replacing the fuse with one of the correct rating and type. The fuse values are:
QUAD Elite Pre-amplifier and Integrated Amplifier
220 - 230V (UK, Korea, etc.) T1.0AL 20mm Slow Blow
100 - 120V (USA, Japan, etc.) T2.0AL 20mm Slow Blow
QUAD Elite CDP and CDS Compact Disc Player
220-230V (UK, Korea, etc.) T315 mAL 20mm Slow Blow
100 - 120V (USA, Japan, etc.) T630 mAL 20mm Slow Blow
Note: An AC convenience outlet is provided on the QUAD Elite Pre. Only double insulated audio equipment may be connected to this outlet. The load must not exceed 500w. QUAD 606, 306, 405 and 303 amplifiers must not be connected to this outlet but to a grounded AC mains point.
obsolete outlet.
Protect the power cord from being walked on or pinched, particularly at plugs, convenience receptacles, and the point where they exit from the apparatus.

Use only attachments/accessories specified by the manufacturer.
Use only with a cart, stand, tripod, bracket, or table specified by the manufacturer, or sold with the apparatus. When a cart is used, use caution when moving the cart/apparatus combination to avoid injury from tip-over.
Unplug this apparatus during lightning storms or when unused for long
periods of time.
Refer all servicing to qualified service personnel. Servicing is required when the apparatus has been damaged in any way, such as power-supply cord or plug is damaged, liquid has been spilled or objects have fallen into the apparatus, the apparatus has been exposed to rain or moisture, does not operate normally, or has been dropped.
Warning: To reduce the risk of fire or electrical shock, do not expose this product to rain or moisture. The product must not be exposed to dripping and splashing and no object filled with liquids such as a vase of flowers should be placed on the product.
No naked flame sources such as candles should be placed on the product.
Caution: Changes or modifications not expressly approved by the manufacturer could void the user's authority to operate this device.
Warning: The battery (battery or batteries or battery pack) shall not be exposed to excessive heat such as sunshine, fire or the like.
Attention should be drawn to environmental aspects of battery disposal.
Use of the apparatus in moderate climates.
Protective earthing terminal. The apparatus should be connected to a mains socket outlet with a protective earthing connection.

This label tells you that the unit contains a Laser component. Opening the unit will expose the user to radiation from the laser beam.
This equipment has been tested and found to comply with the limits for a Class B digital device, pursuant to part 15 of the FCC rules. These limits are designed to provide reasonable protection against harmful interference in a residential installation. This equipment generates, uses and can radiate radio frequency energy and, if not installed and used in accordance with the instructions, may cause harmful interference to radio or television reception, which can be determined by tuning the equipment off and on, the user is encouraged to try to correct the interference by one or more of the following measures:
Re-orientate or re-locate the receiving antenna. Increase the separation between the equipment and the receiver. Connect the equipment into an outlet on a circuit different from that to which the receiver is connected.
Consult the dealer or an experienced radio/TV technician for help.
-- Laite on liitettävä suojamaadoituskoskettimilla varustettuun pistorasiaan.(For Finland only)
-- Apparatet må tilkoples jordet stikkontakt. (Far Norway only)
-- Apparaten skall anslutas till jordat uttag. (For Sweden only)
WARNING: The mains plug/appliance coupler is used as disconnect device, the disconnect device shall remain readily operable.





QUAD
ELITE
USER GUIDE
Elite INT
Elite PRE
Elite FM
Elite CDP
Elite CDS
CONTENTS
SAFETY CAUTIONS ....IFC
MAINS SUPPLY AND SAFETY ....IFC
INTRODUCTION 2
GUARANTEE AND PRODUCT REGISTRATION 2
PACKING LIST AND UNPACKING THE EQUIPMENT ....2
INSTALLATION OF ELITE SERIES EQUIPMENT ....2
ELITE INT AMPLIFIER 6
ELITE PRE-AMPLIFIER 8
REMOTE CONTROL 9
TONE CONTROLS....11
ELITE FM STEREO TUNER....12
USING THE ELITE CDP (IN AN ELITE SYSTEM) 14
USING THE ELITE CDS (IN AN ELITE SYSTEM) 16
TROUBLESHOOTING....18
USING THE ELITE CDP (AS A STANDALONE CD PLAYER) .....19
USING THE ELITE CDS (AS A STANDALONE CD PLAYER)....23
SPECIFICATIONS....26
CARE & CLEANING....27
SERVICE ARRANGEMENTS 27




INTRODUCTION
The Quad Elite series is a matched range of equipment which can be connected using the Quadlink system. Please read this manual fully before you begin to install and use the equipment.
Product Registration and Warranty
QUAD equipment is guaranteed against any defect in material and workmanship for a period of one year from the date of purchase. Proof of purchase is required for Warranty claims.
Please complete and return the enclosed Warranty Registration form. Within the warranty period QUAD will undertake replacement of defective parts free of charge provided that the failure was not caused by misuse, accident or negligence. Your statutory rights within the territory in which you purchased the equipment are not affected by this warranty.
QUAD carries out regular reviews and reserves the right to adjust the specifications and performance from time to time.
UNPACKING THE EQUIPMENT
The Elite Pre-Amplifier carton contains:
- Elite Pre-Amplifier
• Elite System Remote Control
• One IEC mains lead
• One Quadlink cable
• Elite System Instruction Manual
• Warranty Registration Form.
The Elite Integrated Amplifier carton contains:
• Elite Integrated Amplifier
- Elite System Remote Control
• One IEC mains lead
• One Quadlink cable
• Elite System Instruction Manual
• Warranty Registration Form.
The CDP and the CDS CD player cartons each contain:
- Elite CDP or CDS Compact Disc Player
• One IEC mains lead
• One RCA stereo phono connecting cable
• CD-Remote Control Handset with batteries.
• Elite System Instruction Manual
• Warranty Registration Form
The FM Tuner carton contains:
- Elite FM Stereo Tuner
• One Quadlink cable.
• Warranty Registration Form.
• Elite System Instruction Manual
Consult the dealer from whom you purchased the equipment if any of these items are not present.
Carefully unpack all the units and accessories. Take care not to damage the surface finish when undoing the protective polythene sleeve. Retain the packing materials for future use.
Retain the user manual and information concerning the date and place of purchase of your equipment for future reference. If you transfer any unit to a third party please pass on this instruction manual along with the equipment.
INSTALLATION
Connecting Elite Series Units
Place the Quad Elite system components in the order shown in
the typical system diagrams on this page and the next page.
Before connecting any units, ensure that the mains switches on the rear panels of ALL units are OFF and that the power is off at the mains sockets.
THE QUAD ELITE SYSTEM -1
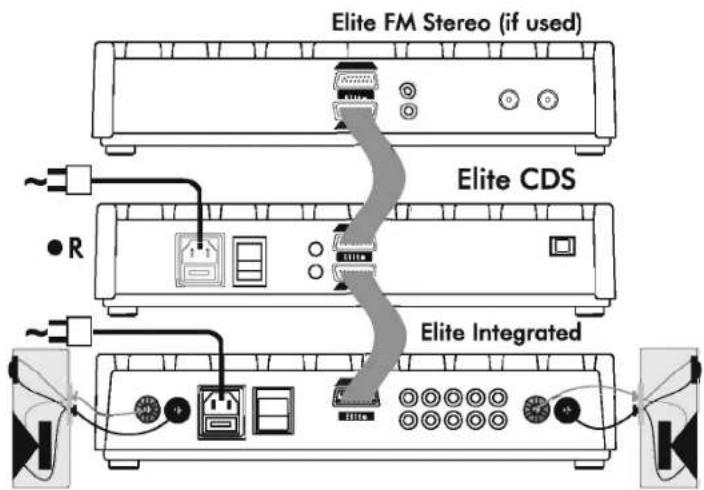
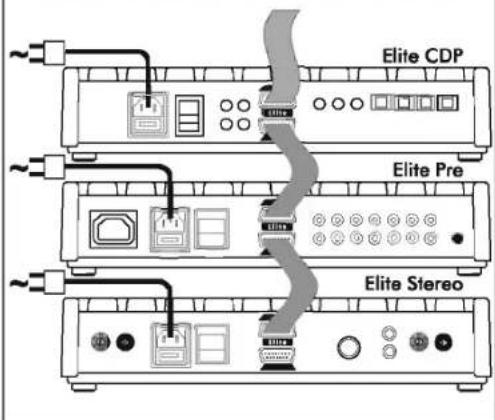
Connect the units together with the special Quadlink cable supplied with each unit. Starting with the lowest unit, connect the upper socket of the lower unit to the lower socket of the next unit above until you have a daisy chain.

IMPORTANT NOTE: ONLY Quad Elite and 99 Series units may be interconnected via the Quadlink system. Other QUAD equipment must be connected to Elite system components via the RCA sockets (see P.5).
THE QUAD ELITE SYSTEM -2

HIGH POWER SYSTEM WITH TWO ELITE MONO AMPLIFIERS
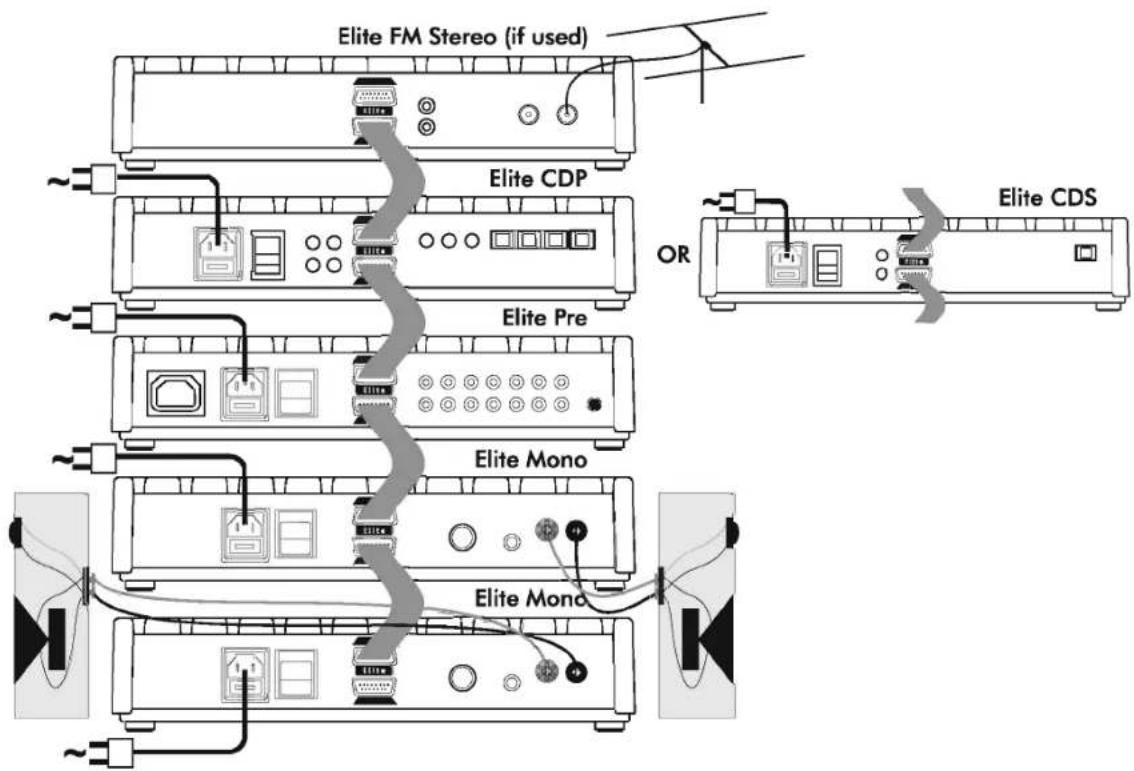






BI-AMPLIFIED SYSTEM WITH TWO QUAD ELITE STEREO POWER AMPLIFIERS

CONNECTING THE QUAD ELITE INTEGRATED AMPLIFIER
TO A NON-QUAD ELITE SERIES POWER AMPLIFIER FOR BI-AMPLIFICATION

flowchart
graph TD
    A["Other Quad Elite sources CD Player, tuner, etc"] --> B["Quad Elite Integrated"]
    B --> C["SPEAKER"]
    B --> D["SPEAKER"]
    B --> E["SPEAKER"]
    B --> F["L"]
    B --> G["R"]
    B --> H["INPUT"]
    B --> I["Stereo Amplifier"]
    style A fill:#f9f,stroke:#333
    style B fill:#ccf,stroke:#333
    style C fill:#cfc,stroke:#333
    style D fill:#fcc,stroke:#333
    style E fill:#cff,stroke:#333
    style F fill:#ffc,stroke:#333
    style G fill:#cfc,stroke:#333
    style H fill:#fcc,stroke:#333
    style I fill:#cfc,stroke:#333


CONNECTING EXTERNAL SOURCES TO THE ELITE INTEGRATED AMPLIFIER


THE QUAD ELITE INTEGRATED AMPLIFIER
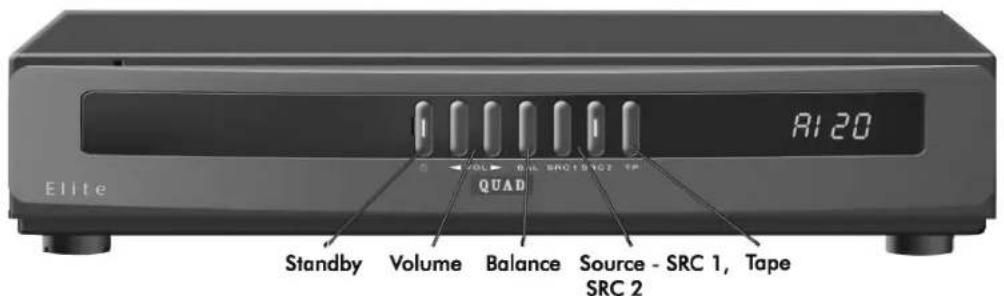
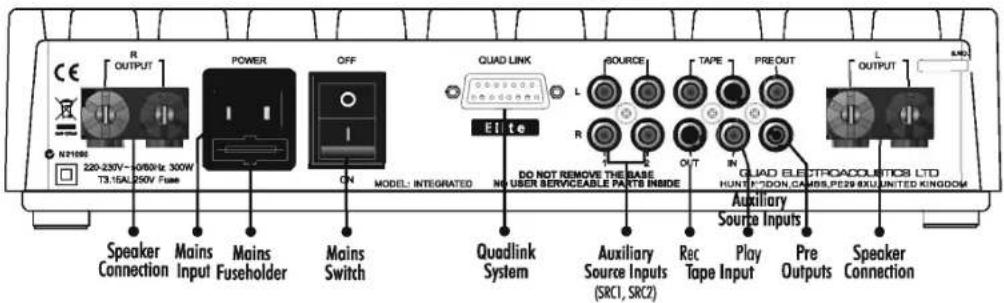

MAINS SWITCH
The Mains Switch is on the rear panel. The pre-amplifier should normally be left switched on and put into standby when not in use. If you are likely to leave it unattended for long periods, switch the unit off and unplug the cord at the mains point.
BASIC FRONT PANEL OPERATION
Basic operation may be carried out from the Front Panel. Advanced functions are available via the system handset.

STANDBY
Pressing the Standby button switches the unit (and all connected Elite units) in and out of standby. The Standby button glows white when the unit is active and red when it is in the standby mode.

SELECTING A SOURCE
Repeatedly press the Source button to scroll through all inputs in the sequence below.
| INPUT | SRC 1 | RI | |
| SRC 2 | RE | DISPLAY | |
| CD | Cd | ||
| Tuner | EU |

VOLUME
The Volume buttons increase and decrease the volume level. Maximum volume is reached when the display reads "32". If the sound appears distorted at any time, reduce the setting.

BALANCE
To change the channel balance press Balance once. Adjust the balance using the Volume buttons. After a few seconds the display reverts to the volume level.
| Balance Central |
| Cd -- |
| Bal. at extreme Right |
| Cd -9 |
| Bal. at extreme Left |
| Cd 9- |

TAPE MONITOR
Press Tape to listen to a tape recording. Press any other input button to deselect the Tape function.
| Tape Monitor ON | |
| tP | 16 |
When Tape is selected the Monitor light comes on with the display. After a few seconds the
display reverts to show the source input but the Monitor light stays on. When Tape is deselected this light goes off.
Only when the Tape Monitor light is off will you be able to listen to other sources e.g. CD.
To record a source:
Select the source

Cd 20
During recording:
Standard Recorder: (CD recorder, minidisc, 2 head tape recorder, etc). The tape monitor light should be off.
Three Head Tape Deck:
Monitor light off - listen to the source.
Monitor light on - listen to the tape recording.
Consult your recorder handbook for full details.
HANDSET OPERATION OF THE INTEGRATED AMPLIFIER

STANDBY: Press to activate all Elite units. The display shows the system as it was when last used.
AI 2U

TAPE: Press to switch Tape Monitor on. Press any other input key to switch Tape Monitor off.
EP 20

AUX 1: Select Aux 1
81 20

AUX 2: Select Aux 2
A2 20

MUTE: Press to set system volume to 0. Press to restore. When Mute is on the display flashes:
Cd -- ↔ Cd 20

VOLUME:
Press the upper Volume button to increase the volume.
Press the lower volume button to decrease the volume.

BALANCE:
Press the upper balance button to adjust the Balance to the Right
Press the lower balance button to adjust the Balance to the Left.

SENSITIVITY:
Adjust Line sensitivity.


THE QUAD ELITE PREAMPLIFIER

Standby Volume Balance Tape Phono Source

MAINS SWITCH
The Mains Switch is on the rear panel. The pre-amplifier should normally be left switched on and put into standby when not in use. If you are likely to leave it unattended for long periods, switch the unit off and unplug the cord at the mains point.
BASIC FRONT PANEL OPERATION
Basic operation may be carried out from the Front Panel. Advanced functions are available via the system handset.

STANDBY
Pressing the Standby button switches the unit (and all connected Elite units) in and out of standby. The Standby button glows white when the unit is active and red when it is in the standby mode.

SELECTING A SOURCE
Repeatedly press the Source button to scroll through all inputs in the sequence below.
| INPUT | Aux 1 | RI | |
| Aux 2 | R2 | ||
| Aux 3 | R3 | DISPLAY | |
| CD | Cd | ||
| Phono | PH | ||
| Tuner | tU |

PHONO INPUT
Press the Phono button to select the tumtable (record player) input. There are settings for Moving Coil and Moving Magnet cartridges. When initially pressed the button displays either PH (moving coil) or PL (moving magnet). To change the setting hold down the Phono button for 5 seconds.

VOLUME
The Volume buttons increase and decrease the volume level. Maximum volume is reached when the display reads "32". If the sound appears distorted at any time, reduce the setting.

BALANCE
To change the channel balance press Balance once. Adjust the balance using the Volume buttons. After a few seconds the display reverts to the volume level.
Balance Central
| PH | bR-- |
| Bal. at extreme Right | |
| PH | bR-9 |
| Bal. at extreme Left | |
| PH | bR9- |

TAPE MONITOR
Press Tape to listen to a tape recording. Press Tape again to deselect the Tape function.
Tape Monitor ON
| tP on |
| Tape Monitor OFF |
| tP off |
When Tape is selected the Monitor light comes on with the display. After a few seconds the
display reverts to show the source input but the Monitor light stays on. When Tape is deselected this light goes off.
Only when the Tape Monitor light is off will you be able to listen to other sources e.g. CD.
To record a source:
Select the source

Cd 20
During recording:
Standard Recorder: (CD recorder, minidisc, 2 head tape recorder, etc). The tape monitor light should be off.
Three Head Tape Deck:
Monitor light off - listen to the source.
Monitor light on - listen to the tape recording.
Consult your recorder handbook for full details.

ELITE REMOTE CONTROL HANDSET
Introduction
Most of the controls available on the front panel are also available on the Elite System Handset. However some features of the Elite system are available only from the handset. Generally it will be found more convenient to operate the Elite system from the System Handset
Fitting and Replacing Batteries
To fit the batteries, open the compartment cover on the rear of the handset. Fit the supplied AAA batteries in the correct alignment as printed in the battery compartment.
When the operation of the handset becomes uncertain or when it becomes necessary to hold the handset close to the Pre-Amplifier, the batteries may need replacement. Always replace batteries with the correct size and type. Old batteries should be safely disposed of.

HANDSET KEYPAD
BATTERY
COMPARTMENT

natural_image
Two vertical batteries with positive and negative terminals, no text or symbols visibleSYSTEM HANDSET FUNCTIONS
(Only for Elite Pre/FM/CDP/CDS. As for Elite INT, please refer to P7.)

STANDBY: Press to activate all Elite units. The display shows the system as it was when last used.
$$ \begin{array}{c c} \text {PH} & 2 0 \ \hline \end{array} $$

CD: Selects only the Elite CDP, or CDS
$$ \begin{array}{c c} \text {cd} & 2 0 \ \hline \end{array} $$

TUNER: Selects only the Elite FM Stereo.
$$ \begin{array}{c c} \text { EU } & 2 0 \ \hline \end{array} $$

PHONO: Selects the turntable
$$ \begin{array}{c c} \text {PH} & 2 0 \ \hline \end{array} \quad \text {or} \quad \begin{array}{c c} \text {PL} & 2 0 \ \hline \end{array} $$

TAPE: Toggles the Tape Monitor on and off
$$ \text { tP } \quad \text { on } \quad \longleftrightarrow \quad \text { tP } \quad \text { off } $$

AUX 1:Select Aux 1
$$ \boxed {A 1} \quad 2 0 $$

AUX 2: Select Aux 2
$$ \begin{array}{c c} \text {A2} & 2 0 \ \hline \end{array} $$

AUX 3:Select Aux 3
$$ \boxed {A 3} \quad 2 0 $$

MUTE: Press to set system volume to 0. Press to restore. When Mute is on the display flashes:
$$ \boxed {C d} \quad \text { - - - } \quad \longleftrightarrow \quad \boxed {C d} \quad 2 0 $$

VOLUME:
Press the upper Volume button to increase the volume.
Press the lower volume button to decrease the volume.

BALANCE:
Press the upper balance button to adjust the Balance to the Right
Press the lower balance button to adjust the Balance to the Left.
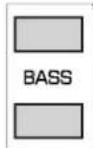
BASS: There is one setting of boost and one of cut.
Press the upper button to boost the bass.
Press the lower button to cut the bass.
$$ \begin{array}{l} \text { BOOST } \left[ \begin{array}{c c} d & b S r _ {7} \end{array} \right] \ \text { LEVEL } \quad \text { Cd } \quad \text { bS-- } \ \text { CUT } \quad [ d \quad b 5 ] \ \end{array} $$
Note: Before the Bass or any tone control is operated, the EQ function must first be enabled.
$$ \text { See } \boxed {\mathrm{EQ}} $$

PLAY: QUAD ELITE CDP, CDS only Play a CD

STOP: QUAD ELITE CDP, CDS only Stop a CD while playing

PAUSE: QUAD ELITE CDP, CDS only Pause a CD while it is playing

OPEN/CLOSE: ELITE CDP, CDS only Open and close the CD drawer

NUMBER KEYPAD: Choose a track - ELITE CDP, CDS only Choose a preset station - ELITE FM STEREO

STORE: Store a track or program - ELITE CDP, CDS Store a station - ELITE FM STEREO

REPEAT: Repeat a CD from the start - ELITE CDP CDS

NEXT: Move up to the next track - ELITE CDP, CDS Move up to the next preset - ELITE FM STEREO

PREVIOUS: Move to the previous track - ELITE CDP, CDS Move to the previous preset - ELITE FM STEREO

TILT: Use this to adjust tonal balance - ELITE PRE Note: EQ function must be enabled - see

STEREO/MONO: Force mono reception on/off - ELITE FM STEREO

SEARCH UP: Fast forward through tracks - ELITE CDP, CDS Search and tune a station - ELITE FM STEREO

SEARCH DOWN: Fast reverse through tracks - ELITE CDP, CDS Search and tune a station - ELITE FM STEREO

FILTER: Toggle treble cut on/off Note: EQ function must be enabled - see

CABLE/ANTENNA - ELITE FM STEREO Select standard or cable aerial input

TUNE UP: Scroll through digital inputs - ELITE CDP Manually tune a station - ELITE FM STEREO

TUNE DOWN: Scroll through digital inputs - ELITE CDP Manually tune a station - ELITE FM STEREO

SENSITIVITY: Adjust Line/Phono sensitivity - ELITE PRE

EQUALISATION: Enable/disable tone controls - ELITE PRE. EQ must be enabled for tone controls to operate.
ADVANCED HANDSET OPERATION
The basic functions of the QUAD Elite Pre (Volume, Input selection, and tape monitor) have been described in previous sections. This section deals with advanced settings and operation.

ALTERING THE PHONO SENSITIVITY
To minimise noise and distortion, a phono cartridge needs to be matched to the pre-amplifier input. There are three sensitivity levels. To alter the sensitivity, press Phono and then press the Sens button repeatedly to cycle between them. The settings and displays are shown below.

5 V MC Input 300 V MC Input 100 V PS PH 300 PH .100 5mV MM Input 3.00mV MM Input 1.00mV PS PL 300 PL 100
ALTERING THE LINE LEVEL INPUTS
Source units can differ widely in output levels. This may cause large volume swings when switching between sources. To help minimise these swings the input sensitivity of Aux 1, Aux 2, Aux 3 and Tape can be altered.
Three sensitivity levels are available. To alter the sensitivity of the Aux inputs, press the required input and press the Sens button repeatedly to cycle between them.
Aux 1 Input 775mV AI 775
Aux 2 Input 300mV A2 300
Aux 3 input 100mV A3 100

ALTERING THE TAPE SENSITIVITY
Three sensitivity levels are available. To alter the sensitivity of the Tape input, press Tape and press the Sens button repeatedly to cycle between the settings which are the same as the line level inputs.
TONE CONTROLS
For a detailed explanation of the tone controls see the end of this section.

SELECTING EQ (EQUALISATION)
Equalisation must be set to ON for the functions described below to work. When EQ is off the tone controls are bypassed and the pre-amplifier response is set "Flat".

TILT
Press to cycle through the seven different settings. The displays are shown below.
BASS LIFT TREBLE CUT
| MIN | MED | MAX | |||
| Cd | tL^71 | Cd | tL^72 | Cd | tL^73 |
BASS CUT TREBLE LIFT
| [ d ] | [ d ] | [ d ] |
NO TILT
Cd EL-0
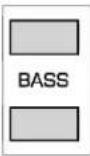
BASS: There is one setting of boost and one of cut.
Press the upper button to boost the bass. Press the lower button to cut the bass.
BOOST Cd bSrr LEVEL Cd bS-- CUT Cd bS

FILTER:
Press Filter to toggle the treble cut filter on and off.
Cd Flon
Cd FL--
APPENDIX 1
WHAT THE TONE CONTROLS DO.
QUAD tone controls are designed to overcome problems of tonal balance without adding distortion. The tone controls should be operated via the handset but they can be operated from the front panel as shown in Appendix 2. The tone controls are only active when the Equalisation function is enabled.
Tilt
Tilt shapes the frequency response about a central point. There are six settings and flat. Tilt allows you to add warmth or life to a recording. The graph shows the shape of the different settings:

line
| Frequency | Gain dB | | --------- | ------- | | 20 Hz | +3 | | 40 Hz | +2 | | 100 Hz | +1 | | 300 Hz | 0 | | 1 KHz | -1 | | 3 KHz | -2 | | 10 KHz | -3 | | 20 KHz | +3 |Bass Contour
The Bass control has one position of lift and one of cut. This can be used to rectify deficiencies in a recording or to compensate for poor room acoustics, e.g. where speakers are placed too close to a corner, etc.
Bass Contour

line
| Freq. Hz | Gain dB | | -------- | ------- | | 15 | 0 | | 30 | +4.5 | | 60 | +4.5 | | 300 | 0 |Treble Filter
The Treble Filter gently rolls off frequencies above 7 KHz. It will help to reduce the effects of excessively bright recordings, and hiss and scratches on older (particularly vinyl) records.
APPENDIX 2
FRONT PANEL OPERATION OF THE TONE CONTROLS
Setting the Equalisation
Press Balance five times until "EQ" is displayed and then press either Volume button to toggle the EQ on or off.

If the EQ function is off the tone controls cannot be adjusted.
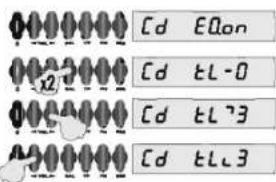
Operating the Tilt Control
Ensure EQ is enabled
Press BAL twice
Press VOL▶ to slope Tilt up
Press ◀VOL to slope Tilt down
Adjusting the Bass
Ensure EQ is enabled
Press BAL three times
Press VOL▶ to select Bass Boost
Press ◀VOL to select Bass Cut

Operating the Treble Filter
Ensure EQ is enabled
Press BAL four times
Press ▶VOL▶ to toggle the Filter on and off

THE QUAD ELITE FM STEREO TUNER
Connecting an Aerial
There are two 75Ω co-axial sockets on the rear panel for aerial or cable signals.
There are two types of Aerials in current use.
Regular Aerials: The performance of your aerial is the performance of your tuner. Ideally you should use a professionally installed multi-element FM aerial mounted on the roof, or in the loft. If you are close to a transmitter, you may be able to use an indoor aerial, but reception may be noisy and distorted, particularly in stereo.
Cable: This is typically a boosted FM signal provided by cable or satellite operators. The Cable input sensitivity is specially tailored to accept these boosted signal levels.
If you plug a normal aerial into the cable input, you will lose much of your signal strength. Plugging a cable feed into the aerial input may cause input overload and distortion.
Line Output Connections
There is a line level phono output available for direct connection to the input of a DAT, CD or tape recorder.
FRONT PANEL OPERATION
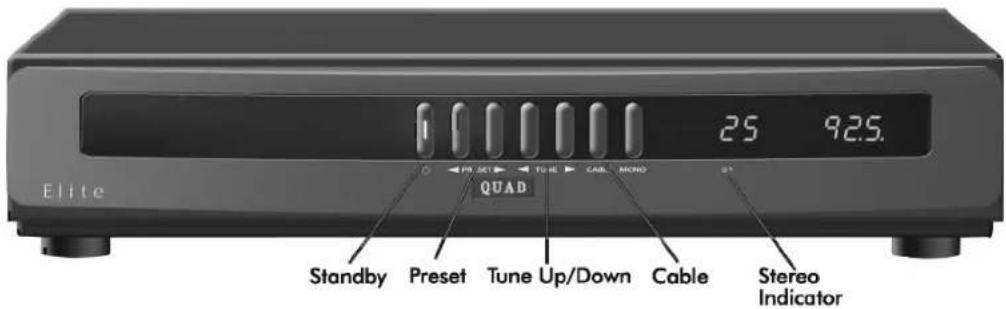
Tuning and Signal Displays

*Frequencies are displayed in MHz. As the tuner scans in 50kHz steps, the final dot indicates that the frequency is 50kHz above that displayed: (i.e 92.55 MHz is shown as 92.5.).

STANDBY
Press the Standby button to bring the Elite system into and out of Standby. The Standby light is white when operational and red in Standby.

SELECTING AN AERIAL
Press the Cable button on the front panel to toggle between the Standard input and the Cable input. When the Cable button is illuminated, the Cable input is selected.
TUNING A STATION

Give a short press to tune manually in decreasing frequencies.

Give a short press to tune manually in increasing frequencies.
A short press on the button as indicated will tune up or down the band in 50kHz steps.

Give a long press to auto-tune in decreasing frequencies.

Give a long press to auto-tune in increasing frequencies.
Press and hold the button briefly as indicated and the tuner will scan up or down in increments of 50kHz until a station is detected. The scan will then stop and the station will play.
When the scan is in progress: Press either tune button once to stop the scan.

FORCED MONO OPERATION
20 1025
Press the MONO button. The stereo indicator will extinguish. The indicator on the MONO button will now light. If the station is broadcasting mono, pressing the MONO button has no effect.

STORING A STATION IN A PRESET
Repeatedly press a preset button to select the number.
20 1025

Tune in the station
20 925

Hold down one preset button
20 ----
The display flashes dashes alternating with the frequency
x4
The display then changes to:
20 925
Release the Button. The Preset is now stored.
20 PSEE
To play a preset station: Repeatedly press a Preset button until you reach the desired number.
To re-allocate a preset: Repeatedly press a Preset button until you reach the desired number. Tune and store the new station using the procedure described above.
HANDSET OPERATION OF THE TUNER

STANDBY
Press Standby to activate all Quad Elite units. The display shows the system as it was when last used.

Press Tuner to select the Elite FM Stereo Tuner..

SELECTING AN AERIAL
Press the CABLE/ANT button to toggle between Cable and Aerial inputs.

MANUAL TUNING
Repeatedly press a button to advance the tuning in 50kHz steps.
Keep the button pressed to speed up the scan.
Release the button to stop the scan
AUTO TUNING
Press the key once to start the search in the desired direction.
When the tuner detects a station it will stop.
Press a key to resume the search if needed.
SELECTING A PRESET USING NUMBER KEYS
Enter a required number (from 1 - 25)
If you start by pressing '1' or '2' the display will briefly wait for you to press another number before selecting the station.
SELECTING A PRESET WITH NEXT/PREVIOUS
Press NEXT to choose the next number up
Press PREVIOUS to choose the next number down.

STORING A STATION IN A PRESET
Choose a preset
Tune in the desired station.
Press STORE to store the preset.
USING THE CDP COMPACT DISC PLAYER IN AN A QUAD ELITE SYSTEM
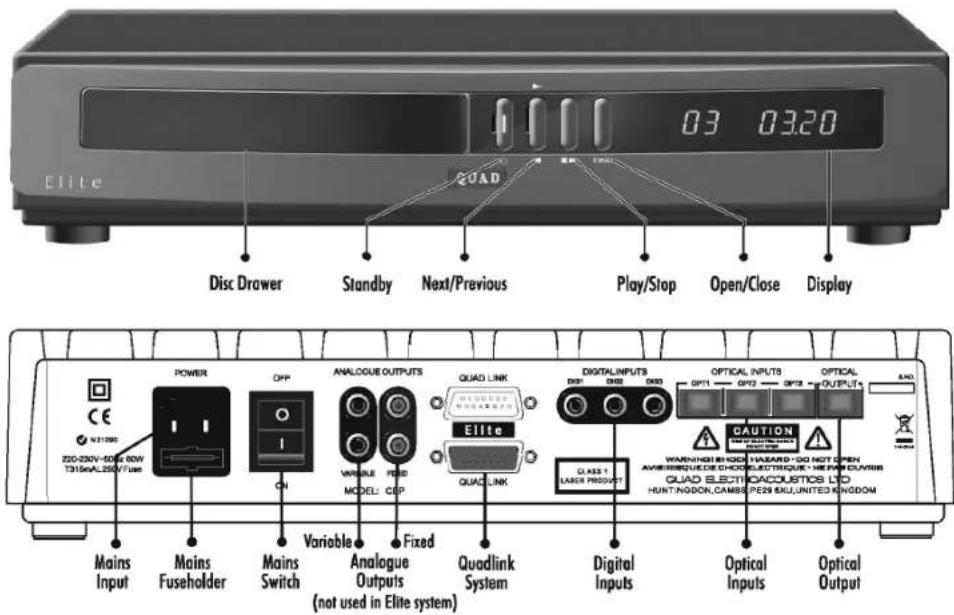
DIGITAL CONNECTIONS
The CDP accepts three optical and three digital inputs. Minidisc and DAT players, or Digital Audio Broadcast tuners (DAB) will be significantly improved by connecting their digital outputs to the CDP. The CDP can accept incoming PCM digital signals to a maximum resolution of 24bit/96kHz.
The stereo output of DVD players can be enjoyed at higher levels of fidelity by connecting the digital or optical output of the DVD player to the relevant input of the CDP. In the DVD player's menu, the digital output option should be set to 'PCM'.
Digital Inputs: These are via single 75 ohm RCA phono leads connected between source and the CDP. Your dealer will be able to supply you with a suitable digital RCA phono cable.
Optical Input: The optical inputs are blanked off when not in use. Remove the blanking plug from the chosen input of the CDP and the source component and connect an optical TOSlink cable between them. Retain the plugs for future use.
Optical Output: This is a TOSlink output for connection to a unit having an onboard Digital to Analogue Converter(DAC)
OPERATION
The CDP may be operated from the front panel or the remote handset. The front panel controls allow basic operation; handset operation is required for the advanced features.
The CDP is supplied with a dedicated handset. Virtually all the functions of this handset are available with the system handset with the exception of Random play and Display Off. We suggest you use the Elite system handset unless these functions are essential for your listening pleasure.
When you load a CD the player has to determine the format before it can display track/time information. This takes 2 - 8 seconds during which the mechanism will whirr. This noise will also occur when you open and close the drawer without inserting a CD, and is normal.

MAINS SWITCH
The Mains Switch is on the rear panel. The unit should normally be left in standby when not in use. If you are likely to leave the system unattended for long periods, switch off and unplug the cord.
FRONT PANEL OPERATION
STANDBY

Depress the Standby button to bring all Elite system units into and out of Standby.
Cd
The Display briefly shows the default input (CD)

LOADING A CD
Press the DISC button. The disc drawer will open. Load a disc label side up into the tray. Press DISC again to close the drawer.


PLAYING A CD
Press Play. Play will commence from Track 1.
01 001

SELECTING A TRACK
To go forward: Press the upper part of the Next/Previous key. The player will go to the start of the next track.
To go back: Press the lower part of the Next/Previous key once. The CD will go to the start of the previous track.

STOPPING A CD WHILE PLAYING
Press PLAY. The disc will stop
HANDSET OPERATION OF THE CDP

STANDBY
Press STANDBY to activate all Elite units. The display shows the system as it was when last used.

CHOOSING AN INPUT
Press CD. Pressing CD will always select the CD and deselect all digital sources.

To choose a Digital or Optical input:
Press the CD button.
Press the TUNE UP or TUNE DOWN buttons. This will cycle the digital inputs in the order: Dig 1, Dig 2, Dig 3, Opt 1, Opt 2, Opt 3.

Digital Indications: Suppose Dig 1 is selected:
The input and the sampling frequency is briefly displayed

If the source is disconnected or switched off:
The display flashes 'No Signal' twice, and reverts

When you select a digital input, the CDP will look for a digital stream to lock onto. If, after the input is selected you switch the digital source off this lock will be defeated. If you wish to confirm whether a digital signal is present, reselect the input.

LOADING A CD
Select CD.
Open the drawer. Place a CD (label side up) in the drawer. Close the drawer.
The display determines and displays track and time information


PLAYING A CD
Press PLAY. Play will commence from track 1 01 001

SELECTING A TRACK
Select a track number. Press Play


SKIPPING A TRACK
Press once to go to the start of the next track. Press repeatedly to go forward several tracks.

Press once to go to the start of the previous track. Press repeatedly to go back several tracks.

If you press NEXT during the final track:


FORWARD AND REVERSE SEARCH
Press and hold to search forward. At the end of the track the search stops.

Press and hold to reverse search. The search stops at the start of the track.

CHANGING TRACKS DURING PLAY
Select the new track from the number keypad. You do not need to press PLAY.
If there are 10 tracks or more on a disc, when selecting a single digit track the CDP will wait briefly for a second digit if appropriate. If none is entered the track will start.
If you try to select a track number that is unavailable, the CDP briefly indicates this. If a track is currently playing it will keep on playing the track. If the disc is stopped, nothing will happen.

RE-STARTING A TRACK DURING PLAY
Press PLAY


PAUSE
Press PAUSE. The track will pause

Press PAUSE again to resume play.

STOPPING THE DISC
Press STOP

PROGRAMMING A DISC
You can customise the number and the play order of tracks in a program This function is only available when the disc is stopped.
EXAMPLE: Storing a 2 track Program

To Erase a program:
Press STOP twice


TO REPEAT PLAY A DISC
Press REPEAT.

To Cancel Repeat: Press REPEAT again.

The disc will play from that point and stop.
To repeat a track or tracks: Make a program of one or more tracks as described above. Press REPEAT to repeat the program.
USING THE CDS COMPACT DISC PLAYER IN A QUAD ELITE SYSTEM

OPERATION
The CDS may be operated from the front panel or the remote handset. The front panel controls allow basic operation; handset operation is required for the advanced features.
The CDS is supplied with a dedicated handset. Virtually all the functions of this handset are available with the Elite system handset with the exception of Random play and Display Off. We suggest you use the Elite system handset unless these functions are essential for your listening pleasure.

MAINS SWITCH
The Mains Switch is on the rear panel. The unit should normally be left in Standby when not in use. If you are likely to leave the system unattended for long periods, switch off and unplug the cord.

PLAYING A CD
Press Play.
Play commences from track 1.

SELECTING A TRACK
To go forward: Press the upper part of the Next/Previous key. The player will go to the start of the next track.

To go back: Press the lower part of the Next/Previous key once. The CD will go to the start of the previous track.

STOPPING A CD WHILE PLAYING
Press PLAY. The disc will stop
FRONT PANEL OPERATION

STANDBY
Depress the Standby button to bring all Elite system units into and out of Standby.


LOADING A CD
Press the DISC button. The disc drawer will open. Load a disc label side up into the tray. Press DISC again to close the drawer.


HANDSET OPERATION OF THE CDS

STANDBY
Press STANDBY to activate all Quad Elite units. The display shows the system as it was when last used.

LOADING A CD
Select CD.
Open the drawer. Place a CD (label side up) in the drawer. Close the drawer. The display determines and displays track and time information

LoRd
→
23 6820

PLAYING A CD
Press PLAY. Play will commence from track 1 01 001
SELECTING A TRACK
Select a track number. Press Play


SKIPPING A TRACK
Press once to go to the start of the next track. Press repeatedly to go forward several tracks.

Press once to go to the start of the previous track. Press repeatedly to go back several tracks.

If you press NEXT during the final track:
23 LAST
→
23 023

FORWARD AND REVERSE SEARCH
Press and hold to search forward. At the end of the track the search stops.
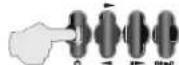
Press and hold to reverse search. The search stops at the start of the track.
CHANGING TRACKS DURING PLAY
Select the new track from the number keypad. You do not need to press PLAY.
If there are 10 tracks or more on a disc, when selecting a single digit track the CDS will wait briefly for a second digit if appropriate. If none is entered the track will start.
If you try to select a track number that is unavailable, the CDS will briefly indicate this. If a track is currently playing it will keep on playing the track. If the disc is stopped, nothing will happen.

RE-STARTING A TRACK DURING PLAY
Press PLAY.
18 021
→
18 001

PAUSE
Press PAUSE. The track will pause
03 820

Press PAUSE again to resume play.

STOPPING THE DISC
Press STOP

PROGRAMMING A DISC
You can customise the number and the play order of tracks in a program This function is only available when the disc is stopped.
EXAMPLE: Storing a 2 track Program


TO REPEAT PLAY A DISC
Press REPEAT.
rEP
To Cancel Repeat: Press REPEAT again.
No rEP
The disc will play from that point and stop.
To repeat a track or tracks: Make a program of one or more tracks as described above. Press REPEAT to repeat the program.
TROUBLESHOOTING
If you suspect that one or more of your QUAD ELITE system components may be malfunctioning, here are a few simple checks you could carry out before you return the suspect unit to your dealer.
Caution: Before carrying out any checks or adjustments to your QUAD ELITE system, ensure that the mains to all the system units is safely disconnected and that the volume level is set to minimum.
| PROBLEMS COMMON TO THE SYSTEM | |
| No front panel lights on the pre-amplifier /integrated amplifier | Mains plugs not inserted/ mains not onMains fuse broken at power supply pointMains fuse on rear panel has broken |
| No signal from the loudspeakers | Mains supply connections to power amp disconnected or faultyNo connection or poor connection between pre and power ampCheck Quadlink and AmpBus cablesLoudspeaker cables disconnectedSource input not connected to pre-amplifier /integrated amplifier or faultySource is switched offTape monitor is inadvertently onThe CD you were playing has finishedIs the pre-amplifier in mute?If you are using a CDP have you set that to mute? |
| PRE-AMPLIFIER /INTEGRATED AMPLIFIER PROBLEMS | |
| Tone controls do not function | EQ not selected; MMElite INT does not have tone controls. |
| Turntable input too high/low | Check MM and MC input is correctly set, adjust sensitivity; Elite INT does not have phono input. |
| Aux/Tape input too high/low | Adjust sensitivity |
| Controls do not function at all | Switch system off at the mains, leave 15 mins, switch on |
| TUNER PROBLEMS | |
| No front panel lights | Is the pre-amplifier switched on and working?Quadlink cable not properly connected |
| The tuner will not tune in SEARCH mode | Cable/antenna switch incorrectly setNo aerial or inadequate aerial (Check that you can tune manually) |
| All stations have high background noise | Inadequate or faulty aerial, aerial improperly connected |
| Mono reception OK, stereo distorted or noisy | Inadequate or misaligned aerial, station is too far awayNearby electronic apparatus causing interference |
| No stereo indicator | Is the station broadcasting mono (can you receive other stations OK) |
| CD PROBLEMS | |
| No front panel lights | Mains plugs not inserted, mains off, fuse/s blown, display switched off |
| No sound | Quadlink connection not properly connected or missing |
| Disc won't load | Disc upside down, or incorrect formatDisc damaged or dirty |
| Disc skips or distorts | Disc damaged or dirty |
| No sound from digital source | Source disconnected or switched off (check NO SIGNAL indicator) |
| I can't select Random Play | Use the supplied CD handset |


USING THE CDP AS A STANDALONE CD PLAYER
INTRODUCTION
The Quad Elite CDP will play regular music CDs, music and standard CD-Rs. Automatic upsampling increases the detail levels in your CD collection, and the ability to add three digital and three optical sources enables you to get the best from other digital media. An optical output is provided to connect the CDP to other digital equipment.
The CDP can be used as a stand alone player with its own remote control, as a CD/pre-amplifier in a basic system, or integrated into the Quad Elite system via the QUADLINK bus.
Please read all these instructions before you install and use your CDP. If you own a Quad Elite system please read this section in conjunction with the system instructions on Pages 3-14 of this manual.
PRELIMINARIES
Unpacking: The packing should contain
• The Quad Elite CDP player
• One IEC mains lead, with a suitable mains plug
• One RCA stereo phono connecting cable
• One CDP remote handset with four AA batteries
• This instruction manual and warranty card.
If any item is missing or damaged, inform your dealer.
Carefully unpack the CDP and accessories. Do not mark the player when undoing the polythene sleeve. Retain the packing for future transportation.
CONNECTING THE CDP

Switch off all units at the mains before connecting the CDP.
Analogue Output (Line) Connections
Please refer to the connection drawings on Page 19
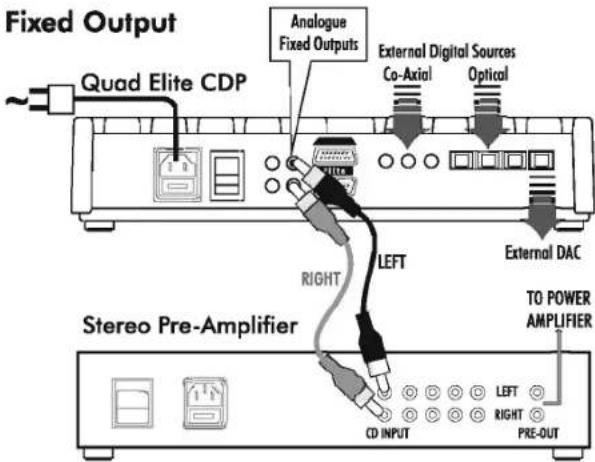
Fixed Output: Use this output when connecting to an amplifier that has a volume control. Connected in this manner, the internal volume control of the CDP is bypassed, and the analogue audio output is unaffected by volume setting changes on the CDP remote control handset.
Variable Output: Use this output to connect the CDP directly to a stereo power amplifier. Connected in this manner, the internal volume control of the CDP becomes active, allowing the user to vary the level of the analogue audio output. This internal volume control is an extremely high quality audiophile component.
Note: When connecting the CDP directly to a power amplifier, never use the 'Fixed' output. System damage may occur if the 'Fixed' output is connected directly to a power amplifier.
To connect the CDP to a Stereo line input: Connect the supplied RCA phono lead from the chosen output of the CDP to a suitable LINE INPUT of the amplifier. Ensure you connect the right and left channels correctly. RCA plugs and sockets coded white or black usually indicate the LEFT channel and those coded red the RIGHT channel.
Quadlink' Output: Use this output when connecting to a Quad Elite Series pre-amplifier. Please refer to the Quad Elite Series system pages of this handbook for full instructions.
Important note: When connecting the CDP directly to a Quad Elite Series power amplifier, you must connect the 'Variable' output to the RCA input of the power amplifier.
The 'Quadlink' connector is not compatible with the Quad 77 Series. Use the Analogue Outputs as directed above.
Digital Input and Output Connections
The CDP accepts three optical and three digital inputs. CD recorders and Digital Audio Broadcast tuners (DAB) will be significantly improved by connecting their digital outputs to the CDP. The CDP can accept incoming PCM digital signals to a maximum resolution of 24bit/96kHz.
The stereo output of DVD players can also be enjoyed at higher levels of fidelity by connecting the digital or optical output of the DVD player to the relevant input of the CDP. In the DVD player's menu, the digital output option should be set to 'PCM'.
Digital Input: This is via a single 75 ohm RCA phono lead connected between source and the CDP. Your dealer will be able to supply you with a suitable digital RCA phono cable.
Optical Input: The optical inputs are blanked off when not in use. Remove the blanking plug from the chosen input of the CDP and the source component and connect an optical TOSlink cable between them. Retain the plugs for future use.
Optical Output: This is a TOSlink digital output for connection to a digital recorder, or any unit having an onboard Digital to Analogue (DAC) converter.
Mains Connection
Check that all connections have been properly made. Plug the supplied IEC lead from the CDP to the mains socket and switch on all the other units in the system.
OPERATION

Switching On
Switch on the power at the mains and at the power switch at the rear of the player. The STANDBY light on the Standby button glows Red.
The CDP may be operated from either the front panel or via the remote handset. The front panel controls allow basic operation; handset operation is required to realise all the advanced operating features of the CDP.
Front Panel Operation
Depress the Standby button. The Standby light will go to white.
The Display briefly shows the default input (CD) and the volume level*


Cd L 16
When switched on from Standby the CDP will power on at a safe volume level. This default level is only available at the variable output and is a safety feature of the equipment.
Loading and Playing a CD
Press the DISC button. The disc drawer will open. Load a disc label side up into the tray. Press DISC again to close the drawer.

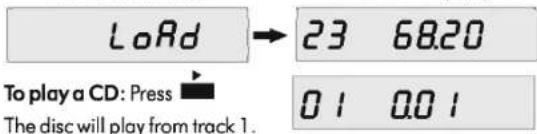
The display will show the number of tracks and the total playing time

To play a CD: Press Play. Playing will commence from track 1.

01 001
To choose and play a given track: Press the Next/Previous key repeatedly to advance or reverse the track one unit.

To go forward: Press the upper part of the Next/Previous key to select and play a track. Each press advances the CD one track.
To go back: Press the lower part of the Next/Previous key once. The CD will go to the start of the previous track. Press the key again to go back one track at a time.
To stop a CD while playing: Press Play. The disc will stop.

23 68.20
To revert to Standby: Press Standby.
The Red Standby light will come on.
Note: When you load a CD, the player has to determine which of the many formats the disc may be in before it can display the track and time information. This takes a couple of seconds during which the mechanism will whirr audibly - this is quite normal.
The CDP Remote Control Handset
The CDP handset replicates all the CDP control panel features plus several additional features that add functionality to its performance, including Input Selection.
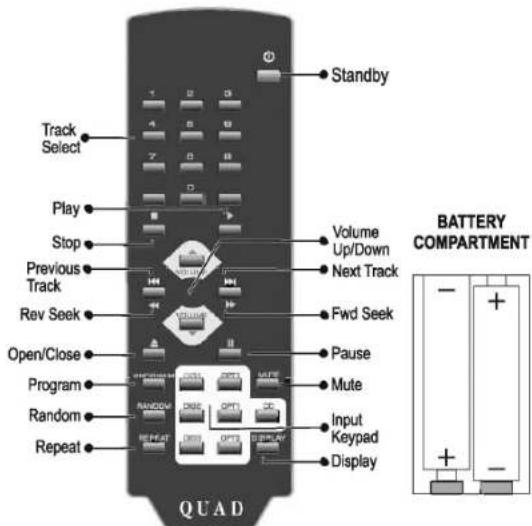
Inserting the Batteries: Carefully remove the cover on the rear of the handset. Unwrap the four supplied AAA batteries and insert them in the positions shown. Replace the cover.
Operating the CDP with the Remote Handset
Switching On: Press the Standby Button The Standby Light will change to white.

Choosing an Input: Source inputs can be selected by pressing the required button on the Keypad.
Closing the disc drawer always selects CD.
To Select a Digital or Optical Input:
Press an input on the keypad, say DIG 1.

The display confirms the input and the sampling frequency and then displays the volume

When you select a digital input, the CDP will look for a digital stream to lock onto. If, after the input is selected you switch the digital source off this lock will be defeated. To confirm whether a digital signal is present, reselect the input.
Playing a CD
Select CD from the Input Keypad.
To load a CD: Press ▲ to open the drawer.
Place a CD in the drawer. Press ■ again to close it
The CDP determines the format and loads the disc information → The display then shows the number of tracks and the total playing time
To select a track: Select a track number. Press Play.

Forward and Reverse Search, Track Skip
Press once to go to the start of the previous track. Press repeatedly to go back several tracks.


Press once to go to the start of the next track. Press repeatedly to go forward several tracks.
Press and hold to reverse search. The search stops at the start of the track.


Press and hold to search forward. At the end of the track the search stops.
Changing Tracks During Play
You can use track skip as above or select the new track from the number keypad. You do not need to press Play.

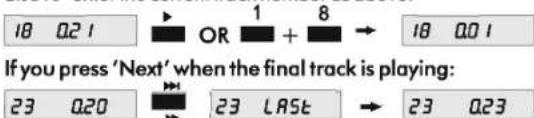
18 0.01
If there are 10 tracks or more on a disc, the CDP will wait briefly for a second digit. If none is entered the track will play.
If you select a track number that is unavailable, the CDP will briefly indicate. If a track is currently playing it will keep playing the track. If the disc is stopped, nothing will happen.
To Re-Start a Track During Play: Press Play ■ . You may also re-enter the current track number as above.
To Pause the Disc: Press Pause. The track will be paused. Press Pause again and play will resume from the point at which the disc was paused.
Normal Display The display alternates as below and the disc is paused

To Stop the Disc: Press Stop.
Changing Your Mind: If when the CD is at rest you choose a track but do not press Play, the disc will register the track, then revert to the original display and erase this command.

Altering the Volume: (not available at Fixed Outputs)
Increase volume VOLUME VOLUME Decrease volume
The Display registers the new level → And will then revert to normal display

The level indication varies between 32 (max.) and 00 (off).
Default Volume Level: The default level is 16. If, the CDP is set to Standby with the Volume level set higher, when you come out of Standby the level will reset to 16. If the CDP is set to Standby with the level set below 16, it will next come back on at the lower level.
Program Play
You can customise the number and order of tracks you wish to play. This function is available when the disc is stopped.
To program a disc: Enter a track number followed by the Program key. After entering the program press Stop.

flowchart
graph TD
    A["1 Program"] --> B["+"]
    B --> C["Program 8"]
    C --> D["+"]
    D --> E["Program"]
    E --> F["+"]
    F --> G["Program 1"]
    G --> H["0 I"]
    H --> I["Program"]
    I --> J["0 I P I"]
    J --> K["+"]
    K --> L["Program 8"]
    L --> M["0 B"]
    M --> N["Program"]
    N --> O["0 B P2"]
    O --> P["+"]
The program entered above is memorised.
To play the program: Press
To erase a program from memory: Press ■ twice.

Random and Repeat Play
To play all tracks on a disc once in random sequence:
Press Random. The disc will play once randomly and stop.

To cancel Random play: Press the Random key again.
The disc plays from that point in normal sequence and stops.

To repeat play an entire disc: Press the Repeat key. The disc will continuously repeat for as long as you want.

To cancel Repeat: Press Repeat again.

The disc plays from that point in normal sequence and stops.
To repeat a track or several tracks: Make a program of one or more tracks as described above. Press Repeat to repeat the program.
Random with Repeat: Press Random and then Repeat. The disc will play in a random sequence; it will then play again in a different sequence, ad infinitum - ideal for party addicts.
Mute
Pressing Mute cuts off the sound but leaves other functions unaltered. Press Mute again to resume normal operation.

Display Off
Many listeners prefer to listen with the display switched off.
To switch off the display: Press Display.

In "display off" mode the Display and the Standby light are muted.
To restore normal operation: Press the Display button again.
Because of the potential difficulties that could arise with a player with no visible indicators Quad engineers have put in some special features.
In "display off" mode you can alter inputs, CD tracks and Volume Level. Each time you perform one of these functions, the CDP will briefly 'wake up', indicate the change and then switch the Display off again.
If in "display off" mode, you select Pause, Mute, Standby, Stop or Drawer Open, the display will trigger on.
When in "display off" mode the CDP reaches the end of a session, whether in Normal, Random, or Program mode, the display will be triggered on.
After these events, the display can be manually switched off.
And Finally: To put the CDP into Standby - Press


QUAD ELITE CDP CONNECTIONS
Variable Output

ELITE SYSTEM CONNECTIONS
USING THE CDS AS A STANDALONE CD PLAYER
INTRODUCTION
The Quad EliteCDS will play regular music CDs, music and standard CD-Rs. An optical output is provided to connect the CDS to other digital equipment.
The CDS can be used as a stand alone player with its own remote control, or fully integrated into the Quad Elite system via the QUADLINK bus.
Please read all these instructions before you install and use your CDS. If you own a Quad Elite system please read this section in conjunction with the system instructions on Pages 3-14 of this manual.
Preliminaries
Unpacking: The packing should contain
• The Quad Elite CDS player
• One IEC mains lead, with a suitable mains plug
• One RCA stereo phono connecting cable
• One CDS remote handset with four AA batteries
• This instruction manual and warranty card.
If any item is missing or damaged, inform your dealer.
Carefully unpack the CDS and accessories. Do not mark the player when undoing the polythene sleeve. Retain the packing for future transportation.
CONNECTING THE CDS

Switch off all units at the mains before connecting the CDS.
Analogue Output (Line) Connections
To connect the CDS to a Stereo line input: Connect the supplied RCA phono lead from the RCA line output of the CDS to a suitable LINE INPUT of the amplifier. Ensure you connect the right and left channels correctly. RCA plugs and sockets coded white or black usually indicate the LEFT channel and those coded red the RIGHT channel.
Note: Never connect the CDS directly to a power amplifier, unless the power amplifier has a variable volume control. System damage may occur if the CDS output is connected directly to the fixed line inputs of a power amplifier.
'Quadlink' Output: Use this output when connecting to a Quad Elite pre-amplifier.
The 'Quadlink' connector is not compatible with the Quad 77 Series. Use the Analogue Output as directed above.
Important note: Never connect the CDS directly to any Quad power amplifier as there is no variable level control.
Mains Connection
Check that all connections have been properly made. Plug the supplied IEC lead from the CDS to the mains socket and switch on all the other units in the system.
QUAD ELITE CDS CONNECTIONS


OPERATION
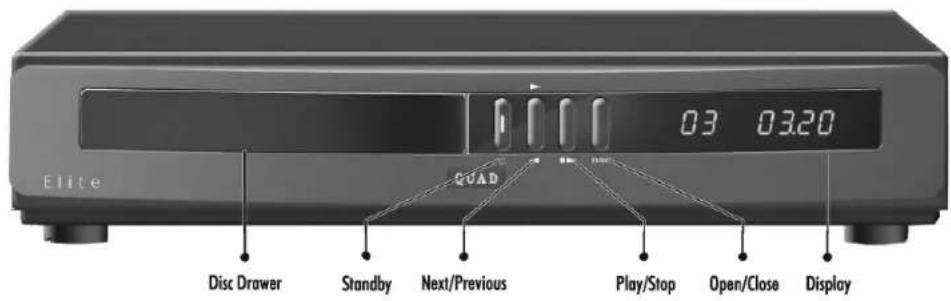
Switching On
Switch on the power at the mains and at the power switch at the rear of the player. The STANDBY light on the Standby button glows Red.
The CDS may be operated from either the front panel or via the remote handset. The front panel controls allow basic operation; handset operation is required to realise all the advanced operating features of the CDS.
Front Panel Operation
Depress the Standby button. The Standby light will go white.

Loading and Playing a CD
Press the DISC button to open the disc drawer. Load a disc label side up in the tray. Press DISC again to close the drawer.
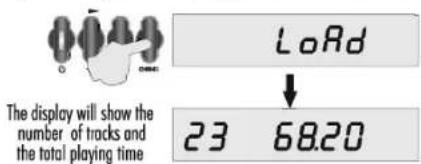
To play a CD: Press Play. Playing will commence from track 1.

To choose and play a given track: Press the Next/Previous key repeatedly to advance or reverse the track one unit.
To go forward: Press the upper part of the Next/Previous key to select a track. Each press advances the CD one track.
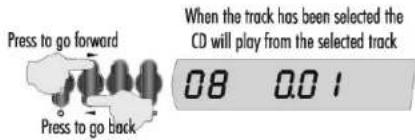
To go back: Press the lower part of the Next/Previous key once. The CD will go to the start of the previous track. Press the key again to go back one track at a time.
To stop a CD while playing: Press Play. The disc will stop.
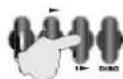
23 6820
To revert to Standby: Press Standby.
The Red Standby light will come on.

Note: When you load a CD, the player has to determine which of the many formats the disc may be in before it can display the track and time information. This takes a couple of seconds during which the mechanism will whirr audibly - this is quite normal.
THE CDS REMOTE CONTROL HANDSET
The CDS handset is identical to the CDP handset but with reduced functionality Input selection and Mute are inoperative with this model.

Inserting the Batteries: Carefully remove the cover on the rear of the handset. Unwrap the four supplied AAA batteries and insert them in the positions shown. Replace the cover.
Operating the CDS with the Remote Handset
Switching On: Press the Standby Button The Standby Light will change to white.

Playing a CD
To load a CD: Press ■ to open the drawer.
Place a CD (label side up) in the drawer. Press ■ again to close the drawer. The display shows the number
Load the CD

to open the drawer.

again to
The display shows the number of tracks and the total playing time

To play a CD: Press

01 001
The disc will play from track 1.
To select a track: Select a track number. Press Play.

14 001
Play commences from Track 14.
Forward and Reverse Search, Track Skip
Press once to go to the start of the previous track. Press repeatedly to go back several tracks.

Press once to go to the start of the next track. Press repeatedly to go forward several tracks.
Press and hold to reverse search. The search stops at the start of the track.
Press and hold to search forward. At the end of the track the search stops.
Changing Tracks During Play
You can use track skip as above or select the new track from the number keypad. You do not need to press Play.

18 001
If there are 10 tracks or more on a disc, when selecting a single digit track the CDS will wait briefly for a second digit if appropriate. If none is entered the track will start.
If you try to select a track number that is unavailable, the CDS will briefly indicate this. If a track is currently playing it will keep on playing the track. If the disc is stopped, nothing will happen.
To Re-Start a Track During Play: Press ■. You may also re-enter the current track number as above.

If you press 'Next' when the final track is playing:

To Pause the Disc: Press Pause. The track will be paused. Press Pause again and play will resume from the point at which the disc was paused.

To Stop the Disc: Press Stop.
Changing Your Mind: If when the CD is at rest you choose a track but do not press Play, the disc will register the track, then revert to the original display and erase this command.

Program Play
You can customise the number and order of tracks you wish to play. This function is available when the disc is stopped.
To program a disc: Enter a track number followed by the Program key. After entering the program press Stop.
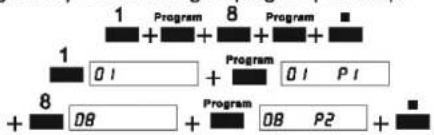
flowchart
graph TD
    A["1 Program"] --> B["8 Program"]
    B --> C["101 Program"]
    C --> D["80 Program"]
    D --> E["08 P2"]
    E --> F["■"]
The program entered above is memorised.
The image contains no text or characters. It is a blank rectangular box.
To play the program: Press
To erase a program from memory: Press ■ twice.
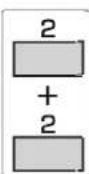
02 Pro + ■ + ■ 23 6820
Random and Repeat Play
To play all tracks on a disc once in random sequence:
Press Random □ The disc plays once randomly and stops.

To cancel Random play: Press the Random key again. The disc will play from that point in normal sequence and stop.

To repeat play an entire disc: Press the Repeat key. The disc will continuously repeat for as long as you want.

To cancel Repeat: Press Repeat again. The disc will play from that point in normal sequence and stop.

To repeat a track or several tracks: Make a program of one or more tracks. Press Repeat to repeat the program.
Random with Repeat: Press Random and then Repeat. The disc will play in a random sequence; it will then play again in a different sequence, ad infinitum - ideal for party addicts.
Display Off
To switch off the display: Press Display. In "display off" mode the Display and the Standby light are extinguished.

To restore normal operation, press the Display button again.
In 'Display Off' mode:
If you alter inputs, CD tracks or Volume Level: the CDS will 'wake up', indicate the change, then switch the Display off.
If you select Pause, Mute, Standby, Stop or Drawer Open: the display will trigger on.
When in "display off" mode the CDS reaches the end of a session the display will be triggered on.
After these events, the display can be manually switched off.
And Finally: To put the CDS into Standby - Press

SPECIFICATIONS - ELITE INTEGRATED AMPLIFIER
Pre-amplifier Section
| Input sensitivity | 300mV, 775mV |
| Output voltage | 300mV, 775mV (3.3V max.) |
| Output impedance | 100 Ohms |
| Tape output impedance | 330 Ohms |
| Inputs | CD & Tuner via Quadlink, 2 x Line (RCA), TAPE IN |
| Outputs | 1 x Pre-out, TAPE OUT |
Power amplifier Section
| Rated power output | 2 x 70W |
| Frequency response | 20Hz-20kHz (+/-0.3dB) |
| Total harmonic distortion | <0.005% |
| Signal to noise ratio | >75dB |
| Main Power On/Off Switch | Yes |
| Dimensions (H x W x D) | 70 x 321 x 310 mm |
| Weight | 6.6 kg |
| Finish | Black |
| Remote Control | 31 keys |
SPECIFICATIONS - ELITE PRE AMPLIFIER
| Inputs | 3 x Aux RCA, 1 x Tape, 1 x Phono MM (MC) |
| Frequency Response | |
| Line Inputs | 1Hz - 20kHz +0dB / -0.3dB0.1Hz - 55kHz +/-3dB |
| MM & MC Inputs | 20Hz - 20kHz +/- 0.4dB |
| Phono Inputs MM (MC) | |
| Sensitivity | 1,3,or 7.75mV (100,300 or 775uV) |
| Signal to Noise Ratio | >78dB (A) ref 7.75mV (775uV) |
| Total Harmonic Distortion | <0.05% (0.01%) |
| Output Specifications | |
| RCA Phono Output Level | 775mV (3.3V Max) |
| Impedance | 100 Ohms |
| Signal to Noise Ratio | >105dB (A) |
| AMPBUS Output Level | 2V (8V Max) |
| Impedance | 20 Ohms |
| Tape Output Level | 10, 300, 775mV (10V Max) |
| Impedance | 330 Ohms |
| Main Power On/Off Switch | Yes |
| Dimensions (H x W x D) | 70 x 321 x 310 mm |
| Weight | 4.42kg |
| Finish | Black |
| Remote Control | 43keys |
SPECIFICATIONS - ELITE FM STEREO TUNER
| Tuning Range | 88 – 108MHz |
| Channel Spacing | 50kHz |
| Sensitivity (30dB quieting) | Mono 8 dBuV |
| Sensitivity (50dB quieting) | Mono 18dBuV |
| Stereo 18dBuV | |
| Full Limiting | <1uV (1.2dBf) |
| Capture Ratio | 1.5dB |
| IF Rejection | >100dB |
| AM Suppression | >60dB |
| Image Rejection | >80dB |
| Pilot Tone Suppression | >60dB |
| De-emphasis | 50uS or 75uS |
| Aerlal Input | 2 x 75 Ohms unbalanced |
| Main Power On/Off Switch | No |
| Dimensions (H x W x D) | 70 x 321 x 310 mm |
| Weight | 2.8 kg |
| Finish | Black |
SPECIFICATIONS - ELITE CDP COMPACT DISC PLAYER WITH PRE-AMP
| D/A Converter | Crystal CS4398 24 bit DAC |
| Input Resolution Signals | 16 - 24bit |
| Input Sampling Rates | 32 - 96kHz |
| Frequency Response | 20Hz – 20kHz (+0dB / -0.7dB) |
| Max.Audio Line Output | 2.4V RMS, RCA (Fix & Variable output)4.8V RMS, Balanced (Quadlink) |
| Output Impedance | 120 Ohms |
| Total Harmonic Distortion | <0.0013% at 1kHz |
| Dynamic Range | >100dB 'A' wtd. 16 bit>117dB 'A' wtd. 24 bit |
| Signal to Noise Ratio | >113dB, 24bit (20Hz – 20kHz)>116dB, 24bit (20Hz – 20kHz) 'A' wtd>94 dB, 16bit (20Hz - 20kHz)>97 dB, 16bit (20Hz - 20kHz) 'A' wtd |
| Crosstalk | <-120dB at 1kHz |
| Digital Audio Inputs | 3 x RCA Coax 75 Ohms, SPDIF3 x Optical TosLink, SPDIF |
| Digital Audio Output | 1 x Optical TosLink, SPDIF |
| Disc Compatibility | CD-DA Conventional Audio CDCD-R Recordable CD |
| Main Power On/Off Switch | Yes |
| Dimensions (H x W x D) | 70 x 321 x 310 mm |
| Weight | 4.5 kg |
| Finish | Black |
| Remote Control | 31keys |
SPECIFICATIONS - ELITE CDS COMPACT DISC PLAYER
| D/A Converter | Crystal CS4398 24 bit DAC |
| Frequency Response | 20Hz-20kHz (+0dB / -0.7dB) |
| Max.Audio Line Output | 2.4V RMS, RCA4.8V RMS, Balanced (Quadlink) |
| Output Impedance | 120 Ohms |
| Total Harmonic Distortion | <0.0013% at 1kHz |
| Dynamic Range | >100dB 'A' wtd. 16 bits |
| Signal to Noise Ratio | >113dB, Digital Silence (20Hz-20Khz)>116dB, Digital Silence (20Hz-20Khz) 'A' wtd>94 dB, 16bit (20Hz - 20kHz)>97 dB, 16bit (20Hz - 20kHz) 'A' wtd |
| Crosstalk | <-120dB at 1kHz |
| Digital Audio Output | 1 x Optical TosLink, SPDIF |
| Disc Compatibility | CD-DA Conventional Audio CDCD-R Recordable CD |
| Main Power On/Off Switch | Yes |
| Dimensions (H x W x D) | 70 x 321 x 310 mm |
| Weight | 4.5 kg |
| Finish | Black |
| Remote Control | 31 keys |

Care and Cleaning
The surface of the equipment may be cleaned with a damp cloth provided that the power has been switched off first. Solvent based cleaning materials should not be used as they may damage the paint finish.
Service Information
Product service enquiries should, in the first instance, be referred to the supplying dealer. If you need to return your equipment for servicing we recommend that it is shipped in its original packing.
In cases of difficulty or for other product enquiries please contact the appointed QUAD distributor for your country. Principal Service Centre addresses and contact numbers can be found below.
For information on authorised service centres worldwide contact QUAD Electroacoustics Ltd. A worldwide distributor list is available on the QUAD website: www.quad-hifi.co.uk
International Service Centres
UK: International Audio Group Service Centre, Unit 4, St Margaret's Way, Stukeley Meadows Industrial Estate Huntingdon, Cambs, PE29 6EB'
Tel: +44 (0)1480 447700 Fax: +44 (0)1480 431767
IMPORTANT NOTICE TO UK USERS
The appliance cord is terminated with a UK approved mains plug fitted with a 5A fuse. If the fuse needs to be replaced, an ASTA or BSI approved BS1362 fuse rated at 5A must be used. If you need to change the mains plug, remove the fuse and dispose of this plug safely immediately after cutting it from the cord.
Connecting a Mains Plug
The wires in the mains lead are coloured in accordance with the code: Blue: NEUTRAL Brown: LIVE: Green and Yellow: Earth. As these colours may not correspond to the coloured markings identifying the terminals in your plug, proceed as follows:
The BLUE wire must be connected to the terminal marked with the letter N or coloured BLUE or BLACK. The BROWN wire must be connected to the terminal marked with the letter L or coloured BROWN or RED. The GREEN & YELLOW wire must be connected to the terminal marked with the letter E or coloured GREEN or GREEN & YELLOW or marked with the Earth Symbol ‡


IAG-QUAD
Correct Disposal of this product. This marking indicates that this product should not be disposed with other household wastes throughout the EU. To prevent possible harm to the environment or human health from uncontrolled waste disposal, recycle it responsibly to promote the sustainable reuse of material resources. To return your used device, please use the return and collection systems or contact the retailer where the product was purchased. They can take this product for environmental safe recycling.








- IMPORTANT SAFETY INFORMATION
- CAUTION!
- ELECTRICAL INFORMATION
- MAINS SUPPLY AND SAFETY
- QUAD
- ELITE
- USER GUIDE
- CONTENTS
- INTRODUCTION
- Product Registration and Warranty
- UNPACKING THE EQUIPMENT
- INSTALLATION
- MAINS SWITCH
- BASIC FRONT PANEL OPERATION
- STANDBY
- SELECTING A SOURCE
- VOLUME
- BALANCE
- TAPE MONITOR
- To record a source:
- During recording:
- Three Head Tape Deck:
- HANDSET OPERATION OF THE INTEGRATED AMPLIFIER
- PHONO INPUT
- ELITE REMOTE CONTROL HANDSET
- Fitting and Replacing Batteries
- SYSTEM HANDSET FUNCTIONS
- ADVANCED HANDSET OPERATION
- ALTERING THE PHONO SENSITIVITY
- ALTERING THE LINE LEVEL INPUTS
- ALTERING THE TAPE SENSITIVITY
- TONE CONTROLS
- SELECTING EQ (EQUALISATION)
- TILT
- FILTER:
- APPENDIX 1
- WHAT THE TONE CONTROLS DO.
- Bass Contour
- Treble Filter
- APPENDIX 2
- FRONT PANEL OPERATION OF THE TONE CONTROLS
- Setting the Equalisation
- Operating the Tilt Control
- Adjusting the Bass
- Operating the Treble Filter
- Connecting an Aerial
- Line Output Connections
- FRONT PANEL OPERATION
- SELECTING AN AERIAL
- TUNING A STATION
- FORCED MONO OPERATION
- STORING A STATION IN A PRESET
- HANDSET OPERATION OF THE TUNER
- MANUAL TUNING
- AUTO TUNING
- SELECTING A PRESET USING NUMBER KEYS
- SELECTING A PRESET WITH NEXT/PREVIOUS
- DIGITAL CONNECTIONS
- OPERATION
- LOADING A CD
- PLAYING A CD
- SELECTING A TRACK
- STOPPING A CD WHILE PLAYING
- HANDSET OPERATION OF THE CDP
- CHOOSING AN INPUT
- To choose a Digital or Optical input:
- Digital Indications: Suppose Dig 1 is selected:
- The input and the sampling frequency is briefly displayed
- The display flashes 'No Signal' twice, and reverts
- SKIPPING A TRACK
- If you press NEXT during the final track:
- FORWARD AND REVERSE SEARCH
- CHANGING TRACKS DURING PLAY
- RE-STARTING A TRACK DURING PLAY
- Press PLAY
- PAUSE
- STOPPING THE DISC
- PROGRAMMING A DISC
- EXAMPLE: Storing a 2 track Program
- To Erase a program:
- TO REPEAT PLAY A DISC
- HANDSET OPERATION OF THE CDS
- TROUBLESHOOTING
- USING THE CDP AS A STANDALONE CD PLAYER
- PRELIMINARIES
- CONNECTING THE CDP
- Switching On
- Loading and Playing a CD
- The CDP Remote Control Handset
- Operating the CDP with the Remote Handset
- To Select a Digital or Optical Input:
- Forward and Reverse Search, Track Skip
- Altering the Volume: (not available at Fixed Outputs)
- Program Play
- Random and Repeat Play
- Mute
- Display Off
- QUAD ELITE CDP CONNECTIONS
- USING THE CDS AS A STANDALONE CD PLAYER
- Analogue Output (Line) Connections
- Mains Connection
- THE CDS REMOTE CONTROL HANDSET
- Operating the CDS with the Remote Handset
- In 'Display Off' mode:
- Care and Cleaning
- Service Information
- International Service Centres
- IMPORTANT NOTICE TO UK USERS
- Connecting a Mains Plug
Marque : QUAD
Modèle : Elite CDP
Catégorie : Lecteur/enregistreur de cd