
SX 55 RD - Lecteur/enregistreur de cd SCOTT - Notice d'utilisation et mode d'emploi gratuit
Retrouvez gratuitement la notice de l'appareil SX 55 RD SCOTT au format PDF.


| Type de produit | Lecteur/enregistreur de CD |
| Marque | Scott |
| Modèle | SX 55 RD |
| Dimensions (L x H x P) | 430 x 100 x 300 mm (approximatif) |
| Poids | Environ 4 kg |
| Alimentation | 230 V ~ 50 Hz |
| Formats compatibles | CD audio, CD-R, CD-RW |
| Fonctions de lecture | Lecture, pause, arrêt, recherche, programmation, répétition, lecture aléatoire |
| Fonctions d'enregistrement | Enregistrement sur CD-R/RW, synchronisation, finalisation |
| Connectiques | Sorties audio (RCA), entrée audio (RCA), prise casque |
| Entretien et nettoyage | Nettoyer avec un chiffon doux et sec. Ne pas utiliser de produits chimiques. |
| Consignes de sécurité | Ne pas exposer à l'humidité, ne pas obstruer les ventilations, utiliser sur une surface stable. |
| Accessoires fournis | Télécommande, câble audio RCA, câble d'alimentation, manuel d'utilisation |
| Réparabilité | Contacter le service après-vente ou un technicien agréé. Pièces détachées disponibles via SAV. |
FOIRE AUX QUESTIONS - SX 55 RD SCOTT
Questions des utilisateurs sur SX 55 RD SCOTT
0 question sur cet appareil. Repondez a celles que vous connaissez ou posez la votre.
Poser une nouvelle question sur cet appareil
Téléchargez la notice de votre Lecteur/enregistreur de cd au format PDF gratuitement ! Retrouvez votre notice SX 55 RD - SCOTT et reprennez votre appareil électronique en main. Sur cette page sont publiés tous les documents nécessaires à l'utilisation de votre appareil SX 55 RD de la marque SCOTT.
MODE D'EMPLOI SX 55 RD SCOTT
SCOTT®
sx 55
STEREO RADIO CASSETTE PLAYER WITH CD/MP3 PLAYER AND USB PORT

Instruction Manual
CE
WARNING
CLASS 1 LASER PRODUCT
CLASS 1 LASER PRODUCT APPAREIL Á LASER DE CLASSE 1 PRODUCTO LASER DE CLASE 1
CAUTION INVISIBLE LASER RADIATION WHEN OPEN AND INTERLOCKS DEFEATED. AVOID EXPOSURE TO BEAM

This product contains a low power laser device.
Warning: Do not touch the lens.
DO NOT THROW BATTERIES IN FIRE!
SAFETY PRECAUTIONS
Follow the advice below for safe and appropriate operations.
ON PLACEMENT
- Do not use the unit in places which are extremely hot, cold, dusty, or humid.
- Place the unit on a flat and even surface.
- Do not restrict the air flow of the unit by placing it in a place with poor air flow, by covering it with a cloth, or by placing it on a carpet.
ON SAFETY
- When connecting and disconnecting the AC cord, grip the plug and not the cord itself. Pulling the cord may damage it and create hazard.
- When you are not going to use the unit for a long period of time, disconnect the AC power cord.
ON AC VOLTAGE
- Before use, check that the rated voltage of your unit matches your local voltage.
ON CONDENSATION
- When left in a heated room where it is warm and damp, water droplets or condensation may form inside the CD player.
- When there is condensation inside the unit, the unit may not function normally.
- Let it stand for 1 to 2 hours before turning the power on, or gradually heat the room up and dry the unit before use.
* Ensure a minimum distance of 5 cm around the apparatus for sufficient ventilation.
* Ensure that the ventilation is not impeded by covering the ventilation openings with items, such as newspapers, table-cloths, curtains, etc..
* Do not place naked flame sources, such as lighted candles on the apparatus.
* Take attention to the environmental aspects of battery disposal.
* Use the apparatus only in moderate climates (not in tropical climates).
* Do not expose the apparatus to dripping or splashing.
* Do not place objects filled with liquids, such as vases, on the apparatus.
- Mains plug is used as the disconnect device. It shall remain readily operable and should not be obstructed during intended use. To be completely disconnected the apparatus from supply mains, the mains plug of the apparatus shall be disconnected from the mains socket outlet completely.
Should any trouble occur, disconnect the AC power cord and refer servicing to qualified personnel.
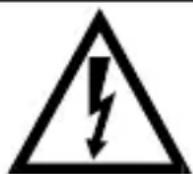
The lightening flash with arrowhead symbol within the triangle is a warning alerting the user of "dangerous voltage" inside the unit.
CAUTION
RISK OF ELECTRIC SHOCK DO NOT OPEN
ATTENTION : To reduce the risk of electric shock, do not remove the cover. There are no user serviceable parts inside the unit. Refer all servicing to qualified personnel.

The exclamation point within the triangle is a warning sign alerting the user of important instructions accompanying the product.
In case of misfunction due to electrostatic discharge the apparatus has to be reset by disconnecting it from mains supply.
THE MARKING PLATE IS LOCATED AT THE BOTTOM OF ENCLOSURE OF THE APPARATUS.
TABLE OF CONTENTS
WARNING....1
SAFETYPRECAUTIONS....1
TABLEOFCONTENTS....2
BOXCONTENTS....2
LOCATIONOFCONTROLS....2
POWERSUPPLY....3
BASICOPERATION....3
RADIOOPERATION....4
CD/MP3/WMAPLAYEROPERATION....4
USBDEVICEOPERATION....5
AUXINFUNCTION....5
CASSETTEPLAYEROPERATION....5
MAINTENANCE....6
TROUBLESHOOTINGGUIDE....6
TECHNICALSPECIFICATIONS....7
BOX CONTENTS
-
Main Unit
-
AC power cord
-
Instruction Manual
LOCATION OF CONTROLS


-
NEXT ▶ button
-
FOLDER UP button
-
CLOCK/ADJ, PROG (programmed play) button
-
CD compartment
-
ON/STANDBY button
-
FUNCTION button
-
PLAY MODE button
-
BAND button
-
TUNING dial
-
USB port
-
AUX IN jack
-
Headphone jack
-
Handle
-
+VOLUME- dial
-
PREVIOUS button
-
PLAY / PAUSE ▶ button
-
STOP ■ button
-
Cassette PAUSE button
-
Cassette STOP/EJECT ▲ button
-
Cassette F.FWD ◀ button
-
LCD display
-
Cassette REWIND ▶▶ button
-
Cassette compartment
-
Cassette PLAY button
-
Cassette RECORD ● button
-
Speaker
-
AC \~ socket
-
Battery compartment
-
FM antenna
-
FM ST LED indicator (FM stereo)
LCD DISPLAY
- Tuner FM/AM mode
- Digit and text display
- MHz/kHz: Unit of FM/AM radio frequency
- Play a CD/ read a USB device
- USB mode
- Random
- Repeat folder
- AUX IN mode
- Cassette TAPE mode

- CD playback 13. WMA file
- REPEAT 1/ALL 14. Programmed play
- MP3 file 15. PM: 12 hour display mode
POWER SUPPLY
Using the AC power supply
Insert the AC power cord into an AC mains outlet with a 230V AC \~ 50Hz power source and insert the other end into the AC \~ socket at the back of the unit.
Using batteries
- Open the battery compartment.
- Insert 6 UM2/ "C" size batteries (not supplied) with the polarities (+/-) matching the markings in the battery compartment. Reversed batteries may damage the unit.
- Close the battery compartment.
Note: When AC power is supplied, the battery power is cut off automatically.
Precautions when using batteries
- Use only the size and type of batteries specified.
- Do not mix different types of batteries together (e.g. alkaline, rechargeable and standard (carbon zinc)) or old batteries with fresh ones.
- Exhausted batteries must be removed to prevent any battery leakage.
- Dispose of batteries properly according to environmental regulations.
BASIC OPERATION
ON/ Standby mode
Press the ON/STANDBY button to turn on the unit and press it again to go to standby mode.
Clock time setting
- In standby mode, press the CLOCK/ADJ button and the "24H" digits will flash.
- Press the |◀◀ /▶▶| buttons to select 24 hour or 12 hour display mode and then press the CLOCK/ADJ button to confirm. The hour digits will flash.
- Press the |◀◀ /▶▶| buttons to set the hour.
- Press the CLOCK/ADJ button to confirm and the minute digits will flash.
- Press the ◀◀ / ▶▶ buttons to set the minutes.
- Press the CLOCK/ADJ button again to confirm the time setting.

Selecting the source
When the unit is switched on, press the FUNCTION button repeatedly to select one of the following sources: CD, USB, TUNER, AUX or TAPE.
VOLUME control
Turn the -VOLUME+ dial to adjust the volume level.
Connecting headphones
Plug in headphones (not supplied) to the headphones jack at the back of the unit for private listening. The speaker output will be shut off automatically.
RADIO OPERATION
Listening to the radio
- When the unit is switched on, press the FUNCTION button to select TUNER mode.
- In tuner mode, press the BAND button to select FM or AM.
- Turn the TUNING dial to receive a station. The radio frequency is indicated on the LCD display.
104.3s FM MHz
● FM ST
FM Stereo mode
In FM mode, the FM ST LED indicator lights up when the unit receives a station with a strong signal and stereo sound
Achieving optimum reception
In FM mode, extend and position the FM antenna to achieve optimum reception.
In AM mode, orientate the main unit to achieve optimum reception.
CD/ MP3 / WMA PLAYER OPERATION
Start playback
- Open the CD compartment.
- Insert a disc with the label side facing up.
- Close the CD compartment.
- When the unit is switched on, press the FUNCTION button to select "CD". It will read the disc and after reading, the total number of tracks will be displayed.
Press the ▶ button to start playback from the first track. During playback, the track number will be displayed.
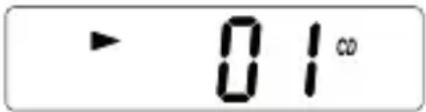
Pause playback
Press the ▶ button to pause playback, The “▶” symbol will flash. Press this button again to resume playback.
Stop playback
Press the ■ button to stop playback. Press the ▶ button to start playback from the first track.
Search function
Skip to the next/ previous track
- Press the button to skip to the next track.
- Press the ◄◀ button once to skip to the beginning of the current track. Press it twice to skip to the previous track.
Search within a track
During playback, hold down the |◀◀ or ▶▶| button to go fast backwards or forwards and then release the button. Normal playback will resume from that point.
Skip to the next folder (for MP3/ WMA files only)
Press the FOLDER UP button to skip to the next folder.
REPEAT/RANDOM playback
During playback, press the PLAY MODE button repeatedly to select the playback mode according to the following table:
| FilePlaybackmode | |
| CD | Repeat One (“REP” flashes on the display), - Repeat All (“REP”) lights up on the display), Random (“MIX” appears on the display). |
| MP3/WMA files | Repeat One (“REP” flashes), Repeat Folder (“REPFOLDER” appears on the display), Repeat All (“REP” appears on the display), Random (“MIX” appears on the display) |
Programmed playback
You can program up to 20 tracks.
- In STOP mode, press the PROG button and the track number "P01" will flash.
- Press the |◀◀ / ▶▶▶ buttons to select the track number.
- Press the PROG button to confirm.
- Repeat steps 2 and 3 above to program other tracks.
- To play the program, press the ▶ button.
- To clear the program, press the ■ button twice or open/close the CD compartment or go to standby mode.
When programming a CD containing MP3 / WMA files, you can press the FOLDER UP button to select the folder in which you want to program the tracks.


USB DEVICE OPERATION
Insert a USB device into the USB port at the back of the unit. When the unit is switched on, press the FUNCTION button repeatedly to select the "USB" mode. Refer to "CD/MP3 / WMA PLAYER OPERATION"
to play MP3/ WMA files.
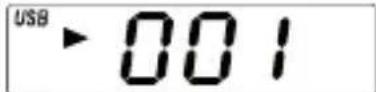
Note: Due to technical differences, some models of USB storage
devices or MP3 players may take longer to be read. In some cases, they may not even be read.
AUX IN FUNCTION
This unit has an AUX IN jack which allows you to connect an external audio device (such as an MP3 player) using a cable.
- Plug an audio cable (not supplied) into the AUX IN jack.
- When the unit is switched on, press the FUNCTION button to select "AUX".
- Operate your external audio device as usual to select and play music.
- Adjust the volume controls on both your external audio device and this unit to the desired volume level.
Note: In AUX IN mode, this unit display cannot show any music information (e.g. track number) for your external audio device.

CASSETTE TAPE OPERATION
Cassette tape playback
- When the unit is switched on, press the FUNCTION button to select "TAPE" (cassette).
- Press the STOP/EJECT ■▲ button to open the cassette compartment.
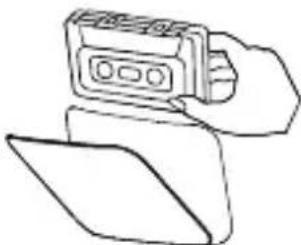
- Gently insert the cassette tape into the cassette compartment as shown.
Note: The cassette compartment door is designed to prevent the user from

TAPE
inserting the cassette upside down. Improper cassette tape insertion may damage the cassette deck inside the unit.
- Close the cassette compartment.
- To start playback, press the PLAY ◀ button.
- To stop playback, press the STOP/EJECT ▲ button.
- To pause playback, press the PAUSE button. To resume playback, press it again.
- To fast forward or fast rewind, press the F.FWD◀◀ or REWIND▶▶ button.
Press the STOP/EJECT ▲ button to stop at the desired position.
Cassette tape recording
- When the unit is switched on, press the FUNCTION button to select the mode (CD, TUNER or AUX) and launch playback.
- Insert the cassette tape (see previous paragraph).
- Press the PAUSE button.
- Press the RECORD ● and PLAY ◀ buttons together to place recording in standby.
- Press the PAUSE button again to start recording.
- To stop recording, press the STOP/EJECT ▲ button.
- To pause recording, press the PAUSE button. To resume recording, press it again.
To erase a recorded cassette tape
- Follow steps 1 to 5 in "Cassette tape playback" to play the cassette tape.
- Press the RECORD ● and PLAY ◀ buttons together to start erasing.
- To stop erasing, press the STOP/EJECT ▪ button.
Cleaning the tape heads
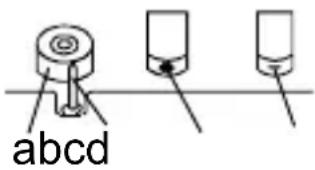
To maintain optimum sound quality, clean the pinch roller (a), capstan (b), playback/record heads (c) and erasure head (d) regularly (every 10 hours of use). Use a cotton swab lightly moistened with cleaning fluid or denatured alcohol.
MAINTENANCE
Care and maintenance
To clean the unit, unplug it and wipe off dust and stains with a soft cloth moistened with a mild soap and water solution only. Do not use benzene, thinner or similar chemicals to clean the unit.
Cleaning CD discs
If the music skips or does not play, the disc may need cleaning. Before playback, wipe the disc from the center out with a clean cloth. After use, store the disc in its case.
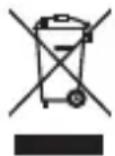
If at any time in the future you should need to dispose of this product please note that Waste electrical products should not be disposed of with household waste. Please recycle where facilities exist. Check with your Local Authority or retailer for recycling advice. (Waste Electrical and Electronic Equipment Directive)
TROUBLESHOOTING GUIDE
| Problems | Recommendations |
| 1.Theplayerordisplay doesnotworkproperly. | 1.1PresstheON/STANDBYbuttontogotostandbymode andpressitagaintoturnontheunit.1.2ResetbyunpluggingtheACpowercordforfewseconds,then plugitbackin. |
| 2.Thediscdoesnotplay. | 2.1Placethediscwiththelabelsidefacingup.2.2Ensurethatthediscisfreefromscratchesandfingerprints.2.3Checkthatthediscs/fileformatsarecompatible;referto “TECHNICALSPECIFICATIONS”.2.4Cleanthedisc. |
| 3.USBdeviceisnotread. | 3.1CheckthattheUSBdevicefilesystemisinFATorFAT32 format.3.2Duetodifferentformats,somemodelsofUSBstoragedevices orMP3playersmaynotberead. |
| 4.Noiseordistorted soundinradiomode. | 4.1FMmode:extendandpositiontheFMantennatoachievethe bestreception.4.2InAMmode,orientatetheunittoachieveoptimumreception . |
TECHNICAL SPECIFICATIONS
CD/USB
Compatible discs and files CD, CD-R/RW, CD-DA, MP3 and WMA
USB port type 2.0
USB maximum handling capacity 4GB
Radio
Tuning range FM: 88 – 108 MHz
AM: 531 – 1620 kHz
Antennas FM: telescopic antenna
AM: built-in ferrite bar
Cassette
Recording system AC bias
Erasing system Magnetic erase
Tape speed 4.75 cm / sec.
General
Output power (RMS) 2 x 1.2 W (AC power)
2 X 1 W (battery power supply)
Power consumption 9 W
Speakers 3" diameter, 8 Ohm impedance
Power source AC 230V \~ 50Hz
DC 9V: 6 x 1.5V batteries UM2/"C" size
Dimension 168 (H) x 262 (W) x 268 (D) mm
Weight 2.1 Kg
Note: Due to continuing improvements, the technical specifications are subject to change without notice.
Where to place the item :
Today's furniture is coated with a wide variety of lacquers and synthetic-coatings that are treated with an extensive range of cleaning products. Therefore, the possibility that some of these substances contain components that react adversely to the rubber feet of the item and soften them, cannot be completely excluded.
The rubber feet of the appliance can cause discoloring to furniture surfaces. If necessary, place the appliance on a non-slide surface.


- SCOTT®
- STEREO RADIO CASSETTE PLAYER WITH CD/MP3 PLAYER AND USB PORT
- WARNING
- CLASS 1 LASER PRODUCT
- SAFETY PRECAUTIONS
- ON PLACEMENT
- ON SAFETY
- ON AC VOLTAGE
- ON CONDENSATION
- CAUTION
- RISK OF ELECTRIC SHOCK DO NOT OPEN
- TABLE OF CONTENTS
- BOX CONTENTS
- LOCATION OF CONTROLS
- LCD DISPLAY
- POWER SUPPLY
- USING THE AC POWER SUPPLY
- USING BATTERIES
- PRECAUTIONS WHEN USING BATTERIES
- BASIC OPERATION
- ON/ STANDBY MODE
- CLOCK TIME SETTING
- SELECTING THE SOURCE
- VOLUME CONTROL
- CONNECTING HEADPHONES
- RADIO OPERATION
- LISTENING TO THE RADIO
- FM STEREO MODE
- ACHIEVING OPTIMUM RECEPTION
- CD/ MP3 / WMA PLAYER OPERATION
- START PLAYBACK
- PAUSE PLAYBACK
- STOP PLAYBACK
- SEARCH FUNCTION
- SKIP TO THE NEXT/ PREVIOUS TRACK
- SEARCH WITHIN A TRACK
- SKIP TO THE NEXT FOLDER (FOR MP3/ WMA FILES ONLY)
- REPEAT/RANDOM PLAYBACK
- PROGRAMMED PLAYBACK
- USB DEVICE OPERATION
- AUX IN FUNCTION
- CASSETTE TAPE OPERATION
- CASSETTE TAPE PLAYBACK
- CASSETTE TAPE RECORDING
- TO ERASE A RECORDED CASSETTE TAPE
- CLEANING THE TAPE HEADS
- MAINTENANCE
- CARE AND MAINTENANCE
- CLEANING CD DISCS
- TECHNICAL SPECIFICATIONS
- CD/USB
- RADIO
- CASSETTE
- GENERAL
Marque : SCOTT
Modèle : SX 55 RD
Catégorie : Lecteur/enregistreur de cd