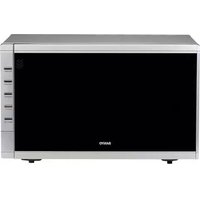
EM-C6786V - Four à micro-ondes SANYO - Notice d'utilisation et mode d'emploi gratuit
Retrouvez gratuitement la notice de l'appareil EM-C6786V SANYO au format PDF.


| Type de produit | Four à micro-ondes |
| Marque | Sanyo |
| Modèle | EM-C6786V |
| Capacité | 20 L |
| Dimensions (L x P x H) | 450 x 350 x 260 mm |
| Poids net | 12 kg |
| Alimentation électrique | 230 V ~ 50 Hz |
| Puissance micro-ondes | 800 W |
| Puissance grill (si équipé) | 1000 W |
| Fonctions principales | Décongélation, cuisson par étapes, horloge, minuteur, grill |
| Type de commande | Électronique tactile et boutons |
| Affichage | LED numérique |
| Entretien et nettoyage | Nettoyer avec un chiffon doux et humide ; éviter les abrasifs |
| Sécurité | Verrouillage enfant, arrêt automatique à l'ouverture de la porte |
| Accessoires inclus | Plateau tournant, grille métallique |
FOIRE AUX QUESTIONS - EM-C6786V SANYO
Questions des utilisateurs sur EM-C6786V SANYO
0 question sur cet appareil. Repondez a celles que vous connaissez ou posez la votre.
Poser une nouvelle question sur cet appareil
Téléchargez la notice de votre Four à micro-ondes au format PDF gratuitement ! Retrouvez votre notice EM-C6786V - SANYO et reprennez votre appareil électronique en main. Sur cette page sont publiés tous les documents nécessaires à l'utilisation de votre appareil EM-C6786V de la marque SANYO.
MODE D'EMPLOI EM-C6786V SANYO
SANYO
INSTRUCTION MANUAL AND COOKING GUIDE
EM-C6786V

Microwave Oven with Convection and Grill
Read these instructions carefully before using your microwave oven. If you follow the instructions, your oven will provide you with many years of good service.
SAVE THESE INSTRUCTIONS
PRECAUTIONS TO AVOID POSSIBLE EXPOSURE TO EXCESSIVE MICROWAVE ENERGY
(a) Do not attempt to operate this oven with the door open since open-door operation can result in harmful exposure to microwave energy. It is important not to defeat or tamper with the safety interlocks.
(b) Do not place any object between the oven front face and the door or allow soil or cleaner residue to accumulate on sealing surfaces.
(c) Do not operate the oven if it is damaged. It is particularly important that the oven door close properly and that there is no damage to the:
(1) DOOR (bent)
(2) HINGES AND LATCHES (broken or loosened)
(3) DOOR SEALS AND SEALING SURFACES
(d) The oven should not be adjusted or repaired by anyone except properly qualified service personnel.
SPECIFICATIONS
| Model: | EM-C6786V |
| Power Source: | AC 120V, 60Hz |
| Microwave Output Power: | 1000W |
| Grill Output Power: | 1150W |
| Convection Output Power: | 1500W |
| Oven Capacity: | 1.0 Cu. Ft. |
| Turntable Diameter: | 12.4" |
| Outside Dimensions: (w x h x d) | 20.5" X 13.25" X 18.8" |
| Weight: | Approx. 42.4 lbs. |
Specifications subject to change without notice.
WARNING: Handling the cord on this product or cords associated with accessories sold with this product, will expose you to lead, a chemical known to the State of California to cause cancer, and birth defects or other reproductive harm. Wash hands after handling.
TABLE OF CONTENTS
SAFETY
■ Proper and Safe Use of Your Oven....4
■ Important Safety Instructions....5
■ Grounding Instructions....6
■ Utensils....6-7
SETTING UP YOUR OVEN
■ Names of Oven Parts and Accessories....8
■ Turntable Installation....8
■ Installation....9
OPERATION
■ Control Panel and Features....10
■ Setting Clock....11
■ Child Lock-Out....11
■ Kitchen Timer....11
■ Microwave Time Cooking....12
■ Start/ +1 min....12
■ Multi-Stage Cooking....13
■ Power Level Setting Guide....13
■ Auto Menu Cooking....14-17
■ Weight Defrost....18
■ Time Defrost....18
■ Defrosting Chart....19
■ Grill/Combination Cooking 20-21
■ Convection Cooking....22
COOKING GUIDE
■ Cooking Principles and Techniques....23
MAINTENANCE
■ Troubleshooting....24
■ Questions and Answers....25
■ Cleaning....25
■ Warranty....26
ESPAÑOL
■ OPERACION.... 27-39
■ GARANTÍA....43
SAFETY
PROPER AND SAFE USE OF YOUR OVEN
• The oven must be on a level surface.
- The turntable and turntable roller rest must be in the oven during cooking.
- Place the cookware gently on the turntable and handle it carefully to avoid possible breakage.
- Incorrect use of browning dish may cause the turntable to break.
- Use carefully when cooking food in the microwave oven to avoid burning due to excessive cooking.
- Use only the specified bag size when using Direct Access Popcorn.
- Failure to maintain the oven in a clean condition could lead to deterioration that could adversely affect the life of the appliance and possibly result in a hazardous situation.
- The oven has several built-in safety switches to ensure that the power remains off when the door is open. Do not tamper with these switches.
- Do not operate the microwave oven empty. Operating the oven with no food or food that is extremely low in moisture can cause fire, charring or sparking.
- Do not cook bacon directly on the turntable. Excessive local heating of the turntable may cause it to break.
- Do not remove feet from the bottom of the oven.
- Do not heat baby bottles or baby food in the microwave oven. Uneven heating may occur and could cause physical injury.
- Do not heat narrow-necked containers, such as syrup bottles.
- Do not attempt to deep-fry in your microwave oven.
- Do not do home canning in this microwave oven as it is impossible to be sure all contents of the jar have reached boiling temperature.
- Do not use this microwave oven for commercial purposes. This microwave oven is made for household use only.
• To prevent eruptive boiling of hot liquids and beverages or scalding yourself, stir liquid before placing the container in the oven and again halfway through cooking time. Let stand in the oven for a short time and stir again before removing the container. - The oven cavity, door, turntable, Grill Rack and cookware become very hot when using grill or combination cooking. To prevent burns, use thick oven mitts when removing food, grill rack or cookware from oven.
IMPORTANT SAFETY INSTRUCTIONS
When using electrical appliances, basic safety precautions should be followed, including the following:
WARNING - To reduce the risk of burns, electric shock, fire, injury to persons or exposure to excessive microwave energy:
- Read all instructions before using the appliance.
- Read and follow the specific "PRECAUTIONS TO AVOID POSSIBLE EXPOSURE TO EXCESSIVE MICROWAVE ENERGY" on page 2.
- As with most cooking appliances, close supervision is necessary to reduce the risk of a fire in the oven cavity.
If materials inside the oven ignite:
- Keep the oven door closed
• Turn the oven off, and - Disconnect the power cord or shut off power at the fuse or circuit breaker panel.
Keep in mind the following rules at all times:
a. Do not overcook food. Carefully attend the appliance when paper, plastic, or other combustible materials are placed inside the oven to facilitate cooking.
b. Do not use the oven cavity for storage purposes. Do not store combustible items such as bread, cookies, paper products, etc. inside the oven. If lightning strikes the power line, the oven may turn on by itself.
c. Remove wire twist-ties and metal handles from paper or plastic containers/bags before placing them in the oven.
4. This oven must be grounded.
Connect only to properly grounded outlet. See "GROUNDING INSTRUCTIONS" on page 6.
5. Install or locate this oven only in accordance with the provided installation instructions.
6. Some products such as whole eggs, water with oil or fat, sealed containers and closed glass jars may explode and therefore should not be heated in this oven.
- Use this appliance only for its intended use as described in the manual. Do not use corrosive chemicals or vapors in this appliance. This oven is specifically designed to heat or cook food. It is not designed for industrial or laboratory use.
- As with any appliance, close supervision is necessary when used by children.
- Do not operate this oven if it has a damaged cord or plug, if it is not working properly or if it has been damaged or dropped.
- This appliance should be serviced only by qualified service technicians. Contact the nearest authorized service facility for examination, repair or adjustment.
- Do not cover or block any vents on the oven.
- Do not store or use this appliance outdoors.
- Do not use this oven near water, near a kitchen sink, in a wet basement or near a swimming pool, or similar locations.
- Do not immerse cord or plug in water.
- Keep cord away from heated surfaces.
- Do not let cord hang over edge of table or counter.
- When cleaning door and oven surfaces that meet when door is closed, use only mild, nonabrasive soaps or detergents applied with a sponge or soft cloth. (See "Cleaning" instructions on page 25.)
- Liquids, such as water, coffee, or tea are able to be overheated beyond the boiling point without appearing to be boiling. Visible bubbling or boiling when the container is removed from the microwave oven is not always present. This could result in very hot liquids suddenly boiling over when the container is disturbed or a spoon or other utensil is inserted into the liquid.
SAVE THESE INSTRUCTIONS
GROUNDING INSTRUCTIONS

DANGER
Electric Shock Hazard
- Touching some of the internal components can cause serious personal injury or death. Do not disassemble this appliance.

WARNING
Electric Shock Hazard
- Improper use of the grounding can result in electric shock. Do not plug into an outlet until appliance is properly installed and grounded.
Three-pronged (grounding) plug
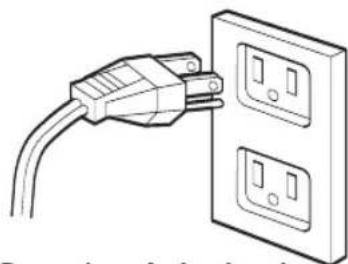
Properly polarized and grounded outlet
This appliance must be grounded. In the event of an electrical short circuit, grounding reduces the risk of electric shock by providing an escape wire for the electric current. This appliance is equipped with a cord having a grounding wire with a grounding plug. The plug must be plugged into an outlet that is properly installed and grounded.
Consult a qualified electrician or service person if the grounding instructions are not completely understood or if doubt exists as to whether the appliance is properly grounded. If it is necessary to use an extension cord, use only a 3-wire extension cord that has a 3-pronged grounding plug, and a 3-slot receptacle that will accept the plug on the appliance.
- A short power-supply cord is provided to reduce the risks resulting from becoming entangled in or tripping over a longer cord.
- Longer cord sets or extension cords may be used if care is exercised in their use.
- If a long cord or extension cord is used:
1) The marked electrical rating of the cord set or extension cord should be at least as great as the electrical rating of the appliance.
2) The extension cord must be a grounding-type 3-wire cord.
3) The longer cord should be arranged so that it will not drape over the counter top or tabletop where it can be pulled on by children or tripped over unintentionally.
UTENSILS

CAUTION
Personal Injury Hazard
- Tightly-closed utensils could explode. Closed containers should be opened and plastic pouches pierced before cooking.
See following page for further instructions "Cooking Utensils Guide and Materials to be avoided in microwave oven at all times."
Utensil Test:
- Fill a microwave-safe container with 1 cup of cold water (250 mL) along with the utensil in question.
- Cook on maximum power (100%) for 1 minute.
- Carefully feel the utensil. If the empty utensil is warm, do not use it for microwave cooking.
Do not exceed 1 minute testing time.
CAUTION:
- Do not use plastic containers for testing.
- Some containers and dishware may be warm (or hot) in only one area. Do not use a container that becomes warm anywhere.
COOKING UTENSILS GUIDE
| COOKWARE | MICROWAVE COOKING | GRILL COMBO 4 | COMBO 1 COMBO 2 COMBO 3 | CONVECTION |
| Glassware | YesHeat-resistant glassware only.Make sure there is no metallic trim. | Yes Heat-resistant glassware only. | Yes Heat-resistant glassware only. | Yes Heat-resistant glassware only. |
| Aluminum Foil and Foil Containers | NoMay be used for shielding only. Small smooth pieces can be used to cover thin parts of meat or poultry to prevent overcooking.Arcing can occur if foil is too close to oven walls.The foil should be at least 1 inch (2.5 cm) away from oven walls. | Yes | No | Yes |
| Dinnerware | Yes Heat-resistant only.Make sure there is no metallic trim. | Yes Heat-resistant only. | Yes Heat-resistant only.Make sure there is no metallic trim. | Yes Heat-resistant only. |
| Plastic Containers | Yes Heat-resistant only. | No | No | No |
| Plastic Wrap | Yes Microwave-safe only. | No | No | No |
| Paper Towels & Paper Plates | Yes Use with supervision for short-term cooking only.Do not use recycled paper products as they may contain metals and could ignite. | No | No | No |
| Metal Grill Rack | No | Yes | No | Yes |
| Wax Paper | Yes Use as a cover to prevent splattering and to retain moisture. | No | No | No |
Materials to be avoided in microwave oven at all times.
| Utensils Remarks | |
| Metal twist ties | May cause arcing and could cause a fire in the oven. |
| Paper bags | May cause a fire in the oven. |
| Plastic foam cups | Plastic foam may melt or contaminate the liquid inside when exposed to high temperature. |
| Wood | Wood will dry out when used in the microwave oven and may split or crack. |
SET UP
NAMES OF OVEN PARTS AND ACCESSORIES
Remove the oven and all materials from the carton and oven cavity. Your oven comes with the following accessories:
1 Turntable
1 Instruction Manual
1 Turntable Roller Rest
1 Grill Rack
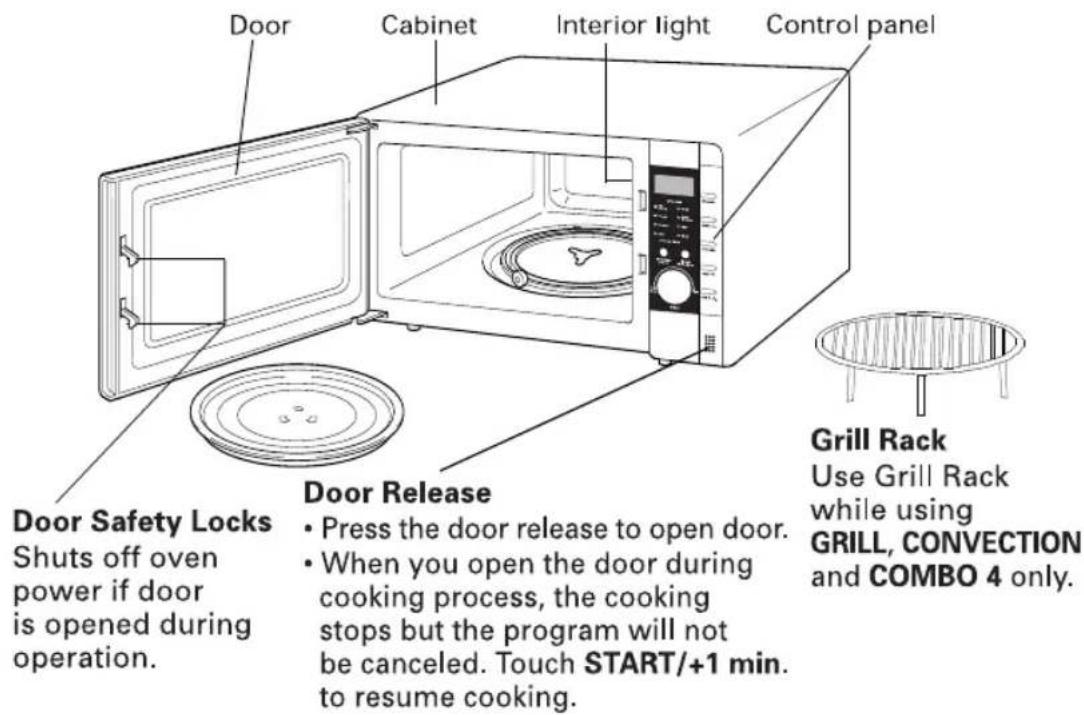
TURNTABLE INSTALLATION

- Place the roller rest on the cavity bottom.
-
Place the turntable on top of the roller rest as shown in the diagram. Make sure the turntable hub is securely locked in the receptacle.
-
Never place the turntable upside down. The turntable should never be restricted.
- Both turntable and roller rest must always be used during cooking.
- All food and containers of food are always placed on the turntable for cooking.
- If turntable or roller rest cracks or breaks, contact your nearest authorized service center for more information regarding replacement.
INSTALLATION
Remove all packing material and accessories. Examine the oven for any damage such as dents or broken door. Do not install if oven is damaged.
NOTE: This unit is not designed for 50 Hz or any circuit other than a 120-volt/60-Hz AC circuit. This oven is designed for countertop installation.
Countertop Installation
- Select a level surface that provides enough open space for the intake and/or outlet vents.

A minimum clearance of 3 inches is required between the oven and any adjacent wall. One side must be open.
- Leave a minimum clearance of 3 inches above the oven.
- Do not remove the legs from the bottom of the oven.
- Blocking the intake and/or outlet openings can damage the oven.
- Place the oven as far away from radios and TV's as possible. Operation of microwave oven may cause interference to your radio or TV.
- If the cabinet is covered with a protective film, remove the film.
- Plug your oven into a standard 120-volt/60-Hz household outlet. Be sure the electrical circuit is at least 15 amperes and that your microwave oven is the only appliance on the circuit.
WARNING: Do not install oven over a range cooktop or other heat-producing appliance. If installed near or over a heat source, the oven could be damaged and the warranty would be void.

OPERATION
CONTROL PANEL AND FEATURES
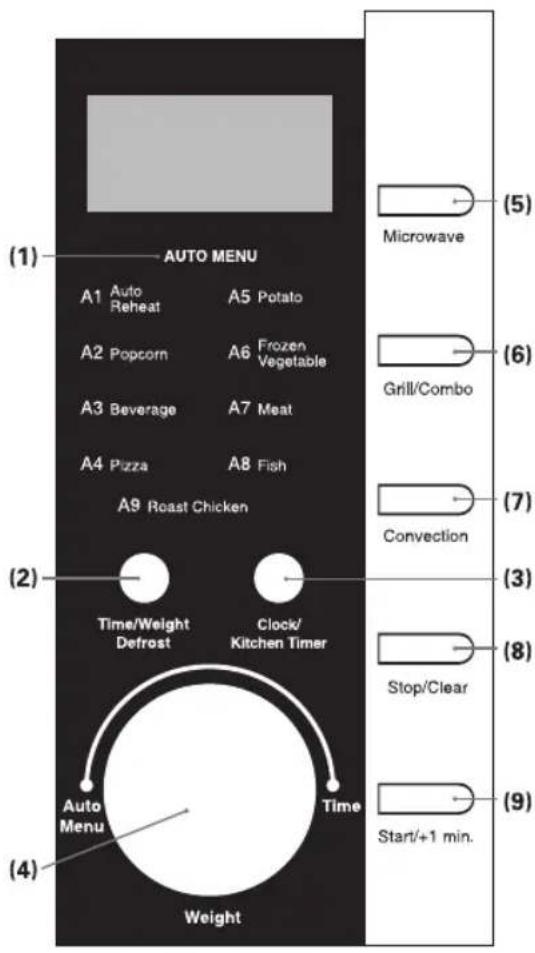
(1) AUTO MENU
Preprogrammed to cook or reheat popular foods with minimal number of steps.
(2) TIME/WEIGHT DEFROST
Press to defrost by time or weight.
(3) CLOCK/KITCHEN TIMER
Press to set clock or kitchen timer.
(4) ROTARY DIAL
Turn left to use AUTO MENUS.
Turn right to enter time, quantity or weight.
(5) MICROWAVE
Press to select MICROWAVE and change power level.
(6) GRILL/COMBO
Press to select GRILL or COMBO 1-4.
(7) CONVECTION
Press to select CONVECTION cooking and set temperature.
(8) STOP/CLEAR
Press once: Stops oven.
Press twice: Stops oven and clears settings.
(9) START/+1 min.
Use to quickly start the MICROWAVE. May also be used to add 1 minute to MICORWAVE, CONVECTION, GRILL and COMBO 1-4 programs.
- Five tones will sound to indicate the completion of a program.
DISPLAY
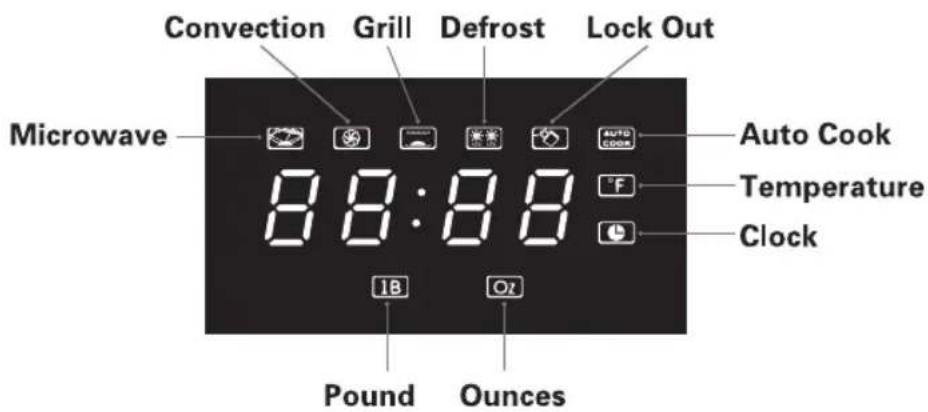
SETTING CLOCK
To set the correct time of day, follow the steps below.
Example: To set 3:15 :
| Step | Procedure | Keypad/Display |
| 1 | Open door. Press CLOCK/KITCHEN TIMER.The display will show “0:00” with the hours “0” flashing. | CLOCK/KITCHEN TIMER |
| 2 | Enter the correct hour by turning the Rotary Dial. Enter 1-12. |  |
| 3 | Press CLOCK/KITCHEN TIMER. The display will show “0:00” with the minutes “00” flashing. | CLOCK/KITCHEN TIMER |
| 4 | Enter the correct minutes by turning Rotary Dial. Enter 00-59. |  |
| 5 | Press CLOCK/KITCHEN TIMER. The colon will remain flashing. Close door. | 3:15 |
Note: • The display will show "0:00" if the clock is not set.
- If the clock (or display) shows any abnormality, unplug the oven from the AC outlet. Plug it in again and then reset the clock.
- When power resumes after a power interruption, reset the clock following the instructions above.
CHILD LOCK-OUT
The oven has a safety feature which prevents use by children. The feature locks the operation of the oven until canceled.
To set:
| Step | Procedure | Keypad/Display |
| 1 | Press and hold STOP/CLEAR for 3 seconds. indicator lights and a tone will sound. | STOP/CLEAR |
To cancel:
| Step | Procedure | Keypad/Display |
| 1 | Press and hold STOP/CLEAR for 3 seconds. indicator turns off and a tone will sound. | STOP/CLEAR |
KITCHEN TIMER
To set kitchen timer for 2 minutes:
| Step | Procedure | Keypad/Display |
| 1 | Press CLOCK/KITCHEN TIMER twice. lights and a tone will sound. The display will show “0:00”. | CLOCK/KITCHEN TIMER |
| 2 | Enter desired time by turning Rotary Dial. |  |
| 3 | Press START/+1min. indicator turns off. The display will show the time remaining. | START/+1 min. |
Note: • Five beeps indicate the KITCHEN TIMER is finished.
- Press STOP/CLEAR to cancel KITCHEN TIMER.
• The maximum time that can be set is 95 minutes.
MICROWAVE TIME COOKING
This basic microwave cooking method allows you to cook food for a desired time. The oven can be programmed for up to 95 minutes. In addition to 100% (maximum power level), you can select different microwave power from 4 levels.
Example: To cook at 80% power level for 20 minutes:
| Step | Procedure | Keypad/Display | |
| 1 | Press MICROWAVE.☑ indicator lights. | MICROWAVEP 100 | |
| 2 | Press MICROWAVE again to enter the desired power level. | MICROWAVE(Press MICROWAVE two times.P 80 appears in display). | |
| Press once | 100% | ||
| Press twice | 80% | ||
| Press three times | 50% | ||
| Press four times | 30% | ||
| Press five times | 10% | ||
| 3 | Open door. Enter cooking time in minutes and seconds by turning Rotary Dial. | 20:00 | |
| 4 | Close door. Press START/+ 1 min.☑ will flash while cooking. | START/+ 1 min. | |
Note: • If no power level is entered, the power level will always be 100%.
- Cooking times from 5 seconds-1 minute are in 5 second intervals.
• Cooking times from 1-5 minutes are in 10 second intervals
• Cooking times from 5-10 minutes are in 30 second intervals. - Cooking times from 10-30 minutes are in 1 minute intervals.
• Cooking times from 30-95 minutes are in 5 minute intervals. - You may press MICROWAVE while cooking to check the power level.
START/+1 min.
This feature provides two functions:
- You may quickly start MICROWAVE cooking by pressing START/+1 min. The maximum time that can be set is 95 minutes.
- You can add extra time while using MICROWAVE, CONVECTION, GRILL AND COMBO 1-4 programs. Press START/+1 min. while cooking is in progress to add time in 1 minute intervals. This feature may not be used with TIME or WEIGHT DEFROST, AUTO MENU or MULTI-STAGE cooking.
STOPPING THE OVEN WHILE IN OPERATION
- You can stop the oven by pressing STOP/CLEAR once or by opening the door.
- You can resume cooking by closing the door and pressing START/+1 min.
- Press STOP/CLEAR twice to stop the oven and clear all settings.
MULTI-STAGE COOKING
Some recipes require different stages of cooking at different power levels to get better results. You can program oven for up to 3 cooking stages. Each stage may be programmed using MICROWAVE, CONVECTION, GRILL or COMBO 1-4 programs.
| Step | Procedure | Keypad/Display |
| 1 | Press MICROWAVE 1-5 times to select power level.Example: To defrost chicken at 30% power level for 20 minutes for first stage. | MICROWAVE(Press MICROWAVE four times.P 30 appears in display). |
| 2 | Open door. Enter cooking time for first stage by turning Rotary Dial to the right. | 20:00 |
| 3 | Select MICROWAVE, GRILL, C1-C4, by pressing MICROWAVE, CONVECTION or GRILL/COMBO for second stage.Example: Grill chicken for 30 minutes for second stage. | GRILL(Press GRILL/COMBO once). |
| 4 | Enter cooking time for second stage by turning Rotary Dial. | 30:00 |
| 5 | Close door. Press START/+1 min. | START/+1 min. |
Note: • Tones will sound as each stage is finished. After total time has elapsed 5 tones will sound.
- You may enter a third stage by following steps 1+2 or 3+4.
- AUTO MENU programs cannot be selected for MULTI-STAGE cooking.
POWER LEVEL SETTING GUIDE
| 100% | • Cooking poultry, vegetables, and most casseroles. Boiling water. |
| 80% | • Reheating precooked or prepared food quickly.• Cooking fish. |
| 50% | • Cooking scrambled eggs.• Baking cakes. |
| 30% | • Cooking less tender cuts of meat in liquid or slow-cooking dishes.• Completing the cooking cycle of less tender roasts. |
| 10% | • Softening chocolate.• Clarifying butter.• Heating breads, rolls, pancakes, tacos, tortillas, French toast.• Manual defrosting. |
| 0% | • Standing time. |
AUTO MENU COOKING
The nine Auto Menus are preprogrammed to cook or reheat a variety of popular foods with a minimum number of steps.
Enter the desired AUTO MENU by turning the Rotary Dial to the left.
The AUTO MENU programs allow you to cook several quantities or weights of food. After you select an AUTO MENU program, press
START/+1 min. then turn Rotary Dial to enter quantity or weight.
Please see Auto Menu Cooking/Reheating Guide for suggestions for food preparation on the following items.
| AUTO MENU | FOOD | QUANTITY OR WEIGHT |
| A 1 | Auto Reheat | 8, 12, 16 ounces |
| A 2 | Popcorn | 1.75, 3.0, 3.5 ounce bags |
| A 3 | Beverage | 1, 2, 3 servings (8 ounce servings) |
| A 4 | Pizza | 1, 2, 3 slices |
| A 5 | Potato | 1, 2, 3 potatoes |
| A 6 | Frozen Vegetable | 8, 10, 16 ounces |
| A 7 | Meat | 4, 8, 16, 24 ounces |
| A 8 | Fish | 4, 8, 16 ounces |
| A 9 | Roast Chicken | 32, 40, 48 ounces |
Auto Reheat
This feature can be used to reheat precooked foods.
| Step | Procedure | Keypad/Display |
| 1 | Open door. Enter A1 by turning Rotary Dial to the left. [IMAGE] and indicators light. |  |
| 2 | Press START/+1 min. | START/+1 min. |
| 3 | Select weight of food by turning Rotary Dial. [OZ] indicator lights. |  |
| 4 | Close door. Press START/+1 min. [OZ] indicator turns off. [IMAGE] and will flash while cooking. | START/+1 min. |
Popcorn
Place prepackaged popcorn bag in oven. (1.75, 3.0 or 3.5 ounce)
| Step | Procedure | Keypad/Display |
| 1 | Open door. Enter A 2 by turning Rotary Dial to the left. [IMAGE] and [IMAGE] indicators light. |  |
| 2 | Press START/+1 min. | START/+1 min. |
| 3 | Select bag size by turning Rotary Dial. [OZ] indicator lights. |  |
| 4 | Close door. Press START/+1 min. [OZ] indicator turns off. [IMAGE] and [IMAGE] will flash while cooking. | START/+1 min. |
Beverage
Place 1-3 cups or mugs in oven.
| Step | Procedure | Keypad/Display |
| 1 | Open door. Enter A 3 by turning Rotary Dial to the left. [IMAGE] and [IMAGE] indicators light. |  |
| 2 | Press START/+1 min. | START/+1 min. |
| 3 | Select quantity by turning Rotary Dial. |  |
| 4 | Close door. Press START/+1 min. [IMAGE] and [IMAGE] will flash while cooking. | START/+1 min. |
Pizza
Place 1-3 slices of refrigerated pizza in oven.
| Step | Procedure | Keypad/Display |
| 1 | Open door. Enter A 4 by turning Rotary Dial to the left. [IMAGE] and [IMAGE] indicators light. |  |
| 2 | Press START/+1 min. | START/+1 min. |
| 3 | Select quantity by turning Rotary Dial. |  |
| 4 | Close door. Press START/+1 min. [IMAGE] and [IMAGE] will flash while cooking. | START/+1 min. |
Potato
Place 1-3 medium size potatoes in oven.
| Step | Procedure | Keypad/Display |
| 1 | Open door. Enter A 5 by turning Rotary Dial to the left. [IMAGE] and [IMAGE] indicators light. |  |
| 2 | Press START/+1 min. | START/+1 min. |
| 3 | Select quantity by turning Rotary Dial. |  |
| 4 | Close door. Press START/+1 min. [IMAGE] and [IMAGE] will flash while cooking. | START/+1 min. |
Frozen Vegetable
This feature can be used to cook frozen vegetables.
| Step | Procedure | Keypad/Display |
| 1 | Open door. Enter A 6 by turning Rotary Dial to the left.and indicators light. |  |
| 2 | Press START/+1 min. | START/+1 min. |
| 3 | Select weight by turning Rotary Dial.indicator lights. |  |
| 4 | Close door. Press START/+1 min.indicator turns off.and will flash while cooking. | START/+1 min. |
Meat
This feature can be used to cook beef or pork.
| Step | Procedure | Keypad/Display |
| 1 | Open door. Enter A 7 by turning Rotary Dial to the left. [IMAGE] and [IMAGE] and [IMAGE] indicators light. |  |
| 2 | Press START/+1 min. | START/+1 min. |
| 3 | Select quantity by turning Rotary Dial. [IMAGE] indicator lights. |  |
| 4 | Close door. Press START/+1 min. [IMAGE] indicator turns off. [IMAGE] and [IMAGE] and [IMAGE] will flash while cooking. | START/+1 min. |
Fish
This feature can be used cook fish.
| Step | Procedure | Keypad/Display |
| 1 | Open door. Enter A 8 by turning Rotary Dial to the left.☑ and ☑ indicators light. |  |
| 2 | Press START/+1 min. | START/+1 min. |
| 3 | Select quantity by turning Rotary Dial.☐ indicator lights. |  |
| 4 | Close door. Press START/+1 min.☐ indicator turns off.☑ and ☑ will flash while cooking. | START/+1 min. |
Roast Chicken
This feature can be used to roast chicken pieces or a whole chicken.
| Step | Procedure | Keypad/Display |
| 1 | Open door. Enter A 9 by turning Rotary Dial to the left. [IMAGE] and [IMAGE] and [IMAGE] indicators light. |  |
| 2 | Press START/+1 min. | START/+1 min. |
| 3 | Select weight by turning Rotary Dial. [IMAGE] indicator lights. |  |
| 4 | Close door. Press START/+1 min. [IMAGE] indicator turns off. [IMAGE] and [IMAGE] and [IMAGE] will flash while cooking. | START/+1 min. |
AUTO MENU COOKING/REHEATING GUIDE
| Item | Special Notes | Starting Temp. |
| Auto Reheat | Arrange food on plate and cover with plastic wrap. Allow to stand, covered, for a few minutes after reheating. | Refrigerated |
| Popcorn | Unfold the bag and place in oven according to package directions. Do not leave the oven unattended when popping popcorn. Pop only 1 popcorn bag at a time. | Room |
| Beverage | Place cups or mugs with liquids in oven uncovered. Stir after reheating. Be careful when handling or drinking liquids immediately out of oven as contents will be hot. | Room/ Refrigerated |
| Pizza | Place cooked slices of pizza on paper towel or paper plates. | Refrigerated |
| Potato | Pierce skin with a fork. Place on plate or in heat-resistant cookware. Arrange in a circular pattern with heavier ends pointing toward the outer edge of turntable. Let stand approximately 10 minutes after cooking. | Room |
| Frozen Vegetable | Follow package directions for adding water. Place in heat-resistant bowl or dish and cover. Let stand, covered, for approximately 2 minutes after cooking. | Frozen |
| Meat | Place beef or pork on plate or in heat-resistant cookware. Allow to stand, covered, for a few minutes after cooking. | Uncooked |
| Fish | Place fish in heat-resistant cookware. | Uncooked |
| Roast Chicken | Place whole chicken or chicken pieces in heat-resistant cookware. Allow to stand, covered, for a few minutes after cooking. | Uncooked |
WEIGHT DEFROST
WEIGHT DEFROST allows you to easily defrost foods by eliminating guesswork in determining defrosting time. Follow the steps below for easy defrosting.
Example: To defrost 2.5 lb. of chicken:
| Step | Procedure | Keypad/Display |
| 1 | Open door. Press TIME/WEIGHT DEFROST twice. The display will show d-2. [IMAGE] and [IMAGE] indicators light. | TIME/WEIGHT DEFROST |
| 2 | Enter weight by turning Rotary Dial. The weight range is between 0.25 – 4.0 lbs. [18] indicator lights. | 2.50 [IMAGE] |
| 3 | Close door. Press START/+ 1 min. [18] indicator turns off. [IMAGE] and [IMAGE] will flash while defrosting. | Press START/+1 min. |
Defrosting Techniques:
- Remove freezer paper, plastic wrap or foil wrap. Place food in microwave-safe dish.
• To prevent thin parts and edges from becoming too warm and cooking before center of food is defrosted, shield with small pieces of aluminum foil. - Some foods may still be icy in the center. Follow standing times in DEFROSTING CHART to complete defrosting.
| OZ | 4 | 8 | 12 | 16 | 20 | 24 | 28 | 32 | 36 | 40 | 44 | 48 | 52 | 56 | 60 | 64 |
| LBS | 0.25 | 0.50 | 0.75 | 1.00 | 1.25 | 1.50 | 1.75 | 2.00 | 2.25 | 2.50 | 2.75 | 3.00 | 3.25 | 3.50 | 3.75 | 4.00 |
TIME DEFROST
TIME DEFROST allows you to defrost foods based on time.
| Step | Procedure | Keypad/Display |
| 1 | Open door. Press TIME/WEIGHT DEFROST.The display will show d-1.and indicators light. | TIME/WEIGHTDEFROST |
| 2 | Enter desired defrosting time by turning Rotary Dial. |  |
| 3 | Close door. Press START/+ 1 min.and will flash while defrosting. | PressSTART/+1 min. |
Note: • The maximum time that can be set is 95 minutes.
DEFROSTING CHART
| Item | During Defrosting | Standing Time |
| Meat | ||
| Ground beef | Turn over. Remove defrosted portion. | 5-10 minutes |
| Liver | Drain Liquid. Separate pieces. | 10-15 minutes |
| Roasts | Turn over. Cover ends with foil. | 20-40 minutes |
| Sirloin steak | Turn over. | 5-10 minutes |
| Rib or T-bone | Turn over. | 10-20 minutes |
| Flank steak | Turn over. | 5-10 minutes |
| Stewing meat | Break apart. | 5-10 minutes |
| Poultry | ||
| Chicken, whole | Turn over. Cover ends with foil. Rinse under cold water after defrosting. | 15-30 minutes |
| Pieces | Separate. Turn over. | 10-15 minutes |
| Cornish hens | Turn over. Cover ends with foil. Rinse under cold water after defrosting. | 15-30 minutes |
| Fish and Seafood | ||
| Crabmeat, Shrimp | Break apart. | 5-10 minutes |
| Fish fillets | Turn over. Rearrange. Rinse under cold water to separate after defrosting. | 5-10 minutes |
| Steaks | Turn over. | 5-10 minutes |
| Scallops | Break apart. Remove defrosted seafood. | 5-10 minutes |
GRILL/COMBINATION COOKING
Grill and Combination Cooking offers many choices to cook your favorite foods. You may enter a cooking time up to 95 minutes.
GRILL
GRILL allows you to cook and heat foods. Use GRILL to cook foods such as hot dogs and sausages.
| Step | Procedure | Keypad/Display |
| 1 | Press GRILL/COMBO once. The display will show G-1. indicator lights. | GRILL/COMBO |
| 2 | Open door. Enter cooking time by turning Rotary Dial. |  |
| 3 | Close door. Press START/+1 min. indicator flashes while cooking. | START/+1 min. |
Note: • Do not remove turntable while using GRILL.
- Foods may be cooked in heat-resistant cookware or placed directly on Grill Rack. A heat-resistant pan can be placed underneath to catch any drippings.
- You may press GRILL/COMBO while cooking to check the COMBO selected.
Tips for using GRILL:
- For better results, some foods should be turned over halfway through cooking.
- Tones will sound halfway through cooking time as a reminder to turn foods over. Cooking will continue if oven is not opened to turn foods over.
COMBINATION 1 (MICROWAVE & CONVECTION)
Use COMBO 1 to cook foods such as frozen foods and casseroles.
| Step | Procedure | Keypad/Display |
| 1 | Press GRILL/COMBO twice. The display will show C-1. and indicators light. | GRILL/COMBO |
| 2 | Open door. Enter cooking time by turning Rotary Dial. |  |
| 3 | Close door. Press START/+1 min. and indicators flash while cooking. | START/+1 min. |
Note: • Do not remove turntable while using COMBO 1.
- Use microwave-safe and heat-resistant cookware.
- Check for doneness while cooking, as foods may cook more rapidly.
- You may press GRILL/COMBO while cooking to check the COMBO selected.
CAUTION!
The oven cavity, door, turntable, grill rack and cookware may become very hot. To prevent burns, use oven mitts when removing food or cookware from oven.
COMBINATION 2 (MICROWAVE & GRILL)
Use COMBO 2 to cook foods such as steaks.
| Step | Procedure | Keypad/Display |
| 1 | Press GRILL/COMBO 3 times. The display will show C-2. and indicators light. | GRILL/COMBO |
| 2 | Open door. Enter cooking time by turning Rotary Dial. |  |
| 3 | Close door. Press START/+1 min. and indicators flash while cooking. | START/+1 min. |
Note: • Do not remove turntable while using COMBO 2.
- Use microwave-safe and heat-resistant cookware.
- You may press GRILL/COMBO while cooking to check the COMBO selected.
COMBINATION 3 (GRILL & MICROWAVE)
Use COMBO 3 to cook foods such as chicken.
| Step | Procedure | Keypad/Display |
| 1 | Press GRILL/COMBO 4 times. The display will show C-3. and indicators light. | GRILL/COMBO |
| 2 | Open door. Enter cooking time by turning Rotary Dial. |  |
| 3 | Close door. Press START/+1 min. and indicators flash while cooking. | START/+1 min. |
Note: • Do not remove turntable while using COMBO 3.
- Use microwave-safe and heat-resistant cookware.
- You may press GRILL/COMBO while cooking to check the COMBO selected.
COMBINATION 4 (GRILL & CONVECTION)
Use COMBO 4 to cook foods such as hamburgers.
| Step | Procedure | Keypad/Display |
| 1 | Press GRILL/COMBO 5 times. The display will show C-4. [IMAGE] and indicators light. | GRILL/COMBO |
| 2 | Open door. Enter cooking time by turning Rotary Dial . |  |
| 3 | Close door. Press START/+1 min. [IMAGE] and indicators flash while cooking. | START/+1 min. |
Note: • Do not remove turntable while using COMBO 4.
- Foods may be cooked in heat-resistant cookware or placed directly on Grill Rack. A heat-resistant pan can be placed underneath to catch any drippings.
- Check for doneness while cooking, as foods may cook more rapidly.
- You may press GRILL/COMBO while cooking to check the COMBO selected.
CONVECTION COOKING + PREHEATING
With convection cooking, hot air is circulated throughout the oven cavity to brown and crisp foods quickly and evenly. Use CONVECTION for baking cakes, cookies, muffins, etc. You may also use CONVECTION to cook and evenly brown meats. You may enter a cooking time up to 95 minutes.
| Step | Procedure | Keypad/Display | |
| 1 | Press CONVECTION. The display will show 265°F. & and °F indicators light. | CONVECTION | |
| 2 | Press CONVECTION again to enter the desired temperature. | CONVECTION | |
| Press once | 265°F | ||
| Press twice | 285°F | ||
| Press 3 times | 300°F | ||
| Press 4 times | 320°F | ||
| Press 5 times | 340°F | ||
| Press 6 times | 350°F | ||
| Press 7 times | 375°F | ||
| Press 8 times | 400°F | ||
| Press 9 times | 410°F | ||
| Press 10 times | 430°F | ||
| 3 | Press START/+ 1 min. to begin preheating. & will flash while preheating.Tones will sound and the display will flash when oven reaches selected temperature.Cooking time must be entered within 5 minutes. | Press START/+1 min. | |
| 4 | Place food in oven. | ||
| 5 | Enter cooking time by turning Rotary Dial. & indicator turns off. |  | |
| 6 | Close door. Press START/+ 1 min. & will flash while cooking. | START/+1 min. | |
Note: • Do not remove turntable while using CONVECTION.
- The turntable can be left in oven cavity or removed while preheating.
- Cooking time cannot be entered if oven does not reach selected temperature.
- You may press CONVECTION while cooking to check the selected temperature.
Tips for using CONVECTION:
- Follow recipe or package directions for cooking cakes, muffins, snacks, etc.
- Check for doneness while cooking, as foods may cook more rapidly.
- A round, metal pizza pan, the Grill Rack or other heat-resistant cookware may be used.
CONVECTION COOKING WITHOUT PREHEATING
Enter cooking time by turning Rotary Dial after temperature is selected in Step 2. Place food in oven and close door. Press START/+ 1 MIN.
CAUTION!
The oven cavity, door, turntable, grill rack and cookware may become very hot. To prevent burns, use oven mitts when removing food or cookware from oven.
MICROWAVE ONLY COOKING GUIDE
COOKING PRINCIPLES AND TECHNIQUES
Advantages of microwave cooking are speed and efficiency. For warming, heating, and defrosting, nothing compares. Here are a few tips that will make microwaving easier and more enjoyable.
Microwave Cooking Principles:
Because microwave cooking requires only one-quarter to one-third the time of conventional cooking, cooking principles become even more important.
Quantity:
In microwave cooking, the cooking time is dependent on the amount of food in the oven. If you double the recipe, plan on doubling the cooking time.
Density:
Dense foods, such as potatoes, need more cooking time as they take longer for microwave energy to penetrate and for the heat to be conducted through them.
Shape and Size:
Cut food into uniform shapes and sizes for even cooking in the microwave. When cooking irregular shapes (such as chicken pieces), place the thicker parts to the outer edge of the dish.
Moisture, Sugar and Fat:
Food high in moisture, sugar or fat cook faster. Add a minimum of liquid to moisten foods.
An excess amount of water slows cooking.
Starting Temperature:
Frozen or refrigerated foods take longer to microwave than food at room temperature.
Delicate Ingredients:
Delicate foods such as eggs, cheese, mayonnaise, etc., cook very quickly, and should be watched carefully.
Microwave Cooking Techniques
Arranging:
Arrange food in a circular pattern, with denser, thicker items at the edge of the dish.
Piercing:
Pierce the membrane of foods such as eggs, oysters, snails, sausages, livers, clams and whole vegetables, so they do not burst.
Reheating:
Cooked food rehears extremely well by using a low level of microwave energy. Place denser foods near the outer edge of the dish when reheating.
Covering:
Most foods will cook and reheat better when covered. Pierce plastic wrap to vent steam.
Stirring:
Stirring foods help them cook more quickly and evenly.
Turning Over:
To promote more even cooking, turn large, solid items such as roasts or baked potatoes over halfway through the cooking time.
Shielding:
Use small, smooth strips of aluminum foil to prevent corners, thin or bony areas from overcooking.
Standing Time:
Foods continue cooking even after removal from the oven. Standing time is necessary to allow foods to complete cooking/defrosting.
Converting Recipes:
Microwave recipes will likely call for less liquid and cooking time.
Microwave Thermometers:
A microwave-safe thermometer can be used to achieve the best results. Insert the thermometer carefully and properly into the food. The guide below gives suggested thermometer readings for meat and poultry. Keep in mind that standing time is essential for most food to reach its proper serving temperature.
Guide to Internal Temperatures
| 140°F (60°C) | Rare beef |
| 150°F (66°C) | Vegetables, hot drinks,soups, casseroles |
| 160°F (71°C) | Medium beef, lamb,veal |
| 165°F (74°C) | Well-done beef, lamb |
| 170°F (77°C) | Whole fish |
| 185°F (85°C) | Well-done pork,poultry pieces orroasted bird |
MAINTENANCE
TROUBLESHOOTING
Check your problem by using the chart below and try the solutions for each problem. If the microwave oven still does not work properly, contact the nearest authorized service center.
| TROUBLE | POSSIBLE CAUSE | POSSIBLE REMEDY |
| Oven will not start. | Electrical cord for oven is not plugged in.Door is open.Wrong operation is set. | Plug into the outlet.Close the door and try again.Check instructions. |
| Arcing or sparking. | Materials to be avoided in microwave oven were used.The oven is operated when empty.Spilled food remains in the cavity. | Use microwave-safe cookware only.Do not operate with oven empty.Clean cavity with wet towel. |
| Unevenly cooked foods. | Materials to be avoided in microwave oven were used.Food is not defrosted completely.Cooking time, power level is not suitable.Food is not turned or stirred. | Use microwave-safe cookware only.Completely defrost food.Use correct cooking time, power level.Turn or stir food. |
| Overcooked foods. | Cooking time, power level is not suitable. | Use correct cooking time, power level. |
| Undercooked foods. | Materials to be avoided in microwave oven were used.Food is not defrosted completely.Oven ventilation ports are restricted.Cooking time, power level is not suitable. | Use microwave-safe cookware only.Completely defrost food.Check to see that oven ventilation ports are not restricted.Use correct cooking time, power level. |
| Improper defrosting. | Materials to be avoided in microwave oven were used.Cooking time, power level is not suitable.Food is not turned or stirred. | Use microwave-safe cookware only.Use correct cooking time, power level.Turn or stir food. |
| Oven turns off while preheating for CONVECTION cooking. | If preheating takes longer than 30 minutes, tones will sound and oven will turn off. | Press CONVECTION to select temperature.Press START/+1 min. to resume preheating. |
QUESTIONS AND ANSWERS
Q. When the oven is plugged into a wall outlet for the first time, it does not work properly. What is wrong?
A. The microcomputer used in the oven control may temporarily become scrambled and fail to function as programmed. Unplug the oven from the wall outlet and then plug it back in. The microcomputer will then reset for proper functioning.
Q. Why is there noise coming from the turntable when the oven is turned on?
A. This noise occurs when the turntable roller rest and cavity bottom are dirty. Clean the turntable roller rest cavity bottom. Frequent cleaning of these parts should eliminate or reduce the noise.
Q. Why is there noise coming from the oven when reducing power?
A. When cooking with a power other than maximum (100%), the oven cycles to obtain the lower power level. The clicking noise can be heard when the oven cycles on and off. This is normal.
Q. Why is there steam coming out of the air exhaust vent?
A. Steam is produced during cooking. The microwave oven has been made to vent this steam.
Q. What is wrong when the oven light will not glow?
A. There may be several reasons why the oven light will not glow. The light bulb has burned out or START/+1min. has not been pressed.
Q. Why do eggs sometimes pop?
A. The egg yolk may pop because of steam build-up inside the membrane. Pierce the membrane with a toothpick before cooking it. Never microwave eggs in the shell since they may explode.
Q. How are boil-overs avoided?
A. Use a larger utensil than usual for cooking. If you open the oven door or touch STOP/CLEAR, the food will stop boiling.
CLEANING
Wipe the oven inside and outside with a soft cloth and a mild detergent solution. Then rinse and wipe dry. This should be done on a weekly basis, more often if needed. Never use cleaning powders or rough pads. Excessive oil splatters on the inside top will be difficult to remove if left for many days. Wipe splatters with a wet paper towel, especially after cooking chicken or bacon.
REMOVABLE PARTS
The following parts may be removed as described. They should be washed in warm (not hot) water with a mild detergent and a soft cloth. Once they are clean, rinse them well and dry with a soft cloth. Never use cleaning powders, steel wool or rough pads.
- The turntable may be cleaned at the sink. Be careful not to chip or scratch the edges as this may cause the turntable to break during use.
- The turntable roller rest should be cleaned regularly.
• The Grill Rack may also be cleaned in the sink. Dry thoroughly after washing with mild detergent.
SPECIAL CARE
For best performance and safety, the inner door panel and the oven front frame should be free of food or grease buildup. Wipe them often with a mild detergent. Then rinse and wipe dry. Never use cleaning powders or rough pads. After cleaning the control panel, press STOP/CLEAR to clear any entries that might have been entered accidentally while cleaning the panel.
SANYO MICROWAVE OVEN LIMITED WARRANTY
OBLIGATIONS
MODEL EM-C6786V
In order to obtain warranty service, the product must be delivered to and picked up from an Authorized Sanyo Factory Service Center at the user's expense, unless specifically stated otherwise in this warranty. The names and addresses of Authorized Sanyo Service Centers may be obtained by calling the toll-free number listed below.
For product operation, authorized service center referral, service assistance, problem resolution, or parts and accessories availability, you may contact us by:
A. Visiting www.sanyoservice.com on a 24 Hr/7 days a week basis or B. Calling the customer support center at 1-800-421-5013
Weekdays 7:30am - 5:00pm Pacific Time.
THIS WARRANTY IS VALID ONLY ON SANYO PRODUCTS PURCHASED OR RENTED AND USED IN THE UNITED STATES OF AMERICA, EXCLUDING ALL U.S. TERRITORIES AND PROTECTORATES.
THIS WARRANTY APPLIES ONLY TO THE ORIGINAL RETAIL USER, AND DOES NOT APPLY TO PRODUCTS USED FOR ANY INDUSTRIAL, PROFESSIONAL OR COMMERCIAL PURPOSE. THE ORIGINAL DATED BILL OF SALE, SALES SLIP OR RENTAL AGREEMENT MUST BE SUBMITTED TO THE AUTHORIZED SANYO SERVICE CENTER AT THE TIME WARRANTY SERVICE IS REQUESTED. Subject to the OBLIGATIONS above and EXCLUSIONS below, SANYO FISHER COMPANY (SFC) warrants this SANYO product against defects in materials and workmanship for the periods of LABOR and PARTS specified below. SFC will repair or replace (at its option) the product and any of its parts which fail to conform to this warranty. The warranty period commences on the date the product was first purchased at retail.
| LABOR | PARTS |
| 1 YEAR | 1 YEAR |
EXCLUSIONS
This warranty does not cover (A) the adjustment of customer-operated controls as explained in the appropriate model's instruction manual, or (B) the repair of any product whose serial number has been altered, defaced or removed.
This warranty shall not apply to the temperature probe, turntable, turntable roller, grill rack, shelf, stirrer cover and any damage initiated by spark fires caused by using anything metal inside the oven, except those accessories approved by SFC.
This warranty does not apply to uncrating, setup, installation, removal of product for repair, or reinstallation of the product after repair.
This warranty does not apply to repairs or replacements necessitated by any cause beyond the control of SFC including, but not limited to, any malfunction, defect or failure caused by or resulting from unauthorized service or parts, improper maintenance, operation contrary to furnished instructions, shipping or transit accidents, modification or repair by the user, abuse, misuse, neglect, accident, incorrect line voltage, fire, flood or other Acts of God, or normal wear and tear. The foregoing is in lieu of all other expressed warranties and SFC does not assume or authorize any party to assume for it any other obligation or liability.
THE DURATION OF ANY WARRANTIES WHICH MAY BE IMPLIED BY LAW (INCLUDING THE WARRANTIES OF MERCHANTABILITY AND FITNESS) IS LIMITED TO THE TERM OF THIS WARRANTY. IN NO EVENT SHALL SFC BE LIABLE FOR SPECIAL, INCIDENTAL OR CONSEQUENTIAL DAMAGES ARISING FROM OWNERSHIP OR USE OF THIS PRODUCT, OR FOR ANY DELAY IN THE PERFORMANCE OF ITS OBLIGATIONS UNDER THIS WARRANTY DUE TO CAUSES BEYOND ITS CONTROL. SOME STATES DO NOT ALLOW LIMITATIONS ON HOW LONG AN IMPLIED WARRANTY LASTS AND/OR DO NOT ALLOW THE EXCLUSION OR LIMITATION OF CONSEQUENTIAL DAMAGES, SO THE ABOVE LIMITATIONS AND EXCLUSIONS MAY NOT APPLY TO YOU. THIS WARRANTY GIVES YOU SPECIFIC LEGAL RIGHTS. YOU MAY HAVE OTHER RIGHTS, WHICH VARY FROM STATE TO STATE.
OPERACIÓN
PANEL DE CONTROLES Y CARACTERÍSTICAS

(1) MENÚ AUTOMÁTICO
Preprogramada para cocinar o recalentar varios alimentos con el número mínimo de pasos.
(2) DESCONGELACIÓN POR TIEMPO/PESO
Oprima para descongelar por tiempo o peso.
(3) RELOJ/ CONTADOR DE TIEMPO DE LA COCCIÓN
Oprima para fijar el reloj o contador de tiempo de la cocción.
(4) RUEDA GIRATORIA
Gire a la izquierda para usar Los MENÚS AUTOMÁTICOS. Gire a la derecha para seleccionar el tiempo, la cantidad o peso.
(5) COCCIÓN POR MICROONDAS
Oprima para seleccionar la cocción por microondas (MICROWAVE) y cambiar los niveles de potencia.
(6) PARRILLA/COMBO
Oprima para seleccionar GRILL o COMBO 1-4.
(7) COCCIÓN POR CONVECCIÓN
Oprima para seleccionar la cocción por convección (CONVECTION) y fijar la temperatura.
(8) PARAR/ BORRAR
Oprima una vez: Para el horno. Oprima dos veces: Para el horno y borra todos los ajustes.
(9) INICIO/+1 min.
Utilice para comenzar rápidamente el tiempo de cocción. También se puede utilizar para agregar un minuto a los programas de la cocción por microondas, por convección, a la parrilla, y por combinación 1-4.
- Se emitirá un timbre 5 veces para indicar que la cocción está completa.
PANTALLA

AJUSTE DEL RELOJ
Para ajustar la hora correcta del día, siga los pasos siguientes.
Ejemplo: Para ajustar las 3:15 :
| Paso | Procedimiento | Teclado/Pantalla |
| 1 | Abra la puerta. Oprima CLOCK/KITCHEN TIMER.La pantalla mostrará “0:00” y parpadeará las horas “0”. | CLOCK/KITCHEN TIMER |
| 2 | Entre la hora correcta girando la rueda giratoria.Introduzca 1-12. |  |
| 3 | Oprima CLOCK/KITCHEN TIMER. La pantalla mostrará “0:00” y parpadeará los minutos “00”. | CLOCK/KITCHEN TIMER |
| 4 | Entre los minutos correctos girando la rueda giratoria. Introduzca 00-59. |  |
| 5 | Oprima CLOCK/KITCHEN TIMER. Los dos puntos seguirán parpadeando. Cierre la puerta. | 3:15 |
Nota: • Si el reloj no esté fijado, la pantalla mostrará "0:00."
- Si el reloj (o la indicación) muestra alguna anormalidad, desenchufe el horno de la toma de corriente de CA. Vuélvalo a enchufar y entonces reajuste el reloj.
- Cuando la potencia se reinicia después de una interrupción de energía eléctrica, tendrá que reprogramar el reloj según las instrucciones antedichas.
BLOQUEO CONTRA NIÑOS
El horno tiene una característica de seguridad que evita que lo empleen los niños. La característica bloquea la operación del horno hasta que se cancela.
Para ajustar:
| Paso | Procedimiento | Teclado/Pantalla |
| 1 | Oprima y mantenga presionado STOP/CLEAR por 3 segundos. EI indicador 📋 se ilumina y se emitirá un timbre. | STOP/CLEAR |
Para cancelar:
| Paso | Procedimiento | Teclado/Pantalla |
| 1 | Oprima y mantenga presionado STOP/CLEAR por 3 segundos. El indicador 📋 se apagará y se emitirá un timbre. | STOP/CLEAR |
TEMPORIZADOR DE COCINA
Para ajustar el temporizador para 2 minutos:
| Paso | Procedimiento | Teclado/Pantalla |
| 1 | Oprima CLOCK/KITCHEN TIMER dos veces. ⓔ se ilumina y se emitirá un timbre. La pantalla mostrará “0:00”. | CLOCK/ KITCHEN TIMER |
| 2 | Introduzca el tiempo de cocción deseada girando la rueda giratoria |  |
| 3 | Oprima START/+1min. El indicador ⓔ se apaga. La pantalla mostrará el tiempo de cocción restante. | START/+1 min. |
Nota: • 5 timbres indicarán el KITCHEN TIMER terminado.
- Oprima STOP/CLEAR para cancelar KITCHEN TIMER.
- El tiempo máximo que se puede fijar es 95 minutos.
TIEMPO DE COCCIÓN PARA HORNO DE MICROONDAS
Este método básico para cocinar con el horno de microondas le permite cocinar la comida durante el tiempo deseado. El horno puede programarse hasta para 95 minutos. Además del nivel de potencia 100% (nivel de potencia máxima), podrá seleccionar otra potencia de microondas entre 4 niveles.
Ejemplo: Para cocinar a un nivel de potencia de 80% durante 20 minutos:
| Paso | Procedimiento | Teclado/Pantalla | |
| 1 | Oprima MICROWAVE.El indicador se ilumina. | MICROWAVEP 100 | |
| 2 | Oprima MICROWAVE otra vez para seleccionar el nivel de potencia que usted desee. | Oprima una vez | 100% |
| Oprima dos veces | 80% | ||
| Oprima tres veces | 50% | ||
| Oprima cuatro veces | 30% | ||
| Oprima cinco veces | 10% | ||
| 3 | Abre la puerta. Introduzca el tiempo de cocción en minutos y segundos girando la rueda giratoria. | 20:00 | |
| 4 | Cierre la puerta. Oprima START/+ 1 min.se parpadeará mientras cocina. | START/+ 1 min. | |
Nota: • Si no se introduce ningún nivel de potencia, el nivel de potencia será siempre 100%.
- Los tiempos de cocción de:
5 segundos a 1 minuto están en intervalos de 5 segundos.
1-5 minutos están en intervalos de 10 segundos.
5-10 minutos están en intervalos de 30 segundos.
10-30 minutos están en intervalos de 1 minuto.
30-95 minutos están en intervalos de 5 minutos.
- Usted puede presionar el botón MICROWAVE mientras que está cocinando para revisar el nivel de potencia
START/+1 min.
Esta característica provee dos funciones:
- Oprima START/+1 min. para empezar el MICROWAVE rápidamente. El tiempo máximo que se puede fijar es 95 minutos.
- Se puede agregar más tiempo al usar los programas de MICROWAVE, CONVECTION, GRILL y COMBO 1-4. Oprima el botón START/+1 min. cuando la cocción esté en progreso para agregar tiempo en intervalos de un minuto. No se puede usar esta característica con el TIME o WEIGHT DEFROST, AUTO MENU o la cocción por MULTI-STAGE.
PARANDO EL HORNO MIENTRAS QUE EN LA OPERACIÓN
- Se puede detener el horno de microondas oprimiendo STOP/CLEAR una vez o abriendo la puerta del mismo.
- Puede reanudarse la cocción cerrando la puerta y oprimiendo START/+1 min.
- Oprima el botón STOP/CLEAR dos veces para parar el horno y borrar todos los parámetros introducidos.
COCCIÓN EN MÚLTIPLES ETAPAS
Algunas recetas requieren diferentes etapas de cocción a distintos niveles de potencia para obtener mejores resultados. Se puede programar el equipo para hasta 3 etapas de cocción.
Cada etapa puede ser programada usando programas de MICROWAVE, CONVECTION, GRILL o COMBO 1-4.
| Paso | Procedimiento | Teclado/Pantalla |
| 1 | Oprima MICROWAVE 1-5 veces para seleccionar el nivel de potencia.Ejemplo: Para descongelar una ave al 30% de Potencia por 20 minutos para la primera etapa. | MICROWAVE(Oprima MICROWAVE cuatro veces.P 30 aparecerá en la pantalla). |
| 2 | Abre la puerta. Introduzca el tiempo de cocción para la primera etapa girando la rueda giratoria a la derecha. | 20:00 |
| 3 | Seleccione MICROWAVE, GRILL, C1-C4,oprimiendo MICROWAVE, CONVECTIONo GRILL/COMBO para la segunda etapa.Ejemplo: Para asar ave durante 30 minutos para la segunda etapa. | GRILL(Oprima GRILL/COMBO una vez). |
| 4 | Introduzca el tiempo de cocción para la segunda etapa girando la rueda giratoria. | 30:00[IMAGE] |
| 5 | Cierre la puerta. Oprima START/+1 min. | START/+1 min. |
Nota: • Se emitirán timbres como se acabe cada etapa. Después de que haya pasado el tiempo total, se emitirá cinco timbres
- Usted puede introducir una tercera etapa siguiendo los pasos 1+2 o 3+4.
- No se puede seleccionar los programas de AUTO MENU para la cocción de MULTI-STAGE
GUIA DE AJUSTE DE NIVEL DE POTENCIA
100% • Cocinado de pollos, verduras y platos de carne con verdura. Hervir agua.
80% • Recalentamiento de comidas preparadas o comidas rápidamente preparadas.
• Cocinado de pescados.
50% • Cocinar huevos revueltos.
• Cocinar pasteles.
30% • Cocinar piezas de carne no tan suaves en líquidos, o platillos que se cocinen despacio.
- Completar el ciclo de cocinar de carnes no tan suaves en líquido o platos de cocción lenta.
10% · Ablandar chocolate.
- Clarificar manteca.
- Calentar panes, tortas, tacos, tortillas y pan francés.
- Descongelar manualmente.
0% · Tiempo de reposo.
COCCIÓN POR MENÚ AUTOMÁTICO
Las nueve teclas de Acceso Directo vienen preprogramadas para cocinar o recalentar en un mínimo número de etapas una diversidad de comidas de consumo habitual. Introduzca el AUTO MENU que usted desee girando la rueda giratoria a la izquierda. Los programas de AUTO MENU le permiten cocinar varias cantidades o pesos de alimentos. Después de seleccionar un programa de AUTO MENU, oprima el botón START/+1 min. entonces gire la rueda giratoria para entrar la cantidad o peso. Refiérase a Guía de Cocción por Menú Automático/Recalentar para encontrar sugerencias para la preparación de los siguientes productos.
| MENU AUTOMÁTICO | ALIMENTOS | CANTIDAD o PESO |
| A 1 | Recalentar Automática | 8, 12, 16 onzas |
| A 2 | Palomitas de Maíz | bolsa de 1.75, 3.0, 3.5 onzas en tamaño |
| A 3 | Bebida | 1, 2, 3 porciones (porciones de 8 onzas) |
| A 4 | Pizza | 1, 2, 3 tajadas |
| A 5 | Papa | 1, 2, 3 papas |
| A 6 | Verduras Congeladas | 8, 10, 16 onzas |
| A 7 | Carne | 4, 8, 16, 24 onzas |
| A 8 | Pescado | 4, 8, 16 onzas |
| A 9 | Pollo Asado | 32, 40, 48 onzas |
Recalentar Automática
Se puede utilizar esta función para recalentar los alimentos precocidos.
| Paso | Procedimiento | Teclado/Pantalla |
| 1 | Abre la puerta. Introduzca A1 girando la rueda giratoria a la izquierda.Los indicadores y iluminan. |  |
| 2 | Oprima START/+1 min. | START/+1 min. |
| 3 | Seleccione el peso de la comida girando la rueda giratoria.El indicador ilumina. |  |
| 4 | Cierre la puerta. Oprima START/+1 min.El indicador apaga.y se parpadearám mientras cocina. | START/+1 min. |
Palomitas de maíz
Coloque la bolsa preempaquetada de palomitas(1.75, 3.0 o 3.5 onzas) en el horno.
| Paso | Procedimiento | Teclado/Pantalla |
| 1 | Abre la puerta. Introduzca A 2 girando la rueda giratoria a la izquierda.Los indicadores y iluminan. | [wGWC] |
| 2 | Oprima START/+1 min. | START/+1 min. |
| 3 | Seleccione el tamaño de la bolsa girando la rueda giratoria. El indicador ilumina. |  |
| 4 | Cierre la puerta. Oprima START/+1 min.El indicador apaga.y se parpadearám mientras cocina. | START/+1 min. |
Bebidas
Coloque 1-3 tazas en el horno.
| Paso | Procedimiento | Teclado/Pantalla |
| 1 | Abre la puerta. Introduzca A 3 girando la rueda giratoria a la izquierda.Los indicadores y AUTO COOM iluminan. |  |
| 2 | Oprima START/+1 min. | START/+1 min. |
| 3 | Seleccione la cantidad girando la rueda giratoria. |  |
| 4 | Cierre la puerta. Oprima START/+1 min.y AUTO COOM se parpadearám mientras cocina. | START/+1 min. |
Pizza
Coloque 1-3 tajadas de pizza refrigerado en el horno.
| Paso | Procedimiento | Teclado/Pantalla |
| 1 | Abre la puerta. Introduzca A 4 girando la rueda giratoria a la izquierda.Los indicadores y iluminan. |  |
| 2 | Oprima START/+1 min. | START/+1 min. |
| 3 | Seleccione la cantidad girando la rueda giratoria. |  |
| 4 | Cierre la puerta. Oprima START/+1 min.y se parpadearám mientras cocina. | START/+1 min. |
Papas
Coloque 1-3 papas de tamaño medio en el horno.
| Paso | Procedimiento | Teclado/Pantalla |
| 1 | Abre la puerta. Introduzca A 5 girando la rueda giratoria a la izquierda.Los indicadores y auto codon iluminan. |  |
| 2 | Oprima START/+1 min. | START/+1 min. |
| 3 | Seleccione la cantidad girando la rueda giratoria. |  |
| 4 | Cierre la puerta. Oprima START/+1 min.y auto codon se parpadearám mientras cocina. | START/+1 min. |
Verduras Congeladas
Se puede utilizar esta función para cocinar verduras congeladas.
| Paso | Procedimiento | Teclado/Pantalla |
| 1 | Abre la puerta. Introduzca A 6 girando la rueda giratoria a la izquierda.Los indicadores y iluminan. |  |
| 2 | Oprima START/+1 min. | START/+1 min. |
| 3 | Seleccione el peso girando la rueda giratoria.El indicador ilumina. |  |
| 4 | Cierre la puerta. Oprima START/+1 min.El indicador apaga.y se parpadearám mientras cocina. | START/+1 min. |
Carne
Se puede utilizar esta función para cocinar carne de res o puerco.
| Paso | Procedimiento | Teclado/Pantalla |
| 1 | Abre la puerta. Introduzca A 7 girando la rueda giratoria a la izquierda.Los indicadores y y aluminan. |  |
| 2 | Oprima START/+1 min. | START/+1 min. |
| 3 | Seleccione la cantidad girando la rueda giratoria.El indicador ilumina. |  |
| 4 | Cierre la puerta. Oprima START/+1 min.El indicador apaga.y y auto se parpadearám mientras cocina. | START/+1 min. |
Pescado
Se puede utilizar esta función para cocinar pescado.
| Paso | Procedimiento | Teclado/Pantalla |
| 1 | Abre la puerta. Introduzca A 8 girando la rueda giratoria a la izquierda.Los indicadores y auto coom iluminan. |  |
| 2 | Oprima START/+1 min. | START/+1 min. |
| 3 | Seleccione el peso girando la rueda giratoria.EI indicador Oz ilumina. |  |
| 4 | Cierre la puerta. Oprima START/+1 min.EI indicador Oz apaga.y auto coom se parpadearám mientras cocina. | START/+1 min. |
Pollo Asado
Se puede utilizar esta función para asar pechugas de pollo o un pollo entero.
| Paso | Procedimiento | Teclado/Pantalla |
| 1 | Abre la puerta. Introduzca A 9 girando la rueda giratoria a la izquierda.Los indicadores y y iluminan. |  |
| 2 | Oprima START/+1 min. | START/+1 min. |
| 3 | Seleccione el peso girando la rueda giratoria.El indicador ilumina. |  |
| 4 | Cierre la puerta. Oprima START/+1 min.El indicador apaga.y y se parpadearám mientras cocina. | START/+1 min. |
GUÍA DE COCCIÓN POR MENÚ AUTOMÁTICO/RECALENTAR
| Alimento | Notas Especiales | Temp. Inicial |
| Recalen-tar Auto-mática | Disponga el alimento sobre el plato y cubra con la envoltura plástica. Deje reposar, sin destapar, un par de minutos luego de recalentar. | Refrigelado |
| Palomitas de Maíz | Abra la bolsa y coloque el alimento en el equipo siguiendo las instrucciones del envoltorio. Controle el funcionamiento del equipo cuando procese palomitas de maíz. Use 1 sola bolsa a la vez. | Ambiente |
| Bebida | Introduzca tazas o jarros con líquidos en el equipo destapados. Revolver después de recalentar. Tener precaución cuando se manipulen o beban líquidos inmediatamente después de retirados del horno de microondas ya que los mismos estarán calientes. | Ambiente/Refrigelado |
| Pizza | Coloque las porciones de pizza sobre toallas de papel o platos de cartón. | Refrigelado |
| Papas | Pinche la piel con un tenedor. Coloque en un plato o en una cacerola adecuada para horno de microondas. Dispóngalo de forma circular con los extremos más pesados apuntando hacia el borde exterior de la bandeja giratoria. Deje reposar por aproximadamente 10 minutos luego de cocinar. | Ambiente |
| Verduras Congela-das | Siga las instrucciones del paquete para añadir el agua. Coloque en un tazón o un plato adecuado para horno de microondas y cúbralo. Deje de reposar, cubierto, por aproximadamente 2 minutos después de la cocción. | Congelado |
| Carne | Coloque la carne cruda en un plato o en una cacerola adecuada para horno de microondas. Deje de reposar, cubierto, por un rato después de la cocción. | Sin cocer |
| Pecado | Coloque pescado en un plato adecuado para horno de microondas. | Sin cocer |
| Pollo Asado | Coloque el pollo entero o las pechugas de pollo en una cacerola adecuada para horno de microondas. Deje de reposar, cubierto, por un rato después de la cocción. | Sin cocer |
DESCONGELACIÓN POR PESO
WEIGHT DEFROST le permite descongelar la comida fácilmente eliminando la conjetura en determinar el tiempo de descongelación. Léase los pasos siguientes para el descongelamiento fácil.
Ejemplo: Para descongelar una ave de 2.5 libras:
| Paso | Procedimiento | Teclado/Pantalla |
| 1 | Abre la puerta. Oprima TIME/WEIGHT DEFROST dos veces. La pantalla mostrará d-2. Los indicadores y iluminan. | TIME/WEIGHT DEFROST |
| 2 | Introduzca el peso girando la rueda giratoria. La gama del peso está entre 0.25 – 4.0 libras. El indicador ilumina. | 2.50 |
| 3 | Cerre la puerta. Oprima START/+ 1 min. El indicador apaga. y se parpadearám mientras cocina. | Oprima START/+1 min. |
Técnicas de Descongelación:
- Remueva la cubierta de plástico, o papel aluminio. Coloque el alimento en una cacerola adecuada para horno de microondas.
- Para evitar que las partes y los bordes finos de los alimentos se lleguen a sobrecocer o cocinen antes que el centro del alimento se descongele, deberán ser cubiertos con los pedazos pequeños de papel aluminio.
- Algunos alimentos todavía pueden estar helados en el centro. El DEFROSTING CHART mostrará cuales tiempos de reposo son los recomendados para el alimento que está completamente descongelando.
| OZ | 4 | 8 | 12 | 16 | 20 | 24 | 28 | 32 | 36 | 40 | 44 | 48 | 52 | 56 | 60 | 64 |
| LBS | 0.25 | 0.50 | 0.75 | 1.00 | 1.25 | 1.50 | 1.75 | 2.00 | 2.25 | 2.50 | 2.75 | 3.00 | 3.25 | 3.50 | 3.75 | 4.00 |
TIEMPO DE DESCONGELACIÓN
TIME DEFROST permite que usted descongele los alimentos baseados del tiempo.
| Paso | Procedimiento | Teclado/Pantalla |
| 1 | Abre la puerta. Oprima TIME/WEIGHT DEFROST.La pantalla mostrará d-1.Los indicadores y iluminan. | TIME/WEIGHT DEFROST |
| 2 | Introduzca el tiempo de descongelación deseado girando la rueda giratoria. |  |
| 3 | Cierre la puerta. Oprima START/+ 1 min.y se parpadearám mientras cocina. | Oprima START/+1 min. |
Nota: • El tiempo máximo que se puede fijar es 95 minutos.
GRÁFICA DE DESCONGELACIÓN
| Producto | Durante la Descongelación | Tiempo de Reposo |
| Carne | ||
| Carne Molida | Dé la vuelta. Saque las partes descongeladas. | 5-10 minutos |
| Hígado | Escurrir el líquido. Separe las partes. | 10-15 minutos |
| Asados | Dé la vuelta. Cubra los extremos con laminilla. | 20-40 minutos |
| Bistecs | Dé la vuelta. | 5-10 minutos |
| Costilla | Dé la vuelta. | 10-20 minutos |
| Bistec del ijar | Dé la vuelta. | 5-10 minutos |
| Guisados | Separe los trozos. | 5-10 minutos |
| Pollo | ||
| Pollo entero | Dé la vuelta. Cubre com alumínio.Enjuague com agua fria despues de descongelar. | 15-30 minutos |
| Piezas | Separe las partes y dé la vuelta. | 10-15 minutos |
| Gallinas de Cornualles | Dé la vuelta. Cubre com alumínio.Enjuaguecom agua fria despues de descongelar. | 15-30 minutos |
| Pescados | ||
| Cangrejo,Camarón | Separe los trozos. | 5-10 minutos |
| Filetes de pescado | Dé la vuelta. Redistribuya. Enjuague com agua fria despues de descongelar. | 5-10 minutos |
| Bistecs | Dé la vuelta. | 5-10 minutos |
| Venera | Separe los trozos. Saque los pescados descongelados. | 5-10 minutos |
COCCIÓN A LA PARRILLA/COMBINACIÓN
La cocción a la parrilla y por combinación les ofrece muchas elecciones para cocinar sus alimentos favoritos. Puede seleccionar un tiempo de cocción hasta 95 minutos.
PARRILLA(GRILL)
GRILL permite cocinar y dorar alimentos. Utilice GRILL para cocinar alimentos como hot dogs y salchichas.
| Paso | Procedimiento | Teclado/Pantalla |
| 1 | Oprima GRILL/COMBO una vez. La pantalla mostrará G-1.El indicador ilumina. | GRILL/COMBO |
| 2 | Abre la puerta. Introduzca el tiempo de cocción girando la rueda giratória. |  |
| 3 | Cierre la puerta. Oprima START/+1 min.El indicador parpadeará mientras cocina. | START/+1 min. |
Nota: • No quite la bandeja giratoria mientras que usa GRILL.
- Los alimentos pueden ser cocidos en una cacerola adecuada para horno de microondas o colocados directamente encima de la parrilla doradora. Una bandeja de goteo adecuada para horno de microondas puede ser colocada debajo para recoger cualquier goteo del alimento.
- Usted puede presionar GRILL/COMBO mientras que cocina para revisar el COMBO seleccionada.
Consejos para utilizar GRILL:
- Para mejores resultados, algunos alimentos deberán ser volteados a mitad de tiempo de la cocción.
- Se emitirán timbres a mitad de tiempo de la cocción como un recordatorio de voltear alimentos. Si no se abra el horno para voltear alimentos, la cocción continuará.
COMBINACIÓN 1 (MICROONDAS & CONVECCIÓN)
Utilice COMBO 1 para la cocción de alimentos como alimentos congelados y cazuelas de guisados.
| Paso | Procedimiento | Teclado/Pantalla |
| 1 | Oprima GRILL/COMBO dos veces. La pantalla mostrará C-1.Los indicadores y iluminan. | GRILL/COMBO |
| 2 | Abre la puerta. Introduzca el tiempo de cocción girando la rueda giratória. |  |
| 3 | Cierre la puerta. Oprima START/+1 min.y se parpadearám mientras cocina. | START/+1 min. |
Nota: • No quite la bandeja giratoria mientras que usa COMBO 1.
- Utilice una cacerola adecuada para horno de microondas.
- Revise los alimentos durante la cocción para asegurar una cocción homogénea porque algunos alimentos se pueden cocer más rápido.
- Usted puede presionar GRILL/COMBO mientras que cocina para revisar el COMBO seleccionada.
PRECAUCIÓN!
El interior del horno, la puerta, la bandeja giratoria, y la parrilla doradora podrán estar calientes. Para evitar quemaduras, utilice las guantes para el horno para quitar el alimento, la parrilla doradora, o cacerolas del horno.
COMBINACIÓN 2 (MICROONDAS & PARRILLA)
Utilice COMBO 2 para cocinar alimentos como bistec.
| Paso | Procedimiento | Teclado/Pantalla |
| 1 | Oprima GRILL/COMBO tres veces. La pantalla mostrará C-2.Los indicadores y iluminan. | GRILL/COMBO |
| 2 | Abre la puerta. Introduzca el tiempo de cocción girando la rueda giratoria. |  |
| 3 | Cierre la puerta. Oprima START/+1 min.Los indicadores y se parpadearám mientras cocina. | START/+1 min. |
Nota: • No quite la bandeja giratoria mientras que usa COMBO 2.
- Utilice una cacerola adecuada para horno de microondas.
- Usted puede presionar GRILL/COMBO mientras que cocina para revisar el COMBO seleccionada.
COMBINACIÓN 3 (PARRILLA & MICROONDAS)
Utilice COMBO 3 para cocinar alimentos como pollo.
| Paso | Procedimiento | Teclado/Pantalla |
| 1 | Oprima GRILL/COMBO 4 veces. La pantalla mostrará C-3.Los indicadores y iluminan. | GRILL/COMBO |
| 2 | Abre la puerta. Introduzca el tiempo de cocción girando la rueda giratoria. |  |
| 3 | Cierre la puerta. Oprima START/+1 min.Los indicadores y se parpadearám mientras cocina. | START/+1 min. |
Nota: • No quite la bandeja giratoria mientras que usa COMBO 3.
- Utilice una cacerola adecuada para horno de microondas.
- Usted puede presionar GRILL/COMBO mientras que cocina para revisar el COMBO seleccionada.
COMBINACIÓN 4 (PARRILLA & CONVECCIÓN)
Utilice COMBO 4 para cocinar alimentos como hamburguesas.
| Paso | Procedimiento | Teclado/Pantalla |
| 1 | Oprima GRILL/COMBO 5 veces. La pantalla mostrará C-4.Los indicadores y iluminan. | GRILL/COMBO |
| 2 | Abre la puerta. Introduzca el tiempo de cocción girando la rueda giratoria. |  |
| 3 | Cierre la puerta. Oprima START/+1 min.Los indicadores y se parpadearám mientras cocina. | START/+1 min. |
Nota: • No quite la bandeja giratoria mientras que usa COMBO 4.
- Los alimentos pueden ser cocidos en una cacerola adecuada para horno de microondas o colocados directamente encima de la parrilla doradora. Una bandeja de goteo adecuada para horno de microondas puede ser colocada debajo para recoger cualquier goteo del alimento.
- Revise los alimentos durante la cocción para asegurar una cocción homogénea porque algunos alimentos se pueden cocer más rápido.
- Usted puede presionar GRILL/COMBO mientras que cocina para revisar el COMBO seleccionada.
COCCIÓN POR CONVECCIÓN + PRECALENTAR
Con la cocción por convección, el ventilador de la convección circula el aire caliente a través de la cavidad del horno. Esto permite que el alimento cocine más rápido y pareja. Use CONVECTION fpara hornear pasteles, galletas, pastelitos, etc. También, usted puede usar CONVECTION para cocinar y dorar más pareja. Usted puede introducir un tiempo de cocción hasta 95 minutos.
| Paso | Procedimiento | Teclado/Pantalla | ||
| 1 | Oprima CONVECTION. La pantalla mostrará 265°F.Los indicadores y iluminan. | CONVECTION | ||
| 2 | Oprima CONVECTIONotra vez para entrar la temperatura deseada. | Oprima una vez | 265°F | CONVECTION |
| Oprima dos veces | 285°F | |||
| Oprima 3 veces | 300°F | |||
| Oprima 4 veces | 320°F | |||
| Oprima 5 veces | 340°F | |||
| Oprima 6 veces | 350°F | |||
| Oprima 7 veces | 375°F | |||
| Oprima 8 veces | 400°F | |||
| Oprima 9 veces | 410°F | |||
| Oprima 10 veces | 430°F | |||
| 3 | Oprima START/+ 1 min. para comenzar el precalentamiento. comenzará a parpadear para mostrar que el horno está precalentando.Se emitirá un timbre y la pantalla parpadeará cuando el horno haya alcanzado su temperatura elegida.Tiene que introducir el tiempo de cocción dentro de 5 minutos. | Oprima START/+1 min. | ||
| 4 | Coloque el alimento en el horno. | |||
| 5 | Introduzca el tiempo de cocción girando la rueda giratoria. El indicador apaga. | |||
| 6 | Cierre la puerta. Oprima START/+ 1 min.parpadeará mientras cocina. | START/+1 min. | ||
Nota: • No quite la bandeja giratoria mientras que usa CONVECTION.
- Se puede dejar o quitar la bandeja giratoria en la cavidad del horno mientras que se precalienta.
- No se puede introducir el tiempo de cocción si el horno no haya alcanzado su temperatura elegida.
- Usted puede oprimir CONVECTION mientras que cocina para revisar la temperatura elegida.
Consejos para utilizar CONVECTION:
- Siga la receta o las indicaciones recomendadas de cocción del paquete para cocinar pasteles, pastelitos, meriendas, etc.
- Revise los alimentos durante la cocción para asegurar una cocción homogénea porque algunos alimentos se pueden cocer más rápido.
- Se puede usar una bandeja redonda de pizza, la Parrilla para Asar u otra cacerola adecuada para horno de microondas.
COCCIÓN POR CONVECTION SIN PRECALENTAR
Introduzca el tiempo de cocción girando la rueda giratoria después de seleccionar la temperatura deseada en el Paso 2. Coloque el alimento en el horno y cierre la puerta. Oprima START/+ 1 MIN.
PRECAUCIÓN!
El interior del horno, la puerta, la bandeja giratoria, y la parrilla doradora podrán estar calientes. Para evitar quemaduras, utilice las guantes para el horno para quitar el alimento, la parrilla doradora, o cacerolas del horno.
GUÍA DE COCINA PARA HORNO DE MICROONDAS SOLAMENTE
PRINCIPIOS Y TÉCNICAS DE COCCIÓN
Las ventajas de cocinar con un horno de microondas son la velocidad y la eficiencia. Para entibiar, calentar y descongelar no admite comparación. He aquí algunos consejos que harán el proceso de cocción con microondas más sencillo y placentero.
Principios de la cocción con microondas:
Dado que la cocción con microondas requiere sólo entre un cuarto y un tercio del tiempo de la cocción convencional, los principios cocción resultan aún más importantes.
Cantidad:
En la cocina con microondas, el tiempo de cocción depende de la cantidad de comida presente en el equipo. Si se duplican las cantidades, considere duplicar el tiempo de cocción.
Densidad:
Los alimentos densos, tales como las patatas, necesitan más tiempo de cocción ya que requieren más tiempo para que la energía de las microondas los penetre y para que el calor los atraviese.
Forma y Tamaño:
Corte los alimentos en formas y tamaños uniformes para lograr una cocción pareja en el horno de microondas. Cuando cocine formas irregulares (como por ejemplo trozos de pollo), disponga las partes más gruesas hacia el borde exterior de la bandeja.
Humedad, Azúcar y Grasa:
Los alimentos con gran humedad, azúcar o grasa se cocinan más rápidamente. Agregue un mínimo de líquido para humedecerlos. Una cantidad excesiva de agua retarda la cocción
Temperatura Inicial:
Las comidas congeladas o refrigeradas requieren más tiempo de microondas que las comidas a temperatura ambiente.
Ingredientes Delicados:
Los alimentos delicados tales como los huevos, el queso, la mayonesa, etc., se cocinan muy rápidamente y deben ser vigilados atentamente.
Técnicas de cocción con microondas
Disposición:
Disponga los alimentos en forma circular, con los productos más densos y gruesos en el la bandeja.
Perforación:
Perfore la membrana de alimentos tales como los huevos, las ostras, los caracoles, las salchichas, los distintos tipos de hígados, las almejas y las verduras enteras, para que no estallen.
Recalentamiento:
Los alimentos ya cocidos se recalientan muy bien utilizando un nivel relativamente bajo de energía de microondas. Cuando proceda a recalentar, coloque los alimentos más densos cerca del borde externo de la bandeja.
Cobertura:
La mayoría de los alimentos se cocinarán y recalentarán mejor cuando se encuentren cubiertos. Perfore la envoltura plástica para dar salida al vapor.
Revolver:
Revolver los alimentos permite que los mismos se cocinen más rápida y uniformemente.
Dar vuelta:
Para obtener una cocción más pareja, de vuelta los elementos grandes y sólidos tales como las carnes o patatas asadas a la mitad del ciclo de cocción.
Protección Térmica:
Utilice hojas de papel de aluminio cortadas en tiras angostas para evitar que se pasen de punto las esquinas o las zonas delgadas o compuestas de huesos.
Tiempo de reposo:
Los alimentos continúan cocinándose de retirarlas del horno de microondas. El período de reposo resulta necesario para permitir que los alimentos completen su cocción / descongelamiento.
Conversión de recetas:
Las recetas de microondas requerirán probablemente menos líquido y tiempo de cocción.
Termómetros de microondas:
Para lograr mejores resultados puede utilizarse un termómetro para microondas. Inserte el termómetro cuidadosa y adecuadamente en el alimento. La guía que se encuentra más abajo suministra lecturas sugeridas de termómetro para carnes y aves. Tenga presente que el tiempo de reposo resulta esencial para que la mayoría de los alimentos alcancen su temperatura adecuada de ingestión.
Guía de temperaturas internas
| 140°F (60°C) | Carne poco hecha |
| 150°F (66°C) | Verduras, bebidas calientes,sopas, cazuelas |
| 160°F (71°C) | Carne de novillo,cordero o ternera a punto |
| 165°F (74°C) | Carne y cordero bien cocidos |
| 170°F (77°C) | Pescados enteros |
| 185°F (85°C) | Carne de cerdo bien cocido,trozos de pollo o aves asadas |
MANTENIMIENTO
LOCALIZACIÓN DE FALLAS
Consulte su problema utilizando el cuadro mostrado más abajo y pruebe las soluciones sugeridas para cada uno. Si el horno de microondas continuara funcionando mal, comuníquese con el centro de reparaciones autorizado más cercano a su domicilio.
| PROBLEMA | CAUSA PROBABLE | POSIBLE REMEDIO |
| El horno no arranca. | El horno no se encuentra conectado al tomacorriente.La puerta está abierta.Se ha seleccionado una operación incorrecta. | Conecte el equipo al tomacorriente.Cierre la puerta y pruebe de nuevo.Verifique las instrucciones. |
| Formación de arcos o chisporroteo. | Se utilizaron materiales que deben ser evitados en un horno de microondas.Se opera el equipo estando vacío.Quedan restos de comida en la cavidad. | Utilice solamente vajilla diseñada para microondas.No operar el horno estando vacío.Limpiar la cavidad con un trapo húmedo. |
| Alimentos cocidos de manera despareja | Se utilizaron materiales que deben ser evitados en un hornode microondas.Los alimentos no se descongelan totalmente.El tiempo de cocción o el nivel de potencia no son los adecuados.La comida no se ha dado vuelta o revuelto. | Utilice solamente vajilla diseñada para microondas.Descongele totalmente los alimentos.Utilice tiempos de cocción y niveles de potencia correctos.De vuelta o revuelva los alimentos. |
| Alimentos pasados de punto de cocción. | El tiempo de cocción o el nivel de potencia no son los adecuados. | Utilice tiempos de cocción y niveles de potencia correctos. |
| Alimentos no cocidos del todo. | Se utilizaron materiales que deben ser evitados en un horno de microondas.Los alimentos no se descongelan totalmente.Los conductos de ventilación del horno se encuentran parcialmente obstruidos.El tiempo de cocción o el nivel de potencia no son los adecuados. | Utilice solamente vajilla diseñada para microondas.Descongele totalmente los alimentos.Inspeccione los conductos de ventilación para comprobar que no se encuentren parcialmente obstruidos.Utilice tiempos de cocción y niveles de potencia correctos. |
| Descongela- miento deficiente. | Se utilizaron materiales que deben ser evitados en un horno de microondas.El tiempo de cocción o el nivel de potencia no son los adecuados.La comida no se ha dado vuelta o revuelto. | Utilice solamente vajilla diseñada para microondas.Utilice tiempos de cocción y niveles de potencia correctos.De vuelta o revuelva los alimentos. |
| El horno se apagará mientras que precalienta para la cocción por CONVECTION. | Si el precalentamiento continúa por más de 30 minutos, se emitirá un timbre y el horno se apagará | Oprima CONVECTION para seleccionar la temperatura deseada.Oprima START/+1 min. para seguir precalentando. |
PREGUNTAS Y RESPUESTAS
P. Cuando el horno se enchufa por primera vez a un toma corriente de pared, no opera correctamente. ¿Qué es lo que funciona mal?
R. El microprocesador utilizado para controlar el equipo puede encontrarse temporariamente bloqueado y no funcionar como ha sido programado. Desenchufe el horno del tomacorriente de pared y luego vuélvalo a enchufar. El microprocesador se reconfigurará entonces para funcionar adecuadamente.
P. ¿Por qué se escucha ruido proveniente de la bandeja giratoria cuando se enciende el equipo?
R. Este ruido tiene lugar cuando el rodillo de la bandeja giratoria y el fondo de la cavidad se encuentran sucios. Limpie el fondo del asiento del rodillo de la bandeja giratoria. La limpieza frecuente de estas piezas debería eliminar o reducir este ruido.
P. ¿Por qué se escucha ruido proveniente del horno de microondas cuando se reduce la potencia?
R. Cuando se cocina con una potencia distinta del máximo (100%), el equipo va disminuyendo la misma hasta arribar al nivel de potencia más bajo. Mientras el mismo va recorriendo los distintos niveles de potencia, se pueden escuchar sucesivos clics. Esto es normal.
P. ¿Por qué sale vapor desde la abertura del escape de aire?
R. Durante la cocción se genera vapor. El horno de microondas está diseñado para dar salida a dicho vapor.
P. ¿Qué es lo que anda mal cuando no se enciende la luz del equipo?
R. Pueden haber varias razones por las cuales la luz del horno de microondas no se enciende. Se ha quemado la lamparita o no se ha oprimido el botón START/+1min.
P. ¿Por qué los huevos a veces estallan?
R. La yema del huevo puede estallar debido al incremento de vapor dentro de la membrana. Perfore la membrana de cada huevo con un palillo antes de proceder a cocinarlo. Nunca cocine en el horno de microondas huevos con su cáscara, ya que pueden estallar.
P. ¿Cómo evitar que los alimentos hiervan?
R. Utilice para la cocción un utensilio más grande que lo habitual. Si se abre la puerta del horno o se toca STOP/CLEAR, el alimento dejará de hervir.
LIMPIEZA
Limpie el horno de microondas por dentro y por fuera con un paño suave y una solución diluida de detergente. Luego enjuáguelo y séquelo. Esto debe llevarse a cabo semanalmente, y más a menudo si fuese necesario. Nunca utilice polvos abrasivos o almohadillas ásperas. Las excesivas salpicaduras de aceite sobre la parte superior interna del equipo serán difíciles de eliminar si se las ha dejado allí durante varios días. Quite las salpicaduras con una toalla húmeda de papel, sobre todo después de cocinar pollo o tocino.
PIEZAS EXTRAIBLES
Las siguientes piezas pueden extraerse procediendo de la manera que se describe. Deben ser lavadas en agua tibia (no caliente) con un detergente no agresivo y un paño suave. Una vez limpias, enjuáguelas bien y séquelas con un paño suave. Nunca utilice polvos abrasivos, lana de acero o almohadillas ásperas.
• La bandeja giratoria puede limpiarse en
el fregadero. Cuidar de no astillar o raspar los bordes, ya que esto puede causar que la misma se rompa durante el uso.
- El asiento del rodillo de la bandeja giratoria debe limpiarse con regularidad.
- La parrilla doradora puede limpiarse en el fregadero. Seque completamente después de lavar con detergente suave.
CUIDADOS ESPECIALES
Para un mejor desempeño y seguridad, el panel interno de la puerta del equipo y la parte frontal de la misma deben permanecer libres de restos de comida o grasa. Límpielos a menudo con un detergente suave. Luego enjuáguelos y séquelos. Nunca utilice polvos abrasivos o almohadillas ásperas.
Luego de limpiar el panel de control, oprima STOP/CLEAR para borrar cualquier parámetro de cocción que pudiese haber sido ingresado accidentalmente mientras se limpiaba el mismo.
GARANTÍA LIMITADA DEL HORNO DE MICROONDAS SANYO
OBLIGACIONES
MODELO EM-C6786V
Con el fin de obtener el servicio de garantía, deberá enviarse e ir a buscar el producto a un Centro de Servicio de Fábrica Autorizado por Sanyo a cargo del usuario, a menos que se mencione lo contrario en esta garantía. Los nombres y direcciones de los Centros de Servicio Autorizados por Sanyo podrán obtenerse llamando a los números sin cargo que se enumeran a continuación.
Para la operación del producto, remisión autorizada del centro de servicio, ayuda del servicio, resolución del problema, o para la disponibilidad de las partes y los accesorios, usted puede contactarnos por :
A. Visitar www.sanyoservice.com, 24 horas/7 días semanal o B. Llamar el centro de ayuda de cliente en 1-800-421-5013
Días laborales de 8:00 AM a 5:00 PM hora del Pacífico.
ESTA GARANTÍA ES VÁLIDA SÓLO PARA LOS PRODUCTOS SANYO ADQUIRIDOS O ALQUILADOS Y EMPLEADOS EN LOS ESTADOS UNIDOS DE AMÉRICA, EXCLUYENDO TODOS LOS TERRITORIOS DE EE.UU. Y PROTECTORADOS.
ESTA GARANTÍA SÓLO SE APLICA AL USUARIO ORIGINAL DE COMPRA AL POR MENOR, Y NO SE APLICA A LOS PRODUCTOS EMPLEADOS PARA PROPÓSITOS INDUSTRIALES, PROFESIONALES NI COMERCIALES. LA FACTURA DE VENTA, RECIBO DE VENTA O ACUERDO DE ALQUILER CON LA FECHA ORIGINAL DEBERÁ ENTREGARSE AL CENTRO DE SERVICIO AUTORIZADO POR SANYO EN EL MOMENTO DE SOLICITAR EL SERVICIO DE LA GARANTÍA.
Sujeto a las OBLIGACIONES de arriba y a las EXCLUSIONES de abajo, SANYO FISHER COMPANY (SFC) garantiza este producto Sanyo contra defectos de materiales y de mano de obra durante los períodos especificaciones para MANO DEOBRA y para PIEZAS siguientes. SFC reparará o reemplazará (según crea conveniente) el producto y cualquiera de sus piezas que no satisfagan esta garantía. El período de garantía comienza en la fecha de la primera adquisición del producto.
| MANO DE OBRA | PIEZAS |
| 1 AÑO | 1 AÑO |
EXCLUSIONES
Esta garantía no cubre (A) el ajuste de los controles operados por el usuario como se explica en el manual de instrucciones del modelo apropiado, ni (B) la reparación de ningún producto cuyo número de serie haya sido alterado, deformado o extraído.
Esta garantía no se aplicará a la sonda de temperatura, bandeja rotativa, rodillo de la bandeja rotativa, parrilla doradora, estante, cubierta agitadora, y cualquier daño iniciado por chispas de fuego causadas por cualquier metal en el interior del horno, excepto los accesorios aprobados por SFC. Esta garantía no se aplicará al desembalaje, preparación, instalación, ni extracción del producto para reparación, ni a la reinstalación del producto después de la reparación.
Esta garantía no se aplicará a las reparaciones o reemplazos necesarios por cualquier causa que esté fuera del alcance del control de SFC incluyendo, pero sin limitarse a ello, cualquier mal funcionamiento, defecto o falla causados o resultantes de un servicio no autorizado de piezas, mantenimiento inadecuado, operación contraria a las instrucciones suministradas, accidentes de embarques o de tránsito, modificaciones o reparaciones hechas por el usuario, abuso, uso indebido, negligencia, accidente, tensión incorrecta de la alimentación eléctrica, incendios, inundaciones, ni otros actos de la providencia, ni al desgaste y deterior o normal. Todo lo dicho será vigente en lugar de cualquier otra garantía expresada y SFC no asume ni autoriza a nadie a asumirla para cualquier obligación ni nada semejante.
LA DURACIÓN DE LAS GARANTÍAS QUE PUEDAN ESTAR IMPLICITAS POR LA LEY(INCLUYENDO LAS GARANTÍAS DE COMERCIO Y ADAPTABILIDAD) ESTÁ LIMITADA A LOS TÉRMINOS DE ESTA GARANTÍA. SFC NO SE HARÁ RESPONSABLE EN NINGÚN CASO DE LOS DAÑOS ESPECIALES, INCIDENTALES, NI DE CONSECUENCIA DEBIDO A LA PROPIEDAD O EMPLEO DE ESTE PRODUCTO, NI A NINGÚN RETARDO EN EL RENDIMIENTO DE SUS OBLIGACIONES DE ESTA GARANTÍA DEBIDO A LAS CAUSAS QUE ESTÁN MÁS ALLÁ DE SU CONTROL. ALGUNOS ESTADOS NO PERMITEN LIMITACIONES DE DURACIÓN DE UNA GARANTÍA IMPLÍCITA O/NI PERMITEN LAS EXCLUSIONES NI LIMITACIONES DE DAÑOS DE CONSECUENCIAS, POR LO QUE LAS LIMITACIONES Y EXCLUSIONES ANTERIORES PUEDEN NO APLICARSE A SU CASO EN PARTICULAR. ESTAGARANTÍA LE OTORGA DERECHOS LEGALES. ES POSIBLE QUE USTED TENGAOTROS DERECHOS, QUE VARÉAN SEGÚN EL ESTADO.

SANYO Fisher Company
21605 Plummer Street
Chatsworth, CA 91311
www.sanyousa.com

- SANYO
- INSTRUCTION MANUAL AND COOKING GUIDE
- EM-C6786V
- MICROWAVE OVEN WITH CONVECTION AND GRILL
- PRECAUTIONS TO AVOID POSSIBLE EXPOSURE TO EXCESSIVE MICROWAVE ENERGY
- TABLE OF CONTENTS
- SAFETY
- SETTING UP YOUR OVEN
- OPERATION
- COOKING GUIDE
- MAINTENANCE
- ESPAÑOL
- PROPER AND SAFE USE OF YOUR OVEN
- IMPORTANT SAFETY INSTRUCTIONS
- IF MATERIALS INSIDE THE OVEN IGNITE
- KEEP IN MIND THE FOLLOWING RULES AT ALL TIMES
- SAVE THESE INSTRUCTIONS
- GROUNDING INSTRUCTIONS
- DANGER
- ELECTRIC SHOCK HAZARD
- WARNING
- UTENSILS
- CAUTION
- PERSONAL INJURY HAZARD
- UTENSIL TEST
- DO NOT EXCEED 1 MINUTE TESTING TIME
- SET UP
- NAMES OF OVEN PARTS AND ACCESSORIES
- TURNTABLE INSTALLATION
- INSTALLATION
- COUNTERTOP INSTALLATION
- CONTROL PANEL AND FEATURES
- DISPLAY
- SETTING CLOCK
- CHILD LOCK-OUT
- KITCHEN TIMER
- MICROWAVE TIME COOKING
- START/+1 MIN
- STOPPING THE OVEN WHILE IN OPERATION
- MULTI-STAGE COOKING
- AUTO MENU COOKING
- AUTO REHEAT
- POPCORN
- BEVERAGE
- PIZZA
- POTATO
- FROZEN VEGETABLE
- MEAT
- FISH
- ROAST CHICKEN
- AUTO MENU COOKING/REHEATING GUIDE
- WEIGHT DEFROST
- DEFROSTING TECHNIQUES
- TIME DEFROST
- GRILL/COMBINATION COOKING
- GRILL
- TIPS FOR USING GRILL
- COMBINATION 1 (MICROWAVE & CONVECTION)
- COMBINATION 2 (MICROWAVE & GRILL)
- COMBINATION 3 (GRILL & MICROWAVE)
- COMBINATION 4 (GRILL & CONVECTION)
- CONVECTION COOKING + PREHEATING
- TIPS FOR USING CONVECTION
- CONVECTION COOKING WITHOUT PREHEATING
- MICROWAVE ONLY COOKING GUIDE
- COOKING PRINCIPLES AND TECHNIQUES
- MICROWAVE COOKING PRINCIPLES
- QUANTITY
- DENSITY
- SHAPE AND SIZE
- MOISTURE, SUGAR AND FAT
- STARTING TEMPERATURE
- DELICATE INGREDIENTS
- MICROWAVE COOKING TECHNIQUES
- ARRANGING
- PIERCING
- REHEATING
- COVERING
- STIRRING
- TURNING OVER
- SHIELDING
- STANDING TIME
- CONVERTING RECIPES
- MICROWAVE THERMOMETERS
- TROUBLESHOOTING
- QUESTIONS AND ANSWERS
- CLEANING
- REMOVABLE PARTS
- SPECIAL CARE
- SANYO MICROWAVE OVEN LIMITED WARRANTY
- OBLIGATIONS
- MODEL EM-C6786V
- THIS WARRANTY IS VALID ONLY ON SANYO PRODUCTS PURCHASED OR RENTED AND USED IN THE UNITED STATES OF AMERICA, EXCLUDING ALL U.S. TERRITORIES AND PROTECTORATES
- EXCLUSIONS
- OPERACIÓN
- PANEL DE CONTROLES Y CARACTERÍSTICAS
- PANTALLA
- AJUSTE DEL RELOJ
- BLOQUEO CONTRA NIÑOS
- TEMPORIZADOR DE COCINA
- TIEMPO DE COCCIÓN PARA HORNO DE MICROONDAS
- PARANDO EL HORNO MIENTRAS QUE EN LA OPERACIÓN
- COCCIÓN EN MÚLTIPLES ETAPAS
- GUIA DE AJUSTE DE NIVEL DE POTENCIA
- COCCIÓN POR MENÚ AUTOMÁTICO
- RECALENTAR AUTOMÁTICA
- PALOMITAS DE MAÍZ
- BEBIDAS
- PAPAS
- VERDURAS CONGELADAS
- CARNE
- PESCADO
- POLLO ASADO
- DESCONGELACIÓN POR PESO
- TÉCNICAS DE DESCONGELACIÓN
- TIEMPO DE DESCONGELACIÓN
- COCCIÓN A LA PARRILLA/COMBINACIÓN
- PARRILLA(GRILL)
- CONSEJOS PARA UTILIZAR GRILL
- COMBINACIÓN 1 (MICROONDAS & CONVECCIÓN)
- PRECAUCIÓN
- COMBINACIÓN 2 (MICROONDAS & PARRILLA)
- COMBINACIÓN 3 (PARRILLA & MICROONDAS)
- COMBINACIÓN 4 (PARRILLA & CONVECCIÓN)
- COCCIÓN POR CONVECCIÓN + PRECALENTAR
- CONSEJOS PARA UTILIZAR CONVECTION
- COCCIÓN POR CONVECTION SIN PRECALENTAR
- GUÍA DE COCINA PARA HORNO DE MICROONDAS SOLAMENTE
- PRINCIPIOS Y TÉCNICAS DE COCCIÓN
- PRINCIPIOS DE LA COCCIÓN CON MICROONDAS
- CANTIDAD
- DENSIDAD
- FORMA Y TAMAÑO
- HUMEDAD, AZÚCAR Y GRASA
- TEMPERATURA INICIAL
- INGREDIENTES DELICADOS
- TÉCNICAS DE COCCIÓN CON MICROONDAS
- DISPOSICIÓN
- PERFORACIÓN
- RECALENTAMIENTO
- COBERTURA
- REVOLVER
- DAR VUELTA
- PROTECCIÓN TÉRMICA
- TIEMPO DE REPOSO
- CONVERSIÓN DE RECETAS
- TERMÓMETROS DE MICROONDAS
- MANTENIMIENTO
- LOCALIZACIÓN DE FALLAS
- PREGUNTAS Y RESPUESTAS
- LIMPIEZA
- PIEZAS EXTRAIBLES
- CUIDADOS ESPECIALES
- GARANTÍA LIMITADA DEL HORNO DE MICROONDAS SANYO
- OBLIGACIONES
- MODELO EM-C6786V
- ESTA GARANTÍA ES VÁLIDA SÓLO PARA LOS PRODUCTOS SANYO ADQUIRIDOS O ALQUILADOS Y EMPLEADOS EN LOS ESTADOS UNIDOS DE AMÉRICA, EXCLUYENDO TODOS LOS TERRITORIOS DE EE.UU. Y PROTECTORADOS
- EXCLUSIONES
Marque : SANYO
Modèle : EM-C6786V
Catégorie : Four à micro-ondes