
TAB-80012 - Tablette DENVER - Notice d'utilisation et mode d'emploi gratuit
Retrouvez gratuitement la notice de l'appareil TAB-80012 DENVER au format PDF.


| Type de produit | Tablette tactile |
| Marque | Denver |
| Modèle | TAB-80012 |
| Dimensions (approx.) | 21,5 x 12,5 x 1 cm |
| Poids (approx.) | 350 g |
| Taille de l'écran | 8 pouces (20,3 cm) |
| Résolution d'écran | 1280 x 800 pixels |
| Système d'exploitation | Android 12 ou version ultérieure |
| Processeur | Quad-core 1,5 GHz |
| Mémoire RAM | 2 Go |
| Stockage interne | 32 Go |
| Connectivité | Wi-Fi 802.11 b/g/n, Bluetooth 4.0 |
| Alimentation | Batterie lithium-ion 4000 mAh, charge via micro-USB |
| Autonomie (approx.) | 6 heures |
| Fonctions principales | Navigation internet, lecture multimédia, applications, jeux, messagerie |
| Entretien et nettoyage | Nettoyer avec un chiffon doux et sec. Ne pas utiliser de produits liquides ou abrasifs. |
| Sécurité | Ne pas exposer à l'humidité ou à des températures extrêmes. Utiliser avec un chargeur adapté. |
| Pièces détachées et réparabilité | Pièces de rechange disponibles via service après-vente Denver. Réparation par personnel qualifié. |
| Informations générales | Garantie : 2 ans. Fabriqué en Chine. |
| Contenu de la boîte | Tablette, chargeur, câble USB, guide de démarrage rapide |
FOIRE AUX QUESTIONS - TAB-80012 DENVER
Questions des utilisateurs sur TAB-80012 DENVER
0 question sur cet appareil. Repondez a celles que vous connaissez ou posez la votre.
Poser une nouvelle question sur cet appareil
Téléchargez la notice de votre Tablette au format PDF gratuitement ! Retrouvez votre notice TAB-80012 - DENVER et reprennez votre appareil électronique en main. Sur cette page sont publiés tous les documents nécessaires à l'utilisation de votre appareil TAB-80012 de la marque DENVER.
MODE D'EMPLOI TAB-80012 DENVER
DENVER®
natural_image
Blank tablet device with rounded corners and a blank center (no text or symbols)USER'S MANUAL TAB-80012
www.facebook.com/denverelectronics Before connecting, operating or adjusting this product, please read this user's manual carefully and completely.
Table of Contents
Table of Contents 2
Features 3
Unit at a Glance 4
Getting Started 5
About Applications 7
Preinstalled Applications 7
Connecting to the Internet 8
Email....10
Transferring Files 11
Troubleshooting....12
Specifications 13
Features
Browse the Web. Visit your favorite websites
Check your e-mail Keep in touch with friends and family
Watch YouTube™ videos Browse the world's most popular video-sharing community
Read your favorite books Download thousands of books with the included E-book reader *
Discover thousands of apps for Android™ Games, applications, and more with marketplace (need for customer installed)
Connect to the Internet wirelessly High-speed Wi-Fi 802.11 b/g/n networking
Enjoy your media library anywhere
Portable powerhouse plays popular music, video, and photo formats microSD memory card reader. Increase your storage capacity (up to 32 GB supported)
Built-in camera Convenient front-facing camera
Automatic orientation detection Read any way you want; the display adjusts automatically!
Reading books in the ePub format requires the included E-book reader application.
Unit at a Glance
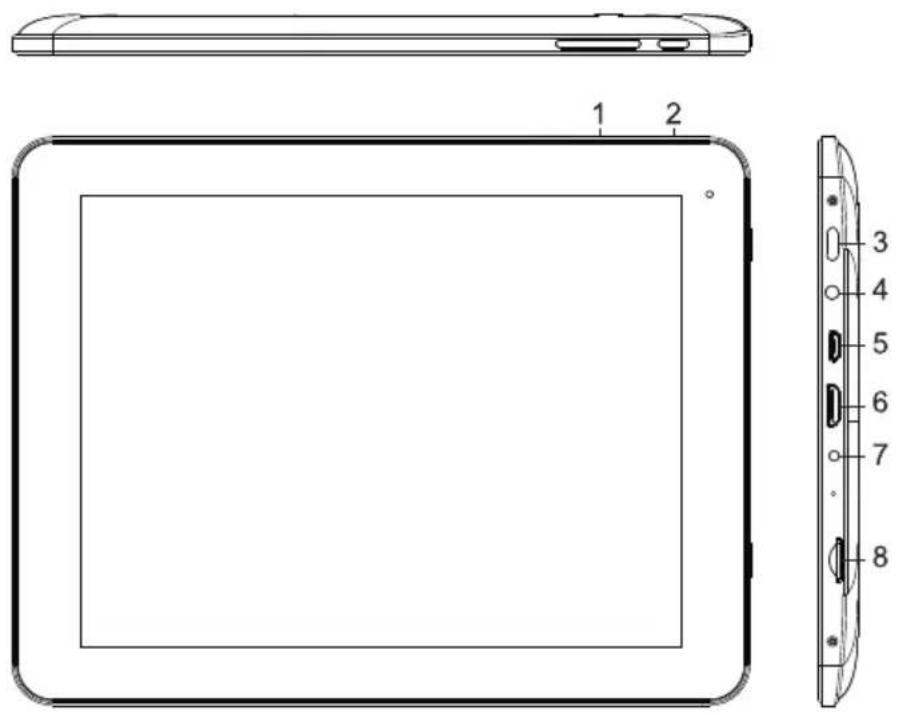
1.V-/V+
Press this button to adjust the volume
2. ESC
Press this button to return to a previous screen.
3. POWER
Press to turn the unit on, or to turn the screen on or off. Press and hold to access the Power Off menu.
4. Headphone
Audio output connection for headphones.
5. USB OTG
Connect to a USB device or a computer to transfer data (e.g. music, videos, photos, files).
6. HDMI
7. DC IN 5V
Change and power the tablet with the included power adapter.
8. microSD
Load external microSD memory cards here.
Getting Started
Turning the Tablet on or off
To turn the tablet on:
Press and hold the Power key until the LCD screen turns on. Wait until the Home screen appears; the tablet is now ready for use.
To turn the tablet off:
- Press and hold the Power key until the power off menu appears.
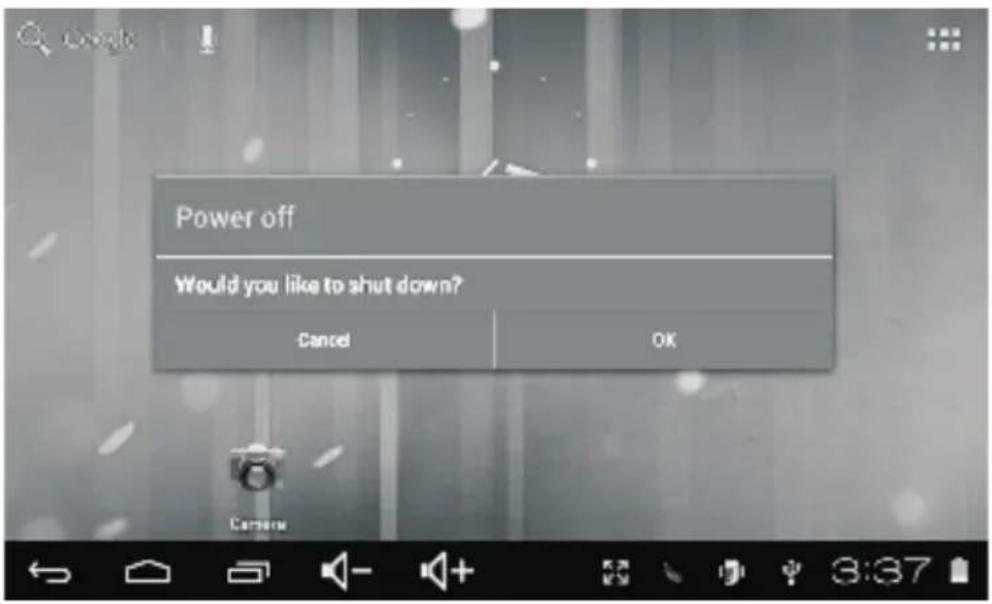
- Touch ok the screen to turn off the tablet.
Turning the Screen On or off (Standby)
When the tablet is on, you can turn off the screen to conserve battery power. Simply press the Power key once to turn the screen off. Press the Power key again to turn the screen back on.

To conserve battery power, the screen can be set to turn off automatically when the tablet is use (between 1 minute and 30 minutes). This Screen timeout option can be found in the y memu.
Getting Started
Unlocking the Screen
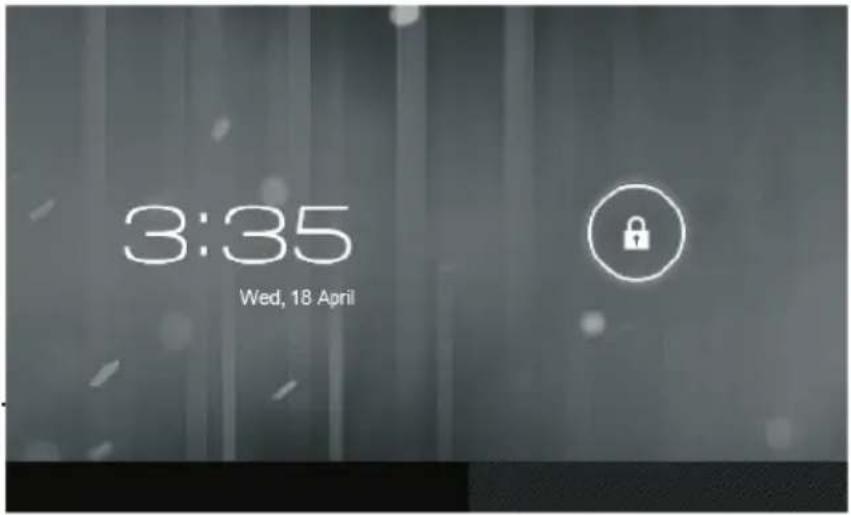
When the screen turns off, you will have to unlock the screen when you turn it back on. To unlock the screen, drag the lock icon across the screen towards the slide lock icon towards right side of the screen where there is an unlock icon shown. This will unlock tablet.
About Applications
To open an application, touch the application icon on the home screen or in the Launcher where you can tap the icon right up on the home screen to get in..
Launcher screen:
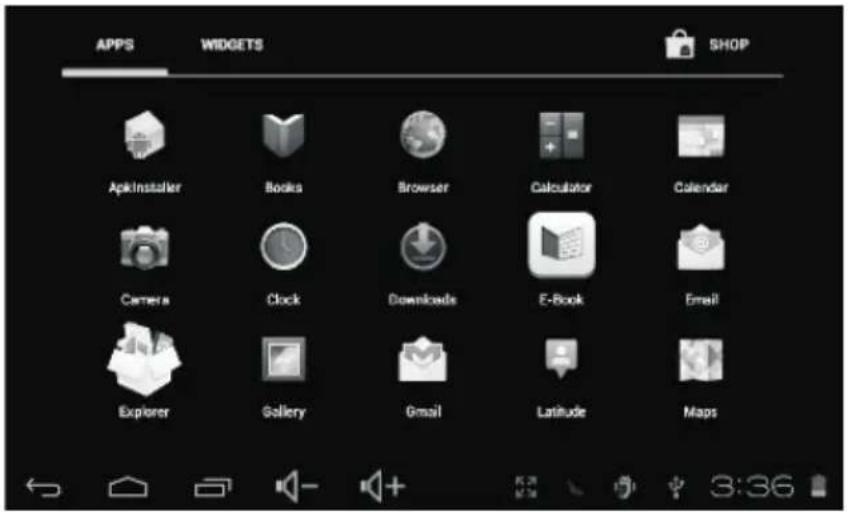

The screen shown above is for illustrative purposes only. Reserves the right to modify and we the final list of applications available on the tablet.
About Applications
Preinstalled Applications
Some applications have been installed on your tablet for your convenience.
These applications include:
Browse the web.
Perform simple mathematical operations.
Take pictures or videos with the frontfacing camera.

Check your e-mail.

Play music.
Access the Settings menu to adjust the tablet's options.
Preinstalled Applications
Installing Applications
You can also download an install additional applications from the device's applications marketplace, he web browser, or other sources.
The tablet must be set to allow installation of applications from non-Market sources. The Unknown sources option can be set in the Application settings menu.
Connecting to the Internet
Connecting to Wireless Internet
- Press the Settings Icon.
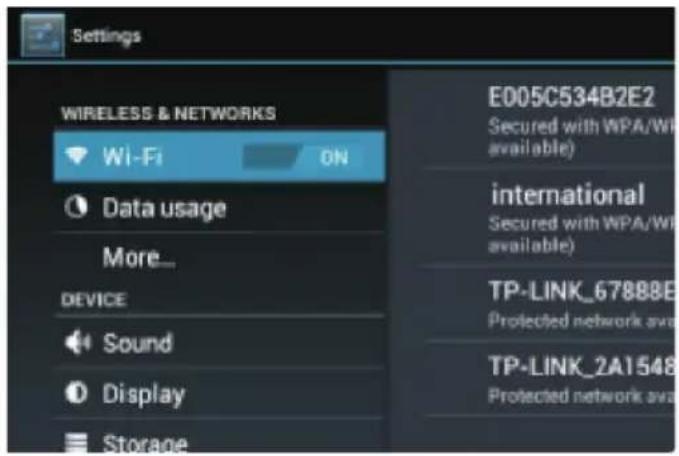
- Locate the Wi-Fi setting and slide it to the On position.
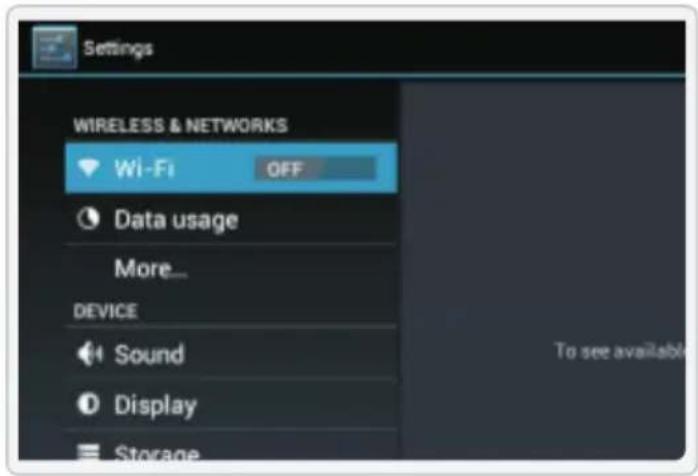
- Select a network from the list of available networks. To refresh the list of available networks, press the Scan button.
To manually add a network, select the Add Network button. - Select Connect from the pop up menu.
- If the network is secured with a password, enter the password to continue.
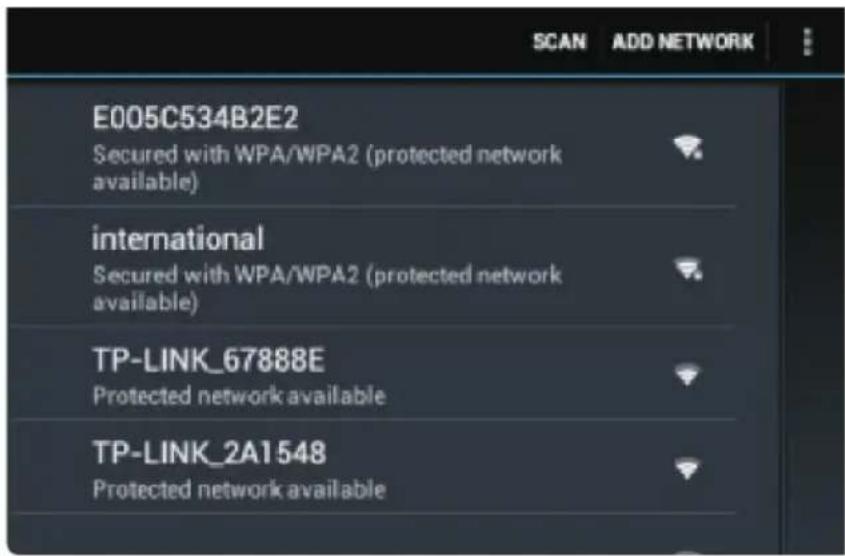
6.Once finished connecting, the display will showConnected under the name of the network.
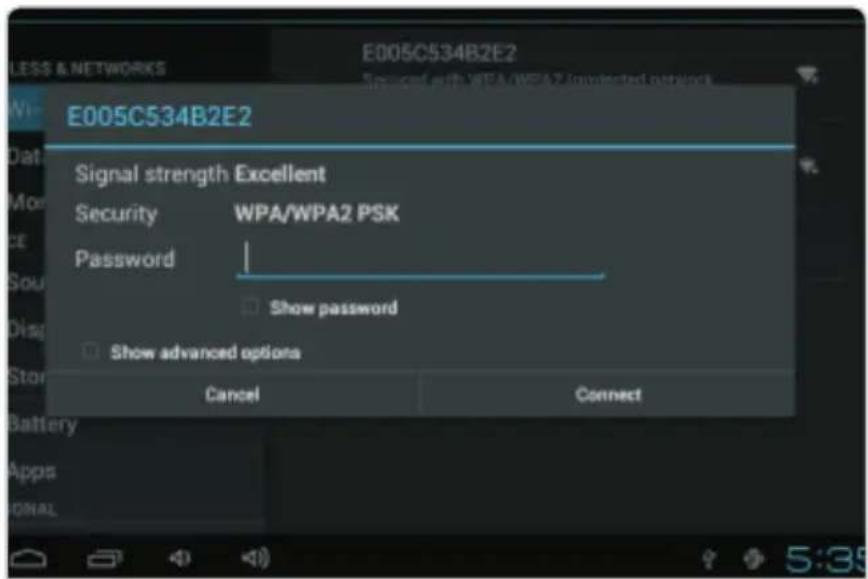
To conserve battery life, turn off Wi-Fi when not in use.
Setting Up an Email account
- Press Email icon under App menu.
- Enter your email address and password, then press Next.
If this does not work, you will need to manually configure your account. Before attempting to configure manually,re-enter you email and password to make sure they are correct.
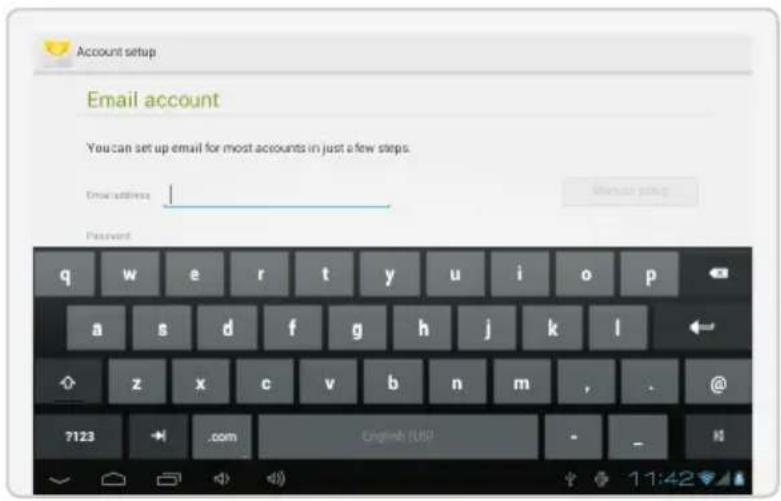
Manually Configuring an Email account
It is recommended to consult an IT professional before attempting to manually configure your email address.
- To set up your email manually, detailed information is required. Check your provider's website or phone support for individual provider information.
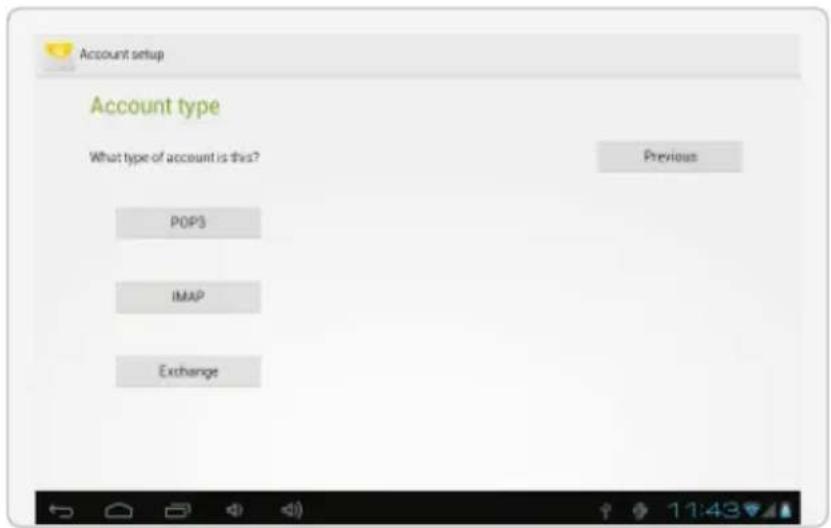
- The first thing you will need to determine is the server type. While most servers are POP3, IMAP and Exchange are also supported services.
- Enter your email address and password then press Next.
- Fill in all information for the Incoming server portion of the manual setup.
- Press Next and the app will test your settings. Wi-Fi is required to be active for this step.
- Fill in all information for the Outgoing server settings.
- Press Next and the app will test your settings. Wi-Fi is required to be active for this step.
Transferring Files
Transferring Files with a Computer
- To begin transferring files to your computer, plug one end of the included Mini-USB to USB cord into the unit, and the other into the USB port on a computer.
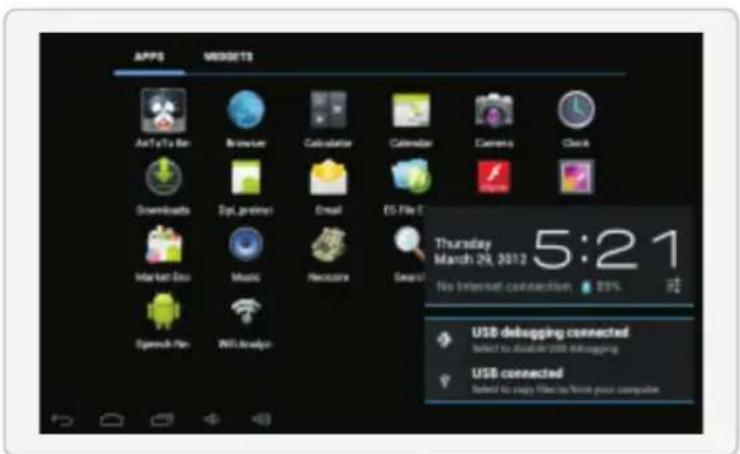
- Press the USB icon in the lower right hand corner.
- Select USB Connected.
- Press the Turn On USB Storage button.
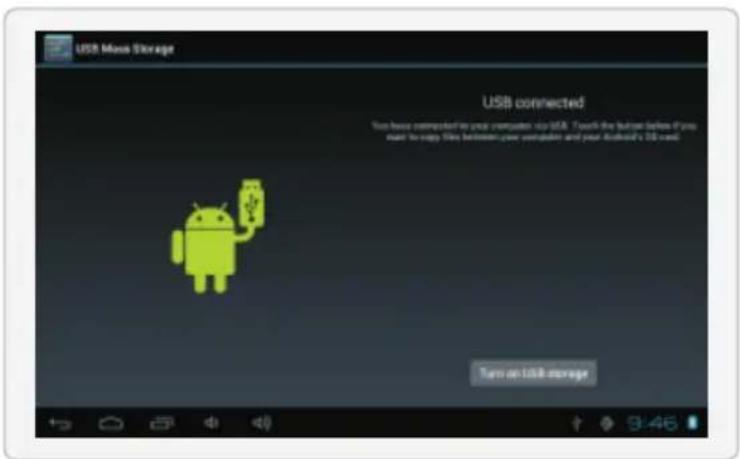
Using the native controls, accept any prompts on the connected computer.
- You will now be able to transfer files to and from your computer.
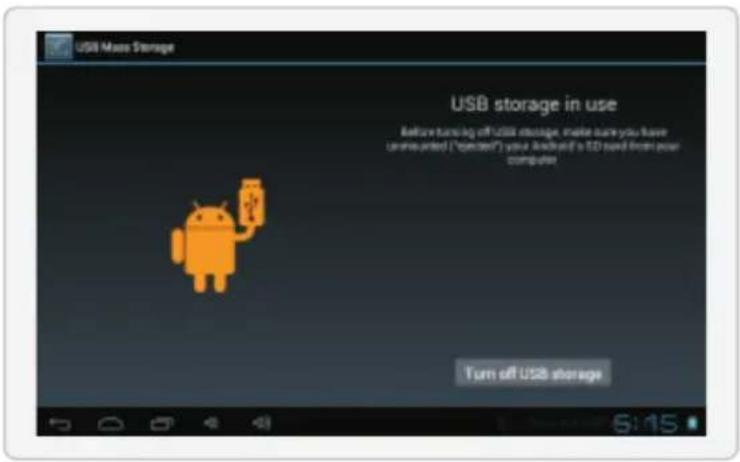
- To end the sessions, press the Turn Off USB Storage button.
Troubleshooting
1.1 Device can not connect to Wi-Fi
- Ensure the wireless network is working by testing it using another wireless device.
- Ensure the device and the wireless router is within the range of the wireless network to be connected too. Walls or other obstructions will reduce the possible distances between wireless devices.
- Ensure the security password being used is correct.
1.2 Device doesn't turn on
- You can not turn on the device when the battery charge is below the critical level, please charge the battery.
- Press the RESET button on the top of the device and check if it is restarting is normally or not.
- Check if the charger is connected correctly.
1.3 Heat Issues
- When running multiple applications, using the screen on its brightest setting, or when being charged, this device can get quite hot. This is normal and should not cause any inconvenience when in use.
1.4 System has anomalies and doesn't work correctly
- Installing some third-party applications may cause the system not to operate correctly. Press the RESET button and perform a system reset to resolve this issue.
1.5 Cannot set E-mail Account or registration application
- Ensure that the MID is connected to a Wi-Fi network and can connect to the Internet.
- Ensure you E-mail settings have been entered correctly for the account being accessed.
- Make sure your system time and local time are correct.
1.6 Can not record
- Press the RESET button on the top of the device, then check if the record function works correctly.
1.7 The stand-by time of the device is too short
- The duration of the lithium battery varies with environmental temperature changes and the service conditions. If the environment temperature is too low or too high, the duration of the battery will be affected. It is recommended to use this device at normal temperature.
- Battery life is dependent on usage. High volume, WIFI, and the frequent use may cause the battery to be drained at a higher rate.
1.8 No sound via earphone
- Please check if the volume setting is 0.
- Please check if audio file is broken, and try to playanother audio file to confirm. If the audio file is broken, it may cause severe noise or static.
1.9 The color distortion of video or picture display
- Press the RESET button on the top of the device to resolve this issue.
1.10 Can not copy files
- Please check if the device is connected to the computer correctly.
- Please check if the memory space is full.
- Please check if the USB cable is broken.
1.11 Other troubles Please follow up the steps as below to fix the other troubles before you return the MID/Tablet PC to us:
- Step 1: Press the RESET button on the top of the device, then check if the function works correctly;
- Step 2: Upgrade the firmware from the PC and restart the device and then check if the function works correctly.
Specifications
Please visit www.denver-electronics.com. for the latest product information. Design, specifications, and manual are subject to change without notice.
| Processor | Boxchip A10 1.2GHz(Cortex A8) |
| RAM | 512, DDR3 |
| Storage | 8GB flash built-in; micro SD card slotStorage (max.32GB supported) |
| Display | 8"TFT LCD(800x600), Capcitive touchscreen |
| Wi-Fi Networking IE | IEEE 802.11 b/g/n |
| Audio Output | 3.5mm headphone |
| PC Interface | USB 2.0 high speed |
| Additional Features | Built-in microphoneCamera(0.3MP)1.5W speaker |
| Operating System | Android^TM 4.0 |
| Power | Rechargeable Li-poly battery powerPower Adapter(DC 5V,2A) |
| Playback Time (hours) | Up to 6 hours music,Playback Time3 hours video,(hours) 4 hours web browsing |
Music was tested with a 128 kbps MP3 file; videowas tested with a 1920x1080 MPEG-4/AVC file; browsing was tested with the screen brightnessset to default. Actual playback results may vary.
Bluetooth Connectivity
This device features Bluetooth connectivity. To use this function, you should,
(1) Open the setting menu and select "WIRELESS & NETWORKS/Bluetooth";
(2) Slide th switch to turn on Bluetooth. The tablet will detect automatically all Bluetooth devices available in service range and list them.
(3) Select one from the list to start paring.
Once paring is done, you can transfer files between the pair of devices.
Electric and electronic equipment and included batteries contains materials, components and substances that can be hazardous to your health and the environment, if the waste material (discarded electric and electronic equipment and batteries) is not handled correctly.
Electric and electronic equipment and batteries is marked with the crossed out trash can symbol, seen below. This symbol signifies that electric and electronic equipment and batteries should not be disposed of with other household waste, but should be disposed of separately.
As the end user it is important that you submit your used batteries to the appropriate and designated facility. In this manner you make sure that the batteries are recycled in accordance with legislature and will not harm the environment.
All cities have established collection points, where electric and electronic equipment and batteries can either be submitted free of charge at recycling stations and other collection sites, or be collected from the households. Additional information is available at the technical department of your city.
Please fill the blank with the model number of this player for future reference
Importer: DENVER ELECTRONICS A/S Stavneagervej 22 DK-8250 EGAA DENMARK
ALL RIGHTS RESERVED, COPYRIGHT DENVER ELECTRONICS A/S
DENVER®
www.denver-electronics.com

Hereby, Inter Sales A/S, declares that this tablet DENVER TAB-80012 is in compliance with the essential requirements and other relevant provisions of Directive 1999/5/EC.
A copy of the Declaration of Conformity may be obtained at
Inter Sales A/S
Stavneagervej 22
DK-8250 Egaa
Denmark
- DENVER®
- USER'S MANUAL TAB-80012
- Table of Contents
- Features
- Unit at a Glance
- 1.V-/V+
- ESC
- POWER
- Headphone
- USB OTG
- HDMI
- DC IN 5V
- microSD
- Getting Started
- Turning the Tablet on or off
- Turning the Screen On or off (Standby)
- Unlocking the Screen
- About Applications
- Preinstalled Applications
- Installing Applications
- Connecting to the Internet
- Connecting to Wireless Internet
- Setting Up an Email account
- Manually Configuring an Email account
- Transferring Files
- Troubleshooting
- Device can not connect to Wi-Fi
- Device doesn't turn on
- Heat Issues
- System has anomalies and doesn't work correctly
- Cannot set E-mail Account or registration application
- Can not record
- The stand-by time of the device is too short
- No sound via earphone
- The color distortion of video or picture display
- Can not copy files
- Other troubles Please follow up the steps as below to fix the other troubles before you return the MID/Tablet PC to us:
- Specifications
- Bluetooth Connectivity
Marque : DENVER
Modèle : TAB-80012
Catégorie : Tablette