
M-1015MR - Autoradio MUSE - Notice d'utilisation et mode d'emploi gratuit
Retrouvez gratuitement la notice de l'appareil M-1015MR MUSE au format PDF.


| Type de produit | Autoradio 1 DIN |
| Marque | Muse |
| Modèle | M-1015MR |
| Dimensions | 178 x 50 x 100 mm (largeur x hauteur x profondeur) |
| Poids | Environ 0,8 kg |
| Alimentation | 12 V CC, négatif à la masse |
| Fonctions radio | FM/AM avec RDS, 30 présélections |
| Lecteur média | USB, auxiliaire (jack 3,5 mm) |
| Bluetooth | Mains-libres et streaming audio |
| Puissance de sortie | 4 x 50 W (max) |
| Écran | LCD rétroéclairé, affichage des fréquences et titres |
| Égaliseur | Préréglages (Pop, Rock, Classique, Jazz, etc.) |
| Entrée antenne | Connecteur ISO standard |
| Sorties | Haut-parleurs avant/arrière (4 paires), sortie préampli subwoofer |
| Entretien et nettoyage | Nettoyer avec un chiffon doux et sec. Éviter les solvants. |
| Sécurité | Fusible 10 A à l'arrière, retirer la face avant amovible pour prévenir le vol |
| Pièces détachées et réparabilité | Face avant, câblage, fusible disponibles en service après-vente |
| Informations générales | Compatible avec commandes au volant (adaptateur requis) |
FOIRE AUX QUESTIONS - M-1015MR MUSE
Questions des utilisateurs sur M-1015MR MUSE
0 question sur cet appareil. Repondez a celles que vous connaissez ou posez la votre.
Poser une nouvelle question sur cet appareil
Téléchargez la notice de votre Autoradio au format PDF gratuitement ! Retrouvez votre notice M-1015MR - MUSE et reprennez votre appareil électronique en main. Sur cette page sont publiés tous les documents nécessaires à l'utilisation de votre appareil M-1015MR de la marque MUSE.
MODE D'EMPLOI M-1015MR MUSE

muse
M-1015 MR
User Manual
CAR RADIO CD-MP3
PLAYER WITH USB/SD/MMC
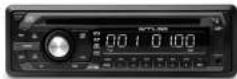
Please read the instruction carefully
before operating the unit.
(二) 2017年1月1日
English
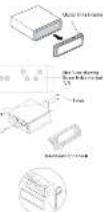
INSTALL AND DETACH THE UNIT
Irsstl this uri

- Method 2 DIV Rear-mount (For Japanese car)
-
Remove the outer film frame
-
Select a position where the screw holes of the mounting bracket supplied with the car and the screw holes of the main unit become aligned (are filled).
-
Tighten the screws. And then fasten them to
3E 4GB
1
PRECAUTIONS
- Do not attempt to modify the unit, modifying the unit may cause an accident.
- Installation or servicing of the unit by persons without training and experiences in electronic equipment and automotive accessories may be dangerous and could express you to the risk of using work at other hazards.
- Stop the vehicle before carrying out any operation that could interfere with your
- Keep the volume at a level which you could hear sounds from outside the vehicle.
- Can not work in a thermally high or low temperature. Be sure the temperature inside the vehicle is between +60°C and -10°C before turning on your unit.
- When belonging from (no's), the representation must be of the same implementation so shown on the rose holder.
- Do not block walls or radiator panels. Blocking them will cause heat to build up the next may result in it.
- Using this unit without running the engine can result in battery drainage
- After completing the installation and beginning to play the unit, including replacing the battery, please return the unit panel of dial, and then press RESET button on the base with pulsed effect (such as ball point point) set the unit to initial status.
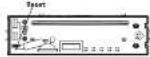
- Before you install the unit, remove absolutely the two transportation screws on top of the wall.
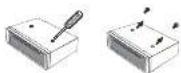
Notice on disc
Use such discs may cause malfunction or breakdown of the internal mechanism with large scratches with irregular shape; cracked; with any colorohole tape or other glass end or with peeling off marks, with protection shed; equipped with shockers, etc.
GB
install the front panel
Insert the panel into the housing and makes sure the panel is properly installed. Otherwise, abnormality occurs on the display or some keys will not function properly.

Detach the Front Panel
Press ▲ button in the upper left corner, and then the front pane will be locked down

Note: Never put any objects into the front panel.
Detock the wall
-
Detash the iron panel, (please refer to upper part)
-
Take out the outer film frame.

- Inboard the keys supplied to the unit of the bath sides of the unit between us instructed until they click. Pulling the keys and move them to remove the unit from the dashboard.

GB 2
LOCATION OF CONTROLS
- [in hana in ilion]
- PWR (Power button)
- 2016 (2017)
- SELVOL kncb
- ANSCH button (Automate
- Tainu
- TRACENT (HARCESTING) II. DRC-40
- LOD display
- ▲ (e)ef bottom
- USB slot
- 8 X 10+5
- 01269 colon (Cervical
- 6'DIR+ button [Directory-up]
- S-DR-bollen (Recovery down
- A RDM B, 000; [R3/26]
- 21BDT L, 000; [R4/27]
- 2'INT button (Intra)
13.1РАШНЛКРГИЗН
23 HANDLODD solen - PTY button (Program type selection)
- EQ turbo
- 8th episip inickwach
- AF buten (Alternative Frequency
- 6849 3,100
Front panel

Buse

。
BASIC OPERATION
Turning on/off the unit Press PWR button (2) to turn on the unit. Press the button again to turn off the unit. Note: When the unit is off, press any key expect, then it is turn on the unit.
Theorem 1.6. (A) Let () be a finite field, such that (x) = 12 , and (x) = 12 .
Selecting the mode After the unit is an press MODE (6) button to select different sourcing modes: Pada → CC-USB SDMMG AUX →
GB-9

CONNECTION
- Amarna Receptade
- Line out Right (rec)
3 Line out left (white) - Ситяг рід (місцію)
- TUSL holder (15 A)

Caution!
Make sure to connect the color coded leases according to the diagram. Incomet connections may cause the wall to malfunction or damage the vehicle's electrical system. - Makes sure to connect the speaker (-) leads to the speaker (-) terminal. Never connect the kill and right channel speaker cables each other or to the vehicle body. - Makes sure all the connections are completely correct before turning on your unit.
Es not convert the gallon wire (pads) and the battery wire (yellow), it may cause a short circuit, read into it.
938
Time display
Press DSP buffer (13) to show the current time on display Adjust time: Long press DSP (13) until clock time with starting hour digits appears. Then Press ▶ and ▶ buffer to adjust the hour value and press DSP (13) to confirm. Then minute digit size: Press ▶ and ▶ before to adjust the minute value and
Information display
information display in case of receiving a 105 slating.
In radio mode CT → FREC → PTY → PS
- CD (MPS 75K84) mode: CD (MPS49K8)
- In case of not receiving a NOS election.
In radio mode: CT → FREQ → NO PTV → NO PE
FUDIncoB (2-3) 5THQ4NGPTP 6KOPS
NOTE: 1-21
Rase the unit
Operating the unit for the first time or after replacing the car battery, you must reset the unit. To set the unit to what status press RESET button (25) loaded on the base with a powered object. When some errors occur in display, you can also reset the unit, but it will erase the clock setting and some memorized functions.
SOUND FEATURES
To increase or decreases the sound level, rotate SEL'VOL knob to cookie or anti-clockwise.
Selling the Sound:
Repeated press SEL' VOL kno (5) to select the closed mode in the following order: BVS (base) > THD (byte) > BAL (balance) > FAD (code) > SLEEP (SELL ON/OFF) > TA VOL (TA volume) > FOV (FCN ON/OFF) > "OOL" (Volume). All selecting the closed mode, you can adjust the current level by routing the SEL' VOL kno (5).
- BEEP: under 0sep mode, male SEL/VOL (S), LOC shows 'BEEP ON' or 'BEEP OFF', checking corresponding status can turn on or turn off soap.
- EON: please refer to POS operation
Notes: The unit return to the previous month is adjusting within 3 seconds.
Press equilizer
When you are listening to popular music, classic music or pink music, using EQ to select relative status can adjust the sound quality. Repeatedly press EQ [6] to select different music or music in listening order: FLAT&POP&ROCK&CLASS & EQ 50.
(1) 2017年 ,公司实现营业收入同比增长16.4%,归属于上市公司股东的净利润为13.8亿元,较上年同期增长10.5%。
Switching Loudness On/off
Press and hold BAND/LOUD button [20] until "LOUD ON" shows on display to activate LOUD function. By this function, you can increase the low frequency, which can improve sound sensitivity. Press and hold this button again until "LOUD OFF" to cancel LOUD function.
金三·F
2011-2-28 13:16 20

LISTENING TO THE RADIO
Selecting band In tuner mode, repeatedly press BAND: LOUD button (20) to select bands in following order: FM1→FM2→FM3
Manual automatic tuning
Press and hold button ➕ or ➕ (3/23) until "MANUAL" shows on display. Then press button ➕ or ➕ (3/23) continuously to select a station downward or upward. Press and hold button ➕ or ➕ (3/23) to tune the station with a faster speed.
Automatic Tuning
Press or (3-23) once, the racks automatically searches a station upward or clear sound simultaneously and plays when it takes a station. Press or (3-23) prior to stop scanning
Scanning memonizing stations automatically
- My POMS, CIG, T, M, D: [B]
In later mode, press and help AMS/SCH button for 3 seconds to sleep beginning for stations and store them automatically in memory. Press AMS/SCH button (5) the radio steps each present status for a few seconds. Press AMS/SCH (6) again or numeric buttons 1-6 to listen to corresponding station.
By number button 1-6 (4-19)
1. Tung in a division by 1325
-
Press and hold one of the 1-6 Number buttons (14-19) for 2 seconds and LCD shows the corresponding number, which indicates that station is stored in the corresponding number button.
-
Under radio mode, press 1-8 Number buttons (16-21) to listen to store stations.
- When you are listening to a station store on a number button, press and hold another number button for more than 2 seconds to store the station on the number button.
Note: The unit can be stored up to 6 stallens for each band.
- BOS (Radio Data System) Operations
This unit has a built-in RDS decoder system that supports broadcast stations.
transporting RDS data. The system can display the name of the broadcast station being received and can automatically switch to the broadcast station with the best reception for us you know on long distances (AF switching). A radio announcement broadcast from an RDS station, no matter what made you are additely. If EON information is necessary, otherwise automatic switching of other pressed stations or the same receiver and interruption of the station being received with traffic information. This function is not available in some areas.
Alternative frequency (AF)
The AF function switches in a different frequency on the same network in order to maintain optimum reception. In FM mode press AF button (24), certain program will be automatically searched and received. If the reception of the current broadcast station encorrelates, "AI" appears in the display and the radio searches for the same program on another frequency. Press AF button (24) again to cancel this function
When reception is bad, the "AF" loan was blank.
Press and hold AF button [24] for 5 seconds, the unit will be under TILG ON or TILG OFF mode. BEG ON Should be selected to list the key broadcast of the current state, even if
there is a natural hopeless of the water.
REG OFF: Should be selected to listen to the national broadcast of the current
xuelm
Traffic alarm (TA)
In the TA standby mode, when a traffic announcement broadcast starts, the traffic announcement broadcast is received as top priority regardless of the function mode so you can stop to it. Traffic programme (IE) automatic turn is stop accessible.
Press TA button [7], when LCD shows 'TP', traffic program will be automatically searched and speed, when LOD shows 'TP', this means that the RDS broadcast station being received has Traffic Announcement programmes.
If you press TA button (7) write a metro announcement broadcast is being received, the Inalic announcement broadcast reception is cancelled and the unit goes into the TA standby mode.
In IP station is not reserved, the unit continues existing
Press TA button (7) again to stop searching. TA goes off.
61.824
"ALARM" will be displayed when an emergency broadcasting is received; means of the sound output level will be adjusted to the preset output level automatically when the volume control is set at minimum.
FON: Extended Other News Information
Press and rotating SEL/VOL ISI to select LON mode, LON ON. When receive the LON information, the LON indication is on. With LON facility, it offers the ability for local stations to break into a national station's broadcast for the duration of a Traffic Annu, account.
Oromon lava selection /RTX
When PTV is selected, the radio starts to search corresponding PTV information, and
steps what the corresponding PTY information is deleted if corresponding PTY information does not exist any more, PTY automatically stopped to normal mode.
(Miss. PTV protein grown The PTV and this channel is shown

According to above 2 groups, the preset number is used for FLY selection as follows:
MUSIC group
1. POP M, ROCK M 2. EAS N M LIGHT M
7. CLOSEST CHUUM
4. JAZZ, COUNTRY
5. RATIONAL OLDIES
6.1OLKM
表决结果:同意
SPEECH group
1. REAS, AFFAIRS, INFO
2. SPORT EDUCATE, DREAM 3. CULTURE SCIENCE VARIED
3. CULTURE, SCIENCE, WHOED 4. WEATHER ENVANCE CHILDREN
4. AERITISH, FINANCE, CHILDREN
6. TRAVEL LEISURE DOCUMENT
LISTENING TO DISC/USB/SD
Insert the disc into the DISC SLOT with the printed slide loading up. The player will play the disc automatically. If a disc was inserted, press MODE button (1) to select playing. To remove the disc, press ▲ button
To insert a USB device (not included)
Open the plastic cover covered your USB device to the USB slot [1]. It will switch to 'USU' mode automatically. If USU has been inserted, press MODE button (4) is switch to USB mode.
To insert an SDYMMC card (not included)
Press button [1] to fold down the front panel slot. Insert your SD-MAC card in card receptacle [26]. Close the front panel and it will automatically start playing. If SD-MAC card has been inserted, press MODE button (4) to switch to card mode.
Plains plays lunquies
Basic player functions Play/pause: press 1.PAU (19) to suspend momentarily the playing back. Press (19) 0002 again 35 ms-mo playing
Step:float search: press button 📄 (3) to skip forward to next track and 📄 (28) to skip backward to previous track. Press and hold 📄 or 📄 (3023) to search quickly within a track.
Intro scan: press 2-INT button (15) when I show INT ON, then the player will play the rest 10 seconds of each track in the disc press again to cancel this function when I show INT OK.
Repeat a back: Press RPT button (17) once to repeat your desired track. Press again to repeat all.
Random playing: Press ROM buffer 116, all in excess with also randoms.
SELECTING DIRECTORY UP/DOWN: Press DIR-button [15] or DIR + button [14] to select directing channel and upward. The MP3 class does not contain any directing, there is no function of pressing DIR-button [15] or DIR + button [14].
Searching a track in MP3-CD/USB card:
Use the keys for corresponding number or letter when you sound a music.
| CZY | Mode Select |
| BELLAY (POWE) | EN-ER |
| MINI (TAW) | A, B, C, I |
| MD (WNT) | D, E, F, G |
| MD (WNT) | G, H, I, J |
| MINI (TAW) | J, K, L, M |
| MD (WNT) | M, N, O, S |
| MD (WNT) | P, Q, R |
| TWODE | S, T, U, V |
| T (MM) | V, W, X, Y |
| Z (MM) | Y, Z, SPACE, S |
| COOP | -/-0 |
| SELLAY (POWE) | At the CHARACTER value |
- Search by track number
- Press AM8/6CH button 15 once, LCG shows "NUM SCH" and "NUM ***" press the
eqs. standing for corresponding numbers (refer to upper limit)
- Press SEL/VOL inch (5) to start playing.
- Search by letter
- Press AMR-BCH button (6) twice LCD shows FILE SCH and * - - " press the
sens standing by corresponding letters (sliver to upper left).
-
Repeat this procedure and you submit the title name.
-
Press SELVOL such as InwardCLEVNC
(五) 陈志伟
- Search by folder
-
Press AMS/SCH button (5) inside. LCD shows "CHS SCIF" then the total circuitures and variable dimensions are
-
Dukes the SFL (WFL, web S) in work now created in the area SFL (WFL, web S).
-
THIS IS THE SEL/VOL KHD (5) to search you desired today, [press SEL/VOL KHD (5)] to enter the selected d channels.
-
Onside the SEL/VOL amb (5) to select your desired race, www SEL/VOL (5)
-
- 求、水、油、煤、天然气、石油、天然气、天然气、天然气、天然气、天然气、天然气、天然气、天然气、天然气、天然气、天然气、天然气、天然气、天然气、天然气、天然气、天然气、天然气、
(1) 12 (2) 12 (3)
Exit disc'USB3D card mode
- Press ▲CUT to select the disc. If the disc is not taken out within 10 seconds, it will
be automatically released.
- To exit USU mode, disconnect your USB device from the unit, it will switch to turn
media automatically:
- To earn card mode, take out your SDMMC card from the unit, it will switch to turn
mode automatically.
GB-113B-1005-00B-8
Note
* Do not use CDs with irregular shape for example octagonal or heart shaped
* Namex CD-Pa in CD-908x playback capability of the player may vary depending on
quality media. CD Burner, burning speed and application software.
There are many USB devices or SDMMAG card on the market. Our card not games here to support all different models. Please try another USB device or SDMMAG card if your device is not supported.
The unit might not support all the multimedia files stored in SDMMC card or USB because it includes some special playbook procedure which might not be compatible with the procedure of this unit.
LISTENING TO AUXILIARY SOURCE
-
Consider your a territory to a mall where to the AUY (Nancy U2)
-
Correct PSR (2) solution in the clinical
-
Error MODE (4) is correct only here.
-
Chat-based 'remover' availability survey
-
Adurl druvul mo i5u as derlied in-
-
Disconnect your auxiliary source from the Aux In jack (12), press MODE button (4) to select other sources.
MAINTENANCE
1. 2017年
Clean the inel panel with a salt cloth or slemp chemoise welber. Never use schonisie.
Handling the Defectable Front Panel: Do not expose to rain or water.
- On the company, apply check
Make sure that you keep your get away from high temperatures.
- The use of separish in medicals consists.
Do not be expressed to drive or spinach, and that an object used with liquids, such
to vases, shall be placed on the apparatus.
- No more damage cases such as lighted caries should be placed on the apparatus.
Clearing the Connector
If the correcter between the main unit and the front panel is dirty, may result in abnormal working condition. To avoid such problems, please detach the front panel, and clean the connector with an alcohol swab. Gently clean and avoid damaging the connector.
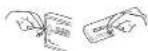
Notes:
For the sake of safety, always shut down the engine and take out the ignition key before cleaning. Never keep your finger or any metal device on the correct directly.
Replacing the Fuse
Where sure the amperege matches the specified value when replacing the fuse. If the fuse is blown, check the power connection and replace with a new one, if the same problem circuits, it would be subjected to the malfunction in-house. In such cases, please consult the current service dealer.
TROUBLE SHOOTING GUIDE SPECIFICATIONS
| Symptom | Cause | Solution |
| No power. | The can question which is not on. | If the power supplies it connected to the car as extremely thick, but the engine is not meaning, matching the lighter key "ACC" |
| The two owners. | Always the fan. | |
| Discan rules allowed or applied. | Presence of CO diet inside the person. | Presence the diet in the paper, that put a nice tone. |
| Hearing too thin in words' direction. | Hearing too thin due to with the label feeling upright. | |
| Compact diet is extremely dirty or distinctive too. | Close the diet or try to play a new one. | |
| Temperature inside the car's top ring. | Cost-of-small the ambient temperature return to normal. | |
| Concordance. | Close the diaper off for an hour away, then the organ. | |
| No sound | Volume is minimal. | About volume to a closed eye. |
| Wing is not partly connected. | Chish wearing connection. | |
| Sound stage. | The installation angle is more than 30 degrees. | About the installation angle less than 30 degrees. |
| The diet is extremely dirty or distinctive too. | Close the compact diet, then try to play a nice tone. | |
| The operator helps do not work. | The built-in microcomputer is not experiencing property use in room. | Create the RESET button. |
| Front panel is not properly fixed into a hole. | ||
| The radio play explore. The radio star exercises indicate about no work. | The umbrella table is not connected. | Heel the umbrella table fully. |
| The signpation too weak. | Sicked isolation necessary. |
General
Роснег Низинтинг
Load impedance
Max. Druess Carpal
Turn Circle
(1) 本说明仅供参考。
[Non-Text]
Dimensions
Mounting Dimensions
Weight Approx.
(五) 本说明仅供参考。
FM Section
Tuning Range
IF Range
Usable Sensitivity | 30dB
Signa-to-noise Ratio
Stereo Separation
27.1.1
CD player Section
Sigma to notice Rank
Separation
Ustellen
Frequency Response
一、表决情况
Note:
Due to continuous product Improvement, specifications and design are subject to change without prior notice.
CAUTION! This set uses a laser beam. To present any accident due to this type of beam, the set should only be opened by properly trained personnel. The unit conforms to the transmittal safety specialist and in guide lines of the Transformer community and also templates with current standards concerning electrical safety and electromagneto compatibility EMC.
WARNINGS
CAUTION FOR EVOLUTIONS STOCK POTATO NAME ATTENTION: To reduce the risk of electric shock, do not remove the cover. There are no user serviceable parts inside the unit. He for all servicing to qualified personnel.
The lighting switch with snowhead symbol within the range is a warning sign indicating the user of "cangorous voltage" inside the arth.
The excitation point within the triangle is a warning sign alerting the user of important instructions accompanying the product.
CAUTION: Invisola laser radiation when open and interfaces distalae. Avoid exposure to beam.
WARNING - To reduce the risk of rise or electric shock, then suppose this application in the case of MCRU.
If at any time in the future you should need to dispose of this product please note that Waste electrical products should not be disposed of with household waste. Please recycle where facilities exist. Check with your Local Authority or retailer for recycling advice.(Waste Electrical and Electronic Equipment Directive)
GB-14GB-13GB-12
GB-15
CE



- muse
- M-1015 MR
- User Manual
- CAR RADIO CD-MP3
- PLAYER WITH USB/SD/MMC
- INSTALL AND DETACH THE UNIT
- PRECAUTIONS
- LOCATION OF CONTROLS
- BASIC OPERATION
- CONNECTION
- SOUND FEATURES
- LISTENING TO THE RADIO
- Manual automatic tuning
- Automatic Tuning
- Scanning memonizing stations automatically
- - My POMS, CIG, T, M, D: [B]
- By number button 1-6 (4-19)
- Tung in a division by 1325
- Note: The unit can be stored up to 6 stallens for each band.
- - BOS (Radio Data System) Operations
- This unit has a built-in RDS decoder system that supports broadcast stations.
- Alternative frequency (AF)
- When reception is bad, the "AF" loan was blank.
- there is a natural hopeless of the water.
- xuelm
- Traffic alarm (TA)
- In IP station is not reserved, the unit continues existing
- Press TA button (7) again to stop searching. TA goes off.
- 61.824
- FON: Extended Other News Information
- Oromon lava selection /RTX
- (Miss. PTV protein grown The PTV and this channel is shown
- MUSIC group
- POP M, ROCK M 2. EAS N M LIGHT M
- CLOSEST CHUUM
- JAZZ, COUNTRY
- RATIONAL OLDIES
- 6.1OLKM
- 表决结果:同意
- SPEECH group
- REAS, AFFAIRS, INFO
- SPORT EDUCATE, DREAM 3. CULTURE SCIENCE VARIED
- CULTURE, SCIENCE, WHOED 4. WEATHER ENVANCE CHILDREN
- AERITISH, FINANCE, CHILDREN
- TRAVEL LEISURE DOCUMENT
- LISTENING TO DISC/USB/SD
- To insert a USB device (not included)
- To insert an SDYMMC card (not included)
- Plains plays lunquies
- Random playing: Press ROM buffer 116, all in excess with also randoms.
- Searching a track in MP3-CD/USB card:
- - Search by track number
- - Search by letter
- (五) 陈志伟
- - Search by folder
- 12 (2) 12 (3)
- Exit disc'USB3D card mode
- Note
- LISTENING TO AUXILIARY SOURCE
- MAINTENANCE
- 2017年
- Clearing the Connector
- Notes:
- Replacing the Fuse
- General
- Роснег Низинтинг
- Load impedance
- Max. Druess Carpal
- Turn Circle
- 本说明仅供参考。
- [Non-Text]
- Dimensions
- Mounting Dimensions
- Weight Approx.
- (五) 本说明仅供参考。
- FM Section
- Tuning Range
- IF Range
- Usable Sensitivity | 30dB
- Signa-to-noise Ratio
- Stereo Separation
- 27.1.1
- CD player Section
- Sigma to notice Rank
- Separation
- Ustellen
- Frequency Response
- 一、表决情况
- Note:
- WARNINGS
Marque : MUSE
Modèle : M-1015MR
Catégorie : Autoradio