
MR1440U - Autoradio BOSS - Notice d'utilisation et mode d'emploi gratuit
Retrouvez gratuitement la notice de l'appareil MR1440U BOSS au format PDF.


| Type de produit | Autoradio |
| Marque | Boss |
| Modèle | MR1440U |
| Dimensions (L x H x P) | 178 x 50 x 160 mm (standard DIN) |
| Poids | 1.2 kg |
| Alimentation | 12 V DC (véhicule) |
| Puissance de sortie | 4 x 50 W max (RMS: 4 x 20 W) |
| Récepteur radio | AM/FM stéréo, RDS |
| Lecteur CD | Oui, compatible CD-R/RW |
| Entrée USB | Avant (lecture MP3/WMA) |
| Entrée AUX | Jack 3.5 mm avant |
| Bluetooth | Oui, intégré (mains libres et streaming audio) |
| Affichage | Écran LCD rétro-éclairé |
| Télécommande | Incluse (sans fil) |
| Connectivité antenne | Connecteur ISO |
| Sorties haut-parleurs | 4 canaux (avant/arrière) |
| Sortie préamplifiée | 2 x RCA (avant/arrière + caisson) |
| Égaliseur | Intégré, réglages graves/aigus |
| Horloge | Affichage 12/24 h |
| Matériau façade | Plastique ABS noir |
| Température de fonctionnement | -20°C à +60°C |
| Entretien | Nettoyage avec un chiffon doux et sec |
FOIRE AUX QUESTIONS - MR1440U BOSS
Questions des utilisateurs sur MR1440U BOSS
0 question sur cet appareil. Repondez a celles que vous connaissez ou posez la votre.
Poser une nouvelle question sur cet appareil
Téléchargez la notice de votre Autoradio au format PDF gratuitement ! Retrouvez votre notice MR1440U - BOSS et reprennez votre appareil électronique en main. Sur cette page sont publiés tous les documents nécessaires à l'utilisation de votre appareil MR1440U de la marque BOSS.
MODE D'EMPLOI MR1440U BOSS
BEE'S CHANGE
MR1440U
办公地址:北京市复兴门内
MP3-COMPABLE CO-MAIN-RECEIVER
9556转正100转3.45转回161.92转
附录式填注
BOSS
AUDIO SYSTEMS
Preface
Thank you for purchasing this car audio product.
Please read this manual carefully before operating this car audio product.
Please keep this manual for future use. It will be helpful to you if you are encounter any operational problem.
Selecting fine audio equipment is only the start of your musical enjoyment. Now it is time to consider how to maximize the enjoyment you will get from knowing how to work your new car stereo receiver.
We hope you enjoy using this product and encourage you to always listen at a moderate, safe sound level to avoid any possible hearing damage or loss. If you listen to excessively loud sound over time, your hearing can adapt to higher volumes and what sounds "normal" to you may be quite harmful and can cause you to have permanent hearing loss. So please practice "safe sound" and always listen at moderate sound levels only.
Start with your volume control at the lowest setting, and slowly increase the level until you can hear it comfortably and clearly, free from distortion.
Once you have established this comfortable sound level, leave it there.
WARNING!
To reduce the risk of fire or electric shock, do not use the unit in the rain or moisture environment.
To prevent direct exposure to laser beam, do not try open the enclosure. Visible and invisible laser radiation when open and interlocks defeated.
To protect our environment, do not dispose of electrical equipment in the domestic waste. Please return any electrical equipment that you will no longer use to the collection points provided for their disposal.
This helps avoid the potential effects of incorrect disposal on the environment and human health. This will contribute to the recycling and other forms of reutilization of electrical and electronic equipment. Information concerning where the equipment can be disposed of can be obtained from your local authority.
SPECIFICATION
GENERAL
Supply Voltage
Current Consumption
Power Output
Number of channels
Unit Dimensions
DC 12 V. Negative Ground
Max.7.5A
4 X
2 STEREO channels.
7[W] X 6.5[D] X 2[H] mm.
60wattshighpower
FM SECTION
Frequency range
Effective sensitivity
I.F Frequency
87.5MHz -107.9MHz
3uV.
10.7MHz.
AM SECTION
Frequency range
Effectivesensitivity
I.F Frequency
530KHz - 1710KHz
40dB.
450KHz
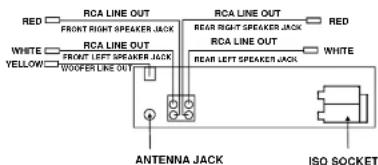
RCA LINE OUT
Output
1000mV @ CD MAX.
CD PLAYER
System
Suitable CDs
Frequency characteristics
MP3 AudioSystem.
MP3, WMA, CD, CD-R, CD-RW Disc
20Hz-100Hz ≤ 5dB
10KHz-20KHz < 5dB.
50dB [1KHz]
S/N Ratio to CD
LOCATION AND FUNCTION OF CONTROLS
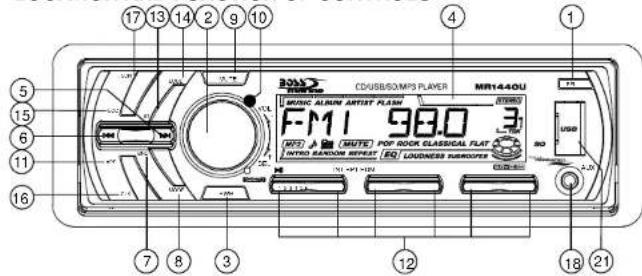
1. OPEN BUTTON
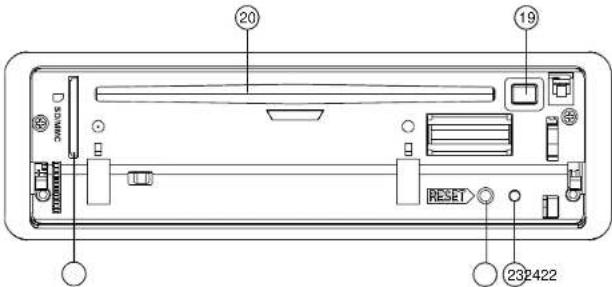
Press the OPEN button to flip down the front control panel.
Then a disc can be inserted into the disc slot or ejected by pressing the EJ button. After flipping down the front panel, push it leftwards, then pull the right side of the panel outwards to remove it from the unit chassis.
2. SEL BUTTON (Select) AND VOL KNOB
a) Press the SEL button briefly, it is activated as selecting each mode of E. VOL.
->VOLUME ->BASS ->TREBLE ->BALANCE ->FADER ->
When selecting a desired audio mode, rotate the VOL knob to adjust the audio effect.
In each mode, the waiting time is about 5 seconds, and the time waiting time
is over, it returns to the last display mode of tuner or CDP mode.
The control mode of E.VOL is operated with following numeric display.
VOL: (MIN)00, 01,.....46, 47(MAX)
- BASS/TRE: -07, -06,...,00,...+06,+07
-BAL:0LR9,1LR9,...,9LR9,...,9LR1,9LR0
- FAD: 0FR9,1FR9,...,9FR9,...,9FR1,9FR0
b) When pressed and hold for 2 seconds, it is activated as cyclical mode of following functions for user's selection.
->BEEP (ON/OFF) -> USER SET(FLAT/CLASSIC/ROCK/POP)
->SUBW(ON/OFF)->VOL(LAST/DEFA)->CLK(ON/OFF)->CLK(12/24)mode.
After selecting the desired mode, rotate the VOL knob to select one setup item of the desired mode.
BEEP ON/BEEP OFF
BEEP ON mode: The beep is generated when any key is pressed.
BEEP OFF mode: The beep sound is disabled.
VOL LAST/VOL DEFA
VOL LAST: The radio switches on at the actual volume it had when it was last switched off.
VOL DEFA: After pressing SEL button, AVOL will be displayed. Then you can pre-select a constant switch-on volume by using the VOL knob.
CLK ON/OFF
CLK ON: Clock will always show on the display when power off.
CLK OFF: Clock will disappear on the display when power off.
3. POWER ON/OFF
When the unit is power off, the unit comes to ON by pressing any button on the front panel (except the OPEN key). It also can turn on the unit to insert a disc, SD card or USB stick into their slots or socket. When the unit is power on, press and hold the power button for more than 0.5 seconds, the unit goes into power off mode.
4. LCD Display
5&6. TUNE, SEEK, TRACK, SKIP UP / DOWN BUTTONS
a) During RADIO mode:
Press the >>| or |<< button shortly to manual tune up/down for the desired radio station frequency step by step.
Press and hold the >>| or |<< button for longer 0.5 seconds, to automatically tune up/down for the radio station frequency of strong signal.
b) During disc, SD, MMC, USB playback mode:
Press the >>| button briefly to play next track
Press the |<< button briefly to play the current track from the beginning of it if the playing time is more than 2 seconds.
Press the |<< button briefly to play the previous track if the playing time is less than 2 seconds.
Press the >>| or |<< button and hold to skip forwards or backwards, release to resume normal playback.
TROUBLE SHOOTING
Beforeusingthechecklist pleasemakeall theconnectionsfirst.
If you still have questions after going through the checklist, please consult
yourlocalcustomerservicerepresentative.
| Common Symptoms | Cause | Solution |
| There is no power. | The car ignition is switched off. | If the power supply is properly connected to the car accessory, switch the ignition key to "ON" or "ACC". |
| The fuse has blown. | Replace another fuse according to the wiring diagram. | |
| The CDs cannot be loaded. | Presence of CD disc inside the player | Remove the disc in the player then put a new upward |
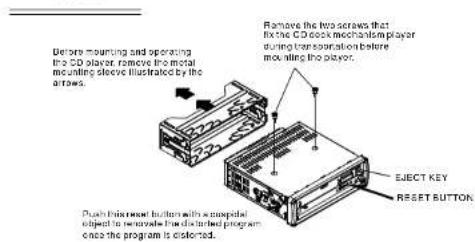
| The CDs are loaded only halfway into the CD tray. | The transport screws have not been removed. | Remove the transport screws before using. |
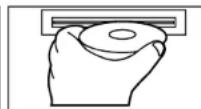
| The device does not work correctly (EJECT, LOAD, PLAY) | Inserting the disc in upside down | Insert the compact disc with the label facing upward |
| The surface of CD is extremely dirty or it is damaged. | Clean the CD or try another CD, if this works correctly, the first CD is properly damaged. | |
| Temperature inside the car is too high. | Cool off until the ambient temperature returns to normal | |
| There is no sound. | The volume control is set too low. | Turn up the volume properly. |
| The device has not been correctly connected. | Check the power and earth connection according to the wiring diagram. | |
| The operation keys do not work | 1.The built-in microcomputer is not operating properly due to noise2.Front panel is not properly fix into its place | 1. Switch the device off and on again. Or press the RESET button to resume the program.2. Reinstall the front panel |
| The sound of the CD player skips | The installation angle is more than 30 degrees | Adjust the installation angle to less than 30 degrees |
| The surface of the road is uneven. | Wait until the road becomes smoother before playing the CD. | |
| The surface of CD is extremely dirty or it is damaged. | Clean the CD or try another CD, if this works correctly, the first CD is properly damaged. | |
| No radio reception. | The antenna cable is not connected. | Insert the antenna cable firmly into the antenna socket of the device. |
| In automatic search mode the radio does not stop at a transmitting station. | The transmission signals are too weak. | Tune in to a radio station manually. |
CARE FOR USING CD'S:
About CD-R/CD-R/W discs:
In addition to commercially-recorded audio CD's, this unit can play CD-R and CD-R/W discs. In come cases, particularly when recorded on older CD burners, some CD-R and CD-R/W discs may not play. Also, whenever you are recording a CD for playback in this receiver, it is recommended that you record at 24x or slower speed for CD-R and 4x or slower for CD-R/W to achieve higher signal quality and better playback performance.
- Tokeepthedisclean:
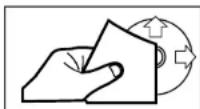
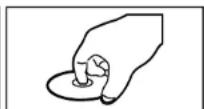
Do not attach any sticker or adhesive tape on the disc. Handle the disc by its edge to keep the disc clean and do not touch the surface. Before playing a disc, wipe it off with a clean, dust-free cleaning cloth. Wipe the disc outwards from the disc center. - When one has already been inserted. Doing so may damage the unit. Insertadisc with labeled surface up, or it will damage the unit.
- Do not expose the disc to direct sunlight or nearby heat sources such as heating vents, caliduct which can cause the disc to warp. Do not leave disc in a car if it is parked in direct sunlight as that will lead to a considerable rise in the temperature inside the car.
- Do not use any secondhand or rented disc, usually, there is glue on the surface of those discs, it will stop the unit working and damage it.
- Always store the disc in its case for protection. Scratched up discs will produce poor soundperformanceandcause CDplayer toskip.
- In raining day or wet area, the moisture may form on the disc or the optical parts, the playback may not be possible. If moisture forms on the disc, wipe it off with a softcloth. If moisture forms on the optical parts of the unit, allow the unit to sit for about one hour with power on.
- Do not use solvents such as benzine or thinners. Commercially available cleaners or anti-static spray will damage the unit.
7. BAND BUTTON
During radio mode, press the BND button briefly to select the radio broadcasting band you would like to hear. The AM/FM band is toggled cyclically through the tuning bands: ->FM 1->FM 2->FM 3->AM 1->AM2->.
8. MODE BUTTON
Press the MODE button to change among tuner (radio), disc (when a disc is loaded), SD/MMC card (when an SD/MMC card is inserted), USB (when an USB stick is inserted) and AUX mode.
9. MUTE BUTTON
This button serves to switch the MUTED state on/off. Press the MUTE button to suppress the loudspeaker temporarily, and press again to resume listening. The muted state will be also released when the MODE, SEL button is pressed and VOL knob on the front panel is used.
10. INFRARED REMOTE CONTROL SENSOR
11. APS BUTTON (Auto-storage /Preset scan)
During radio mode:
1) when long pressing for more than 1 seconds, the radio searches from the current frequency and checks the signal strength level until 6 station are found. And then the 6 stations frequency are preset to the corresponding preset memory numbered bank. The auto-storage operation is implemented in the each selected band. When the auto-storage operation is finished, the radio execute the Preset Scan.
2) when short pressing, the radio searches for each preset station in the current band and holds at that preset number for 5 seconds with releasing mute, and then search again.
In disc mode, MMC/SD or USB mode, press APS button repeatedly to select TRACK SEARCH, DIRECTORY SEARCH or FIRST CHARACTER SEARCH mode.
In TRACK SEARCH mode, the LCD will display TRK T 000 and flash the biggest digit0 that the MMC/SD card, USB or MP3 disc contain. Rotate the knob to select the number of the flashing digit from 0 \~ 9. Then press SEL button to confirm the number and flash next smaller digit 0. With the same means, select the number of the flashing digit. After finishing selecting the number of all flashing digit, press SEL button to play the track of the selected serial number. In DIRECTORY SEARCH mode, the LCD will display the root folder (if there is not the root folder, it will find a root folder named ROOT). Then rotate the knob to select your desired folder. Finally press SEL button to play the first track of the folder.
In FIRST CHARACTER SEARCH mode, the LCD will display A- rotate the knob to select file's first character by the order of A\~Z and 0\~9. Then press >>| or |<< button to select one file its first characters is the selected one. Finally press SEL button to play the selected file.
12. PRESET STATION MEMORY AND TOP/>||, INT, RPT, RDM BUTTONS
a) During radio mode:
Go to any preset station by pressing one of the 6 preset station buttons (1-6). If one of these buttons is pressed for more than 2 seconds, the station currently being listened to will be memorized into the selected preset button.
b) During disc, SD/MMC or USB mode:
1) Press the TOP/>|| button briefly to interrupt the playback of the disc, SD/MMC or USB. Press again to resume normal playback of the disc, SD/MMC or USB. Press the TOP/>|| button and hold for approximately 0.5 seconds to play the first track of the disc, SD/MMC or USB.
2) Press the INT button to sample the first 10 seconds part of each track, and the INT ON will be visible on the LCD display. In the process of INT, pressINT button again to stop sampling and to continue playing the current track, and the LCD will display INT OFF.
3) Press the RPT button once to play the current track repeatedly, and the RPT ONE will be visible on the LCD display. During MP3/WMA disc, SD/MMC or USB mode, press the RPT button twice continuously to play the current folder repeatedly, and the RPT ABM will be visible on the LCD display.
In the process of RPT, press RPT button again to stop playing repeatedly mode and the LCD will display RPT OFF.
4) Press the RDM button to play all tracks on disc in random order, and the RDM ON will be visible on the LCD display. In the process of RDM, press RDM button again to stop playing in random order and the LCD will display RDM OFF.
c) During the normal playback of MP3/WMA disc, SD, MMC, USB: Press the radio preset button 6 and 5 to move up and down10 tracks at a time.
13. ST/MO BUTTON
In FM mode, press the ST briefly to select stereo or mono sound mode.
14. LOUDNESS BUTTON
When press shortly, the LOUD mode is turned on, its to enhance the bass sound effect when the volume level is low. Press again to cancel the loudness effect.
15. LOC/DX BUTTON
Radio station search mode is divided by this LOC/DX switch, this button can be used to control an attenuator in the tuner during search. In radio mode, press the LOC button to change local reception or distance reception. Local mode improves reception in some areas where the signal is too strong. Note: This button is only for FM reception. In AM mode, LOC is void.
16. CLOCK BUTTON
Press the CLK button briefly to display time for 5 seconds on the display, and then returns to its previous display unless the button is pressed again. Then press the CLK button and hold for more than 1 second until the real time flashes on the display. Then you can adjust HOUR or MINUTE by rotating the VOL knob.
INSTALLATION
INSTALLATION METHOD
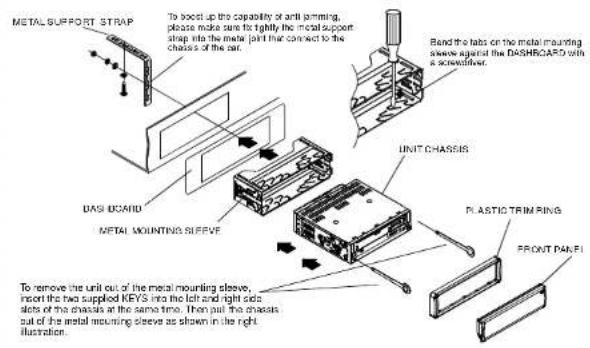
This is an anti-theft installation method.
The main unit wears a METAL MOUNTING SLEEVE.
Please connect the wiring, eg. the Power Supply, the Speakers and the Antenna according to the requirements of this Instruction Manual, then install the metal mounting sleeve into the car as per the diagram illustrated below.
NOTE
WIRES CONNECTION
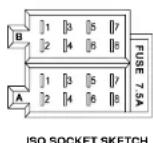
CONNECTOR A
1.
2.
3
-
Memory +12V
-
Auto Antenna Output
6.
-
12V (To Ignition Key)
-
GROUND
CONNECTOR B
-
Rear Right Speaker (+)
-
Rear Right Speaker (-)
-
Front Right Speaker (+)
-
Front Right Speaker (-)
-
Front Left Speaker (+)
-
Front Left Speaker (-)
-
Rear Left Speaker (+)
-
Rear Left Speaker (-)
17. SCAN BUTTON
Press the SCN button to scan the radio frequency. If a valid signal has detected, the current frequency will be hold and blinking for 5 seconds, then press SCN again to stop scan and remain the current frequency; otherwise, the radio will go on to scan the other radio frequency 5 seconds later.
18. AUX INPUT JACK
Press the mode button to select auxiliary input playing mode. Then you can connect any matched external audio device to this socket. Use the volume knob to adjust volume.
19. EJECT KEY
In the power on state, the loaded disc can be ejected by pressing the EJ key.
20. CD SLOT
21. USB SOCKET
When needing to play the file in the USB stick, turn over the plastic cover cap then insert the USB stick into the USB socket. The system will change into the USB mode automatically, and then play the first file in the USB.
When no needing to do USB operation, please cover the plastic cover cap.
22. SD/MMC CARD SLOT
When you need to play the file in the SD/MMC card, insert the SD/MMC card into the card slot. The system will change into the mode automatically, and then play the first file in the SD/MMC.
23. FLASHING LED
When the front control panel is removed this indicator flashes.
24. RESET BUTTON
Before operating the unit for the first time, or after replacing the car battery or changing the connections. You must reset the unit. Press this button with a cuspidal object. This operation will erase the clock setting and some stored contents.
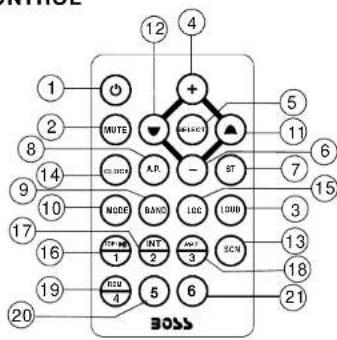
OPERATION OF REMOTE CONTROL
-
Power On/Off
-
Mute Button
-
Loudness Button
-
Level/MENU UP Button
-
SEL/MENU Button
-
Level/MENU Down Button
-
MO/ST Button
-
A.P Button
-
BandButton
-
Mode Button
-
Tune/Seek Up And Track Skip Up/FF Button
-
Tune/Seek Down And Track Skip Down/REW Button
-
SCANBUTTON
-
Clock Display /Setting Button
-
LOC/DX Button
-
CD Track TOP/>||/Radio Preset 1
-
CD Track INT/Radio Preset 2
-
CD Track RPT/Radio Preset 3
-
CD Track RDM/Radio Preset 4
-
Radio Preset 5
-
Radio Preset 6
MAINTENANCE OF REMOTE CONTROL
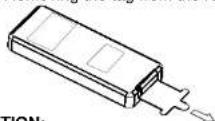
An insulation tag was installed in your remote by the manufacturer to prevent the battery from draining. Removing the tag from the remote before using.
BATTERY INFORMATION:
Lithium Battery: CR2025 3V
Battery Life: Approximately 6 months.
Replacing the Battery from the Remote Controller:
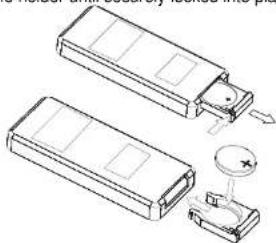
1) Remove the battery holder by pressing the locking tab with your thumb and pulling it out.
2) Replace the battery with the same type and the "+" side facing up.
3) Gently push in the holder until securely locked into place.
natural_image
Technical line drawing of two electronic components with a close-up view showing internal structure (no text or symbols)
WARNING:
- Do not recharge, disassemble or dispose of in fire.
- Battery leakage may cause damage to the unit.
• To avoid the risk of accident, keep batteries out of reach of children.
- Preface
- WARNING!
- SPECIFICATION
- GENERAL
- FM SECTION
- AM SECTION
- RCA LINE OUT
- CD PLAYER
- OPEN BUTTON
- SEL BUTTON (Select) AND VOL KNOB
- BEEP ON/BEEP OFF
- VOL LAST/VOL DEFA
- CLK ON/OFF
- POWER ON/OFF
- LCD Display
- 5&6. TUNE, SEEK, TRACK, SKIP UP / DOWN BUTTONS
- TROUBLE SHOOTING
- CARE FOR USING CD'S:
- BAND BUTTON
- MODE BUTTON
- MUTE BUTTON
- INFRARED REMOTE CONTROL SENSOR
- APS BUTTON (Auto-storage /Preset scan)
- PRESET STATION MEMORY AND TOP/>||, INT, RPT, RDM BUTTONS
- ST/MO BUTTON
- LOUDNESS BUTTON
- LOC/DX BUTTON
- CLOCK BUTTON
- INSTALLATION
- INSTALLATION METHOD
- WIRES CONNECTION
- CONNECTOR A
- CONNECTOR B
- SCAN BUTTON
- AUX INPUT JACK
- EJECT KEY
- CD SLOT
- USB SOCKET
- SD/MMC CARD SLOT
- FLASHING LED
- RESET BUTTON
- OPERATION OF REMOTE CONTROL
- MAINTENANCE OF REMOTE CONTROL
- BATTERY INFORMATION:
- Replacing the Battery from the Remote Controller:
- WARNING:
Marque : BOSS
Modèle : MR1440U
Catégorie : Autoradio