
AHD H23 - Caméscope AIPTEK - Notice d'utilisation et mode d'emploi gratuit
Retrouvez gratuitement la notice de l'appareil AHD H23 AIPTEK au format PDF.


| Type de produit | Caméscope numérique |
| Marque | Aiptek |
| Modèle | AHD H23 |
| Résolution vidéo | Full HD 1080p (1920x1080) à 30 images par seconde |
| Résolution photo | Jusqu'à 12 mégapixels (interpolée) |
| Zoom optique | 5x |
| Zoom numérique | 4x |
| Écran | LCD TFT 3 pouces (7,6 cm) orientable |
| Stockage interne | 128 Mo (extensible via carte SD jusqu'à 32 Go) |
| Alimentation | Batterie lithium-ion rechargeable (3,7 V, 1500 mAh) |
| Autonomie | Environ 120 minutes d'enregistrement continu |
| Dimensions (L x H x P) | 130 x 70 x 55 mm |
| Poids | 280 g (avec batterie et carte SD) |
| Interface | USB 2.0, HDMI mini, entrée micro, sortie AV |
| Fonctions principales | Enregistrement vidéo HD, prise photo, stabilisateur d'image numérique, détection de visage, enregistrement en boucle, fonction webcam |
| Entretien et nettoyage | Nettoyer l'objectif avec un chiffon doux et sec. Utiliser un souffleur pour la poussière. Ne pas utiliser de solvants. |
| Sécurité | Ne pas exposer à l'humidité, aux chocs ou au soleil direct. Éteindre lors du remplacement de la batterie. Utiliser uniquement des chargeurs approuvés. |
| Pièces détachées et réparabilité | Pièces détachées disponibles : batterie, chargeur, câbles. Réparations par un centre agréé. |
| Informations générales | Garantie 1 an. Compatible Windows et Mac. Manuel utilisateur inclus. |
FOIRE AUX QUESTIONS - AHD H23 AIPTEK
Questions des utilisateurs sur AHD H23 AIPTEK
0 question sur cet appareil. Repondez a celles que vous connaissez ou posez la votre.
Poser une nouvelle question sur cet appareil
Téléchargez la notice de votre Caméscope au format PDF gratuitement ! Retrouvez votre notice AHD H23 - AIPTEK et reprennez votre appareil électronique en main. Sur cette page sont publiés tous les documents nécessaires à l'utilisation de votre appareil AHD H23 de la marque AIPTEK.
MODE D'EMPLOI AHD H23 AIPTEK
High Definition Camcorder

natural_image
Line drawing of a digital washing machine (no text or symbols)User's Manual
Read This Before Using the Camcorder
SAFETY INSTRUCTIONS
Do not drop, puncture or disassemble the camcorder.
Use the camcorder with care. Rough handling may damage the internal components.
Do not expose the camcorder to high temperature. Avoid contact with water.
- Please notice that the camcorder body may become warm when operating it for an extended period.
Test for proper operation before using the camcorder.
Only use accessories supplied by the manufacturer.
Use only the type of battery that came with your camcorder.
Remove the battery if the camcorder is not going to be used for long periods.
Product Information
Designs and specifications of the camcorder are subject to change without notice. This primary product specifications, software, and this user's manual.
This User's Manual is a general reference guide for the camcorder.
- The illustrations in this manual may not be the same as the actual design of your camcorder and those you see on the LCD screen.
Contents
Read This Before Using the Camcorder 2
Section 1 Getting to Know Your Camcorder .... 4
Section 2 Getting Started .... 7
Section 3 Enjoying the Record Mode 9
Section 4 Enjoying the Playback Mode 21
Section 5 Setting Your Camcorder 26
Section 6 Viewing Photos and Videos on TV 29
Section 7 Viewing Video & Photo on PC 30
Section 8 Uploading Files to Internet 31
Section 9 Specifications and System Requirements .... 34
Section 10 Troubleshooting .... 36
Section 1
Getting to Know Your Camcorder
Overview
The camcorder equipped a 5 Mega Pixel sensor that can take H.264 format videos. The H.264 technology allows for extended video recording with less memory. High quality images up to 16 mega-pixels can also be delivered smoothly. With a color LCD monitor, you can view and examine the videos and photos easily.
The camcorder features 7.6 cm LCD (3" LCD) touch panel which is an ideal platform for you to operate your camcorder. The menu options are accessible with your finger. With the touch panel, you can select the options directly and quickly.
The camcorder also features video recording at an HD resolution of 1920x1080. You can also connect it to an HDTV via an HDMI cable, and easily playback the recorded high-definition videos on the wide screen HDTV.
Moreover, the camcorder has an advanced uploading feature. With the exclusive built-in Internet Direct application, you can upload the videos captured by the camcorder to the web site more effortlessly.
ISO sensitivity and color balance can either be adjusted automatically or changed manually. A 120x digital zoom helps you to control over the videos and photos you take.
The varied effect options, such as Time Lapse, Slow Motion and different Scene, make recording more fun.
The built-in memory allows you to take photos and to record videos without a memory card. The memory card slot allows users to increase the storage capacity.

Note
- Partial memory of the built-in memory is used for the camcorder's Firmware code and software.
Install the bundled software application on the CD, ArcSoft MediaImpression, for viewing the • videos correctly on a PC.
Standard Accessories
Unpack the package and make sure all standard accessories listed are included:
Camcorder•
USB Cable•
AV Cable•
HDMI Cable•
Adaptor•
Lithium-ion Rechargeable Battery
- Quick Guide
• CD-ROM (Software, User's Manual) - Pouch
- Lens Cover Set (Lens cover and Strap)
Front View

Rear View

Side View
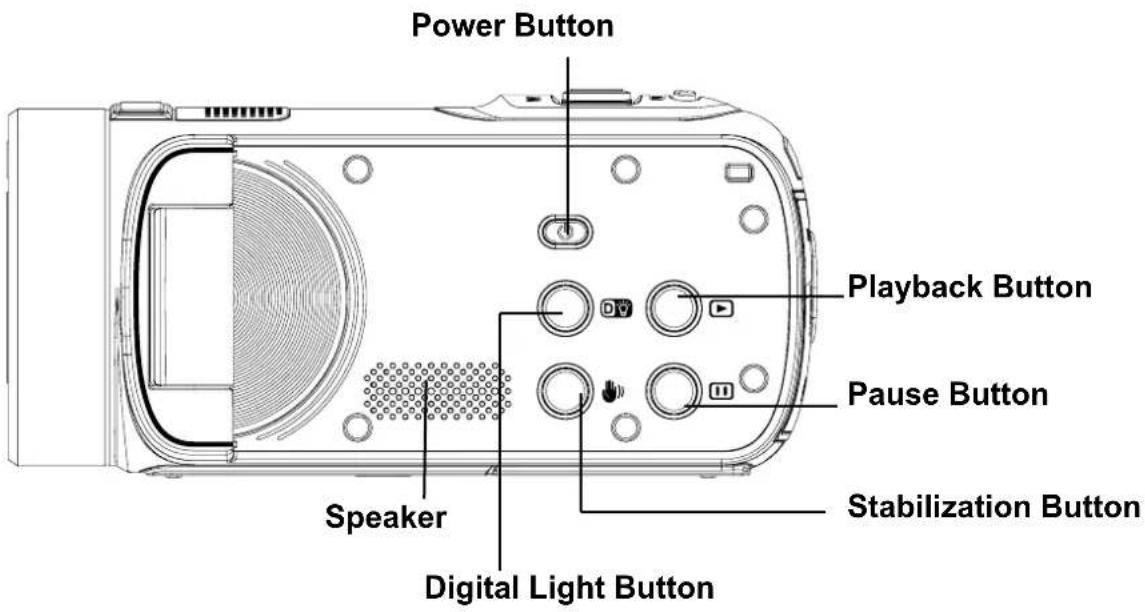
Bottom View

Section 2
Getting Started
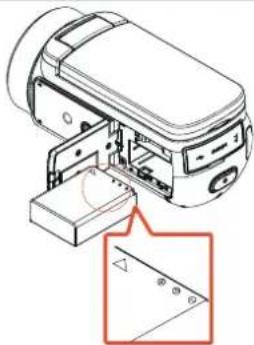
Loading the Battery
Before using the camcorder, you must load the Lithium-ion rechargeable battery come within the package.
Insert the battery according to the correct polarity marks (+ or 1. -).
Close the battery cover firmly.2.
natural_image
Technical line drawing of a mechanical device with a highlighted section showing a triangular component (no text or symbols present)Charging the Battery
Please charge the battery for at least 8 hours prior to its first use. Afterwards, it will take approximately 4 or 5 hours to fully charge the battery by AC adapter. The camcorder must be turned OFF. The blinking light confirms the camcorder is currently charging, and the light becomes constant after the charging is completed. In AC charging Mode, the light will turn itself off automatically after 3\~5 minutes. (Actual charging time depends on the battery conditions.)

Inserting and Removing an SD Card (Optional)
The camcorder comes with an internal memory that allows you to store photos and videos. You can expand the memory capacity by using an optional SD memory card.
To inset a memory card, please refer to the figure on the right side.1. To remove the memory card, please press the card and it will pop 2. up. Then pull the card out of the slot.

natural_image
Technical line drawing of a mechanical device with internal components and directional arrows (no text or symbols)
Note
When a memory card is fitted, videos/photos are saved • to the card rather than the built-in memory.
Protecting Data on an SD Card: SD Card is read-only when it is locked. No photos or videos can be recorded when the SD card is locked. Make sure the lock is on the writeable position before recording any media.

Turning On/Off Your Camcorder
Open the LCD monitor or press and hold down the [Power Button] for 1 second to camcorder.
- To turn off the camcorder, press and hold down the [Power Button] for 1 second or close the LCD monitor.
Configuring the Initial Date and Time Setup
The time setting screen appears to allow you to setup date and time:•
| Operation Display Screen | |
| Touch Year, Month, Day, Hour, Minute, and AM/PM to set.1.Adjust the numeric value by touching 2. ▲/ ▼Touch the [OK] icon to validate the setting.3.4. Touch the Exit icon ( [IMAGE] ) to exit. | 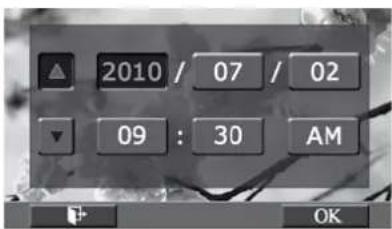 |
Getting Started
- To record video: Press [Record Button] to record video. To stop recording, press it again.
- To pause recording: Press [Pause Button] to pause recording. To continue the recording, press it again.
- To take a photo during video recording: When recording video, press [Photo Button] to capture the image. The Picture in Video (PIV) icon ( ) appears on the LCD monitor.
- To take a photo: Press [Photo Button] halfway down until the focusing frame turns from white to green. Then, press it fully down to take photo.
 |  |
| Focusing Frame: White | Focusing Frame: Green |
- To view stored videos and photos: Press [Playback Button] or touch 📋 on the screen to switch to the Playback mode.
Section 3
Enjoying the Record Mode
Button Function
| [cwww] | Record Button:Press to take video. 1.To stop recording, press it again.2. |
 | Photo Button:Press to take photo.1.When recording video, press to capture the image.2. |
 | Tele Button:Zoom In.1.Wide ButtonZoom out.1. |
 | Power Button:Press down for one second to turn on or turn off the camcorder.1. |
 | Playback Button:Switch between Record / Playback Mode.1.For quick review, press it after recording.2. |
 | Pause Button:Press to pause the recording. 1.To continue the recording, press it again.2. |
 | Digital Light Button:Digital Light On/Off. |
 | Stabilization Button:Stabilization On/Off. |
LCD Monitor Information
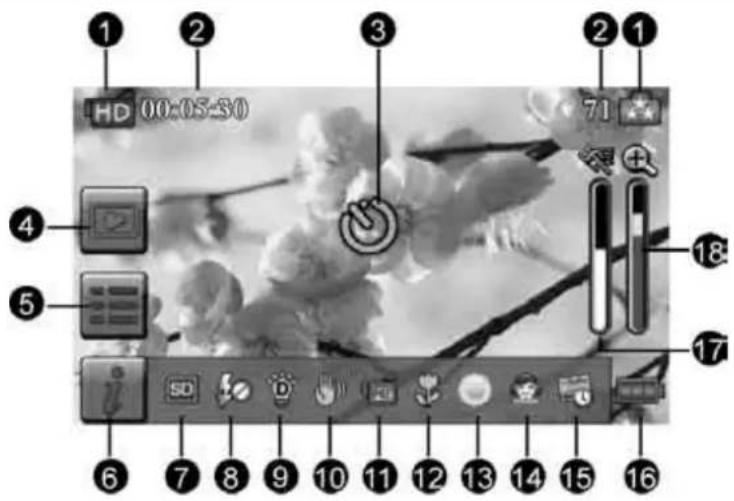
| (1) | Video Resolution | |
 | Full HD (1080p 30 fps) | |
 | HD (720p 60 fps) | |
 | HD (720p 30 fps) | |
 | VGA (640X480) | |
 | Slow Motion (Record video at 432x240(QVGA) resolution.) | |
| Photo Resolution | ||
 | 16MP | |
 | 5MP | |
| [2TSZ] | 3MP | |
| (2) | 00: 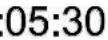 | Remaining recordable time |
 | Number of images that can still be taken at current resolution | |
| (3) |  | Self-timer enabled |
 | Picture in Video (PIV) | |
| (4) | Playback  | |
| (5) | Menu  | |
| (6) | Information  | |
| (7) | SD Card In  | |
| (8) |  | Flash Auto (Photo Recording Only) |
 | Red Eye Reduction (Photo Recording Only) | |
 | Flash Off | |
| (9) Digital Light |  | |
| (10) Stabilizati |  | |
| (11) |  | Pre-Record Mode |
 | Time Lapse | |
 | Smile Detection | |
| (12) Macro Foring On | ||
| (13) |  | Daylight |
 | Fluorescent | |
 | Tungsten | |
| (14) | Scene | |
 | Skin | |
 | Night | |
 | Backlight | |
 | Black/White | |
 | Classic | |
 | Negative | |
| (15) Date Print In | ||
| (16) |  | Battery: full power |
 | Battery: medium power | |
 | Battery: low power | |
 | Battery: empty power | |
 | DC power mode | |
| (17) Motion Deion | ||
| (18) |  | Zoom meter: 1X~2700X (23X Optical zoom and 120X Digital zoom) |

Note
Stabilization, Time Lapse, and Slow Motion functions can not be used simultaneously. • Stabilization and Night Mode functions can not be used simultaneously. • Pre-Record, Motion Detect, Slow Motion, and Time Lapse functions can not be used • simultaneously.
Video Recording
- Press [Record Button] to start recording. When a video is being recorded, a time indicator will display on the LCD monitor ( ) to stop recording, press it again.
- To pause recording: Press [Pause Button] to pause recording ( ☐00:00:36 ). To continue the recording, press it again.
Picture in Video (PIV): During recording, you can capture images by pressing [Photo Button]. • The PIV icon( 📄 appears on the LCD monitor.
- Press [Playback Button] or touch ▶ on the screen to view the recorded video.
- Four resolution settings are available:
| Video Quality | ||
 | Full HD (1080p 30 fps) | |
 | HD (720p 60 fps) | |
 | HD (720p 30 fps) | |
 | VGA (640X480) | |

Note
- The image resolution captured during video recording is the same as the video resolution.
- The flash can not be used when capturing image during video recording.
Photo Capturing
- Press [Photo Button] halfway down until the focusing frame turns from white to green. Then, press it fully down to take photo.
- Press [Playback Button] or touch ▶ on the screen to view the photos.
- Three resolution settings are available:
| Image Quality | |
 | 16 Mega Pixels |
 | 5 Mega Pixels |
 | 3 Mega Pixels |
Using Zoom Function
- The zoom magnifies images when recording video or taking photo.
- To zoom in/out, press the Tele/Wide Button.
- It can be set from 1X\~2700X (23X Optical zoom and 120X Digital zoom)
Using Digital Light Function
The setting allows you to extend the brightness of the objects that are dark or in the shadow. • It can extend the dynamic range for backlight and high contrast sense, so that the objects will be brighter and clearer.
To use the Digital Light function:•
Press [Digital Light Button1.] in Record Mode. The Digital Light icon appears on the LCD monitor.
- Press [Record Button] to start recording or press [Photo button] to take photo.
Using Stabilization Function
To record with an effect of reducing camcorder shake to result in more stable video.
To use the Stabilization function:•
- Press [Stabilization Button] in Record Mode. The Stabilization icon( 🔍 ) appears on the LCD monitor.
Press 2. [Record Button] to start recording.
Showing Information on the screen
- Touch the on-screen button to show or not to show the indicators on the LCD screen.
| Operation | Screen |
| 1. Touch i on the screen. The information bar will show on the screen. |  |
| 2. Touch again to hide all indicators. |  |
| 3. Touch i to display the indicators. |  |
Options for Record Menu
| Video Photo Effect Setting* | |||
 |  |  |  |
| Resolution•Pre-record•Motion Detect•Slow Motion•Time Lapse• | Resolution•Flash•Self-Timer•Smile Detect•ISO• | Scene•WB(White Balance)•Macro Mode•Face Tracking• | • Sound• TV• LanguageTime Setting•Date Printing• Format• Default Setting |
* Please refer to Section 5 for the detailed information about [Setting].
Operations for Record Mode
| Operation | Display Screen |
1. Touch  on the screen in Record Mode. The menu will show on the screen. on the screen in Record Mode. The menu will show on the screen. | 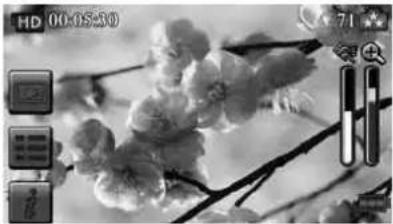 |
| 2. Touch the option icons on the screen lightly with your finger. The options are Video, Photo, Effect, and Setting.3. The option submenu will pop up on the screen.4. Touch to select the specific option you want to adjust. (The selected option will be highlighted.)5. Touch the Exit icon ( [IMAGE] ) to exit. | [KABD]     |
Video
| Operation Display Screen | |
| T1. ouch on the screen and the menu will show on the screen.Touch the [Video] icon on the screen. Submenu of Video 2. will pop out on the screen.The Video submenu contains 5 options-- Resolution, 3. record, Motion Detect, Slow Motion, and Time Lapse --for you to adjust the camcorder settings. |  Pre- Pre- |
Video Resolution
Four resolution settings are available.
FHD (1080p 30):• Record videos at 1920x1080p 30 fps resolution.
HD+ (720p 60):• Record videos at 1280x720p 60 fps resolution.
• HD (720p 30): Record videos at 1280x720p 30 fps resolution.
• VGA (640X480): Record videos at 640x480p 30 fps resolution.
| Operation Display Screen | |
| 1. In the Video menu, touch the [Resolution] icon on the screen.2. Touch to select the desired option.3. Touch the Exit icon ( [IMAGE] ) to exit. |  |
Pre-record
The Pre-record function ensures that you will not miss any critical recording opportunities. The videos are recorded 3 seconds more before the [Record Button] is pressed.
| Operation Display Screen | |
| 1. In the Video menu, touch the [Pre-record] icon on the screen.2. Touch to select [On] or [Off] ( √ ✗ ).3. Touch the Exit icon ( [IMAGE] ) to exit. |  |

Note
- Aim the camcorder at the subject and position it securely.
Motion Detection
Record videos automatically when the camcorder detects a movement.
| Operation Display Screen | |
| In the Video menu, touch the [Motion Detect] icon on the 1. screen.Touch to select [On] or [Off] 2. Touch the Exit icon 3. Camcorder will start to record video automatically if it detects a movement. Stop recording if it does not detect a movement. |  |
Slow Motion
Record videos with slow motion effect. When the video is played, the playback time will be longer than the actual recording time.
| Operation Display Screen | |
| In the Video menu, touch the [Slow Motion] icon on the 1 screen.Touch to select [On] or [Off] 2.√) ✘Touch the Exit icon 3. ) to exit. | 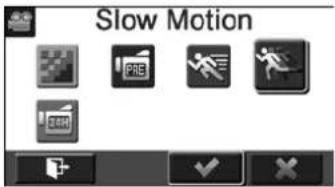 |

Note
Pause function can not be used when Slow Motion function is activated.
Time Lapse
Record still images at specific intervals you can set and play them as one video file.
Off:• Disable Time Lapse.
• 1 Second.: Record one frame per second.
• 3 Seconds: Record one frame every 3 seconds.
• 5 Seconds: Record one frame every 5 seconds.
| Operation Display Screen | |
| 1. In the Video menu, touch the [Time Lapse] icon on the screen.2. Touch to select the desired option.Touch the Exit icon 3.) to exit. |  |

Note
- Pause function can not be used when Time Lapse function is activated.
Photo
| Operation Display Screen | |
| T1. ouch on the screen and the menu will show on the screen.Touch the [Photo] icon on the screen. Submen Photo will pop out on the screen.The Photo submenu contains 5 options-- Resolut Flash, Self-Timer, Smile Detect, and ISO, --for you to adjust the camcorder settings. |  |
Photo Resolution
Three resolution settings are available.
• 16MP: Shoot photo at 4608 x 3456, 16MP quality.
- 5MP:Shoot photo at 2592 x 1944, 5MP quality.
• 3MP: Shoot photo at 2048 x 1536, 3MP quality.
| Operation Display Screen | |
| In the Photo menu, touch the [Resolution] icon screen.2. Touch to select the desired option.3. Touch the Exit icon ( [IMAGE] ) to exit. |  |
Flash
This camcorder has three flash settings.
- Flash Auto: The flash fires automatically according to light conditions. Use this mode for general photography.
- Red Eye Reduct. (Red Eye Reduction): The pre-flash will fire to reduce the red-eye effect.
- Flash Off: The flash will not fire under any circumstances. Use this mode when taking photo in a place where flash photography is prohibited, or when the subject is distant (beyond the range of the flash).
| Operation Display Screen | |
| 1. In the Photo menu, touch the [Flash] icon on the screen.2. Touch to select the desired option.3. Touch the Exit icon ( [IMAGE] ) to exit. | 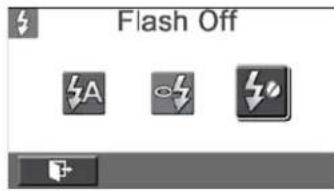 |

Note
The flash will be disabled automatically when the battery power is low ( ).
Self-Timer
The self-timer allows you to take photos with a ten-second time delay. The self-timer light on the front of the camcorder will also blink. The speed of blinking will increase just before the photo is taken.
| Operation Display Screen | |
| In the Photo menu, touch the [Self-timer] screen.Touch to select [On] or [Off] 2. 📋. ✗Touch the Exit icon 3. 🎨) to exit. | icon |
Smile Detection
Capture image automatically when the camcorder detects a smile.
| Operation Display Screen | |
| In the Photo menu, touch the [Smile Detect] icon on the 1. screen.Touch to select [On] or [Off] 2.√). ✗Touch the Exit icon 3. (*) to exit. |  |
| In Record Mode, aim the camcorder at the face(s). The face frame(s) will appear around the face with smile. | 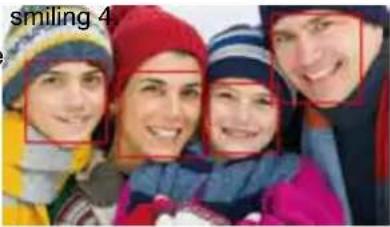 |
| The camcorder will focus on the subject. 5. |  |
| 6. Then, the camcorder will capture the photo automatically. |  |
ISO
The camcorder adjusts the ISO sensitivity of its images automatically. Four manual ISO settings are available. (800/1600/3200/6400). The larger the number is, the higher the ISO sensitivity is set to. Select a small number to shoot a smoother image. Select a large number to shoot an image in a dark location or to shoot a subject moving at high speed.
| Operation Display Screen | |
| In the Photo menu, touch the [ISO] icon on the screen.1.Touch to select the desired option.2.Touch the Exit icon 3.) to exit. |  |

Note
The image may become noisy when the ISO number is large.
Effect
| Operation Display Screen | |
| T1. ouch on the screen and the menu will show on the screen.Touch the [Effect] icon on the screen. Submenu of Effect will pop out on the screen.The Effect submenu contains 4 options--Scene, White Balance, Macro Mode, and Face Tracking --for you to adjust the camcorder settings. | 2.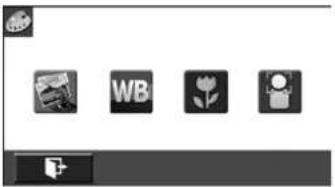 |
Scene
You can select the mode according to the scene condition.
• Auto: Shoot without any special effect on the image.
- Skin: Shoot with an effect that makes skin tones more natural.
• Night: Use Night Mode for night scenes or low light conditions.
- Backlight: You can take shots when the bright light is behind the subject.
- Black/White: The image is converted to black-and-white.
• Classic: The image is converted to a sepia look.
- Negative: The image is converted as the negative of the normal.
| Operation Display Screen | |
| 1. In the Effect menu, touch the [Scene] icon on the screen.Touch to select the desired option.2.Touch the Exit icon 3.) to exit. | 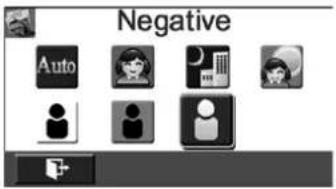 |

Note
To avoid blurry photos, place the camcorder on a flat, steady surface, or use a tripod when taking shots in the Night Mode.
White Balance
The camcorder adjusts the color balance of images automatically. Three manual white balance settings are available:
Auto: • The camcorder automatically adjusts white balance.
Daylight: • Under outdoor condition.
Fluorescent: • Under fluorescent light condition.
Tungsten: • Under tungsten light condition.
| Operation Display Screen | |
| In the Effect menu, touch the [White Balance] icon on 1. the screen.Touch to select the desired option.2.3. Touch the Exit icon ( [IMAGE] ) to exit. | 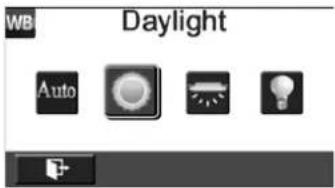 |
Macro Mode
You can select the mode for recording close-up video and photo.
| Operation Display Screen | |
| 1. In the Effect menu, touch the [Macro Mode] icon on the screen.2. Touch to select [On] or [Off] ( √ ✗ ).3. Touch the Exit icon ( [IMAGE] ) to exit. |  |
Face Tracking
The camcorder can detect human face(s) and focus on the face(s) automatically. This function can works with video recording and photo capturing. It is wonderful for capturing beautiful portraits in backlight situation.
| Operation Display Screen | |
| 1. In the Effect menu, touch the [Face Tracking] icon on the screen.2. Touch to select [On] or [Off] ( √ ✗ ).3. Touch the Exit icon ( [IMAGE] ) to exit. |  |
| 4. In Record Mode, aim the camcorder at the face(s). The face frame(s) will appear around the face. | 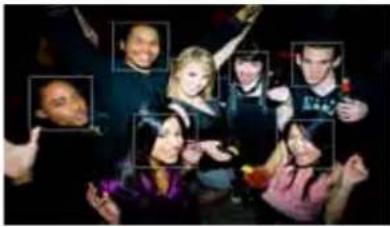 |

Note
When Face Tracking is activated, aim the camcorder at the human face(s). The face frame(s) will show on the LCD before the [Record Button]/[Photo Button] is pressed.
Section 4
Enjoying the Playback Mode
Button Function
The Buttons have the following functions in Playback Mode.
 | Record Button:Switch to Record Mode.1. |
 | Tele Button:Zoom In.1.Wide ButtonZoom out.1. |
 | Playback Button:Switch between Record / Playback Mode.1.For quick review, press it after recording.2. |
 | Pause Button:In Video Playback Mode, press to pause the recorded video.1. |
LCD Monitor Information
Indicators on the LCD screen while in Playback Mode:

| (1) | Video Resolution | |
 | Full HD (1080p 30 fps) | |
 | HD (720p 60 fps) | |
 | HD (720p 30 fps) | |
 | VGA (640X480) | |
 | Slow Motion (432x240(QVGA)) | |
| Photo Resolution | ||
 | 16MP | |
 | 5MP | |
| [CAWS] | 3MP | |
 | Picture in Video (PIV) (The image resolution captured during videos recording is the same as the video resolution.) | |
| (2) | 00:05:30 | Video playback time counter. |
| [OKHZ] | Current number/ Total number of photo/video. | |
| (3) Volume | ||
| (4) |  | Return |
 | Video stop | |
(5) Previous  | noto | |
(6) Video fas  | ||
| (7) |  | Video play |
 | Video pause | |
| (8) | Video fast  d d | |
| (9) | Next video  | |
| (10) | Delete  | |
| (11) |  | Slideshow |
 | Slideshow stop | |
| (12) | Magnifica  dicator dicator | |
Operations for Playback Mode
The Playback Mode is for viewing and managing videos and photos on the built-in memory or on an SD Card.
| Operation Display Screen | |
Press 1. [Playback Button] or  on the screen to switch to the Playback mode. on the screen to switch to the Playback mode. | 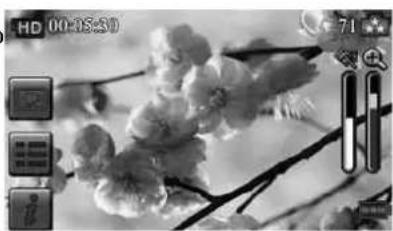 |
| Touch to select the desired option.2.Touch (3.) to back to Record Mode. | 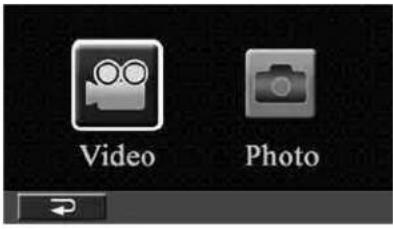 |
Video Playback
| Operation Display Screen | |
| In the Video Playback mode, touch 1. // to play or pause the videos.Sweep to the 2. right or touch to go to the previous video; sweep to the left or touch to go to the next video.While playing videos, touch 3. / to fast rewind/forward.4. Touch to increase the volume; touch to reduce the volume.5. Touch ( ) to exit. | 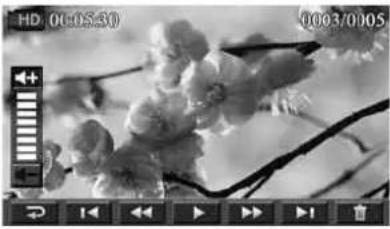 |

Note
- When the LCD is idle for a few seconds, the playback function icons will disappear automatically.
Delete Videos
| Operation Display Screen | |
| 1. Touch to go to the Delete option screen. |  |
| 2. Touch [Yes] to delete the current video or [No] to cancel the operation and to exit; touch [All (Delete All)] to delete all videos.3. Before all videos are about to be deleted, a confirmation screen will appear; touch [Yes] to execute the operation and [No] to cancel the operation. | 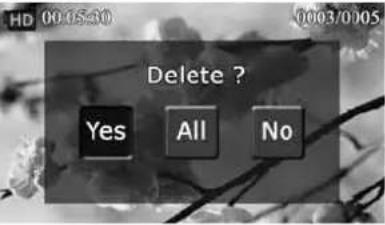 |
 |

Note
- If a memory card has been inserted, you can only delete those videos stored on the card.
• Videos on a written-protected memory card cannot be deleted.
Photo Playback
| Operation Display Screen | |
| In the Photo Playback mode,1. sweep to the right or touchto go to the previous photo; sweep to the left ortouch to go to the next photo.While the photo is selected, press [Tele Button] to magnify. 2.(The magnification Indicator appears on the screen)To navigate the magnified photo, press on the screen and 3.move as well. (The inner Magnification Indicatorred)Press [Wide Button] to zoom out or exit the magnification 4.mode.Touch 5:7 to start or to stop the slide show.Touch (6: ) to exit. | 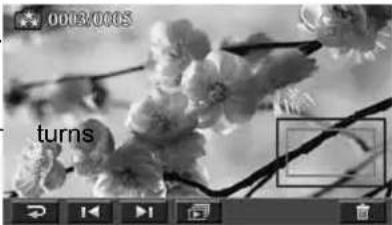 |

Note
- When the LCD is idle for a few seconds, the playback function icons will disappear automatically.
Delete Photo
| Operation Display Screen | |
| 1. Touch to go to the Delete option screen. |  |
| 2. Touch [Yes] to delete the current photo or [No] to cancel the operation and to exit; touch [All (Delete All)] to delete all photos.3. Before all photos are deleted, a confirmation screen will appear; touch [Yes] to execute the operation and [No] to cancel the operation. |   |

Note
- If a memory card has been inserted, you can only delete those photos stored on the card.
- Photos on a written-protected memory card cannot be deleted.
Section 5
Setting Your Camcorder
Setting Menu
| Operation Display Screen | |
| T1. ou on the screen and the menu will show on the screen.Touch the [Setting] icon on the screen. Subme Setting will pop out on the screen.The Setting submenu contains 7 options for configuring 3.your camcorder setup. They are Sound (operation sound), TV, Language, Time Setting, Date Format, and Default Setting. | 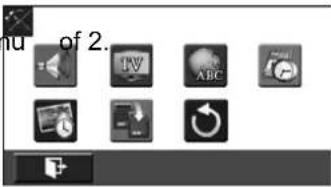 |
Sound
Enable or disable the keypad tone and the operation sound.
| Operation Display Screen | |
| In the Setting menu, touch the [Sound] icon screen.2. Touch to select [On] or [Off] ( √ ✗ ).3. Touch the Exit icon ( [IMAGE] ) to exit. |  |
TV
Ensure that the appropriate TV standard of your area is selected – either NTSC or PAL. Wrong TV system setting may cause image flickers.
• NTSC(60Hz):USA, Canada, Japan, South Korea and Taiwan, etc.
• PAL(50Hz):UK, Europe, China, Australia, Singapore and Hong Kong, etc.
| Operation Display Screen | |
| 1. In the Setting menu, touch the [TV] icon on the screen.2. Touch to select [PAL] or [NTSC].3. Touch the Exit icon ( [IMAGE] ) to exit. |  |
Language
Use this option to select the language of the user interface.
| Operation Display Screen | |
| In the Setting menu, touch the [Language] icon screen.Touch to select the desired option.2.Touch the Exit icon 3.) to exit. |  |
Time Setting
| Operation Display Screen | |
| In the Setting menu, touch the [Time Setting] icon on the 1. screen to enter the time setting screen.Touch Year, Month, Day, Hour, Minute, and AM/PM to set.2.Adjust the numeric value by touching 3. ▲ / ▼Touch the [OK] icon to validate the setting.4.Touch the Exit icon 5. (→) to exit. |  |
Date Printing
Imprint the date and time on the video and photo.
| Operation Display Screen | |
| 1. In the Setting menu, touch the [Date Printing] icon on the screen.2. Touch to select [On] or [Off] ( √ ✗ ).Touch the Exit icon 3. ) to exit. |  |

Note
- Date Printing function can not be used when Slow Motion function is activated.
Format
- Yes: Format the built-in memory (When there is no SD card in the camcorder) / SD Card (When there is an SD card in the camcorder).
- No: Do not format the built-in memory (When there is no SD card in the camcorder) / SD Card (When there is an SD card in the camcorder).
| Operation Display Screen | |
| In the Setting menu, touch the [Format] icon screen.2. Touch to select [Yes] or [No] ( √ × ). (Touch [Yes] √to enter the confirmation screen.) | 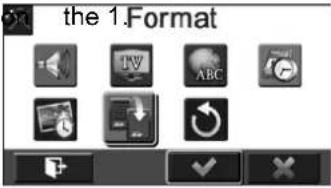 |
| 3. Touch the [Yes √ ] icon to execute the operation and the [No ✗ ] icon to cancel the operation. |  |

Note
All the data will be erased if the SD card is formatted. Make sure all the data are copied to your PC before formatting the SD card.
Default Setting
To restore the default factory setting, select this option.
| Operation Display Screen | ||
| 1. In the Setting menu, touch the [Default Setting] icon on the screen.2. Touch to select [Yes] or [No] ( √ × ). (Touch [Yes] √ to enter the confirmation screen.) | 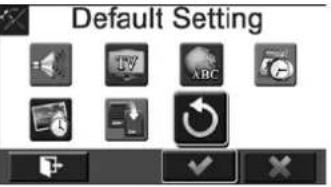 | |
| 3. Touch the [Yes √ ] icon to execute the operation and the [No ✗ ] icon to cancel the operation. |  | |
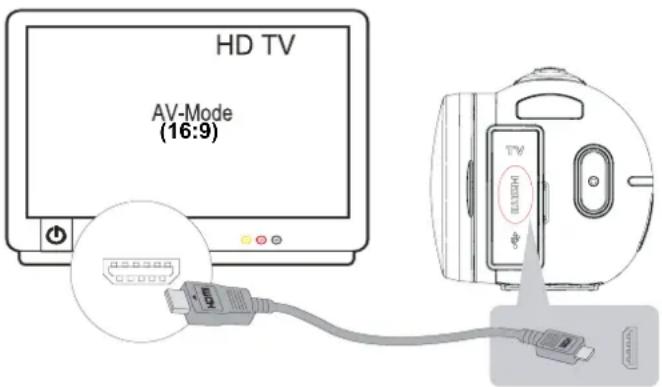
Connecting to a High-Definition 16:9(Wide) TV
Connect the HDMI cable to your camcorder's HDMI Out port.1.
Connect the other end of the cable to a television.2.
Set the video input source of your TV to "HDMI."3.
- The steps for viewing stored videos and photos on HDTV are exactly the same as for viewing them on the LCD monitor.
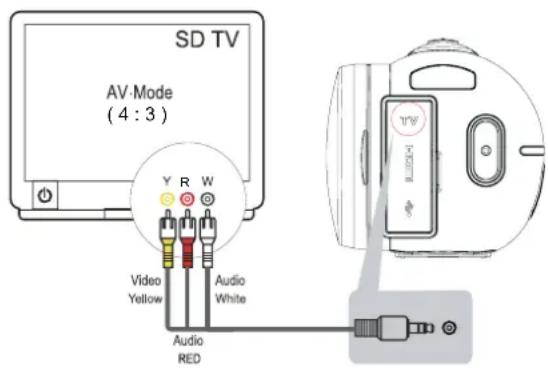
Connecting to a non-high-definition 4:3 TV
Connect one end of the AV cable to your camcorder's AV out port.1.
Connect the other end of the cable to a television.2.
The steps for viewing stored videos and photos on TV are exactly the same as for viewing them on 3. the LCD monitor.
Installing Bundled Software
The CD-ROM supplied with this camcorder contains 2 pieces of software.
- ArcSoft MedialImpression is a user-friendly application that helps you managing your media, burning your video into DVD, and uploading your files to the web sites easily.
- Adobe Reader is a popular program that you need to have installed to read the User's Manual. Many computer users will find they already have this software installed on their computer.
To install the bundled software:
Insert the CD-ROM into your computer's CD-ROM drive. The autorun screen appears.1.
- Click "Install ArcSoft MediaImpression". Follow the on-screen instructions to complete the installation.

Note
- The detailed Instructions for the bundled software can be found within the program once the installation is completed. Click on [Extras] on the title bar and select [Help] to open the instruction manual.
- Install the bundled software application, ArcSoft MediaImpression, for viewing the videos correctly on a PC.
Transferring Photos or Videos to a Computer
You can transfer photos or videos stored on your camcorder to a computer and send them in e-mails to friends or post them on the web sites.
To do this you should:
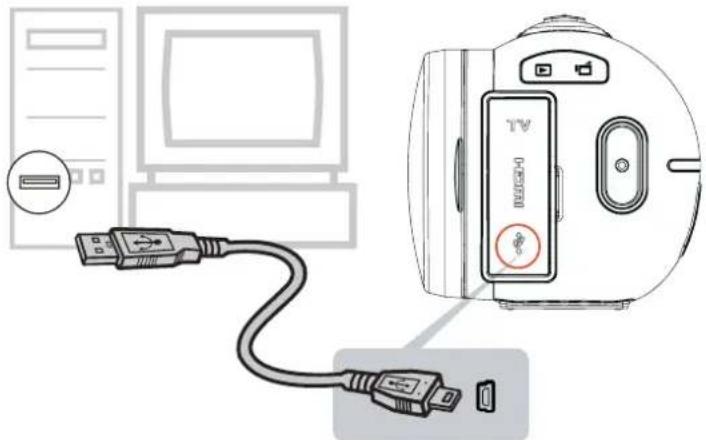
- Connect the computer and camcorder with the supplied mini USB 2.0 cable.
- The videos and photos can be found on your computer at "My Computer\Removable Disk\DCIM\100MEDIA". (Under the circumstances of within the SD card in the camcorder)
- Under this folder, you can view, delete, move, or copy any video/photo you want.
Section 8
Uploading Files to Internet
The built-in Internet Direct application offers you an easy way to upload your files to Internet instantly. It helps you share them with your family and friends on the web site.
To upload files to Internet:
Connect the camcorder to your computer by using the supplied USB cable.1.
natural_image
Diagram showing a USB cable connected to a computer monitor and a device with a switch (no text or symbols present)- After making a USB connection, the AutoPlay window will appear. (It may be different based on OS recognition. If the AutoPlay window does not appear. Please click [My Computer]-->[DVAP]-->[DVAP.exe] to execute the application.)
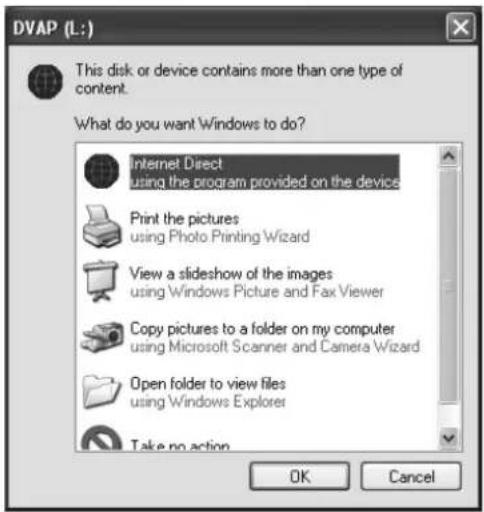
(In Windows XP)
The main screen appears automatically on the desktop. (To view the recorded clips on Internet Direct, 3. it is necessary to install ArcSoft MediaImpression first.)
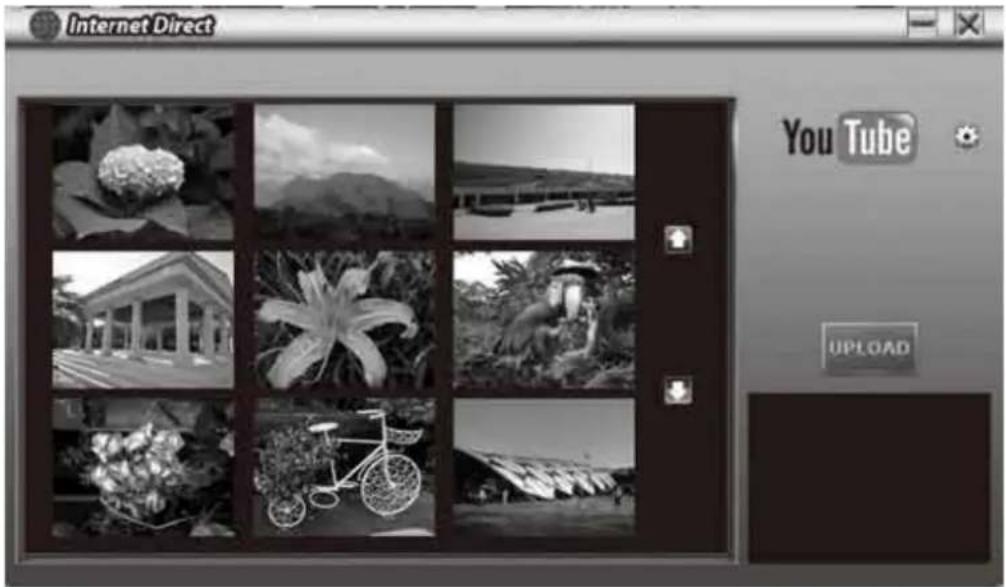

Note
The web site may be not allowed to access in certain regions.
- On the thumbnail screen, click on the up/down icon to change the pages. Click on the file(s) you want to upload.
Click on "UPLOAD" to start uploading.5.

Click on "CANCEL" to stop uploading. 6.

To playback the video file:
Double click on the video clip on the thumbnail screen. 1.
- Click on the Play/Pause icon 📄 to play/pause. Click on the Return icon 📋 to return to the thumbnail preview screen.

To setup your account information for the website:
- Click on 📋 to go to the setup screen.
- Fill in your account information in the blanks. Then click on "Save".

(If you do not have a account, please sign up on the website first.)
Section 9
Specifications and System Requirements
Specification
| Image sensor 5 Mega-pixels CMOS sensor | |
| Operation modes Video record, Photo record | |
| Lens 23X Optical Zoom Lens (4.0 - 92.0mm / F 3.5-4.1) | |
| Zoom 1X~2700X (23X Optical zoom and 120X Digital zoom) | |
| Shutter Electronic | |
| LCD monitor 7.6 CM touch LCD (3" touch LCD) | |
| Storage media Built-in 128MB memory (around 40MB for storage);SD/SDHC/SDXC card slot support (up to 64GB) (does not support 1.8V UHS mode of SDHC/SDXC card ) | |
| Image resolution 16M (4608 x 3456) (Interpolated)5M (2592x1944)3M (2048x1536) | |
| Video resolution 1920X1080, up to 30 fps (FULL HD 30f)1280X720, up to 60 fps (HD 60f)1280X720, up to 30 fps (HD 30f)640X480, up to 30 fps (VGA 30f) | |
| White balance Auto/Manual (Daylight, Fluorescent, Tungsten) | |
| ISO Auto/800/1600/3200/6400 | |
| Self-timer 10 seconds delay | |
| Power Save Mode 3 mins Auto off | |
| Flash Flash Auto/Red-Eye-Reduction/Flash Off | |
| File format | Photo: JPGVideo: AVI (H.264) |
| Image play | Single image/Slideshow |
| PC interface | Mini USB 2.0 port |
| TV out | HDTV HDMI out; Composite AV-out (NTSC/PAL) |
| Battery | Lithium-ion rechargeable battery |
| DC Input | +5V=2.0A |
| Dimension | 126mm (L) x 57mm (H) x 60mm (W) |
| Weight | 340g ( without battery) |
System requirements
Microsoft Windows XP/Vista/7•
Intel Pentium 4, 2.4 GHz or above•
512 MB RAM•
1 GB free HDD space•
Available USB port•
CD-ROM Drive
16-bit Color Display•

Note
The LCD screen is manufactured using extremely high-precision technology, so over 99.99% of the pixels are operational for effective use. However, some tiny black and/or bright dots (white, red, blue or green) may appear on the LCD screen. These dots are a normal result of the manufacturing process, and do not affect the recording.

Flicker Setting Reference
| Area | England | Germany | France | Italy | Spain | Russia |
| Setting | 50Hz | 50Hz | 50Hz | 50Hz | 50Hz | 50Hz |
| Area | Portugai | America | Taiwan | China | Japan | Korea |
| Setting | 50Hz | 60Hz | 60Hz | 50Hz | 50Hz/60Hz | 60Hz |
Note: The flicker setting is based on the frequency standard of your local power supply.
Troubleshooting
| Symptom/Situation Possible | Cause/Solution |
| The flash is not working. | The battery power is low. |
| The camcorder is in DC power mode. | |
| In flash auto mode, camcorder flash fires ONLY when necessary (in dark setting as example). | |
| The files on the memory card do not display smoothly when the LCD shows the “!” marking. | The “!” means the SD card is low speed or is having wrong content inside. The way to solve this condition is to format SD card by the camcorder instead of a PC (Please refer to the detailed Format instruction in Section 5). |
| Please change the SD/SDHC/SDXC card to a high speed one. | |
| Why do some of my indoor photos look blurry and dark? | The camcorder extends photo exposure time under low light/indoor condition. Keep the camcorder (and the target subject) steady for several seconds when taking photos. The shutter will sound when photos are being taken. |
| How do I charge battery? | Please charge the battery for at least 8 hours prior to its first use. Afterwards, it will take approximately 4 or 5 hours to fully charge the battery by AC adapter. |
| Use the supplied AC charger or the USB cable. The camcorder must be turned OFF. The blinking light confirms the camcorder is currently charging, and the light becomes constant after the charging is completed. | |
| In AC charging Mode, the light will turn itself off automatically after 3~5 minutes. (Actual charging time may vary. It depends on the battery conditions.) | |
| After connecting the USB cable to the computer, ...... | The disk [DV] indicates the internal memory of the camcorder. (The disk label may be different according to different model and PC OS.) |
| [Removable Disk] indicates the external memory. (Under the circumstances of within the SD/SDHC/SDXC card in the camcorder) | |
| The disk [DVAP] indicates the built-in Internet Direct application is saved at this disk. Please DO NOT format this disk or delete the application inside; otherwise, the Internet Direct application can not function. |


- High Definition Camcorder
- Read This Before Using the Camcorder
- SAFETY INSTRUCTIONS
- Product Information
- Contents
- Section 1
- Getting to Know Your Camcorder
- Overview
- Note
- Standard Accessories
- Front View
- Rear View
- Side View
- Bottom View
- Section 2
- Getting Started
- Loading the Battery
- Charging the Battery
- Inserting and Removing an SD Card (Optional)
- Turning On/Off Your Camcorder
- Configuring the Initial Date and Time Setup
- Section 3
- Enjoying the Record Mode
- Video Recording
- Photo Capturing
- Using Zoom Function
- Using Digital Light Function
- Using Stabilization Function
- Showing Information on the screen
- Options for Record Menu
- Operations for Record Mode
- Video
- Video Resolution
- Pre-record
- Motion Detection
- Slow Motion
- Time Lapse
- Photo
- Photo Resolution
- Flash
- Self-Timer
- Smile Detection
- ISO
- Effect
- Scene
- White Balance
- Macro Mode
- Face Tracking
- Section 4
- Enjoying the Playback Mode
- Button Function
- LCD Monitor Information
- Operations for Playback Mode
- Video Playback
- Delete Videos
- Photo Playback
- Delete Photo
- Section 5
- Setting Your Camcorder
- Setting Menu
- Sound
- TV
- Language
- Time Setting
- Date Printing
- Format
- Default Setting
- Connecting to a High-Definition 16:9(Wide) TV
- Connecting to a non-high-definition 4:3 TV
- Installing Bundled Software
- Transferring Photos or Videos to a Computer
- Section 8
- Uploading Files to Internet
- To upload files to Internet:
- To playback the video file:
- To setup your account information for the website:
- Section 9
- Specifications and System Requirements
- System requirements
- Troubleshooting
Marque : AIPTEK
Modèle : AHD H23
Catégorie : Caméscope