
SS-700 - Machine à café CUISINART - Notice d'utilisation et mode d'emploi gratuit
Retrouvez gratuitement la notice de l'appareil SS-700 CUISINART au format PDF.


| Type de produit | Machine à café automatique avec broyeur |
| Marque | Cuisinart |
| Modèle | SS-700 |
| Dimensions (L x l x H) | 25 x 20 x 40 cm |
| Poids | 5 kg |
| Alimentation | 120 V~60 Hz, 1100 W |
| Capacité du réservoir d'eau | 1,2 litre |
| Fonctions principales | Broyeur intégré, programmation 24h, pause-café, extraction à 94°C |
| Entretien et nettoyage | Nettoyage automatique, indication de détartrage, pièces amovibles lavables |
| Sécurité | Arrêt automatique après 30 min, verrouillage du couvercle |
| Pièces détachées et réparabilité | Filtre à eau, broyeur, réservoir, mousseur à lait disponibles |
| Garantie | 2 ans (pièces et main-d'œuvre) |
| Couleur | Argent brossé et noir |
FOIRE AUX QUESTIONS - SS-700 CUISINART
Questions des utilisateurs sur SS-700 CUISINART
0 question sur cet appareil. Repondez a celles que vous connaissez ou posez la votre.
Poser une nouvelle question sur cet appareil
Téléchargez la notice de votre Machine à café au format PDF gratuitement ! Retrouvez votre notice SS-700 - CUISINART et reprennez votre appareil électronique en main. Sur cette page sont publiés tous les documents nécessaires à l'utilisation de votre appareil SS-700 de la marque CUISINART.
MODE D'EMPLOI SS-700 CUISINART
TROUBLESHOOTING GUIDE
| Problem:Solution: | |
| Brewer does not have power. | Plug brewer into an independent outlet. |
| Make sure the brewer is securely plugged in. | |
| Plug into a different outlet. | |
| Confirm the power has been turned on and the LCD is illuminated. | |
| Brewer will not brew/doesn't brew a full cup. | Every once in a while an air bubble may get trapped in the water path. Lift off the reservoir, then put it back into place. |
| Turn off and unplug the brewer for 30 seconds or more. When you plug the brewer back in, be sure to turn the power back on. | |
| After placing the K-Cup ^ In the K-Cup ^ Holder, make sure the handle is pushed down securely and the LCD control panel reads READY. The▼and▲buttons, Brew, Hot Water, and Rinse buttons will be illuminated. Then press any of the lit buttons. | |
| Make sure the water reservoir is properly in place, and perform a Rinse cycle. | |
| The exit needle may be clogged (refer to “Cleaning & Maintenance” page 18). | |
| Clean the K-Cup ^ brewing chamber (refer to “Cleaning & Maintenance” page 18). | |
| The time is not displayed on the LCD control panel. | You must set the clock (refer to page 15) in order for the time to be displayed on the LCD. |
| If power is interrupted to the brewer, you will need to reset the clock (refer to page 15). | |
| Brewer shuts off or turns on automatically. | Make sure the AUTO OFF and the On/Off time features have not been set. To do this, press the Menu button and scroll through the programming options. OFF should be displayed for AUTO OFF timer and On/Off. If OFF is not displayed, you must reset (refer to page 15). |
| The blue light in the water reservoir is flashing. | This indicates the water level in the reservoir is low and water must be added (refer to page 14) in order to brew a full cup. |
| If sufficient water is in the reservoir, make sure the reservoir Is properly seated In the base. | |
| Chlorine or mineral taste in coffee. | Consider using bottled water, filtered water or the Cuisinart Charcoal Water Filter. |
| Coffee is too weak or watery. | Reduce the brew size for a stronger-tasting cup of coffee (refer to “Programming Your Brew Size” on page 18). |
| Try an Extra Bold K-Cup ^ . It has 30% more ground coffee In each portion pack. |
For more helpful hints see instruction booklet
QUICK REFERENCE GUIDE
Cuisinart®
Single Serve Brewing System
SETUP
1.
Plug the brewer into a grounded outlet.
Make sure to remove
all packing tape, stickers and polybags from the brewer.
Lift reservoir straight up and away from the brewer and wash with warm soapy water. Then fill reservoir with water to the max fill line, return to unit.

natural_image
Technical line drawing of a mechanical device with no visible text or symbols2.
Follow directions carefully to maximize flavor and performance.
Fully immerse charcoal filter in cold
tap water – soak for 15 minutes.
Press down on the filter compartment and pull toward you to open.
Place the filter into the holder and snap it closed. Be careful – improper placement can tear the filter skin.
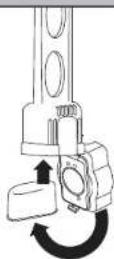
3.
Flush filter by running fresh water through lower portion of the filter holder for 10 seconds,
allowing the filter to completely drain. Then place the water filter holder into the water reservoir, pushing it down to fit into place. Replace the lid.

Setup instructions continued inside
SETUP continued BREWING USING K-CUP
4.
Press the power switch on the rear right side of the brewer.
The brewer will fill the internal
tank and heating will begin. This will take about four minutes.
NOT READY will be displayed on control panel.

5.
Once the water is heated,
OPEN HEAD
will be displayed. Open and close brewing chamber.
READY and brew size icons will be displayed; the default size will appear as a solid mug.

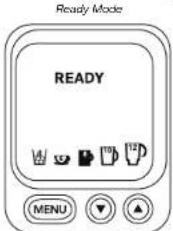
6.
Make sure a mug (10 oz. minimum) is securely on the drip tray, and press the BREW button to
start the cleaning cycle. The control panel will display BREWING and the factory default brew size. When the cycle is complete, dispose of hot water.
Note: Do not use a K-Cup® for this cycle.

The one-time set-up process is complete.
IMPORTANT
Do not throw away. Read before operating your new
Brewing System. Keep for future reference.
These helpful hints are intended to be a supplement to the Instruction Booklet.
In order to ensure safe operation and optimum performance,
please read the entire Instruction Booklet.
1.
Lift the handle. The brewing chamber will open toward you.
Place a K-Cup ^® in the brewing chamber.
Caution: Avoid putting your fingers in K-Cup® chamber.
Puncture needles are located above and below K-Cup ^® chamber.

K-Cup®
Portion
Pack

natural_image
Line drawing of a medical device with a monitor and connector (no text or symbols)2.
Lower the handle to close the brewing chamber. READY will be displayed on control panel.
Choose desired serving size using the ▼ and ▲ buttons.
Ready Mode
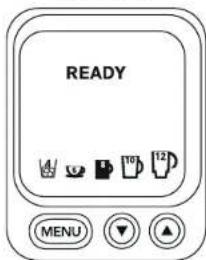
3.
Make sure the correct size cup or mug is on the drip tray and press BREW. Control panel will
display BREWING and your chosen serving size.
Caution: There is very hot water in the K-Cup® chamber during the brew process. To avoid risk of injury, do not lift the handle or open the K-Cup® chamber during the brew process.

Enjoy your cup of gourmet coffee, tea, or hot cocoa!


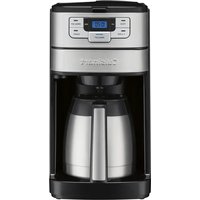

Marque : CUISINART
Modèle : SS-700
Catégorie : Machine à café