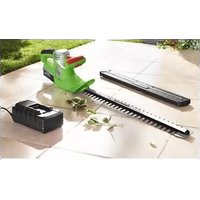
FAH 18 A1 - Taille-haies FLORABEST - Notice d'utilisation et mode d'emploi gratuit
Retrouvez gratuitement la notice de l'appareil FAH 18 A1 FLORABEST au format PDF.


| Type de produit | Taille-haies |
| Marque | Florabest |
| Modèle | FAH 18 A1 |
| Type d'alimentation | Batterie lithium-ion 18 V |
| Capacité de la batterie | 2.0 Ah (typique) |
| Temps de charge | Environ 1 heure |
| Longueur de la lame | 50 cm |
| Écartement des dents | 18 mm |
| Poids | 2,5 kg |
| Dimensions (L x l x h) | 90 x 20 x 15 cm |
| Niveau sonore (LpA) | 85 dB(A) |
| Vibration (ah) | 2,5 m/s² |
| Fonctions principales | Coupe de haies, arbustes, buissons |
| Entretien et nettoyage | Lubrification régulière de la lame, nettoyage après usage |
| Sécurité | Protection contre les redémarrages, gâchette à deux mains, capot de protection |
| Pièces détachées et réparabilité | Disponible via le service après-vente Florabest ou revendeurs |
| Contenu de l'emballage | Taille-haies, batterie, chargeur, guide de chaîne (selon modèle) |
| Utilisation | Extérieur, jardinage |
FOIRE AUX QUESTIONS - FAH 18 A1 FLORABEST
Questions des utilisateurs sur FAH 18 A1 FLORABEST
0 question sur cet appareil. Repondez a celles que vous connaissez ou posez la votre.
Poser une nouvelle question sur cet appareil
Téléchargez la notice de votre Taille-haies au format PDF gratuitement ! Retrouvez votre notice FAH 18 A1 - FLORABEST et reprennez votre appareil électronique en main. Sur cette page sont publiés tous les documents nécessaires à l'utilisation de votre appareil FAH 18 A1 de la marque FLORABEST.
MODE D'EMPLOI FAH 18 A1 FLORABEST
florabest
FAH 18 A1

natural_image
Green hatched crop in a lush green field under a blue sky with clouds (no text or symbols visible)
GB IE
Cordless Hedge Trimmer
Translation of original operation manual

GB IE
Before reading, unfold the page containing the illustrations and familiarise yourself with all functions of the device.


Content
Notes on Safety 4
Symbols 4
General safety instructions for power tools ....5
Special Safety Directions 7
Intended Use ......9
General Description ....10
Overview 10
Function Description ......10
Scope of delivery ....10
Charging the battery ....10
Removing / inserting the battery .....10
Recharging the battery 11
Used batteries 11
Operating 11
Switching On and Off 12
Checking the battery charge level .....12
Working with the Hedge Trimmer .....12
Cutting Techniques 12
Cleaning and Maintenance ....13
Cleaning 13
Maintenance ....13
Storage 13
Waste Disposal and Environmental
Protection 14
Technical Data ....14
Guarantee 15
Spare Parts....15
Trouble Shooting 16
Grizzly Service-Center ....16
CE declaration of conformity .....17
Exploded Diagram ......17

Before first using the machine, please read this instruction manual carefully, for your own safety and for the safety of others. Keep the manual in a safe place and pass it on to any subsequent owner to ensure that the information contained therein is available at all times.
Notes on Safety
This section details the basic safety instructions for working with the appliance.
Symbols
Symbols in the manual

Warning symbols with information on damage and injury prevention.

Instruction symbols (the instruction is explained at the place of the exclamation mark) with information on preventing damage.

Help symbols with information on improving tool handling.
Symbols on the Equipment

Caution!

Read through the instruction manual carefully.

Wear eye and ear protection.

Do not use the hedge trimmer in the rain or on wet hedges.

Information of the acoustic power level L_WA in dB.

Cutting length
Machines are not to be place with domestic waste.
Symbols on the battery

Do not dispose of batteries in household waste, fire or water.

Do not subject the battery to strong sunlight over long periods and do not leave it on a heater (max. 60°C).

Take batteries to an old battery collection point where they will be recycled in an environmentally friendly manner.
Symbols on the recharger

WARNING!

Before using for the first time, carefully read through the user manual

The recharger is for indoor use only.

Protective temperature limiter

Protection class II
Electrical appliances must not be disposed of with the domestic waste.
General safety instructions for power tools

WARNING! Read all safety directions and instructions. Omissions in the compliance with safety directions and instructions can cause electrical shock, fire and/or severe injuries.
Retain all safety directions and instructions for future use.
The term "Power Tools" used in the safety instructions refers to mains-operated power tools (with power cord) and to battery-operated power tools (without power cord).
1) WORK AREA SAFETY
- Keep work area clean and well lit. Cluttered or dark areas invite accidents.
- Do not operate power tools in explosive atmospheres, such as in the presence of flammable liquids, gases or dust. Power tools create sparks which may ignite the dust or fumes.
- Keep children and bystanders away while operating a power tool. Distractions can cause you to lose control.
2) ELECTRICAL SAFETY
- Power tool plugs must match the outlet. Never modify the plug in any way. Do not use any adapter plugs with earthed (grounded) power tools. Un-modified plugs and matching outlets will reduce risk of electric shock.
- Avoid body contact with earthed or grounded surfaces, such as pipes, radiators, ranges and refrigerators. There is an increased risk of electric shock if your body is earthed or grounded.
- Do not expose power tools to rain or wet conditions. Water entering a power tool will increase the risk of electric shock.
- Do not abuse the cord. Never use the cord for carrying, pulling or unplugging the power tool. Keep cord away from heat, oil, sharp edges or moving parts. Damaged or entangled cords increase the risk of electric shock.
- When operating a power tool out-
GBIE
doors, use an extension cord suitable for outdoor use. Use of a cord suitable for outdoor use reduces the risk of electric shock.
- If operating a power tool in a damp location is unavoidable, use a residual current device (RCD) protected supply. Use of an RCD reduces the risk of electric shock.
3) PERSONAL SAFETY
- Stay alert, watch what you are doing and use common sense when operating a power tool. Do not use a power tool while you are tired or under the influence of drugs, alcohol or medication. A moment of inattention white operating power tools may result in serious personal injury.
- Use personal protective equipment. Always wear eye protection. Protective equipment such as dust mask, non-skid safety shoes, hard hat, or hearing protection used for appropriate conditions will reduce personal injuries.
- Prevent unintentional starting. Ensure the switch is in the off-position before connecting to power source and/or battery pack, picking up or carrying the tool. Carrying power tools with your finger on the switch or energising power tools that have the switch on invites accidents.
- Remove any adjusting key or wrench before turning the power tool on. A wrench or a key left attached to a rotating part of the power tool may result in personal injury.
- Do not overreach. Keep proper footing and balance at all times. This enables better control of the power tool in unexpected situations.
- Dress properly. Do not wear loose
clothing or jewellery. Keep your hair, clothing and gloves away from moving parts. Loose clothes, jewellery or long hair can be caught in moving parts.
- If devices are provided for the connection of dust extraction and collection facilities, ensure these are connected and properly used. Use of dust collection can reduce dust-related hazards.
4) POWER TOOL USE AND CARE
- Do not force the power tool. Use the correct power tool for your application. The correct power tool will do the job better and safer at the rate for which it was designed.
- Do not use the power tool if the switch does not turn it on and off. Any power tool that cannot be controlled with the switch is dangerous and must be repaired.
- Disconnect the plug from the power source and/or the battery pack from the power tool before making any adjust -ments, changing accessories, or storing power tools. Such preventive safety measures reduce the risk of starting the power tool accidentally.
- Store idle power tools out of the reach of children and do not allow persons unfamiliar with the power tool or these instructions to operate the power tool. Power tools are dangerous in the hands of untrained users.
- Maintain power tools. Check for misalignment or binding of moving parts, breakage of parts and any other condition that may affect the power tool's operation. If damaged, have the power tool repaired before use. Many accidents are caused by poorly maintained power tools.
- Keep cutting tools sharp and clean.
Properly maintained cutting tools with sharp cutting edges are less likely to bind and are easier to control.
- Use the power tool, accessories and tool bits etc. in accordance with these instructions, taking into account the working conditions and the work to be performed. Use of the power tool for operations different from those intended could result in a hazardous situation.
5) CAREFUL HANDLING AND USE OF BATTERY DEVICES
a) Charge the batteries only in chargers that are recommended by the manufacturer. Risk of fire if a charger that is suitable for a specific type of battery is used with other batteries.
b) In the power tools, use only the batteries designed for the purpose. The use of other batteries may result in injuries and risk of fire.
c) Keep the unused battery away from paper clips, coins, keys, nails, screws and other small metal objects, which could cause bridging of the contacts. A short circuit between the battery contacts may cause burns or fire.
d) If used incorrectly, liquid may leak from the battery. Avoid contact with this. In the event of accidental contact, rinse off with water. If the liquid gets into eyes, seek medical assistance. Leaking battery fluid may cause skin irritations or burns.
6) SERVICE
- Have your power tool serviced by a qualified repair person using only identical replacement parts. This will ensure that the safety of the power tool is maintained.
Special Safety Directions
1) SPECIAL SAFETY DIRECTIONS FOR HEDGE TRIMMERS
a) Keep all body parts away from the blade. Do not attempt to remove clippings while the blade is operating or to hold on to material which is to be cut. Only remove trapped clippings when the tool is switched off. One moment of carelessness in the usage of the hedge trimmer can lead to severe injury.
b) Carry the hedge trimmer at the handle with an idle blade. Always pull on the protective cover during transport and storage of the hedge trimmer. Careful handling of the tool reduces the risk of injury from the blade.
c) Hold the power tool only on the insulated handle surfaces, as the cutting blade may come into contact with concealed power cables. Contact between the cutting blade and a live cable may render metallic components live and result in an electric shock.
2) FURTHER SAFETY DIRECTIONS

For your personal safety:
Wear suitable work clothes such as boots with non-slip soles, sturdy long trousers, gloves and goggles. Do not wear long flowing clothing or jewellery, as this may be caught by moving parts. Do not use this tool while walking barefooted or while wearing open sandals.
a) Do not use the hedge trimmer in the rain.
b) The appliance is designed for trimming hedges. Do not use to cut twigs, hard wood or other objects.
c) Do not attempt to dislodge a blocked/
GBIE
trapped blade before switching the tool off.
d) Before commencing with the trimming check the hedge for hidden objects such as wire etc.
e) When operating the appliance, always hold it well with both hands and at some distance away from your body.
f) Do not use the tool in the vicinity of flammable liquids or gasses. Fire- and explosion risk exist in the event of a short circuit.
g) The blades have to be checked for wear in regular intervals and re-sharpened. Blunt blades will overload the machine. Resulting damages are not covered by warranty.
h) Do not attempt to repair the tool yourself, unless you are schooled in this field. All works, which are not described in this manual, may only be performed by our Service-Centre.
3) SPECIAL SAFETY DIRECTIONS FOR BATTERY-OPERATED TOOLS
a) Ensure that the device is switched off before inserting the battery. Inserting a battery into a power tool that is switched on may result in accidents.
b) Recharge the batteries indoors only because the battery charger is designed for indoor use only.
c) To reduce the electric shock hazard, unplug the battery charger from the mains before cleaning the charger.
d) Do not subject the battery to strong sunlight over long periods and do not leave it on a heater. Heat damages the battery and there is a risk of explosion.
e) Allow a hot battery to cool before charging.
f) Do not open up the battery and avoid mechanical damage to the battery.
Risk of short circuit and fumes may be emitted that irritate the respiratory tract.
Ensure fresh air and seek medical assistance in the event of discomfort.
g) Do not use non-rechargeable batteries!
4) CORRECT HANDLING OF THE BATTERY CHARGER
- The device must not be used by people (including children) with limited physical, sensory or mental faculties or who lack the necessary experience and/or knowledge - other than they are supervised by a person responsible for safety or are being instructed to operate the appliance by such a person.
- Children must be supervised in order to ensure that they do not play with the equipment.
- To charge the battery, use only the charger supplied.
Risk of fire and explosion. This ensures that the safety of the device is maintained.
- Before each use, check the charger, cable and plug and have them repaired by qualified professionals and only with original parts. Do not use a defective charger and do not open it up yourself. This ensures that the safety of the device is maintained.
- Connect the charger only to a socket with an earth. Ensure that the mains voltage matches the specifications on the charger rating plate. Risk of electric shock.
- Disconnect the charger from the mains before closing or opening connection to the battery / power tool / device.
- Keep the charger clean and away from wet and rain. Do not use the charger
outdoors. Dirt and the entry of water increase the risk of electric shock.
- Operate the charger only with the appropriate original batteries. Charging other batteries may result in injuries and risk of fire.
- Avoid mechanical damage to the charger. This can result in internal short circuits.
- Do not operate the charger on a combustible surface (e.g. paper, textiles). Risk of fire due to heating during charging.
- If the power cable for this equipment is damaged, it must be replaced by the manufacturer, a customer service agent of the same or a similarly qualified person in order to prevent hazards.
- The battery of the appliance is not fully charged at the time of delivery. It therefore needs to be fully recharged before you use it for the first time. For the first recharge cycle we recommend that you charge the battery for about 1 hour. Slot the battery into the base and plug the battery charger into a mains outlet.
- When the battery is fully charged, unplug the charger from the mains and from the appliance. Charging time is approx. 1 hour.
- Do not charge the battery continuously since this may damage the battery cells. Note: Repeatedly charging small capacities may damage the battery cells. Recharge the battery only if the appliance is becoming slow.
- Do not use the charger to charge non-rechargeable batteries.
5) RESIDUAL RISKS
Even if properly operating and handling this electric tool, some residual risks will remain. Due to its construction and build, this electric tool may present the following hazards:
a) Cuts b) Ear damage if working without ear protection.
c) Damage to your health caused by swinging your hands and arms when operating the appliance for longer periods of time or if the unit is not held or maintained properly.

Warning! During operation, this electric tool generates an electromagnetic field which, under certain circumstances, may impair the functionality of active or passive medical implants. To reduce the risk of serious or lethal injuries, we recommend that persons with medical implants consult their doctor and the manufacturer of their medical implant before operating the machine.
Intended Use
The equipment is specified for use only for the cutting and trimming of hedges, bushes and ornamental shrubs in the domestic environment. Any other use that is not explicitly approved in these instructions may result in damage to the equipment and represent a serious danger to the user.
The equipment is designed for use by adults. Adolescents over the age of 16 may use the device only under supervision. Do not use the hedge trimmer in the rain or on wet hedges.
The operator or user is responsible for accidents or damage to other people or their property.
The manufacturer is not liable for damages caused by unspecified use or incorrect operation.
GBIE

Before use, check that the blades are sharp. Ensure that the blades are sharpened whenever blunt, in order to avoid overstressing of the machine. Damages caused by cutting with blunt blades are not covered by the guarantee.
General Description

See the front fold-out page for illustrations.
Overview

1 Strike guard
Safety knife bar
3 Hand protection
4 Safety switch
5 On/Off switch, front
6 Front handle
7 Ventilation slots
8 On/Off switch, rear
9 Rear handle
10 Battery
11 Battery release button
12 Battery charge state indicator
13 Battery charger operation indicator
14 Battery charger
15 Knife guard
Function Description
The cordless hedge trimmer features a laser-cut knife of special-grade steel. When trimming, the cutting teeth move to and fro in a linear shearing motion. The strike guard at the tip of the knife prevents unpleasant kickback reactions when hitting walls, fences, etc. Operators are protected by the appliance's two-hand safety switch and quick-stop brake function.
The hand protection guards your hands against twigs and branches.
Read the sections below to learn more about each operating element's function.
Scope of delivery
Carefully unpack the trimmer and check that it is complete:
- Cordless hedge trimmer
- Knife guard
- Battery
- Battery charger
Charging the battery

Do not expose the battery to extreme conditions such as heat or impact. Risk of injury from escaping electrolytic solution!

Prior to charging the battery, check that its outer surface is clean and dry.
- The battery of the appliance is not fully charged at the time of delivery. It therefore needs to be fully recharged before you use it for the first time.
- Recharge the battery when you notice that the appliance is becoming slower.
- Do not keep charging the battery continuously and avoid it becoming entirely discharged since this may damage the battery cells.
The warranty excludes all defects caused by improper handling.
Removing / inserting the bat- tery

-
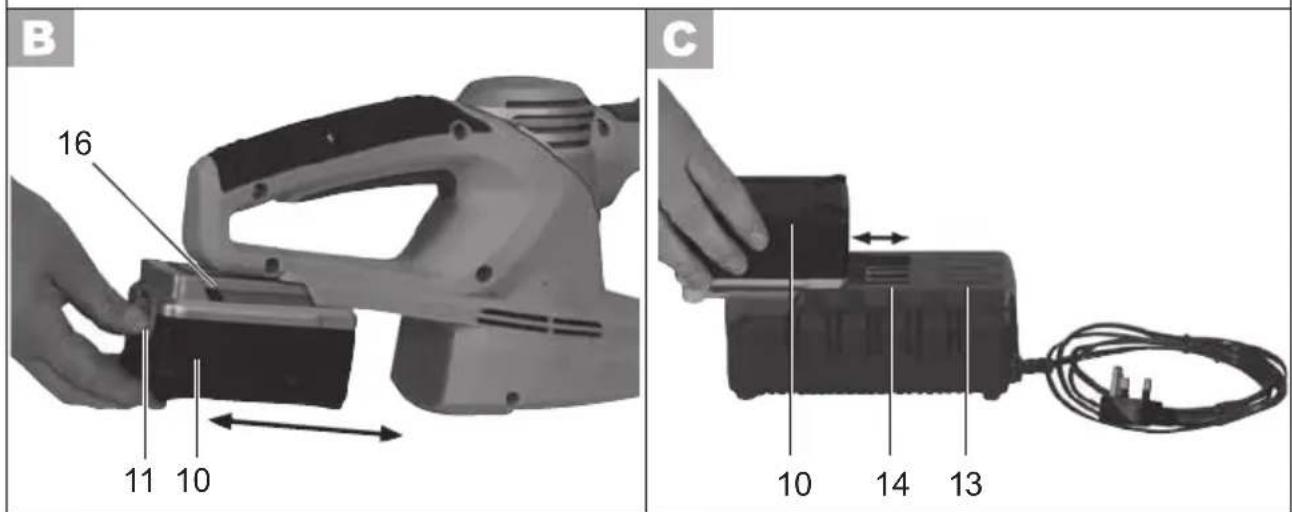
To remove the battery (10) from the appliance, press the release button (11) on the battery and pull out the battery.
-
To insert the battery (10), place it
on the guide track (16) and push it back into the appliance. It will audibly snap in.
Recharging the battery

Overheating protection allows the battery to be charged only from a certain battery temperature. If the battery is too warm after the equipment has been used, it cannot be charged immediately (charge indicator red).
After a cooling period of a few minutes, the charging process starts automatically (charge indicator green).

-
Remove the battery (10) from the appliance, as necessary.
-
Inser the battery (10) in the charging compartment of the battery charger (14). It will audibly snap in.
-
Plug the battery charger (14) into a mains outlet.
The charging indicator lamp (13) lights up:
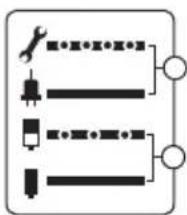
flowchart
graph TD
    A["Switch"] --> B["Rvert"]
    C["Rvert"] --> D["Resistor"]
    E["Resistor"] --> F["Pump"]
    G["Power Line"] --> H["Output"]
    I["Output"] --> J["Output"]
Flashing red: fault (see "Troubleshooting").
Permanent red light: current applied.
Flashing green: charging.
Permanent green light:
charging complete (recommended charging time is approx. 1 hour).
-
When the battery is fully re-charged unplug the battery charger (14) from the mains.
-
Press the release button (A 11) on the battery (10) and pull the battery out of the battery charger (14).
Used batteries
- If a fully recharged battery lasts for considerably shorter operating times, the battery is used up and needs to be replaced. Only use an OEM battery pack replacement available from our Customer Service.
- Always take heed of the applicable safety instructions as well as the environmental protection regulations and information (see “Cleaning and Maintenance”).
Operating

Wear suitable clothing and work gloves when working with the equipment.
Ensure that the equipment is functional before each use. The On/Off switch and the safety switch must not be held closed. They must switch off the motor when on is released. Should a switch be damaged, stop working with the equipment. Ensure that the mains voltage value matches the label on the equipment.
Reduce the risk of injuries and accidents by wearing personal protection equipment and ensuring that the unit is fully functional.

After turning off the appliance, the blades will keep moving for some time. Allow the blades to come to a standstill. Neither touch nor slow down the moving blades. Risk of injury!

Note noise protection and local specifications.
Switching On and Off

Ensure that you are standing in a firm position with both hands gripping the hedge trimmer away from the body. Ensure that the trimmer is in contact with no other objects before switching on.

Turning on:
- Before turning on the unit, remove the knife guard (A 15).
- Check that the battery (10) is in (see "Removing/inserting the battery").
- Press the safety switch (4) at the front handle (6).
- Press the front (5) and rear (8) On/Off switches. The hedge trim-mer will run at top speed.
Turning off:
- Release the front (5) or rear (8) On/Off switch.
Checking the battery charge level
The battery's (10) charge level is indicated by the charge state indicator (12).

Press the PRESS button (17) on the battery (10).
The LEDs indicate the battery's charge level.

Recharge the battery if the red or yellow LED lights up.
Working with the Hedge Trimmer

During cutting work, ensure that no contact is made with objects, e.g.
such as wire fencing or main plant stems. This may result in damage to the cutter bar.
- Switch off the equipment immediately in the event that the blades are blocked by solid objects, pull out the power plug then remove the object.
- Avoid overstraining the equipment during work.
Cutting Techniques
- Cut thick branches beforehand using a branch clippers.
- The double-sided cutter bar enables cutting in both directions or, with a swinging action, from one side to the other.
- In case of vertical cutting, move the hedge trimmer uniformly forward or up and down in an arc movement.
- In case of horizontal cutting, move the hedge trimmer in a sickle-shaped movement to the edge of the hedge, so that cut branches fall to the ground.
- In order to achieve long straight lines, the placing of tensioned guiding cords is recommended.
Cutting Shaped Hedges:

natural_image
Grayscale 3D mesh pattern with dimension annotations (10 cm and 100 cm) showing no readable text or symbolsIt is recommended that hedges be cut in a trapezoidal shape, in order to prevent stripping off of the lower branches. This corresponds to the natural plant growth and allows the hedge to thrive optimally. During cutting, only the new annual growths are reduced and thus a dense branching and a good screen will develop.
- Cut the sides of a hedge first. To do this, move the hedge trimmer in the direction of growth from bottom to top. If you cut down from the top, the thinner branches will move out, which may result in some areas having sparse growth or holes.
- Cut the top edge, according to taste, in a flat shape, roof shape or rounded shape
- Trim young plants to the required shape. The main growth should remain undamaged until the hedge has reached the planned height. All other shoots are lopped off to half size.
Care of Free-Growing Hedges:
Free-growing hedges are not shaped when cut, although they must be regularly maintained so the hedge does not become too high.
Cleaning and Maintenance

Repair and servicing work not described in this manual should always be carried by our Service Centre (see p.16 for address). Use only original parts.

Turn off the appliance and, before doing any servicing, remove the battery.

Wear gloves when handling the safety knife bar. This will protect you against cuts.
The following cleaning and servicing should be done regularly. This will ensure a long and reliable service life.
Cleaning

Do not spray the appliance with water and do not immerse it in water. Electric shock hazard!
- Keep clean the ventilation slots, motor housing and handles of the appliance. Use a damp cloth or a brush.
Do not use cleaning agents or solvents. You may otherwise irreparably damage the appliance.
- Clean the cutter bar carefully after each use. Wipe it off with an oily cloth or spray it with a metal protective spray.
Maintenance
- Prior to every use, check the appliance for obvious defects such as loose, worn or damaged parts. Check that the screws in the safety knife bar (A 2) are tight.
- Check covers and safety devices (see A) for damages and correct installation. Replace as necessary.
- You can smoothen minor nudges in the cutting teeth yourself using a knife grinder to sharpen the cutting edges. The trimmer will only cut well if the teeth are sharp.
- Blunt, bent or damaged knife bars to be replaced.
Storage
- Keep the appliance in the knife guard (A 15) from the package and make sure it is kept dry and out of the reach of children.
- In order to keep the battery well charged, avoid exposing the appliance to extreme heat or cold in storage.
- Before storing for a longer period, remove the battery from the equipment and charge it fully.
Waste Disposal and Environmental Protection
Remove the battery from the device and take the device, battery, accessories and packaging for environmentally friendly recycling.
Machines do not belong with domestic waste.

Do not dispose of batteries in household waste, fire (risk of explosion) or water. Damaged batteries may damage the environment and your health if toxic fumes or liquids leak out.
- Return the unit to a recycling centre. The plastics and metals in the unit can be sorted and appropriately recycled. Ask our Service Centre for details.
- Dispose of batteries in discharged condition. We recommend covering the pole with adhesive tape to prevent a short circuit. Do not open up the battery.
- Dispose of batteries in accordance with the local regulations. Take batteries to an old battery collection point where they will be recycled in an environmentally friendly manner. For information about this, ask your local waste management company or our service centre.
- Defective units returned to us will be disposed of for free.
- Throw the cut grass on the compost. Do not throw it in the normal household waste.
Technical Data
Appliance
Motor voltage ....18 V==
Idling speed 1100 min(rpm)
Protection Class .... III
Runtime max. 50 min*
Cutting length 520 mm
Cutting capacity....15 mm
Weight (without battery charger) ...2.5 kg
Sound pressure level (L_pA) ..... 73 dB(A), K=3 dB(A)
Sound power level ( L_wA )
guaranteed....96 dB(A)
measured ..... 93 dB(A); K_wA=3 dB(A)
Vibration ( a_n ) ......
Rear handle ....2.0 m/s ^2 , K=1.5 m/s ^2 Front handle ....2.6 m/s ^2 , K=1.5 m/s ^2
Battery (NiMH)
Nominal voltage ....18 V==
Capacity 1.5 Ah
Charging time .... approx. 1 h
Recharger....18MC01
Uptake voltage ..... 230-240V\~50/60Hz
Nominal consumption....67 W
Voltage output ....18 V=
Recharging curren.... 1.95 A
Protection class □ II
Protection category IP20
* The actual runtime under load of a fully charged battery depends on how you work and on the load put on the trimmer during operation.
Noise and vibration values have been determined according to the standards and regulations mentioned in the declaration of conformity. Technical and optical changes may be undertaken in the course of further development without notice. All dimensions, references and information in this instruction manual are therefore not guaranteed. Legal claims made on the basis of the instruction manual can therefore not be considered as valid.
The stated vibration emission value was measured in accordance with a standard testing procedure and may be used to compare one power tool to another. The stated vibration emission value may also be used for a preliminary exposure assessment.

Warning:
The vibration emission value may differ during actual use of the power tool from the stated value depending on the manner in which the power tool is used.
Safety precautions aimed at protecting the user should be based on estimated exposure under actual usage conditions (all parts of the operating cycle are to be considered, including, for example, times during which the power tool is turned off and times when the tool is turned on but is running idle).
Guarantee
This unit has a guarantee period of 36 months, or 12 months for units used on a commercial basis or for replacement units according to the statutory regulations. Justified guarantee claims should be reported to our Service Centre (see page 16 for telephone & fax no.s, and email address). Our Service Team will tell you more about our complaints handling procedure.
The guarantee does not include damages that are attributable to natural wear, overloading or inappropriate use. Certain component parts are subject to normal wear and are excluded from the guarantee. This specifically applies to the knives, battery and gear wheel, unless the complaints are based on material defects.
Furthermore, a condition of the guarantee services is that the maintenance intervals indicated in the operating instructions have been observed and the instructions for cleaning, care and maintenance have been followed. Damages due to material or manufacturer faults will be repaired free of charge by replacement delivery or repair. However, this is conditional upon the unit being returned complete and assembled to our Service Centre, together with proof of purchase and guarantee slip.
Repairs that are not covered by the guarantee can be carried out by our Service Centre for a fee. Our Service Centre will be happy to provide you with a cost estimate. We can deal only with equipment that has been packaged correctly and which has been sent to us with the correct postage paid.
Caution: The sender shall bear the cost of any material damages during transport. In case of complaint or for servicing, please send your equipment cleaned and with an indication of the defect, to our service address.
Equipment sent in with freight collect – by bulk freight, express or with other special freight – are not accepted.
Defective units returned to us will be disposed of for free.
Spare Parts
The following spares are available from Grizzly Service-Center. Please indicate the machine type and the number of the spare part with your order.
Battery 91094283 Battery charger 91094285
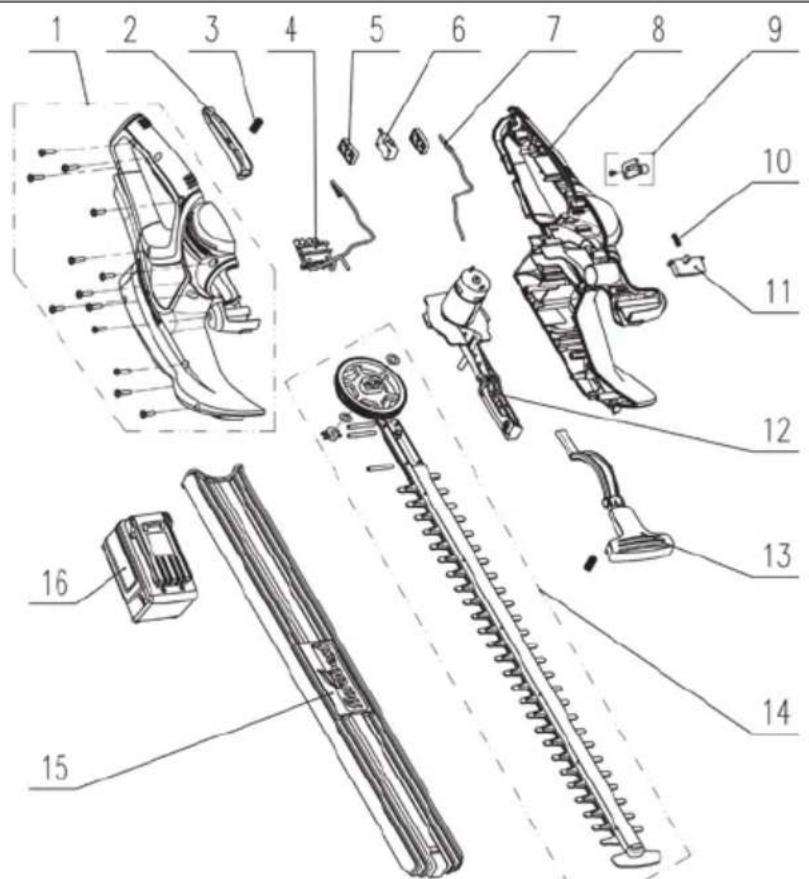
If further spare parts should be necessary, please find the part number on the exploded drawing.
Trouble Shooting
| Problem Possible | le cause Corrective action | |
| Appliance won't start | Battery discharged | Recharge battery (see „Charging“) |
| Battery not in | Insert battery (see „Operation“) | |
| Safety switch not pressed properly | Turn on (see "Operation") | |
| On/Off switch defective | Send in to Service Centre for repair | |
| Intermittent operation | Internal loose contact | Send in to Service Centre for repair |
| On/Off switch defective | ||
| Blades become hot | Blades are blunt | Have the blades sharpened or replaced (Service Centre) |
| Blades are notched | Have the blades checked or replaced (Service Centre) | |
| Too much friction due to lack of lubrication | Oil the blades | |
| Bad trim | Too much friction due to missing lubrication | Lubricate knife bar |
| Knife bar dirty | Clean knife bar | |
| Knife bar blunt | Grind or have knife bar replaced (Service Centre) | |
| Bad cutting technique | See ("Working with the hedge trimmer") | |
| Battery not fully charged | Recharge battery (see "Charging") | |
| Charging not possible. (Red light flashing on the battery charger) | Battery too warm | Allow the battery to cool |
| Battery not placed in battery charger properly | Insert battery correctly (see „Charging“) | |
| Battery charger not plugged into mains properly | Plug into mains outlet correctly | |
| Battery contacts dirty | Clean contacts | |
| Battery defective | Replace battery (see „Spare Parts“) | |
| Battery charger defective | Replace battery charger (see „Spare Parts“) |
Grizzly Service-Center
DES UK Ltd.
Unit B7
Oxford Street Industrial Park
Vulcan Road
Bilston, West Midlands WV14 7LF
Tel: 0870 787 6177
Tel from Ireland: 0044 870 787 6177
Fax: 0870 7876168
Fax from Ireland: 0044 870 787 6168
Email: grizzly@deslimited.com
| CE declaration of conformity | ||
| We hereby confirm that the Cordless hedge trimmer model FAH 18 A1(Serial number 201011000001 - 201101031750)conforms with the following applicable relevant version of the EU guidelines: | ||
| 2006/42/EC • 2004/108/EC • 2000/14/EC | ||
| In order to guarantee consistency, the following harmonised standards as well as national standards and stipulations have been applied: | ||
| EN 55014-1:2006 • EN 55014-2/A1:2001 • EN 62233:2008EN 61000-3-2:2006 • EN 61000-3-3/A2:2005 • EN 60745-1:2009EN 60745-2-15:2009 • EN 60335-1/A13:2008 • EN 60335-2-29:2004 | ||
| We confirm the following in accordance with the 2000/14/EC emissions guideline:Guaranteed sound power level: 96 dB(A) - Measured sound power level: 93 dB(A)Compliance evaluation process carried out in accordance with Appendix V / 2000/14/EC | ||
 Grizzly GartengeräteGmbH & Co. KGAm Gewerbepark 264823 Groß-Umstadt 16.3.2011 Grizzly GartengeräteGmbH & Co. KGAm Gewerbepark 264823 Groß-Umstadt 16.3.2011 |  Andreas Gröschl(Technical Manager and Documentation Representative) Andreas Gröschl(Technical Manager and Documentation Representative) | |
Exploded Diagram
informative
IAN 61266
Grizzly Gartengeräte GmbH & Co. KG
Am Gewerbepark 2
D-64823 Groß-Umstadt
Last Information Update: 12 / 2010
Ident.-No.: 72031010122010-6


- florabest
- FAH 18 A1
- Cordless Hedge Trimmer
- GB IE
- Content
- Notes on Safety
- Symbols
- Symbols on the Equipment
- Symbols on the battery
- Symbols on the recharger
- General safety instructions for power tools
- 1) WORK AREA SAFETY
- 2) ELECTRICAL SAFETY
- GBIE
- 3) PERSONAL SAFETY
- 4) POWER TOOL USE AND CARE
- Special Safety Directions
- 5) RESIDUAL RISKS
- Intended Use
- General Description
- Overview
- Function Description
- Scope of delivery
- Charging the battery
- Removing / inserting the bat- tery
- Recharging the battery
- Used batteries
- Operating
- Switching On and Off
- Turning on:
- Turning off:
- Checking the battery charge level
- Working with the Hedge Trimmer
- Cutting Techniques
- Cutting Shaped Hedges:
- Care of Free-Growing Hedges:
- Cleaning and Maintenance
- Cleaning
- Do not spray the appliance with water and do not immerse it in water. Electric shock hazard!
- Maintenance
- Storage
- Waste Disposal and Environmental Protection
- Technical Data
- Appliance
- Battery (NiMH)
- Recharger....18MC01
- Warning:
- Guarantee
- Spare Parts
- Grizzly Service-Center
Marque : FLORABEST
Modèle : FAH 18 A1
Catégorie : Taille-haies