
Commander (2009) - Voiture JEEP - Notice d'utilisation et mode d'emploi gratuit
Retrouvez gratuitement la notice de l'appareil Commander (2009) JEEP au format PDF.


| Type de produit | SUV 7 places |
| Marque | Jeep |
| Modèle | Commander (2009) |
| Catégorie | Voiture |
| Motorisations disponibles | Essence 3.7L V6, 4.7L V8 ; Diesel 3.0L CRD |
| Transmission | Automatique 5 rapports ou manuelle 6 rapports (selon version) |
| Roues motrices | 4x4 permanent Quadra-Trac® II |
| Dimensions (L x l x h) | 4750 x 1900 x 1785 mm |
| Empattement | 2780 mm |
| Poids à vide | Environ 2200 kg |
| Capacité du réservoir | 78 litres |
| Nombre de places | 7 (configuration 2-3-2) |
| Volume de coffre | Min 170 L, max 950 L (sièges rabattus) |
| Équipements de sécurité | ABS, ESP, airbags frontaux/latéraux/rideaux, contrôle de traction |
| Système audio | Radio AM/FM, lecteur CD, entrée auxiliaire, haut-parleurs Infinity (selon version) |
| Conduite assistée | Direction assistée, régulateur de vitesse, aide au stationnement arrière |
| Éclairage | Projecteurs halogènes, feux anti-brouillard avant |
| Pneus et jantes | Jantes alliage 17 ou 18 pouces, pneus 235/65R17 |
| Entretien vidange moteur | Tous les 15 000 km ou 1 an |
| Batterie | 12V, capacité 70-80 Ah |
| Poids remorquable | Jusqu'à 2250 kg (freiné) |
FOIRE AUX QUESTIONS - Commander (2009) JEEP
Questions des utilisateurs sur Commander (2009) JEEP
0 question sur cet appareil. Repondez a celles que vous connaissez ou posez la votre.
Poser une nouvelle question sur cet appareil
Téléchargez la notice de votre Voiture au format PDF gratuitement ! Retrouvez votre notice Commander (2009) - JEEP et reprennez votre appareil électronique en main. Sur cette page sont publiés tous les documents nécessaires à l'utilisation de votre appareil Commander (2009) de la marque JEEP.
MODE D'EMPLOI Commander (2009) JEEP
Jeep®
COMMANDER
2009
QUICK
REFERENCE
GUIDE
natural_image
Front view of a green Jeep SUV driving on a dirt road, no visible text or symbolsVEHICLE FEATURE
fuel cap:

Loose Gas Cap MessaGe
- If a "CHECK GASCAP" message appears in the Electronic Vehicle Information Center (EVIC), tighten the gas cap until a "clicking" sound is heard.
- If the message continues to appear for more than three days after tightening the gas cap, see your dealer.
Tire pressure MoniToring sYsTeM (TpMs):

- If one or more of the four road tire pressures are low, the Tire Pressure Monitoring Light will illuminate and an audible chime will sound.
- Check the inflation pressure of each road tire on your vehicle and inflate to the recommended cold pressure value, shown on the placard located in the driver's door opening. The instrument cluster should not be used as a tire pressure gauge when adjusting your tire pressure.
- The light will turn off once the updated tire pressure has been recognized. The vehicle may need to be driven for up to 10 minutes above 15 mph (25 km/h) before the light will turn off.
- Temperature changes can affect tire pressures. Colder temperatures will decrease tire pressure and warmer temperatures will increase tire pressure.
- If your spare tire's pressure is low or in use on the vehicle, the TPMS light may turn on. Refer to your Owner's Manual.
oil change indicaTor:
Message
- A "CHAngE OIL" or "Oil Change Required" message will illuminate and a single chime will sound when it is time for your next required oil change.
ResettinG LiGht aFteR seRViCinG
- Turn the ignition switch to the ON/RUN position (do not start engine).
- Fully depress the accelerator three times within 10 seconds.
- Turn the ignition switch to the OFF/LOCK position.
S
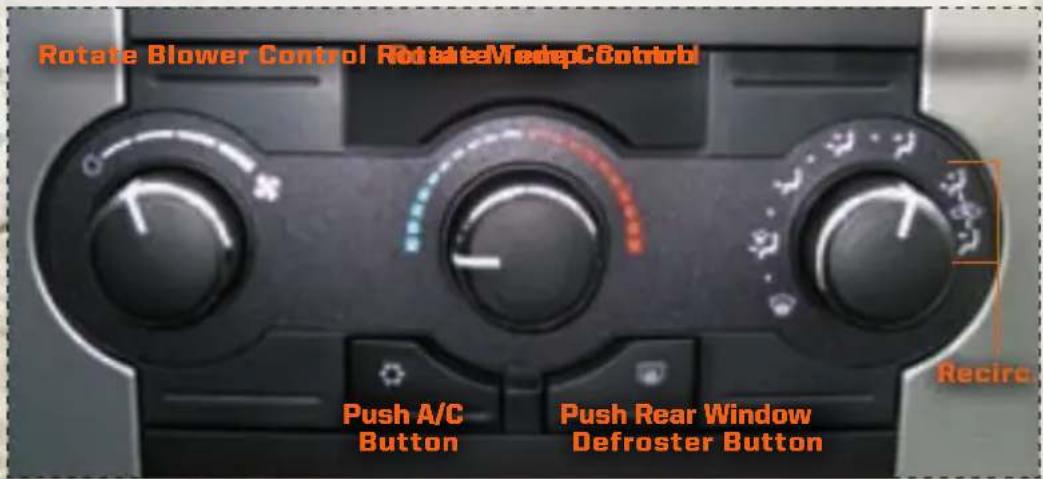
MANUAL CLIMATE CONTROLS:
aiR ReCiRCULATION

- Use recirculation for MAX A/C operation.
- For window defogging, turn recirculation off.
- Recirculation is not allowed in defrost, floor, defrost/floor (mix) modes.
MEMORY SEATS:
- To recall the memory setting for driver one, press memory button 1 on the driver's door panel or UNLOCK on the key fob linked to memory position 1.
- To recall the memory setting for driver two, press memory button 2 on the driver's door panel or UNLOCK on the key fob linked to memory position 2.
- Refer to your Owner's Manual for programming.

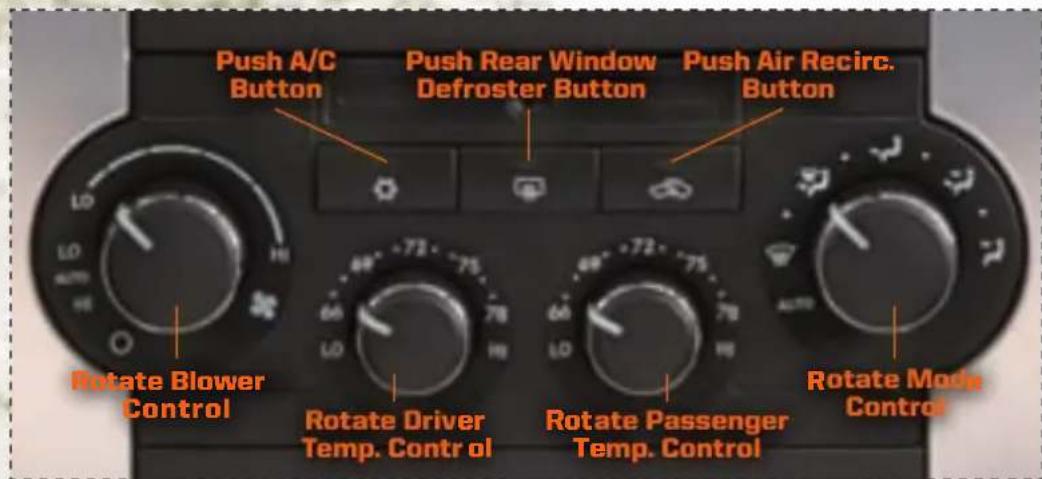
AUTOMATIC TEMPERATURE CONTROLS (ATC):
aUtoMatiC opeRation
- Turn the Mode Control to the AUTO position and the Blower Control to either LO AUTO or HIGH AUTO position.
- Select the desired temperature by rotating the Temperature Control.
- The system will maintain the set temperature automatically.
aiR ConditioninG

- If the air conditioning button is pressed while in the AUTO mode, the indicator light may flash three times to indicate the air conditioning is being controlled automatically.
aiR ReCiRCULATION

- Use recirculation for MAX A/C operation.
- For window defogging, turn air recirculation off.
- If the recirculation button is pressed while in the AUTO mode, the indicator light may flash three times to indicate the cabin air is being controlled automatically.
WIND BUFFETING:
- Wind buffeting can be described as a helicopter-type percussion sound. If buffeting occurs with the rear windows open, adjust the front and rear windows together.
- If buffeting occurs with the sunroof open, adjust the sunroof opening, or adjust any window. This will minimize the buffeting.
CLOCK SETTING:
Res/ReQ (non-toUCh sCReen Radios)
- Press and hold the TIME button until the hours blink; turn the TUNE/SCROLL control knob to set the hours.
- Press the TUNE/SCROLL control knob until the minutes begin to blink; turn the TUNE/SCROLL control knob to set the minutes.
- Press the TUNE/SCROLL control knob to save the time change.
ReR/Ren (toUCh sCReen Radios)
- Turn the radio ON.
- Touch the screen where the time is displayed.
- Touch the screen where "User Clock" is displayed.
- To adjust the hours, touch either the hour forward button or the hour backward button.
- To adjust the minutes, touch either the minute forward button or the minute backward button.
- To save the new time setting, touch the screen where the word "Save" is displayed.
uconnect® phone:
- uconnect® phone is a voice-activated, hands-free, in vehicle, communications system. uconnect® phone allows you to dial a phone number with your cellular phone using voice commands.
- uconnect® phone requires a cellular phone equipped with the Bluetooth® Hands-Free Profile, Version 0.96 or higher. See the www.jeep.com/uconnect website for supported phones. Refer to your Owner's Manual for further information.
ELECTRONIC VEHICLE INFORMATION CENTER (EVIC) CONTROLS:
- The EVIC features a driver interactive display that is located in the instrument cluster. Pressing the controls on the steering wheel allows the driver to select vehicle information and Personal Settings.
INSTRUMENT
Turn signal/ lighTs leVer
elecTronic Vehicle inforMaTion cenTer (eVic) conTrols
insTruMenT clusTer/ eVic
speed conTrol leVer

PANEL

natural_image
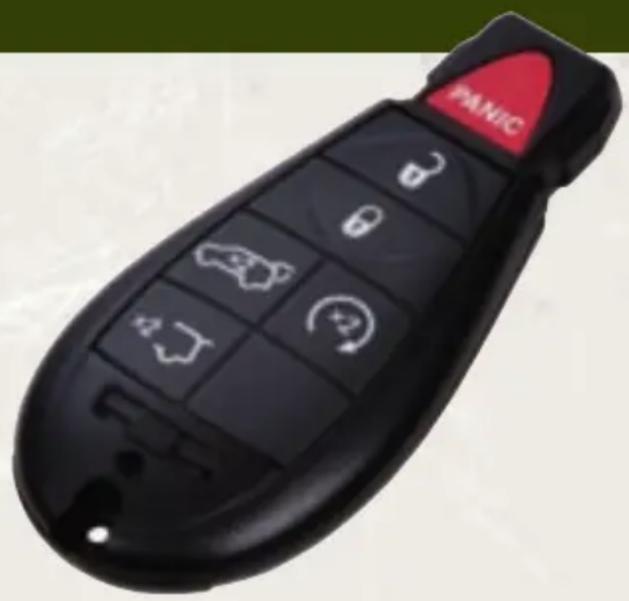
Black and white photo of a car key with various function buttons and icons, no readable text or symbols beyond the 'PANIC' button.KeY foB WiTh inTegraTed KeY (foBiK):
LoCKinG and UnLoCKinG the dooRs/LiFtGate
- Press the LOCK button once to lock all doors and liftgate.
- Press the UNLOCK button once to unlock the driver's door only and twice to unlock all the doors and liftgate.
- All doors can be programmed to unlock on the first press of the UNLOCK button.
- Refer to the Owner's Manual for programming.
ReMote staRt
- Press the REMOTE START button x2 twice within five seconds.
- To drive vehicle, press the UNLOCK button, insert the key in the ignition and turn to ON/RUN position.
- With remote start, the engine will only run for 15 minutes (timeout) unless the ignition key is placed in the ON/RUN position.
- The vehicle must be started with the key after two consecutive timeouts.
poweR LiFtGate
- The liftgate may be opened or closed manually or by pressing the LIFTGATE button ×2 twice within five seconds.
paniC aLaRM
- Press the button once to turn the panic alarm on.
- Wait approximately three seconds and press the button a second time to turn the panic alarm off.

TURN SIGNAL/LIGHTS LEVER:
HEADLIGHTS/PARKING LIGHTS/AUTOMATIC HEADLIGHTS
- Rotate the end of the lever to the first detent for parking lights, the second detent for headlights and the third detent for AUTO.
- This system automatically turns the headlights on or off based on ambient light levels.
SmartBeams
- Automatically controls the use of the headlight high beams.
INSTRUMENT PANEL DIMMER
- Rotate the center portion to the extreme bottom position to turn off the interior lighting. In this position, the interior lights will not turn on when a door is opened.
- Rotate the center portion of the lever up to increase the brightness of the instrument panel lights when the parking lights or headlights are on.
- Rotate the center portion upward to the next detent position to brighten the odometer and radio when the parking lights or headlights are on.
- Rotate the center portion upward to the last detent to turn on the interior lighting.
HIGH BEAM OPERATION
- Push the lever forward to activate the high beams.
FOG LIGHTS
- Turn on the parking lights or low beam headlights and pull out the end of the lever.
VEHICLE
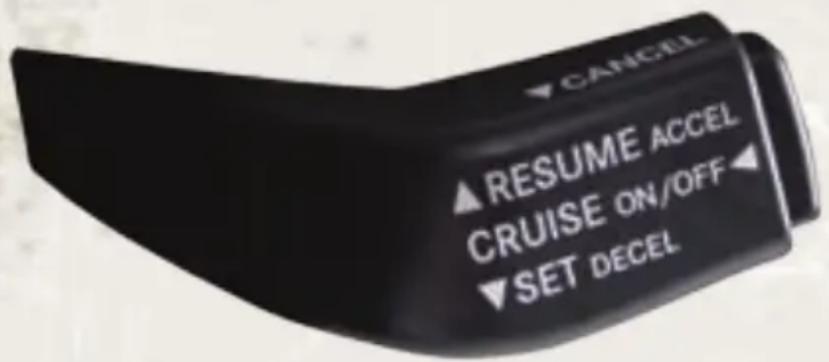
speed conTrol leVer:
CRUise on/oFF
- Push the ON/OFF button to activate the Speed Control.
- CRUISE will appear on the instrument cluster to indicate the Speed Control is on.
set
- Press down and release the lever to set a desired speed.
aCCeL/deCeL
- Press and hold the lever up to accelerate or down to decelerate the vehicle; release the lever to save the new set speed.
- Once a speed is set, tapping the lever up or down will increase or decrease the set speed approximately 1 mph (2 km/h).
CanCeL
- Pull the lever toward you, or apply the brakes to cancel the set speed and maintain the set speed memory.
- Press the ON/OFF button to turn the system off and erase the set speed memory.
ResUMe
- To resume a previously selected speed, push the lever up and release.
FEATURES
Front WipersRear Wiper/Washer

WIPER/WASHER LEVER:
FRONT WIPERS
Intermittent, Low and High Operation
- Rotate the end of the lever to the first detent position for one of five intermittent settings, the second detent for low wiper operation and the third detent for high wiper operation.
Mist
- Pull down on the lever and release when a single wipe is desired.
Washer Operation
- Pull the lever towards you and hold for as long as spray is desired.
Rain Sensing Wipers
- This feature senses moisture on the vehicle's windshield and automatically activates the wipers for the driver when the switch is in the intermittent position. Refer to Owner's Manual for operation.
REAR WIPER
Wiper Operation
- Rotate the center portion of the lever forward to the first detent for rear wiper operation.
Washer Operation
- Rotate the center portion of the lever past the first detent to activate the rear washer.
Commander
First Printing
Quick Reference Guide

81-316-0972
This guide has been prepared to help you get quickly acquainted with your new Jeep and to provide a convenient reference source for common questions. However, it is not a substitute for your Owner's Manual.
For complete operational instructions, maintenance procedures and important safety messages, please consult your Owner's Manual, Navigation Radio User Manual, Multimedia User Manual and other Warning Labels in your vehicle.
Not all features shown in this guide may apply to your vehicle.
For additional information on accessories to help personalize your vehicle, visit www.mopar.com or your local Jeep dealer.
Have fun out there. Jeep

natural_image
Front view of a black SUV driving through muddy terrain with mist and hills in the background (no visible text or symbols)www.JEEP.com

- Jeep®
- COMMANDER
- VEHICLE FEATURE
- fuel cap:
- Loose Gas Cap MessaGe
- Tire pressure MoniToring sYsTeM (TpMs):
- oil change indicaTor:
- Message
- ResettinG LiGht aFteR seRViCinG
- S
- MANUAL CLIMATE CONTROLS:
- MEMORY SEATS:
- AUTOMATIC TEMPERATURE CONTROLS (ATC):
- WIND BUFFETING:
- CLOCK SETTING:
- Res/ReQ (non-toUCh sCReen Radios)
- ReR/Ren (toUCh sCReen Radios)
- uconnect® phone:
- ELECTRONIC VEHICLE INFORMATION CENTER (EVIC) CONTROLS:
- INSTRUMENT
- PANEL
- KeY foB WiTh inTegraTed KeY (foBiK):
- ReMote staRt
- poweR LiFtGate
- paniC aLaRM
- TURN SIGNAL/LIGHTS LEVER:
- INSTRUMENT PANEL DIMMER
- HIGH BEAM OPERATION
- FOG LIGHTS
- VEHICLE
- speed conTrol leVer:
- CRUise on/oFF
- set
- aCCeL/deCeL
- CanCeL
- ResUMe
- FEATURES
- WIPER/WASHER LEVER:
- FRONT WIPERS
- REAR WIPER
- Have fun out there. Jeep
Marque : JEEP
Modèle : Commander (2009)
Catégorie : Voiture