Rally 200 - Scooter VESPA - Notice d'utilisation et mode d'emploi gratuit
Retrouvez gratuitement la notice de l'appareil Rally 200 VESPA au format PDF.

Questions des utilisateurs sur Rally 200 VESPA
0 question sur cet appareil. Repondez a celles que vous connaissez ou posez la votre.
Poser une nouvelle question sur cet appareil
Téléchargez la notice de votre Scooter au format PDF gratuitement ! Retrouvez votre notice Rally 200 - VESPA et reprennez votre appareil électronique en main. Sur cette page sont publiés tous les documents nécessaires à l'utilisation de votre appareil Rally 200 de la marque VESPA.
MODE D'EMPLOI Rally 200 VESPA
OPERATION AND MAINTENANCE
VESPA RALLY 200

text_image
中 ZHEJIANGPIAGGIO

text_image
Vapo scooterhelp.comOPERATION AND MAINTENANCE
VESPA RALLY 200

PIAGGIO

text_image
Vaspa scho.ervelp.comINTRODUCTION
The PIAGGIO Co. takes this opportunity of thanking you for your preference for this excellent model Vespa. We feel sure that this scooter will give you complete satisfaction.
You will appreciate the matchless performance of the Vespa « RALLY 200 » both as regards to its sports and touristic aspects: the engine of 200 cc. with electronic ignition allows to obtain with a very good regularity of functioning high speed and brilliant pick-up; very good suspensions and road-holding, quiet engine and elegance are further characteristics of the vehicle.
Long journeys on your scooter will not fatigue you and you will quickly appreciate its first class performance and its high overage speed on long distances.
This booklet, with its simple instructions on operation and maintenance will furnish you all the informations necessary for obtaining a complete working knowledge of your Vespa « Rally 200 ».
CONTENTS
Performance and specifications Page 5
Layout of controls . . . . " 7
Operating instructions . . . » 8
Oil to be used of the 'fuel mixture » 11
Running - in . . . . . . . » 11
Tyre pressure . . . . . . » 11
Operating and maintenance: common operations to carr. 15
Maintenance . . . . . . Page 31
Summary of Instr. for Mainten. » 34
Operating instruct.: Fault finding » 36
General specification . . . » 38
Accessories . . . . . . . ” 40
Electrical equipment . . . . »41-43
Identification data . . . . . » 144
text_image
38 40 1.43 44 otermelp.com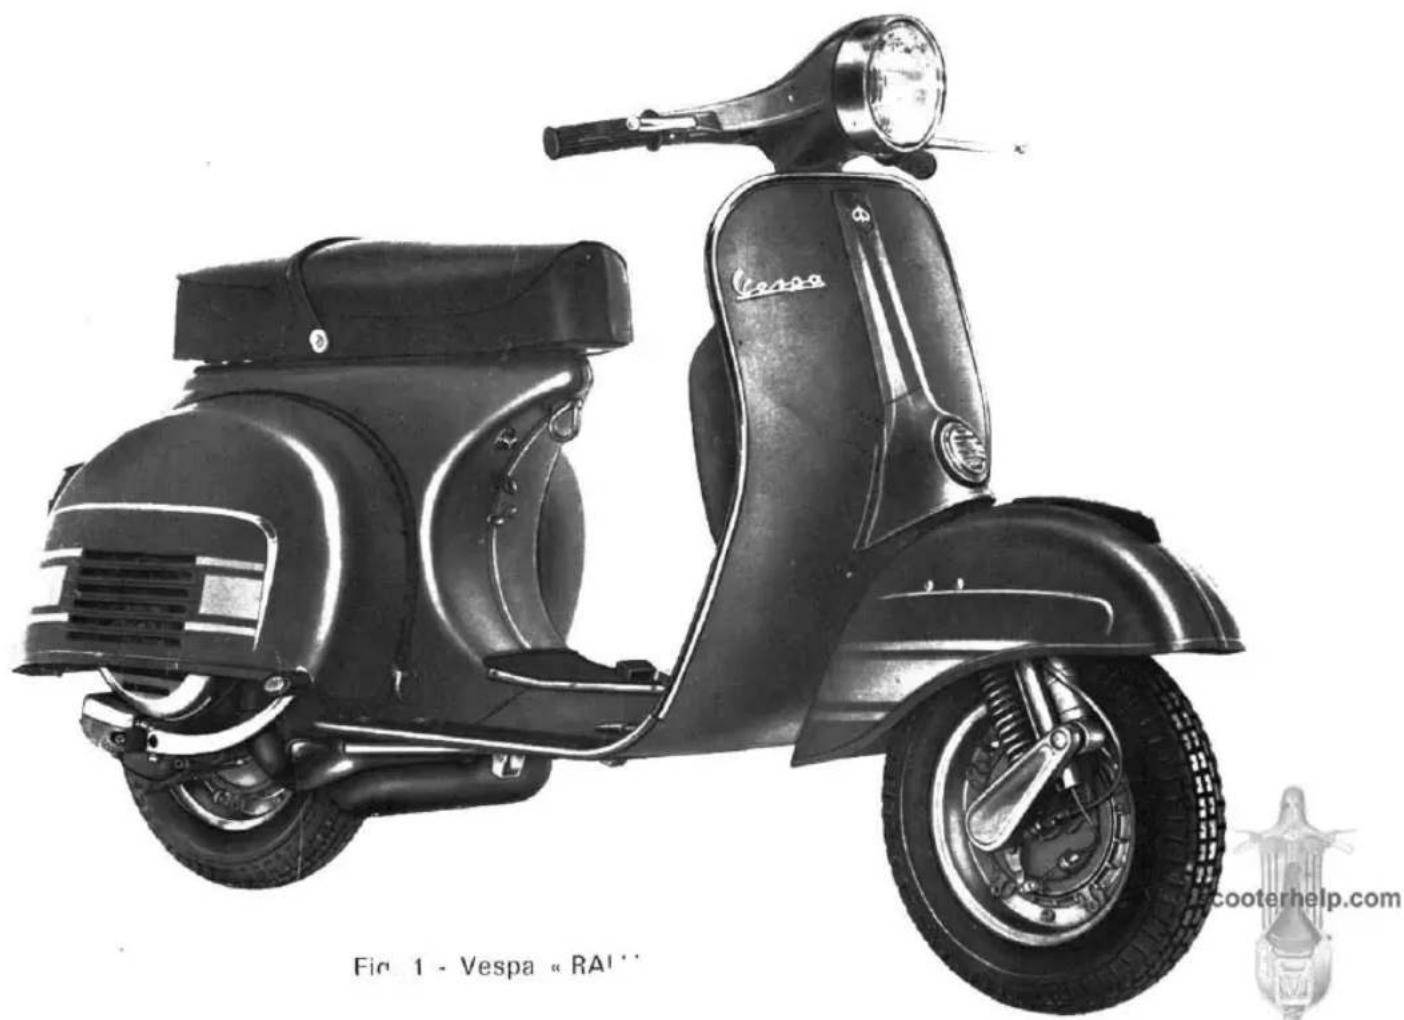
natural_image
Black-and-white illustration of a Vespa scooter with visible exhaust plume and side panel (no text or symbols on the scooter itself)NOTICE
To maintain your Vespa in perfect running order and not to invalidate the guarantee offered by the contract, it is advisable to consult your dealer or Service Station, recognisable by the mark shown here, regarding repairs.
Demand exclusively original Piaggio spares.
All PIAGGIO spare parts are produced from the same specific materials, have been subjected to the same machining operation and inspection as the component parts of your machine. This is guarantee for durability, performance and personal safety.

text_image
PIAGGIO Vespa MANUFACTURERS OF VESPA SCOOTERS SERVICEscooterhelp.com
PERFORMANCE AND SPECIFICATIONS
Consumption (according to CUNA Standards): 3 lt/100 Km. (78 mls/U.S. gals; 94 mls/imp. gals), gasoline - oil mixture i. e. 2% oil.
Max. speed (CUNA Standards): 110 Km/h (68 mph).
Carrying capacity . . . 2 persons and 10 Kg. (22 lbs.) of luggage.
Range . . . . ∽ 280 Km (174 mls)
Max fuel capacity: 8.2 lt. (2.13 U.S. galls or 1.8 imp. galls) (incl. 1.8 lt. - 0.47 U.S. galls or 0.39 imp. galls of reserve).
Wheel base . . . 1230 mm (48".4)
Handlebar width . . 690 mm (27".6)
Total lenght . . . 1770 mm (69".6)
Max height . . . 1070 mm (42".1)
Min. ground clearance 130 mm (5".2)
Turning radius . . 1400 mm (55".0)
Total dry weight ∽ 103 Kg. (226.5 lbs)
ENGINE: single horizontal cylinder, two stroke rotary distribution: i. e., carburated mixture is regulated by the crankshaft rotation, with three transfer ports.
Bore 66.5 mm (2".62); Stroke 57 mm (2".24); Cylinder displacement 197,97 cc. (12.076 cu. in.).
Compression ratio: 1:8.2.
IGNITION: by means of an electronic device that offers many advantages, i. e., allowing to produce a higher tension peak reached in a very short time and with a very limited length of the discharge.
scooterhelp.com

It follows:
1) Engine regular running also with spark - plugs very dirty.
2) Starting facility when cold.
3) Light ignition and combustion of the fuel.
4) Higher life of the spark - plugs because of a smaller electrodes wear.
5) Unalterability, during the time, of the ignition advance because the traditional mechanical devices exposed to the wear (as the contact breaker cam, contact breaker, sliding block etc.) are not longer present.
Sparking plug types: Marelli CW 7 LTP; Champion N 88; Bosch W 240 T 2; K.L.G. FE 80; Lodge 2 H LH.
Spark advance: 24° before T.D.C.

natural_image
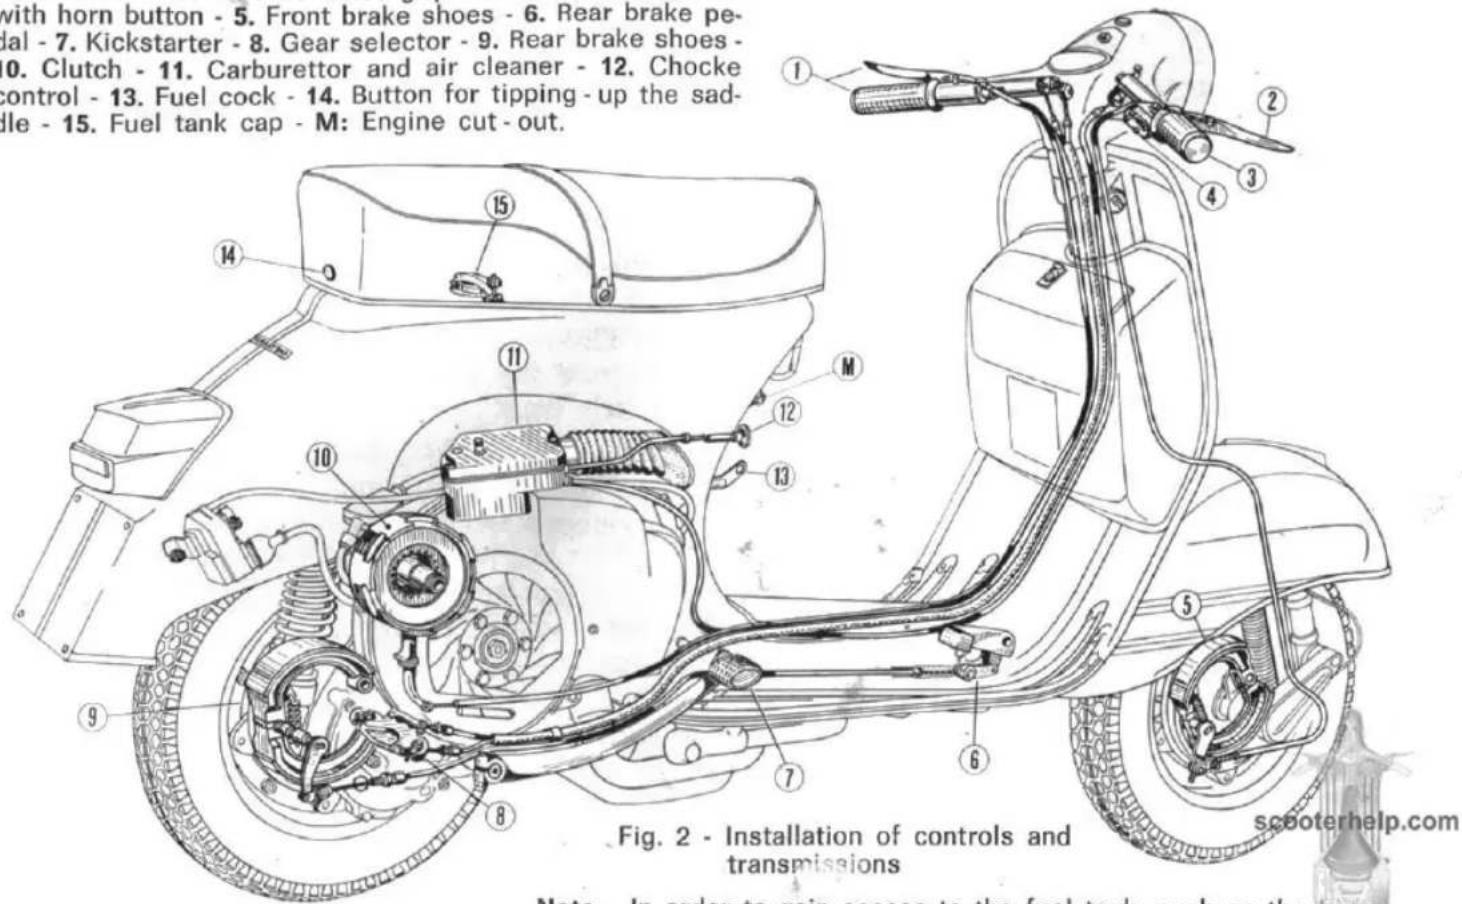
Illustration of a scooter inside a vehicle (no text or symbols visible)- Gear change twist grip and clutch control lever - 2. Front brake lever - 3. Throttle twist grip - 4. Main switch unit with horn button - 5. Front brake shoes - 6. Rear brake pedal - 7. Kickstarter - 8. Gear selector - 9. Rear brake shoes - 10. Clutch - 11. Carburettor and air cleaner - 12. Chocke control - 13. Fuel cock - 14. Button for tipping - up the saddle - 15. Fuel tank cap - M: Engine cut - out.
text_image
with horn button - 5. Front brake shoes - 6. Rear brake pedal - 7. Kickstarter - 8. Gear selector - 9. Rear brake shoes - 10. Clutch - 11. Carburettor and air cleaner - 12. Chocke control - 13. Fuel cock - 14. Button for tipping-up the saddle - 15. Fuel tank cap - M: Engine cut-out. Fig. 2 - Installation of controls and transmissions Note: In order to gain access to the fuel tank, push on the wheelNote - In order to gain access to the fuel tank, push on the button No. 14 and release the saddle; then swivel it upwards.
OPERATING INSTRUCTIONS
| OPERATION | INSTRUCTIONS | NOTES |
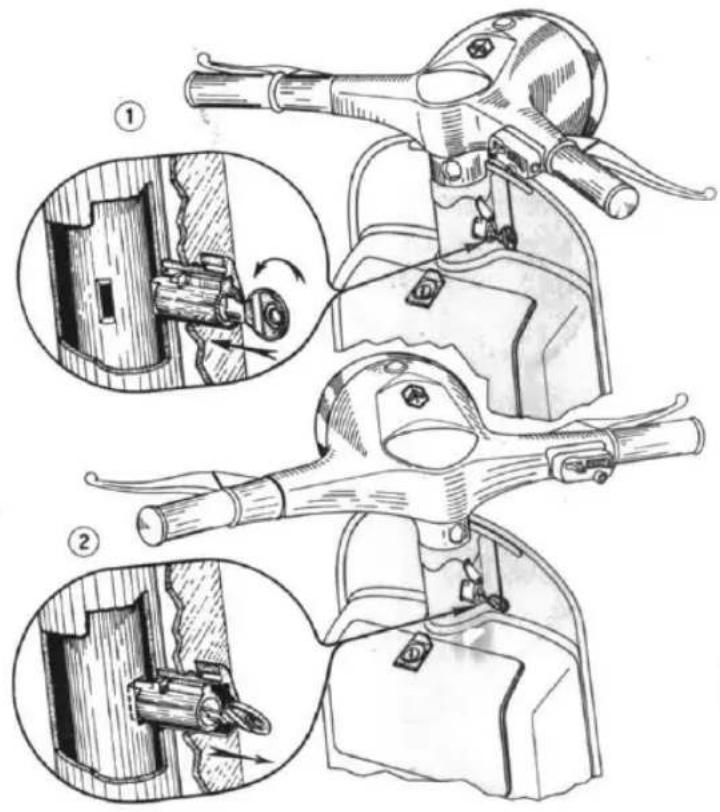
| SECURITY LOCK1. - Steering lock.a) Locking the handlebarsb) Unlocking the handlebars | To lock the vehicle, turn the handlebars anticlockwise up to the limit stop; rotate the key anticlockwise and push inwards. So that it thrusts the sliding bar against the steering column (see fig. 3).To ease the insertion of the sliding bar into the hole of the steering column, slightly turn the handlebars from the limit stop clockwise. When the handlebars are locked the key will now spring back to its original position and can then be withdrawn.To release the handlebars, insert the key in the lock, turn it to the left and pull it back; then turn the handlebars in the normal position. | The vehicle is provided with two security locks, the one relates to the steering column and the other one for locking the front tool box. Both operated by the same key.The key can be extracted from the lock even if the handlebars are free.The security locks should not be lubricated, eventually use colloidal graphite.scooterh |
scooterhelp.com
OPERATING INSTRUCTIONS
| OPERATION | INSTRUCTIONS | NOTES |
| 2. Front tool box lockBEFORE OPERATING THE VEHICLE | To open the flap door of the front box insert the key in the lock and turn it fully anticlockwise, then slide down the external plaque of the lock (fig. 4).In order to close it, close the flap door until the lock clicks against the tool box; then turn the key clockwise and withdraw.Unscrew the plug on the gear box marked « OLIO » (fig. 16) and check that the oil is on a level with the hole when the vehicle is standing upright. |
scooterhelp.com
text_image
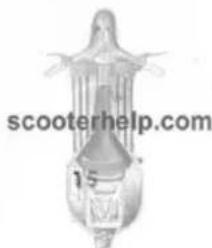
Technical diagram illustrating two steps of a hairpin tool, showing how to adjust the handle and lock mechanism.Fig. 3 - Steering lock on the steering column
1. Normal position and locking operation - 2. Locked position and unlocking operation.

text_image
Technical diagram illustrating mechanical assembly steps with labeled diagrams and component illustrationsFig. 4 - Front tool box lock
scooterhelp.com
N. B. - The arrow indicates the operation to be carried out for unlocking (1) and for locking (2) the tool box.
OPERATING INSTRUCTIONS
| OPERATION | INSTRUCTIONS | NOTES |
| FUEL SUPPLY | Use a mixture of gasoline (petrol) and pure mineral Oil SAE 30 at 2%: (Esso 2 - T Motor Oil; Shell Golden Motor Oil, Shell X - 100 2 T; Total 2 T).The mixture should be at 2% of oil by volume ( 14 pint of oil to 112 gals of gasoline (petrol).For access to fuel tank pivot the saddle on its forward edge, after having released the rear attachment as shown at fig. 2. | Ensure that the fuel tank breather is always clean.Use a mixture 2% by volume during and after running - in. |
For running in first 2000 Km. (1200 mls), do not maintain the throttle fully open for long periods.
— After first 1000 Km. (600 mls) change oil in gear box (page 23) and check that all nuts and bolts are tight.
— Check tyre pressure:
Front: 1.2 Kg/cm² (17 lbs/sq. in); Rear: 1.75 Kg/cm² (25 lbs/sq. in) with one up; Rear: 2.5 Kg/cm² (35 lbs/sq.in) with two up.
scooterhelp.com
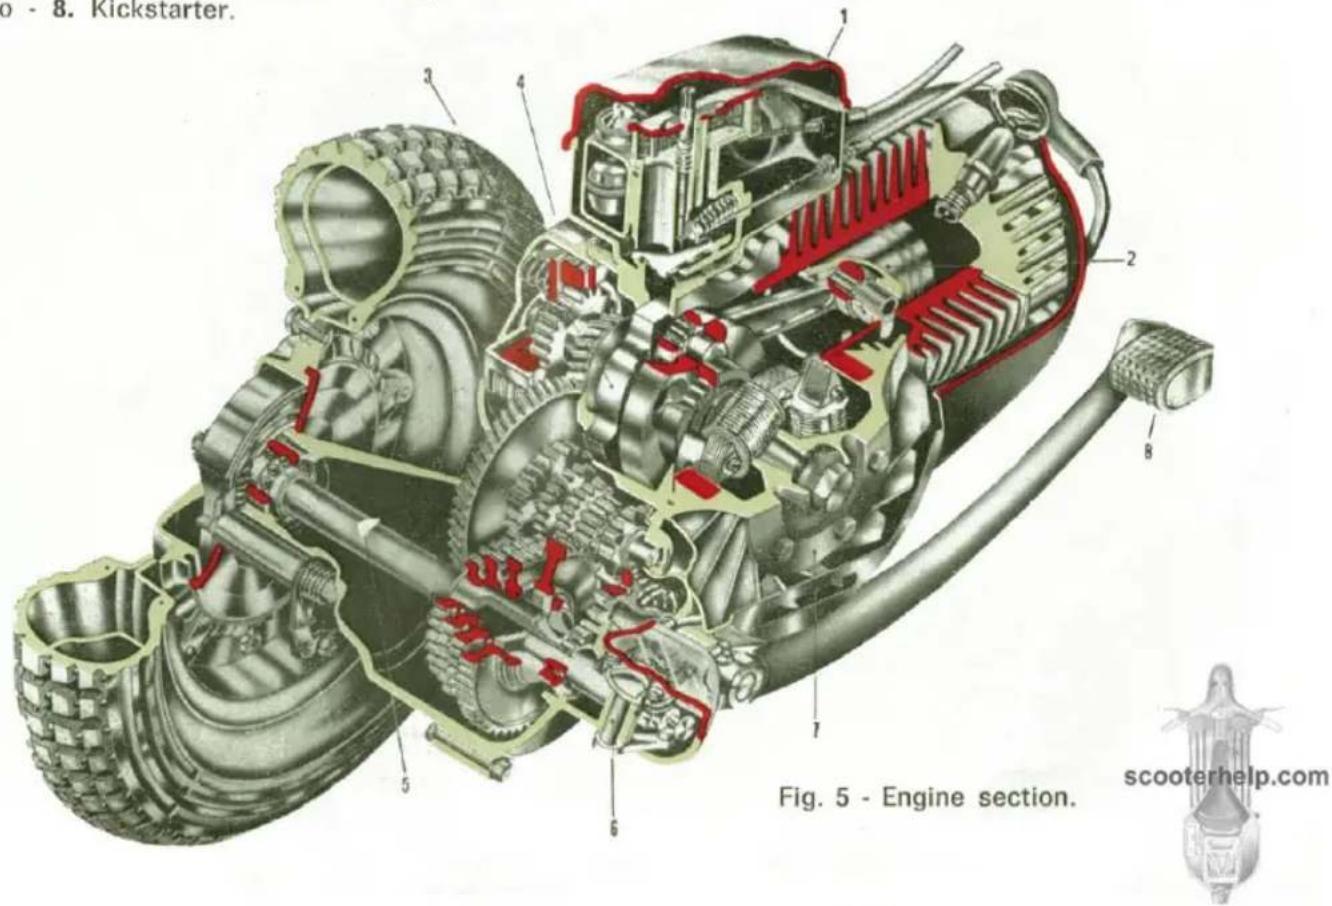
- Group carburettor air cleaner - 2. Piston - 3. Crankshaft - 4. Clutch - 5. Driveshaft and gear pinions assy. - 6. Gear shifter - 7. Flywheel magneto - 8. Kickstarter.
text_image
6 - 8. Kickstarter. Fig. 5 - Engine section. scooterhelp.comOPERATING INSTRUCTIONS
| OPERATION | INSTRUCTIONS | NOTES |
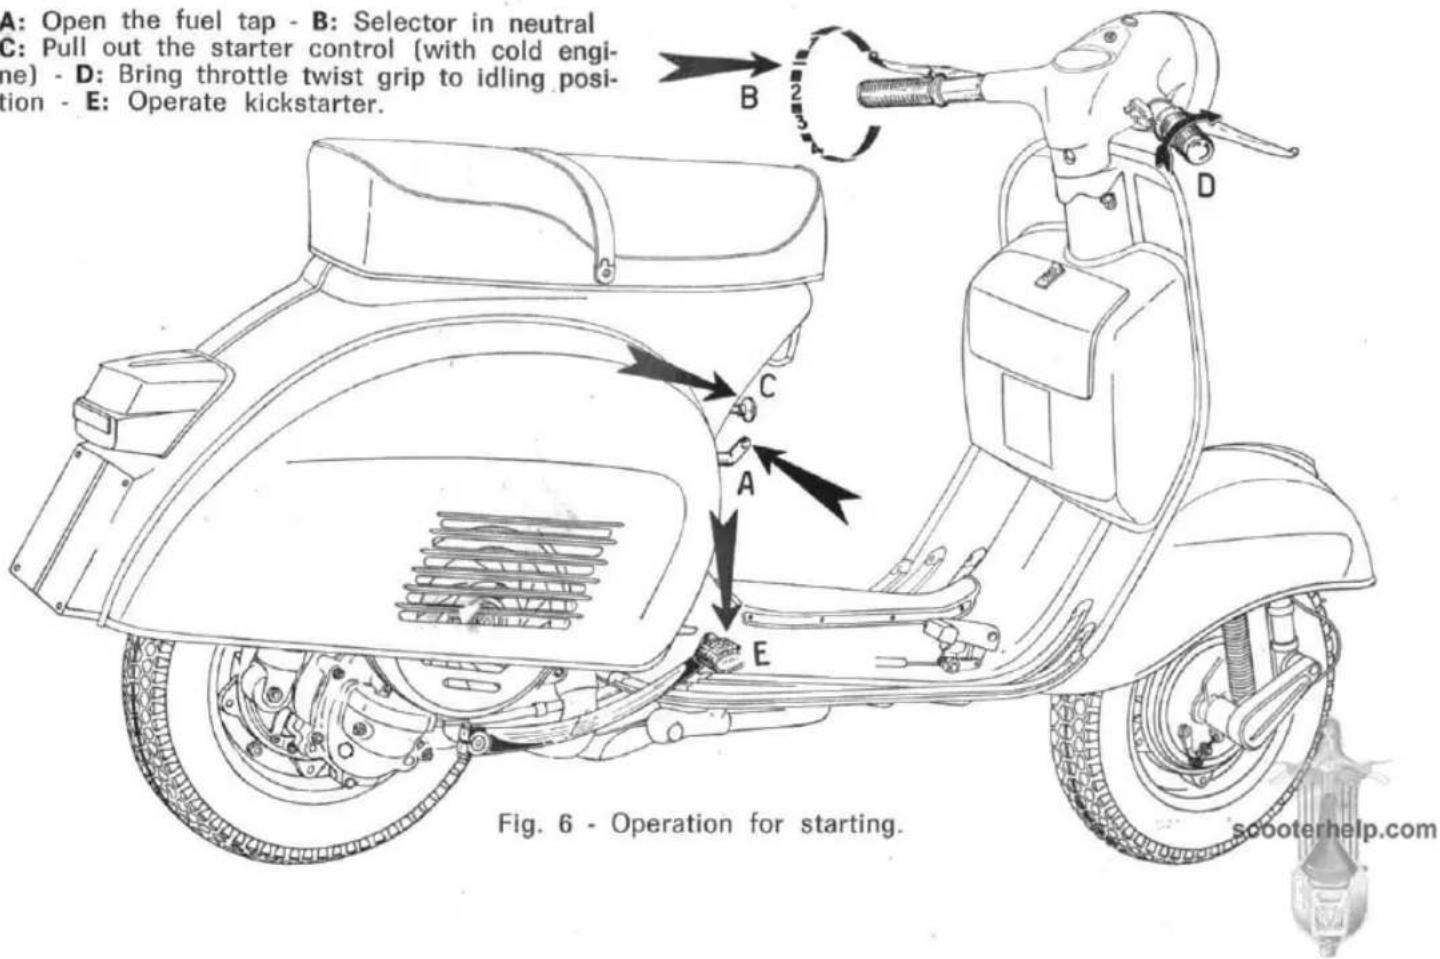
| STARTING | — Carry out the operations indicated on fig. 6. Do not use the choke when the engine is warm; as soon as the engine is running smoothly bring the starter control back to its normal position. | In case of hard starting see page 17. |
| SETTING THE SCOO-TER IN MOTION | — With the engine running at idling speed declutch and rotate the gear change twist grip to the position of first gear (fig. 6). For setting the vehicle in motion slowly let in the clutch and gradually open the throttle. | |
| GEAR CHANGE | — Close the throttle, declutch and rotate the gear change grip to a higher or lower gear, as the case may be (fig. 6). | When it is necessary to decellerate do not hesitate in changing down. |
| STOPPING THE ENGINE | — Before stopping the engine change to “neutral” and then switch off the ignition (Fig. 2). |
scooterhelp.com
text_image
A: Open the fuel tap - B: Selector in neutral C: Pull out the starter control (with cold engine) - D: Bring throttle twist grip to idling position - E: Operate kickstarter. Fig. 6 - Operation for starting. sooterhelp.comOPERATING AND MAINTENANCE: COMMON OPERATIONS TO CARRY OUT
text_image
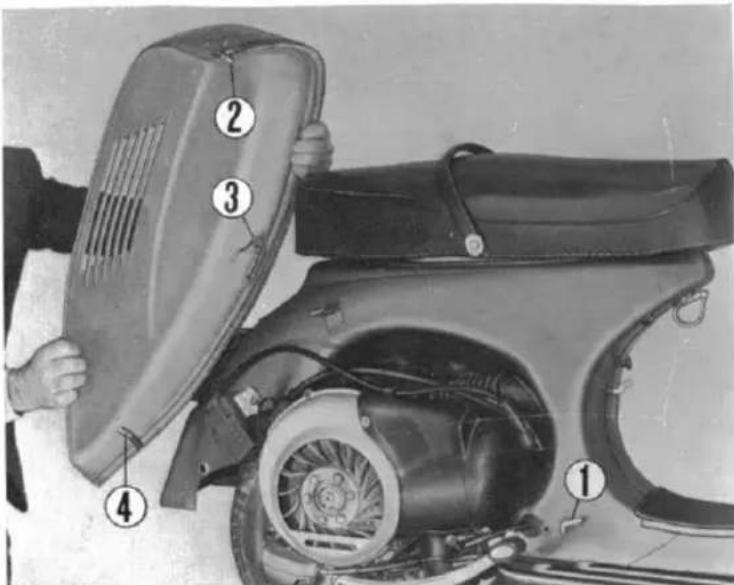
Technical diagram of an electric motor with numbered parts for identificationFig. 7 - Removing engine cowling
- Lever for locking cowling.
- Front locating pin.
- Clasp securing cowling to chassis.
- Rear hooked pivot pin.
REMOVAL OF ENGINE COWLING
— Pull the lever « 1 » and turn to release from cowling. Swing the cowling outwards so that the front locating pin « 2 » is free of its housing.
— Lift the cowling upwards from the front pivoting on its rear section: so that the clasp « 3 » releases from the chassis bracket.
— Pull the cowling outwards on the locating pin «4» so that the latter clears its housing, thus releasing the cowling.
For reassembly carry out the reverse procedure.
natural_image
Illustration of a scooter-shaped object with no visible text or symbols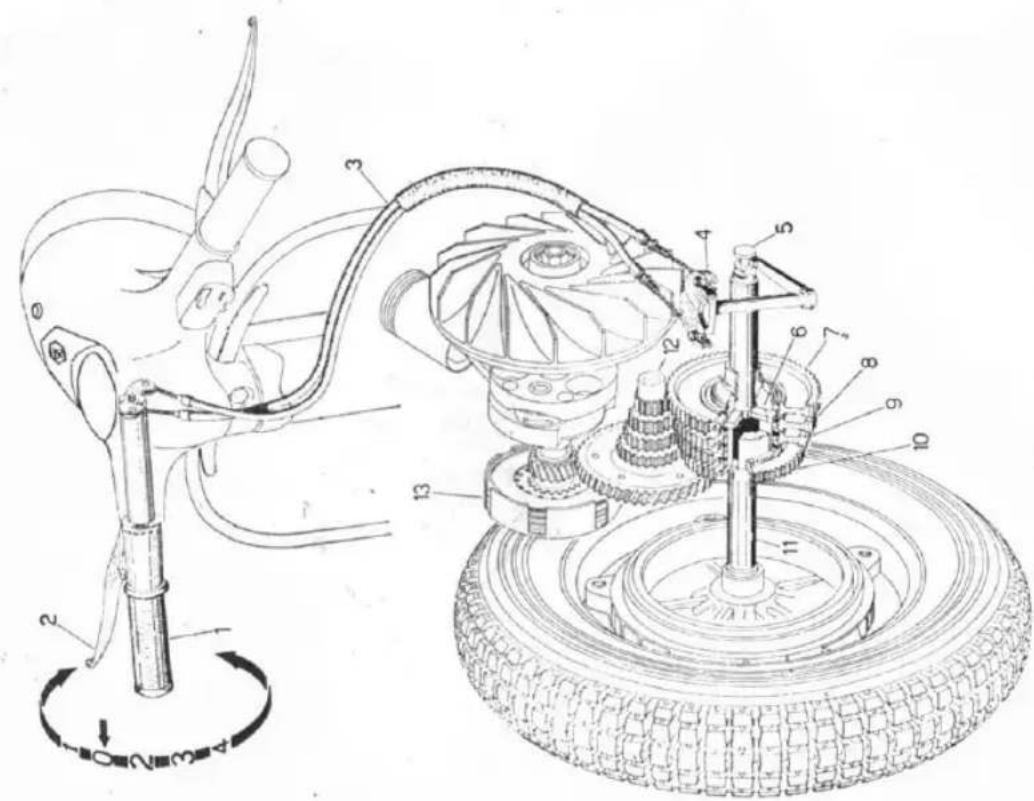
text_image
Technical diagram of a bicycle steering wheel assembly with numbered components and labeled partsFig. 8 - Gear transmission
- Gear change twist grip - 2. Clutch control lever - 3. Gear change cable - 4. Gear shifter - 5. Selector stem - 6. Selector spider - 7. 1st gear - 8. 2nd gear - 9. 3rd gear - 10. Top gear - 11. Mainshaft - 12. Spring gear - 13. Clutch.
B. - The position 1-2-3-4 on the gear change twist grip correspond to bottom, 2nd, 3rd and top gear respectively; the «0» indicates neutral.

OPERATING AND MAINTENANCE: COMMON OPERATIONS TO CARRY OUT
ADJUSTMENT ON CARBURETTOR
For adjusting the idling turn the slow running adjuster screw (on the air cleaner cover) (Fig. 9, n. 5).
— On the carburettor body a set screw is provided for adjusting the throttle cable play; this screw is to be reset only if necessary or on dismantling and reassembly operations.
— On the air cleaner case, opposite to said screw, is a plugged hole. When this plug is removed the spring loaded idler adjusting screw is accessible (Fig. 9, n. 14).
To avoid carburations troubles, we recommend that this adjustment is carried out by a Vespa dealer.
STARTING UP when the engine is floo- ded:
In the case of difficulties caused by flooding (presence of unvaporised mixture in the cylinder), the following methods can be used:
— Attempt push starting: engage the 2nd gear, declutch, push the vehicle to a certain speed, sharply release the clutch and when the engine fires declutch immediately.
— Close the fuel tap, remove the sparking plug (page 23) and clean; then kick over the engine several times. Screw in the sparking plug securely open the fuel tap and start the engine
text_image
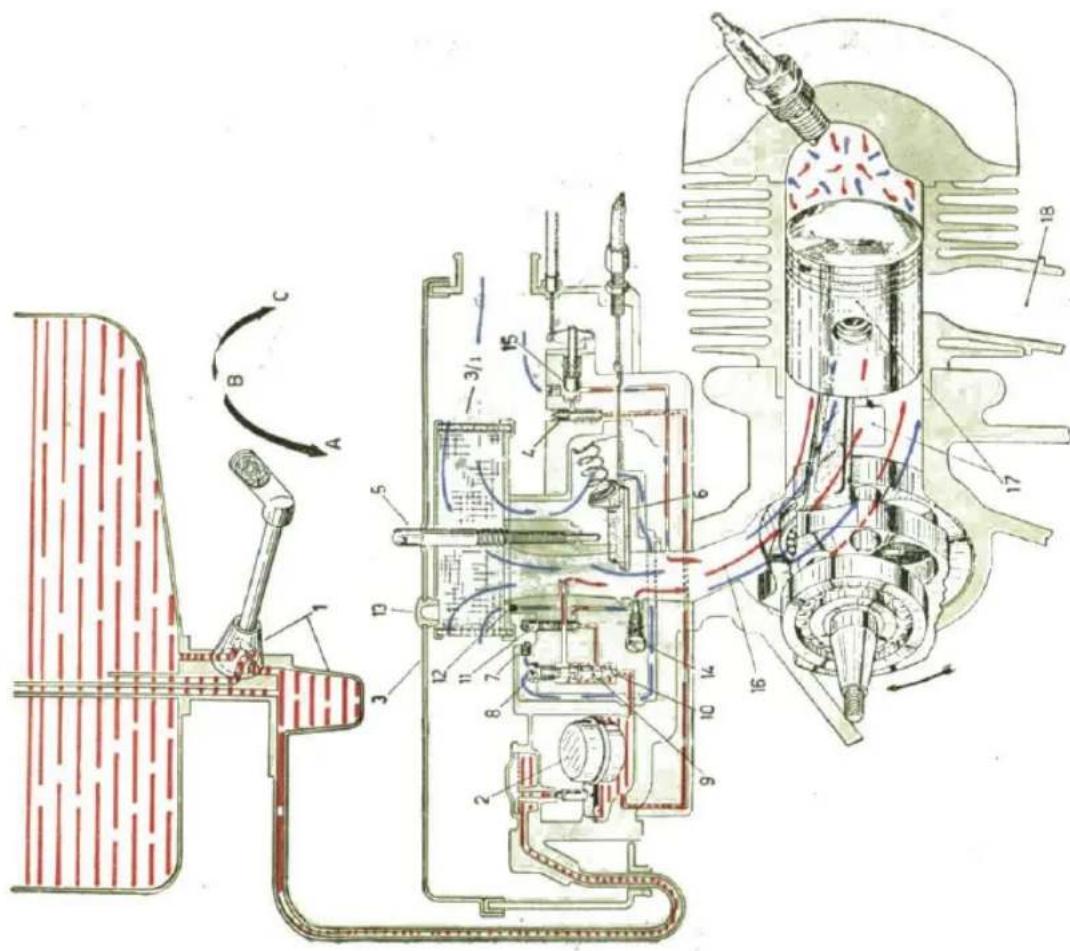
Technical schematic diagram of a mechanical device with numbered components and flow paths labeled A, B, C, 1 through 18.Fig. 9 - Fuel supply and distribution diagram
1. Combined fuel tap and sediment bowl. - A) Reserve; B) Open; C) closed - 2. Float - 3. Carburettor and air cleaner - 3/1. Air filter - 4. Calibrator for starter - 5. Throttle slide set screw - 6. Throttle slide - 7. Main jet air calibrator - 8. Air calibrator on mixer - 9. Mixer - 10. Main jet - 11. Slow running jet - 12. Slow running jet air calibrator - 13. Oil filler plug - 14. Slow running adjuster screw - 15. Starter valve - 16. Inlet port. - 17. Transfer ports (one of the ducts is schematically illustrated) - 18. Exhaust port.
OPERATING AND MAINTENANCE: COMMON OPERATIONS TO CARRY OUT
| OPERATION | INSTRUCTIONS | NOTES |
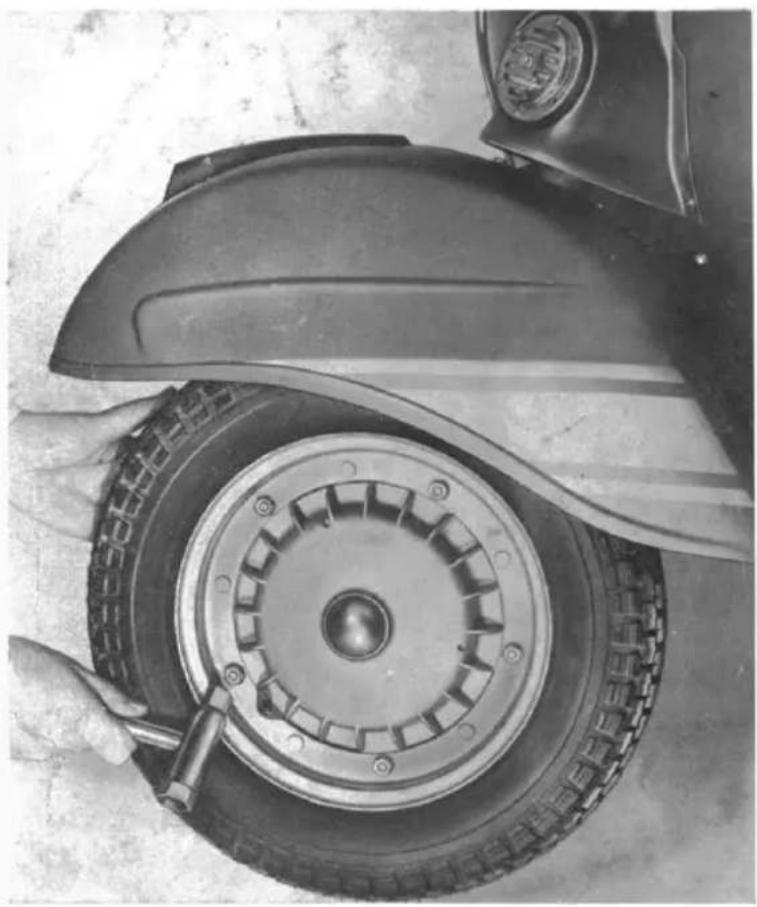
| CHANGING WHEELS AND TYRES | — For dismantling the wheels from the vehicle remove the nuts as indicated in fig. 10.On reassembly tighten said screws alternately and progressively. | The front and rear wheel are interchangeable one with another providing that the tyre pressures are regulated accordingly (page 11). |
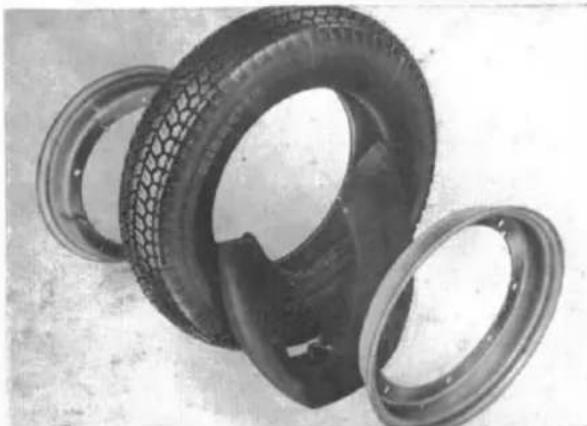
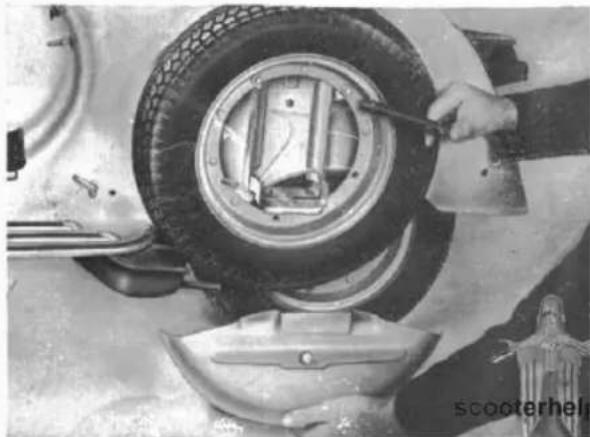
| DISMANTLING THE SPARE WHEEL | — When a tyre has to be removed, first deflate and then remove the nuts joining the two wheel rim (fig. 11).Dismantle the spare wheel cowl, following the instructions given for engine cowl (see pag. 15). To release the wheel unscrew the bolt securing it to the lower section of the protective plate, then the two nuts securing the wheel to the upper part (Fig. 12) of the bracket. |
scooterhelp.com
natural_image
Close-up of hands installing or adjusting a mechanical component with hoses and a fan (no visible text or symbols)Fig. 15 - Dismantling spark plug

OPERATING AND MAINTENANCE: COMMON OPERATIONS TO CARRY OUT
| OPERATION | INSTRUCTIONS | NOTES |
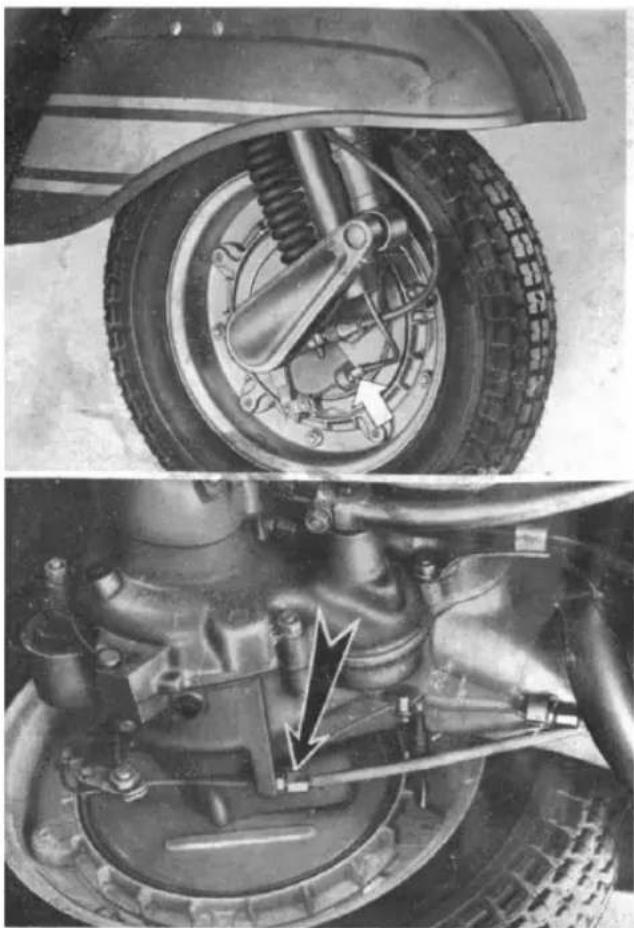
| BRAKE ADJUSTMENT | — Rotate the adjusting screw indicated in fig. 13 so that the wheel is completely free to rotate when the lever and brake pedal are in the resting position.The braking action should commence immediately the respective controls are operated. | The air cleaner case cap can be extracted by dismantling the two securing screws. |
| DISMANTLING AIR FILTER | — For extracting the air filter «A» (fig. 14) from the air filter case remove the engine cowl (fig. 7) and air cleaner case cap.Unscrew the two screws «B» securing the air filter and extract the latter component. |
scooterhelp.com
natural_image
Close-up of a car tire mounted on a vehicle wheel, with a hand adjusting the rim (no visible text or symbols)Fig. 10 - Removing wheel from vehicle
natural_image
Stacked tires and flange components on a plain surface (no text or symbols visible)Fig. 11 - Tyre removal
natural_image
Close-up of a car tire repair operation with a hand using a tool to lift the wheel (no visible text or symbols)Fig. 12 - Dismantling of spare wheel
OPERATING AND MAINTENANCE: COMMON OPERATIONS TO CARRY OUT
| OPERATION | INSTRUCTIONS | NOTES |
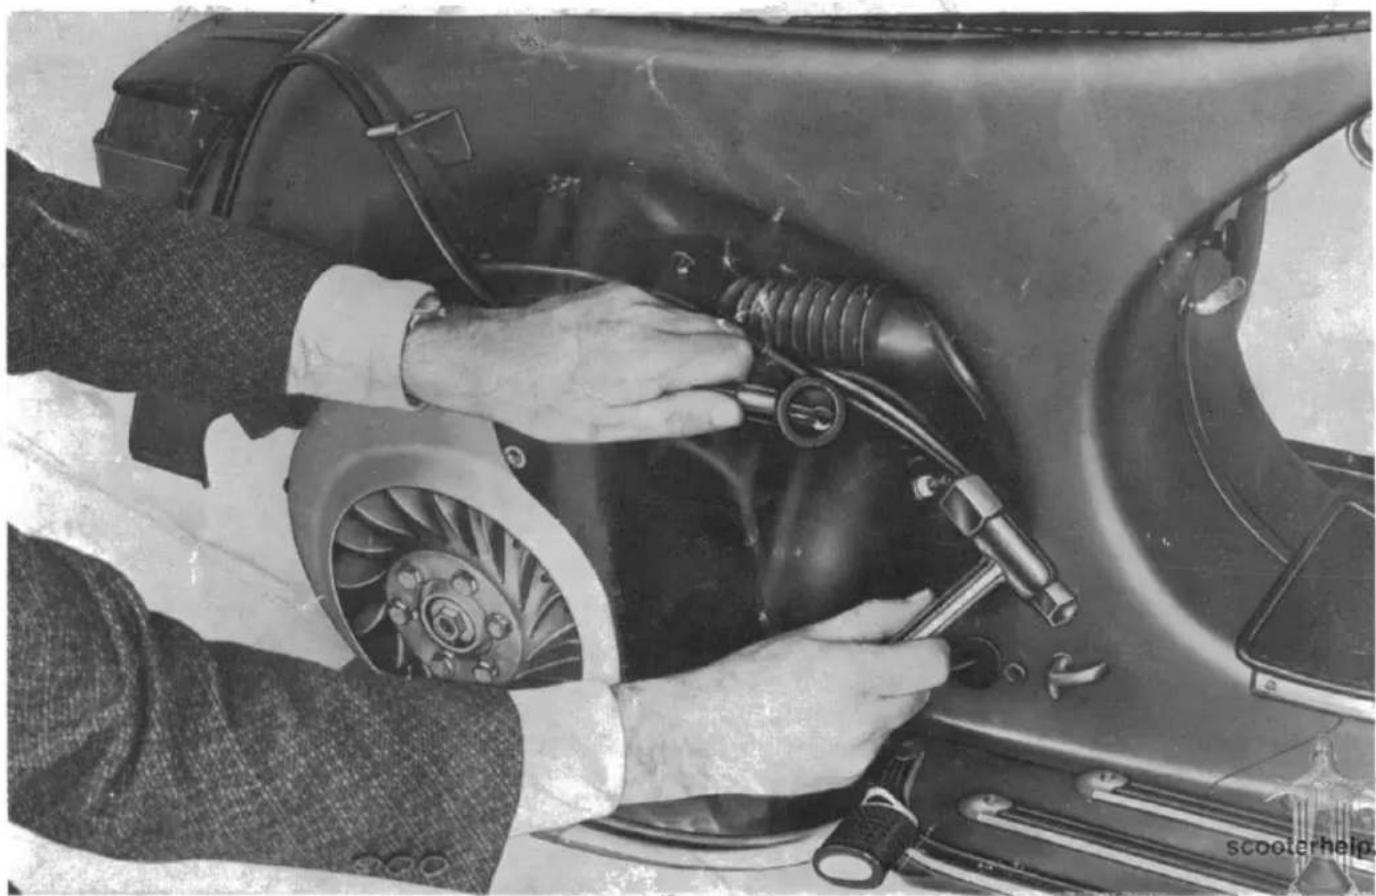
| SPARK PLUG REMO-VALCHANGING OIL IN GEAR CASE | — Remove engine cowl (Fig. 7), disconnect the H. T. lead and extract the spark plug using the box wrench as indicated in Fig. 15.— Drain off through hole (Fig. 16). Clean carefully the plug of said hole.— Introduce a small quantity of flushing oil, run the engine a few minutes to ensure thorough circulation and cleaning and drain off again.— Afterwards refill gear case with about 250 grs. of new oil (up to level of filling hole). | On reassembling the spark plug ensure that it is fitted into the threaded hole at the correct inclination.This operation of chang. oil should be carried out with warm engine. |
scooterhelp.com
natural_image
Mechanical assembly diagram showing a wheel bearing and brake system (no text or labels)Fig. 13 - Front and rear brake adjustment.
text_image
A BFig. 14 - Dismanti. J the air cleaner
vote - If the air cleaner case is taken off, it is also possible to gain access to the carburettor.
OPERATING AND MAINTENANCE: COMMON OPERATIONS TO CARRY OUT
| OPERATION | INSTRUCTIONS | NOTES |
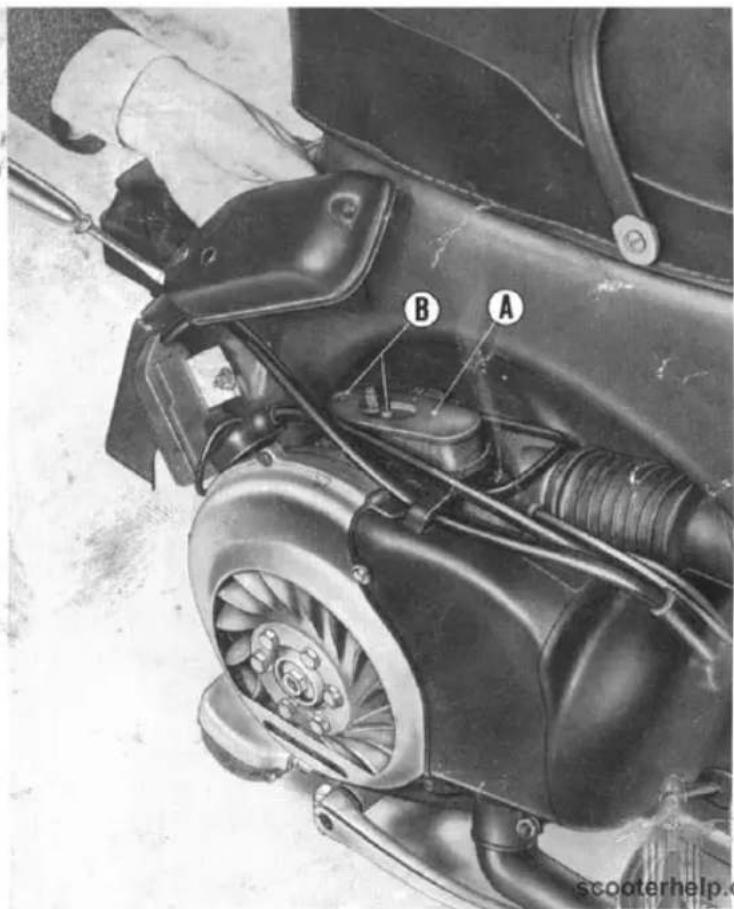
| DISMANTLING CYLINDER HEAD | — Strip off engine cowling, (Fig. 7), disconnect the H. T. lead, dismantle the « Cooling hood » (fastenings « A » - « B » - « C », fig. 17) and unscrew the 4 securing nuts by means of a box wrench. | For dismantling the cleaner see at page 21. |
| SUBSTITUTING BULBS | — Should one of the bulbs fail, before fitting a replacement, check that the socket contact points and the general functioning of the electrical plant are efficient. |
scooterhelp.com
natural_image
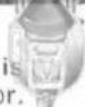
Close-up of a mechanical assembly with labeled parts, showing gears and springs (no readable text or symbols)Fig. 16 - Oil filler hole (1); oil draining hole (2).
text_image
Technical diagram of a mechanical assembly with labeled parts A, B, C, and D, showing a hand operating a tool.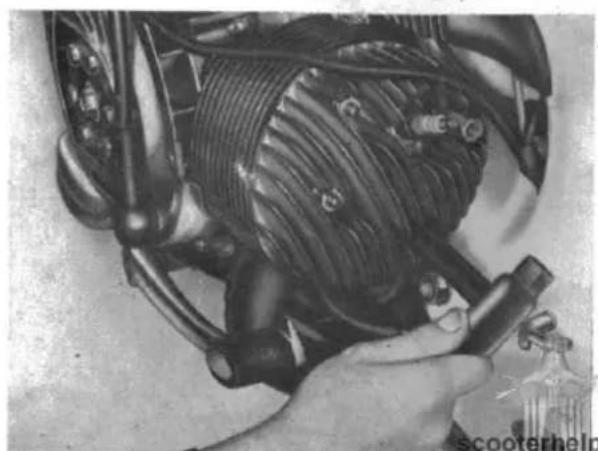
natural_image
Close-up of a hand adjusting a mechanical component with visible wiring and components (no text or symbols)Fig. 17 - Dismantling cooling hood from engine (A) and head (B).
A)
B)
OPERATING AND MAINTENANCE: COMMON OPERATIONS TO CARRY OUT
| OPERATION | INSTRUCTIONS | NOTES |
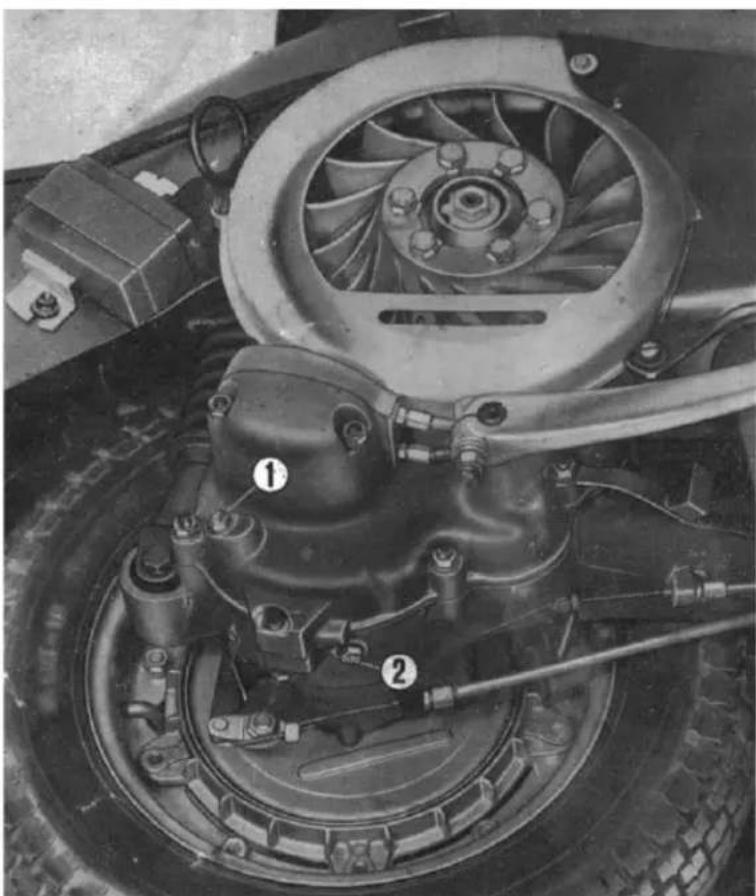
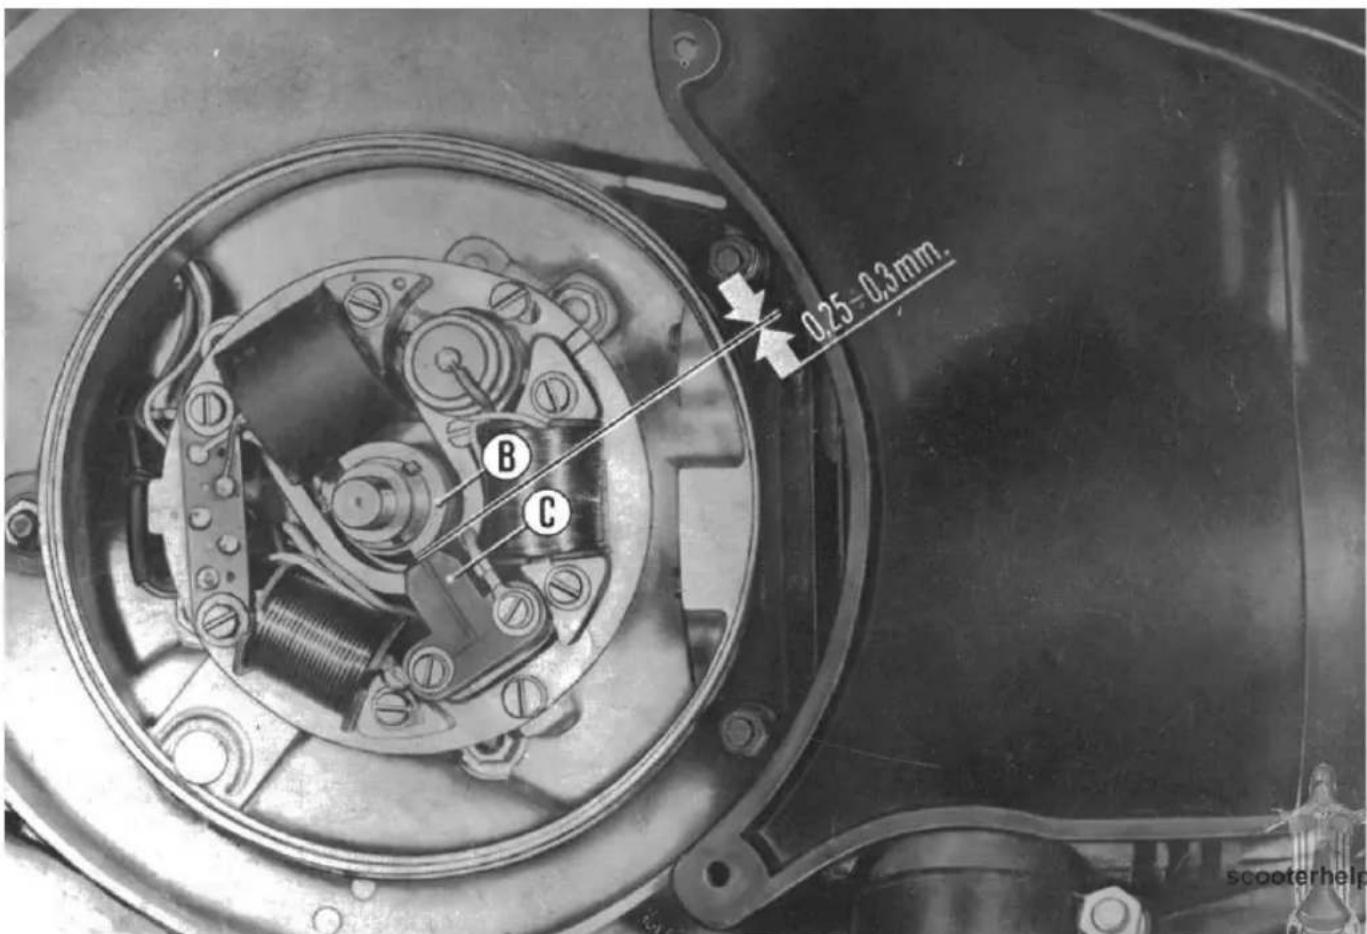
| TIMING CHECKING AND SETTING | — Since in this type of ignition there are not - as we have said at page 6 - mechanical parts exposed to the wear, the timing remains during the time practically unalterable.— Anyway when irregularities of functioning occur, remove the flywheel rotor acting on ,the locking nut « D » (Fig. 17) (on the Fig. 18 the rotor is already removed) and check that the interference between the ignition control cam « B » and the pick - up « C » is 0.25 ÷ 0.30 mm on the position of max. radius (see Fig. 18).If the suggested remedies are not sufficient in eliminating the trouble and specific controls and timing are necessary,consult your Dealer. | Also for checking the ignition advance, addres to your Dealer. |
scooterhelp.com
text_image
0.25-0.3mm. B C scooterhelpFig. 18 - Operations for checking the interference between cam and pick-up.
OPERATING AND MAINTENANCE: COMMON OPERATIONS TO CARRY OUT
| OPERATION | INSTRUCTIONS | NOTES |
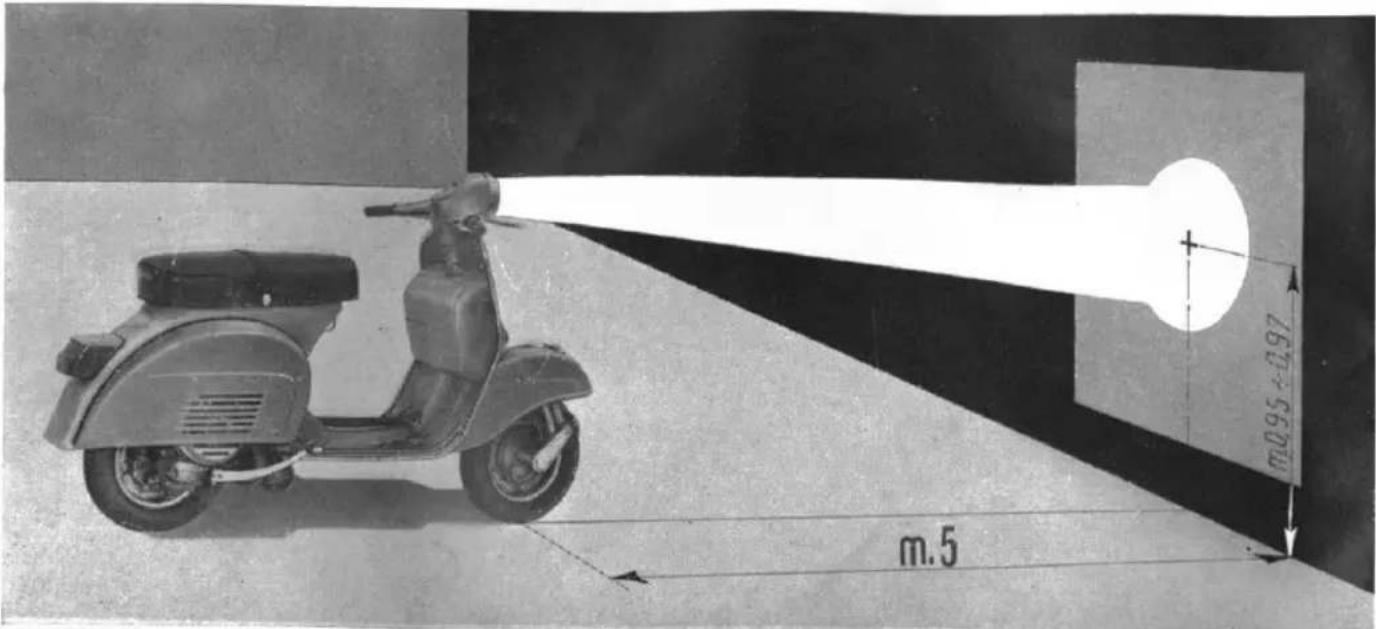
| SETTING THE HEADLAMP | The correct setting of the main beam can be obtained both horizontally and vertically as follows:Check that both front and rear tyres are inflated to correct pressure; i. e. 1.2 and 2.5 Kg/cm^2 (15.5 and 35.5 p.s.i.). Place the scooter on a level floor in front of a white wall as seen in Fig. 19. Start the engine, hold the throttle control twist grip at about 1/3 and set the switch on « main beam ». With two persons on the Vespa, slacken the screws securing the headlamp, then move the latter as required, in order that the beam axis coincides with point « + » on the wall. Tighten the screws firmly. | Do not wipe down with a cloth or contact with finger the reflector.This operation can be carried out also with the driver only sitting on the machine. In this case, of course, the beam alignement should be altered whenever the scooter is bee-ing ridden by both driver and passenger. |
scooterhelp.com
SETTING THE HEADLAMP
text_image
m.5 m.95±0.97Fig. 19 - Setting the headlamp
N. B. - The point « + » is valid for setting with one or two persons mounted. Note: m. 5 = 16 FT approx.: m. 0.95÷0.97 = 3 FT approx.

natural_image
Illustration of a scooter body with no visible text or symbolsMAINTENANCE
Though the electronic ignition provides a regular running of the engine also when the spark plug is dirty or the electrodes setting is not correct, when difficulties of ignition occur, check the spark plug: clean in neat gasoline (petrol) and wire brush (or emery cloth) the electrodes; adjust the gap 0.6 mm (0".023). Check porcelain insulation: if cracked or broken change plug.
It is advisable not to change the type of spark plug as recommended by the manufacturer.
Every 4000 Km (2400 mls):
1) - Check oil level in gear box (Fig. 16).
2) - De-coke the engine (cylinder head, piston crown and cylinder ports, see at page 25). Ensure that not residual carbon deposits remain inside the cylinder.
Clean the exhaust pipe using a hooked steel wire.
3) - Grease front hub through the appropriate nipples and lubricate the speedometer drive and transmission, the brake lever and gear selector.
4) - Remove the air filter, (see page 21), clean by agitating in an oil gasoline (petrol) bath and if possible air blast dry.
Every 8000 Km (4800 mls):
1) - Change oil in gear box (see page 23). The oil should be changed also after the first 1000 Km.
2) - Lubricate control cables transmissions and felt lubricating pad on flywheel.
(Consult your Service - Station).
3) - If the engine runs irregularly or in any case the performances are reduced, consult your Service - Station.
text_image
or in duced scooterhelp.com 31SUMMARY OF INSTRUCTIONS FOR MAINTENANCE AND LUBRICATION
| PRINCIPAL OPERATIONS TO CARRY OUT | LUBRICANTS | |
| EVERY 4000 Km. (2400 mls) | EVERY 8000 (4800 mls) | |
| Gear box (top up) | Gear box (change oil) | Oil SAE 30 (+) |
| Fulcrum points of brake lever and pedal - Gear selector - Front suspension - Speedometer drive and transmission. | Greasing control cables | Shell Retinax A.Esso Beacon 3.Mobilgrease MP.Total Multis. |
| Cleaning air filter in gasoline (petrol). | ||
| Decoking cylinder head and piston. | ||
| Cleaning and adjusting sparking plug electrodes. | ||
| Decoking silencer. | ||
| Engine: At each refilling (lubricated by oil in mixture). | 2% by volume pure mineral Oil SAE 30 (+) | |
| Front and rear dampers (only if defective) ★ | Esso Univis J 43Shell Tellus Oil 13Mobilfluid 62 scooterh | |
★ Consult your Service Station. (+) e.g.: Esso 2 T Motor Oil; Shell Golden Motor Oil; Shell X-100 2T; Total
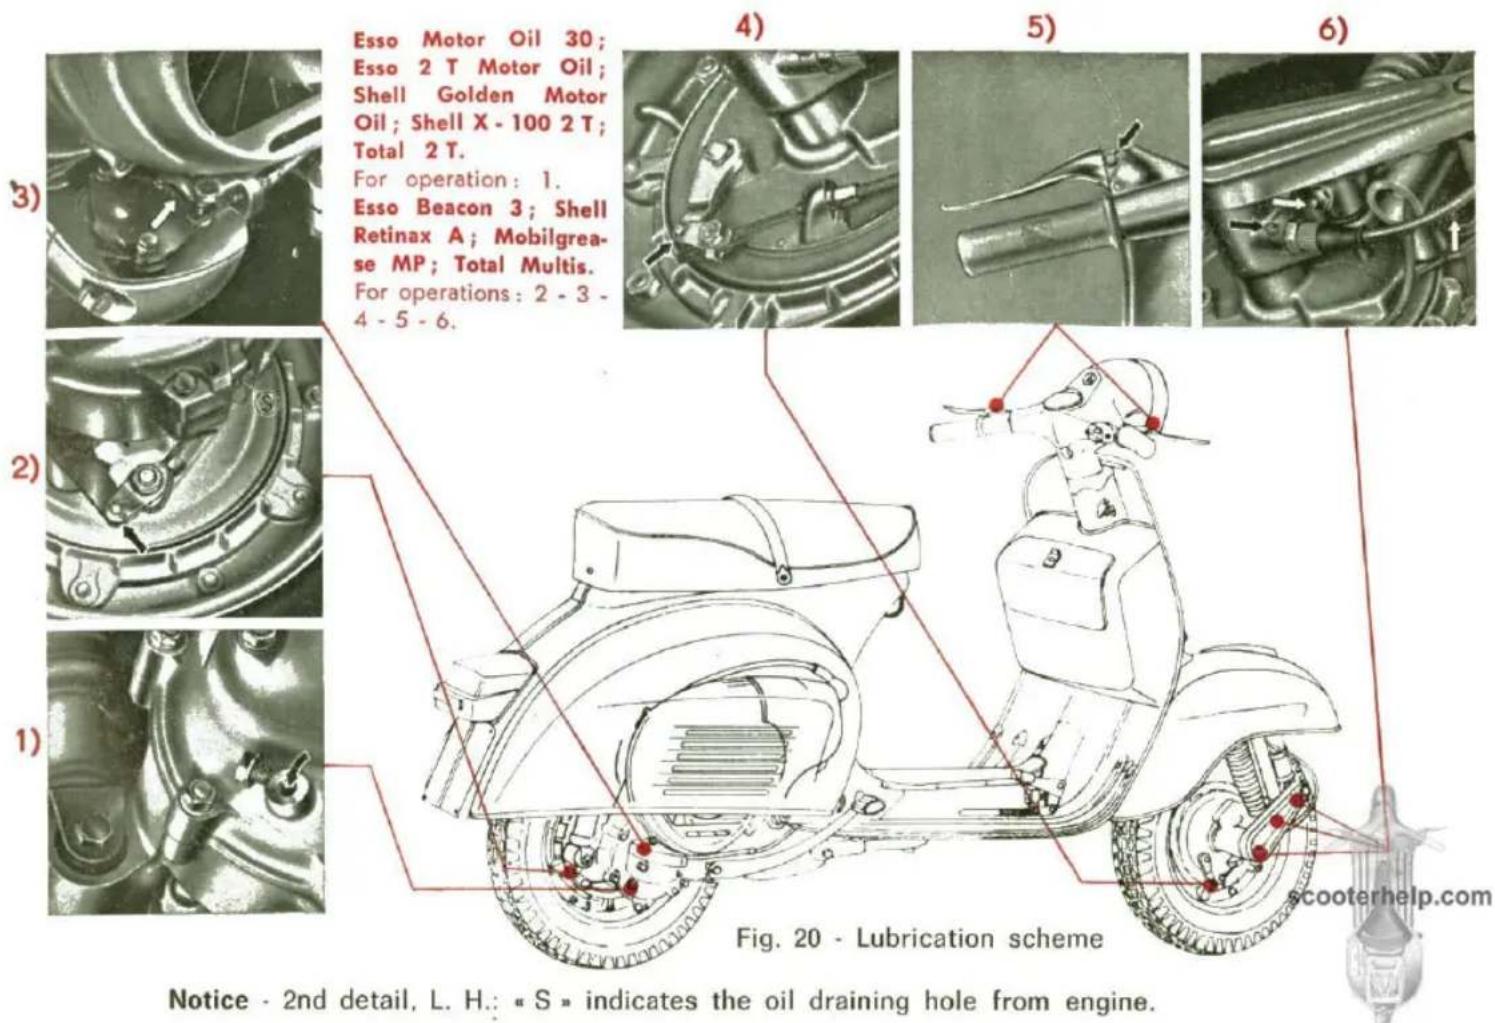
Esso Motor Oil 30;
Esso 2 T Motor Oil;
Shell Golden Motor
Oil; Shell X - 100 2 T;
Total 2 T.
For operation: 1.
Esso Beacon 3; Shell Retinax A; Mobilgrease MP; Total Multis.
For operations: 2 - 3 - 4 - 5 - 6.
Notice - 2nd detail, L. H.: « S » indicates the oil draining hole from engine.
LAYING UP
We recommend that the following operations be carried out:
1) - Clean down the vehicle.
2) - With the engine stationary, and throttle fully opened, introduce 40 cc.
of oil SAE 30 through the appropriate hole in the air cleaner case (see page 21). After said operation depress the kickstarter three or four times.
3) - Drain off all fuel contained in the fuel tank; then grease over all unpainted metallic parts; next raise the wheel off the ground by placing wooden checks under the footrest.

natural_image
Illustration of a scooter inside a vehicle (no text or symbols visible)CLEANING THE VEHICLE
Notice:
Washing and polishing operations should not be carried out in the sun, particularly during the summer when the bodywork is warm.
Under no circumstances should petrol or Diesel oil be used for washing painted surfaces or plastic material as they will deteriorate.
Always wash the scooter before polishing.
1) Engine
For cleaning the exposed surface of the engine use paraffin, a brush and clean rags.
2) Bodywork.
— Washing.
Painted parts should be washed down using a low pressure hose. Do not use a high pressure system as grit may be forced into the paint.
When the dirt and grime becomes soft, sponge off using one of the « car type » shampoos available (use a product of the type Rolene and Teepol, which are employed in aqueous solution, 3 ÷ 5% by weight). First, lightly wash the painted surface of the scooter, in order to avoid scratching. Thoroughly rinse with plenty of water. Dry off using a clean chamois leather to eliminate water marks.
— Spots.
To remove spots caused by tar, grease, insects, etc, rub gently with a soft cloth dipped in oil or turpentine. More persistent marks can be removed with a solution of warm water and car shampoo. Carry out this procedure periodically, to eliminate permanent paintwork damage.
— Polishing.
If after washing, as previously described, the original condition is not restored, apply evenly a thin coat of good quality wax polish and shine with a soft cloth, rubbing gently in a side to side manner.
scooterhelp.com
FAULT FINDING
When the machine does not run properly, inspect and rectify as explained below.
If the suggested remedies are not sufficient in eliminating the trouble, consult your Dealer.
| Faut finding | Remedies |
| HARD STARTING1. - Fuel system - Carburation - Ignition.Lack of fuel.Filter, jets, fuel tap, carburettor body clogged or dirty.Engine flooding.Air cleaner chocked or dirty.Porcelain of sparking plug cracked.Generator device faulty. | Turn to reserve and refil as soon as possible.Remove, wash in petrol and blow dry.See page 17.See page 21.Check the spark plug or change.Disconnect the plug lead. Check if sparking occurs between lead and crankcase when the kickstarter is operated.(Consult your Dealer for eventual repairs). |
scooterhelp.com
| Fault finding | Remedies |
| VARIOUS RUNNING DEFECTS | |
| 1. - Lack of power.Silencer (or engine) choked.Sparking plug loose in the cylinder head.Cylinder head loose. | Clean (see page 31).Screw down with a wrench.Set head accurately and tighten nuts. |
| 2. - High fuel consumption.a) Air filter chocked or dirty or choke control incorrectly set.b) Other causes (carbu:ettor, lack in compression etc.). | Wash in neat petrol (gas), air blast dry.Check choke control mechanism and lubricate.Consult your Dealer. |
| 3. - Noisy engine - Defective suspension - Mechanical failures. | Consult your Dealer. |
| 4. - Defective electrical equipment.Wire terminals disconnected or carelessly connected.Headlamp beam incorrectly set.Defective bulbs. | Carefully check and connect.Adjust (see page 29).See page 25 for substituting. |
scooterhelp.com
GENERAL SPECIFICATION
Engine (see characteristics at pag. 5 and fig. 5): the engine is pivoted to the chassis of the vehicle (fig. 21). The rear wheel if fitted on the outer side of the drive shaft.
Lubrication of engine components (piston, cylinder, crankshaft main bearings) is effected by the oil in the fuel mixture. Clutch and gear box function in an oil bath.
Fuel supply (see Fig. 9): gravity feed with mixture of oil and petrol (gasoline). Three way tap (« closed », « open », « reserve »).
Carburettor provided with a throttle slide and built into the air cleaner case.
Ignition by means of an electronic device with a built-in H. T. coil, connected to the three flywheel outputs.
Clutch (see fig. 5): multiplate.
Control lever on the handlebars, L. H. and flexible and adjustable control cable. Transmission ratio engine to driving wheels:
| Bottom gear | 1:13.42 |
| 2nd' gear | 1: 9.13 |
| 3rd gear | 1: 6.32 |
| 4th gear | 1: 4.71 |
Starting (see Fig. 6): by means of a kick-starter.
Cooling by means of a centrifugal fan
scooterhelp.com
text_image
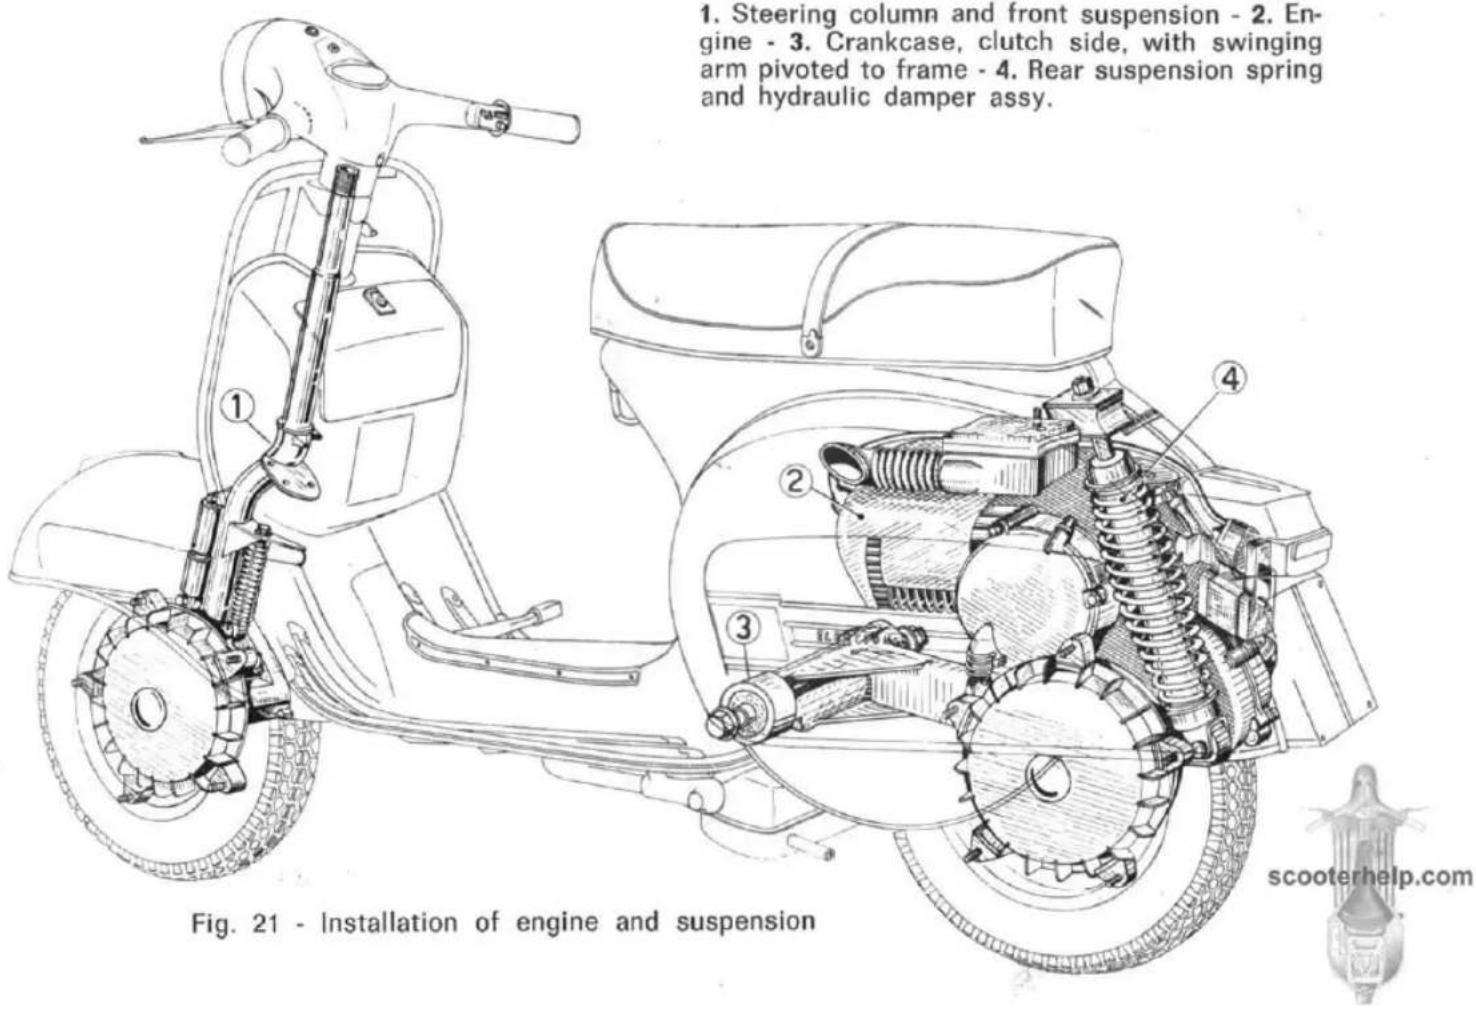
1. Steering column and front suspension - 2. Engine - 3. Crankcase, clutch side, with swinging arm pivoted to frame - 4. Rear suspension spring and hydraulic damper assy. Fig. 21 - Installation of engine and suspension scooterhelp.com- Steering column and front suspension - 2. Engine - 3. Crankcase, clutch side, with swinging arm pivoted to frame - 4. Rear suspension spring and hydraulic damper assy.
FRAME
INTEGRAL CHASSIS (see fig. 1): of pressed sheet steel with streamlined monocoque type structure. It is completed, for protective means, by lateral cowl and mudguard.
Handlebars: Light alloy casting comprising speedometer and headlamp ∅ 130. All transmission cables and various controls are concealed therein.
It is arranged for easy fitting of a wind-screen (accessory).
Steering column, suspension: On the lower end of the steering column is pivoted the front wheel swinging hub. Front and rear suspensions with helical spring and double acting hydraulic damper. Dual saddle. Security lock on the steering column.
Wheels: Interchangeable and made up of 2.10" pressed steel flanges, onto which are mounted 3.50 - "s.
Brakes: Mechanical, expanding type. Front brake is operated by hand, the rear brake is pedal operated.
Controls: clutch, gear box, throttle, front and rear brake, choke, provided with flexible and adjustable control cables.
STANDARD TOOL KIT (contained in the front tool box) four ended box wrench (11-13-21-22 mm.) and two double open ended wrench (11-13 and 7-10 mm.); one single open-ended wrench (8 mm.); one screwdriver.
Accessories
A full range of accessories can plied and fitted by your dealer.

text_image
be sup scooterhelp.comELECTRICAL EQUIPMENT
A six pole magneto-nominal voltage 6 V-supplies alternating current to the electrical equipment. The controls (switching levers, horn button) are located on the handlebars, R. H. into the main light and dip switch (Fig. 22).
The engine cut-out button is located on the frame, under the hook for bag (see Fig. 2).
This equipment consists of the following lighting and signalling devices:
— The headlamp, ∅ 130, has a 25/25 W bulb (main and dipped beam) and a 5 W bulb (pilot light and front parking light).
— The rear lamp, with red reflector, is provided with a 5 W bulb (red pilot light and light for registration plate) and a 10 W bulb (Stop light).
- Speedometer light and checking light for headlamp are both 6 V - 0,6 bulbs. Horn.
text_image
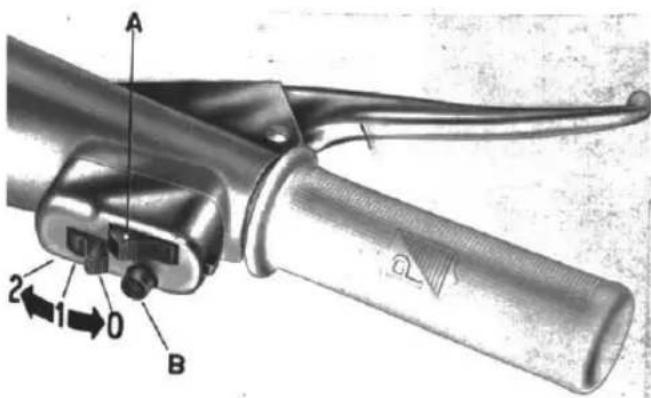
A 2←1→0 BFig. 22 - Light and dip switch.
Switching lever:
0: lights off.
1: pilot light and tail lamp on.
2: head light, front parking light and tail lamp on).
A: Switch (dipped and main beam).
B: Horn button
Notice: For the engine cut-out button see Fig. 2 on page 7
scooterhelp.com

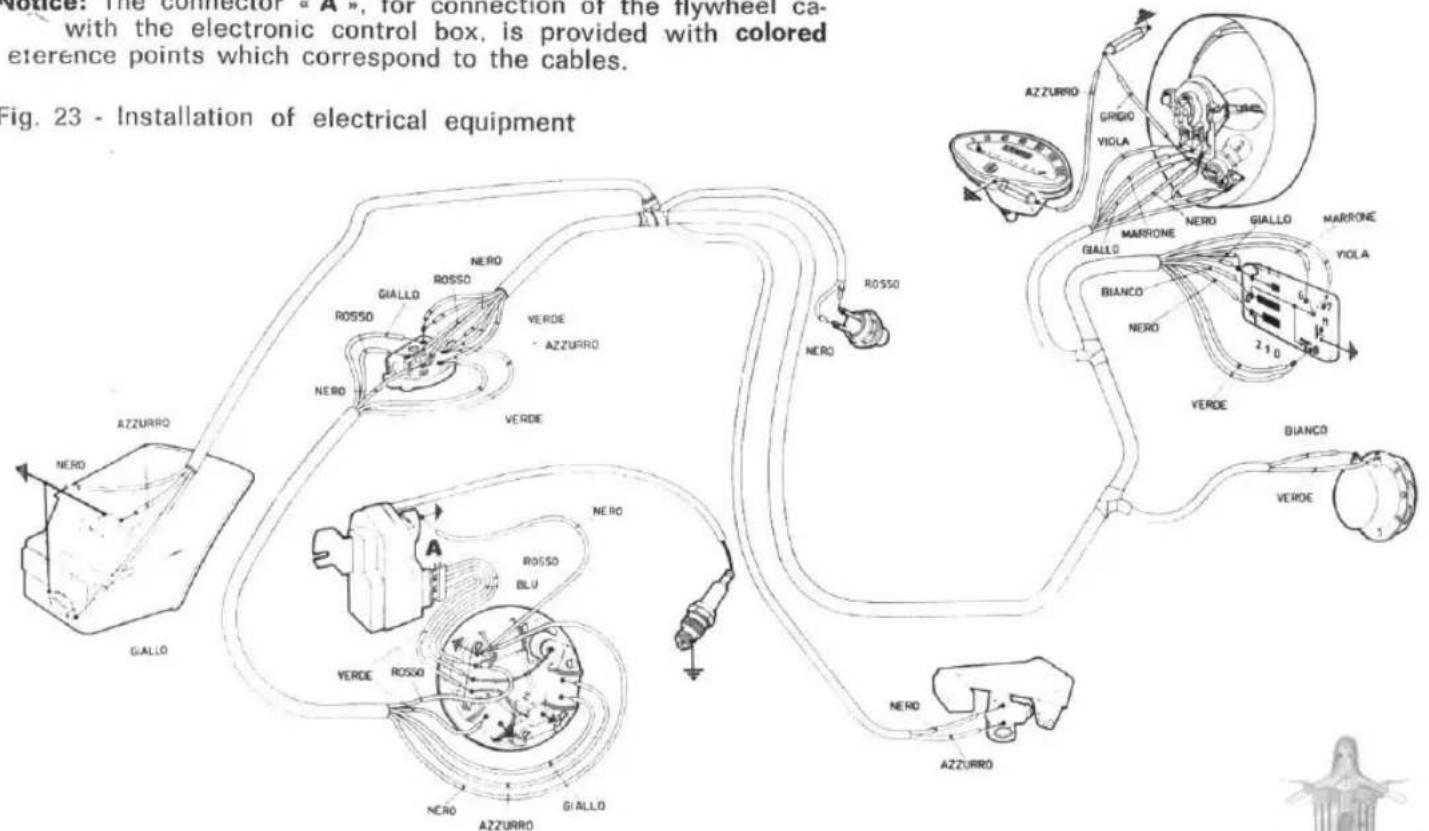
Notice: The connector "A", for connection of the flywheel ca-with the electronic control box, is provided with colored cference points which correspond to the cables.
text_image
Notice: The connector "A", for connection of the flywheel ca- with the electronic control box, is provided with colored eference points which correspond to the cables. Fig. 23 - Installation of electrical equipment AZZURRO GIALLO NERO ROSso NERO GIALLO VERDE AZZURRO NERO VERDE NERO ROSso BLU NERO VERDE BERDE NERO AZZURRO NERO AZZURRO GERIO VIGLA NERO GIALLO MARRONE BIANCO NERO VERDE BIANCO VERDE NERO AZZURRONotice: For avoiding damages to the electronic control box, not disconnect the cables of the low tension socket, when the engine is running.
Giallo = Yellow; Nero = Black; Azzurro = Sky-blue; Verde = Green; Rosso = Red; Blu Blue; Grigio = Grey; Violet; Marrone = Brown; Bianco = White.

Electronic control box with built-in H. T. coil.
text_image
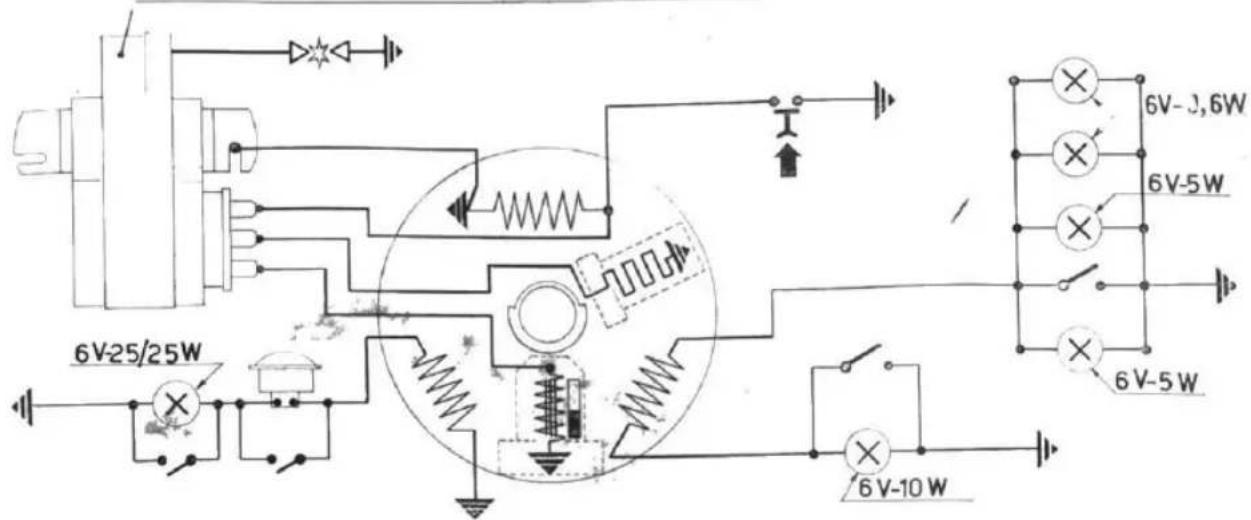
6V-25/25W 6V-10 W 6V-5W 6V-J,6W 6V-5WFig. 24 - Wiring diagram
NOTICE:
The loads on the bulbs and horn are connected in series with respect to the flywheel magneto coils, whereas the switch units are in parallel to the bulbs: the insertion of the lights and horn comes about by opening (instead of closing) the relative control switches.
text_image
d horn scooterhelp.com 43IDENTIFICATION DATA
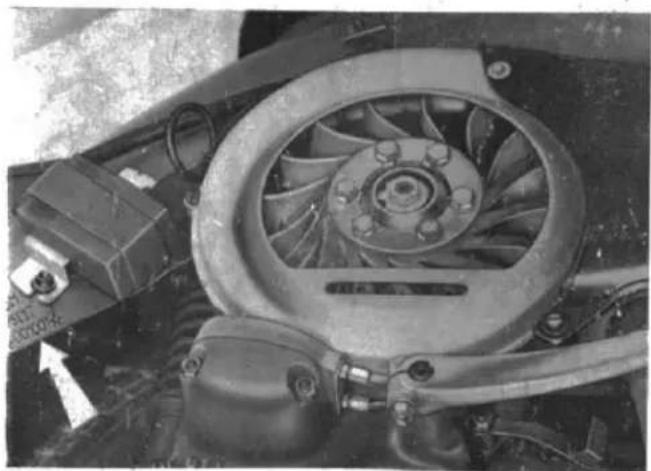
natural_image
Close-up of a mechanical fan assembly with visible blades and components (no text or symbols)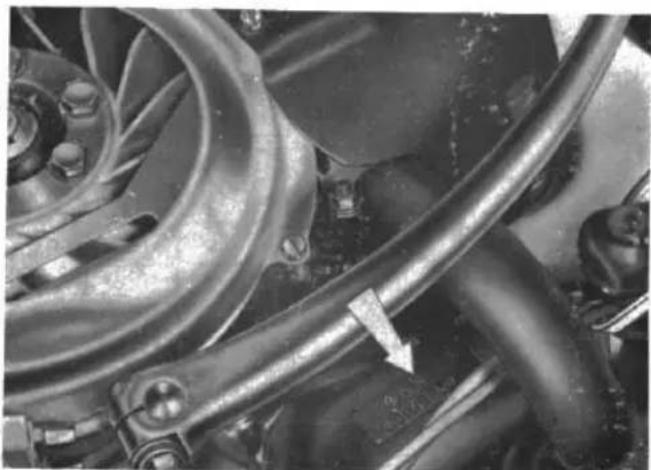
natural_image
Close-up of mechanical components with visible pipes and springs (no text or symbols)Fig. 25 - Serial number stamped on frame (VSE 1 T.....) and on engine (VSE 1 M.....). Notice. These numbers should be quoted when ordering spare parts.
The descriptions and illustrations in this booklet are not to be taken as binding on the Manufacturer. The essential features of the model described and illustrated herein remaining unaltered, the PIAGGIO Firm reserves therefore the right to carry out at any moment, without being obliged to bring this booklet up - to - date in due course, modification that may occur concerning machine units and parts, or delivery of accessories, that the Firm deems to be convenient on improvement purposes or for what may concern manufacturing or commercial requirements.
scooterhelp.com
PIAGGIO & C. - S. p. A. - Pontedera - S. I. A. T. - Ufficio Pubblicazioni Tecniche - Dis. N. 170210 - 1000/7210