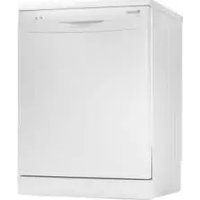
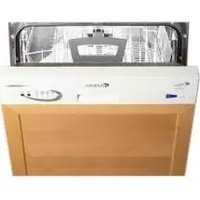
DW 45 AL - Lave-vaisselle Ardo - Notice d'utilisation et mode d'emploi gratuit
Retrouvez gratuitement la notice de l'appareil DW 45 AL Ardo au format PDF.


| Type de produit | Lave-vaisselle |
| Marque | Ardo |
| Modèle | DW 45 AL |
| Dimensions (L x H x P) | 45 x 85 x 60 cm (estimation) |
| Poids net | 38 kg (estimation) |
| Capacité | 10 couverts (estimation) |
| Alimentation électrique | 220-240 V ~ 50 Hz |
| Puissance totale | 1900 W (estimation) |
| Pression d'eau | 0.04 - 1.0 MPa |
| Consommation d'eau | 9,5 L par cycle (estimation) |
| Consommation d'énergie | 0,92 kWh par cycle (estimation) |
| Niveau sonore | 49 dB(A) (estimation) |
| Fonctions principales | Programmes de lavage (Prélavage, Normal, Eco, Intensive, Rapide), Départ différé jusqu'à 24 h, Demi-charge, Adoucisseur d'eau réglable |
| Sécurité | Sécurité enfants (verrouillage porte), Protection anti-débordement |
| Entretien et nettoyage | Nettoyage régulier des filtres et des bras de lavage, nettoyage de la porte |
| Pièces détachées et réparabilité | Filtres, bras de lavage, paniers, joints disponibles |
| Accessoires fournis | Panier à couverts, corbeille supérieure réglable, support à verres, entonnoir pour sel |
FOIRE AUX QUESTIONS - DW 45 AL Ardo
Questions des utilisateurs sur DW 45 AL Ardo
0 question sur cet appareil. Repondez a celles que vous connaissez ou posez la votre.
Poser une nouvelle question sur cet appareil
Téléchargez la notice de votre Lave-vaisselle au format PDF gratuitement ! Retrouvez votre notice DW 45 AL - Ardo et reprennez votre appareil électronique en main. Sur cette page sont publiés tous les documents nécessaires à l'utilisation de votre appareil DW 45 AL de la marque Ardo.
MODE D'EMPLOI DW 45 AL Ardo
DWF09L6W (GB)
natural_image
Stylized white line drawing of a building interior with stairs and windows against a solid blue background (no text or symbols)
Read this Manual
Dear Customer,
This appliance is intended to be used in household and similar applications such as:
-staff kitchen areas in shops, offices and other working environments;
-farmhouses;
-by clients in hotels, motels and other residential typeenvironments;
-bed and breakfast type environments.
■ Please carefully reading it before using the dishwasher will help you to use and maintain the dishwasher properly.
■ Keepittorefertoatalaterdate.
■ Passitonto any subsequent owner of the appliance.
This manual contains sections of Safety Instructions, Operating Instructions, Installation Instructions and Troubleshooting Tips, etc.

Before Calling for Service
To review the section on Troubleshooting Tips will help you to solve some common problems by yourself and not need to ask for the help of professional technicians.

NOTE:
The manufacturer, following a policy of constant development and up-dating of the product, may make modifications without giving prior notice.
1) Safety Information .... 1
2) Disposal 2
3) Operating Instructions
Control Panel .... 3
Dishwasher Features .... 3
4) Prior using for the first time .... 4
A Water Softener .... 4
B Loading the salt into the softener .... 5
C Fill the Rinse Aid Dispenser .... 6
RINSE AID DISPENSER .... 6
Adjusting Rinse Aid Dispenser .... 6
D Function of Detergent .... 7
Concentrated Detergent .... 7
Detergent Tablets .... 7
Detergent Dispenser .... 7
Amount of Detergent to Use .... 7
Fill in Detergent .... 8
Detergent .... 8
5) Loading the Dishwasher Rack .... 9
Attention before or after loading the Dishwasher Rachs .... 9
Removing the Dishes .... 9
Loading the upper Rack .... 9
Adjusting the upper Rack .... 9
Loading the Lower Rack .... 10
Folding spikes .... 10
Silverware Basket .... 11
Attention! .... 12
Possible causes: .... 12
Suggest remedy .... 12
At the Ene of the Wash Cycle .... 12
6) Starting a washing programme .... 13
Wash Cycle Table .... 13
Turning on the Appliance .... 14
Change the Programme .... 14
7) Maintenance and cleaning .... 15
Filtering System .... 15
Caring for the Dishwasher .... 15
Project Against Freezing .... 15
Cleaning Filters .... 16
Filter assembly .... 16
Cleaning the Spray Arms .... 16
Cleaning the Door .... 17
How to Keep Your Dishwasher in Shape .... 17
8) Installation instruction .... 17
Installation preparation .... 17
About Electricity Connecting .... 19
Water Connection .... 19
Start of dishwasher .... 20
9) Troubleshooting Tips .... 21
Before calling for service .... 21
Error codes .... 22
Technical information .... 23
1. IMPORTANT SAFETY INFORMATION READ ALL INSTRCUTIONS BEFORE USING
WARNING!
When using your dishwasher, follow the below basic precautions including the following:
WARNING! PROPER USE
- Do not abuse, sit on, or stand on the door or di sh rack of the dishwasher
- Do not touch the heating element during or immediately after use
- Do not operate your dishwasher unless all enclosure panels are properly in place. Open the door very carefully if the dishwasher is operating. There is a risk of water squirting out.
- Do not place any heavy objects of stand on the door when it is open. The appliance could tip forward.
- When loading items to be washed:
o Locate sharp items so that they are not likely to damage the door seal;
o Load sharp knives with the handles up to reduce the risk of cut-type injuries;
o Warning: knives and other utensils with sharp points must be loaded in the basket with their points down or placed in a horizontal position. - When using your dishwasher, you should prevent plastic items from contacting with heating element.
- Check that the detergent receptacle is empty after completion of the wash cycle.
- Do not wash plastic items unless they are marked dishwasher safe or the equivalent. For plastic items not
so marked, check the manufacturer's recommendations. - Use only detergent and rinse additives designed for an automatic dishwasher. Never use soap, laundry detergent, or hand washing detergent in your dishwasher.
- Other means for disconnection from the supply must be incorporated in the fixed wiring with at least 3mm contact separation in all poles.
- Keep children away from detergent and rinse aid, keep children away from the open door of the dishwasher, there could still be some detergent left inside.
- Young children should be supervised to ensure that they do not play with the appliance.
- The appliance is not intended for use by young children or infirm persons without super vision.
- Dishwasher detergents are strongly alkaline. They can be extremely dangerous if swallowed. Avoid contact with skin and eyes and keep children away from the dishwasher when the door is open.
- The door should not be left in the open position since this could present a tripping hazard.
- If the supply cord is damaged, it must be replaced by the manufacturer or its service agent or a similarly qualified person in order to avoid a hazard.
- Please dispose of packing materials properly.
- Use the dishwasher only for its intended function.
- During installation, the power supply must not be excessively or dangerously bent or flattened.
- Do not tamper with controls.
- The appliance is to be connected to the water mains using new hose sets and the old hose -sets should not be reused.
READ AND FOLLOW THIS SAFETY INFORMATION CAREFULLY SAVE THESE INSTRUCTIONS
2. Disposal
Dispose of the dishwasher packaging material correctly.
All packaging materials can be recycled.
Plastic parts are marked with the standard international abbreviations:
➢ PE for polyethylene, e.g. sheet wrapping material
➢ PS for polystyrene, e.g. padding material
➢ POM polyoxymethylene, e.g. plastic clips
PP polypropylene, e.g. Salt filler
➢ ABS Acrylonitrile Butadiene Styrene, e.g. Control Panel.


Warning!
This appliance is marked according to the European directive 2002/96/EC on Waste Electrical and Electronic Equipment (WEEE).
By ensuring this product is disposed of correctly, you will help prevent potential negative consequences for the environment and human health, which could otherwise be caused by inappropriate waste handling of this product.
The symbol 📄 on the product, or on the documents accompanying the product, indicates that this appliance may not be treated as household waste. Instead it shall be handed over to the applicable collection point for the recycling of electrical and electronic equipment.
Disposal must be carried out in accordance with local environmental regulations for waste disposal.
For more detailed information about treatment, recovery and recycling of this product, please contact your local city office, your household waste disposal service or the shop where you purchased the product.
3. Operation Instruction
IMPORTANT!
To get the best performance from your dishwasher, read all operating instructions before using it for the first time.

1 ON/OFF Button: To turn on/off the power supply.
2 Display Window: Program remaining time, delay time, running indicator, faut codes and etc.
3 Delayed Start Button: Press this button to set the delayed hours for washing. You can delay the start of washing up to 24 hours. One press on this button delays the start of washing by one hour.
Dishwasher Features

1 Upper Basket
2 Spray Arms
3 Lower Basket
4 Water Softener
5 Main Filter
6 Detergent Dispenser
7 Cup Shelf
8 Silverware Basket
9 Coarse Filter
10 Rinse Aid Dispenser
11 Drain pipe connector
12 Inlet pipe connector
4 Half load functions Button: To select Half load functions. (With this Half load function you can only use it when you have only about or less than 6 place setting dish wave, and you will see less water and energy consumption, can only be used with all programs)
5 Program button: To select washing program when press the button.
6 Door Handle: Pull it to open the door.
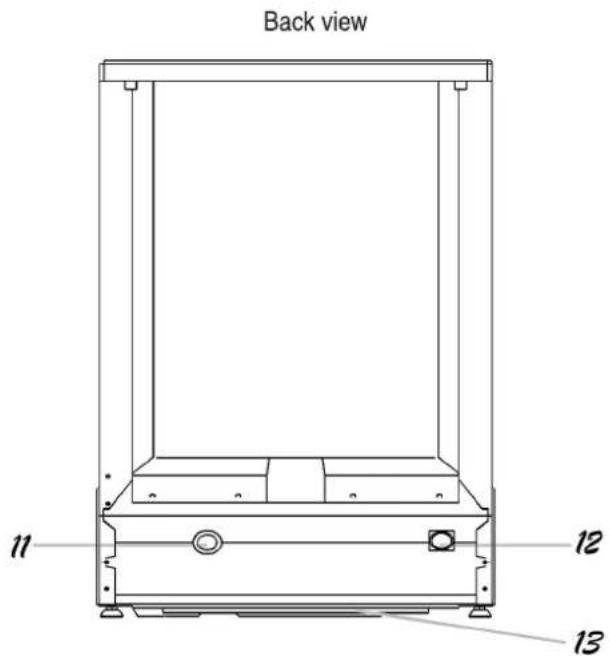
13 Tray ass
4. Prior using for the first time
Before using your dishwasher for the first time:
A. Set the water softener
B. Add 1.5kg dishwasher salt and full fill the salt container with water
C. Fill the rinse aid dispenser
D. Function of detergent
A. Water Softener
The water softener must be set manually, using the water hardness dial
The water softener is designed to remove minerals and salts from the water, which would have a detrimental or adverse effect on the operation of the appliance. The higher the content of these minerals and salts, the harder your water is. The softener should be adjusted according to the hardness of the water in your area. Your local Water Authority can advise you on the hardness of the water in your area.
Adjusting Salt Consumption
The dishwasher is designed to allow for adjusting the amount of salt consumed based on the hardness of the water used. This is intended to optimize and customize the level of salt consumption so that the salt consumption could be set proceed as follows:

natural_image
Simple circular diagram with a central arrow and plus/minus symbols, no text or labels present.- Unscrew the cap from the salt container
- There is a ring on the container with a narrow on it (see figure to the side), if necessary, rotate the ring in the anticlockwise direction from the “-”Setting toward the “+”sign, based on the hardness of the water being used. It is recommended that adjustments should be made in accordance with the following schema:
| WATER HARDNESS | Selector Position | Salt consumption (gram/cycle) | Auto nomy (cycles/1.2kgs) | |||
| °dH | °fH | °Clark | mmol/l | |||
| 0~8 | 0~14 | 0~10 | 0~1.4 | / | 0 | / |
| 8~22 | 14~39 | 10~28 | 1.4~3.9 | - | 20 | 60 |
| 22~45 | 39~480 | 28~56 | 3.9~8 | Mid | 40 | 30 |
| >45 | >80 | >56 | >8 | + | 60 | 20 |
Note:1 ° dH=1.25 ° Cl ark=1.78 ° fH=0.178mmol/
° dH : German degree
° fH : French degree
° Clark: British degree
Contact your local water board for information on the hardness of your water supply.
NOTE: If your model have not water softener, you may skip this section
WATER SOFTENER
The hardness of the water varies from place to place. If hard water is used in the dishwasher, deposits will form on the dishes and utensils.
The appliance is equipped with a special softener that used salt specifically design to eliminate lime and minerals from the water.
B. Loading the Salt into the Softener
Always use salt intended for use with dishwasher.
The salt container is located beneath the lower rack and should be filled as follows: Attention!
Only use salt specifically designed for use in dishwashers! All other types of salt not specifically designed for use in a dishwasher, especially table salt, will damage the water softener. In case of damages caused by the use of unsuitable salt the manufacturer does not give any warranty nor is liable for any caused damages.
Only fill with salt just before starting one of the complete washing programmes.
This will prevent any grains of salt or salty water, which may have been split, remaining of the bottom of the machine for any period of time, which may cause corrosion.
After the first wash cycle the control panel light expires.


natural_image
Line drawing of a hand holding a tray with a mechanical component inside, no text or symbols presentA Remove the lower basket and then unscrew and remove the cap from the salt container. 1
B Place the end of the funnel(supplied) into the hole and introduce about 1.5kg of dishwasher salt.
Full fill the salt container with water. It is normal for a small amount of water to come out of the salt container. 2
D Carefully screw the cap back on.
E Usually, the salt warning light will be off in 2-6 days after the salt container be filled with salt.
NOTE: 1. The salt container must be refilled when the salt warning light in the control panel comes on.
Though the salt container is filled enough, the indicator light may not black out before the salt fully dissolve.
If there is no salt warning light in the control panel (for some models), you can judge when to load the salt into the softener by the cycles that the dishwasher had run (see the following schema).
2. If there are spills of the salt, a soak program could be run to wipe them out.
C. Fill the Rinse Aid Dispenser
Function of the Rinse Aid
Rinse aid is automatically added during the last rinse, ensuring thorough rinsing, and spot and streak free drying.
Attention!
Only use branded rinse aid for dishwasher. Never fill the rinse aid dispenser with any other substances (e.g. dishwasher cleaning agent, liquid detergent). This would damage the appliance.
When to refill the Rinse Aid Dispenser
If there is no rinse-aid warning light in the control panel, you can judge the amount of rinse-aid by the color of the optical level indicator "D" located next to the cap. When the rinse-aid container is full, the whole indicator will be dark. As the rinse-aid diminishes, the size of the dark dot decreases. You should never let the rinse aid get below 1 / 4 full.
As the rinse aid diminishes, the size of the black dot on the rinse aid level indicator changes, as illustrated below.
Full
3 / 4 full
1/2 full
- 1 / 4 full - Should refill to eliminate spotting
○ Empty

RINSE AID DISPENSER


natural_image
Illustration of a bottle with a lid and decorative items, no text or symbols present
To open the dispenser, turn the cap to the "open" (left) arrow and lift it out.
2 Pour the rinse aid into the dispenser, being careful not to overfill.
3 Replace the cap by inserting it aligned with "open" arrow and turning it to the closed (right) arrow.
The rinse aid is released during the final rinse to prevent water from forming droplets on your dishes that can leave spots and streaks. It also improves drying by allowing water to sheet off the dishes.
Your dishwashers are designed to use liquid rinse aids. The rinse aid dispenser is located inside the door next to the detergent dispenser. To fill the dispenser, open the cap and pour the rinse aid into the dispenser until the level indicator turns completely black. The volume of the rinse aid container is about 140ml.
Be careful not to overfill the dispenser, because this could cause over sudsing. Wipe away any spills with a damp cloth. Don't forget to replace the cap before you close dishwasher door.
Attention!
Clean up any rinse aid split during filling with an absorbent cloth to avoid excess foaming during the next wash.
Adjusting Rinse Aid Dispenser

The rinse aid dispenser has six or four settings. Always start with the dispenser set on "2". If spots and poor drying are problems, increase the amount of rinse aid dispensed by removing the dispenser lid and rotating the dial to "3". If the dishes still are not drying properly or are spotted, adjust the dial to the next higher number until your dishes are spot-free. We suggest you to set on "4"(Factory value is "4")
NOTE:
Increase the dose if there are drops of water or lime spots on the dishes after washing. Reduce it if there are sticky whitish streaks on the dishes or a bluish film on glassware or knife blades.
D. Function of Detergent
Detergents with its chemical ingredients are necessary to remove dirt, crush dirt and transport it out of the dishwasher. Most of commercial quality detergents are suitable for this purpose.
Concentrated Detergent
Based on their chemical composition, dishwasher can be split in two basic types:
■ conventional, alkaline detergents with caustic components
■ low alkaline concentrated detergents with natural enzymes
Detergent Tablets
Detergent tablets of different brands dissolve at different speeds. For this reason some detergent tablets cannot dissolve and develop their full cleaning power during short programmes. Therefore please use long programmes when using detergent tablets, to unsure the complete removal of detergent residuals.
Detergent Dispenser
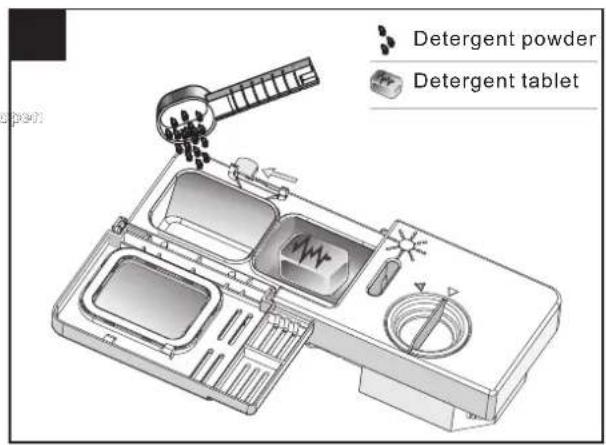
The dispenser must be refilled before the start of each wash cycle following the instructions provided in the Wash Cycle Table? Your dishwashers use less detergent and rinse aid then conventional dishwashers. Generally, only one tablespoon of detergent is needed for a normal wash load. Also, more heavily soiled items need more detergent. AI ways add the detergent just before starting dishwasher, otherwise it could get damp and will not dissolve properly.
Amount of Detergent to Use

NOTE:
1 If the lid is closed: press release button. The lid springs open.
2 Always add the detergent just before starting each wash cycle. Only use branded detergent aid for dishwasher.
WARNING!
Dishwasher detergent is corrosive! Take care to keep it out of reach of children.
Proper Use of Detergent
Use only detergent specifically made for use in dishwashers. Keep your detergent fresh and dry. Don't put powder detergent into the dispenser until you're ready to wash dishes.
Fill in detergent
Fill the detergent dispenser with detergent. The marking indicates the dosing levels, as illustrated on right:
1 The place of main wash cycle detergent placed, "MIN" means approximately 20g of detergent.
2 The place of pre-wash cycle detergent placed, approximately 5g of detergent
Please observe the manufacturers dosing and storage recommendations as stated on the detergent packaging.
Close the lid and press until it locks in place.

If the dishes are heavily soiled, place an additional detergent dose in the pre-wash detergent chamber. This detergent will take effect during the pre-wash phase.
NOTE:
You find information about the amount of detergent for the single programmes on the last page. Please aware, that according to the level soiling and the specific hardness of water differences are possible.
Please observe the manufacturer's recommendations on the detergent packaging.
Detergents
There are 3 sorts of detergents
- With phosphate and with chlorine
- With phosphate and without chlorine
- Without phosphate and without chloride
Normally new pulverised detergent is without phosphate. The water softener function of phosphate is not given. In this case we recommend to fill salt in the salt container even when the hardness of water is only 6 dH. If detergents without phosphate were used in case of hard water often white spots appear at dishes and glasses. In this case please add more detergent to reach better results. Detergent s without chlorine do only bleach a little. Strong and coloured spots will not remove completely. In this case please choose a programme with higher temperature.
5. Loading the Dishwasher Racks
For best performance of the dishwasher, follow these loading guidelines. Features and appearance of racks and silverware baskets may vary from your model.
Attention before or after Loading the Dishwasher Racks
Scrape off any large amounts of leftover food. It is not necessary to rinse the dishes under running water. Place objects in the dishwasher in following way:
- Items such as cups, glasses, pots/pans, etc. are stood upside down.
- Curve items, or those with recesses, should be at a slant so that water can run off.
- They are stacked securely and can not tip over.
- They do not prevent the spray arms from rotating while washing takes place.
Very small items should not be washed in the dishwasher as they could easily fall out of the racks.
Removing the Dishes
To prevent water dripping from the upper back into the lower back, we recommend that you empty the lower basket first and then the upper back.
Loading the Upper Rack
The upper rack is designed to hold more delicate and lighter dishware such as glasses, coffee and tea cup and saucers, as well as plates, small bowls and shallow pans (as long as they are not too dirty).
Position the dishes and cookware so that they do not get moved by the spray of water.


Adjusting the Upper Rack
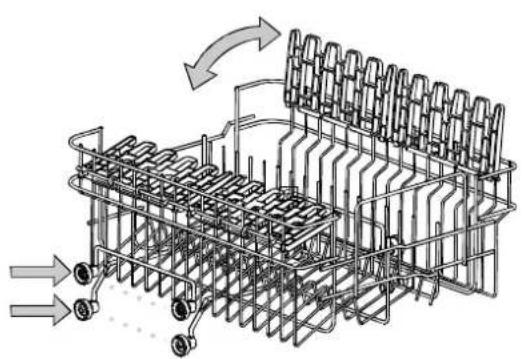
If required, the height of the upper rack can be adjusted in order to create more space for large utensils either in the upper rack or lower rack. The upper rack can be adjusted for height by putting wheels of different height into the rails. Long items, serving cutlery, salad servers or knives should be placed on the shelf so that they do not obstruct the rotation of the spray arms. The shelf can be folded back or removed when not required for use.
natural_image
Technical line drawing of a mechanical assembly with internal components and directional arrows (no text or symbols)
natural_image
Mechanical assembly diagram showing two views of a lever mechanism with no visible text or symbols

- Read this Manual
- Before Calling for Service
- NOTE:
- IMPORTANT SAFETY INFORMATION READ ALL INSTRCUTIONS BEFORE USING
- WARNING!
- WARNING! PROPER USE
- READ AND FOLLOW THIS SAFETY INFORMATION CAREFULLY SAVE THESE INSTRUCTIONS
- Disposal
- Operation Instruction
- IMPORTANT!
- Prior using for the first time
- Water Softener
- Loading the Salt into the Softener
- Fill the Rinse Aid Dispenser
- Function of the Rinse Aid
- Attention!
- RINSE AID DISPENSER
- Adjusting Rinse Aid Dispenser
- Function of Detergent
- Concentrated Detergent
- Detergent Tablets
- Detergent Dispenser
- Amount of Detergent to Use
- Proper Use of Detergent
- Fill in detergent
- Detergents
- Loading the Dishwasher Racks
- Attention before or after Loading the Dishwasher Racks
- Removing the Dishes
- Loading the Upper Rack
- Adjusting the Upper Rack
Marque : Ardo
Modèle : DW 45 AL
Catégorie : Lave-vaisselle