 — Voiture — Mode d'emploi PDF")
Traverse (2011) - Voiture CHEVROLET - Notice d'utilisation et mode d'emploi gratuit
Retrouvez gratuitement la notice de l'appareil Traverse (2011) CHEVROLET au format PDF.

| Type de produit | Voiture |
| Marque | Chevrolet |
| Modèle | Traverse (2011) |
| Catégorie | SUV (Sport Utility Vehicle) |
| Dimensions (L x l x H) | 5,20 m x 1,99 m x 1,78 m |
| Poids à vide | Environ 2 200 kg |
| Alimentation | Essence sans plomb |
| Moteur | 3,6 L V6 |
| Capacité du réservoir | 83 L |
| Transmission | Automatique à 6 rapports |
| Type de transmission | Traction avant ou intégrale (option) |
| Capacité de remorquage | Jusqu'à 2 360 kg (avec ensemble de remorquage) |
| Système de sécurité | Airbags, ABS, StabiliTrak, contrôle de traction |
| Système de surveillance de pression des pneus | Oui, avec témoin au tableau de bord |
| Régulateur de vitesse | Oui, avec commandes au volant |
| Bluetooth | En option, pour téléphone et audio |
| Hayon motorisé | En option, avec commande à distance et intérieure |
| Sièges électriques conducteur | En option, réglages multiples |
| Climatisation arrière | Oui, avec commandes séparées |
| Assistance routière | 5 ans / 100 000 miles (inclus) |
| Notice d'utilisation | 12 pages, format PDF disponible en téléchargement |
FOIRE AUX QUESTIONS - Traverse (2011) CHEVROLET
Questions des utilisateurs sur Traverse (2011) CHEVROLET
0 question sur cet appareil. Repondez a celles que vous connaissez ou posez la votre.
Poser une nouvelle question sur cet appareil
Téléchargez la notice de votre Voiture au format PDF gratuitement ! Retrouvez votre notice Traverse (2011) - CHEVROLET et reprennez votre appareil électronique en main. Sur cette page sont publiés tous les documents nécessaires à l'utilisation de votre appareil Traverse (2011) de la marque CHEVROLET.
MODE D'EMPLOI Traverse (2011) CHEVROLET
Getting to Know Your
2011 Traverse

natural_image
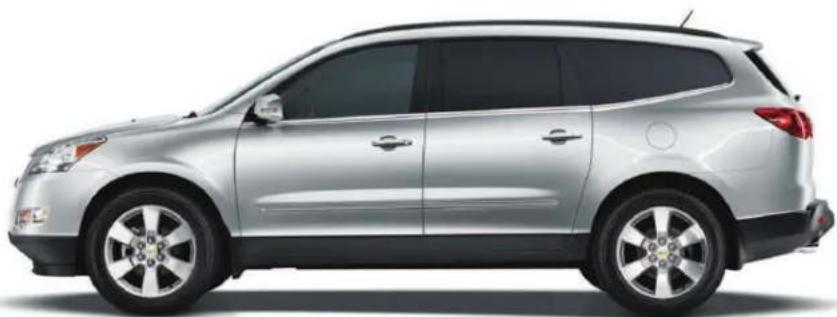
Side profile of a silver SUV (no visible text or symbols)Review this Quick Reference Guide for an overview of some important features in your Chevrolet Traverse. More detailed information can be found in your Owner Manual. Some optional equipment described in this guide may not be included in your vehicle.
If you have additional questions about the features and controls in your vehicle, press the blue Onstar button to speak with a customer assistance representative who can provide more information.
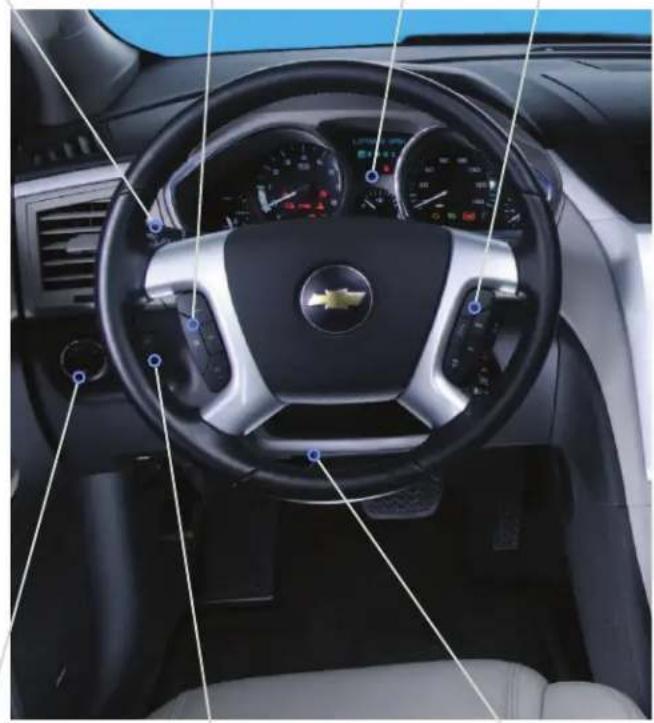
Instrument Panel
Turn Sig na I Ever/
inc shield W ip ers L ever
Cruise Control
8 uttons
Instrument
Cluster
A ud io S teering
W h eel Controls
natural_image
Interior view of a car dashboard with steering wheel, dashboard gauges, and a BMW logo (no visible text or symbols)Exterior Lamps Control
Instru ent P a nel Illum in ation Control/D or e L a n p O ff B utton
Tilt/Telesc op ic 3 teering
Wheel Lever
Symbols

S tab iliT ra k / T ra c tion Control

Ch a rg ing S y sten B ra k e S y sten

Security

Oil Pressure

Airbag Readiness Engine Coolant Temperature

Low Tire Pressure Safety Belt Ren ind er

Check Engine or Tighten Gas Cap Cruise Control Set Antilock Brake System

Antilock Brake System

Note: Refer to your Owner Manual to learn about the information being relayed by the lights, gauges and indicators of the instrument cluster, as well as what to do to ensure safety and prevent damage.
♦ optional equipment
See Instruments and Controls in your Own
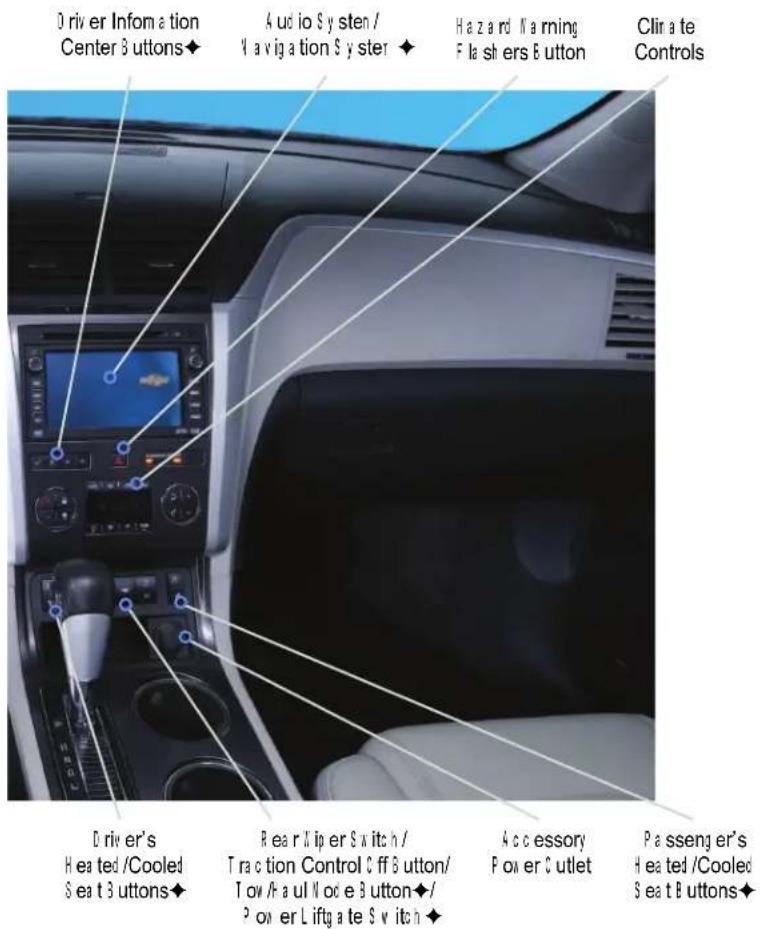
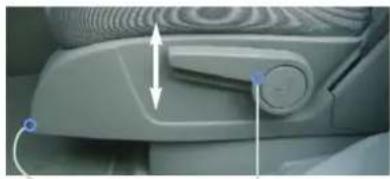
D r i v e r' s S eat
Manual Driver's Seat
natural_image
Close-up of a car interior showing the dashboard and seat area with directional arrows indicating movement (no text or symbols visible)A
B
natural_image
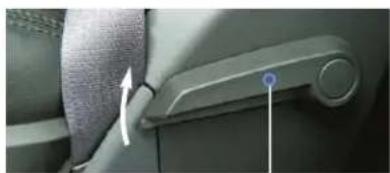
Close-up of a car seatbelt buckle with a blue indicator light and white arrow pointing to the side (no text or symbols visible)D
C

natural_image
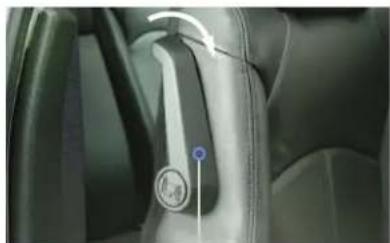
Close-up of a mechanical component with a blue circular mark and directional arrows indicating rotation (no text or symbols)Power Driver's Seat (optional)
natural_image
Close-up of a car's front panel showing a control knob and push button (no text or symbols visible)A
B
C
A. Seat Fore/A ft Adjustment
Lift the hand le under the front of the seat to a nually slide the seat forward or rearward.
B. Seat Height Adjustment
Repeated by reach the lever on the outboard side of the seat up to raise the seat or down to lower the seat.
C. Seatback Rec line Adjustment
Lift the lever on the lower outboard side of the sea back (behind the safety belt) to a nually rec line or raise the sea back.
D. Lumbar Adjustment ^2 ull up/push down the lever on the inboard side of the seat back to adjust the amount of lumbar support.
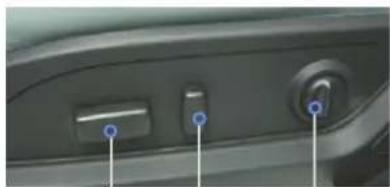
A. Seat Adjustment
N over the horizontal control to move the seat forward or rear and to raise, lower or tilt the seat.
B. Seatback Recline Adjustment
Move the vertical control to recline or raise the seatback.
C. Lumbar Adjustment
Press the switch to adjust the amount of lumbar support.
Head Restra in t
The head restraint is in a forward position to meet the Insurance Institute for Highway Safety (IH S) performance criteria for rear impacts.
• To raise the head restraint, pull it up.
- To lower the head restraint, press the release button on the head restraint post and push it down.
See Seats and Restraints in your Owner Manual.
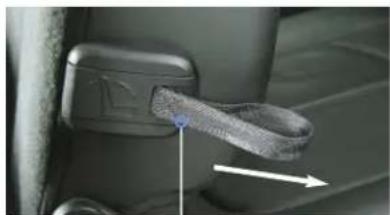
2nd-Rows
Enter or Exit the 3rd-Row Seats
natural_image
Interior view of a car showing the wheel and seatbelt mechanism (no visible text or symbols)A
- Make sure nothing is on the 2nd-row seat or the floor in front of or behind the seat.
- Fold up the arm rest(s).
- A rota te the relea se lever (A) on the upper-outb oa rd side of the sea back forward.
- Push the top of the seat back forward. The seat cushion will fold and the entire seat will slide forward.
- After entering /exiting, push the top of the seat back rear ward until the seat-back and floor tracks lock.
- Push down at the rear of the seat cushion to lock it in place.
Slide the Seat
natural_image
Close-up of a car rear infotainment panel with a blue indicator point and white arrow pointing to the button (no text or symbols visible)B
- I make sure nothing is on the floor in front of or behind the 2nd-row seat.
- Full outward on the handle (6) on the outboard side of the seat cushion and slide the seat forward or rear wall.
- Release the handle.
Fold /Recline the Seatback
natural_image
Close-up of a car seatbelt buckle with a blue cable inserted, showing no text or symbolsC
- Make sure the seat is all the way rea rn and (w h en folding the seat) and the a m rest(s) are up right.
- Pull forward on the strap (C) on the outboard side of the seat back.
- Fold down or recline the seat back.
See Seats and Restraints in your Owner Manual.
Exterior/Interior Lighting
Automatic Headlamp System
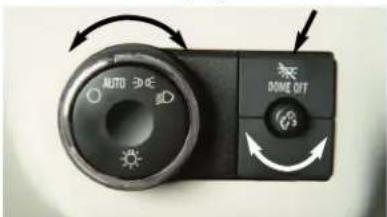
0ff/0n
AUTO Automatic Headlamp System Activates the Daytime Running Lamps (DRLs) in the daytime and the headlamps and other exterior lamps at night or when necessary.
= Parking Lamps
Manual operation of the parking lamps.
D Headlamps
Manual operation of the headlamps.
Instrument Panel Lighting
Instrument Panel Brightness
Turn the small knob to increase or decrease the instrument panel lighting. Turn the knob fully to turn on the dome lamps when all doors are closed.
Dore Lamp
Done Lamp Off
Press the button to turn off the dome lamps. With the button depressed, the done lamps will not turn on when a door is open.
Press the button again to have the dome lamps turn on when a door is open.
See Lighting in your Owner Manual.
RearS eatC li mateC o n
Front Seat Control
Press the REAR button (A) on the front clir ate control panel to cycle through three rear control settings - Front, Rear, and 0 ff.
Front: Provide control to the front seat occurs; the rear setting are the same as the driver's setting s.
Rear: Provide control to the rear seat occupants; the rear setting are controlled by the rear controls.
0 ff: Turn off the rear climate controls sy ster.
A
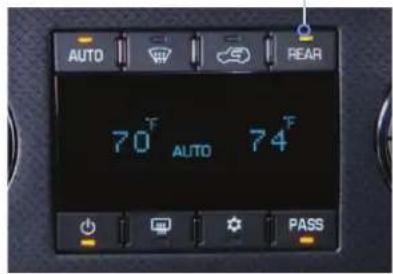
I ual automatic climate controls (optional) shown.
Rear Seat Control
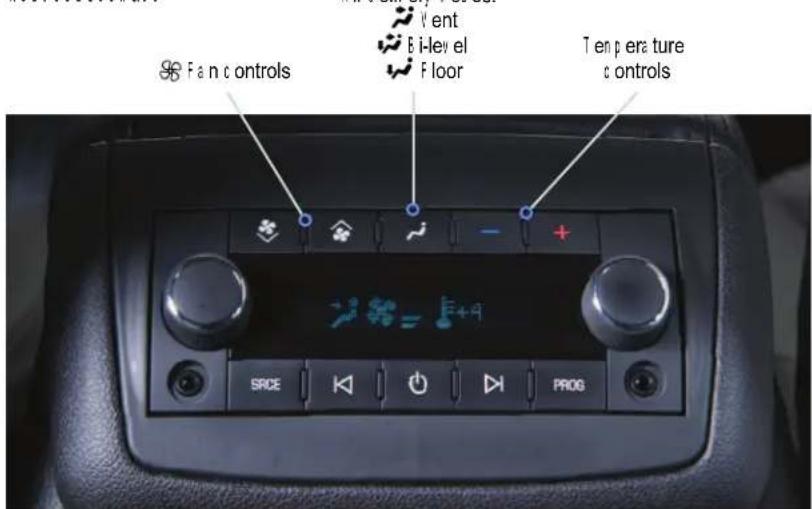
Rear climate controls with rear seat audio (optional) shown.
Rearseat occupants can adjust the rear settings at any time by using the rear controls, regardless of the front control panel REAR setting.
• To turn on the rear system, press any rear control.
- To turn off the rear system, turn the left knob to the ○ 3 ff position, or press the down ★ Fan Control repeated by (rear climate controls with rear seat audio).
See Climate Controls in your Owner Manual.
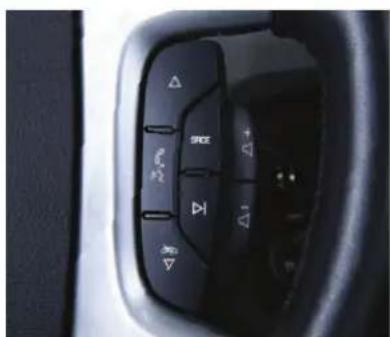
C rui se C o ntro I
Set Cruise Control
- Press the ☑0 n /0 ff button. The button ind ic a tor x ill illum ina te w h en the sy sten is on.
- If then traveling at the desired speed, press the SET - button to set the speed. The Cru is e Control symbol will illustrate on the instrur ent cluster.
A d j u s t C r u i s e C o n t r o l
R E S + R es u n e /A c c e l e r a t e
Press to resun e a set speed.
When the system is a active, press to inc rea se speed.
SET-Set/Coast
When the system is active, press to de crea se speed.
Cancel
Press to cancel the cruise control but reta in the set speed in or enory. The cruise control set speed is erased when cruise control or the vehicle ignition is turned off.
See Driving and Operating in your Owner Manual.
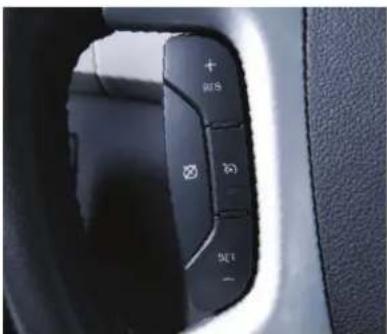
Audio Steering Wheel Copntro
+ ▷■ - Volume
Pull up the + or - button to increase or d ec rea se the v olun e.
△ Next/P previous
Press the up or down a row to go to the next or previous favorite radio station, CD track or DVD chapter (optional).
SRCE Source
Press to select a n a ud io sourc e.
Press and hold for one second to initiate voice recognition on the navigation system (optional).
▷I Seek
Press to go to the next radio station on the same band, CD track or DVD chapter (optional).
# Nute/Push to Talk
Press to urte the veh ic le sp e a k ers.
Press and hold for two seconds to interact with the 0 ns tar or B bluetooth system.
End
Press to end or reject an 0 ns tar or Bluetooth call.
Bluetooth® System (optional)
A B bluetooth -enabled cell phone must be paired with the in-vehicle Bluetooth system before it can be used in the vehicle. V of all phones will support all functions.
'visit www.gn.com /b Bluetooth form ore information.
See Instruments and Controls in your Owner Manual.
R ear Wi p er/ Wash er
natural_image
Close-up of a car interior control panel with icons and buttons, no visible text or symbols
Rear Wiper
Press the top of the switch to turn the rear wiper on or off.

Nasher Fluid
Press the bottom of the switch to spray a sh er fluid on the rear wind on.
See Instruments and Controls in your Owner Manual.
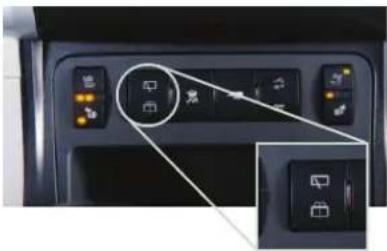
Power Liftgate (o p tio nal)

natural_image
Interior view of a car dashboard with control buttons and a highlighted circular dial (no text or symbols visible)Power Liftgate Switch
- Press the Power Liftgate OFF switch to turn off the power liftgate. The liftgate can only be operated in a hourly when the power liftgate switch is in the off position. - Press the top of the Power Liftgate switch to turn on the power liftgate.
Note: If the power liftgate does not open or close, make sure the power liftgate switch is not in the Off position.
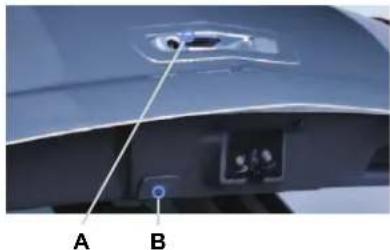
natural_image
Close-up of a car's rear panel showing a button labeled A and B, with no visible text or symbols beyond labels.Open/C lose the Power Liftgate
- Press and hold the Power Liftgate button on the R erote Key less Entry transmitter until the liftgate starts moving. - Press the top of the Power Liftgate switch on the center console. - Press the touchpad (4) above the liftgate hand to open. - Press the touchpad (8) next to the liftgate latch to close.
See Keys, Doors and Windows in your Owner Manual.
Wi nd No
If a rear wind on is op en, there may be a buffeting wind noise inside the vehicle. Opening a front wind on slightly when a rear wind on is op en will prevent this noise from occurring.
See Keys, Doors and Windows in your Owner Manual.
Towi
The Traverse base towing capacity is 2,000 lbs. Vehicles equipped with the Trailer Towing Package have a towing capacity of 5,200 lbs.
U se the Tow A a ul n o d e (optional) w h en p ulling a h e a v y tra iler to redu u c e t h e f r e q u e n c y of transn ission sh ifts a nd ir p rove t h e c ontrol of v e h ic le sp eed.
- To turn the Tow /H a ul n o d e on or off, press the —∞ Tow /H a ul b button on the c enter c onsole.
See Vehicle Care in your Owner Manual.
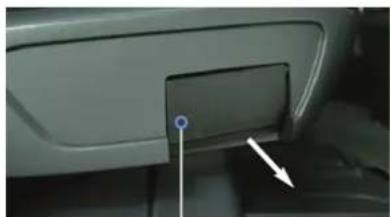
Battery Loca
The battery is located beneath the floor behind the front passenger seat.
J un p -sta rt p ositiv e a nd neg a tive p ost s are loc a ted under the h ood on the p a sseng er's sid e of the v eh ic le.
See Vehicle Care in your Owner Manual.
T i re Pressure Mo ni
The Tire Pressure Monitor alerts you when the tire pressure in any tire be on es too low by illuminating the (1) Low Tire Pressure warning light on the instrument cluster. The warning light will remain on until the tire pressure is corrected by adding the proper amount of air to the tire(s). Refer to the tire & Loading Information label in the driver's door opening for the record ended tire pressures. Once the tires are properly filled with air, drive the vehicle and the warning light will turn off.
You may notice during cooler outdoor temperatures that the low tire pressure warning light will turn on when the vehicle is first started and then turn off as you drive and tire pressure expand s. This may be an early indicator that your tire pressures are getting low and the tires need to be inflated to the correct to reassure.
Note: The tire pressure Monitor can alert you about low tire pressure, but it doesn't replace normal monthly tire maintenance. It is the driver's responsibility to maintain correct tire pressures.
See Vehicle Care in your Owner Manual.
Roadside Assistance
1-800-CHEV-USA
TTY Users: 1-888-889-2438
(1 -80 0 -243-8872)
A s the owner of a new Chevrolet, your vehicle is a utterically enrolled in the Chevrolet Road side A ssista nc progra for 5 years/100,000 miles at no expense to you. This is a lue-added service is intended to provide you with peace of mind as you drive in the city or travel the open road.
Chevrolet's Road side A ssistance toll-free number is staffed by a team of technically trained advisors who are available 24 hours a day, 365 days a year, to provide minor repair information or make arranging ents to tow your vehicle to the near rest. Chevrolet dealer.
Roadside Assistance and On Star
If you have a current 0 ns tar sub scri p tion, press the 0 ns tar button and the vehicle will send your current C P S location to an 0 ns tar A d visor w h o w ill sp e a k to y ou, a sess your prob lem , contact R o a d sic e A ssista nc e a nd rel ay your ex act loc at ion so y ou w ill g et the help y ou need.
C h evro let Owner C enter
The Che rolet 0 w ner Center, a c on p l ir ent ary ser vi ce for Che rolet ow ners, is a one-stop resourc e d esig nd to enh a nc e y our Che rolet ow nersh ip ex p erience. E x c l u s i v e n en b er benefits inc lud e:
• Online service reminders
- Vehicle maintenance tips
• Online owner in a nua I
• \$ p ec ia l p riv ileg es
S i g n u p t o d a y a t w w w .g n o w n e r c e n t e r . c o n / c h e v r o l e t.
A l w a y s d e n and g e n u i n e G N P a r t s
Certa in restrictions, precautions and safety procudures apply to your vehicle. Please se read your 0 v ner N a nual for complete instructions. A ll information contained herein is a sed on the la test information available at the tir e of printing and is subject to changing with out notice. Copyright 2010 by S enere IM otors. All rights reserved.

20977796 A
- Getting to Know Your
- Traverse
- Symbols
- D r i v e r' s S eat
- 2nd-Rows
- Exterior/Interior Lighting
- RearS eatC li mateC o n
- Front Seat Control
- C rui se C o ntro I
- Set Cruise Control
- A d j u s t C r u i s e C o n t r o l
- Cancel
- Audio Steering Wheel Copntro
- △ Next/P previous
- R ear Wi p er/ Wash er
- Rear Wiper
- Nasher Fluid
- Power Liftgate (o p tio nal)
- Wi nd No
- Towi
- Battery Loca
- T i re Pressure Mo ni
- Roadside Assistance
- C h evro let Owner C enter
Marque : CHEVROLET
Modèle : Traverse (2011)
Catégorie : Voiture