RMD231BT - Autoradio CALIBER - Notice d'utilisation et mode d'emploi gratuit
Retrouvez gratuitement la notice de l'appareil RMD231BT CALIBER au format PDF.

Questions des utilisateurs sur RMD231BT CALIBER
0 question sur cet appareil. Repondez a celles que vous connaissez ou posez la votre.
Poser une nouvelle question sur cet appareil
Téléchargez la notice de votre Autoradio au format PDF gratuitement ! Retrouvez votre notice RMD231BT - CALIBER et reprennez votre appareil électronique en main. Sur cette page sont publiés tous les documents nécessaires à l'utilisation de votre appareil RMD231BT de la marque CALIBER.
MODE D'EMPLOI RMD231BT CALIBER

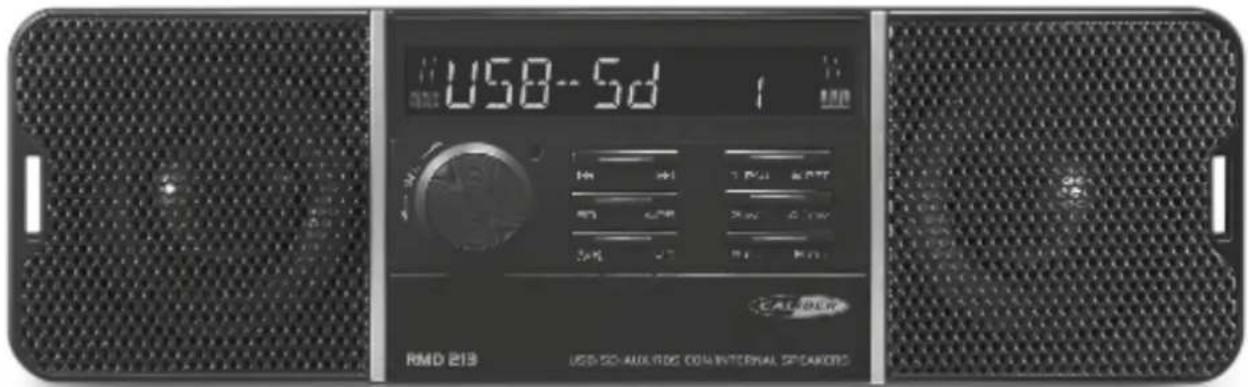
RMD 213
Manual
ENGLISH
TECHNICAL SPECIFICATIONS
MP3/WMA PLAYER SECTION
Signal to Noise Ratio > 60 dB
Channel Separation > 50 dB (1kHz)
Frequency Response 60Hz - 15 kHz
TUNER FM
Frequency range 87.5-108 MHz
Sensitivity 2.8 μV
Stereo separation 30 dB
Signal to noise ratio 45 dB
Channel step 50 kHz
LINE-OUT
Output 5V (max.)
Impedance 10k Ohm
FRONT AUX IN
Frequency Response 60 Hz - 20 kHz
Sensitivity 775 mV
Impedance 20k Ohm
GENERAL
Power Supply 24V DC (10.8-32V allowable)
Speaker impedance 4 or 8 Ohm
Output power
25W x 4CH
Fuse
7.5A
Note: Specification and the design are subject to possible modification without notice due to improvements.
Location of parts and controls
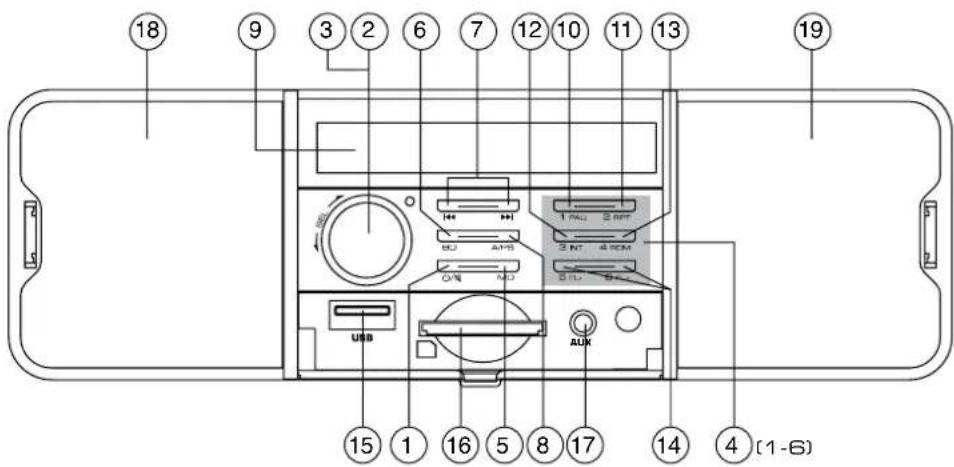
- Switching the device on and off ( ) turning the sound off (MU)
- Call up Settings menu
- Turn to set values/volume
- Preset stations (1,2,3,4,5,6)
- Setting the operating mode (MD) / setting the PTY function (PTY)
- Selecting memory location band (BD) / showing display information (DISP)
- Title / Station search backwards/forwards ( ◀◀ / ▶▶
- Automatic station memory / search function during MP3/WMA playback (A/PS)
- LCD display
- Pause playback (1 PAU)
- Repeat function (2 RPT)
- Intro function (3 INT)
- Random play (4 RDM)
- Directory backwards/forwards (MP3/WMA Files only) (5 FL-/6 FL+)
- USB port
- Card reader for SD cards
- 3.5 mm stereo input socket for the connection of an external audio device
- Left speaker
- Right speaker
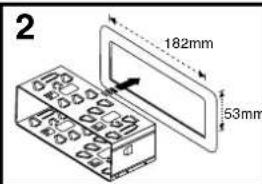
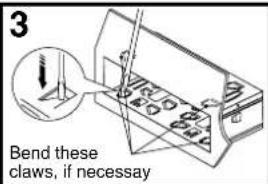
Installation
PRECAUTIONS
- Choose the mounting location carefully so that the unit will not interfere with the normal driving functions of the driver.
- Avoid installing the unit where it would be subject to high temperatures, such as from direct sunlight or hot air from the heater, or where it would be subject to dust, dirt or excessive vibration.
- Use only the supplied mounting hardware for a safe and secure installation.
- Be sure to remove the front panel before installing the unit.
NOTE : Inclination angle for car radio installation must not exceed 30° otherwise the front panel will not open.
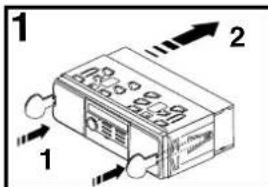
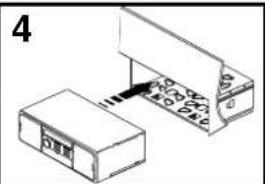
natural_image
Diagram showing two connected electronic components with a label '4' (no text or symbols on the components themselves)Note: Keep the release key in the safe place as you may need it in future to remove the unit from the car.
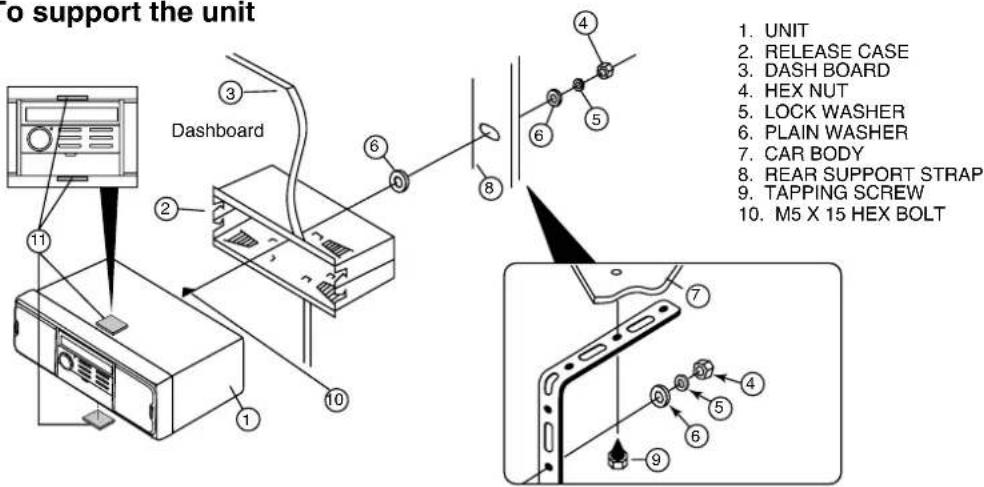
To support the unit
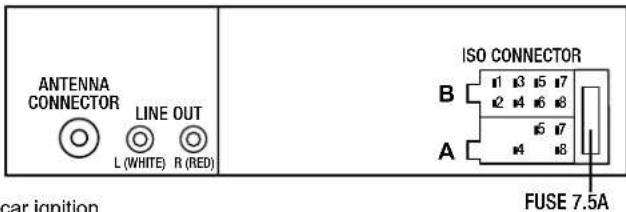
Wire connection
RCA Jack Line Out:
Red (right) White (left)
CONNECTOR A
- MEMORY +24V
- AUTO ANTENNA OUTPUT
- +24V (TO IGNITION KEY)
- GROUND
Note: (connector A no. 7) must be connected by car ignition key in order to avoid that car battery being drained when the car will be not used for long period.
CONNECTOR B
- REAR RIGHT SPEAKER (+)
- REAR RIGHT SPEAKER (-)
- FRONT RIGHT SPEAKER (+)
- FRONT RIGHT SPEAKER (-)
- FRONT LEFT SPEAKER (+)
- FRONT LEFT SPEAKER (-)
- REAR LEFT SPEAKER (+)
- REAR LEFT SPEAKER (-)
General operations
Switching on and off
Press any button to switch the device on. To switch off, press and hold the ⏻/MU button pressed.
Volume
Turn the VOL(3) knob to set the volume.
Switching mute on / off
Press the ⏻/MU button briefly to turn the sound off. Press the ⏻/MU button again to turn the sound on again. Muting is cancelled when receiving a PTY or TA station.
Operating mode
Press the MD button to switch between AUX/TUNER/USB/SD mode.
Display
Keep pressing the BD button to have the following information displayed in turn: Radio station, time (automatically set with RDS reception), frequency and PTY settings (these RDS functions are sent by broadcasting services in various volumes; also refer to Section "Radio functions").
Settings using the SEL(2) button (VOL/BAS/TRE/BAL/FAD)
Press the SEL button on the device. The current volume level is shown. Each further press of the SEL button accesses the next setting.
The following settings are possible:

flowchart
graph LR
    A["1"] --> B["2"]
    B --> C["SEL SEL SEL SEL SEL"]
    C --> D[" "] --> E[" "] --> F[" "] --> G[" "]
    G --> H[" "]
    H --> I[" "]
    I --> J[" "]
    J --> K[" "]
    K --> L[" "]
    L --> M[" "]
    M --> N[" "]
    N --> O[" "]
    O --> P[" "]
    P --> Q[" "]
    Q --> R[" "]
    R --> S[" "]
    S --> T[" "]
    T --> U[" "]
    U --> V[" "]
    V --> W[" "]
    W --> X[" "]
    X --> Y[" "]
    Y --> Z[" "]
    Z --> A
- Volume 2. Bass 3. Treble 4. Balance 5. Fader
Turn the VOL(3) knob to change the settings of the menu item displayed.
Further settings using the SEL button (TA/AF/EQ/AVOL/STEREO/LOUD/SPEAKER/LOCAL/ADUST CLOCK)
- Hold down the SEL button for about 2 seconds and then keep pressing the SEL button until the required function is shown on the display.
- Turn the VOL knob to change the settings of the menu item displayed.

flowchart
graph LR
    A["SEL"] --> B["TA"]
    B --> C["SEL"]
    C --> D["AF"]
    D --> E["SEL"]
    E --> F["EQ"]
    F --> G["SEL"]
    G --> H["AVOL"]
    H --> I["SEL"]
    I --> J["STEREO"]
    J --> K["SEL"]
    K --> L["LOUD"]
    L --> M["SEL"]
    M --> N["SPK"]
    N --> O["SEL"]
    O --> P["LOC"]
    P --> Q["SEL"]
    Q --> R["ADJUST CLOCK"]
    R --> S["2 sec."]
TA - Enabling / disabling Traffic Announcement (traffic information)
TA ON: If TA mode is enabled, the device immediately switches from other stations or operating modes to the radio station that is currently transmitting traffic information.
Note: When the TA function is enabled, you can only search for or save stations that are transmitting traffic information. Stations that are transmitting traffic information signals are denoted in the display by TP.
TA OFF: The TA function is disabled.
AF - Enabling / disabling Alternative Frequencies
AF ON: When the AF function is enabled, the device searches for the current station's optimum frequency.
AF OFF: The AF function is disabled.
EQ - Equaliser
Turn the multi-controller to select one of the FLAT, CLASSIC, ROCK, POP or EQ OFF settings. The equaliser will be disabled if EQ OFF is set. The equaliser setting is shown at the bottom of the display.
AVOL - Set the volume when radio is switched on
Turn the VOL knob to set the volume level used when the radio is turned on.
STEREO / MONO - Set the audio output
Turn the VOL knob to set the audio output in radio mode to stereo or mono. If you are receiving a stereo station, the stereo symbol Ⓞ appears on the display.
LOUD - Enable / disable the loudness function
Turn the VOL knob to increase base or treble levels (LOUD ON) or to disable the function (LOUD OFF). When the loudness function is enabled, LOUD is shown on the right of the display.
SPEAKERS
Turn the VOL knob to turn ON or OFF built-in speakers.
DX / LOCAL - Set reception sensitivity
Turn the VOL knob to align the reception sensitivity to national stations (DX) or regional stations (LOCAL).
ADJ - Set the time
Turn the VOL knob to the right to set the minutes and to the left to set the hours.
Note: The device has an RDS-controlled clock. The clock sets itself automatically when the RDS function is enabled and continues to run when the radio is switched off. If you do not receive any RDS signal, you can set the time of day manually.
Radio functions
Selecting the station memory band
Press the BD button to switch between station memory bands (FM1, FM2, FM3). Each station memory band covers the same frequency range and has 6 memory locations.
Automatic station search
Keep the ▶ or button pressed to start automatic station search. The search stops when a station is found.
Manual station selection
Press the ▶ or button briefly to change the frequency until the required frequency is set.
Storing radio stations
Keep one of the 1 to 6 buttons pressed for about 3 seconds to store the station currently selected. The showing of numbers 1 to 6 on the display indicates a successful store.
Selecting stations stored
Use BD to select the station memory band (FM1, FM2, FM3). Press one of the 1 to 6 buttons to select the station stored.
Automatic storing
Keep the A/PS button pressed for 3 seconds. A search starts immediately and stays for about 5 seconds at each station found. The station indicator and/or the station frequency flashes and the memory slot is displayed. The search continues automatically when weak stations are found.
Run through the stations stored
Press the A/PS button briefly. All stations are selected briefly. When you hear the required station, press the A/PS button. The station chosen remains selected.
Programme type (PTY)
You can use this function to search for a particular type of station. The following settings are available: POP M, ROCK M, NEWS, AFFAIRS, INFO, EASY M, LIGHT M, SPORT, EDUCATE, DRAMA, CLASSICS, OTHER M, CULTURE SCIENCE, VARIED, JAZZ, COUNTRY, WEATHER, FINANCE, CHILDREN, NATION M, OLDIES, SOCIAL, RELIGION, PHONE IN, FOLK M, TRAVEL, LEISURE, DOCUMENT
Note: Please note that this information is dependent on region, broadcasting corporation and station.
Setting the PTY ID
- Keep pressing the MD button until the PTY message is shown at the bottom of the display.
- Then press one of the 1 to 6 buttons to select the required PTY entry.
- To change between the “Musical style” and “Vocal style” PTY entries, press the MD button again when the first PTY entry is displayed.
Buttons 1 to 6 are assigned as follows:
Musical genre
1 Pop M, Rock M 2 Easy M, Light M 3 Classics, Other M
4 Jazz, Country 5 Nation M, Oldies 6 Folk M
Vocal style
1 News, Affairs, Info 2 Sport, Educate, Drama 3 Culture, Science, Varied
4 Weather, Finance, Children 5 Social, Religion, Phone IN 6 Travel, Leisure, Document
If there is no further input for 2 seconds, an automatic search for stations matching the PTY entry starts. The search stops when the first station is found.
Disabling / enabling the PTY function
- Press the MD button to activate the PTY search. The PTY symbol is shown on the display with the last PTY entry selected (e.g. POP M, Rock M...). Only stations with the PTY ID currently selected are included in the station search.
- Press the MD button again to disable the PTY search. PTY is no longer shown on the display.
Station search by PTY ID
If you do not input anything for 2 seconds whilst a PTY ID is being displayed, an automatic search for stations matching this PTY ID is started. If no stations matching this PTY ID are found, PTY NONE is shown briefly and the search then ends at the station last set.
USB port
The device can process USB data carriers up to 16 GB.
Connecting data carriers
- Push the USB port protective cap to the right.
- Connect your USB device to the port.
• To protect against dirt, replace the protective cap on the USB port when no USB device is connected.
Card reader
The device can process SD/MMC memory cards up to 2 GB, and SDHC memory cards up to 32 GB.
Connecting data carriers
Push a memory card into the memory card slot with the lettering pointing upwards.
MP3 / WMA playback functions
Playback
- The device can play back files in the MP3 and WMA formats.
- A mixture of titles and directories on the same level can cause problems when playing back.
- During playback, the information from the MP3 file ID3 tag is read and shown in turn on the display.
- Playback of the MP3 or WMA title on the USB device or memory card begins automatically.
Stop playback
Press the 1 PAU button to stop playback. Press the 1 PAU button again to continue playback.
Note: Keep the 1 PAU button pressed to play the first title on the storage medium.
Skip title
Press the ▶▶ or button to select the next or previous title. The title number is shown on the display.
Fast forward/backward
Hold down the ▶ or button for longer to start fast forward or backward.
Repeat function (RPT - Repeat)
Press the 2 RPT button several times to switch between the repeat functions. The following settings are available:
RPT ONE: The current title is repeated.
RPT DIR: All titles in the current directory are repeated.
RPT ALL: All titles on the storage medium are repeated.
Title sampling
Press the 3 INT button. All titles are played back one after the other for approximately 10 seconds. Press the 3 INT button again to commence playback of the title currently selected.
Random playback of all titles (RDM - Random)
Press the 4 RDM button. A randomly controlled playback is started. Press the 4 RDM button to commence normal playback again.
Skip directory
Press the 6 FL+ button to skip to the next directory or the 5 FL- button to skip to the previous directory. Playback starts automatically.
Search functions
Title number search
- Press the A/PS button.
- Turn the VOL knob to set the first digit of the title number required.
- Press the SEL button to confirm the entry and to skip to entry of the second, third or fourth digit.
- Press the 1 PAU button to commence playback of the selected title.
Title name search
- Press the A/PS button twice. The search for title names starts immediately. If no title starting with the digit set is found.
- Turn the VOL knob until the desired character or digit appears.
- Press the ▶ or button to confirm the character set and to display all titles beginning with the required character.
- Press the 1 PAU button to commence playback of the title displayed.
Search for directories
- Press the A/PS button three times. The directory currently being played back is shown.
- Turn the VOL knob to switch between the available directories.
- Press the 1 PAU button to select the directory currently being displayed. Playback of the first title from the selected directory starts immediately.
Connecting an external audio device to the device
Connect the audio output of an external audio device (e.g. an MP3 player) via a 3.5 mm stereo jack plug to the AUX IN socket on the front panel of the device. Select audio input playback by repeatedly pressing the MD button until AUX is shown on the display.
Memory Backup
This unit is equipped with built-in memory I.C. (Integrated Circuits) to save user settings such as tuner preset stations and audio control settings. Whenever power is unplug, these settings will not be lost.
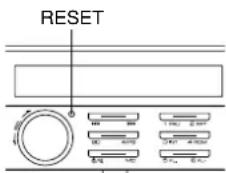
Reset
To reset the device to its factory default settings, press and hold 6 sec. the RESET button with a pointed object, such as a pen.
Reset the device:
- when operating for the first time,
• after the cable connection,
- if not all function buttons are working
- when an error message appears in the display.
Note: To access the RESET button the face plate must be completely detached, see also the section "Removing the face plate".