
VideoMic Rycote - Microphone RODE - Notice d'utilisation et mode d'emploi gratuit
Retrouvez gratuitement la notice de l'appareil VideoMic Rycote RODE au format PDF.

| Marque | Rode |
| Modèle | VideoMic Rycote |
| Type de produit | Microphone canon directionnel pour caméra |
| Dimensions (L x Ø) | Environ 170 mm x 20 mm |
| Poids | Environ 85 g |
| Alimentation | Pile 9V (autonomie jusqu'à 100 heures avec pile alcaline ou lithium) |
| Connectique | Câble de sortie 3,5 mm mono double (stéréo non équilibré) |
| Filtre passe-haut (HPF) | Filtre coupe-bas réglable : 80 Hz ou 200 Hz |
| Atténuateur (PAD) | Commutateur à 3 positions : 0 dB, -10 dB, -20 dB (situé dans le compartiment pile) |
| Suspension antichoc | Suspension intégrée Rycote Lyre (thermoplastique, ne se détériore pas) |
| Bonde pare-vent | Mousse synthétique amovible incluse |
| Montage | Patte de fixation pour griffe porte-accessoires de caméra (avec bague de serrage) |
| Indicateur LED | Témoin rouge de batterie faible (environ 1 heure de fonctionnement restant) |
| Entretien et nettoyage | Nettoyer avec un chiffon doux légèrement humide. Ne pas utiliser de solvants agressifs. |
| Sécurité | Retirer la pile en cas de non-utilisation prolongée. Ne pas exposer à l'humidité excessive. |
| Pièces détachées et réparabilité | Pare-vent de rechange disponible. Suspension Lyre durable. Pour toute réparation, contacter le SAV Rode. |
| Garantie | Garantie gratuite de 10 ans après enregistrement sur warranty.rodemic.com/videomic |
FOIRE AUX QUESTIONS - VideoMic Rycote RODE
Questions des utilisateurs sur VideoMic Rycote RODE
0 question sur cet appareil. Repondez a celles que vous connaissez ou posez la votre.
Poser une nouvelle question sur cet appareil
Téléchargez la notice de votre Microphone au format PDF gratuitement ! Retrouvez votre notice VideoMic Rycote - RODE et reprennez votre appareil électronique en main. Sur cette page sont publiés tous les documents nécessaires à l'utilisation de votre appareil VideoMic Rycote de la marque RODE.
MODE D'EMPLOI VideoMic Rycote RODE
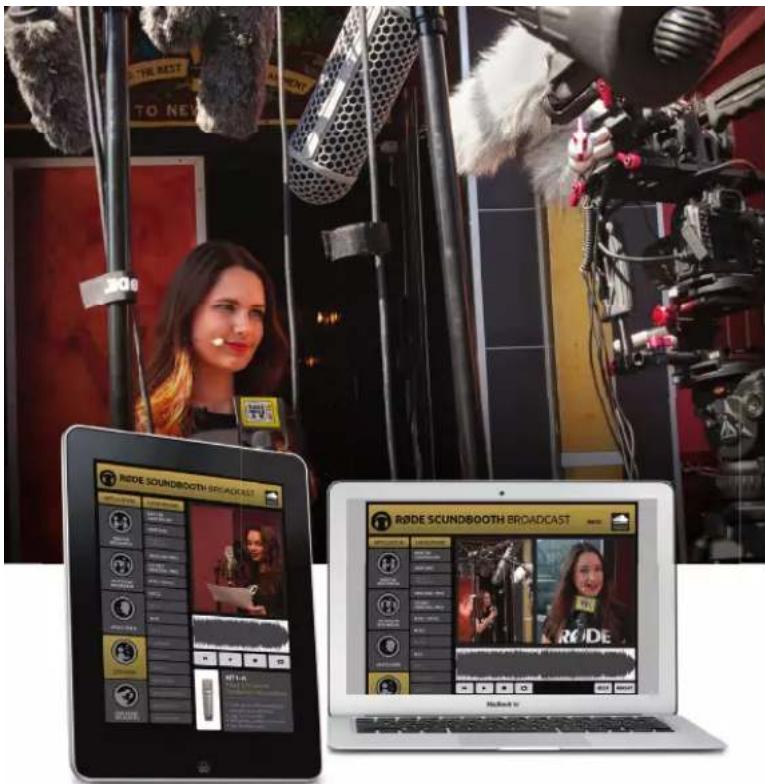
R∅DE SOUNDBOOTH
now for Broadcast mics
Hear and compare R∅DE microphones at www.rodemic.com/soundbooth or on your iPad ^®

Available on the
App Store

The R∅DE VideoMic™ features an integrated shock mount based on Rycote® Lyre® technology.
Constructed from a single piece of hard-wearing thermoplastic, the Lyre ^® provides superior acoustic suspension to traditional elastic solutions, and will never wear out, sag or snap.
VideoMic™
quickstart guide
VideoMic™
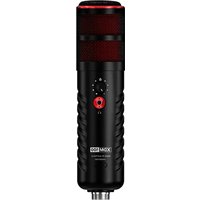
Parts Guide

- Foam windshield
- Camera shoe mount
- Battery cover
-
PAD switch (inside battery compartment)
-
LED power indicator
- Power and HPF switch
- Integrated Rycote®Lyre® suspension
- 3.5mm dual mono output cable
Mic Controls
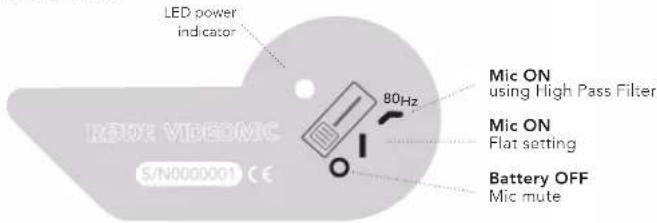
The High Pass Filter (HPF) is a low frequency cut-off setting, which you can use to remove rumble, camera noise or other low frequency noise while recording.
DON'T FORGET
to register for your FREE ten year warranty!

Scan the QR code to
register now, or visit
warranty.rodemic.com/videomic
R∅DE®
MICROPHONES

www.rodemic.com
mounting to camera
natural_image
Illustration of a mechanical component being inserted into a spring, with no visible text or symbols- Turn the tightening ring counterclockwise to loosen the camera shoe connection, before attaching to camera.

- Slide the camera-shoe into place on the camera mount. When the mic is in place, secure it by gently tightening the ring clockwise.
natural_image
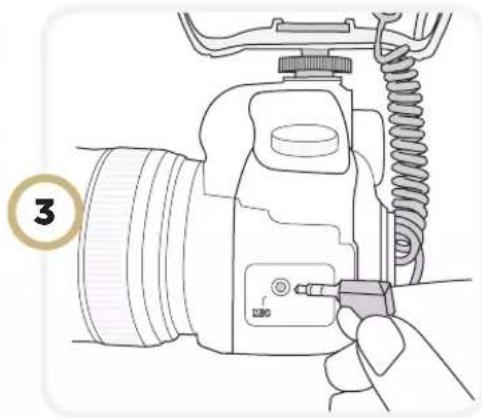
Line drawing of a DSLR camera with attached spring and cable, no text or symbols present- Connect the VideoMic's audio lead to the camera's "Audio In" or "Mic" socket, and secure the cable in place using the in-built cable clips (see below).
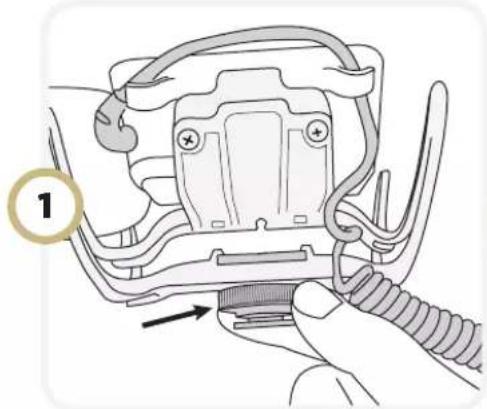
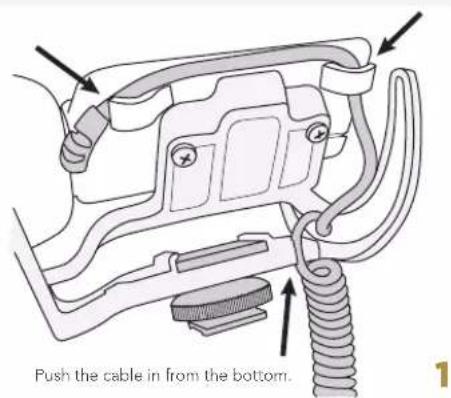
securing the cable
Securing the cable will eliminate undesired noise caused by cable movement.
The cable can be secured in one of two orientations, depending on the location of your camera's "Audio In" socket.
See diagram 1 for cameras with mic socket on the left.
See diagram 2 for cameras with mic socket on the right.

natural_image
Technical diagram of a mechanical assembly with hoses and connectors (no text or symbols)PAD switchbatter
natural_image
Illustration of a hand holding a small electronic device with a scroll wheel, showing a right-hand rule (no text or symbols present)
natural_image
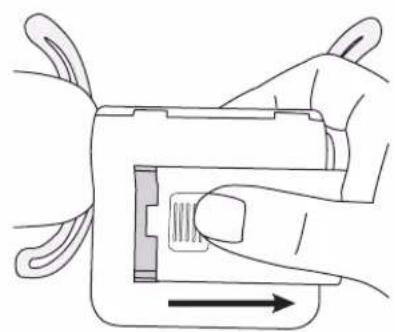
Line drawing of a rectangular electronic device with a label on the front panel (no readable text or symbols beyond branding)To change the battery, gently push and slide the battery cover off. Insert a standard 9V battery with the positive (+) end upwards.
The VideoMic uses a standard 9V battery. With a good quality Alkaline or Lithium battery, the VideoMic will run for up to 100 continuous hours. We recommend you remove the battery if storing your VideoMic for extended periods without use.
The LED power indicator next to the On/Off switch will turn red when the battery is running low. The mic will work for approximately one hour once the red indicator is lit, however with reduced performance.

The VideoMic comes with a three-position PAD switch which is located inside the battery compartment.
The PAD provides a selectable 10 or 20db reduction of the input sensitivity, reducing the output level when recording loud sound sources, so that the optimal level can be achieved in a wide range of situations.

Marque : RODE
Modèle : VideoMic Rycote
Catégorie : Microphone