DriveLink USB 3.0 - Station d'accueil Sharkoon - Notice d'utilisation et mode d'emploi gratuit
Retrouvez gratuitement la notice de l'appareil DriveLink USB 3.0 Sharkoon au format PDF.

Questions des utilisateurs sur DriveLink USB 3.0 Sharkoon
0 question sur cet appareil. Repondez a celles que vous connaissez ou posez la votre.
Poser une nouvelle question sur cet appareil
Téléchargez la notice de votre Station d'accueil au format PDF gratuitement ! Retrouvez votre notice DriveLink USB 3.0 - Sharkoon et reprennez votre appareil électronique en main. Sur cette page sont publiés tous les documents nécessaires à l'utilisation de votre appareil DriveLink USB 3.0 de la marque Sharkoon.
MODE D'EMPLOI DriveLink USB 3.0 Sharkoon
Sharkoon
DRIVELINK
natural_image
Black Harack device with USB cable and red connector, no visible text or symbols on main bodyMANUAL
Content
- Features 1
- Parts and accessories 1
- The device at a glance 2
- Installing the hardware 3
- Installing the software 4
- The backup software 4
6.1 Start 4
6.2 Quick Launch 5
6.3 File Backup 5
6.4 File Manager 6
6.5 Setup 6
6.5.1 Files Backup 6
6.5.2 Others 7
1. Features
- Enables the external usage of 2.5"/3.5"/5.25" IDE and SATA drives via USB
• One click backup function - Status LED
• Multi-purpose (PC, Laptop etc.) - Plug & Play
- USB2.0 compatible
-
No additional drivers needed for Windows XP/Vista/7 (32- and 64-bit)
-
Parts and accessories
text_image
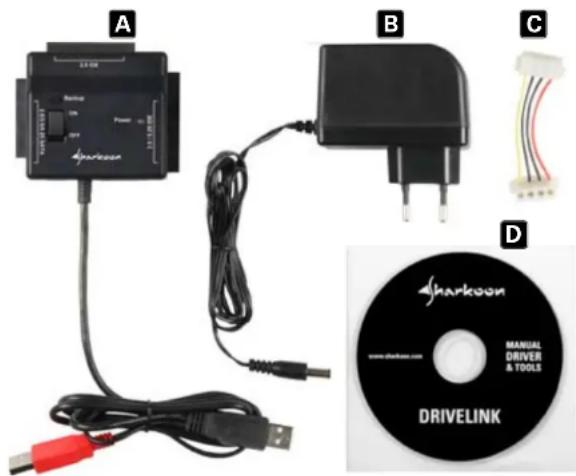
A B C D Sharkoon MANUAL DRIVER & TOOLS DRIVELINK www.sharkoon.comA. Sharkoon DriveLink (IDE, SATA/USB)
B. Power supply
C. 4-pin power cable for IDE devices (3.5"/5.25")
D. CD including manual, driver & tools
Note:
If you are missing any of the items listed above, please contact customer service via e-mail at support@sharkoon.com or call +49 (0) 6403-775 6100.
3. The device at a glance
text_image
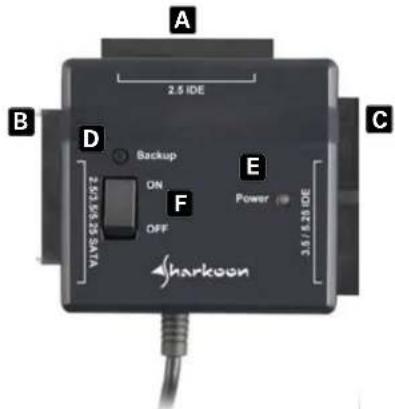
A 2.5 IDE B D Backup ON OFF 2.5/3.5/25 SATA E Power C 3.5/5.20 IDE SharkoonA - 2.5" IDE HDD connection
B - 2.5"/3.5"/5.25" SATA connection
C - 3.5"/5.25" IDE connection
D - Backup button (press to start the data directly)
E - Status LED (green: ready; red: access)
F - On/Off switch
natural_image
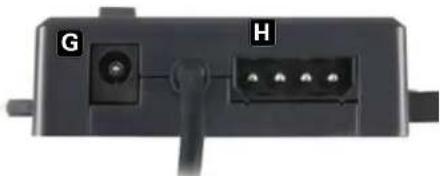
Close-up of a black electronic device rear panel showing ports G and H with a cable (no text or symbols beyond labels)G - ISO power connector (DC)
H - 4-pin power connector for IDE devices

natural_image
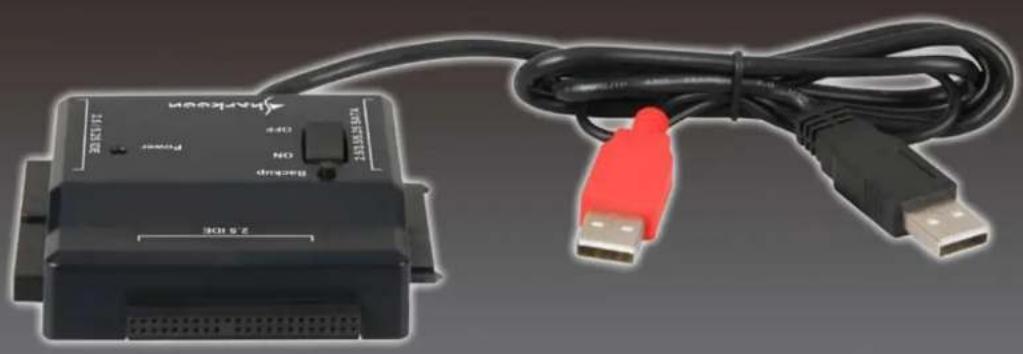
Black electronic device with USB cable and red connector, labeled I and J (no visible text or symbols on the device body)I - USB power connector (red)
J - USB connector
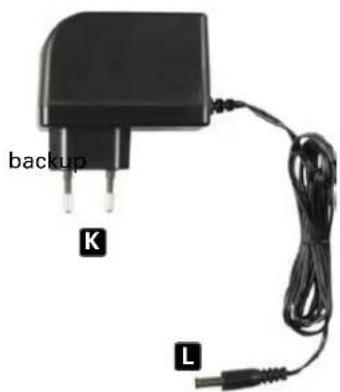
text_image
backup K LK - Power connector (220 V)
L - ISO power connector (DC)
4. Installing the hardware
Note:
Before you plug the DriveLink to your PC/Laptop, connect the peripheral devices to the DriveLink. HDDs which you want to connect must be jumpered to "Master", formatted and partitioned. Proceed as follows (e.g. Windows XP): Start – Settings – Control Panel – Administrative Tools – Computer Management – Disk Management. Click the respective HDD with the right mouse button and choose format/partition.
-
Connect the respective data connector of the DriveLink to the matching connector of the device (HDD/optical device).
-
Attach the power connections as follows:
2.5" IDE and SATA HDDs:
connect both USB connectors of the DriveLink to your PC/Laptop. If there are less than two USB ports available, additionally connect the ISO power connector of the included power supply to the ISO power connector of the DriveLink.
3.5"/5.25" IDE devices:
connect the ISO power connector of the power supply directly to the ISO power connector of the DriveLink. Then connect the included 4-pin power cable for IDE devices to the respective connectors of both the DriveLink and the HDD/optical device you wish to operate.
3.5"/5.25" SATA devices:
connect the ISO power connector of the included power supply to the ISO power connector of the DriveLink.
-
Connect the power supply to a power outlet.
-
Turn on the DriveLink. Plug the black USB connector of the adapter to a free USB port of your computer. The device will be detected and installed automatically. Connected HDDs/optical devices will be displayed in the Windows Explorer.
Note:
There is no need to install additional drivers. Before you shut down your PC remove the DriveLink from your system's hardware configuration by double-clicking the 📋 symbol in the task bar. A menu will open up. Select the DriveLink to securely remove it. After that switch off the DriveLink and shut down your PC.
5. Installing the software
- Insert the included Driver&Tools CD into your CD/DVD drive.
- Choose your CD/DVD drive (e.g. D:).
- Open the folder "Sharkoon".
- Start "Setup.exe". The installation wizard will guide you through the installation procedure.
- After the installation is completed the following icon will appear on your desktop:
- Double-click (left mouse button) this desktop icon to launch the software, the main interface will open up and another program icon will appear in your task bar.
6. The backup software
6.1 Start
- Click the icon in your task bar with the right mouse button once. The following context menu will open up:
Show PC Clone EX
About PC Clone EX Help
Exit PC Clone EX
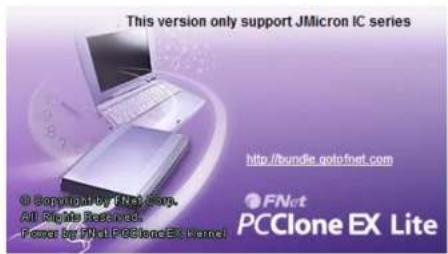
- "About..." displays information about the software (fig. 1).
text_image
This version only support JMicron IC series © Copyright by JMC Corp. All rights reserved. Power by JMC PCClone EX Lite http://bundle.gotofnet.com FNcrt PCClone EX Litefig. 1
- "Help" starts the help program of the backup software (fig. 2) where all functions of the backup software will be explained in detail.
text_image
PCClone EX Lite Notice • This type of PCClone ex. (not a program not to be used) is the best tool for file download. • When user can access the PCClone ex. (not a program not to be used), you can access the PCClone ex. (not a program not to be used). • Use the next file to log out the next file in PCClone EX Lite, which can be installed that last file contains or may not have any other relevant information. • Applicable scanning of existing or existing.fig. 2
- "Exit PC Clone EX" quits the program (the icon will be removed from your task bar).
- "Show PC Clone EX" re-opens the program interface after you have minimized it (see below). Alternatively you may re-open the program interface by double-clicking (left mouse button) the icon.
6.2 Quick Launch
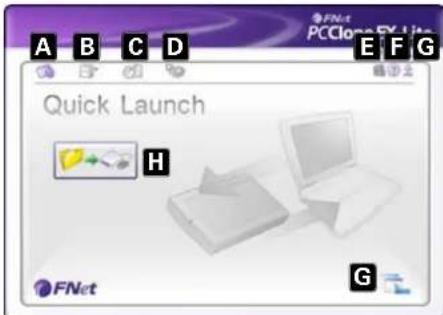
text_image
A B C D FN4 PCClose FX Lite E F G Quick Launch H FNet GA - Quick Launch (6.2)
B - File Backup (6.3)
C - File Manager (6.4)
D - Setup (6.5)
E - Shows you information about the software (see above 6.1).
F - Starts the help program of the backup software (see above 6.1)
G - Minimize the program window.
To completely quit the program see above
6.1.
H - Start the data backup by clicking this button.
6.3 File Backup
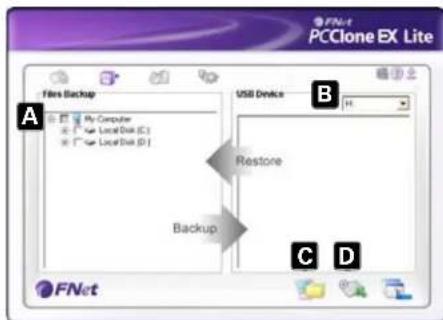
text_image
PCClone EX Lite File Backup A My Computer Local Disk (C:) Local Disk (D:) USB Devices B Restore Backup C D FNetA - All folders of your system are displayed here.
Choose the folders that shall be copied during a backup, by ticking the respective checkbox(es).
B - Select the external target device from the dropdown menu.
C - Start the backup by clicking the button.
D - Restore already existing backup files from the external (backup) drive, by clicking this
button.
Note:
The backup files are copied to the (hidden) folder "Fnet" on the target device. This folder must not be deleted!
6.4 File manager
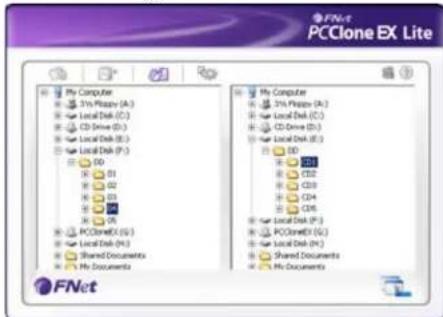
text_image
FNet PCClone EX Lite My Computer 37% Procy (A:) Local Disk (C:) CD Drive (D:) Local Disk (E:) Local Disk (F:) DD R1 R2 R3 R4 R5 R6 R7 R8 R9 R10 R11 R12 R13 R14 R15 R16 R17 R18 R19 R20 R21 R22 R23 R24 R25 R26 R27 R28 R29 R30 R31 R32 R33 R34 R35 R36 R37 R38 R39 R40 R41 R42 R43 R44 R45 R46 R47 R48 R49 R50 R51 R52 R53 R54 R55 R56 R57 R58 R59 R60 R61 R62 R63 R64 R65 R66 R67 R68 R69 R70 R71 R72 R73 R74 R75 R76 R77 R78 R79 R80 R81 R82 R83 R84 R85 R86 R87 R88 R89 R90 R91 R92 R93 R94 R95 R96 R97 R98 R99 PCCloneEX (A:) Local Disk (B:) Shared Documents My DocumentsThe File Manager makes it easy to govern your local folders/files and supports similar functions as known from the Windows Explorer.
6.5 Setup
6.5.1 Files Backup
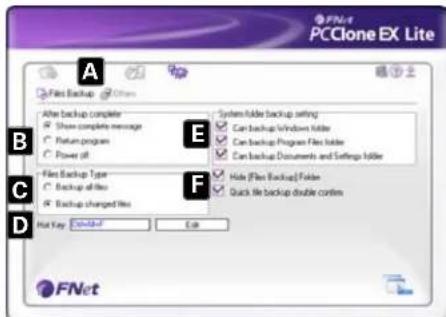
text_image
PCClone EX Lite A Files Backup B After backup complete Show complete message Return program Power off File Backup Type Backup of files Backup changed files Hot Key: Default E System folder backup setting Can backup Windows folder Can backup Program Files folder Can backup Documents and Settings folder Hide (Files Backup) Folder Quick file backup double contains F D FNetA - Select between the windows "Files Backup" (6.5.1) and "Others"
B – Decide what shall happen after the backup has been completed: "Show complete message" will show a summary of the backup; "Return program" returns to the program; "Power off" will shut down your system.
C - Choose whether all or only changed files shall be secured.
D - Determine a hot key to start the backup.
E - Select which system folders shall be included into the backup.
F - Determine whether the Files Backup folder shall be hidden and if the quick file backup shall be double confirmed or not.
6.5.2 Others
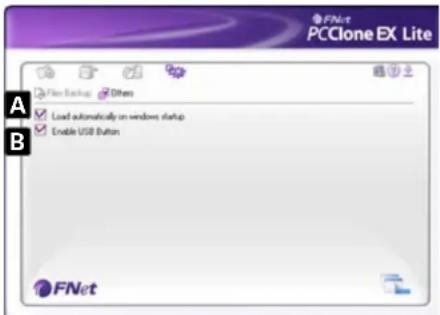
text_image
PCClone EX Lite File Backup Divers Load automatically on windows startup Enable USB Button FNetA – Decide if the program shall be started during system boot-up.
B – Activating this check box will also activate the backup button on the enclosure enabling you to commence a backup process by simply pressing the respective button (see above 4.). Deactivating will prevent unintentional backup procedures.
Warning:
For potential loss of data, especially due to inappropriate handling, SHARKOON assumes no liability.
All named products and descriptions are trademarks and/or registered trademarks of the respective manufacturers and are accepted as protected.
As a continuing policy of product improvement at SHARKOON, the design and specifications are subject to change without prior notice. National product specifications may vary.
The legal rights of the enclosed software belong to the respective owner. Please observe the license terms of the manufacturer before using the software.
All rights reserved especially (also in extracts) for translation, reprinting, reproduction by copying or other technical means. Infringements will lead to compensation.
All rights reserved especially in case of assignation of patent or utility patent. Means of delivery and technical modifications reserved.
Disposal of your old product
Your product is designed and manufactured with high quality materials and components, which can be recycled and reused.

When this crossed-out wheeled bin symbol is attached to a product, it means the product is covered by the European Directive 2002/96/EC. Please be informed about the local separate collection system for electrical and electronic products.
Please act according to your local rules and do not dispose of your old products with your normal household waste. The correct disposal of your old product will help prevent potential negative consequences to the environment and human health.
© SHARKOON Technologies 2010
www.sharkoon.com