
VW8810E1 - Chauffage DE DIETRICH - Notice d'utilisation et mode d'emploi gratuit
Retrouvez gratuitement la notice de l'appareil VW8810E1 DE DIETRICH au format PDF.

| Type de produit | Lave-vaisselle |
| Marque | DE DIETRICH |
| Modèle | VW8810E1 |
| Hauteur | 815 - 880 mm (réglable) |
| Largeur | 595 mm |
| Profondeur | 550 mm |
| Profondeur porte ouverte | 1118 mm |
| Alimentation électrique | 230-240 V, 2150-2300 W, fusible 13 A |
| Capacité | 12 couverts (norme DIN 44990) |
| Pression d'eau | 10 - 100 N/cm² (1-10 bar) |
| Température max. eau chaude | 60°C |
| Hauteur d'évacuation | 60 - 85 cm |
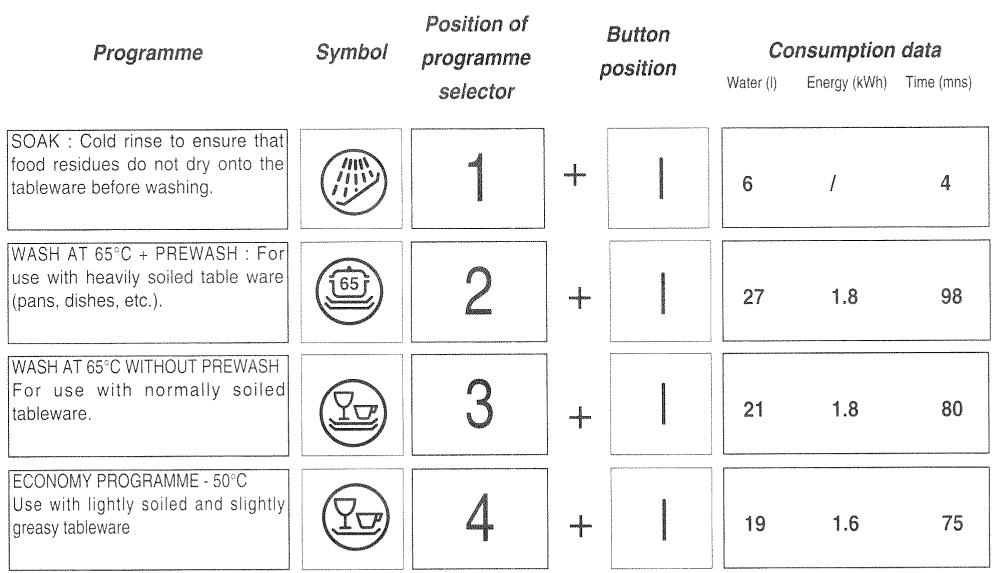
| Programmes de lavage | Trempage, Lavage 65°C avec prélavage, Lavage 65°C sans prélavage, Économique 50°C |
| Consommation d'eau (programme standard) | 21 L |
| Consommation d'énergie (programme standard) | 1,8 kWh |
| Durée (programme standard) | 80 min |
| Adoucisseur d'eau | Oui, avec sélecteur de dureté (6 positions) |
| Indicateur de sel régénérant | Oui |
| Indicateur de liquide de rinçage | Oui |
| Filtres | Filtre principal, micro-filtre auto-nettoyant, filtre de vidange |
| Bras de lavage | Démontables pour nettoyage |
| Sécurité | Protection anti-débordement, mise à la terre obligatoire |
| Installation | Encastrable ou intégré, fixation sous plan de travail obligatoire |
| Classe énergétique | Non spécifié (ancien modèle) |
FOIRE AUX QUESTIONS - VW8810E1 DE DIETRICH
Questions des utilisateurs sur VW8810E1 DE DIETRICH
0 question sur cet appareil. Repondez a celles que vous connaissez ou posez la votre.
Poser une nouvelle question sur cet appareil
Téléchargez la notice de votre Chauffage au format PDF gratuitement ! Retrouvez votre notice VW8810E1 - DE DIETRICH et reprennez votre appareil électronique en main. Sur cette page sont publiés tous les documents nécessaires à l'utilisation de votre appareil VW8810E1 de la marque DE DIETRICH.
MODE D'EMPLOI VW8810E1 DE DIETRICH
V. 8810 U1.

text_image
De Dietrich| Page | |
| Safety precautions | 3 |
| Installation - Description of the machine | 4 - 5 |
| Softening the waterAdding the rinse aid | 6 |
| Loading the dishwasherAdding the detergent | 7 |
| Operation | 8 |
| Table of programmes | 9 |
| Principle of operationCleaning and maintenance instructions | 10 |
| Fault finding | 11 |
| Technical characteristics and sizes | 12 |
BEFORE READING THE INSTRUCTIONS, UNFOLD THE LAST PAGES OF THIS LEAFLET, CONTAINING THE ILLUSTRATIONS
Please read the information in this instruction leaflet carefully. It gives all the information you need for safety, installation, use and guarantees for the appliance. We advise you to keep this leaflet and to pass it on to the new owner if you sell the machine.
Please be sure to comply with the information below, so that we can fulfil our responsibilities :
- Dispose of the packaging in a suitable manner and comply with legal standards regarding protection of the environment.
- If there is any visible damage to the machine, do not connect it to the mains power supply, but contact your supplier.
- The machine must be located in a frost-free environment. In the event of frost, the electrical components may be damaged.
- The inlet and outlet pipes must be connected in accordance with the leaflet. Incorrect connections can lead to damage.
- In order to ensure good stability, flush-fitting machines must be installed under a continuous work top fixed to the adjoining cabinets.
- Do not climb or lean on the door of the dishwasher when it is open. The machine can overbalance or be damaged.
- The machine is designed as a dishwasher and must not be used for any other purpose.
- We advise you to only use dishwasher products and not solvents.
- Keep dishwasher products as well as other cleaning products out of reach of children. These products, if they are swallowed, have a corrosive effect in the mouth and pharynx.
- If the machine does not operate correctly for reasons other than those mentioned in this leaflet, disconnect the machine from the mains power supply (pull out the plug) or disconnect the fuse in the circuit concerned and contact our after-sales service.
- The machine complies with current safety regulations. Any repairs must be carried out by qualified personnel. Repairs and alterations which do not conform can be dangerous to the user. In the event of replacement, only use original components.
- Worn out machines must be taken out of service immediately. Disconnect from the mains power supply, cut the supply cable and break the lock on the door.
- We strongly advise that you disconnect the machine from the mains power supply after use.
- Do not allow children to play with the machine or handle it.
- The water inside the machine is not drinkable.
- Do not touch the heating system after a wash programme (there is a risk of injury!).
- While the machine is operating, do not open the door, since steam will be released.
Always block the dishwasher so that it is horizontal and ensure that it is level using a spirit level. Slight unevenness in the floor can be compensated for by adjusting the feet.
IMPORTANT : Only connect the dishwasher to the mains supply and to the water supply after final installation.
If you are installing your diswasher on a carpeted floor, adjust the feet to ensure that there is an air space beneath the machine.
Integrated version
The machine may only be assembled and installed by a professional.*
Enclosed, you will find a template which will assist you in fitting a false door to the front section.
* Dishwashers designed to be integrated or built into your kitchen (i.e. supplied without a top panel) should be FIXED underneath a working surface.
Do not use this type of appliance without fixing it to a worktop or adjacent units (it may tip over if not fixed down).
If you are fitting your dishwasher under a worktop with a built-in hob, the original felt sound insulation must be replaced by suitable heat insulation.
CONNECTION
Water supply (fig. 2)
The water supply pipe must be connected to a threaded tap. (fig. 2) The water pressure may vary from 10 to 100 N/cm ^2 (1-10 bar). In the event of high pressure, it is advisable to fit a pressure regulator. Your Water Company will give you the necessary information.
Flow (fig. 3)
Evacuation is carried out via the evacuation hose, which must be assembled fitted to a siphon ①.
If necessary, the hose may be fitted over a sink ② provided that it is adequately fixed. In both cases, the height at the end of the hose must be between 60 and 85 cm. ① - ② The hose must be fixed freely to ensure that it does not crack and its opening must be below the surface of the evacuated water.
Special cases
Protection against water damage :
Your machine is equipped with :
- an overflow safety mechanism which automatically cuts off the water supply if the level of water in the tub is abnormally high.
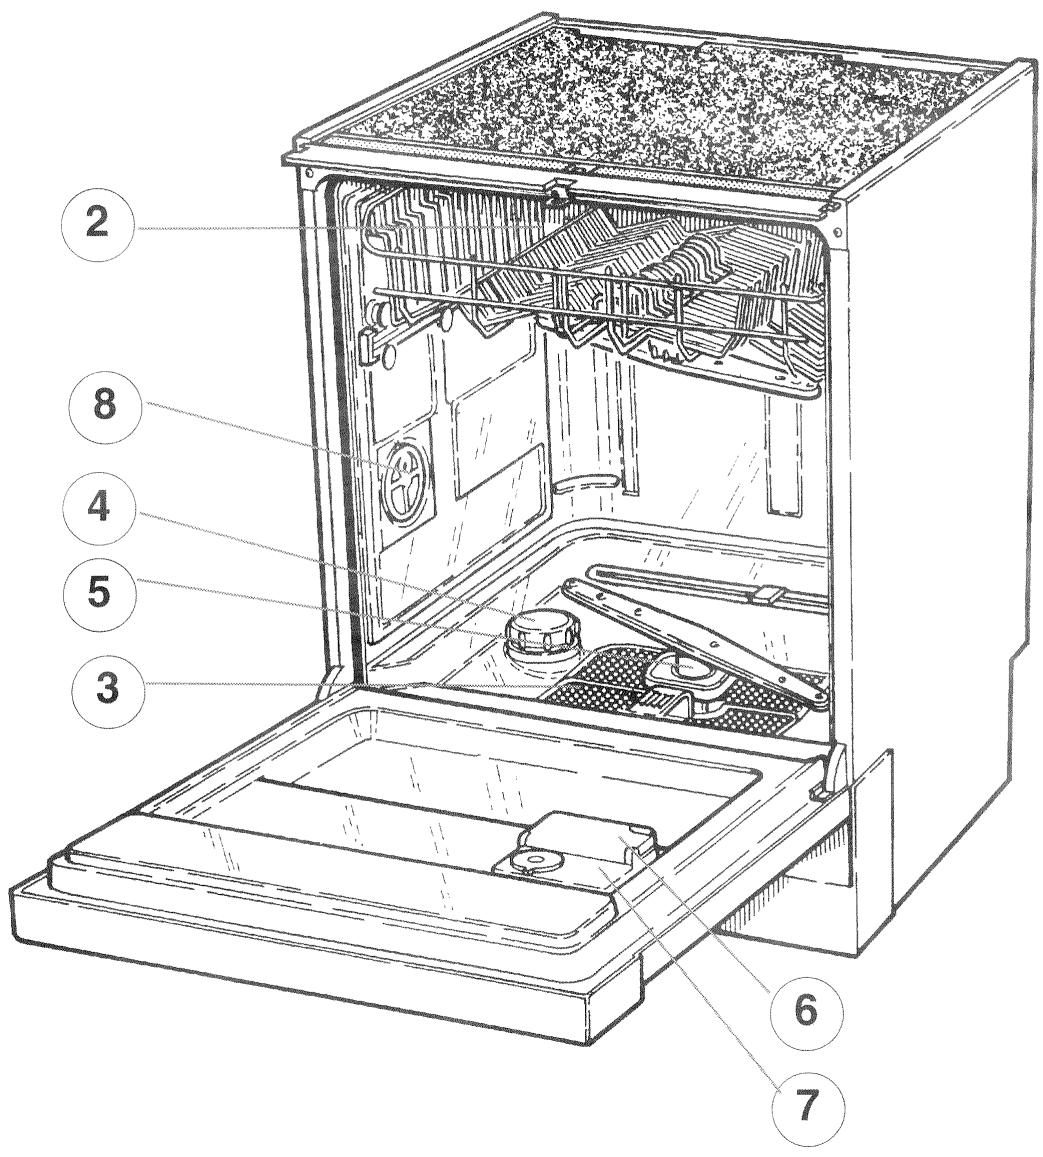
Description of the machine (fig. 1)
1 - Upper basket
2 - Main filter
3 - Regenerating salt container
4 - Self-cleaning microfilter
5 - Detergent dispenser
6 - Rinse aid dispenser
7 - Adjustment of the regeneration of the softener
Electrical connection
Important : Ensure that the electricity supply is switched off before connecting.
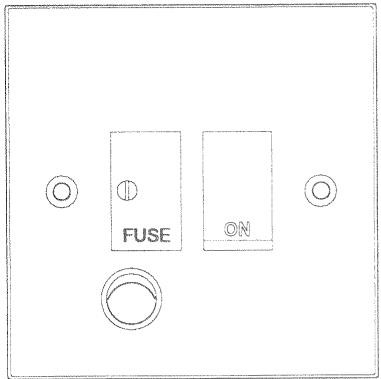
Your appliance must be connected to fixed wiring via the use of a double pole switched fused spur outlet with at least 3 mm contact separation, with a pilot lamp (see technical data for fuse rating).
We strongly recommend the appliance is connected by a qualified electrician who is a member of the N.I.C.E.I.C. or Corgy who will comply with the I.E.E. and any local regulations.
NOTE : The terminology "DOUBLE POLE" means that both the live and neutral supplies are switched and disconnected at the same time.
The terminations labelled SUPPLY are for the connection for the internal house wiring and the terminations labelled LOAD are for connection for the appliance.
WARNING THIS APPLIANCE MUST BE EARTHED
Important :
The wires in this mains lead are coloured in accordance with the following code :
Green/Yellow Earth
Blue Neutral
Brown Live
As the colours of the wires in the mains lead of this appliance may not correspond with the coloured markings identifying the terminals in your spur box, proceed as follows :
The wires which is coloured green and yellow must be connected to the terminal which is marked with the letter "E" or by the earth symbol 12 or coloured green or green and yellow. The wire which is coloured blue must be connected to the terminal which is marked with the letter "N" or coloured black. The wire which is coloured brown must be connected to the terminal which is marked with the letter "L" or coloured red.
text_image
FUSE ONBLUE BROWN
(NEUTRAL) (LIVE)
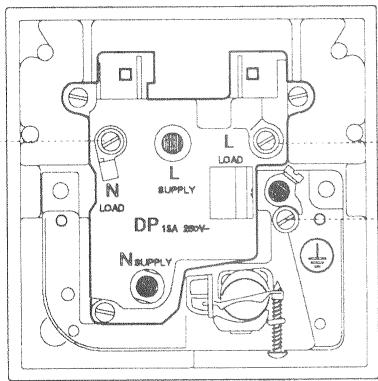
text_image
N LOAD L SUPPLY L LOAD DP 18A 220V- N_BUPPLYGREEN & YELLOW (EARTH)
Note : if you change the supply cable, you must replace it with a cable of the following type : HO5VV-F 3G1,5 mm².
* We cannot be held liable for any damage caused by the faulty earthing of the machine.
In order to obtain satisfactory cleaning results and to avoid lime deposits on the crockery in the machine, your dishwasher must use soft water. For this reason, the dishwasher is equipped with a water softener with a regeneration selector (fig. 1 - 8) for the various water hardness values. The test strips supplied will tell you, precisely, the hardness values of your local water supply. Using a coin, turn the selector (fig. 6) according to the following table:
| HARDNESS OF THE WATER | ADD SALT | POSITION | SELECTOR |
| 0 to 6° | NO | 1 | 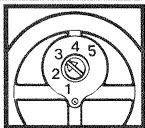 |
| 7 to 11° | YES | 1 | |
| 12 to 17° | YES | 2 | |
| 18 to 24° | YES | 3 | |
| 25 to 34° | YES | 4 | |
| 35 to 42° | YES | 5 |
The regenerating salt container (above 7^ dH) must always be full. A warning lamp on the control panel indicates when the salt needs replenishing.
Replenishing the salt (fig. 7)
1 - Unscrew the cover of the regenerating salt container.
2 - Using the funnel provided, completely fill the salt container.
3 - Fill the water container.
4 - Remove the salt residues from around the inlet of the container.
5 - Replace the cover and screw it down fully.
IMPORTANT!
If the water hardness is less than 7^ dH, it is not necessary to use regenerating salt, but the salt container must absolutely be filled with water before using the dishwasher for the first time.
Only use "special dishwasher" regeneration salt. Do not use table salt, cooking salt, etc. These salts can contain insoluble elements and will cancel out the effect of the softener.
We recommend the use of a rinse aid to ensure that the water can drain off without leaving marks on your crockery.
IMPORTANT!
Only use products designed for dishwashers and NOT products intended for washing up by hand!
Filling and adjusting the amounts of rinse aid (fig. 8)
1 - In order to fill the compartment, put the door into a horizontal position and unscrew the cap ② located on the door, turning anticlockwise.
2 - Fill the compartment up to 5 mm below the black level mark (maximum : 120 ml).
3 - Replace the cap and close.
4 - In order to achieve the best rinsing and drying results, you can adjust the distribution between 1 and 5, depending upon the hardness of the water and the results. The dosage rate is set to 3 at the factory.
5 - For this adjustment, use a coin to turn the dosage button, located inside the dispenser, using a coin ③.
When the amount is correct, the crockery should shine and should not be marked in any way. The crockery will be marked if too much rinse aid has been used.
In order to obtain good cleaning results, be sure to remove any large food residues before switching on the machine. Any burnt or stuck-on residues must be removed beforehand.
Your dishwasher has two baskets for 12 place settings (140 items) in accordance with DIN Standard 44990 (fig. 21 + 22). Always point the inside of the crockery downwards. Ensure that no item conceals another and that nothing obstructs the spraying facility. After switching on, check that the spraying arms can move freely (fig. 18). No item should overlap the baskets (fig. 18). Avoid placing large dishes in the right hand side of the bottom basket, in order to allow the dishwasher powder/liquid distributor to open freely.
Upper basket (fig. 12)
This basket is espacially designed to receive : glasses, cups, ramekins, bowls and little salad bowls , saucers, etc...
Containers, such as cups, glasses, pots, should be placed with the cavity upside down. Arrange the dishes methodically in the way of using all space.
The special adjustable bar allows to the long-stemmed glasses to be well holded (fig. 12). You can remove the cup-rack in the way to use most of the space (fig. 12).
Lower basket (fig.14 to 15)
Arrange plates and serving dishes by positioning them, if possible, towards the centre of the basket. Always arrange cutlery in the baskets designed for them, handles downwards (fig. 16). Keep silver items separate from other cutlery.
Before starting any washing programme, pour the correct amount of detergent into the dispenser provided for this purpose.
IMPORTANT!
Use a detergent designed to be used exclusively with household dishwashers.
For the correct quantity, refer to the manufacturer's instructions on the packaging.
- Open the door of the dishwasher.
-
Adding the detergent :
-
Prewash : pour the detergent into the tub.
- Main wash : fill the container (fig. 19) between the minimum and maximum marks, according to the degree of soiling.
- Close the cover of the dispenser.
In a half-load programme, the amount of detergent can be reduced. An incorrect amount will cause deposits (lime or lime with traces of detergent on the crockery). These deposits can be removed using citric acid.
WARNING!
Keep dishwasher products out of reach of children. If swallowed, these products can cause burns in the mouth and throat.
SAVING ENERGY!
With normally soiled crockery, avoid using the prewash with running water. If possible, use the full capacity of the dishwasher.
1 - Open the door and load the dishwasher.
Check that the dishes do not obstruct the turning sprinkler arms.
2 - Introduce dishwashing powder or liquid and close the distributor.
3 - Close the door.
4 - Open the water supply tap.
5 - Select the required programme by turning the programming knob clockwise. (see page 9).
6 - Turn the ON/OFF button | to start the dishwasher. The ON light ⏻ will go on.
Machine off - Lights
When the programme has ended, the programming knob will be in the STOP position.
Stop the dishwasher by turning the ON/OFF button☐; The ON light ⏱ will go out.
- "SALT" warning light: when this light comes on, fill the salt container. If salt is not being used (soft water), this lamp will be on during the whole wash.
- "RINSE AID" warning light: fill the rinse aid compartment when this light comes on.
PROGRAMME SEQUENCE
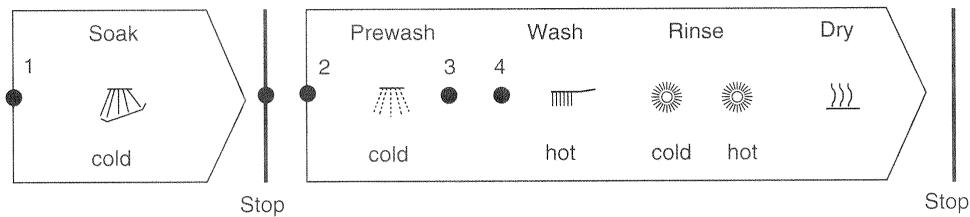
flowchart
graph LR
    A["Soak"] --> B["cold"]
    B --> C["Stop"]
    D["Prewash"] --> E["cold"]
    E --> F["3"]
    F --> G["4"]
    G --> H["Wash"]
    H --> I["hot"]
    I --> J["Rinse"]
    J --> K["cold"]
    K --> L["Hot"]
    L --> M["Dry"]
    M --> N["Stop"]
PROGRAMME SELECTION
other
| Programme | Symbol | Position of programme selector | Button position | Consumption dataCOMPARATIVE PROGRAMME DATA
WASH AT 65°C
WITHOUT PREWASH
German Standard DIN 44990

Energy
1.8 kWh

Water
211
• Standard-size baskets full : fig .21 - 22
- Rinse aid dispenser setting : position 3
• Quantity of dishwaher liquid : 25 g in the dispenser
The principle of washing by machine is a combination of three actions :
The hydraulic action
The hydraulic action is obtained by spraying arms which spray pressurised water onto the crockery.
The chemical action
The chemical action is obtained by adding a detergent to the water, which facilitates the elimination of food residues.
The thermal action
The thermal action is obtained by using a resistor which, by heating the water/detergent mixture, completes the previous actions and, in particular, eliminates grease.
These three actions are combined in the process of washing dishes by machine. A programme is the continuous cycle of this principle until the end of the wash.
Throughout the wash, the water/detergent mixture is recycled and purified by passing through filters; it then falls to the bottom of the container, where it is redirected under pressure into spraying arms.
With a minimum of water consumption, this recycling provides a washing process equivalent to several thousand litres of water.
After each prewash and at the end of the wash, the waste water is drained off. Firstly, the crockery is rinsed with cold water, then hot water, then it is dried and the wash programme is finished.
The water which enters the dishwasher passes through the softener in order to remove its lime content. During the programme, the softener is automatically "regenerated" by the addition of regenerating salt.
For good washing results, especially for glasses; it is important to correctly adjust the softener.
To ensure that your dishwasher operates correctly regularly clean the main filter and drainage filter.
Your dishwasher is equipped with a self-cleaning microfilter which does not need to be removed.
Removing the filter (fig. 20)
- Remove the main filter/drainage filter assembly by pulling both of them upwards.
- Separate the drainage filter from the main filter. The drainage filter is located under the main filter: if there are food residues inside, remove them.
Cleaning
- Brush the main filter and rinse it under the tap.
Replacing the filters
- Refit the drainage filter into the main filter.
- Replace the unit correctly in its housing.
Regular cleaning
- The spraying arms : remove (by unscrewing), wash and make sure that there are no food residues.
- The area around the door as well as the door seal: remove deposits using a damp sponge.
Once a year
- Programme a short wash cycle without any crockery with, if necessary, a special commercial cleaning product for the inside of the washing compartment.
Good washing results depend on good maintenance of the dishwasher.
Clean the outside of the dishwasher with a damp, soapy sponge then dry it. Never use abrasive materials or cleaning products containing alcohol to clean the machine.
Prolonged non-use
- Completely clean the machine.
- Leave the door ajar.
- Pull out the plug from the mains power supply and close the water inlet tap.
| Operating faults | Check / possible cause |
| The dishwasher does not start. | Are the fuses in order?Is the machine plugged in?Has the door been closed properly? |
| The dishwasher does not fill-up. | Open the tap.The inlet pipe may be squashed or twisted. |
| The water stays in the dishwasher. | The drainage pipe may be squashed or twisted.Check the machine filter.It may need cleaning. |
| Unsatisfactory washing. | Clean the filter.Check that the filter is fitted correctly.Check the sprinklers.Clean them if necessary.Check that the sprinklers can turn freely.Check the amount of detergent.Check the programme selected. |
| White marks on the crockery. | Check the setting of the softener.Fill the salt container.Is the salt container cover properly closed?Increase the amount of rinse aid. |
| Marked cutlery. | Cutlery items should be placed on top of one another in the basket without packing them down. Keep silver cutlery separate from other types. |
| Unsatisfactory drying. | Add some rinse aid.In the case of persistent spots, increase the amount of rinse aid.If the case of crockery with smears and marks, decrease the amount. |
| The dishwasher does not drain out. | You have moved your appliance and on this occasion you have tipped it backwards. Unhook the drain hose, spread on the floor, with its end above a bowl; the emptying should start again. Put the drain hose back in place. |
| If, in spite of these guidelines, you still have problems, consult your retailer or our After-Sales Service. Please state the type of machine and the serial number on the identification plate (inside the door). This will avoid unnecessary waiting and expense. | This machine complies with the current safety standards. Any repairs must be carried out by qualified personnel. Repairs carried out by unqualified individuals can be dangerous for the user. |
Technical characteristics and sizes
| Height : | 815 - 880 mm |
| Width : | 595 mm |
| Depth : | 550 mm |
| Depth with door open : | 1118 mm |
| Voltage : | 230 V - 240 V |
| Power output : | 2150 W - 2300 W |
| Fuses : | 13 A |
| Capacity : | 12 place settings |
| Water pressure (flow pressure) : | 10 - 100 N/cm ^2 |
| Hot water connection : | 60°C maximum |
| Height of evacuation by pump : | 60 - 85 cm |
This equipment conforms to EEC Directives 73/23 of 19/2/73 concerning the electrical security and 89/336 of 3/5/89 concerning the electromagnetic compatibility.
text_image
Black-and-white photo of multiple 'Finish' branded product packaging boxes with visible branding and text.finish
text_image
Technical diagram of an open refrigerator with numbered parts for identification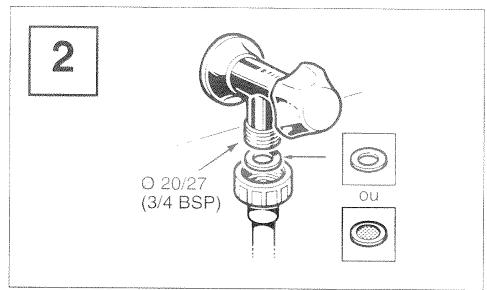
text_image
2 O 20/27 (3/4 BSP) ou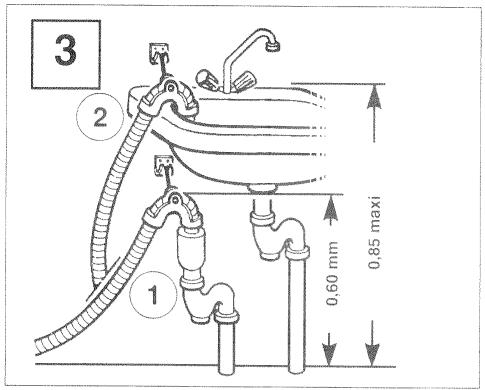
text_image
3 2 1 0,60 mm 0,85 maxi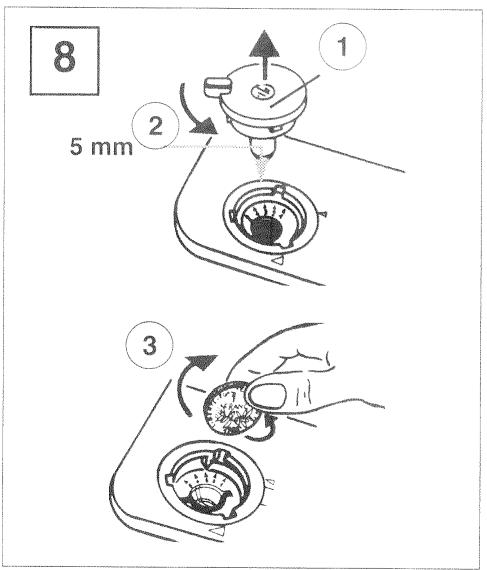
text_image
8 1 2 5 mm 3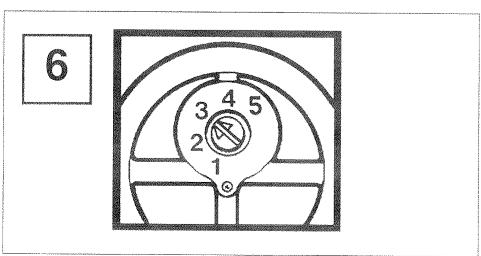
text_image
6 3 4 5 2 1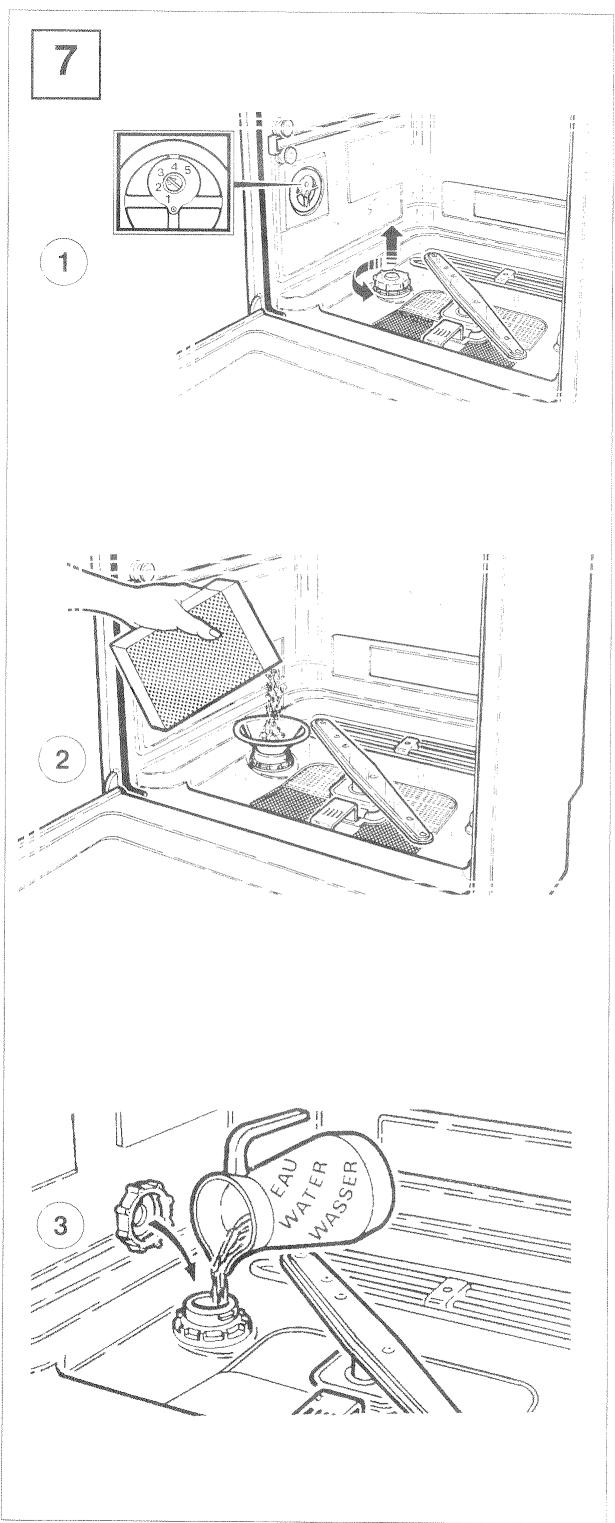
text_image
7 ① ② ③ EAU WATER WASSER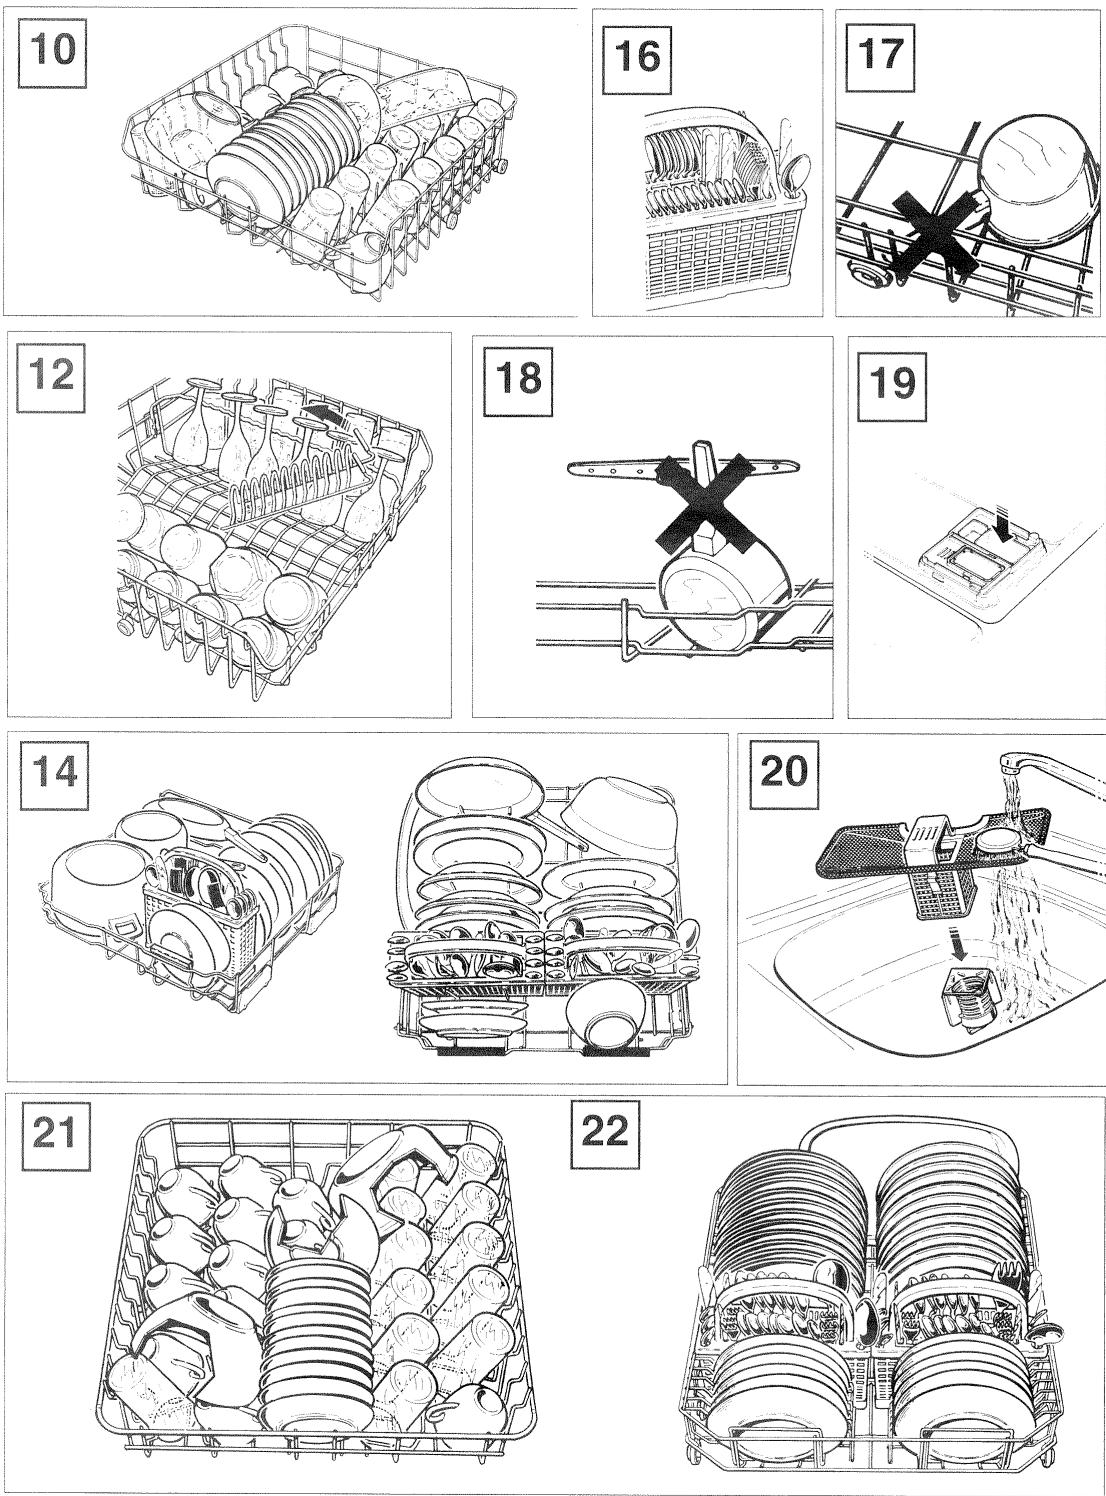
79, RUE DU GENERAL LECLERC ■ B.P. 76 ■ 78403 CHATOU CEDEX
TEL. (1) 34 80 59 58 ■ FAX (1) 34 80 58 60 ■ TELEX 699 615
SERVICE CONSOMMATEUR TEL.(1) 34 21 48 46
DE DIETRICH EUROPEENNE D'ELECTROMENAGER
SA A CONSEIL D'ADMINISTRATION AU CAPITAL DE F 160.100.000 ■ RCS VERSAILLES B 352827687