CU-AV007 - Télécommande PIONEER - Notice d'utilisation et mode d'emploi gratuit
Retrouvez gratuitement la notice de l'appareil CU-AV007 PIONEER au format PDF.

| Type de produit | Télécommande programmable infrarouge |
| Marque | Pioneer |
| Modèle | CU-AV007 |
| Dimensions (L × H × P) | 73 mm × 21 mm × 218 mm |
| Poids (sans piles) | 130 g |
| Alimentation | 2 piles alcalines LR6/AM-3 (AA) |
| Portée infrarouge | Environ 7 mètres, angle de 30 degrés |
| Fonction d'apprentissage | Oui, programmable pour commander d'autres appareils infrarouges |
| Modes de transmission | Audio et vidéo |
| Sélecteur SR RECALL/USE/LEARN | Pour sélectionner le mode de fonctionnement (rappel SR, utilisation ou apprentissage) |
| Nombre de touches programmables | Jusqu'à 40 touches (selon le format des codes) |
| Fonctions audio compatibles | Amplificateur, platine CD, magnétophone, tuner, etc. |
| Fonctions vidéo compatibles | Magnétoscope, lecteur VDP, télévision, etc. |
| Veille automatique (Sleep) | Oui, pour amplificateur et télévision |
| Bouton RESET | Oui, sur le côté avant gauche |
| Affichage / Indicateur | Indicateur TRANSMIT/LEARN |
| Entretien et nettoyage | Nettoyer avec un chiffon sec et doux. Ne pas utiliser de solvants. |
| Sécurité | Respecter les polarités des piles, ne pas mélanger piles neuves et usagées |
| Accessoires fournis | 2 piles alcalines, mode d'emploi, garantie, 2 gabarits |
| Réparabilité | Remplacement des piles par l'utilisateur ; pas de pièces réparables par l'utilisateur |
FOIRE AUX QUESTIONS - CU-AV007 PIONEER
Questions des utilisateurs sur CU-AV007 PIONEER
0 question sur cet appareil. Repondez a celles que vous connaissez ou posez la votre.
Poser une nouvelle question sur cet appareil
Téléchargez la notice de votre Télécommande au format PDF gratuitement ! Retrouvez votre notice CU-AV007 - PIONEER et reprennez votre appareil électronique en main. Sur cette page sont publiés tous les documents nécessaires à l'utilisation de votre appareil CU-AV007 de la marque PIONEER.
MODE D'EMPLOI CU-AV007 PIONEER
CU-AV007
AUDIO VIDEO PROGRAMMABLE REMOTE CONTROL UNIT
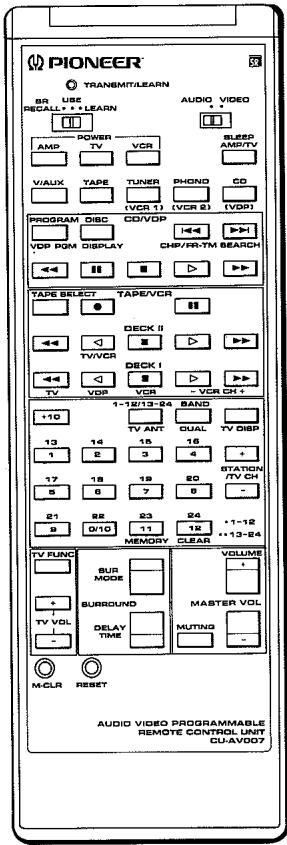
Operating Instructions
Thank you for buying this Pioneer product.
Please read through these operating instructions in order to know how to operate your model properly. After you have finished reading the instructions, put them away in a safe place for future reference.
Keys on the remote control unit are effective only if your components have corresponding functions that are remote controllable. Remote controllable functions of non-Pioneer equipment may be programmed into this remote control unit by using its LEARN mode.
CONTENTS
REMOTE CONTROL OPERATIONS 2
PANEL FACILITIES 3
USE OF LEARNING FUNCTIONS 8
SPECIFICATIONS 10
REMOTE CONTROL OPERATION
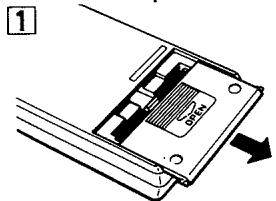
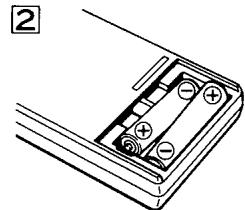
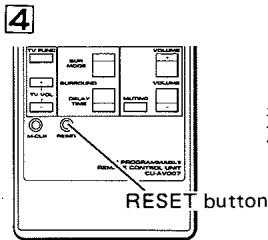
LOADING BATTERIES
- Open the battery compartment cover on the rear of the remote control unit. The cover should open easily if you slide it in the direction of the arrow while pressing on it with your thumb.
- Take out the two supplied alkaline batteries (LR6/ AM3), and insert them into the battery compartment in accordance with the indications in the compartment.
- Close the cover of the battery compartment.
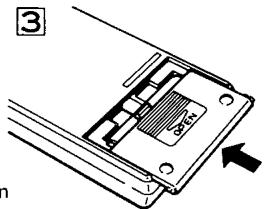
4 Press the RESET button on the bottom left side of the front of the unit with something suitable such as a mechanical pencil.
Incorrect use of batteries may lead to leakage or rupture. Always be sure to follow these guidelines:
A.
Always insert batteries into the battery compartment correctly matching the positive (+) and negative (-) polarities, as indicated inside the compartment.
B.
Never mix new and used batteries.
C.
Batteries of the same size may have different voltages, depending on their type. Do not mix different type of batteries.
D.
Be sure to use your batteries in accordance with the caution labels affixed to them.
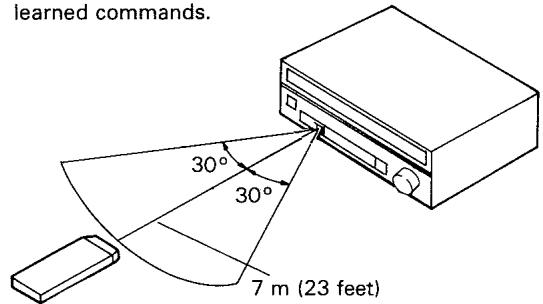
RANGE OF REMOTE CONTROL
When operating the remote control unit, point the front of the unit at the front panel of the component. The remote control unit may be used within a range of about 7 meters (23 feet) from the remote sensor, within angles of up to about 30 degrees.
These figures are general and do not necessarily apply to learned commands.
NOTE:
If the remote control sensor window is in a position where it receives strong light such as sunlight or fluorescent light, control may not be possible.
Battery Replacement
Replace the batteries as soon as possible if pressing the control keys does not cause the TRANSMIT/LEARN indicator to light even after the RESET button has been pressed. Learned commands will be lost from memory within a short time if batteries are removed. Therefore, have new batteries ready for replacement before removing old batteries.
Also, be sure to always use the specified batteries (LR6/AM3-alkaline batteries).
NOTE:
As the unit's power switch is connected to the battery compartment cover:
- The unit will not operate when the cover is off even if batteries are loaded.
- If batteries are not loaded and the cover is replaced, the memory will be lost after a few seconds.
- With batteries loaded and the cover off, memory is retained for about 30 minutes.
- Be very careful not to lose the battery compartment cover.
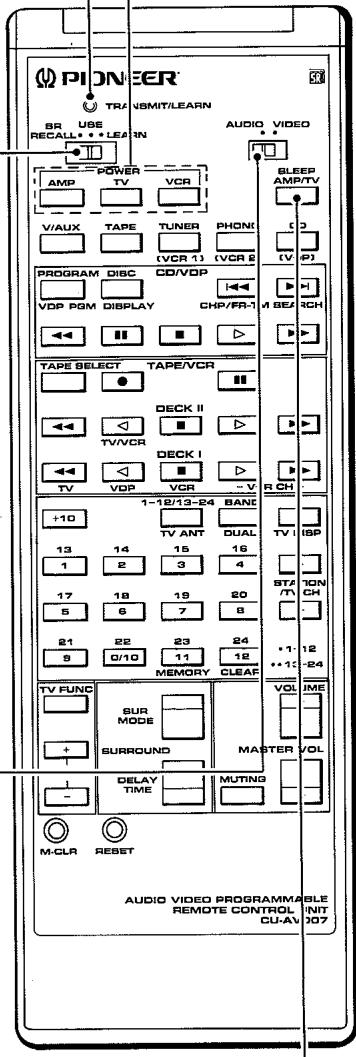
POWER switch:
For AMP, TV, and VCR power on/off switching.
TRANSMIT/LEARN indicator:
When the SR RECALL/USE/LEARN selector is at the SR RECALL or USE position:
The indicator flashes when a remote command key is pressed.
When the SR RECALL/USE/LEARN selector is at the LEARN position:
The indicator lights when the unit is in the LEARNING STANDBY mode.
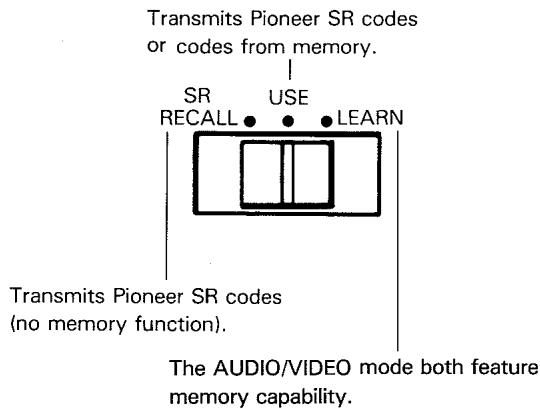
SR RECALL/USE/LEARN selector:
SR RECALL:
Set to this position if only Pioneer SR code compatible components will be controlled.
USE:
Set to this position if the remote will be used to control Pioneer SR code compatible components and components which use "learned" commands.
LEARN:
Set to this position when "teaching" this remote the commands of other remotes.
TRANSMIT mode switch:
AUDIO MODE:

Set to this position for remote operation of CD players, tape decks, tuners, and other audio components.
VIDEO MODE:

Set to this position for remote operation of VDP players, VCRs, TVs, and other video components.
AMP/TV SLEEP switch:
When the audio mode is selected, this switch is used to turn off the amplifier automatically after the "sleep" time has elapsed.
When the video mode is selected, this switch is used to turn off the television automatically after the "sleep" time has elapsed.
NOTE:
Applies only to components with Sleep Timer feature. Refer to the amplifier and TV operating instructions for information on the Sleep Timer.
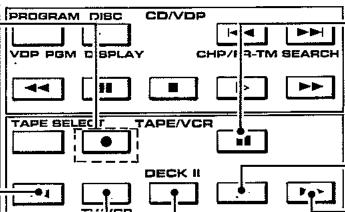
Keys explained on this page determine operation of the remote control system itself. The actual keys used for operating remote controlled components are explained on pages four through seven.

Set the TRANSMIT mode selector to AUDIO.
*FUNCTION key:
Switches amplifier input function.
DECK II key:
Switches to the DECK II functions when using a double cassette deck.
- (REC) key:
Press REC and the deck is ready to record.
Recording will start when you press the Play key (▶, ≦).
TAPE SELECT key:
This selects cassette tapes in the multi-cassette changer.
PAUSE)key:
Temporarily interrupts recording or playback. Press again to resume.
FF) key:
Fast reverse the tape in the direction of the arrows.
(PLAY) key:
Starts reverse playback.
STOP)key:
Stops the tape.
(PLAY) key:
Starts forward playback.
FF) key:
Fast forwards the tape in the direction of the arrows.
NOTE:
- Keys marked with ** have the same function in both the AUDIO and VIDEO positions.
- The TAPE I/II selector switch on tape decks so equipped cannot be used to control TAPE I. Use the selector switch on the deck itself. (If you set the switch on this deck to TAPE I, you can control it with the TAPE II keys on the remote control unit.)
- The key can only be used with tape decks capable of reverse play.
- Some keys will not work with all types of tape deck. Refer to the operating instructions for more information.
DECK I key:
Switches to the DECK I functions when using a double cassette deck.
FF) key:
Fast reverse the tape in the direction of the arrows.
(PLAY) key:
Starts reverse playback.
(STOP) key:
Stops the tape.
(PLAY) key:
Starts forward playback.
FF) key:
Fast forwards the tape in the direction of the arrows.
REMOTE CONTROL OF COMPACT DISC PLAYER (CD)

Set the TRANSMIT
mode selector to
AUDIO.
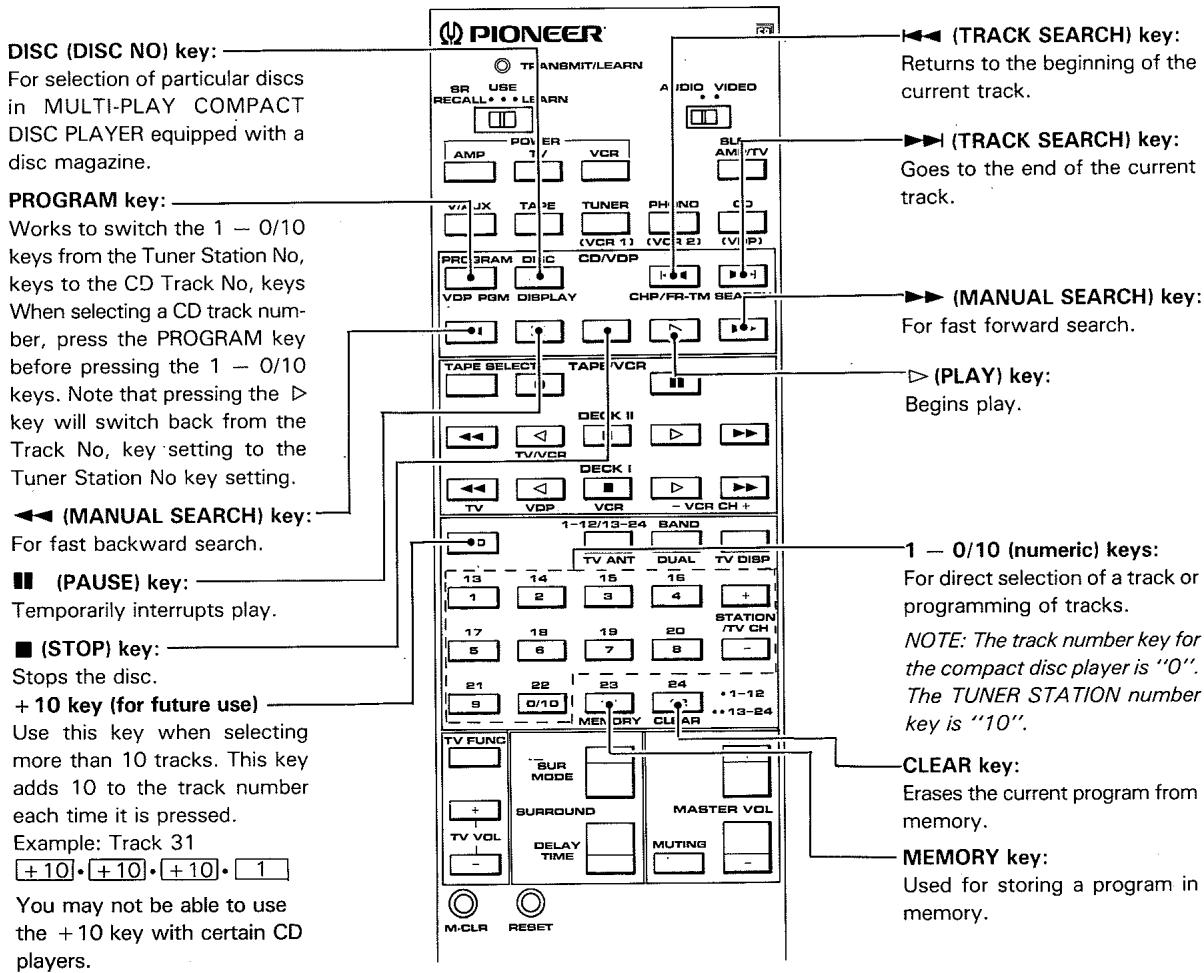
REMOTE CONTROL OF TUNER

Set the TRANSMIT
mode selector to
AUDIO.
1 to 12 (STATION CALL) keys:
For direct tuning of stations stored in STATION CALL memory.
Pressing these keys twice gives an additional 12 settings, numbered 13 to 24.
(mode selector) key:
Switches between Mode 1 (1 to 12) and Mode 2 (13 to 24).
NOTE: Operation is possible only with tuners which have a STATION CALL mode switch.
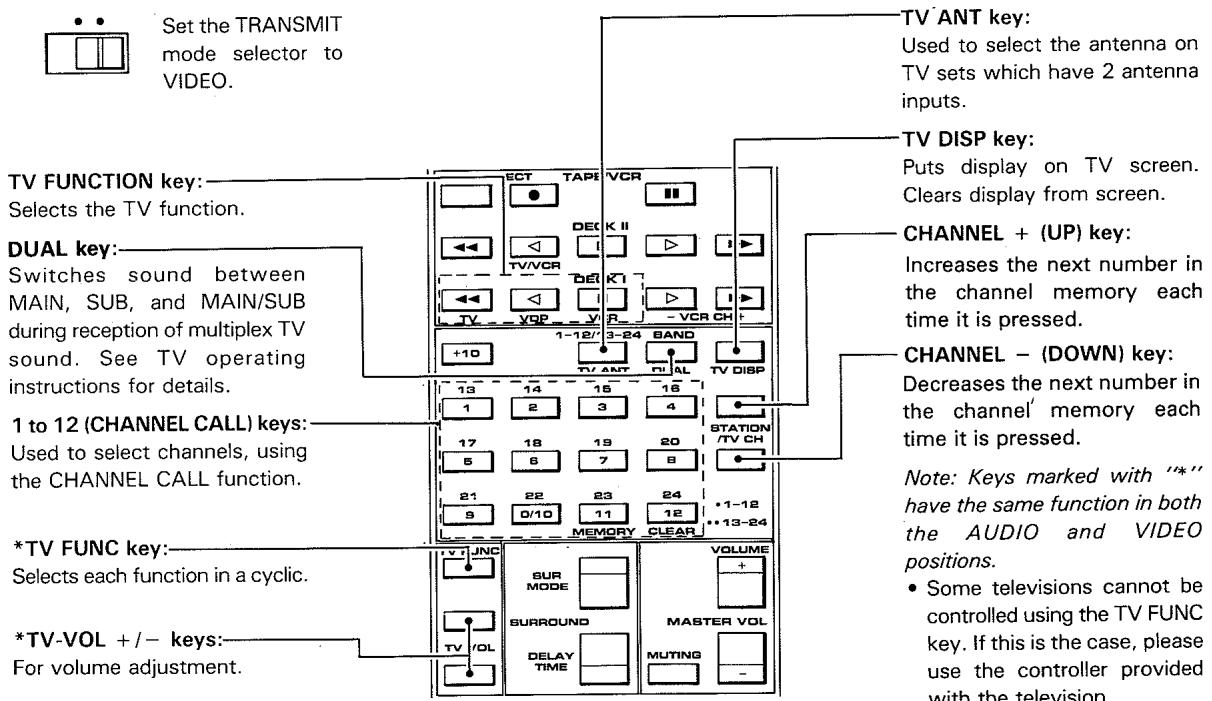
BAND key:
Switches between AM and FM or other.
STATION + (UP) key:
Increases the (PROGRAMMED) station number.
STATION - (DOWN) key:
Decreases the (PROGRAMMED) station number.

Set the TRANSMIT
mode selector
switch toVIDEO.
DISPLAY call key:
Cleared the chapter and frame/time displays on the screen.
VDP PGM key: Switches the 1 - 0/10 keys from the TV Channel keys to the VDP CHP/FR-TM No.
keys:
To use the VDP CHP/FR-TM No. keys, press this key to switch the key functions, then use the 1 - 0/10 keys. Note that pressing the key will switch back from the VDP CHP/FR-TM No. key setting to the TV channel key setting.
(SCAN) key: For fast backward scanning.
(PAUSE) key:
Temporarily interrupts video and audio playback.
1-0/10 (numeric) keys:
Used for chapter and frame/time number search and for chapter program play.
NOTE: The 0/10 key number for VDP CHP/FR-TM is "0". The TV CH key number is "10".
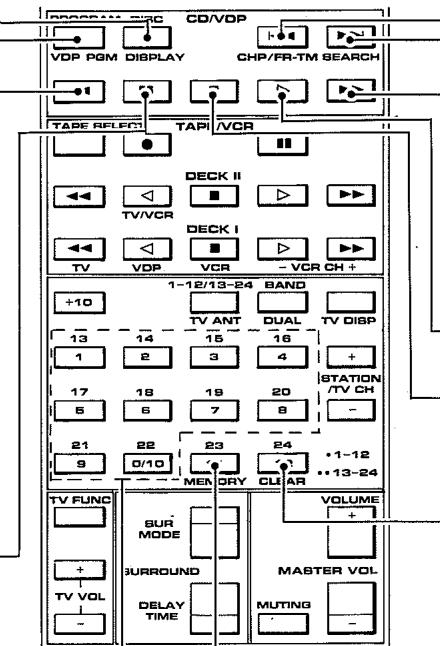
CHP/FR-TM
(CHAPTER/FRAME-TIME)
key:
Used for chapter or frame (time) search operation.
SEARCH key:
Used for search and memory repeat operation.
(SCAN) key:
For fast forward scanning.
(PLAY) key:
Selects playback.
(EJECT) key:
Playback is stopped when pressed once. Pressing again causes the disc tray to open.
CLEAR key:
Used for canceling repeat playback, number correction and mode release during search operation, and for canceling program play.
MEMORY key:
Used for chapter program play.
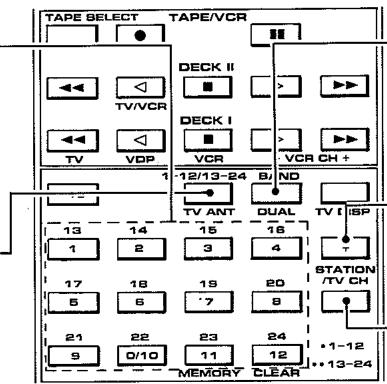
REMOTE CONTROL OF VIDEOCASSETTE DECK (VCR)

Set the TRANSMIT
mode selector toVIDEO.

(REC) key:
Selects the recording mode.
(REW) key:
Rewinds the tape and allows picture search.
TV/VCR ANT key:
This key can be used only for VCRs with a VCR/TV selector. It switches the antenna output between VCR and TV.
STOP) key:
Stops the tape.
(PAUSE) key:
Temporarily interrupts recording or playback, producing a still picture during playback.
(PLAY) key:
Starts playback.
FF) key:
Fast forwards the tape and allows picture search.
VCRCH+ (UP)key:
Increases the next number in the channel memory each time it is pressed.
VCR CH - (DOWN) key:
Decreases the next number in the channel memory each time it is pressed.
REMOTE CONTROL OF AMPLIFIER
FUNCTION SELECTOR keys:
Press to select the audio and video source:

Set the TRANSMIT mode selector to AUDIO.
V/AUX, TAPE, TUNER, PHONO, or CD.

Set the TRANSMIT mode selector to VIDEO.
VCR 1, VCR 2, or VDP.
SUR MODE key:
Selects the surround mode in a loop sequence of the digital surround processor as shown here.
STADIUM SIMULATED
SURROUND DOLBY
SURROUND OFF
→STADIUM → -- -
DELAY TIME key:
This selects the digital surround processor delay time.
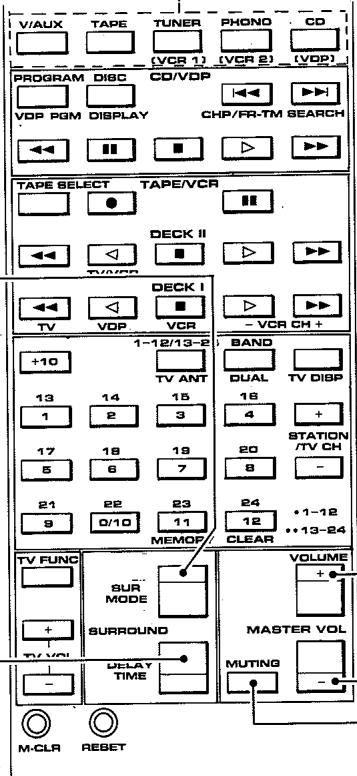
VOLUME key:
Adjusts the overall (front and surround) volume.
MUTING key:
Used to temporarily mute the sound. the volume is restored when pressed again.
Introduction
This system remote controller may "learn" the commands of other remote control unit, regardless of manufacturer, as long as the other unit is of the infrared type. In some cases you may still need the original remote control unit for special situations. But as a rule, you will be able to use this Pioneer remote for most system control needs, including video as well as audio equipment.
NOTE:
When using the "LEARN" mode it is a good idea to take the another remote control unit to another room. This avoids problems such as sudden high volume output or accidental tape erasure that may occur if particular infrared command signals reach your components. Alternatively you may wish to unplug your component system. Simply turning off the power may not be sufficient since power on/off switching may also be remote controllable.
Which keys can be programmed with new commands?
By setting the SR RECALL/USE/LEARN selector to the LEARN position, you can memorize codes in the AUDIO mode and VIDEO mode for the TRANSMIT mode switch.
The USE mode allows you to use the remote control to operate your system components. Only Pioneer SR codes are transmitted in the SR Recall mode, and none of the keys can be used for memory of other codes. The keys on the remote control unit change their functions according to the setting of the TRANSMIT mode switch.
You can switch the TRANSMIT mode between the AUDIO and VIDEO modes.
You can assign new commands to the keys in each of the modes. In theVIDEO' and AUDIO mode, all keys can be assigned new commands.
When you first start using the remote control unit, it contains initial commands appropriate for Pioneer equipment (when set to the AUDIO and VIDEO modes). If your audio and video equipment consists of Pioneer components exclusively you can use the remote control unit as is. It is also possible to restore the original Pioneer commands after assigning other commands. (Refer to "Returning to the Initial Settings" for this procedure.)
Other Important Notes
- A total of 40 keys may be used for memorization of other codes. (This may very depending on the command format of the codes to be memorized.)
- If the batteries become weak, all functions will be stopped automatically. If the indicators no longer light or flash, or components do not respond to signals from the remote control unit, you should replace the batteries with a set of fresh ones. (Always use the recommended size alkaline cells.)
- When presetting keys, make sure that the remote control units of both this and the other component are loaded with fresh batteries.
- For some special remote signal types of infrared remote control units programming may be impossible.
Using the remote control unit of your VCR to program the playback command.
- It is recommended that the name of the key and its function correspond. This convenient when operating equipment.
[Operation example]
-
Set the SR RECALL/USE/LEARN switch of the programmable remote control unit to the LEARN position and set the TRANSMIT mode selector switch to the VIDEO position.
-
Programming is possible with the TRANSMIT mode selector switch in any position, but VIDEO is used as an example.
![PIONEER CU-AV007 - [Operation example] - 1](/content/2024/12/118561/images/b539f7efb7ab8f5f8e8158a6939cf624cebbbf616440c59c5c60e7ec77011661.jpg)
- Place the transmission sections of the programmable remote control unit and the remote control of the VCR facing each other.
![PIONEER CU-AV007 - [Operation example] - 2](/content/2024/12/118561/images/f0a66aa436435ecfdd8380071a1d69e794771c162f4e637ac09f747a32ba3b3a.jpg)
![PIONEER CU-AV007 - [Operation example] - 3](/content/2024/12/118561/images/3ed56154cd3f8b78bf4c99993254dc8ed8ccf52479d9ffbbd71de6afc6ba7682.jpg)
- Place the two units on a table, separated by 2 to 5 cm (1 to 2 inches).
Memorization will not be possible if they are too close.
- Hold down the VCR PLAY key of the programmable remote control unit until the TRANSMIT/LEARN indicator lights up, then release the key.
- Hold down the PLAY key of the VCR remote control unit.
- Release the key of the VCR remote control unit after making sure that the TRANSMIT/LEARN indicator has gone out on the programmable remote control unit.
NOTE:
If the LEARN indicator flashes, it indicates that you are trying to preset a key not available for the learning function, or otherwise the program capacity has been exceeded. In case the program capacity has been exceeded, the function programmed last will not be memorized correctly. All previously programmed functions, however, will be retained in memory and may be used as they are if the last function is not essential. For re-programming refer to page 10 "Returning to the Initial Settings".
-
Set the SR RECALL/USE/LEARN selector switch of the programmable remote control unit to the USE position.
-
The previous code (Pioneer uniform remote control code or code for other equipment) is erased and replaced by the new code.
-
Check that the program works.
-
Try actual operation and make sure the unit works properly.
- If the VCR does not operate when pressing the key, change angle, position and distance between both remote control units and repeat the programming procedure.
- When programming, make sure that the function indications (for example, , , ) on the other remote control unit and the programmable remote control unit are the same. This will facilitate operation.
When teaching functions whose names differ from those of the keys, write in the names or codes of the functions on the included templates and place on the panel.
Questions and Answers about the Learning Function
Q: The remote control unit of my VCR has two REC (recording) keys. They both have to be pressed at the same time to start recording. What is the learning procedure in this case?
A: Hold one of the keys on the programmable remote control depressed (except the VCR key) until the TRANSMIT/LEARN indicator lights up, and then press the two keys on the VCR remote control simultaneously.
Q: The remote control unit of my VCR has a REC (recording) key and a PLAY (playback) key and they both have to be pressed at the same time to start recording. What is the learning procedure in this case?
A: Hold one of the keys on the programmable remote control depressed (except the VCR key) until the TRANSMIT/LEARN indicator light up, and then press the REC and PLAY keys on the VCR remote control simultaneously.
- As described above, operations which require two keys to be pressed at the same time are programmed by pressing the two keys simultaneously.
Operating other equipment by the programmable remote control unit
- Set the SR RECALL/USE/LEARN selector of the programmable remote control unit to the USE position.
-
Set the TRANSMIT mode selector switch to the desired position (AUDIO/VIDEO).
-
Set the VIDEO position for programming as described in the example.
-
Press the key of the desired function.
- The TRANSMIT/LEARN indicator lights up while the remote control unit is sending codes.
Note:
- When operating a device with the programmed remote controller, always set the LEARN changeover switch to the USE position.
- For functions which require two keys to be pressed at the same time (recording, etc.) or functions for which several codes are sent simultaneously (auto functions, timer programming, etc.) the programming procedure is different and improper operation may occur.
- The remote control unit will not operate when the battery cover is removed.
Returning to the Initial Settings
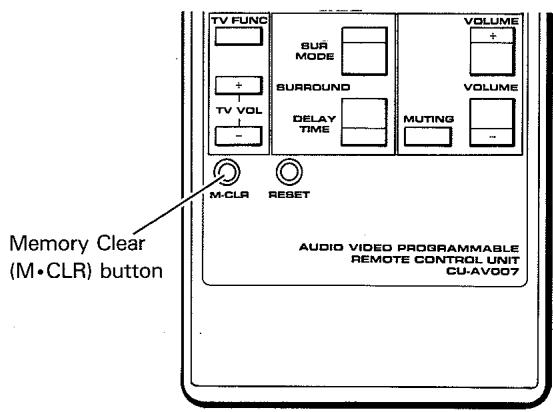
To return all settings to the Pioneer Uniform Remote Control Code settings, set the SR RECALL/USE/LEARN switch to the SR RECALL position. Proceed as follows to memorize new codes when the memory is full.
- Set the RECALL/USE/LEARN selector switch to the LEARN position.
- Press one of the LEARN keys. The TRANSMIT/LEARN indicator will light up.
-
Use a ball-point pen or similar object to press the M·CLR button while the TRANSMIT/LEARN indicator is flashing.
-
The programmed functions for the AUDIO and VIDEO positions are cleared, and the remote control unit is reset to the Pioneer uniform remote control codes.
- Do not press the keys with too much force.
SPECIFICATIONS
Operation system: Programmable infrared remote control system
Applicable batteries: two LR6/AM-3 alkaline batteries
Attachments: two batteries, an operating instructions, a written guarantee and two templates.
Outer dimensions: 73W× 21H× 218Dmm
Weight: 130 g (excluding batteries)
Published by Pioneer Electronic Corporation.
Copyright © 1990 Pioneer Electronic Corporation.
All rights reserved.
PIONEER ELECTRONIC CORPORATION
4-1, Meguro 1-Chome, Meguro-ku, Tokyo 153, Japan
PIONEER ELECTRONICS [USA] INC.
2265 East 220th Street, Long Beach, California 90810, U.S.A.
P.O. BOX 1720, Long Beach, California 90801, U.S.A.
PIONEER ELECTRONICS OF CANADA, INC. 505 Cochrane Drive, Markham, Ontario L3R 8E3, Canada
PIONEER ELECTRONIC [EUROPE] N.V. Keetberglaan 1, 2740 Beveren, Belgium, TEL: 03/750.05.11
PIONEER ELECTRONICS AUSTRALIA PTY. LTD. 178-184 Boundary Road, Braeside, Victoria 3195, Australia, TEL: [03] 580-9911