
CT-W806DR - Enregistreur de cassette PIONEER - Notice d'utilisation et mode d'emploi gratuit
Retrouvez gratuitement la notice de l'appareil CT-W806DR PIONEER au format PDF.

| Type de produit | Enregistreur de cassette stéréo double platine |
| Marque et modèle | PIONEER CT-W806DR |
| Dimensions (L x H x P) | 420 x 125 x 250 mm |
| Poids (sans emballage) | 4,7 kg |
| Alimentation | CA 220-240 V (modèle européen), 50/60 Hz ; modèle multivoltz 110-240 V commutable |
| Consommation électrique | 25 W |
| Têtes | 2 têtes d'enregistrement/lecture en Permalloy dur, 2 têtes d'effacement en ferrite |
| Moteurs | 2 moteurs servo CC, 2 moteurs de chargement |
| Wow and flutter | 0,09 % (WRMS), 0,19 % (DIN) |
| Rapport signal/bruit (Digital NR activé) | 82 dB (Dolby OFF), 90 dB (Dolby B/C ON) |
| Réponse en fréquence (à -20 dB) | Type I : 20-18 000 Hz ; Type II : 20-19 000 Hz ; Type IV : 20-20 000 Hz |
| Distorsion harmonique | ≤ 0,8 % (à -4 dB) |
| Entrée ligne (sensibilité) | 100 mV (impédance 53 kΩ) |
| Sortie ligne (niveau) | 0,5 V (impédance 1,9 kΩ) |
| Sortie casque | 1,33 mW (impédance 32 Ω) |
| Fonctions principales | Lecture/Enregistrement auto-reverse, Dolby B/C NR, Dolby HX Pro, recherche musicale (±15), copie haute vitesse/normale, lecture par relais, saut de blancs, enregistrement synchronisé CD, systèmes numériques FLEX, TDNS, ALCA, Super Auto BLE XD, Legato Link, réduction de bruit numérique, mélange microphone, filtre MPX, télécommande système, minuterie |
| Entretien et nettoyage | Nettoyage régulier des têtes, rouleaux et cabestans avec un coton-tige imbibé d'alcool ; démagnétisation périodique des têtes avec un démagnétiseur |
| Sécurité | Ne pas exposer à la pluie ou à l'humidité ; débrancher avant entretien ; utiliser la tension correcte |
| Accessoires fournis | Notice d'utilisation, câbles de connexion (x2), cordon de télécommande, cordon de synchronisation CD, câble à fibre optique (sauf modèles UK et Europe) |
| Informations générales | Système 4 pistes, 2 canaux stéréo ; temps de bobinage rapide : environ 100 s (C-60) |
FOIRE AUX QUESTIONS - CT-W806DR PIONEER
Questions des utilisateurs sur CT-W806DR PIONEER
0 question sur cet appareil. Repondez a celles que vous connaissez ou posez la votre.
Poser une nouvelle question sur cet appareil
Téléchargez la notice de votre Enregistreur de cassette au format PDF gratuitement ! Retrouvez votre notice CT-W806DR - PIONEER et reprennez votre appareil électronique en main. Sur cette page sont publiés tous les documents nécessaires à l'utilisation de votre appareil CT-W806DR de la marque PIONEER.
MODE D'EMPLOI CT-W806DR PIONEER
CT-W8O6DR
STEREO DOUBLE CASSETTE DECK GRABADORA DE DOBLE CASETÉ ESTEREOFONICA
English
Espanol
- For the demo function, refer to back cover of these operating instructions.
Thank you for buying this Pioneer product.
Please read through these operating instructions so you will know how to operate your unit properly. After you have finished reading the instructions, keep them in a safe place for future reference.
In some countries or regions, the shape of the power plug and power outlet may sometimes differ from that shown in the explanatory drawings. However, the method of connecting and operating the unit is the same.
WARNING: TO PREVENT FIRE OR SHOCK HAZARD, DO NOT EXPOSE THIS APPLIANCE TO RAIN OR MOISTURE.
This product complies with the Low Voltage Directive (73/23/EEC), EMC Directives (89/336/EEC, 92/31/EEC) and CE Marking Directive (93/68/EEC).
THE POWER SWITCH IS SECONDARY CONNECTED AND THEREFORE DOES NOT SEPARATE THE UNIT FROM MAINS POWER IN THE STANDBY POSITION.
- Para la función de demostración, consulta laULTIMA págradede este manual de instrucciones.
Enhorabuena por la requisión de este producto Pioneer.
Lea Completely estemanual de instruetionesparaaprender a operarcorrectamenteelaparato.Despuesdehaberterminado lalectura delas instruetiones,guardeelmanual enun lugar seguro para poderlo consultar enel futuro.
En algunos Países o regiones, la forma de la clavija de alimentación y del enchufe de corriente pueda ser differsentes de la在哪ada en las ilustraciones de explicación. Sin embargo, el método de connexion y operation del aparato es el mesmo.
ADVERTENCIA: PARA EVITAR RIESGOS DE INCENDIOS O DESCARGAS ELECTRICAS, NO EXPONGA Este APARATO A LA LLUVIA NI A LA HUMEDAD.
Este producto cumple con la Directiva de Bajo Voltaje (73/23/CEE), Directivas EMC (89/336/CEE, 92/31/CEE) y Directiva de Marcacion CE (93/68/CEE).
EL INTERRUPTOR POWER ESTA CONECTADO AL SECUNDARIO Y POR LO TANTO NO SEPARA LA UNIDAD DE LA RED ELECTRICA EN LA POSICION DE ALIMENTACION EN STANDBY.
IMPORTANT 1

The lightning flash with arrowhead symbol, within an equilateral triangle, is intended to alert the user to the presence of uninsulated "dangerous voltage" within the product's enclosure that may be of sufficient magnitude to constitute a risk of electric shock to persons.
CAUTION
RISK OF ELECTRIC SHOCK DO NOT OPEN
CAUTION:
TO PREVENT THE RISK OF ELECTRIC SHOCK, DO NOT REMOVE COVER (OR BACK). NO USER-SERVICEABLE PARTS INSIDE. REFER SERVICING TO QUALIFIED SERVICE PERSONNEL.

The exclamation point within an equilateral triangle is intended to alert the user to the presence of important operating and maintenance (servicing) instructions in the literature accompanying the appliance.
CONTENTS
INSTALLATION 3
HANDLING CASSETTE TAPES 3
MAINTENANCE 5
CONNECTIONS 6
FRONT PANEL FACILITIES 8
PLAYBACK 16
SINGLE PLAYBACK 16
BLANKSKIP 16
RELAY PLAYBACK 17
MUSIC SEARCH 18
RECORDING 19
SINGLE RECORDING 19
DIGITAL ALCA SYSTEM 20
DIGITAL SUPER AUTO BLE XD TUNING 21
RECORDING MUTE 22
ERASING A TAPE 23
RECORDING USING A MICROPHONE 23
DIGITAL SYNCHRO RECORDING 23
CD-DECK SYNCHRO RECORDING 24
RELAY RECORDING 26
PARALLEL RECORDING 27
TAPE COOPYING 28
LAST MEMORY FEATURE 29
RECORDING AND PLAYBACK USING AN AUDIO TIMER .... 30
UNATTENDED RECORDING 30
WAKE-UP PLAYBACK 31
TROUBLESHOOTING 32
SPECIFICATIONS 38
INDICE
INSTALLACION 3
MANIPULación DE LAS CINTAS DE CASETE 3
MANTENIMIENTO 5
CONEXIONES 6
DISPOSITIVOS DEL PANEL FRONTAL 8
REPRODUCCION 16
REPRODUCCION SENCILLA 16
SALTOS DE ESPACIOS EN BLANCO 16
REPRODUCCION POR RELEVOS 17
BUSQUEDA DE CANCIONES 18
GRABACION 19
GRABACION SENCILLA 19
SISTEMA DIGITAL ALCA 20
AJUSTE DEL SISTEMA SUPER AUTO BLE XD DIGITAL ... 21
SILENCIAMIENTO EN GRABACION 22
BORRADO DE UNA CINTA 23
GRABACION EMPLEANDO UN MICROFONO 23
GRABACION SINCRONIZADA DIGITAL 23
GRABACION SINCRONIZADA DE DISCOS COMPACTOS....24
GRABACION POR RELEVOS 26
GRABACION EN PARALELO 27
COPIADO DE CINTAS 28
MEMORIA DE LOS ULTIMOS AJUSTES 29
GRABACION Y REPRODUCCION EMPLEANDO UN
TEMPORIZADOR DE AUDIO 30
GRABACION CON TEMPORIZADOR 30
REPRODUCCION DE DESPERTADOR 31
SOLUCION DE PROBLEMAS 35
ESPECIFICACIONES 39
This equipment has been tested and found to comply with the limits for a Class B digital device, pursuant to Part 15 of the FCC Rules. These limits are designed to provide reasonable protection against harmful interference in a residential installation. This equipment generates, uses, and can radiate radio frequency energy and, if not installed and used in accordance with the instructions, may cause harmful interference to radio communications. However, there is no guarantee that interference will not occur in a particular installation. If this equipment does cause harmful interference to radio or television reception, which can be determined by turning the equipment off and on, the user is encouraged to try to correct the interference by one or more of the following measures:
- Reorient or relocate the receiving antenna.
- Increase the separation between the equipment and receiver.
- Connect the equipment into an outlet on a circuit different from that to which the receiver is connected.
- Consult the dealer or an experienced radio/TV technician for help.
Information to User
Alteration or modifications carried out without appropriate authorization may invalidate the user's right to operate the equipment.
IMPORTANT 2
FOR USE IN THE UNITED KINGDOM
The wires in this mains lead are coloured in accordance with the following code:
Blue: Neutral
Brown:Live
If the plug provided is unsuitable for your socket outlets, the plug must be cut off and a suitable plug fitted.
The cut-off plug should be disposed of and must not be inserted into any 13 amp socket as this can result in electric shock. The plug or adaptor of the distribution panel should be provided with 5 amp fuse. As the colours of the wires in the mains lead of this appliance may not correspond with coloured markings identifying the terminals in your plug, proceed as follows:
The wire which is coloured blue must be connected to the terminal which is marked with the letter N or coloured black.
The wire which is coloured brown must be connected to the terminal which is marked with the letter L or coloured red.
Do not connect either wire to the earth terminal of a three-pin plug.
NOTE
After replacing or changing a fuse, the fuse cover in the plug must be replaced with a fuse cover which corresponds to the colour of the insert in the base of the plug or the word that is embossed on the base of the plug, and the appliance must not be used without a fuse cover. If lost, replacement fuse covers can be obtained from your dealer.
Only 5 A fuses approved by B.S.I. or A.S.T.A. to B.S.
1362 should be used.
[FOR USE IN THE UNITED KINGDOM] INFRINGEMENT OF COPYRIGHT
Recording and playback of copyrighted material may require consent. See Copyright Act 1956 and the Performers' Protection Acts 1958 and 1972.
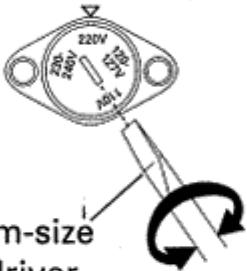
LINE VOLTAGE SELECTOR SWITCH
Only multi-voltage models are provided with this switch. European and UK models are not provided with this switch. Mains voltages in Saudi Arabia are 127V and 220V only. Never use this model with a 110 V setting in Saudi Arabia.
The line voltage selector switch is located on the rear panel. Check that it is set properly before plugging the power cord into the AC outlet. If the voltage is not properly set or if you move to an area where the voltage requirements differ, adjust the voltage to a more appropriate value.
the selector switch as follows: 1. Disconnect the power cord.
2. Use a medium-size screwdriver.
3. Insert the screwdriver into the groove on the voltage selector, and adjust so that the tip of the arrow points to the voltage value of your area.
INSTALLATION
When installing the deck, avoid locations with high temperatures or humidity, and make sure that the deck receives adequate ventilation.
- Do not install the deck in locations subject to direct sunlight, or near a space heater or other heating device, as this may cause damage to the finish or internal parts.
Malfunctions may also result if the deck is installed in an excessively humid or dusty location. Avoid installing the deck next to kitchen counters or other locations subject to oily smoke or humidity.
If the deck is placed directly on top of an amplifier, it may pick up humming or other noise. Also, if the amplifier generates a large amount of heat, the deck may malfunction.
If the deck is located near a television set, it may pick up interference noise, which will be recorded as a whistling sound on the tape. If this happens, move the deck further away from the television set or turn the television set off when operating the deck. - Do not place a cloth over the deck, or block the ventilation slots in any way. The ventilation slots on this deck are necessary to keep internal parts cool. If they are blocked, the deck may malfunction.
HANDLING CASSETTE TAPES
Do not use tapes longer than 90 minutes in length
Because over the C-90 tapes are very thin, they can easily jam in the pinch rollers and capstan, and they often are subject to other problems such as irregular winding. It is best not to use them with this deck. Use tapes of 90 minutes or less.
TIPS ON CASSETTE TAPES
- Leader tape (which cannot be recorded on) is provided at the beginning of a cassette tape. Let the tape run for about 5 seconds before starting to record, to allow the leader tape to clear the recording head.
- Do not leave a cassette tape exposed to the environment. Store the cassette in its case after use so that dust and dirt do not adhere to the tape, and so the tape will not get slack. Store tapes in a location free from magnetism, dust, dirt, oil, heat and humidity.
- If cassette tapes are irregularly wound, the tape may get jammed in the rollers. This can cause damage to both the tape and the deck. If you are not certain whether the tape is wound evenly, fast forward or rewind the tape from beginning to end, to make sure that the tape is properly wound.
INTERRUPTOR SELECTOR DE VOLTAJE DE LINEA
Solamente los modelos de multitension se proveen con este selector. Los voltajes principales en Arabia Saudita son solamente de 127V y 220V. Nunca utilizes este Modelo con un ajuste de 110V en Arabia Saudita.
El interruptor selector de voltaje de linea está en el panel posterior. Revise si está ajustado apropiadamente antes de enchufar el cable de alimentacion en la toma de corriente. Si el voltaje no está apropiadamente ajustado, o si Ud. se muda a un area donde losrequireimientos del voltaje diferieran,ajuste el interruptor selector de la?siguefte manera:
- Desconecte el cable de alimentacion.
- Utilice un destornillador de時間 mediano.
- Inserte el destornillador bajo de la ranura del selector de voltaje, y ajuste de tal manos, de que la punta de la flecha señale el valor del volteje de suarea.
INSTALLACION
Para la instalación de la grabadora, descarte los lugar con altas temperatas y humedad, y asegúrese de que el lugar está bien ventilado para la grabadora.
No instale la grabadora en Lugares en los que los rayos del sol den directamente, nioca de estufas u otheros aparatos de calefaction, porque el acabado o material del exterior podrián quedar adversamene afectados.
Si se instala el aparato en un lugar humedo o polvoriento pueda producirse además mal funciona bajo. No lo instale tampoco cerca de cocinas u otros Lugares susjetos a humos de aceites o humedad.
Si pone el aparato directamente encima de un amplificador, pueda ser que capte zumbido uthers ruidos. Ademas, si el amplificador genera mucho calor, la grabadora podria averiarse.
Si pone el aparato cerca de un televisor, es posible que capte ruido de interferencia, el qual可以选择 incluso grabarse como tono de silbido en la cinta. En tales casos, separe la grabadora del televisor o desconecte la alimentacion del televisor.
No ponga telas encima de la grabadora ni obstruya las revillas de ventilacion de ningun otherwise. Las revillas de ventilacion de esta grabadora son necessities para tener frias las partes internas. Si se bloquean, la grabadora couldra funciona mal.
MANIPULación DE LAS CINTAS DE CASETE
No utiliseCNTAs de mas de 90 minuto de duracion
Puesto que lasCNTas de mas de duracion que las C-90 son muy finas,pueden atascarse con calidad en los rodillos de presion y eje de arrastre,ynormallypresentanotros problemas tales como bobinado irregular. Lo mayor es no utilizeslas con esta grabadora. EmpleeCNTas de 90 minuto s o mas cortas.
CONSEJOS SOBRE EL EMPLEO DE LAS CINTAS DE CASETE
- La parte de cinta guía, en la que no se pueda grabar sonido, es la que está al principio de lasCNTAs de casete. Inicia la grabación antes de partir de cinta guía haya podido pasado por la cabeza grabadora.
- Nocede lasCNTAs de casete expuestos al aire libre.Garde los casetes en sus cajas, y de este modo evitarae que se adhiera la suciedad y el polvo asi como también que se afloje la cinta. Seleccione un lugar que no este expuesto a los efectos del magnetismo,polvo,suciedad y gratasa para guardarlos.
- Si lasCNTas de casete se bobinan de forma irregular,la cinta suepe atascarse en los rodillos. Esto peutecausear daños a la cinta y al aparato.Sino está seguro si la cinta se bobina de forma uniforme,realice el avance rápido o rebobinado de la cinta de principio a final,para asegurarse de que se bobina correctamente. 3
| A | Turn the pencil to take up the tape slack. Gire el lápiz para tensar la cinta. | B | Tab for Side A La lengüeta para la cara A | C | Cover with adhesive tape Pegue la cinta adhesiva fácil |
| For erasure prevention remove ... Para evitar el bomrado deCNTAS grabadas rompa ... | Tab for Side B La lengüeta para la cara B | ||||
| D | Sensor holes Orificios sensores | Erasure prevention tabs Lengüetas protectoras contra bomrado TYPE IV (metal) tape Cinta del TIPO IV (metal) | E | Sensor holes Orificios sensores | |
| TYPE II (High/CrO2) tape Cinta del TIPO II (posicion alta/CrO2) | |||||
CHECK CASSETTE BEFORE USE
Check the following items before loading a cassette tape:
Is the tape loose, or is some of the tape outside the cassette?
If some of the tape is loose or projecting outside the cassette shell, the tape may not load properly between the capstan and pinch roller. This will prevent the tape from operating properly, and may even damage the tape itself. To prevent this, insert a pencil into the reel hole and take up the slack (Fig. A). Some cassette tapes come with a plastic or thick paper stopper to prevent the tape from becoming slack. Remove this stopper when loading the cassette and replace it after using the cassette.
Are the accidental erasure prevention tabs intact?
These tabs allow you to prevent important recordings from being erased accidentally. When the tab on the cassette shell is broken off (Fig. B), it is not possible to activate the recording function, so valuable recordings will not be erased by mistake.
To rerecord on a cassette whose tab has been broken off, simply stick a piece of doubled adhesive tape over the hole (Fig. C).
When using TYPE IV (Metal) or TYPE II (High/CrO2) tapes, be careful not to block the sensor holes with the tape (Fig. D, Fig. E). If the holes are blocked, the automatic tape selector mechanism will not operate correctly.
NOTES:
- The accidental erasure tab for each side is the one located on the top left when the side that you want to protect is facing you.
- When breaking off the tab, do not use a magnetized screwdriver.
AUTOMATIC TAPE SELECTOR FUNCTION
This cassette deck is equipped with an automatic tape selector function which utilizes the sensor holes on the tape cassette to determine the type of tape being used. The deck is then set to match the tape recording bias and equalization.
NOTES:
- When using TYPE IV (Metal) tapes, make sure that the tapes have sensor holes.
- Make sure that the sensor holes on the cassette are not blocked; otherwise the tape selector mechanism will not function properly.
- Do not use TYPE III (FeCr) tapes.
4
En/Sp
COMPRUEBE EL CASETE ANTES DE UTILIZARLO
Compruebe los+puntossiguientesantesdecarguna cinta de casete:
¿Está la cinta floja o sale fuera del casete?
Si la cinta sale del casete o si está floja, pueda moverse sin pagar entre el eje de arrastre y el rodillo de presión, lo cual evitará que la cinta pueda desplazarse correctamente, motivo por el qual能把 danarse. En tales casos, tense la cinta insertando un lápiz a工程技术 del cubo del carrete y girelo. (Fig. A)
Algunos caseles poder tener un retenedor de plastico o de papel grueso para evitar que se afloje la cinta. Asegürese de extraerlo antes de introduir dicho casete en la grabadora, y vuélvalo a colocar afterwards de haber utilisé el casete.
¿Están interactas las lengüetas de protección contra el bomrado?
Los casetes disponibles de lengüetas de protección contra el bomrado que impiden el bomrado accidental de grabaciones valiosas. Si rompe estas lengüetas con un destornillador (Fig. B), impedirá el bomrado de programas incluo también ponga la grabadora en el modo de grabación presionando el botón de grabación por error. Para volver a grabar un casete carrente de lengüetas, cubra la abertura con una capa doble de cinta adhesiva (Fig. C).
Cuando utilise@cintas del TIPO IV (metal) o del TIPO II (posicion alta/CrO2),onga cuidado de no bloquear los orificios sensores de la cinta (Fig. D, Fig. E). Si se bloquean los orificios, el mecanismo del selector automatico de@cintas no funciona correctamente.
NOTAS:
- Las lengüetas de protección contra el bomrado está situadas en la parte superior izquierda de la cinta cuando se mira la parte a proteger.
- Cuando rompa la lengüeta de un casete, no emplee paraarlo un destornillador magnetizzato.
FUNCION DEL SELECTOR AUTOMÁTICO DE CINTAS
Esta grabadora de casete está provista de una función de selección automatica deCNTas que emplea los orificios senseores del casete para determinar el tipo de la cinta insertada para que la grabadora pueda ajustarse a la ecualizacion y polarizacion propias de la cinta.
NOTAS:
- En el caso deCNTas del TIPO IV (metal),aseguede que tengan orificios sensores.
- Asegürese de no bloquear los orificios de detectación del tipo de cinta, porque cuando se bloquean这些东西 orificios, el mecanismo del selector automatico de cintas no funciona correctamente.
No empleeCNTAs del TIPO III (FeCr).
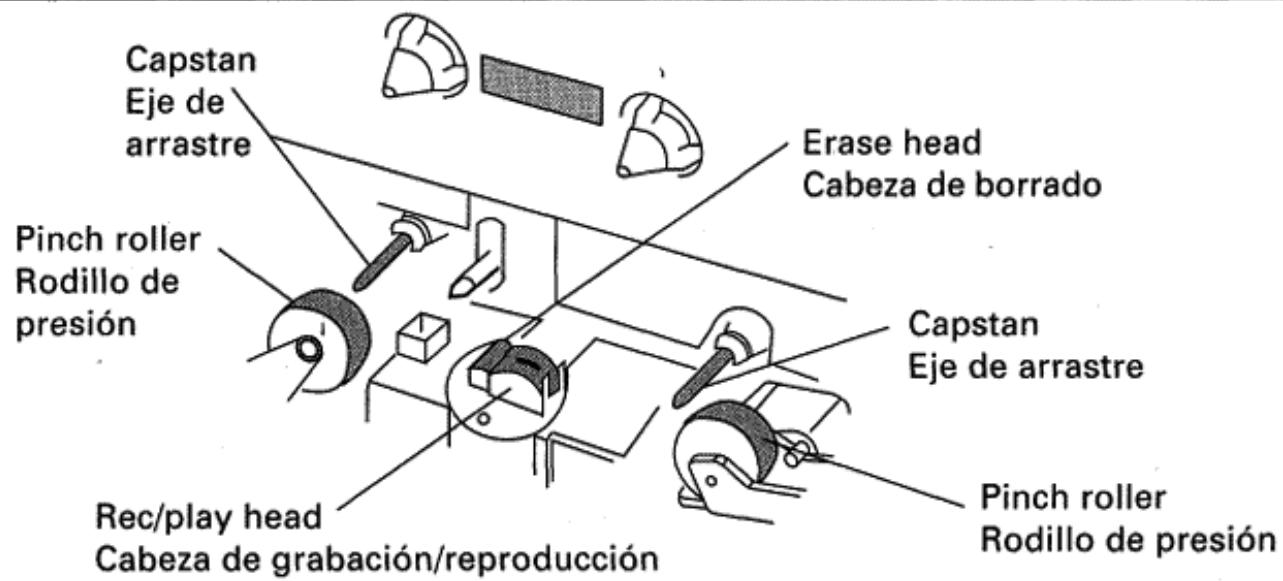
CLEANING THE HEADS, PINCH ROLLERS AND CAPSTANS
The heads, pinch rollers and capstans are likely to get dirty quite easily. If these parts, particularly the heads, get dirty, the high frequency components of a recording will not be reproduced and the stereo balance will be impaired, resulting in a deterioration of the playback sound. It is therefore recommended that the head section be cleaned regularly.
- Press the OPEN/CLOSE button to open the cassette door.
- Dip a cleaning swab in cleaning fluid and use it to wipe the heads, capstans and pinch rollers.
NOTE:
After cleaning the head section, do not load a tape until the cleaning fluid has dried completely (about two or three minutes).
DEMAGNETIZING THE HEADS
After using the cassette deck for a period of time, the heads will become magnetized. The same effect will occur if a magnetized screwdriver, magnet or other magnetized object is brought too close to the heads. When the heads become magnetized, highfrequency sounds will be lost during recording or playback, and interference noise may also occur. The heads should be regularly demagnetized with a head demagnetizer, which can be purchased at most audio stores.
When demagnetizing the heads, make sure that the STANDBY/ON switch of the cassette deck is set to ON. However, be sure to turn down the amplifier's volume control to its lower position, and disconnect any headphones from their headphones jack. For detailed instructions, refer to the operating instructions of the head demagnetizer.
CLEANING THE FRONT PANEL
Clean the deck regularly with a soft cloth. If the front panel becomes soiled, moisten a soft cloth with a weak solution of neutral detergent (diluted in five to six parts water), wring the cloth well, and wipe the panel clean. Never use volatile cleaners like thinners, benzine or alcohol because they will damage the panel finish.
CONDENSATION
When the unit is brought into a warm room from previously cold conditions or when the room temperature is suddenly increased, condensation may form inside and the unit may not be able to attain its full performance. To prevent this, allow the unit to stand for about an hour or raise the room temperature gradually.
LIMPIEZA DE LAS Cabezas, RODILLOS DE PRESION Y EJES DE ARRASTRE
Las cazas, los ejes de arrastres y rodillos de presión son partes propensas a ensuciarse fácilmente. Si las cazas se ensucian, los componentes de altas Frequencias del sonido no se reproducirán y el equilibrio entre canales se degrada, lo que resultará en el deterioro de la calidad sonora. Por lo tanto, se recomienda limpar regularmente estas piezas.
- Presione el botón OPEN/CLOSE para Abrir el compartmento del casete.
- Humedezca un palillo de algodón en liquido limpiador y limpie las cabezas, ejes de arrastre y rodillos de presión.
NOTA:
Después de la limpieza, no inserte ninguna cinta hasta que no se haya(secado porcomplete elliquido limpiador (lo cui toma de dos a tres minutos).
DESMAGNETIZACION DE LAS Cabezas
Las cabezas de grabación y reproducción se magnetizan con el uso. Elsameffecto se produce también cuando se acercan destornilladores, imanes uothersobjectos magnetizados a las cabezas.Esta magnetización produe la perdida de las altas Frequencias durante la grabación y la reproducción, y occasiona también interferencias de ruido. Por lo tanto,deferan desmagnetizarse periodically con un desmagnetizador, que podra adquirir por分开ado en casi todos los establishimientos de aparatos de audio. Antes de desmagnetizar las cabezas, cerciórese de que el interruptor STANDBY/ON de la grabadora esté en la posicón ON. Sin embargo, asegúrese de bajo el control del volumen del amplificador a su posicion minima,y de descenthufar los auriculas de la toma de auriculas. Para mas detalles, consulte el manual de instructiones suministrado con el desmagnetizador de cabezas.
LIMPieZA DEL PANEL FRONTAL
Limpie regularmente la grabadora con un paño suave. Si se ensucía mucho el panel frontal, humedezca un paño suave con detergente neutro (diluido con cinco ophis partes de agua), escurra bien el paño y frote el panel. No utilise nunca productos químicos volátilles tales como disolvente, bencina ni alcohol porque podrián darar el acabado del panel.
CONDENSACION DE HUMEDAD
Cuando se lva el aparato de una sala fría a另一边 caliente, o cuando la temperatura cambia con rapidez, se forma condensación en las partes mecánicas, lo cual afecta el rendimiento de la grabadora. En tales casos,deo el aparato en un lugar con temperatura mas calida durante aproximadamente una hora hasta que el aparato se ajuste a la temperatura de la sala. Para evaporar condensación cuando se caliente la sala,urrente gradualmente la temperatura de la sala. 5
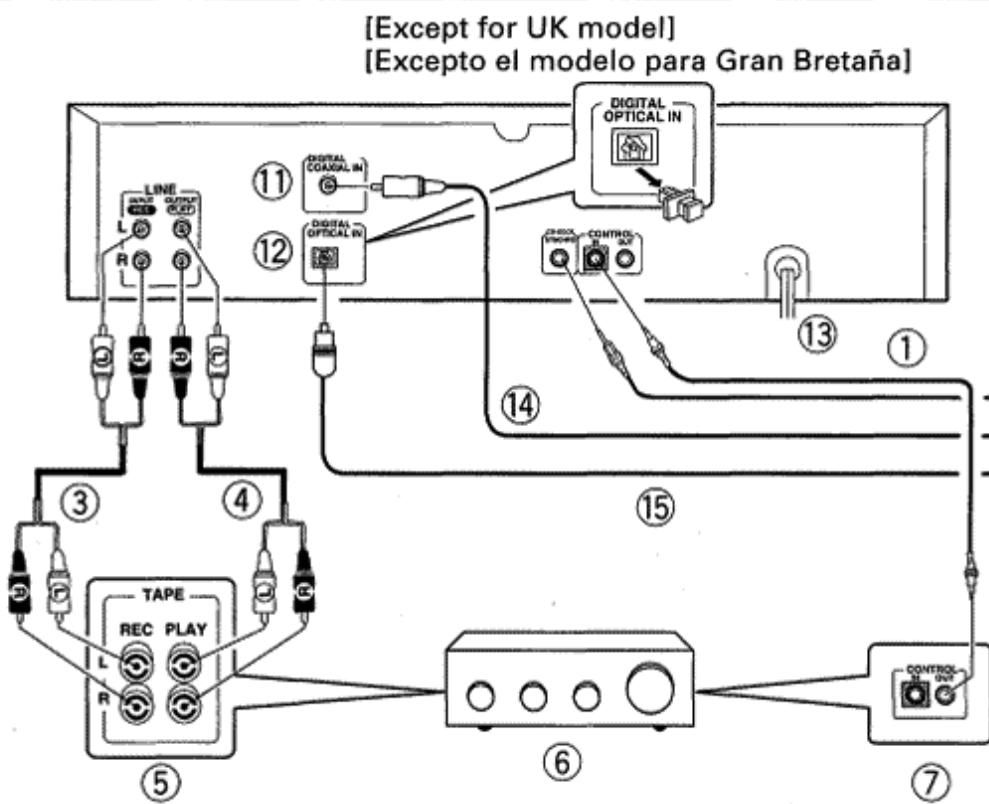
CONNECTIONS
① Remote control cord
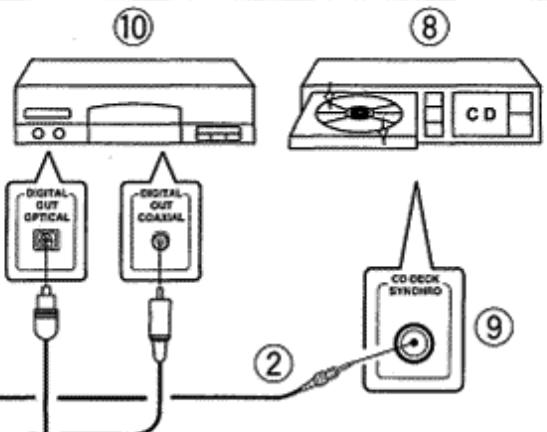
② CD-DECK SYNCHRO control cord
③ Recording connection cord
④Playback connection cord
⑤ TAPE REC/PLAY jacks
⑥ Stereo Amplifier
⑦ CONTROL OUT jack
8 Compact Disc Player
CD-DECK SYNCHRO jack
MD or CD player
⑪ DIGITAL COAXIAL IN jack (UK model only)
DIGITAL OPTICAL IN jack (except for UK model)
③ Power cord
④ Connection cord with pin plugs (Used only on UK model; sold separately)
Optical fiber cable
(Used on all models except those sold in UK. Sold separately for European model)
CONEXIONES
① Cable de control remoto
② Cabel de control de CD-DECK SYNCHRO
③ Cable de conexión de grabación
④ Cabel de connexion de reproduccion
⑤ Tomas TAPE REC/PLAY
⑥ Amplificador estereo
⑦ Toma CONTROL OUT
Reproducor de discos compactos
⑨ Toma CD·DECK SYNCHRO
Reproducor de discos MD o CD
① Toma de entrada coaxial digital (DIGITAL COAXIAL IN) (sólo el modelos para Gran Bretaña)
② Toma de entrada optica digital (DIGITAL OPTICAL IN) (excepto el modelo para Gran Bretana)
③ Cable de alimentacion
Cable de connexion con clavijas (Sólo se employs en el modelo para Gran Bretaña; de vente por separado)
Cable de fibra optica (se emplea en todos los modelos excepto en los que se venden en Gran Bretaná; de vente por partirdo para el Modelo para Europa)
Before making or changing the connections, set the STANDBY/ON switch to the STANDBY position and disconnect the power cord from the AC outlet.
Antes de hacer oCambiar las conexiones,pongael interruptor STANDBY/ ON en la posicion STANDBY y desenchufe el cable de alimentacion de la toma de CA.
Concerning about the remote control cord or CD-DECK SYNCHRO control cord, be sure to use the items included in the package.
En cuando al cable de control remoto o cable de control de CD-DECK SYNCHRO, asegúrese de utiliser los itemes incluidos en el paquete.
- Read through the operating instructions of the stereo components which you intend to connect to this unit.
Make sure that all of the connection plugs are inserted securely, as improper connections may generate noise.
PIONEER SYSTEM REMOTE CONTROL (1)
CONTROL IN jack
Use the enclosed Remote Control Cord to connect this jack to the CONTROL OUT jack of another component which bears the SR mark (indicating that it is equipped with PIONEER System Remote Control). You will then be able to operate this unit using the Pioneer system remote control unit. If the remote control unit does not have separate buttons for DECK I and DECK II, or a selection button to choose DECK I or DECK II, the buttons will only operate DECK II. To operate DECK I with a remote control unit which was not designed for double cassette deck, see page 13.
CONTROL OUT jack
Intermediary jack outputs signals from the CONTROL IN jack of this unit to the input jack of another unit. Connect this jack to the CONTROL IN jack of another component compatible with PIONEER System Remote Control.
NOTE:
Be sure to connect both of the control cord's plugs securely to the CONTROL IN and CONTROL OUT jacks. Do not connect only one end of the cable.
6
En/Sp
Lea el manual de instrucciones de los componentes estereofonicos a los que desea conectar este aparato.
Cerciorese de que las clavijas esten bien insertadas. Las conexiones incorrectly peuvent tener ruido.
CONTROL REMOTO DEL SISTEMA PIONEER (1)
Toma de entrada de control (CONTROL IN)
Utilice el cable de control remoto incluido para conectar esta toma en la toma CONTROL OUT de otro componente queonga lamarca (lo que indica que está equipado con control remoto del sistemas PIONEER). Entonces podra operar esta unidad usingo la unidad de control remoto del sistemas Pioneer.
Si la unidad de control remoto noiene botones分开ados para la platina I y la platina II, o un botón selector para esconger entre la platina I o la platina II, los botones solo operaran la platina II. Para operar la platina I con una unidad de control remoto no disénada para grabadoras de casete de doble, vea la página 13.
Toma de salute de control (CONTROL OUT)
Es una toma intermediaria que hace salir las senales desde la toma CONTROL IN de esta unidad a la toma de entrada de另一边 unidad. Conecte esta toma en la toma CONTROL IN de otro componente compatible con el control remoto del sistemas Pioneer.
NOTA:
Asegürese de conectar las clavijas del cable de control con seguridad en las tomas CONTROL IN y CONTROL OUT. No conecte solo un extremo del cable.
CONNECTING THE RECORDING AND PLAYBACK CORDS (3, 4)
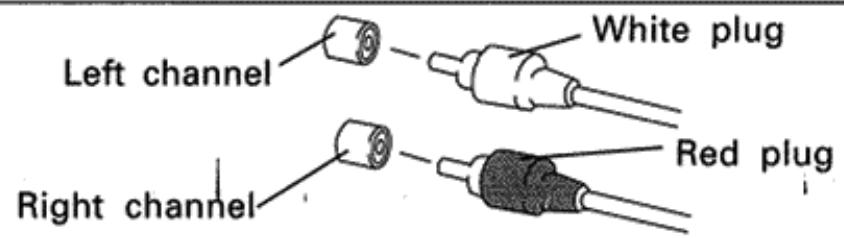
Connect the TAPE jacks of your amplifier to the LINE jacks of the cassette deck. Be sure to connect the REC (INPUT) jacks of the deck to the recording (output) jacks of the amplifier, and the PLAY (OUTPUT) jacks of the deck to the play (input) jacks of the amplifier.
- Connect the plugs properly:
Left channel - White plug
Right channel - Red plug
CD-DECK SYNCHRO RECORDING (2)
- CD·DECK SYNCHRO recording can be carried out when this unit is connected to a Pioneer CD player equipped with a CD·DECK SYNCHRO jack.
NOTES:
- Keep the input and output jacks connected between the amplifier and this unit, otherwise, the CD-DECK SYNCHRO recording cannot be carried out.
- Even when the CD player is connected to the amplifier with an optical fiber cable, connect the CD player to the amplifier or this unit with the input and output cords that have pin plugs.
- Do not use any cords other than the supplied accessory cord. (Use only the supplied accessory cord.)
CONNECTING THE DIGITAL SIGNAL (11, 12)
This unit can be connected to a CD player or MD player equipped with a digital output jack (the connected player must have a sampling frequency of 44.1kHz only).
- When digital signals are connected, digital synchro recording can be performed even if the CD player's synchro cord is not connected.
- Use a commercially available pin-plug connection cord to connect this unit's DIGITAL COAXIAL IN jack to the digital COAXIAL output jack of the other component (UK model only).
OPTICAL FIBER CABLE (15) (except for UK model)
- Remove the protective dust cap from this unit's DIGITAL OPTICAL IN jack.
- Use an optical fiber cable to connect the DIGITAL OPTICAL IN jack of this unit to the digital optical output jack of the other component.
- Align the plug of the optical fiber cable with the digital optical jack and fully insert the plug to make a secure connection.
Precautions concerning use of optical fiber cables
- Fully insert the optical fiber cable plugs all the way into the jacks.
- Be careful not to fold or crimp the cable. When coiling an optical fiber cable for storage, make sure the diameter of the coil is 15cm (6 in.) or larger.
- Use an optical fiber cable with a length of 3m (10 ft.) or less.
- Protect the optical fiber cable plugs from scratches and dust.
CONEXION DE LOS CABLES DE GRABACIOn Y REPRODUCCION (3, 4)

Conecte las tomas TAPE de su amplificador a las tomas LINE de la grabadora de casetes. Asegúrese de conectar las tomas REC (INPUT) de la grabadora a las tomas de grabación (salida) del amplificador, y las tomas PLAY (OUTPUT) de la grabadora a las tomas de reproducción (entrada) del amplificador.
- Conecte correctamente las clavijas:
Canal izquierdo - Clavija blanca
Canal derecho - Clavija roja
GRABACION SINCRONIZADA PARA DISCOS COMPACTOS-GRABADORA (2)
- La grabacion con la referencia CD·DECK SYNCHRO puede realizarse cuando se connecta estaunidad a un reproductor de discos compactos Pioneer provisto de toma CD·DECK SYNCHRO.
NOTAS:
- Mantenga estas tomas de entrada y calidad conectadas entre el amplificador y este aparato, porque de lo contrario, noURTRArealizarse la grabacion sincronizada para discos compactos-grabadora (CD*DECK SYNCHRO).
- Incluso cuando el reproductor de discos compactos está connectado al amplificador con cable de fibra optica, conecte el reproductor de discos compactos al amplificador o a este aparato con los cables de entrada y salida con clavijas.
- No utilise ningún或其他 cable que no sea el suministrado. (Utilice solamente el cable suministrado.)
CONEXION DE LA SENAL DIGITAL (11, 12)
Este aparato pueda connectarse a un reproductor de discos CD o MD provisto de toma de salute digital (el reproductor conectado debe tener una Frequencia de muestreo de 44,1 kHz solamente).
- Cuando se conectan senales digitales, la grabacion sincronizada digitaluede realizarse=aquel cable de sincronizacion del reproductorde discos CD no este conectado.
- Emplee un cable de connexion con clavijas disponible en las tiendas del ramo para connectar la toma DIGITAL COAXIAL IN de este aparato a la toma de salute COAXIAL del除外 componente (sólo el modelo para Gran Bretaña).
CABLE DE FIBRA ÖPTICA (15)
(excepto el modelos para Gran Bretaña)
- Extraiga la tapa protectora contra el polvo de la toma DIGITAL OPTICAL IN de este aparato.
- Emplee un cable de fibra optica para conectar la toma DIGITAL OPTICAL IN de este aparato a la toma de salute optica digital del除外 componente.
- Alinee la clavija del cable de fibra optica con la toma optica digital e inserte a fondo la clavija para hacer una connexion segura.
Precauciones relacionadas con el empleo de cables de fibra optica
- Inserte a fondo por complete los clavijas del cable de fibra optica en las tomas.
- Tenga cuidado de no doblar ni dañar el cable. Cuando se bobina un cable de fibra optica para guardarlo, el diametro de enrollado debe ser de 15 cm o mayor.
-
Emplee un cable de fibra optica con una longitud de 3 m o menos.
Proteja las clavijas del cable de fibra optica contra rayadas y contra el polvo. -
When the unit is not connected using an optical fiber cable, be sure to keep the protective dust cap plugged into the DIGITAL OPTICAL IN jack at all times.
CONNECTING THE POWER CORD (13)
Insert the power cord of the cassette deck into the accessory AC outlet of your amplifier, or into a normal household outlet.
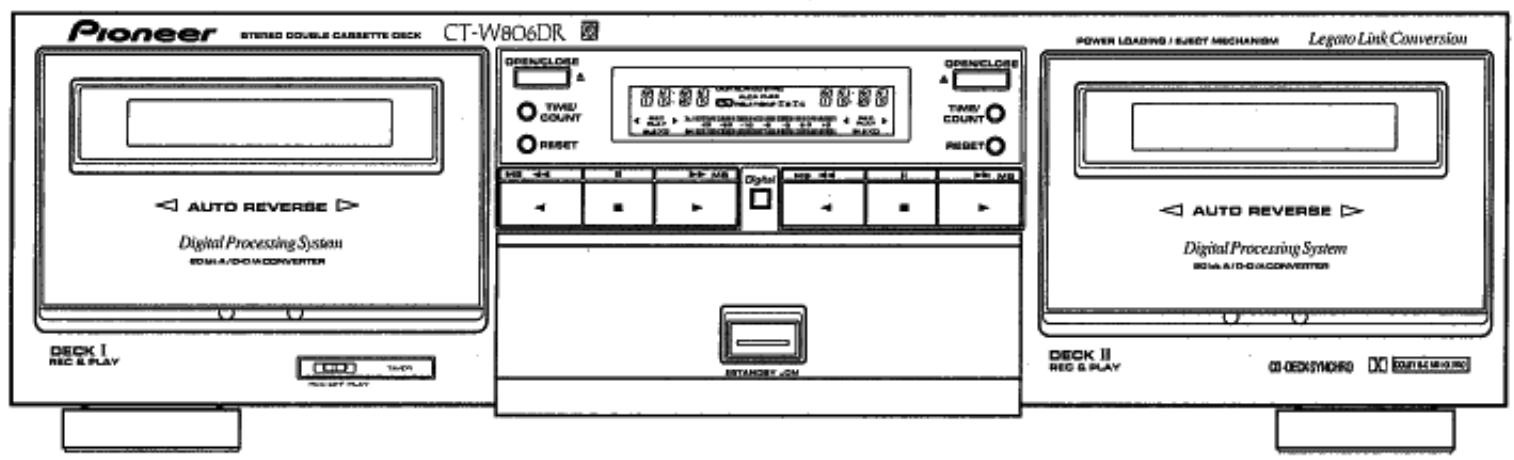
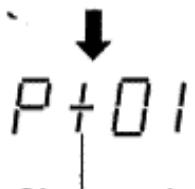
FRONT PANEL FACILITIES
CONEXIONES
- Cuando la unidad no se ha connectadoemployando un cable de fibra optica,aseguese demantener puesta la tapa protectora contra el polvo en la toma DIGITAL OPTICAL IN en todo momento.
CONEXION DEL CABLE DE ALIMENTACION (13)
Inserte el cable de alimentacion de la grabadora de casetes en la toma de CA para accesorios de su amplificador, o a un enchufe normal.
DISPOSITIVOS DEL PANEL FRONTAL
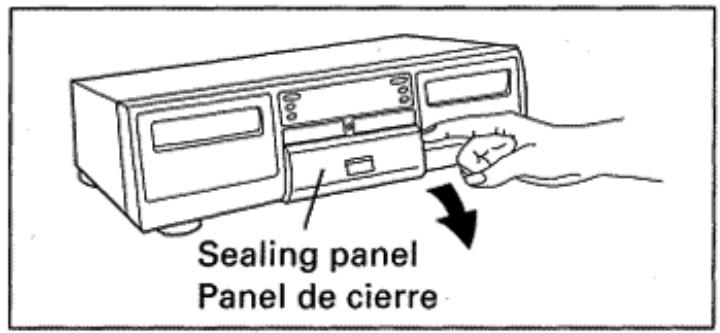
The illustration shows the condition in which the sealing panel is open.
- La ilustración muestra el estado con el panel de cierre abierto.
① STANDBY/ON switch
The STANDBY/ON switch activates the secondary transformer only. Even when the switch is in the STANDBY position, there will be a power flow to the deck's circuits as long as the power cord is connected to a power outlet.
When the STANDBY/ON switch is left ON, standby mode is controlled by the connected amplifier's System Remote Control function. Press the POWER button on the remote control unit to select the standby mode. This mode is displayed as "STBY" on the DECK II counter.
② DECK I operation buttons
: Reverse playback
:Stop
Forward playback
MS : Fast reverse/music search
/MS : Fast forward/music search
:Recording mute
:Pause
:Recording
③ DECK I counter reset button (RESET)
④ DECK I counter mode button (TIME/COUNT)
⑤ DECKI OPEN/CLOSE button (▲)
- If the tape is moving (recording, playback, tape winding, etc.), press the stop (■) button before pressing this button. NOTE:
If the power is turned off while the tape is moving, the cassette door may remain locked. In this case, turn the power on before pressing the OPEN/CLOSE (▲) button.
⑥ Function display
⑦ Digital indicator
Turns off while the Digital-NR is OFF.
FLEX button
DECK I/II BLE XD button PARALLEL REC button
8
En/Sp
① Interruptor de la alimentación (STANDBY/ON)
El interruptor STANDBY/ON activa solo el transformador secundario. Incluso con el interruptor puesto en la posicion STANDBY, circulará algo de corriente a los circuitos de la grabadora siempre y cuando el cable de alimentacion está enchufado a una toma de corriente.
Cuando el interruptor STANDBY/ON sedea en la posicion ON, el modo deerva se controla con la functiOn de control remoto del systema del amplificador connectado. Presione el boton POWER del controlador remoto para seleccionar el modo deerva. Este modo se visualiza en forma de "STBY" en el contactor de la platina II (DECK II).
② Botones de operación de la platina I (DECK I)
: Reproduccion en inversionion
:Parada
: Reproduccion en avance
<MS : Inversión rápida/búsqueda musical
/MS : Avance rápido/búsqueda musical
O : Silencimiento de grabacion
Pausa
:Grabacion
③ Botón de reposión del contador de la platina I (RESET)
④ Botón de modo del contador de la platina I (TIME/COUNT)
⑤ Boton de abertura/cierre de la platina I (OPEN/CLOSE) ()
- Si la cinta está en Movimiento (grabación, reproducción, bobinado de la cinta, etc.), presione el botón de parada (■) antes de presionar este botón.
NOTA:
Si se desconecta la alimentacion,msteadasla cinta está en movimiento,la puerta del casete peuteedquedarbloqueada. En este caso, conecte la alimentacion antes de presionar el boton OPEN/CLOSE ()
⑥ Visualizador de la funciona
⑦ Indicador digital
Se apaga@msteadlesystemade reduccionde ruidodigital estadesconectado(OFF).
Botón del sistema FLEX
Botón BLEXD de la platinas I/II
Botón de grabación en paralelo (PARALLEL REC)
⑨ DECK II OPEN/CLOSE button (▲)
- If the tape is moving (recording, playback, tape winding, etc.), press the stop (■) button before pressing this button.
NOTE:
If the power is turned off while the tape is moving, the cassette door may remain locked. In this case, turn the power on before pressing the OPEN/CLOSE (▲) button.
DECK II counter.mode button (TIME/COUNT)
⑪ DECK II counter reset button (RESET)
DECK II operation buttons
: Reverse playback
:Stop
Forward playback
MS : Fast reverse/music search
/MS : Fast forward/music search
O : Recording mute
II : Pause
:Recording
③ REV MODE button
DOLBY* NR button (OFF/B/C)
- Dolby noise reduction and HX Pro headroom extension manufactured under license from Dolby Laboratories Licensing Corporation. HX Pro originated by Bang & Olufsen.
- "DOLBY", the double-D symbol and "HX PRO" are trademarks of Dolby Laboratories Licensing Corporation.
DIGITAL IN button
CD-DECK SYNCHRO recording button (CD SYNC)
ALCA button
COPY MODE button
TDNS : TDNS copy (Normal speed copy).
NOR : Normal speed copy.
HI : High speed copy.
COPY START button
14 Recording level control (REC LEVEL)
15 Headphones jack (PHONES)
⑥ Microphone jack (MIC)
MIC LEVEL control
⑱ TIMER switch (TIMER REC/OFF/PLAY)
REC : Set to this position to perform timer recording.
OFF : Set to this position under ordinary conditions (when not using the timer or repeat functions).
PLAY : Set to this position to perform timer playback. When the switch is set to this position during normal playback, repeat playback of a single tape can be performed.
DIGITAL TDNS SYSTEM
DIGITAL TDNS system: Tape Duplication Noise Supressor system (hereafter abbreviated to TDNS)
Ordinary tape copy contains much noise due to the hiss noise of the copy source master tape and the noise due to tape recording bias. The digital TDNS is a system which allows to copy tape by reducing the noise. It reduces the hiss noise in the master tape by applying Digital-NR processing and the bias noise by decreasing the recording bias amount while the played music signal is in the no-signal condition. (As a result, the noise in the middle of music is equivalent to the master tape and the noise between music can be reduced.)
The digital TDNS copy may not be effective with a master tape in which the noise between music and music signal are hardly distinguishable. In such a case, use the normal-speed or high-speed copy function.
⑨ Boton de abertura/cierre de la plastina II (OPEN/CLOSE) ()
- Si la cinta está en Movimiento (grabación, reproducción, bobinado de la cinta, etc.), presione el botón de parada (■) antes de presionar este botón.
NOTA:
Si se desconecta la alimentacion,m吲nas la cinta está en movimiento,la puerta del casete pueda quedar bloqueada. En este caso, conecte la alimentacion antes de presionar el boton OPEN/CLOSE ()
⑩ Boton de modo del controler de la platina II (TIME/ COUNT)
① Boton de reposacion del contactor de la platina II (RESET)
Botones de operation de la plastina II (DECK II)
:Reproduccion en inversionion
Parada
:Reproduccion en avance
MS : Inversión rápida/búsqueada musical
/MS:Avance rapiido/busqueda musical
: Silencimiento de grabacion
Pausa
:Grabación
③ Boton del modo de inversionion (REV MODE)
Botón del sistema DOLBY* NR (OFF/B/C)
- Reductor de ruido Dolby y HX Pro headroom extension fabricados bajo licencia de Dolby Laboratories Licensing Corporation. HX Pro createo por Bang & Olufsen.
DOLBY, el símbolo de la doble D y HX PRO son marcas de Dolby Laboratories Licensing Corporation.
Botón de entrada digital (DIGITAL IN)
Botón de grabación sincrúnizada de disco CD a grabadora (CD SYNC)
Botón del sistema ALCA
Botón del modo de copiado (COPY MODE)
DOLBY, el símbolo de la doble D y HX PRO son marcas de Dolby Laboratories Licensing Corporation.
TDNS : Copiado TDNS (copiado a la velocidad normal).
NOR : Copiado a la velocidad normal.
HI : Copiado a alta velocidad.
Botón de inizio de copiado (COPY START)
④ Control del nivel de grabacion (REC LEVEL)
⑤ Toma de auriculares (PHONES)
⑥ Toma de micrófono (MIC)
⑦ Control del nivel del micrófono (MIC LEVEL)
18 Selector del temporizador (TIMER REC/OFF/PLAY)
REC : Ajustelo en esta posicion para efectuar grabaciones con temporizador.
OFF : Ajustelo en esta posicion en las conditiones normales (cuando no se emplean las functions del temporizador ni de repetition).
PLAY : Ajustelo en esta posicion para efectuar la reproduccion con temporizador. Cuando el selector se ajusta en esta posicion durante la reproduccion normal,uede efectuarse la repetition de la reproduccion de una cinta.
SISTEMA TDNS DIGITAL
Sistema TDNS DIGITAL: Sistema supresor de ruido para duplicacion deCNTas (abreviado a partir deaquicn las siglas inglesas TDNS)
El copiado normal deCNTAs contiene mucho ruido debido al siseo inherente de la cinta principal de fuente de copiado y al ruido debido a la polarizacion de grabacion de la cinta. El TDNS digital es un systema que permite copiar una cinta reduciendo el ruido. Reduce el ruido de siseo de la cinta principal de copiado aplicando el proceso de reduccion de ruido digital y el ruido de la polarizacion reduciendo la cantidad de polarizacion de grabacion cuando la senal musical reproduceda esta el estado de silencio (sin senal). 9
REVERSE MODE (REV MODE)
There are three settings:
One way mode position
When this mode is selected by pressing the REV MODE button, playback or recording is performed on one side of the tape only. When the tape reaches the end of the side, it stops automatically (auto stop function).
Two way mode position
When this mode is selected by pressing the REV MODE button, playback or recording can be performed on both sides of the tape. When the tape reaches the end of the first (forward) side, its direction is automatically reversed, and playback or recording continues on the other (reverse) side. When it reaches the end of the reverse side, the tape stops automatically (auto stop function). If playback or recording is started from the reverse side, the tape will stop when it reaches the end of that side.
Repeat mode position (RELAY/SKIP)
[If a tape is loaded in either DECK I or II]
Both sides of a tape are played back repeatedly using the auto reverse system. When 16 sides of the tape have been played back the deck stops automatically.
Recording will be performed in the same manner as the two way mode.
[If both DECK I and II are loaded with tapes]
Relay play will be used for playback (See page 17).
DIGITAL FLEX SYSTEM
- DIGITAL FLEX system: Frequency Level Expander system. (hereafter abbreviated to FLEX system)
This system automatically compensates high and low frequency level balance above 1kHz according to the 1/f curve during playback.
Generally, the envelope line of sound energy distribution of Hi-Fi sounds corresponds statistically with the 1/f curve.
The 1/f curve indicates that if the frequency doubles, the level decreases by approx. Half of the original frequency level. - During playback, the FLEX system automatically compensates tapes with poor sound quality at high frequency levels of 1kHz and over, based on the appropriate auditory characteristics.
The FLEX system is designed to improve high frequency reproduction in the 10kHz range be up to about 10 dB (max.), particularly in tapes with poor sound clarity and sound presence at high frequency levels. If the playback tape sound matches the 1/f curve, the FLEX system defeats compensation adjustment automatically. - When you press the FLEX button to turn the FLEX system on and start playback, the FLEX indicator flashes and compensation adjustment begins.
Compensation adjustment takes approximately 3-5 seconds to complete, depending on the music source. The indicator changes from a flashing to a steadily lit condition when the adjustment is completed. - When the FLEX system is engaged, each music selection is automatically adjusted during playback. System operation status is indicated by the FLEX indicators (flashing or steadily lit.)
NOTE:
When a tape has been recorded at a high frequency level above the compensation level, the FLEX system operation is automatically defeated during playback.
10
En/Sp
DISPOSITIVOS DEL PANEL FRONTAL
(Ccomo的结果,el ruido que hay en medio de la música es equivalente al de la cinta principal y pueda reducirse el ruido que hay entre las partes de música.)
- El copiado con TDNS digitaluede no ser eficaz con una cinta principal en la que el ruido entre las partes de musica y la senalde musica es dificil de distinguir. En tales casos, emplee la functiOn de copiado a velocidad normal o a alta velocidad.
MODO DE INVERSION (REV MODE)
Hay tres ajustes:
Posicion de un sentido
Cuando se selección este modo presionando el botón REV MODE, la reproduccion o grabación se efectuarán solo en una cara de la cinta. Cuando finalice la cara de la cinta, se para automatistically (función de parada automática).
Posicion de dos sentidos
Cuando se selección este modo presionando el botón REV MODE, la reproducción o grabación podrá efectuarse en ambas caras de la cinta. Cuando se termine la prima cara de la cinta (cara de avance), se invertirá automatistically la direccion y continua la reproducción o grabación en la另一边 cara (cara de inversionión). Cuando se terminen ambas caras, la cinta se parará automatistically (función de parada automática). Si la reproducción o grabación se iniciarn desde la cara de inversionión, la cinta se parará al terminar esta cara.
Posicion 已 del modo de repetition (RELAY/SKIP)
[Si hay una cinta introducida en la platina I o en la II]
Ambas caras de una cinta seran reproducios repetidamente usingo el systema de inversionomática. Cuando se produzcan las caras de una cinta 16 vezes, la platina se parará automatistically. La grabacion se realizara de igual forma que en el mode de dos sentidos.
[Si hayCNTAs introducidas en ambas platinas, la I y la II]
Para la reproduccion se utilizes la reproduccion con relevo (consulte la page 17).
SISTEMA DIGITAL FLEX
- Sistema DIGITAL FLEX: Sistema expansor del nivel de la Frequencia (abreviado a partir de hoy con las siglas inglesas FLEX)
Esteistema compensa automatistically el balance del nivel de las Frequencias altas y bajas por encima de 1kHz de acuerdo con la curva de 1/f durante la reproduccion. Por lo general, la linea de envolvente de la distribución de energia sonora de los sonidos de alta fidelidad (Hi-Fi) corresponde estadistically a la curva 1/f. La curva 1/f indica que si se duplica la Frequencia, el nivel se reduce aproximamente a la mitad del nivel de la Frequencia original. - Durante la reproduccion, el sistema FLEX compensate automatistically lasCNTas de poca calidad de sonido a niveles de alta freuencias por encima de 1kHz en base a lascharacteristicas de audio apropiadas. El Sistema FLEX estádisnado para perfeccionar la reproduccion de altas freuencias en el margen de 10kHz hasta aproximamente 10 dB (MAX) particularmente enCNTas de mala calidad de sonido y presencia de sonidos a niveles de altas freuencias. Si el sonido de reproduction corresponde con la curva 1 / f ,el sistemas FLEX anulara automatamente el ajuste de compensacion.
- Cuando se presiona el botón FLEX para activar el sistema FLEX e iniciar la reproducción, el identador FLEX parpadea y se inicia el ajuste de compensación. El ajuste de compensación tarda aproximamente 3~5segundos para completarse. El identador cambia del estado de parpadeo a la iluminación continua.
DIGITAL-NR
The Digital-NR is a noise reduction system developed originally by PIONEER. It is an innovative system capable of reducing almost all hiss noise regardless of how the tape being played was recorded.
- (This system can reduce noise based on operations during playback only.)
When a tape is played by selecting Dolby NR, the Dolby NR circuit reduces hiss noise then the Digital-NR circuit eliminates residual hiss noise remaining after the Dolby processing, thereby achieving a very high S/N.
Though this system has been set so that it is activated every time a tape is played, it is also possible to cancel its operation by the procedure described below. - Sufficient NR effect may not be obtained in case the level of noise recorded in the tape is higher than the hiss noise level.
To cancel the Digital-NR, press the DECK I TIME/COUNT button and DECK II TIME/COUNT button simultaneously while the power is ON. (The DIGITAL indicator on the center of the front panel should turn off.)
To activate the Digital-NR again, perform the same operation as above again. The Digital-NR cannot be turned ON/OFF in recording mode. Also note that the Digital-NR is always ON in the initial condition after turning the power from OFF to ON.
DOLBY NR & DOLBY HX PRO
Dolby NR Systems
Dolby NR systems are designed to reduce the amount of tape hiss, mainly in the treble components. During recording, the highpitched pianissimo sounds which are most characteristic of audible noise are boosted, and during playback, only these boosted sections are attenuated, so that tape sound is returned to normal. As a result, the noise is attenuated by an amount equal to the boosting in the treble range. The Dolby B-type NR system reduces noise in the treble range, cutting tape hiss and expanding the dynamic range. The Dolby C-type NR system is even more effective in reducing noise, as it reduces noise from the mid-range on.
NOTE:
When a tape has been recorded using the Dolby B-type or C-type NR system, the same DOLBY NR system selected for recording must be selected for playback.
Dolby HX PRO Headroom Extension System
The DOLBY HX PRO system controls the bias current during recording and maintains it at the optimal level based on the amount of the high-frequency components in the music signal. It therefore provides excellent recording quality even when recording signals from digital sources, which contain a large amount of high-frequency components. To guarantee optimal results, the HX PRO system is activated automatically when recording begins. Since this system controls the quality of recording itself, the clarity of the sound will be maintained even when the tapes are played back on another cassette deck which does not contain the HX PRO Headroom Extension System.
- Cuando se activa el sistema FLEX, cada selección musical se ajusta automatistically durante la reproduccion. El estado de operacion del sistemas se indica mirando si el indicator FLEX está o no encendido.
NOTA:
Cuando se ha grabado una cinta a un nivel de altas Frequencias por encima del nivel de compensacion, la operation del systema FLEX se desactiva automatistically durante la reproduccion.
SISTEMA DE REDUccion DE RUIDO DIGITAL
El Sistema de reduccion de ruido digital es un Sistema desarrollado originalmente por PIONEER. Es un innovador Sistema capaz de reducir casi todo el ruido de siseo independiente de como seibia grabado la cinta que se reproduce.
-
(Este sistemas可以把 reducir el ruido solamente bajo en operaciones durante la reproduccion.)
Cuando se reproduce una cinta seleccionando el sistema Dolby NR, el circuito Dolby NR reduce el siseo de la cinta y bajo el circuito de reduccion de ruido digital elimina el ruido de siseo residual que queda afterwards del proceso Dolby, consiguiendo asi una relacion de senal/ruido muy alta.
Aúnque este sistemas ha sido ajustado de modo que se activa cada vez que se reproduce una cinta, es también possible cancelar su operación mediante el procedimiento descririto a continuación. -
Es possible que no se obtenga un efecto de reduccion de ruido suficiente en el caso de que el nivel de ruido grabado en la cinta sea mas alto que el nivel de ruido de siseo.
Para cancelar la reduccion de ruido digital, presione simultaneamente el boton TIME/COUNT de la platina y el boton TIME/COUNT de la platina II,m间隙as la alimentacion esta connectada. (Se apagar a el indicator DIGITAL del centro del panel frontal.)
Para volver a activar la reduccion de ruido digital, efectue la misma operation que la arriba Mentionada. La reduccion de ruido digital no pueda activarse ni desactivarse en el modo de grabacion. Tenga también presente que la reduccion de ruido digital está sixthly activada en el estado inicial afterwards de connectar la alimentacionupon de haber estado desconectada.
SISTemas DE SONIDO DOLBY NR Y DOLBY HX PRO
Sistemas DOLBY NR
Los sistemas DOLBY NR están diseñados para reducir la�性 de siseos de la cinta, principalmente en los componentes de agudos. Durante la grabación, los sonidos de pianisimo de tono alto que son los más caracteristicos de los ruidos audibles se refuerzan, y durante la reproducción, solo estas secciones reforzadas se atenúan, de forma que el sonido de la cinta vuelve a ser normal. Como的结果, el ruido se atenea mediante una�性idad igual de refuerzo en el margen de agudos. El sistema DOLBY del tipo B reduce el ruido del margen de agudos, cortando los siseos de la cinta, y expandiendo el margen dinámico. El sistema DOLBY del tipo C esún más efectivo al reducir el ruido, ya que lo canta a partir del margen de Frequencias medias.
NOTA:
Cuando una cinta ha sido grabada empleando el sistema Dolby del tipo B o del tipo C, el本身就是 problema DOLBY NR seleccionado durante la grabacion devera seleccionarse también para la reproduccion.
■ Sistema de extension sonora DOLBY HX PRO
El Sistema DOLBY HX PRO controla la corriente de polarizacion durante la grabacion y la mantiene siempre en el nivel optimo de acuerdo al nivel de los componentes de altas Frequencias de las senales musicales. Por lo tanto, proportionsa una excellente calidad de grabacion aun cuando se graban senales desde fuentes digitales que contienen una grancantidadde componentes de altas Frequencias. 11
DIGITAL SUPER AUTO BLE XD
DIGITAL SUPER AUTO BLE
With commercially available cassette tapes, sensitivity and frequency characteristics might differ slightly from one another, even though the same sound adjustment is set for them.
To utilize tape characteristics to the maximum possible and realize an ideal recording which reproduces the source exactly, optimum recording level (sensitivity) and equalizer values must be set accordingly for each tape. In many conventional tape decks, standard values are fixed for standard tapes, thus nullifying the subtle differences between individual tapes. Perfect tuning by ear through use of fine adjustment controllers for bias and sensitivity is difficult and requires a lot of effort. It is especially difficult with a 2-head deck where the recording sound cannot be monitored.
The AUTO BLE on this unit automatically adjusts bias, level and equalizer by using a microprocessor to set the optimum recording characteristics accordingly for each tape.
- DIGITAL SUPER AUTO BLE XD (XD: eXtended Dynamic range)
This function enables recording with expanded dynamic range in the high range by combining our unique bias control technology with conventional AUTO BLE.
After adjusting the above bias, level, and equalization (BLE), this system checks the tape's recording capability by using relatively high level high-range test signals. During recording, DIGITAL SUPER AUTO BLE XD controls the bias to maximize the tape's recording capability.
This makes possible a more faithful recording of sources having a wide dynamic range in the high range.
- You can switch between AUTO BLE and AUTO BLE XD. Refer to pages 21~22 for the switching procedure.
- Since this system controls the quality of recording itself, the clarity of the sound will be maintained even when the tapes are played back on another cassette deck.
DIGITAL ALCA
DIGITAL ALCA: Auto Level Control with tape Analysis (hereafter abbreviated to ALCA)
The Digital ALCA system analyzes the tape performance and sets the recording level automatically according to the tape performance and input signal. With this function, the electronic level controller sets the recording level according to the input signal so that the level is as close as possible to the previously set peak recording level.
When selecting "Digital In", it will not change the recording level during recording. The microcomputer is able to calculate the best peak level for using tape before recording, because, it is knows the max. level of the digital audio data.
DISPOSITIVOS DEL PANEL FRONTAL
Para garantizar los resultados de grabacion optimos, el systema HX PRO se activa automatistically cuando empieza la grabacion. El systema DOLBY HX PRO opera independiente del ajuste del interruptor del systema DOLBY NR. Ademas, bajo que este systema alecta la calidad de grabacion por si mesmo, la claridad y alta calidad del sonido se mantiene excepta lasCNTAs se reproduzcan en othera grabadora que noonga el systema de extension sonora HX PRO.
SISTEMA SUPER AUTO BLE XD DIGITAL
SISTEMA SUPER AUTO BLE DIGITAL
Con lasCNTAs de casete disponibles en las tiendas del ramo, lascharacteristicas de sensibidad y de Frequencia poden ser algo distinctas de cinta a cinta, excepte se realice elismo ajustedel sonido para todas.
Para aprovechar al máximo las caracteristicas de la cinta yatarquearuna grabacion ideal que reproduce con exactitud la fuente de sonido,debenajustarse optimamente el nivel de grabacion (sensibilidad) y la ecualizacion para cada cinta.En muchas grabadoras convencionales,se fijan valores estandar para las cintas estandar,suprimiendo asi las sutiles diferencias entre las cintas individuales.Elajuste perfecto a odo empleando controladores de ajuste preciso para la polarizacion yla sensibilidad es dificil yrequiree mucho esfuerzo.Es especially dificil con grabadoras de 2 cabezas en las que el sonido de grabacion no pueda monitorizarse.
El sistema AUTO BLE de este aparato ajusta automatistically la polarización, el nivel y la ecualización Employment un microprocesador paralijar las optimas caractéristicas de grabación de acuerdo con cada cinta.
- SISTEMA SUPER AUTO BLE XD DIGITAL (XD: Margen dinamico ampliado)
Esta funciona permitte la grabacion con el margen dinamico ampliado en la gama de altas Frequencias combinando nuestra Tecnologia exclusiva de control de la polarizacion con el systema AUTO BLE convencional.
Después del ajuste anterior de la polarización, del nivel, y de la ecualización (BLE), este sistemas comprueba la capacité de grabación de la cinta employando senales de prUEBA de Frequencia relativamente de alta. Durante la grabación, el sistema SUPER AUTO BLEXD DIGITAL controla la polarización para maximizar la capacité de grabación de la cinta.
De este modo es possible encontrar una grabacion mas fiel de fuentes que tienen un margen dinamico amplio en el margen de altas Frequencias.
- Podrá cambio entre AUTO BLE y AUTO BLE XD. Consulte las páginas 21~22 para ver el procedimiento de cambio.
- Puesto que este sistemas controla la calidad de la grabacion en sí, la claridad del sonido se mantendra incluso se reproduzcan lasCNTAs enotrasgrabadoras.
SISTEMA DIGITAL ALCA
DIGITAL ALCA: Control automático del nivel con análisis de la cinta (abreviado a partir de然是 con las siglas inglesas ALCA) El sistemas digital ALCA analiza el rendimiento de la cinta y ajusta automatistically el nivel de grabacion de acuerdo con el rendimiento de la cinta y la senal de entrada. Con esta direccion, el controlador electronomic del nivel ajusta el nivel de grabacion de acuerdo con la senal de entrada de modo que el nivel sea lo mas parecido possible al nivel de grabacion pico previamente ajustado. Cuando se seleccione "Digital In", no cambiaré el nivel de grabacion durante la grabacion. El microprocesador es capaz de calcular el mejor nivel pico para emplear la cinta antes de la grabacion, porque conoce el nivel máximo de los datos de audio digital.
LEGATO LINK CONVERSION
The Legato Link Conversion brings about a drastic expansion of the reproduced band. The Legato Link Conversion circuit assume the original signals before recording based on the recorded signals and reproduce music more closely to the originally performed sound.
OPERATION OF DECK I WITH A REMOTE CONTROL UNIT NOT DESIGNED FOR DOUBLE DECKS (SYSTEM REMOTE CONTROL)
Selecting DECK I
In order to operate DECK I with the remote control unit, adjust the unit as follows: With the power off, press and hold the stop (■) button of DECK I, and turn the power on. Continue to hold the stop (■) button for approximately five seconds. DECK I can now be operated using the remote control unit, but DECK II cannot.
Switching to DECK II
To restore remote control operation to DECK II, press the stop (■) button of DECK II while DECK II is in stop mode. DECK II can now be operated using the remote control unit. Remote control operation can be switched back and forth between decks by pressing the stop button of the desired DECK while it is in stop mode.
NOTE:
If a power failure or a sudden change in the power supply (caused by lightning, etc.) occurs, the unit is reset to its original state. Only DECK II can be operated by remote control. To restore operation to either deck, repeat the above procedure from the beginning.
FUNCTION DISPLAY
① DECK I counter indicator
Normally the tape counter or time counter is displayed (see page 15). It flashes for 4 seconds after turning the power on.
② ALCA SYSTEM indicator
Lights when the ALCA system is used.
③ DIGITAL IN indicator
This indicator light when the DIGITAL IN button is pressed.
④ CD-DECK SYNCHRO indicator (CD SYNC)
This indicator lights steadily when the CD SYNC button is pressed and the operation starts.
⑤ FLEXindicator
This indicator lights when the FLEX button is pressed.
⑥ DECK II counter indicator
Normally the tape counter or time counter is displayed (see page 15). It flashes for 4 seconds after turning the power on.
⑦ DECK II tape transport mode indicators
See table entitled "TAPE TRANSPORTATION MODE INDICATORS" on page 14.
⑧ DECK II AUTO BLE XD indicator
See page 21.
CONVERSION DE ENLACE DE LIGADO
La conversion de enlace de ligado proporciona una expansión drástica de la banda reproduceda. El circuito de conversion de enlace de ligado asume las señales originales antes de la grabación en base a las señales grabadas y reproduce la música lo más parecida possible al sonido original.
OPERACION DE LA PLATINA I EMPLEANDO UNA UNIDAD DE CONTROL REMOTO NO DISENADA PARA GRABADORAS DOBLES (CONTROL REMOTO DEL SISTEMA)
Selección de la plastina I
Para operar la platina I con la unidad de control remoto, ajuste el aparato del modo suiviente: Con la alimentacion desconectada, presione y mantenga presionado el boton de parada (■) de la platina I y connecte la alimentacion. Siga presionando el boton de parada (■) durante uno cinco segundos. La platina I pourraitentries operarse usinga la unidad de control remoto, pero no couldrutilizarse para la platina II.
Operación de cambio a la platina II
Para reponer la operación de control remoto a la platina II, presione el botón de parada (■) de la platina II cuando la platina II está en el modo de parada. La platina IIouldra先进技术 operarse usingla unidad de control remoto. La operación de control remoto podrá Cambiarse entre las platinas presionando el botón de parada de la platina deseada cuando está en el mode de parada.
NOTA:
Si se produce una falla de la red electrica o algo semejante (debido a rayos, etc.), el aparato se repondrá al estado original. Sóloouldoperarse la platina Il mediatede I control remoto Para reanudar la operación del综合素质, repita los pasos arriba descritos desde el principio.
VISUALIZADOR DE FUNCIONES
① Indicador del contour de la platina I
Normalmente, se visualiza el contador de la cinta o el控制器 de tiempo (vea la page 15). Parpadea durante 4segundos antes de haber connectado la alimentacion.
② Indicador delsystemaALCA
Se enciende cuando se utilizes el sistema ALCA.
③ Indicador de entrada digital (DIGITAL IN)
EstevidicadorseenciendewhenspresionaelbotonDIGITALIN.
④ Indicador de sincronizacion de disco CD con grabadora (CD SYNC)
Este指示器queencendidowhenspresionaelbotondCDSYNCyseinicia laoperacion.
⑤ Indicador delsystema FLEX
EstevidicadorseencienducandoespresionaelbotonFLEX.
⑥ Indicador del contador de la platina II
Normally, se visualiza el contador de la cinta o el contador de tiempo (vea la page 15). Parpadea durante 4segundos antes de haber connectado la alimentacion.
⑦ Indicadores del modo de transporte de la cinta de la plastina II
Vea la tabla titulada "INDICADORES DE MODO DE TRANSPORTE DE LA CINTA" en la page 14.
⑧ Indicador delsystema AUTO BLEXD de la platina II
Vealapagina21.
⑨ DOLBY NR B/C indicator
10 Level meter
Holds peak for about 1.3 seconds.
The "●" mark beside the 0 dB mark indicates the Dolby NR system standard level.
⑪ Reverse mode indicator
12 DECK I AUTO BLE XD indicator
See page 21.
13 DECK I tape transport mode indicators
See table entitled "TAPE TRANSPORTATION MODE INDICATORS" on page 14.
TAPE TRANSPORTATION MODE INDICATORS

REC PLAY


REC PLAY

These indicators display the current tape transport mode. The chart below shows the meaning of each of these indicators. The indicators for DECK I and DECK II differ only in the location of the PLAY and REC indicators (DECK I-left, DECK II-right).
For both DECK I and II
Flashing rapidly
For both DECK I and II
| Forward mode | Reverse mode | |
| Stop | ▲ | ▲ |
| Playback | PLAY ▲ | ▲ PLAY |
| Fast forward | ▲ | ▲ |
| Fast reverse | ▲ | ▲ |
| Forward music search | ▲ PLAY▼▲ | ▲ PLAY▼ |
| Reverse music search | ▲ PLAY▼▲ | ▲ PLAY▼▲ |
□ Flashing slowly
| Forward mode | Reverse mode | |
| Playback pause | PLAY | PLAY |
| Recording | REC | REC |
| Recording standby | REC | REC |
| Recording mute | REC | REC |
9 Indicador delsystemaDOLBYNRtips B/C
Medidor del nivel
Retiene los picos duranteunos 1,3segundos.
Lamarca“●”alado de0dBindicael nivel estandardelsistema Dolby NR.
1 Indicador del modo de inversionion
② Indicador delsystema AUTO BLEXD de la platina I
Vealapagina21.
⑬ Indicadores del modo de transporte de la cinta de la plastina I
Vea la tabla titulada "INDICADOS DE MODO DE TRANSPORTE DE LA CINTA" en la page 14.
INDICADOS DE MODO DE TRANSPORTE DE LA CINTA

REC PLAY


REPCPLAY

Estosindicadoresmuestranlacondiciondetransportede la cintaactual.Lagraphrifica seguiente muesa el significado de这些 indicadores.Losindicadorespara laPlatinaIylaPlatinaII differedenoledelugardelosindicadoresdePLAYyREC(la PlatinaI enla izquierda,la PlatinaII enla derecha).
Para las platinas I y II
Parpadeo rápido
Para las platinas I y II
| Modo de avance | Modo de inversionión | |
| Parada | ||
| Reproducción | PLAY | PLAY |
| Avance=rápido | ||
| Inversiónrápido | ||
| Búsqueada decanções deavance | PLAY | PLAY |
| Búsqueada decanções deinversión | PLAY | PLAY |
Parpadeo lento
| 1 | Modo de avance | Modo de inversionión |
| Pausa en reproducción | PLAY | PLAY |
| Grabación | REC | REC |
| Preparado para grabación | REC | REC |
| Silenciamiento en grabación | REC | REC |
TWO MODES COUNTER
Counter Mode button (TIME/COUNT)
Press the button, and 2 modes change alternately.
Tape counter Time counter
Tape counter
Different counters are provided for DECK I and II. The numbers useful on the counters increase/decrease as a tape runs. It is useful if you make a note of the location and length of a selection while recording or playing back. You can then easily locate a desired selection or where to resume recording.
Time counter
- This indicates the elapsed time for recording or playback. This automatically starts counting when recording or playback starts. During fast-forwarding/rewinding, the counter automatically switches to a tape counter.
- The time counter indicates only the time duration of recording or playback. When recording or playback is changed to fastforwarding, rewinding, or music search, the counter switches from the time counter to the tape counter. When the operation returns to recording or playback, the counter switches to the time counter.
- Tape counter indication

Time counter indication

Counter reset button (RESET)
Press this button to reset the tape counter to 0000, or to reset the time counter to 00:00.
Counter indicator during music search

Normal tape counter indicator
Counter indicator during music search
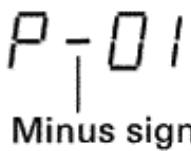
- A plus sign (+) appears during music search in the forward direction.
- A minus sign (-) appears during music search in the reverse direction.
The last two digits of the counter indicator show the number of selections to be skipped. If three selections are to be skipped, for example, it shows "P+03" initially. The number then decreases by 1 each time a selection is skipped ("P+02" "P+01 etc.). When the deck resumes playback, the normal tape counter reappears.
CONTADOR DE DOS MODOS
Botón de modo de captador (TIME/COUNT)
Presione el boton, y los dos modelos cambian sucesivamente.
Contador de la cinta = Contador de tiempo
Contador de la cinta
Se incorpocran contactores distinctos para la platina I y II. El numero de un controler aumenta/disminuye a medida que corre la cinta. Es conveniente si se anota el contenido grabado y el margen del controler durante la grabacion o reproduccion.
Entonces, pode encontrar con fácilad la cancion deseada o la ultima parte grabada para proseguir la grabacion.
Contador de tiempo
- Visualiza el tiempo transcurrido durante la grabación o reproducción. El控制器 de tiempo se activa automatistically cuando launidad se ajusta para la grabación o reproducción. Durante el avance rápido/rebobinado, el控制器 cambia automatistically al控制器 de la cinta.
- El contador de tiempo visualiza sólo la duración de la grabación o reproducción. Cuando la grabación o reproducción se cambian a avance rápido, rebobinado o búsqueada musical, el contador es reemplazado por el contador de cinta. Cuando se reanuda la grabación o reproducción, el contador de tiempo reaparece de nuevo.
- Indicación del contador de la cinta

- Indicación del contador de tiempo

Botón de reposión del contador (RESET)
Presione este boton para reponer el contador de la cinta a 000 o para reponer el contador de tiempo 000.
Indicación del contador durante la búsqueada musical

Indicación del contador de cinta normal
Indicación del contador durante la búsqueada musical
Signo mas

Signo menos
- Un signo más (+) aparece durante la búsqueada musical en la direccion de avance.
- Un signo menos (-) aparece durante la búsqueada musical en la direccion de inversionión.
Los dos ultimos digitos de la indicacion del contador indican el numero de caniones a saltarse. Si deben saltarse tres caniones, por exemple, estarar P + 03 primero, despues de lo cui el numero se reducirá en 1 cada vez que se salte una canción ("P+02 "P+01", etc.) Cuando el aparato se establezca en el mode de reproduccion, aparecerá de nuevo el控制器 de la cinta normal.
PLAYBACK
SINGLE PLAYBACK (Either DECK I or DECK II)
REPRODUCCION
REPRODUCCION SENCILLA (Empleando una sola platina, ya sea la I o la II)
- Load a prerecorded tape in DECK I or II.
- Select the Dolby NR mode with the DOLBY NR button.
Always set the same Dolby NR system that was used for recording.
- Select the reverse mode with the REV MODE button (see page 10).
- Set the stereo amplifier for tape playback.
- Press the playback (▶ or ) button of either DECK I or II.
To improve high frequency sound during playback in tapes with poor recordings
Press the FLEX button and playback the tape.
To stop playback temporarily
Press the pause (II) button.
- To resume playback, either press the pause (II) button again, or press the playback (▶ or ←) button.
To fast forward or rewind tape
: Press in stop mode to fast forward the tape on the side which can be seen through the cassette door (the tape on the invisible side is rewound).
: Press in stop mode to rewind the tape on the side which can be seen through the cassette door (the tape on the invisible side is fast forwarded).
To stop playback
Press the stop (■) button.
BLANKSKIP
This function allows you to skip unrecorded portions of the tape during playback.
Select the [ ] reverse mode with the REV MODE button.
NOTES:
- When the REV MODE button is set to the position, the relay mode will be selected.
- When this mode is selected, if the tape deck encounters an unrecorded portion of tape more than 15 seconds in length, it will fast forward the tape until it encounters another recorded portion, and resume playback from that point.
RELAY PLAYBACK
When relay playback mode is selected, continuous playback can be performed. When the tape in the first deck reaches its end and stops, the other deck will automatically begin playback.
16
En/Sp
- Inserte una cinta grabada en la platina I o II.
-
Seleccione el modo Dolby NR con el boton DOLBY NR.
-
Ajuste sempre el@mismo problema Dolby NR que el正常使用 para la grabacion.
-
Selección el modo de inversionión con el botón REV MODE (vea la頁面 10).
- Ajuste el amplificador estereo para reproduccion deCNTas.
- Presione el botón de reproducción (▶ o ⊥) de la platina I o de la II.
Para melhorar el sonido de altas Frequencias durante la reproduccion deCNTAs con grabaciones deficientes
Presione el boton FLEX y reproduzca la cinta.
Para detener momentáneamente la reproducción
Presione el boton de pausa (II).
- Para reanudar la reproduccion, presione el boton de pausa (II) o el de reproduccion other vez ( o ).
Para realizar el avance rápido o el rebobinado de la cinta
: Presiónelo en el modo de parada para realizar el avance rápido de la cinta en la cara que pueda verse por la puerta del casete (la cinta de la cara que no se ve se rebobina).
: Presiónelo en el modo de parada para realizar el rebobinado de la cinta en la cara que pueda verse por la puerta del casete (la cinta de la cara que no se ve se avanza rápidamente).
Cuando se termina la reproduccion
Presione el botón de parada (■).
SALTOS DE ESPACIOS EN BLANCO
Estefuncionlepermitesaltar espaciossingrabardela cinta durante la reproduccion.
Selección el modo de inversion [ ] con el botón REV MODE. NOTAS:
- Cuando el botón REV MODE se ajuste en la posición, se selecciónará el modo de relevo.
- Cuando se selección este modo, y si la platina oculta una parte sin grabar durante más de 15segundos, el aparato avanza rápidamente la cinta hasta el principio de lasuma parte grabada, y對於 reanuda la reproducción desde este punto.
REPRODUCCION POR RELEVOS
Cuando se selección el modo de reproducción porreibvos, podra efectuarse la reproduccion continua. Cuando la cinta de la primera platina finaliza y se para, la othera platina inicia automatically la reproduccion.
- Load prerecorded tapes in DECK I and DECK II.
- Select the Dolby NR mode with the DOLBY NR button.
Always set the same Dolby NR system that was used for recording.
- Select the [ ] reverse mode with the REV MODE button (see page 10).
- Set the stereo amplifier for tape playback.
-
Press the playback (▶ or ) button of the deck that will start to play first.
-
When the tape in one deck ends, the other deck automatically begins playback.
- To cancel relay playback, press the stop (■) button.
To improve high frequency sound during playback in tapes with poor recordings
Press the FLEX button and playback the tape.
NOTES:
Relay playback can begin from either DECK I or DECK II.
- The tape in the idle deck can be replaced during relay playback mode, allowing many tapes to be played back continuously. This is a convenient feature for parties, background music, etc.
- When this mode is selected, if the deck encounters an unrecorded portion of tape more than 15 seconds in length, it will fast forward the tape until it encounters another recorded portion, and resume playback from that point.
To stop playback temporarily
Press the pause (II) button.
To resume playback, either press the pause (II) button again, or press the playback ( or ) button.
To stop playback
Press the stop (■) button of the operating deck.
PLAYBACK SEQUENCE WITH REV MODE BUTTON SETTING
The playback sequence depends on the setting of the REV MODE button and on which playback (▶ or ) button is pressed first. The playback sequence for each possible selection is shown below.
*2 In the repeat (C) mode, relay playback always begins from the forward direction.
I> :DECK I forward playback
I:DECK I reverse playback
II> : DECK II forward playback
II:DECK II reverse playback
: Auto-reverse function
Relay
| REV MODE button | Starting playback button | Other deck mode | Playback sequence |
| ∅ | DECK I ▲ | *2 | |▷∞|←→||▷∞||←→|▷∞|←...15 times relay (32 sides playback) |
| ∅ | DECK I ▲ | *2 | |←→||▷∞||←→|▷∞|←→||▷∞|←...15 times relay (31 sides playback) |
| ∅ | DECK II ▲ | *2 | ||▷∞||←→|▷∞|←→||▷∞||←...15 times relay (32 sides playback) |
| ∅ | DECK II ▲ | *2 | ||←→|▷∞|←→||▷∞||←→|▷...15 times relay (31 sides playback) |
- Inserte@cintas grabadas en las platinas I y II.
-
Selezione el modo Dolby NR con el botón DOLBY NR.
-
Ajuste siempre el@mismo problema Dolby NR que elutilizzato para la grabacion.
-
Selección el modo de inversion [ ] con el botón REV MODE (vea la頁ina 10).
- Ajuste el amplificador estéreo para la reproducción deCNTAs.
-
Presione el botón de reproducción (▶ o <) de la plastina que deba empezar la reproducción.
-
Cuando finaliza la cinta de una platina, la另一边 platina inicia automatistically la reproduccion.
- Para cancelar la reproduccion, presione otra vez el boton de parada (■).
Para melhorar el sonido de altas Frequencias durante la reproduccion deCNTAs con grabaciones deficientes
Presione el botón FLEX y reproduzca la cinta.
NOTAS:
- La reproduccion porreibvos peut iniciarse en la platina I o en la II.
- La cinta de la platina sin, operar pueda Cambiarse durante el modo de reproduccion porreibvos, permitiendo reproducir continuamenteantasCNTAs como se desee.Esta es una funcion conveniente para fiestas,musica de fondo,etc.
- Cuando se selección este modo, si se encuesta una parte sin grabar durante más de 15segundos, el aparato avanza rápidamente la cinta hasta el principio de lasuma parte grabada, y對於 reanuda la reproducción desde este punto.
Para detener temporalmente la reproduccion
Presione el boton de pausa (II).
- Para reanudar la reproduccion, presione other than boton de pausa (II), o presione el boton de reproduccion ( o ).
Cuando se termina la reproduccion
Presione el botón de parada (■) de la platina en operación.
SECUENCIA DE REPRODUCCION CON EL AJUSTE DEL BOTON REV MODE
La secuencia de reproduccion depende del ajuste del boton REV MODE y del boton de reproduccion ( o ) que se presiona primero. La secuencia de reproduccion para cada seleccion possible se muestra a continuacion.
*2 En el modo de repetition ( 📁), la reproduccion por relevos se inicia siempre desde la direccion de avance.
I> : Reproduccion en avance de la platina I
I : Reproduccion en inversion de la platina I
II> : Reproduccion en avance de la platina II
II:Reproduccion en inversion de la platina II
:Funci de inversion automatica
:Relevos
| Botón REV MODE | Botón de reproducción inicial | Modo de la otra platina | Secuencia de reproducción |
| ∅ | DECK I ▶ | *2 | |▷∞|←→||▷∞||←→|▷∞|←... Relevos 15 vezes (reproducción de 32aras) |
| ∅ | DECK I ▶ | *2 | |←→||▷∞||←→|▷∞|←→||▷∞|←... Relevos 15 vezes (reproducción de 31aras) |
| ∅ | DECK II ▶ | *2 | ||▷∞||←→|▷∞|←→||▷∞||←... Relevos 15 vezes (reproducción de 32aras) |
| ∅ | DECK II ▶ | *2 | ||←→|▷∞|←→||▷∞||←→|▷... Relevos 15 vezes (reproducción de 31aras) |
MUSIC SEARCH
(Skipping forward or backward to playback a desired selection)
The music search function detects blanks (longer than 4 seconds) between selections, advances the tape in the forward or reverse direction to find the beginning of the desired selection and automatically starts playback.
It can find a selection located up to 15 selections before or after the present position.
During forward playback
When you wish to locate a future song, press the button as many times as the number of songs to be skipped. When you wish to listen to the song currently being played from the beginning, press the button once. To return to a previously played song, press the button as many times as the number of songs to be skipped, plus one.
During reverse playback
When you wish to locate a future song, press the button as many times as the number of songs to be skipped. When you wish to listen to the song currently being played from the beginning, press the button once. To return to a previously played song, press the button as many times as the number of songs to be skipped, plus one.
From the stop mode
Press the playback (▶ or ←) button to set the playback mode, then press the (← or →) button to perform music search as mentioned above.
- If the button is pressed more times than the number of selections recorded on the tape, forward search will continue on the opposite side, but reverse search will stop at the tape end.
NOTES:
In the following circumstances, the music search function may be unable to properly detect blanks between selections; this is not, however, a sign of a malfunction with the unit.
- When using a tape with blanks between selections less than 4 seconds long.
- When listening to tapes with long low-level intervals, like classical music, or with sound breaks several seconds long within selections.
- When listening to recorded conferences or talk shows, where sound is intermittent.
- When using tapes with noise in the blanks between selections.
How Selections are counted
When starting the music search operation from the middle of a selection and specifying "1st previous selection," playback will return to the beginning of the present selection. To return to selections further back, count one extra selection.
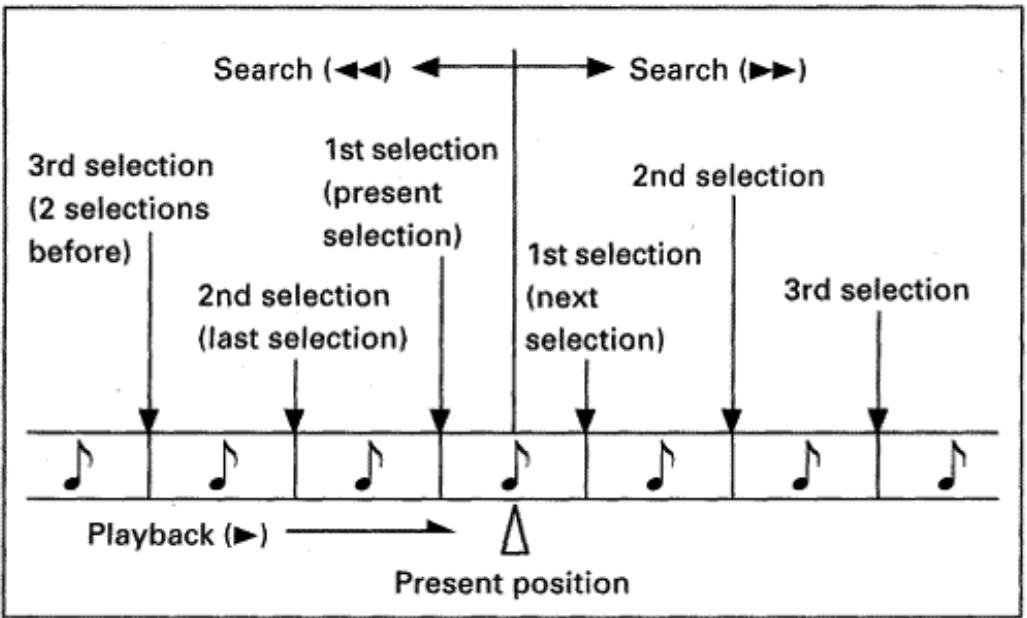
18
En/Sp
BUSQUEDA DE CANCIONES
(Salto de avance o retroceso para reproducir la canción deseada)
La función de búsqueada de canciones detecta los espacios en blanco entre canciones (con una duración de más de 4segundos) y activa las functions de avance rápido o inversionión para encontrar el principio de la canciónCEEjiente, momento en que se reanuda automatistically la reproducción.
Puede seleccionarse un maximum de 15 caniones de antes o despues de la posicjion actual.
Durante la reproduccion en la direction de avance
Para selectionar la canciónsuma o de antes, presione el botón▶tantas vezes como el número de canciones que deban saltarse. Cuando desee esucchar desde el prinicio la mesma canción que ahora está escuchando, presione el botón una vez. Para volver a la canción anterior o de antes, presione el botón tantas vezes como el número de canciones que deban saltarse más una.
Durante la reproduccion en la direction de inversionion
Para selectionar una canción posterior, presione el botón « tantas vezes como el número de canciones que deban saltarse. Cuando deseee escuchar desde el principio la misma canción que ahora está escuchando, presione el botón » una vez. Para volver a una canción anterior, presione el botón « tantas vezes como el número de caciones que deban saltarse más una.
Cuando está en el modo de parada
Presione el boton de reproduccion ( o ) para establecer el modo de reproduccion y presione bajo el boton o para efectuar la busingada de caniones como se ha mentionado arriba.
- Si se presiona el botón más vezes que el número de canciones grabadas en la cinta, la busqueda de avance proseguirá en la otra cara, pero la busqueda de inversionión se detendra al terminar la cinta.
NOTAS:
La función de selección de canrientes no operará correctamente con los siguientes temas deCNTas.Aunque pueda producirse operaciones incorrectas, no significa que se haya producido ninguna avería en la unidad.
- Cuntas con espacios en blanco de menos de 4segundos entre canciones.
- Cuntas con pasajes largos de música de bajo nivel de sonido, como por exemple con música clásica, en la que hay tales pasajes de varioussegundos seguidosde silenciodentro de una canción.
- Cuntas con intervalos largos sin sonido, como en caso de conferencias, programas de entrenimiento, etc.
- Cintas con ruido en las partes en blanco entre canciones.
Reciento del numero de las canaciones
Cuando se inicia la operation de búsqueada de canciones desde la mitad de una canción y seswana "la prima canción anterior", la reproduccion volverá al principio de la canción actual. Para volver a canciones de masdietas, cuente una canción adicional.
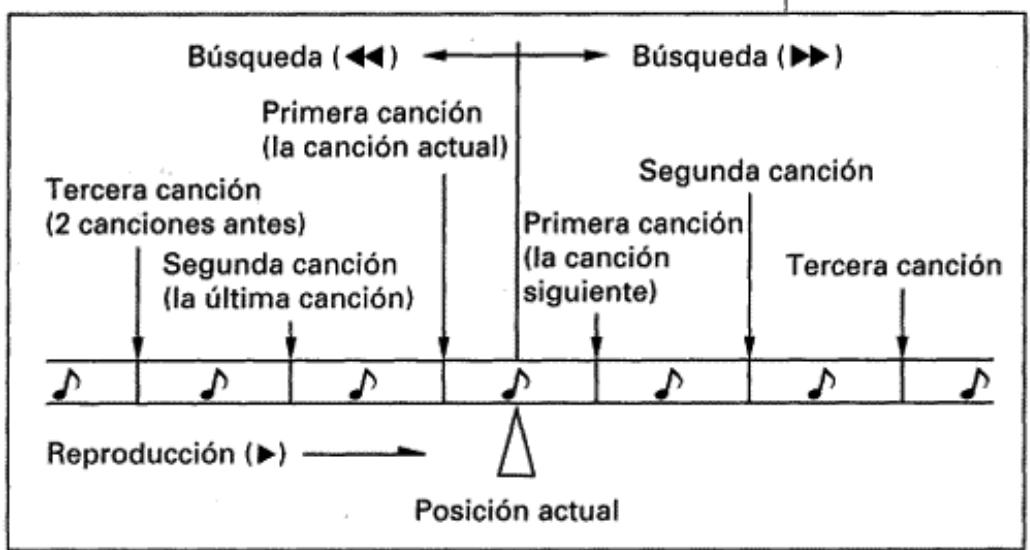
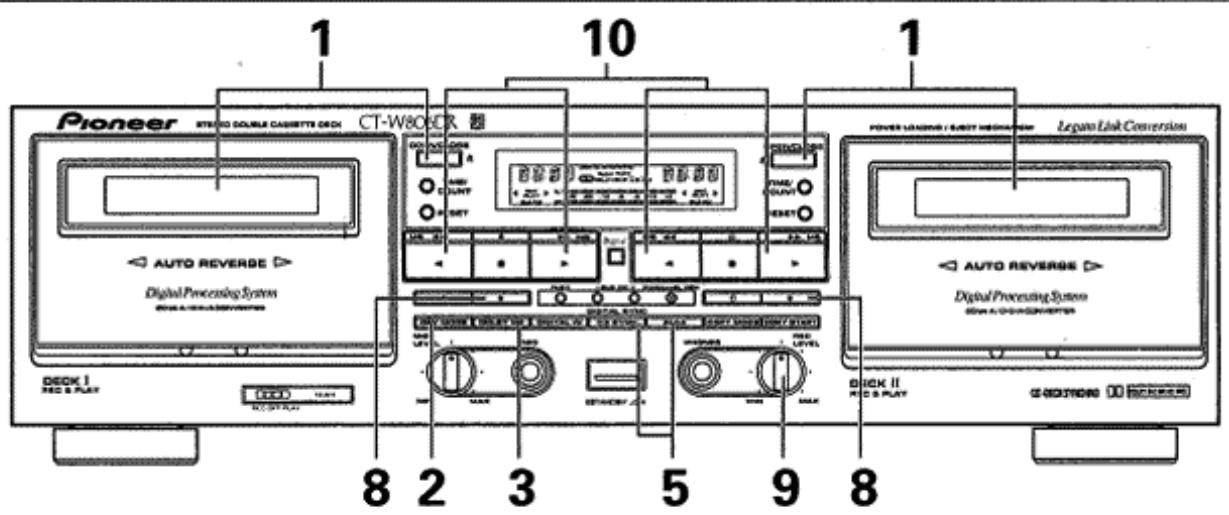
- Load a tape for recording in DECK I or II.
-
Select the reverse mode with the REV MODE button.
-
To record on one side only, set the button to the position. To record on both sides, set the button to the position.
- If recording is begun from DECK I when reverse mode is set to (relay), following recording on DECK I, the unit will attempt to continue recording automatically on DECK II. If you do not wish to record on the tape loaded in DECK II, be sure to remove it before beginning recording.
-
If recording is begun from DECK II when reverse mode is set to (relay), the reverse mode will change automatically to for recording. When the recording ends on DECK II, the unit will stop and the mode will automatically switch back to .
-
Select the Dolby NR mode with the DOLBY NR button.
- Prepare the audio source from which you wish to record. Turn on the stereo amplifier and prepare it for playback of the desired audio source.
- If you use AUTO BLE XD, press BLE XD button.
6.DIGITAL IN
When the digital input signal is used, press to select the digital input. (This activates the ALCA system.)
When the analog input signal is used, press to deselect the digital input.
- If you use ALCA system press ALCA button (see pages 20~21).
- Press the recording (●) button.
- Adjust the recording level. For details, see the section "ADJUSTING THE RECORDING LEVEL" on page 20. (When ALCA system is set to ON, recording level is adjusted automatically.)
-
Press the playback (▶ or <) button or the pause (II) button to begin recording.
-
When recording on both sides, press the button. If the button is pressed, recording will stop after only one side is recorded.
To stop recording temporarily
Press the pause (II) button.
To resume recording, either press the pause (II) button again, or press the playback ( or ) button.
To Stop Recording
Press the stop (■) button.
Erasure prevention tabs
The recording () button does not work when the erasure prevention tabs of the loaded cassette tape have been broken off (see page 4). When recording on both sides, make sure that both tabs are intact.
- Inserte la cinta para grabacion en la platina I o II.
-
Seleccione el modo de inversionion con el boton REV MODE.
-
Para grabar solo una cara, ajuste el botón en la posición
- Para grabar en ambas caras, ajuste el botón en la posición.
- Si la grabación se inicia desde la platina I cuando el modo de inversionión está ajustado a (relevos),después de la grabación en la platina I,la unidad intentará proseguir la grabación automatistically en la platina II. Si usted no desea grabar en la cinta insertada en la platina II,asegúrese de sacarla antes de que se inicia la grabación.
-
Si la grabación se inicia desdela platina Il cuando el modo de inversionion estáajustadoa 已 (relevos),el modo de inversionion cambiará automatistically a para la grabacion. Cuando se termina la grabacion en la platina Il,el aparato se pararayel mode cambiará automatistically alde
-
SeLECTIONE el modo Dolby NR con el boton DOLBY NR.
-
Prepare la fuente de audio desdela que deseegrab. Conecte la alimentacion del amplificador estereo y preparelo para reproducir la fuente de audio眼看ada.
- Si emplea el sistema AUTO BLE XD, presione el botón BLE XD.
6.DIGITAL IN
Cuando se emplee la senal de entrada digital, presionelo para selectionar la entrada digital. (De este modo se activa el systema ALCA.) Cuando se emplee a la senal de entrada analogica, presionelo para cancelar la seleccion de la entrada digital.
- Si emplea el sistema ALCA, presione el botón ALCA (vea las páginas 20~21).
- Presione el botón de grabación (●).
- Ajuste el nivel de grabación. Para más detalles, vea la sección de "AJUSTE DEL NIVEL DE GRABACION" en la頁a 20. (Cuando se activa (ON) el sistema ALCA, el nivel de grabación se ajusta automatistically.)
10.Presione el botón de reproducción (▶ o ⊥) o el botón de pausa (II) para iniciar la grabación.
- Para la grabación en las dos caras, presiones el botón . Si se presiona el botón , la grabación se detendra cuando se obtiene una sola cara.
Para detener temporalmente la grabación
Presione el boton de pusa (II).
- Para reanudar la grabacion, presione el boton de pausa (II) o el de reproduccion ( o ).
Cuando se termina la grabación
Presione el boton de parada (■).
Lenguetas de proteccion contra grabacion accidenta
El botón de grabación (●) no funciona cuando se han roto las lengüetas de protección contra grabación accidental del casete (vea la頁面 4). Para grabar en ambas caras, asegúrese de que ambas lengüetas estén interactas. 19
ADJUSTING THE RECORDING LEVEL
The adjustment of the recording level is the most important factor in achieving good recording results. A high level provides a good signal-to-noise ratio and dynamic range, but an excessively high level distorts the sound. If the level is set too low for fear of sound distortion, irritating tape hiss will mar the recording. The characteristics of tapes differ depending on the manufacturer and the type of tape. Set the REC LEVEL control so that the level meter's -3dB indicator lights steadily most of the time. No harm will be done if the 0dB indicator lights occasionally at peaks.
NOTES:
- The optimal recording level may differ somewhat depending on the audio source and type of tape used. In order to obtain the best possible results, set the recording level after actual testing. Listen to your recordings, and adjust the level as necessary.
The level meter may react differently during recording and playback of the same tape. This is due to differences in tape sensitivity, and creates no problem.
Precautions when recording from digital sources
- When recording from digital signal sources, be sure that the optical fiber cable (or the connection cord with pin plugs) is connected, and that the corresponding digital playback component is turned on. If the optical fiber cable (or the connection cord with pin plugs) is not connected, digital recording will not be possible. In this case, the DIGITAL IN indicator will flash to indicate that no signal is being received.
- Recording to the tape deck can be performed only from digital components using 44.1kHz digital sampling. When recording from digital components with other sampling frequencies, set the recording mode for analog input.
- When performing digital recording from portable CD players, if the player is provided with a skip-prevention function, its switch should be set to OFF when recording.
DIGITAL ALCA SYSTEM
ALCA: Auto Level Control with tape Analysis
The Digital ALCA system analyzes the tape performance based on the high-frequency recording characteristic near 0 dB and sets the recording level automatically according to the tape performance and input signal. This makes possible a recording with high S/N fully exploiting the performance of each tape.
- Input the peak section of the music source in record-pause mode or, if the peak section is unknown, input a section of about 3 minutes from the beginning of the music. The optimum recording will be set to allow natural recording.
- With low-level music such as a classic music, the recording level may sometimes not be increase or may take a long time before being set. In this case, cancel the ALCA and set the recording level using the manual control.
The recording level control is defeated while the ALCA is activated. - When selecting "Digital In", it will not change the recording level during recording. The microcomputer is able to calculate the best peak level for using tape before recording, because, it is knows the max. level of the digital audio data.
AJUSTE DEL NIVEL DE GRABACION
El ajuste del nivel de grabacion es el factor mas importante para encontrar una buena grabaciones. Un nivel alto proportionscna una buena relation de senal/ruido y margen dinamico, pero un nivel demasiado alto hara que, la distorsion de la grabacion se incremente. Si el nivel se ajusta demasiado bajo por temor a distorsionar el sonido, aumento el ruido de la cinta y echara a perdir la grabacion. Las caracteristicas de las cintas differen segun el fabricante y el tipo de cinta. Ajuste el control REC LEVEL de modo que el indicator -3dB quede encendido la mayor parte del tiempo. No pasará nada si el indicator 0dB se enciende momentaneamente en los picos. NOTAS:
- El nivel de grabación optimo pueda diferir un poco dependiendo de la fuente de sonido y del tipo de cinta realizada. Para Obtener los最好的 resultados posibles, ajuste el nivel de grabación cuando de la prueba actual. Escuche su grabación y ajuste el nivel como seanecessary.
- El nivel del medidor puede reccionar de forma diferente durante la grabacion y la reproduccion de la mesma cinta. Illo se debe a las diferencias en la sensibilitidad de la cinta y no implica ningún problema.
Precauciones para grabar de fuentes digitales
- Cuando grabe de fuentes de senal digital, asegúrese de que el cable de fibra optica (o el cable de connexion con clavijas) está connectado, y que se haya connectado la alimentación del componente de reproducción digital. Si el cable de fibra optica (o el cable de connexion con clavijas) no está connectado, noURTAR.
- El indicator DIGITAL IN para indicar que no se recibe ninguna senal.
- La grabación en la grabadora pourrait efectuarse solo desde componentes digitales que empleen muestreo digital de 44,1 kHz. Cuando grabe de componentes digitales con除外 frequencies de muestreo, ajuste el modo de grabación para entradaanalógica.
- Cuando se efectue la grabacion digital desde reproductores de discos CD portátiles, si el reproductor está provisto de una referencia paraatar saltos, el interruptor deberá desactivarse para la grabacion.
SISTEMA DIGITAL ALCA
ALCA: Control automático del nivel con análisis digital
El Sistema digital ALCA analiza el rendimiento de la cinta en base a las caracteristicas de grabacion de altas Frequencias circa de 0 dB y ajusta automatistically el nivel de grabacion de acuerdo con el rendimiento de la cinta y la senal de entrada. De este modo es possible realizar una grabacion con alta relation de senal/ruido aprovechando al maximum el rendimiento de cada cinta.
- Introduzca la sección pico de la fuente musical en el modo de pausa de grabación o, si se desconce la parte pico, introduzca una sección deunos 3 horas desde el principio de la música. Se ajustará la grabación optima para permitir una grabación natural.
- Con música de bajo nivel como por exemple música clásica, es possible que algunas vezes no se incremente el nivel de grabación o que tarde tiempo antes de ajustarse. En este caso, cancele el sistema ALCA y ajuste el nivel de grabación employando el control manual.
- El control del niveau de grabación se desactiva cuando el sistema ALCA está activado.
- Cuando se selección "Digital In", no cambiará el nivel de grabación durante la grabación. El microprocesador es capaz de calcular el mejor nivel pico para emplear la cinta antes de la grabación, porque conoce el nivel máximo de los datos de audio digital.
MECHANISM OF ALCA OPERATION
The operation of the ALCA system is variable in two ways; (1) between before and after the AUTO BLE XD system setting, and; (2) between the digital input and analog input.
(1)
The recording level is controlled according to the standard allowable level which has been set previously for each tape type (I, II, IV).
After the AUTO-BLE XD system setting>
The characteristic of the tape is detected during the tuning of the AUTO BLE XD system. After this, the recording level is controlled by determining the maximum allowable level which can be used in recording according to the tape characteristic.
(2)
The optimum recording level is set automatically according to the allowable level set in (1).
The recording level is determined so that the full-bit data (loudest signal) becomes the allowable level recorded on the tape.
The ALCA system cannot be used in tape copying.
- During parallel recording, the ALCA system functions according to the tape with the lower allowable level.
- The manual recording level control is possible only in the mode in which the ALCA system is deactivated and the analog input is selected.
- Any of the Dolby NR types can be used together with the ALCA system. Changing the Dolby NR type after the recording level adjustment by the ALCA system does not affect the ALCA effect.
- Pressing the ALCA button in the middle of record or recording mute mode cannot cancel the ALCA system.
- The data set by the ALCA system is retained in the standby mode of the unit as well as after the power cord has been unplugged or during timer recording.
DIGITAL SUPER AUTO BLE XD TUNING
-
Load a tape for recording in DECK I or II.
-
The AUTO BLE XD does not work when the erasure prevention tabs of the loaded cassette tape have been broken off.
-
Set the REV MODE button to or
-
Press the BLEXD button.
The BLEXDindicatorwillflashforabout50seconds,after which it will light steadily.
The tape will be forwarded for approximately one second after pressing the start button so that recording will start from the recordable portion of the tape.
The operation is completed when the start position is resumed.
- Load tapes in both decks.
- Set the REV MODE button to 心
- Press the BLE XD button of DECK I.
SUPER AUTO BLE XD tuning will be performed on DECK I and DECK II, respectively.
- If the BLE XD button of DECK II is pressed, the tuning will stop after only DECK II is tuned.
- A tuning signal will be recorded on the cassette in the cassette deck when using AUTO BLE XD. The music and other information already recorded on this cassette will be erased from the point where tuning starts.
MECANISMO DE LA OPERACION DEL SISTEMA ALCA
La operation del sistema ALCA pueda variarse de dos formas: (1) entre antes y.afters del ajuste del sistemas AUTO BLE XD, y (2) entre la entrada digital y la entrada analógica.
(1)
El nivel de grabación se controla de acuerdo con el nivel permissible estándar que se ajustó previamente para cada tipo de cinta (I, II IV).
La caracteristica de la cinta se detecta durante el ajuste del sistemas AUTO BLE XD. Después, el nivel de grabación se controla determinando el nivel máximo permissible que pueda utiliser en la grabación de acuerdo con la característica de la cinta.
(2)
El optimo nivel de grabacion se ajusta automatamente de acuerdo con el nivel permissible ajustado en (1).
El nivel de grabación se determina de modo que los datos de在哪 bitios (senal más fuerte) pasan a ser el nivel Perkinsible grabado en la cinta.
- El sistema ALCA no pueda emplearse para el copiado deCNTAS.
- Durante la grabacion en paralelo, el sistema ALCA funciona de acuerdo con la cinta con el minimum高位 permissible.
- El control manual del niveau de grabación es possible sólo en el modo en el que el sistema ALCA está desactivado y se ha selecciónado la entradaanalógica.
- Cualquiera de los temas delsystema Dolby NR pueda utiliser junto con el systema ALCA. Si se cambia el tipo del systema DOLBY NR después del ajuste del niveau de grabacion con el systema ALCA, el efecto del systema ALCA no quede afectado.
- Presionando el botón ALCA a mitad de la grabación o durante el modo de silenciamiento de grabación, no se Cancela el sistema ALCA.
- Los datos ajustados por el sistema ALCA se retienen en el modo de reserve del aparato asi como antes de haber desenchufado el cable de alimentacion o durante la grabacion con temporizador.
AJUSTE DEL SISTEMA SUPER AUTO BLE XD DIGITAL
-
Inserte la cinta para grabacion en la platina I o II.
-
El sistemas AUTO BLE XD no funciona cuando las lenguetas de proteccion contra borrado del casete insertado STL an rotas.
-
Ajuste el boton REV MODE a o
-
Presione el botón BLE XD.
El indicator BLE XD parpadeará duranteunos 50segundos,despuésde loquel quedarayencendido.Lacinta se avanzara duranteapproximadamente unsegundo despuesede presionareel boton de inicio de modo que la grabacion se inicia desde la parte que pueda grabarse de la cinta. La operationsequoplata cuando se reanuda la posición de inicio.
- Inserte@cantas en las dos platinas.
-
Ajuste el botón REV MODE a .
-
Presione el botón BLE XD de la platina I.
El ajuste del sistema SUPER AUTO BLE XD se efectuará en las platinas y ll respectfully.
- Si se presiona el botón BLE XD de la platina II, el ajuste se detendra sólo cuando se haberse ajustado la platina II.
- Se grabará una seals de ajuste en el casete insertado en la grabadora cuando se emplee el sistema AUTO BLE XD. La música y la other information que ya haya grabada en este casete se borrará desde el punto en que se inicia el ajuste.
Error display
- If the old tape, the tape end or the leader (white portion) immediately prior to the tape end is reached during AUTO BLE XD operation, tuning becomes impossible. That means recording will stop immediately and the counter indicator will display the following (flashing) message: "Err". In this case, press the BLE XD button again to reset, and record without AUTO BLE XD tuning.
The following illustrates the operation:
| Operation | Counter Indicator | Display |
| (Start) ① Fast forward | BLE | BLE flashes. |
| ② Record ⑤ Play | BI R5 | |
| ③ Record ⑥ Play | LE V L | |
| ④ Rewind ⑧ Rewind | BLE | |
| ⑦ Record ⑨ Play | EQ | |
| ⑩ Record ⑫ Play | BI A5 | BLE lights. XD flashes. |
| ⑪ Rewind | BLE | |
| ⑬ Rewind or Stop (End of adjustment) | TUNE | BLE and XD lights. |
Turning XD ON/OFF
(Switching between the BLE XD system and BLE system) After setting the BLE XD system, the XD function can be turned OFF and ON as desired.
When the BLE XD button is pressed in record-pause mode, the XD indicator turns off so that recording is possible based only on the setting of the BLE system. Pressing the BLE XD button again turns the XD indicator on and recalls the BLE XD system setting.
NOTES:
To cancel AUTO BLE XD tuning before it has finished, press the stop (■) button.
To reset a tuned condition, press the BLEXD button again.
- During AUTO BLE XD tuning, a test signal is recorded on the tape to determine the proper adjustment. Therefore, any music (etc.) recorded on that portion of the tape will be erased.
- You can select any type of Dolby NR when using AUTO BLE XD. You can also change the type of Dolby NR after AUTO BLE XD adjustment without disturbing AUTO BLE XD effect.
- If you switch tapes after setting the AUTO BLE XD, be sure to set the AUTO BLE XD again.
RECORDING MUTE
Use this function to create the 4.5-second blanks needed for proper operation of the music search function.
- Press the recording mute (O) button during recording and the deck will create a blank space by recording a section which contains no signal for approximately 4.5 seconds. The deck will then enter recording standby mode.
Visualización de error
- Si se lega a la parte guía del principio o del final de la cinta cuando es una parte blanca que noiene recubrimiento magnético durante la operación de AUTO BLE XD, el ajuste sera imposible. Esto significa que la grabación se detendra inmediamente y el indicator del控制器做不到 el suiviente mensaje (parpadeando): "Err".
En este caso, presione otra vez el botón BLE XD para reponer y grabar sin el ajuste de AUTO BLE XD.
A continuación se ilustra la operation:
| Operación | Indicador del控制器 | Visualización |
| (Inicio) ① Avance=rápido | BLE | BLE parpadea. |
| ② Grabación ⑤ Reproducción | BI R5 | |
| ③ Grabación ⑥ Reproducción | LE V L | |
| ④ Rebobinado ⑧ Rebobinado | BLE | |
| ⑦ Grabación ⑨ Reproducción | EQ | |
| ⑩ Grabación ⑫ Reproducción | BI A5 | BLE se enciende. XD parpadea. |
| ⑪ Rebobinado | BLE | |
| ⑬ Rebobinado o parada (Final del ajuste) | TUNE | BLE y XD se encienden. |
Activación/desactivación (ON/OFF) de XD
(Cambio entre el sistema BLEXD y el sistemasBLE)
Después de haber ajustado el sistema BLEXD,lamericanoXD podradasactivarse(OFF) oactivarse (ON) como sepecte.
Cuando se presione el botón BLE XD en el modo de pausa de grabación, el indicator XD se apagará con lo que la grabación sólo sera possible en base al ajuste del sistema BLE. Si se presiona otra vez el botón BLE XD, el indicator XD se enciende y se reactiva el ajuste del sistemas BLE XD.
NOTAS:
- Para cancelar el ajuste de AUTO BLE XD antes de haber terminado, presione el botón de parada (■).
- Para reponer un estado ajustado, presione de nuevo el botón BLE XD.
- Durante el ajuste de AUTO BLE XD, se graba una postal de prueba en la cinta para determinar el ajuste adecuado. Por lo tanto, toda la música, etc. grabada en esta parte de la cinta se borrará.
- Podrá selecciónarrialquier tipo de reduccion de rudo Dolby cuando utilise AUTO BLE XD. Internacional podra cambiar el tipo de reduccion de rudo Dolby afterwards del ajuste AUTO BLE XD sin afectar para nada al efecto AUTO BLE XD.
- Si cambía de cinta después de ajustar AUTO BLE XD, asegúrese de ajustar de nuevo AUTO BLE XD.
SILENCIAMIENTO EN GRABACION
Emplee esta func tion para crear espacios en blanco de 4,5 segundos de duracion requeridos para la operation de businga de caniones.
- Presione el botón de silenciamiento en grabación (O) durante la grabación, y el aparatodeerádegrabarsonido enla cinta duranteunoscuatrosegundos,yluego seestableceré enel modo de pausa de grabación.
NOTE:
When the tape running direction is reversed during recording mute operation (tape end is reached in forward direction), the recording mute operation is cancelled and the deck enters the recording mode.
- To create a blank which is more than 4.5 seconds long, hold the button down for the desired length of time. When the button is released, the deck will enter recording standby mode.
- To resume recording, press the pause (II) button or the playback (▶ or ←) button.
ERASING A TAPE
To erase the recorded contents of a tape, load the tape in DECK I or II and follow the procedure below.
- Set the REC LEVEL control to the MIN position.
- Press the recording (●) button.
- Press the playback (▶ or <) button or the pause (II) button.
RECORDING USING A MICROPHONE
- Connect the plug of the microphone to the MIC jack.
-
Follow the procedure for recording given above.
-
To adjust the microphone recording level (page 20), use the microphone level control (LEVEL) instead of the REC LEVEL control.
- Set the REC LEVEL control to its minimum position when recording with a microphone only.
Turn the REC LEVEL control up gradually after playing back the music source during microphone recording.
Use both the REC LEVEL control and the LEVEL control to adjust mixing level balance between microphone sound level and line source sound level.
NOTES:
LEVEL control is only effective when a microphone is connected to the MIC jack.
- Be sure to disconnect the microphone plug from the MIC jack when not using the microphone for recording.
- Use a commercially available microphone when recording.
DIGITAL SYNCHRO RECORDING
(When the accessory CD-DECK SYNCHRO cord is not used)
- Load a tape for recording in DECK I or II.
-
Select the reverse mode with the REV MODE button.
-
To record on one side only, set the button to the position. To record on both sides, set the button to the position.
- If recording is begun from DECK I when reverse mode is set to (relay), following recording on DECK I, the unit will attempt to continue recording automatically on DECK II. If you do not wish to record on the tape loaded in DECK II, be sure to remove it before beginning recording.
-
If recording is begun from DECK II when reverse mode is set to (relay), the reverse mode will change automatically to for recording. When the recording ends on DECK II, the unit will stop and the mode will automatically swtch back to
-
Select the Dolby NR mode with the DOLBY NR button.
NOTA:
Cuando se invierta la direccion de movimiento de la cinta durante la operacion de silenciamiento de grabacion (cuando se时代的 final de la cinta durante el avance), la operation de silenciamiento de grabacion se cancelar y la platina entrada en el mode de grabacion.
- Para create un espacio en blanco de más de quatresegundos, retenga presionado el boton durante el tiempo deseado. Launidad se establecerá en el modo de pausa de grabación cuando usted suele el botón.
- Para reanudar la grabacion, presione el boton de pausa (II) o el boton de reproduccion ( o ).
BORRADO DE UNA CINTA
Para borrar el contenido grabado de una cinta, inserte la cinta en la platina I o II y siga el procedimiento suiviente.
- Ajuste el control REC LEVEL a la posicion MIN.
- Presione el botón de grabación (●).
- Presione el botón de reproducción (▶ o <) o el botón de pausa (II).
GRABACION EMPLEANDO UN MICROFONO
- Enchufe clavija del micrófono a la toma MIC.
-
Siga el procedimiento para grabación arribamentionado.
-
Paraaabstarenliveldegrabaciondel microfono(pagina 20),empleeel control del microfono (LEVEL) en lugar del controlRECLEVEL.
- Ajuste el control REC LEVEL a la posición minima cuando grabe sólo con un microfono.
Aumente gradualmente el nivel con el control REC LEVEL desdes deREENCRLEL y el control LEVEL paraajustar el balance de nivel de mezcla entre el nivel del sonido del microfono y el nivel de sonido de la fuente de la linea.
NOTAS:
- El control LEVELsoleo es eficaz cuando se ha conectado un microfono a la toma MIC.
- Asegürese de desenchufar la clavija del micrófono de la toma MIC cuando no emplee el micrófono para la grabación.
- Emplee un micrófono de vente en las tiendas del ramo para la grabación.
GRABACION SINCRONIZADA DIGITAL
(Cuando no se emplea el cable accesorio para la función de grabación sincronizada de discos compactos (CD-DECK SYNCHRO)
- Inserte la cinta para grabacion en la platina I o II.
-
Selección el modo de inversion con el botón REV MODE.
-
Para grabar solo una cara, ajuste el botón en la posición . Para grabar en ambas caras, ajuste el botón en la posición .
- Si la grabación se inicia desde la platina I cuando el modo de inversionión está ajustado a C (relevos),después de la grabación en la platina I,la unidad intentará proseguir la grabación automatistically en la platina II. Si usted no desea grabar en la cinta insertada en la platina II,asegúrese de sacarla antes de que se inicia la grabación.
-
Si la grabación se inicia desde la platina II cuando el modo de inversionión está ajustado a (relevos),el modo de inversionión cambiará automatistically a para la grabación. Cuando se termina la grabación en la platina II, el aparato se pararay el modo cambiará automatistically al de .
-
SeLECTIONE el modo Dolby NR con el boton DOLBY NR.
-
Prepare the audio source from which you wish to record. Turn on the stereo amplifier and prepare it for playback of the desired audio source.
- If you use AUTO BLE XD, press BLE XD button.
- Load the disc in the recording source component.
- Press the DIGITAL IN button to select the digital input.
- Press the CD SYNCHRO (DIGITAL SYNCHRO) button once.
- Play the CD or MD player.
The digital synchro operation starts. NOTE:
Recording cannot be performed when the DIGITAL IN indicator flashes (see "Precautions when recording from digital sources" on page 20).
- Insert cassette tapes into DECK I and DECK II.
- Set REV MODE button to
- Perform operations 3-9 above.
CD-DECK SYNCHRO RECORDING
Operations when using a CD player that supports Pioneer CD-DECK SYNCHRO recording. (See page 7 for details regarding synchro connections with the CD player.)
If the CD player has a program function to determine the order of playback, program the CD player before beginning this operation.
-
Load a tape for recording in DECK I or II.
-
Rewind the tape to the desired starting position.
-
Select the reverse mode with the REV MODE button.
-
To record on one side only, set the button to the position.
To record on both sides, set the button to the position. -
If recording is begun from DECK I when reverse mode is set to (relay), following recording on DECK I, the unit will attempt to continue recording automatically on DECK II. If you do not wish to record on the tape loaded in DECK II, be sure to remove it before beginning recording.
If recording is begun from DECK II when reverse mode is set to (relay), the reverse mode will change automatically to for recording. When the recording ends on DECK II, the unit will stop and the mode will automatically switch back to -
Select the Dolby NR mode with the DOLBY NR button.
- If you use AUTO BLE XD, press BLE XD button (see page 21).
5.DIGITAL IN
When the digital input signal is used, press to select the digital input (This activates the ALCA system).
When the analog input signal is used, press to deselect the digital input.
- If you use ALCA System, press ALCA button (see page 20~21).
- Load a compact disc in the CD player.
- Press the play button of the CD player.
- Adjust the recording level. For details, see the section "ADJUSTING THE RECORDING LEVEL" on page 20. (When ALCA system is set to ON, recording level is adjusted automatically.)
- Press the stop (■) button of both the cassette deck and the CD player.
Unless both this deck and the CD player are in stop mode, synchro recording cannot be performed.
- Prepare la fuente de audio desdela que desee打招呼. Conecte la alimentacion del amplificador estereo y preparelo para reproducir la fuente de audio deseada.
- Si emplea el sistema AUTO BLE XD, presione el botón BLE XD.
- Inserte el disco en el componente de la fuente de grabacion.
- Presione el botón DIGITAL IN para selectionar la entrada digital.
- Presione una vez el botón CD SYNCHRO (DIGITAL SYNCHRO).
- Reproduzca el disco en el reproductor de discos CD o MD. Se inicia la operation de sincronizacion digital. NOTEA:
La grabación noURTAD efctuarse cuando parpadee el indicator DIGITAL IN (vea la seccion de "Precauciones para grabar de fuentes digitales" en la page 20).
- Inserte lasCNTAs de casete en las platinas I y II.
- Ajuste el botón REV MODE en .
- Efectue las operaciones 3 a 9 anteriores.
GRABACION SINCRONIZADA DE DISCOS CD EN LA GRABADORA
Operaciones para emplear un reproductor de discs CD que apoya la grabacion sincronizada de discs CD en la grabadora. (Vea la page 7 para encontrar los detailles relacionados con las conexiones de sincronizacion con el reproductor de discos compactos.)
Si el reproductor de discs CD tiene una función de programación para determinar elorden de la reproduccion,programe el reproductor de discos CD antes de empezar esta operation.
-
Inserte la cinta para grabacion en la platina I o II.
-
Rebobine la cinta hasta la posición en la que desee inicia la grabación.
-
Selección el modo de inversion con el botón REV MODE.
-
Para grabar solo una cara, ajuste el botón en la posición . Para grabar en ambas caras, ajuste el botón en la posición .
- Si la grabación se inicia desde la platina I cuando el modo de inversionión está ajustado a (relevos),después de la grabación en la platina I,la unidad intentará proseguir la grabación automatistically en la platina II. Si usted no desea grabar en la cinta insertada en la platina II,asegúrese de sacarla antes de que se inicia la grabación.
-
Si la grabación se inicia desdela platina Il cuando el modo de inversionion estáajustadoa 念 (relevos),el modo de inversionion cambiará automatistically a para la grabacion. Cuando se termina la grabacion en la platina Il,el aparato se pararayel mode cambiará automatistically alde
-
SeLECTIONE el modo Dolby NR con el boton DOLBY NR.
- Si emplea el sistema AUTO BLE XD, presione el botón BLE XD (vea la頁ina 21).
- DIGITAL IN
Cuando se emplee la senal de entrada digital, presionelo para seleccionar la entrada digital. (De este modo se activa el Sistema ALCA.) Cuando se emplee a la senal de entrada analogica, presionelo para cancelar la seleccion de la entrada digital.
- Si emplea el sistema ALCA, presione el botón ALCA (vea las páginas 20~21).
- Inserte un disco compacto en el reproductor de discos CD.
- Presione el botón de reproducción del reproductor de discos CD.
- Ajuste el nivel de grabación. Para más detalles, vea la sección de "AJUSTE DEL NIVEL DE GRABACION" en la頁a 20. (Cuando se activa (ON) el sistema ALCA, el nivel de grabación se ajusta automatistically.)
11. Press the CD SYNC button.
When using an analog source, press the button once to begin recording. When using a digital source, press the button twice to begin recording.
NOTE:
Recording cannot be performed when the DIGITAL IN indicator flashes (see "Precautions when recording from digital sources" on page 20).
-
Insert cassette tapes into DECK I and DECK II.
-
Set REV MODE button to
-
Perform operations 3-11 above.
-
The cassette deck begins recording, and the CD player begins playback.
- Although recording begins when the CD SYNC button is pressed, the CD player does not start playback until the button is released. This function can be used to advance the tape past the leader section, or to create a blank section on the tape.
- When tapes for recording are loaded into both DECK I and II, recording begins onto DECK I.
When the compact disc finishes playing:
The CD player enters stop mode and the cassette deck enters recording standby mode. Change the disc and press the play button of the CD player to resume recording. If the CD player does not resume play within one minute, the cassette deck enters stop mode.
When the CD player changes discs (twin tray or multi CD players):
The cassette deck enters recording standby mode, and resumes recording when the CD player begins playing the next disc. A fourth second blank space is automatically created between tracks.
When the end of the tape is reached while the CD player is still playing:
The CD player returns to the beginning of the selection currentlyplaying and then enters the pause mode. To resume recording, load another tape and check the tape running indicator to ensure that the tape is moving in the desired direction. If not, press the playback (▶ or ←) button to change the tape direction, then immediately press the stop (■) button. The tape running indicator will change direction. Synchro recording can be resumed by pressing the CD SYNC button again. (The CD SYNC button should be pressed within 1 minute. If more than 1 minute elapses, the CD player will enter stop mode.)
If the auto-reverse function operates while the CD is still playing:
The CD player returns to the beginning of the current selection and enters pause mode.
A ten-second blank space is automatically created on the reverse side, then the CD player resumes playback and the deck resumes recording.
NOTES:
- The CD·DECK SYNCHRO function only works with PIONEER CD players equipped with the CD·DECK SYNCHRO function.
- Be sure to connect the deck and the CD player with the CD·DECK SYNCHRO control cord.
- Only PIONEER CD players equipped with a CD·DECK SYNCHRO jack can be used for CD·DECK SYNCHRO recording. Any type of CD player which meets these requirements, including twin-tray or multi CD models, can be used.
10.Presione el botón de parada (■) de la grabadora de casete y del reproductor de discos CD.
- A menos que esta grabadora y el reproductor de discos CD estén en el modo de parada, la grabación synchronize noURTRA realizarse.
11.Presione el botón CD SYNC.
Cuando emplee una fuente analogica, presione el boton una vez para iniciaar la grabacion. Cuando emplee una fuente digital, presione el boton dos veces para iniciaar la grabacion. NOTEA:
La grabación noURTAD efctuarse cuando parpadee el indicator DIGITAL IN (vea la seccion de "Precauaciones para grabar de fuentes digitales" en la page 20).
- Inserte lasCNTAs de casete en las platinas I y II.
- Ajuste el botón REV MODE en 心
-
Efectue las operaciones 3 a 11 anteriores.
-
La grabadora inicia la grabación simultanamente con el[inicio de la reproduccion del disco compacto.
- Aúnque la grabación se inicia cuando se presiona el botón CD SYNC, el reproductor de discos compactos no inicia la reproducción hasta que se sueña el botón.Esta funciona para utiliserse para avanzar la cinta hasta afterwards de la parte guía, o para create una parte en blanco en la cinta.
- Cuando lasCNTas para grabacion estan insertadas en las platinas I y II, la grabacion se inicia en la platina I.
Cuando se termina la reproduccion del disco compaco:
El reproductor de discos compactos se establiece en el modo de parada y la grabadora se establiece en el modo de pausa de grabacion. Cambie el disco y presione el boton de reproduccion del reproductor de discos compactos para reanudar el modo de grabacion. Si el reproductor de discos compactos no reanuda la reproduccion antes de un minuto, la grabadora de casete se establecer a en el mode de parada.
Cuando el reproductor de discos compactos cambia de disco (con reproductores de dos bandejas o de multidiscos):
La grabadora se establoce en el modo de pausa de grabacion y bajo inicia de nuevo la grabacion cuando el reproductor de discos compactos empieza la reproduccion del disco?sigue. Se create automaticallyuna parte en blanco de quatre segundos entre caniones.
Cuando se时代的 al final de la cinta,msteads el reproductor de discos compactos está toda reproduciendo:
El reproductor de discos compactos vuye al principio de la canción que está reproduciendo y se establece en el modo de pausa. La grabación podra reanudarse dando la vuelta a la cinta o cargando una nuevo cinta asegurándose de que la cinta se mueve en la direccion deseada. De lo contrary, presione el botón de reproducción (▶ o ⊥) para Cambiar la direccion de la cinta, y presioneentries inmediamente el botón de parada (■). La grabación sincronizada podra reanudarse presionando de nuevo el botón CD SYNC. (El botón CD SYNCDebe presionarse entes de 1 minuto. Si transcurre más de un 1 minuto, el reproductor de discos compactos se estableceré en el mode de parada.)
Si opera la función de inversionión automatica de la cinta,mientras el disco compacto todas se está reproduciendo:
El reproductor de discos compactos returnará al principio de la canción actual y se establearé en el modo de停下a.
Se creará automatistically un espacio en blanco de diez segundos en el lado de inversion, y對於 es reproductor de discos compactos reanudará la reproducción y la grabadora reanudará la grabación.
NOTAS:
- La función de sincronización con discos compactos funcionally solo con reproductores de discos compactos PIONEER disénados para la operation sincronizada de grabación de discos compactos (CD-DECK SYNCHRO). 25
When performing Relay Recording:
- When DECK I stops recording, recording begins on DECK II.
- If CD playback ends while recording is underway on DECK I:
The tape will be allowed to travel for about ten seconds on DECK II, then switch to the recording mode, and playback will simultaneously begin from the beginning of the loaded CD.
The tape will be allowed to travel for about ten seconds on DECK II, after which it will switch to the recording mode, as playback simultaneously begins on the next CD.
NOTES:
- During relay recording, if the CD player is stopped to change a disc before DECK I has completed recording, DECK I will stop recording and recording will begin on DECK II.
- At the time that recording is completed in the forward direction on DECK I, if the accidental erasure prevention tab is broken out of the cassette on the reverse side (▲), DECK I will stop playing, and relay recording will not begin on DECK II.
RELAY RECORDING (from DECK I to DECK II)
- Load tapes for recording in DECK I and DECK II.
- If you use AUTO BLE XD or ALCA tuning, see pages 20~22.
- Select the Dolby NR mode with the DOLBY NR button.
- Set the REV MODE button to
- Press the recording (●) button of DECK I.
- Prepare the audio source from which you wish to record. Turn on the stereo amplifier and prepare it for playback of the desired audio source.
- Adjust the recording level. For details, see the section "ADJUSTING THE RECORDING LEVEL" on page 20. (When ALCA system is set to ON, recording level is adjusted automatically.)
-
Press the playback (▶ or <) button of DECK I to begin recording.
-
When recording on both sides, press the button. If the button is pressed, recording will stop after only one side is recorded.
- When the tape in deck one ends, the other deck automatically begins recording.
- To cancel relay recording, press the stop (■) button.
NOTES:
- When erasure prevention tabs are broken, you cannot record even if you press the recording (●) button.
- You cannot relay-record from DECK II to DECK I.
To stop recording temporarily
Press the pause (II) button of the operating deck.
To resume recording, either press the pause (II) button again, or press the playback ( or ) button.
To stop recording
Press the stop (■) button of the operating deck.
- Asegürese de conectar este aparato al reproductor de discos compactos empleando el cable de control de sincronizacion para grabacion de discos compactos suministrado (CD-DECK SYNCHRO).
- Los reproductores de discos compactos PIONEER equipos con la toma CD SYNCHRO peuvent usarse para la grabación sincronizada de discos compactos (CD-DECK SYNCHRO). Internacional,EARá utilizesczualquier tipo de reproductor de discos compactos que satisfaga这些 requisitos, incluyendo modelos de dos bandejas, o de multidiscos.
Cuando efectue la grabacion por relevos:
- Cuando se detiene la grabacion en la platina I, la grabacion se inicia en la platina II.
- Si la reproduccion del disco CD termina cuando se está realizando la grabacion en la platina I:
Se deja desplazarse la cinta durante uno diez segundos en la plastina II, cuando se cambiará al modo de grabación, y la reproducción se inicia simultaneamente desde el principio del disco CD insertado.
Se dejará desplazarse la cinta durante uno diez segundos en la platina II, después de lo cual cambiará al modo de grabación, y la reproducción se inicia simultaneamente desde el siguientes disco CD.
NOTAS:
- Durante la grabación de relevantos, si se para el reproductor de discos CD para Cambiar un disco antes de que la platina I haya terminado la grabación, la platina I parará la grabación, y la grabación se inicia en la platina II.
- Cuando se ha completado la grabacion en la direction de avance en la platina I, si la lengüeta protectora contra borrado accidental de la othera cara (A) del casete está rota, la platina I detendra ala grabacion y la grabacion de relevos no se inicia en la platina II.
GRABACION POR RELEVOS (DeSde la platina I a la platina II)
- Inserte lasCNTAs para grabacion en las platinas I y II.
- Si emplea el sistema AUTO BLE XD o ALCA, consulte las páginasas 20~22.
- SeLECTIONE el modo Dolby NR con el botón DOLBY NR.
- Ajuste el boton REV MODE en 心
- Presione el boton de grabacion (●) de la platina I.
- Prepare la fuente de audio desdela que deseegrab. Conecte la alimentacion del amplificador estereo y preparelo para reproducir la fuente de audio deseada.
- Ajuste el nivel de grabación. Para más detalles, vea la sección de "AJUSTE DEL NIVEL DE GRABACION" en la頁a 20. (Cuando se activa (ON) el sistema ALCA, el nivel de grabación se ajusta automatistically.)
-
Presione el botón de reproducción (▶ o ⊥) de la plastina I para iniciar la grabación.
-
Para grabar en ambas caras, presione el botón. Si se presiona el botón, la grabación se detendra cuando de haber grabado una sola cara.
- Cuando se termine la cinta de una platina, la另一边 platina inicia automatistically la grabacion.
- Para cancelar la grabación por relevantos, presione el botón de parada (■).
NOTAS:
- Cuando las lengüetas protectoras contra bomrado está rotas, noURTAR que presione el boton de grabacion (●).
- No pode grabar por relevos desde la platina Il a la platina I.
Para detenermomentaneamente lagrabacion
Presione el botón de pausa (II) de la plastina que está configurando.
- Para reanudar la grabacion, presione otra vez el boton de pausa (II) o presione el boton de reproduccion ( o ).
RELAY RECORDING SEQUENCE
The recording sequence depends on which playback (or button is pressed first. The relay recording sequence for each possible selection is shown below.
Relay recording always begun from the direction indicated by the tape transport indicator (or). To change this direction, press the desired playback (or) button, then immediately press the stop (■) button.
: DECK I forward recording
1: DECK I reverse recording
II> : DECK II forward recording
II: DECK II reverse recording
: Auto-reverse function
:Relay
| REV MODE button | Starting playback button | Other deck mode | Recording sequence |
| DECK I ▲ | II ▲ | |▷∞|◁→||▷∞||◁ | |
| DECK I ▲ | II ▲ | |▷∞|◁→||◁ | |
| DECK I ▲ | II ▲ | |◁→||▷∞||◁ | |
| DECK I ▲ | II ▲ | |◁→||◁ |
PARALLEL RECORDING
- Load tapes for recording in DECK I and DECK II.
- If you use AUTO BLE XD or ALCA tuning, see pages 20~22.
- Select the Dolby NR mode with the DOLBY NR button.
-
Select the reverse mode with the REV MODE button.
-
To record on one side only, set the switch to the position. To record on both sides, set the button to the position.
-
Press the recording (●) button of DECK I or II.
- Prepare the audio source from which you wish to record. Turn on the stereo amplifier and prepare it for playback of the desired audio source.
- Adjust the recording level. For details, see the section "ADJUSTING THE RECORDING LEVEL" on page 20. (When ALCA system is set to ON, recording level is adjusted automatically.)
- Press the stop (■) button of DECK I or II.
- Set the tape transportation direction for recording.
Parallel recording is always begun from the direction indicated by the tape transport indicator ( or ) . To change this direction, press the desired playback button ( or ) , then immediately press the stop (■) button.
- Press PARALLEL REC button.
Both DECK I and DECK II start recording the same sound source.
To stop recording temporarily
Press the pause (II) button on either deck (both decks pause).
To resume recording, press the pause (II) button again.
To stop recording
Press the stop (■) button on either deck (both decks stop).
Para terminar la grabación
Presione el botón de parada (■) de la platina que está en funciona.
SECUENCIA DE GRABACION POR RELEVOS
La secuencia de grabacion depende del boton de reproduccion (一 0 ) que se presiona primo.A continuacion se muestra la secuencia de grabacion por relevos para cada possible seleccion.
- La grabación por relevantes siempre se inicia desde la direccion indicaea por el indicator de transporte de la cinta ( o) Para cambio esta indication, presione el boton de reproduccion deseado ( o) y bajo presione inmediamente el boton de parada (■).
: Grabación en avance en la platina I
I: Grabación en inversionión en la platina I
II> : Grabacion en avance en la platina II
II: Grabación en inversionión en la platina II
:Funci de inversion automatica
:Relevos
| Botón REV MODE | Botón de inicio de la reproducción | modo de la otra plastina | Secuencia de grabación |
| CDO | PLATINA I ▲ | II ▲ | |D∞|←→||D∞||< |
| CDO | PLATINA I ▲ | II ▲ | |D∞|←→||D∞| |
| CDO | PLATINA I ▲ | II ▲ | |←→||D∞|| |
| CDO | PLATINA I ▲ | II ▲ | |←→||D∞| |
GRABACION EN PARALELO
- Inserte lasCNTAs para grabacion en las platinas I y II.
- Si emplea el sistema AUTO BLE XD o ALCA, consulte las páginas 20~22.
- Selezione el modo Dolby NR con el botón DOLBY NR.
- SeLECTIONE el modo de inversionion con el boton REV MODE. Para grabar solo una cara,ajuste el boton en la posicion .Para grabar en ambas caras,ajuste el boton en la posicion
- Presione el botón de grabación (●) de la platina I o II.
- Prepare la fuente de audio desdela que desee打招呼. Conecte la alimentacion del amplificador estereo y preparelo para reproducir la fuente de audio deseada.
- Ajuste el nivel de grabación. Para más detalles, vea la sección de "AJUSTE DEL NIVEL DE GRABACION" en la頁a 20. (Cuando se activa (ON) el sistema ALCA, el nivel de grabación se ajusta automatistically.)
- Presione el botón de parada (■) de la platina I o II.
- Ajuste la direccion de transporte de la cinta para la grabacion.
La grabación en paralelo siempre se inicia desde la direccion indicada por el indicator de transporte de la cinta ( o ). ParaATTERa this indication, presione el boton de reproduccion deseado ( o ), y bajo presione inmediamente el boton de parada (■).
10.Presione el boton PARALLEL REC.
Las platinas I y II iniciaar an la grabacion de la mesma fuente de sonido.
Para detenermomentaneamentelagrabacion
Presione el botón de pausa (II) de una de las platinas (se paasarán ambas platinas).
- Para reanudar la grabacion, presione otra vez el boton de pausa (II).
Para terminar la grabación
Presione el botón de parada (■) de una de las platinas (se pararán ambas platinas).
NOTES:
- When either tape reaches the end, parallel recording is completed. Therefore, use the same length tapes for both decks.
- If the erasure prevention tabs are broken, you cannot parallel-record even if you press PARALLEL REC button.
- Always start recording from the forward direction (FWD) for both sides recording. Otherwise, the tape automatically stops when it reaches the end in the reverse direction.
- Since the recording level adjustment affects both decks equally, it is recommended that the same type of cassette tapes be used.
- If you press the recording mute (O) button, both decks enter the recording mute mode (see page 22).
NOTAS:
- Cuando se termina la cinta de una de las platinas, se termina la grabacion en paralelo. Por lo tanto, empleeCNTas de la mesma longitud para ambas platinas.
- Cuando las lengüetas protectoras contra bomrado está rotas, no pode grabar en paralelo quando presione el botón PARALLEL REC.
- Inicie siècle la grabación desdela direccion de avance (FWD) paragrabaciondeambascaras.De locontrario,la cinta separar automatisticallywhenordertine enla direccionde inversionion.
- Puesto que el nivel de grabación afecta todas platinas por igual, se recomienda emplearCNTas de casete del本身就是 tipo.
- Si presiona el botón de silencimiento de grabación (O), ambas platinas se establearán en el modo de silencimiento de grabación (vea la頁a 22).
TAPE COPYING (From DECK I to DECK II)
COPIADO DE CINTAS
(DeSdela platinaIa la II)
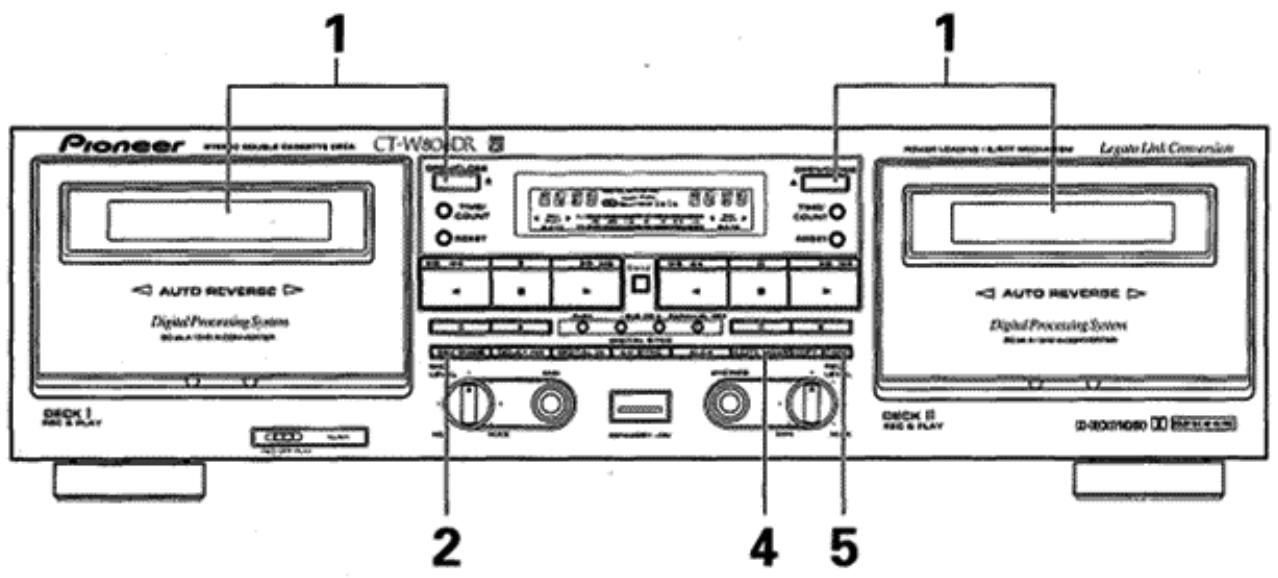
The tape copying function permits you to copy the contents of a tape from DECK I to DECK II.
- The COPY MODE button lets you select 3 types of copying: copying at normal speed while listening to the song, copying an entire tape in half the time with high-speed copying, or copying while reducing noise between songs with TDNS copy.
1. Load a tape for playback into DECK I and a tape for recording into DECK II.
2. Select the reverse mode with the REV MODE button.
- To record on one side only, set the button to the position. To record on both sides, set the button to the position.
- When record mode is activated while has been set, the reverse mode switches automatically to . In this case, the reverse mode switches back to automatically after completion of the recording.
3. Set the tape transport direction.
-
Tape copying is always performed in the direction indicated by the tape transport indicator (▶ or ≦). To change this direction, press the desired playback button (▶ or ≦), then immediately press the stop (■) button.
-
La funciona de copiado deCNTas le permite copiar el contentsido de una cinta de la platina I a la II.
- El botón COPY MODE le permite selecciónar 3 temas de copiado: copiado a velocidad normal cuando eschúa una canción, copiado de toda una cinta en la mitad de tiempoempleando el copiado a alta velocidad, o copiado cuando se reduce el ruido entre canciones con el copiado TDNS.
1. Inserte una cinta grabada en la platina y una cinta para grabar en la platina II.
2. Selección el modo de inversion con el botón REV MODE.
- Para grabar solo una cara, ajuste el botón en la posición. Para grabar en ambas caras, ajuste el botón en la posición.
- Cuando se presiona el botón de起初 de copiado@msteadas se ha ajustado 已 ,el modo de inversionion Cambia automatistically a. En este caso, el modo de inversionion returna a automatistically afterwards de haberse terminado la grabacion.
3. Seleectione la direc tion de transporte de la cinta.
- La copia deCNTAs se efectua en la direc tion mostrada por el indicator del transporte de la cinta ( o) .Para combustar la direc tion de la cinta, presione el boton de reproduction desrado ( o) y bajo presione inmediamente el boton de parada ().
4. Press the COPY MODE button to select either NORMAL or HIGH speed or TDNS.
TDNS: Tape copying that reduces noise between songs. ("TDNS" appears on the counter for DECK I.)
NOR : Tape copying at normal speed allows you to listen during playback ("NOR" appears on the counter for DECK I).
HI : Tape copying at high speed ("HI" appears on the counter for DECK I).
5. Press the COPY START button.
To stop copying
Press the stop (■) button of either deck. Both decks will stop. NOTES:
- The tape in DECK II will be copied in the same type of the Dolby NR as DECK I's tape, regardless of its own setting. When listening to the copied tape, set the type of the Dolby NR to the type used for recording.
- If a nearby television set is on while high-speed copying is being performed, a high-pitched interference sound may be heard on the tape. In this case, either use the normal speed copying function, or turn off the television.
- During high-speed copying, none of the operation buttons will function except for the stop (■) button.
- During normal speed copying or TDNS copying, the recording mute (O), pause (I) and stop (■) buttons of DECK II also function.
- Tape copying is cancelled when either of the two tapes reaches the end. Therefore it is advisable to use tapes of the same length.
The sound quality of the copied tape will be somewhat less than the original. Therefore when making more than one copy, always record from the original tape (do not make a copy of a copy). - The recording level adjustment is not necessary during tape copying.
The effect of TDNS copy may not be exhibited well with a tape in which the noise between musical tunes and musical signal cannot be distinguished clearly. In this case, use the NORMAL or HIGH speed copy function.
LAST MEMORY FEATURE
This unit uses non-erasable non-volatile semiconductor memory to provide semi-permanent (about 10 years) storage of the most recent AUTO BLE XD data in addition to the on/off positions of other switches and buttons. As a result, the most recent settings are stored in the memory even when the power cord is disconnected.
- AUTO BLE XD data
FLEX System mode (On or off) - Tape counter number data
- Tape transport mode
REV MODE
Dolby (OFF/B/C)
ALCA data
To clear all the memorized data and set the unit to its original data settings
Press the DECK II recording mute (O) button and DECK I counter mode (TIME/COUNT) button simultaneously.
4. Presione el botón COPY MODE para selección la velocidad NORMAL o HIGH or TDNS.
TDNS: Copiado deCNTas que reduce el ruido entre las canciones (Aparece "TDNS" en el contactor de la platina I.)
NOR : Copiado deCNTas a la velocidad normal que le permite escuchar el sonido durante la reproduccion. (Aparece "NOR" en el contactor de la platina I.)
HI : Copiado deCNTAs a alta velocidad normal. (Aparece "HI" en el contactor de la platina I.)
5. Presione el botón COPY START. Para detener la copia
Presione el botón de parada (■) de una de las platinas. Se parará ambas platinas.
NOTAS:
- La cinta de la platina II se graba en las mismas conditiones que la cinta de la platina I, independiente de la posicion del botón DOLBY NR. Cuando se escucha la cinta copiada, ajuste el tipo del botón DOLBY NR.
- Cuando efectue la copia a alta velocidad, pueda grabarse un zumbido de interferencia si hay un telesor cerca del aparato. En tales casos, emplee la copia a la velocidad normal o desconnecte el telesor.
- Durante la copia a alta velocidad, no funciona润滑油 botón de operación a exception del botón de parada (■).
- Durante el copiado a velocidad normal o copiado TDNS, también funciona an los botones de silenciamiento de grabacion (O),停下 (II), y de parada (■) en la platina II.
- El modo de copia deCNTAs se cancela cuando se ilega al final dealguna de lesCNTAs, por lo que esaNconsejable emplearCNTas de la mesma longitud.
- Cuando se copia el@mismo material varias varies, grabelo siempre desdela cintaoriginal.La calidad del sonido se deteriorarasi se grabadeuna copia.No copie deuna copia).
- El ajuste del nivel de grabacion no esnecessary durante el copiado deCNTAs.
- El efecto del copiado TDNS tal vez no se mueste bien con una cinta en la que el ruido entre las melodías musicales y las señales musicales no se pueda distinguir claramente.
En este caso, utilise la fonction de copiado a velocidad NORMAL o HIGH.
MEMORIA DE LOS ULTIMOS AJUSTES
Estaunidad tiene unmemoria de semiconductor no borbable y no volatil para almacenar semipermanentmente (unos 10 años) los datos AUTO BLE XD más recientes,adelmas de las posiciones deactivacion/desactivaciondeotros conmutadores y botones. Como的结果ado,losajustes más recientes se memorizaran en la memoria awhilee cable de alimentacion estedesconectado.
- Datos del sistema AUTO BLE XD
- Modo del sistema FLEX (activado o desactivado)
- Datos del número del contador de la cinta
- Modo de transporte de la cinta
Modo de REV MODE - Ajuste del sistema Dolby (OFF/B/C)
- Datos del sistema ALCA
Para barrar todos los datos memorizados yponer la unidad en sus ajustes de datos originales.
Pulse simultaneamente el botón de silenciamiento de grabación (O) de la platina II y el botón del modo del contador (TIME/ COUNT) de la platina I.
UNATTENDED RECORDING
GRABACION CON TEMPORIZADOR
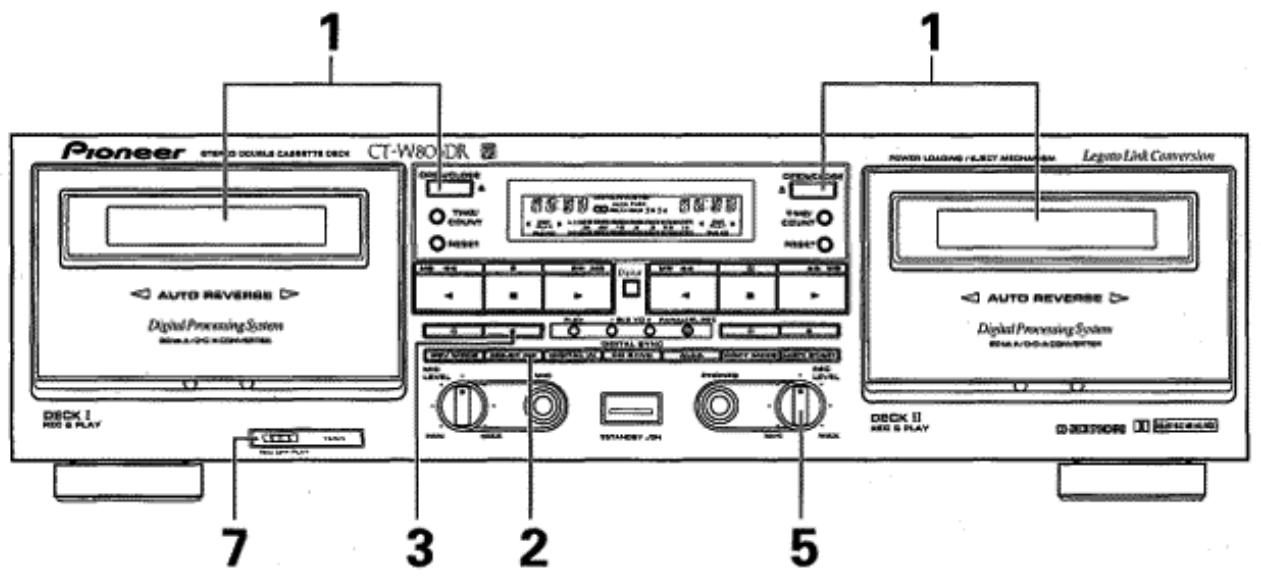
- Load a tape for recording in DECK I or II.
- Make sure that the tape is properly rewound.
- Set the REV MODE button to or
- Set the Dolby NR system by pressing the DOLBY NR button.
- Press the recording (●) button.
-
Prepare the audio source.
-
Set the amplifier input selector to tune, then tune in the desired station.
-
Adjust the recording level. For details, see the section "ADJUSTING THE RECORDING LEVEL" on page 20. (When ALCA system is set to ON, recording level is adjusted automatically.)
-
Set the audio timer.
-
When the timer is set, it will turn off the power of all connected components.
-
Set the TIMER mode switch to the REC position.
- At the preset time, the power will be turned on, and recording will begin automatically.
- Insert cassette tapes into DECK I and DECK II.
- Set REV MODE button to 心
- Perform operations 3-8 above.
NOTES:
Digital signal recording cannot be performed in this mode.
- Timer recording will not work if the erasure prevention tabs of the tape loaded have been removed.
- Operations depend on the type of audio timer used; be sure to consult the operating instructions of the audio timer you actually use.
- When not performing timer operations, set the TIMER mode switch to the OFF position. Otherwise, recording might begin unexpectedly when the power is turned on.
- Turn down the volume of the amplifier if you do not wish to listen to the program while it is being recorded.
- The Last Memory function preserves the most recent adjustments made with the SUPER AUTO BLE XD function. By using the SUPER AUTO BLE XD function to set the response for a new tape, you can use the timer recording feature to record on the new tape at the most recent settings obtained with SUPER AUTO BLE XD.
- Inserte la cinta para grabacion en la platina II o en la I. Asegúrese de que la cinta está correctamente bobinada.
- Ajuste el boton REV MODE a o
- Seleccione el modo Dolby NR con el boton DOLBY NR.
- Presione el botón de grabación (●).
-
Prepare la fuente de audio.
-
Ajuste el selector de entrada del amplificador a la posicion del sintonizador y sintonice la emisora deseada.
-
Ajuste el nivel de grabación. Para más detalles, vea la sección de "AJUSTE DEL NIVEL DE GRABACION" en la頁a 20. (Cuando se activa (ON) el sistemas ALCA, el nivel de grabación se ajusta automatistically.)
-
Ajuste el temporizador de audio.
-
Cuando se ajusta el temporizador, desconectará la alimentación de todos los componentes.
-
Ajuste el selector del modo TIMER en la posicion REC.
- A l ahora preajustada, se conectará la alimentación y la grabación se inicia automatistically.
- Inserte lasCNTAs de casete en las platinas I y II.
- Ajuste el botón REV MODE en
-
Efectue las operaciones 3 a 8 anteriores. NOTAS:
-
La grabación de la postal digital noURTRA realizarse en este modo.
- La grabación con temporizador no funciona si la cinta insertada está desprovista de las lengüetas de protección contra bomrado accidental.
- Las operaciones dependen del tipo de temporizador de audio utilisé; por lo que deben leer el manual de instructcciones de su temporizador que utilise.
- Cuando no efectue la operation con temporizar, ajuste siempre el selector de modo TIMER en la posicion OFF. De lo contrario, la grabacion o reproduccion pourrait iniciarse automatistically al connectar la alimentacion.
- Baje el volumen del amplificador no desea escuchar el programa cuando se está grabando.
- La funciona de memoria de los ultimos ajustes conserva los ajustes más recientes hechos con la funciona SUPER AUTO BLE XD. Empleando la funciona SUPER AUTO BLE XD paraaabstar la的回答sta para una nuevo cinta,oulda usar la funciona de grabacion con temporizador para grabar en lanova cinta con los ajustes más recientes obtenidos con SUPER AUTO BLE XD.
WAKE-UP PLAYBACK
REPRODUCCION DE DESPERTADOR
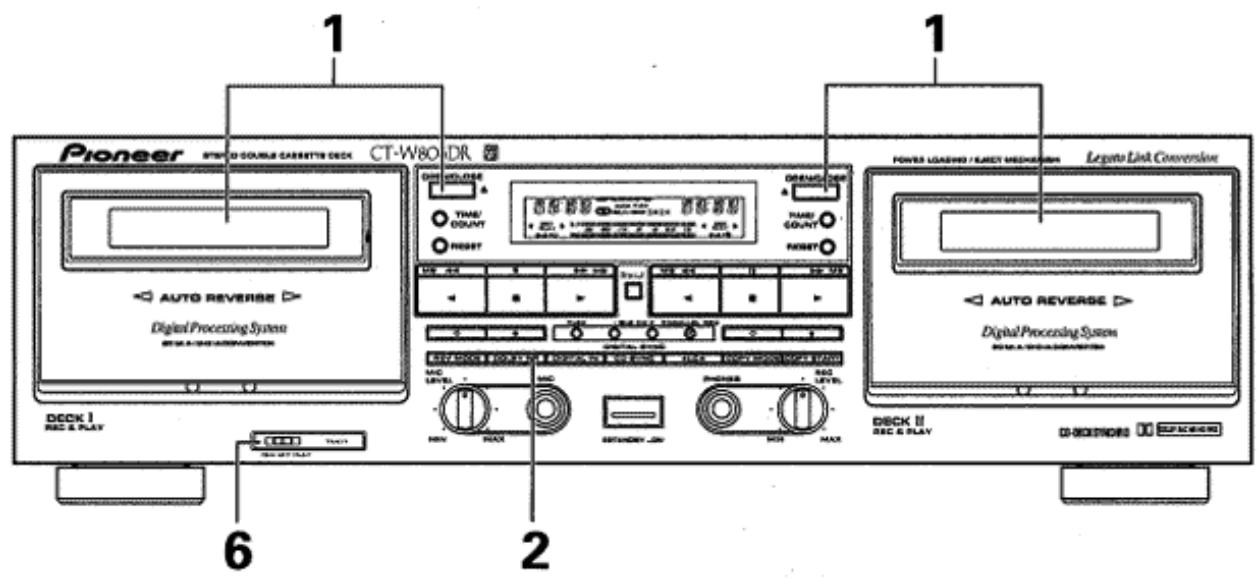
- Load a prerecorded tape.
Make sure that the tape is properly rewound.
- Select the reverse mode with the REV MODE button.
When the mode is selected and playback tapes are loaded into both DECK I and II, relay playback begins on DECK I and continues automatically on DECK II.
-
Set the Dolby NR system by pressing the DOLBY NR button.
-
Set the stereo amplifier for tape playback.
-
Adjust the volume level by playing back a portion of the tape.
-
Rewind the tape to the position where playback is to start.
-
Set the audio timer.
-
When the timer is set, it will turn off the power of all connected components.
-
Set the TIMER mode switch to the PLAY position.
-
At the time set on the audio timer, the power will be turned on and playback will begin automatically.
NOTES:
- Operations depend on the type of audio timer used; be sure to consult the operating instructions of the audio timer you actually use.
- When the TIMER mode switch is set to the PLAY position for the wake-up playback, the deck is set to the repeat playback mode.
-
When not performing timer operations, set the TIMER mode switch to the OFF position. Otherwise, playback might begin unexpectedly when the power is turned on.
-
Inserte la cinta grabada.
- Asegürese de que la cinta está correctamente bobinada.
- Selección el modo de inversionión con el botón REV MODE.
Cuando se selección el modo y lasCNTas de reproduccionestan insertadas enlasplatinylyII,se inicia la reproduccion por relevos desdela platinaIycontinua automatamente en la platina II. - Ajuste el sistema Dolby NR presionando el botón DOLBY NR.
- Ajuste el amplificador estéreo para reproducción deCNTAs.
- Ajuste el nivel de volumen reproduciendo una parte de la cinta.
- Rebobine la cinta a la posicion en la que deba iniciarse la reproduccion.
-
Ajuste el temporizador de audio.
-
Cuando se ajuste el temporizador, se desconectará la alimentación de todos los componentes conectados.
-
Ajuste el selector de modo TIMER en la posicion PLAY.
- A la hora preajustada se conectará la alimentación y se inicia automatistically la reproducción.
NOTAS:
- Las operaciones dependen del tipo de temporizador de audio utilisé; por lo que deben leer el manual de instructcciones de su temporizador que utilise.
- Cuando el selector del modo TIMER se pone en la posicion PLAY para la reproduccion de descentador, la unidad se establearce en el mode de reproduccion.
- Cuando no efectue la operation con temporizador, ajuste sempre el selector de modo TIMER en la posicion OFF. De lo contrario, la grabacion o reproduccion pourrait iniciarse automatistically al connectar la alimentacion.
TROUBLESHOOTING
Incorrect operations are often mistaken for trouble and malfunctions. If you think that there is something wrong with this component, check the points below. Sometimes the trouble may lie in another component. Investigate the other components and electrical appliances being used. If the trouble cannot be rectified even after exercising the checks listed below, ask your nearest PIONEER authorized service center or your dealer to carry out repair work.
| Symptom | Cause | Remedy |
| POWER | ||
| Cannot turn power on. | The power plug is disconnected. The component (stereo amplifier, audio timer, etc.) to which the power cord is connected is off. | Connect the power plug. Turn the stereo amplifier or audio timer on. |
| CASSETTE DOOR | ||
| The door dose not open. | The deck is not in stop mode (tape is moving). Power was turned off with the tape moving. | Press the stop (■) button. Turn power on. |
| The door does not close. | The cassette is not properly loaded. | Reinsert the cassette. |
| PLAYBACK | ||
| Immediately stops. | The tape is completely wound. The tape is slack. | Play back in the opposite direction. Rewind the tape. Take up slack (see page 4). |
| The level meter does not work. | The tape is blank. The tape head is dirty. | Replace the blank tape with a recorded one. Clean the heads (see page 5). |
| No sound. | The amplifier input selector is not correctly set. The amplifier volume level setting is too low. Connection problems (wrong connection, cord removed, poor contact, broken wire.) | Set the amplifier input selector correctly. Turn the amplifier volume control up. Connect securely (see page 6). |
| RECORDING | ||
| The recording indicator does not light up. | The cassette erasure prevention tabs are broken. | Replace the cassette with one whose tabs are intact. Cover the hole over the tab (see page 4). |
| The level meter does not work. | REC LEVEL control is set too low. The amplifier is not delivering a recording signal (from the tuner, CD player, etc.). Wrong connection, connection cord removed, poor contact, broken wire. | Turn REC LEVEL control up (see page 20). Set the amplifier recording output selector correctly. Check connections (see page 6). |
| Immediately stops. | The tape is completely wound. The tape is slack. | Record in the opposite direction. Rewind the tape. Take up the slack (see page 4). |
| Cannot record. | The head is dirty. | Clean the head (see page 5). |
| No sound. | Connection problems (wrong connection, cord removed, poor contact, broken wire.) | Check that the recording and playback connection cords are connected correctly. (see page 6). Set the amplifier selector correctly. |
| REC LEVEL control does not function. | ALCA is currently operating. Tape is being copied. Digital input is selected. | ‘Cancel ALCA. Cancel tape copy. Switch to analog input. |
| POOR SOUND QUALITY | ||
| Unstable or interrupted sound. | The head, pinch rollers and capstans are dirty. The tape is not uniformly wound. | Clean the head and pinch rollers (see page 5). Completely fast-forward or rewind the tape. |
| No high frequencies. | A tape recorded without using Dolby NR is being played back with the DOLBY NR button in the B or C position. The head is dirty. | Press the DOLBY NR button to OFF. Clean the head (see page 5). |
| High frequencies are emphasized. | A tape recorded using Dolby NR is being played back with the DOLBY NR button in the OFF position. | Press the DOLBY NR button to select the same position as the position used in recording. |
| Sound from previous recordings remains when rerecording a tape. | The head is dirty. | Clean the head (see page 5). |
| The sound is distorted. | Recording level is too high. The recorded signal itself is distorted. The head is dirty. | Turn REC LEVEL control down when recording (see page 20). Replace the cassette. Clean the head (see page 5). |
| Too much noise. | High noise tape is being used. Incomplete insertion of a connection cord, poor contact. Recording level is too low. The head is dirty. The head is magnetized. | Replace the cassette. Check connections (see page 6). Turn REC LEVEL control up when recording (see page 20). Clean the head (see page 5). Demagnetize with a head demagnetizer (see page 5). |
| OTHERS | ||
| The music search function does not work. | Blanks between selections are less than 4 seconds long. | Use a tape with blanks more than 4 seconds long. |
| Cannot use the remote control system. | The control cord is not connected. | Connect the control cord (see page 6). |
| CD-DECK SYNCHRO is disabled. | The components are not connected properly. The cassette erasure prevention tabs are broken. | Connect them properly (see page 6). Replace the cassette with one whose tabs are intact. |
| The CD SYNC indicator is off during CD-DECK SYNCHRO recording. | The tape ran out during the CD-DECK SYNCHRO mode. After the deck entered recording standby mode, more than 1 minute elapsed before the CD player resumed playback. | Replace the tape with a longer one. Change the disc and press the CD SYNC button again. |
Abnormal functioning of this unit may be caused by static electricity, or other external interference. To restore normal operation, turn the power off and then on again, or unplug the AC power cord and then plug it in again.
When troubles occur:
When certain troubles occur during use of the cassette deck, the following display (service number) appears on the function display of the cassette deck. If this occurs, follow the "Remedy" below.
Function display of the cassette deck
M3
- Service numbers M3 and L1 are displayed on the counter indicator of Deck I while M4 and L2 are displayed on the counter indicator of Deck II.
| Service No. | Status of This Unit | Cause | Treatment |
| M3 | DECK I is in mecha-nism operation er-ror status. | DECK I mechanism mal-function | Turn power off then on again and press the OPEN/CLOSE button. If the door does not open or the same information is displayed, the unit may be in trouble.When requesting servicing, please notify us of the service number displayed on the FL display of the unit. |
| M4 | DECK II is in mecha-nism operation er-ror status. | DECK II mechanism mal-function | Turn power off then on again and press the OPEN/CLOSE button. If the door does not open or the same information is displayed, the unit may be in trouble.When requesting servicing, please notify us of the service number displayed on the FL display of the unit. |
| L1 | DECK I is in the door loading error condi-tion. | ●You loaded the tape up-side down and attempted to close the door.The door hits an obstacle and cannot open. | Load the tape properly.The same information is displayed, the unit may be in trouble.When requesting servicing, please notify us of the service number displayed on the FL display of the unit. |
| L2 | DECK II is in the door loading error condi-tion. | ●You loaded the tape up-side down and attempted to close the door.The door hits an obstacle and cannot open. | Load the tape properly.The same information is displayed, the unit may be in trouble.When requesting servicing, please notify us of the service number displayed on the FL display of the unit. |
| D1 | Digital input | ●Optical fiber cable is not connected (except for UK model).●Digital pin-plug cord not connected (UK model only).CD or MD player is not turned on. | Connect the optical fiber cable (Sold separately for European model).Connect digital pin-plug cord (Sold separately).Turn on power to CD or MD player. |
SOLUTION DE PROBLEMAS
Frecuentemente se toman por averias problemas debidos a operaciones incorrectas. Siusted cree que hay algo que no funciona con normalidad en este aparato, compruebe los+puntos seguidentes. A vez el problema reside en other componente. Investigue los demas componentes y aparatos electricos que estéutilizando. Si el problema no puedaSolutionarse incluo afterwards de haber realizado las comprobaciones de la lista de abajo, lleve el aparato a reparar al centro de service的技术ico autorizzato por PIONEER o al establishimiento whence lo compró.
| Síntoma | Causa probable | Remedio |
| ALIMENTACION | ||
| No se conecta la alimentación. | Se desenchufó la clavija de alimentación. El componente (amplificador estéreo, temporizador, etc.), al que se había connectado el cable de alimentación, está desconnectado. | Inserte correctamente la clavija de alimentación. Conecte el amplificador estéreo o el temporizador. |
| COMPARTIMIENTO DEL CASETÉ | ||
| No se abre el compartmentimiento del casete. | El mecanismo de la cinta no está en la posición de parada (la cinta está moviéndose). Se desconnectó la alimentación durante el funcionaimiento de la cinta. | Presione el botón de parada (■). Conecte de nuevo la alimentación. |
| El compartmentimiento del casete no se cierra. | La cinta de casete no se ha cargado correctamente. | Cargue de nuevo la cinta. |
| REPRODUCCION | ||
| Se para inmediamente. | La cinta está bobinada por completeo. La cinta está floja. | Reproducza en la direction opuesta. Rebobine la cinta. Tense la cinta (vea la págrina 4). |
| El medidor de nivel no funciona. | La cinta no está grabada. Lackeza está sucia. | Reemplace la cinta por otra grabada. Limpie lackeza (vea la págrina 5). |
| No hay sonido. | El selector de entrada del amplificador está Incorrectamente ajustado. El ajuste del nivel de volumen es demasiado bajo. Problemas de connexion (conexiones erróneas, cables desenchufados, malos contactos, conductores rotos). | Ajuste correctamente el selector de entrada del amplificador. Aumente el ajuste del control del volumen del amplificador. Conecte correctamente (vea la págrina 6). |
| GRABACION | ||
| No se enciende el indicator de grabación. | Las lengüetas de protección del casete está rotas. | Cambie el casete por otro con lengüetas interactas. Ponga cinta adhesiva en los orificios de las lengüetas (vea la págrina 4). |
| El medidor de nivel no funciona. | El nivel ajustado en el control REC LEVEL es demasiado bajo. El amplificador no suministra una seals de grabación (desde el sintonizador, reproductor de discos compactos, etc.) Conexiones erróneas, cables desenchufados, malos contactos, conductores rotos. | Aumente el nivel del control REC LEVEL (vea la págrina 20). Ajuste correctamente el selector de salute de grabación del amplificador. Compruebe las conexiones (vea la págrina 6). |
| Se para inmediamente. | La cinta está bobinada por completeo. La cinta está floja. | Grabe en la direction opuesta. Rebobine la cinta. Tense la cinta (vea la págrina 4). |
| No pueda grabar. | Lackeza está sucia. | Limpie lackeza (vea la págrina 5). |
| No hay sonido. | Problemas de connexion (conexiones erróneas, cables desenchufados, malos contactos, conductores rotos). | Compruebe si los cables de connexión para la grabación y la reproducción está connectados correctamente. (Consulte la págrina 6.) Ponga el selector del amplificador en la posición apropiada. |
| El control REC LEVEL no funciona. | Elsystema ALCA está en configuracion. Se está copiando la cinta. Se ha seleccióndo la entrada digital. | Cancle el systema ALCA. Cancle el copiado de la cinta. Cambie a entrada analógica. |
| Sintoma | Causa probable | Remedio |
| MALA CALIDAD DE SONIDO | ||
| Sonido inestable o interrupido. | · La cabeza, rodlillos de presión y ejes de arraste está sucios. · La cinta no está bien bobinada. | · Limpie lackeza y los rodlillos de presión (vea la págrina 5). · Rebobine la cinta o avancela rápidamente hasta el final. |
| No hay sonido de altas Frequencias. | · Una cinta que no se grabó con el sistema Dolby se está reproduciendo con el sistemas DOLBY NR temas B o C. · Lackeza está sucia. | · Ajuste correctamente el botón DOLBY NR a OFF. · Limpie lackeza (vea la págrina 5). |
| Sonidos agudos demasiado acentuos. | · Una cinta que ha sido grabada con el sistemas Dolby NR se está reproduciendo con el botón DOLBY NR en la posición OFF. | · Presione el botón DOLBY NR para selectionar la mesma posición que la utilizesda para laGrabación. |
| Queda sonido debajo de la nuevo grabación. | · Lackeza está sucia. | · Limpie lackeza (vea la págrina 5). |
| Sonido distorsionado. | · El nivel de grabación es demasiado alto. · La signalmobada está ya de sdistorsionada. · Lackeza está sucia. | · Reduzca el nivel del control REC LEVEL para grabar (vea la págrina 20). · Reemplace el casete. · Limpie lackeza (vea la págrina 5). |
| Ruido excessivo. | · Se usa cinta con ruido. · Un cable de conexión no está correctamente connectado o mal contacto. · El nivel de grabación es demasiado bajo. · Lackeza está sucia. · Lackeza está magnetizada. | · Cambie el casete. ·Inspeccione todas las conexiones (vea la págrina 6). ·Aumente el nivel del control REC LEVEL para grabar (vea la págrina 20). ·Limpie lackeza (vea la págrina 5). ·Desmagnetice lackeza con un desmagnetizador de cabezas (vea la págrina 5). |
| OTROS | ||
| No pueda usarse el sistema de control remoto | · La cinta realizada no tiene espacios en blanco de 4segundos entre caniones. | · Utilice un casete con espacios en blanco de 4segundos o más. |
| No opera la función de búsqueada de canciones | · El cable de control no está connectado. | · Conecte el cable de control (vea la págrina 6). |
| Está inactividad la grabación sincronizada de discos compactos. | · Los componentes no están correctamente connectados. · Las lengüetas de protección del casete están rotas. | · Conéctelos correctamente (vea la págrina 6). · Cambie el casete por除外 con lengüetas interactas. |
| El indicator CD SYNC está apagado durante la grabación sincronizada de discos compactos. | · La cinta ha finalizo durante el modo de grabación sincronizada de discos compactos. · Después de que la grabadora se ha establecido en el modo de reserve de grabación, transcurrresde 1 minuto antes de reanudarse la reproducción del reproductor de discos compactos. | · Reemplace la cinta por otra más larga. · Cambie el disco y presione de nuevo el botón CD SYNC. |
La electricidad estatica, yudas interferencias externas, podran ser causa un functionamento anomal de la unidad. Para reanudar la operacion normal, desactive el interruptor de alimentacion y activelo nuevamente, o desconnecte el cable de alimentacion de CA conectele bajo Nuevo conveniently.
Cuando se produzcan problemas...
Cuando se produzcan ciertos problemas durante la requisión de la platina, la visualizaciónsscuiente (número de servicios) aparecerá en el visualizador de la platina. Si ocurre this, siga los "Remedios" indicados mas abajo.
Visualizador de sistemas de la platina
M3
- Los nombres de servicios M3 y L1 se visualizan en el indicator del contador de la platina I cuando que M4 y L2 se visualizan indicador del contador de la platina II.
| N.° de servicios | Estado de este aparato | Causa | Remedio |
| M3 | La platina I está en estado de error de operación del mecanismo. | Mal funciona el等功能 del mecanismo de la platina I. | • Desconecte la alimentación y vuélvala a conectar y presione el botón OPEN/CLOSE. Si la puerta no se abre o se visualiza laquia informática, es possible que el aparato está averiado. • Cuando Solicite el service专业技术, notificufenos el número de service visualizzato en el visualizador fluorescent del aparato. |
| M4 | La platina II está en estado de error de operación del mecanismo. | Mal funciona el等功能 del mecanismo de la platina II. | • Desconecte la alimentación y vuélvala a conectar y presione el botón OPEN/CLOSE. Si la puerta no se abre o se visualiza laquia informática, es possible que el aparato está averiado. • Cuando Solicite el service专业技术, notificufenos el número de service visualizzato en el visualizador fluorescent del aparato. |
| L1 | La platina I está en estado de error dearga carga de la puerta. | • La cinta se ha insertado al revés y se ha intentado asi cerrar la puerta. • La puerta golpea alcun obstáculo y no pueda abrirse. | • Inserte correctamente la cinta. • Si se visualiza laquia informática, es possible que el aparato está averiado. Cuando Solicite el service专业技术, notificufenos el número de service visualizzato en el visualizador fluorescent del aparato. |
| L2 | La platina II está en estado de error dearga carga de la puerta. | • La cinta se ha insertado al revés y se ha intentado asi cerrar la puerta. • La puerta golpea alcun obstáculo y no pueda abrirse. | • Inserte correctamente la cinta. • Si se visualiza laquia informática, es possible que el aparato está averiado. Cuando Solicite el service专业技术, notificufenos the número de service visualizzato en el visualizador fluorescent del aparato. |
| D1 | Entrada digital | • El cable de fibra optica no está connectado (excepto para el modelo para Gran Bretaña). • El cable de clavijas digitall no está connectado (sólo el modelo para Gran Bretaña). • El reproductor de discoc CD o MD no está connectado. | • Conecte el cable de fibra optica (se vende por separado para el modelo para Europa). • Conecte el cable de clavijas digital (se vende por separado). • Conecte la alimentación del reproductor de discos CD o MD. |
SPECIFICATIONS
System 4-track,2-channel stereo
Heads . . . . . . . . . "Hard Permalloy" recording/playback head x 2
"Ferrite" erasing head × 2
Motor DC servo motor x 2
Loading motor × 2
Wow and Flutter .0.09% (WRMS)
± 0.19% (DIN)
Fast Winding Time .... Approximately 100 seconds (C-60 tape)
Frequency Response
-20 dB recording:
TYPE IV (Metal) tape 20 to 20,000 Hz
TYPE II (High/CrO _2 ) tape 20 to 19,000 Hz
TYPE I (Normal) tape 20 to 18,000Hz
Signal-to-Noise Ratio Dolby NR OFF .More than 57 dB
Signal-to-Noise Ratio (when Digital NR ON)
Dolby NR B or C-type ON 90 dB
Dolby NR OFF 82 dB
(TYPE I tape, 3rd distortion 3% , IEC. DIN AUDIO)
Harmonic Distortion No more than 0.8%
(at -4 dB: 160 nwb/m)
Input (Sensitivity) LINE (INPUT) 100 mV (Input impedance 53k
Output (Reference level) LINE (OUTPUT) 0.5 V (Output impedance 1.9k
Headphones 1.33 mW (Load impedance 32 Ω)
Miscellaneous
Power Requirements UK model AC 230-240 V, 50/60 Hz
European model AC 220-230 V, 50/60 Hz
Multivoltage model AC 110/120-127/220/230-240 V
(Switchable), 50/60 Hz
Power Consumption 25 W
Dimensions 420(W) x 125(H) x 250(D) mm
Weight (without package) 4.7kg (10 lb 6 oz)
Subfunctions
Automatic reverse
DOLBY HX PRO system
DOLBY B/C type NR systems
Music search up to ± 15 selections
Synchronized copy start
High-speed and normal-speed copy (DECK I DECK II)
Relay recording
- Parallel recording
Relay playback/blank skip
CD-DECK SYNCHRO recording capability
Peak level meter with peak-hold function
Automatic space recording mute
Automatic tape selector
System remote control available
- 2-mode electronic 4-digit twin tape counter
- Headphone jack
DIGITAL FLEX system (Frequency Level Expander)
DIGITAL TDNS system (Tape Duplication Noise Suppressor)
- DIGITAL ALCA system (Auto Level Control with tape Analysis)
DIGITAL SUPER AUTO BLE XD system
LAST MEMORY
DIGITAL NR
- Legato Link Conversion
Power Loading/Eject
DIGITAL SYNCHRO recording capability
MIC MIXING
- MPX filter (Interlocks with DOLBY NR)
Accessories
Operating instructions 1
Connection cord with pin plugs 2
Remote control cord 1
CD-DECK SYNCHRO control cord 1
Optical fiber cable (except for UK and European models) .... 1
NOTE:
Specifications and design subject to possible modifications without notice, due to improvements.
POWER-CORD CAUTION
Handle the power cord by the plug. Do not pull out the plug by tugging the cord and never touch the power cord when your hands are wet as this could cause a short circuit or electric shock. Do not place the unit, a piece of furniture, etc., on the power cord, or pinch the cord. Never make a knot in the cord or tie it with other cords. The power cords should be routed such that they are not likely to be stepped on. A damaged power cord can cause a fire or give you an electrical shock. Check the power cord once in a while. When you find it damaged, ask your nearest PIONEER authorized service center or your dealer for a replacement.
ESPECIFICACIONES
Sistema 4 pistas,2 canales estereo
Cabezas. Cabeza de grabacion/reproduccion de
"Permaloy Duro" X 2
Cabeza de borrado de "Ferrita" X 2
Motor Motor servo CC X 2
Motor de energia x 2
Fluctuación y trémolo 0,09% (WRMS)
0,19% (DIN)
Tiempo de bobinado, rápido ... Aproximamente 100 segundos
(cinta C-60)
Respuesta en Frequencia
Grabacion-20 dB:
Cinta del TIPO IV (metal) 20 a 20.000 Hz
Cinta del TIPO II (alta/cromo) 20 a 19.000 Hz
Cinta del TIPO I (normal) 20 a 18.000 Hz
Relación de postal/ruido
Dolby NR disactivado . MAs de 57 dB
Relación de postal/ruido
(cuando el sistema NR digital está activado)
Dolby NR tipo B o C aktivado 90 dB
Dolby NR desactivado 82 dB
(Cinta del TIPO I,teringa distorsion del 3 % IEC,DIN AUDIO)
Distorsión armónica. No más de 0,8%
(a -4 dB: 160 nwb/m)
Entrada (sensibilitidad)
LINE (INPUT) 100 mV (impedancia de entrada 53k
Salida (nivel de referencia)
LINE (OUTPUT) 0,5 V (impedancia de salute 1,9 kΩ)
Auriculares 1,33 mW (impedancia de energia de 32 Ω)
Misceláneos
Alimentación
Modelos para Gran Bretan.. 230-240 V CA, 50/60 Hz
Modelos para Europa 220-230 V CA, 50/60 Hz
Modelos de multitension .... 110/120-127/220/230-240 V CA
(seLECTIONABLE), 50/60 Hz
Consumo 25W
Dimensiones 420 (An) X 125 (Al) X 250 (Prf) mm
Peso (sin embalaje) 4,7 kg
Funciones secundarias
Inversión automática de la cinta
- Sistema DOLBY HX PRO
- Sistemas de reduccion de ruido DOLBYtips B/C
- Búsqueada de canciones de más de ±15 canciones
- Inicio de copiado sincerzoncido
- Copiado deCNTAs a alta velocidad y velocidad normal (platina I platina II)
- Grabación por relevos
- Grabación en paralelo
- Reproduccion por relevantos/salto de espacios en blanco
- Capacidad de grabación sincronizada de discos compactos
- Medidor de nivel pico con funciona de retencion de picos
- Silencimiento en grabación con separación automatística
- Selector automatico deCNTas
- Control remotodelsistema 5R disponible
- Contador de cinta doble de 4 digitos electrico de 2 modelos
- Toma de auriculares
- Sistema FLEX DIGITAL (expansor de nivel de Frequencia)
- Sistema TDNS DIGITAL (supresor de ruido de duplication deCNTAs)
- Sistema ALCA DIGITAL (control automático del nivel con análisis de la cinta)
- Sistema SUPER AUTO BLE XD DIGITAL
- Memoria de laULTima referencia (LAST MEMORY)
- Reducción de ruido digital (DIGITAL NR)
- Conversion de enlace de ligado
- Inserción/expulsión motorizadas
- Capacidad de grabación digital sincronizada (DIGITAL SYNCHRO)
- Mezcla microfónica (MIC MIXING)
- Filtro MPX (funciona con el sistema DOLBY NR)
Accesorios
Manual de instrucciones 1
Cable de conexión con clavijas 2
SR Cable de control remoto 1
Cable de control remoto para grabacion sincronizada 1
Cable de fibra optica
(excepto los modelos para Gran Bretanay Europa) 1
NOTA:
Especification y diseño susjetos a Cambios sin previo avisado debesto a mayoras del producto.
PRECAUCIONES CONCERNIENTES A LA MANIPULACION DEL CABLE DE ALIMENTACION
Tome el cable de alimentación por la clavija. No extraiga la clavija tirando del cable. Nunca toque el cable de alimentación cuando sus manos esténzejadas, ya que thiso podria causar cortocircuitos o descargas electricas.No coloque la unidad,?.,.sobre el cable de alimentacion.Asegurese de no hacer nudos en el cable ni de unirlo aothers cables.Los cables de alimentaciondeferan ser dispuestos de tal forma que la probabilitad de que sean pisados sea minima.Una cable de alimentacion daado podra causar incendios o descargas electricas.Revise el cable de alimentacion esta daado,solicite el reemplazo del本身就是 al centro de service autorizzato PIONEER mas cercado,o a su distribuidor.
Publicado por Pioneer Electronic Corporation. Copyright © 1997 Pioneer Electronic Corporation. Todos los derechos reservados.
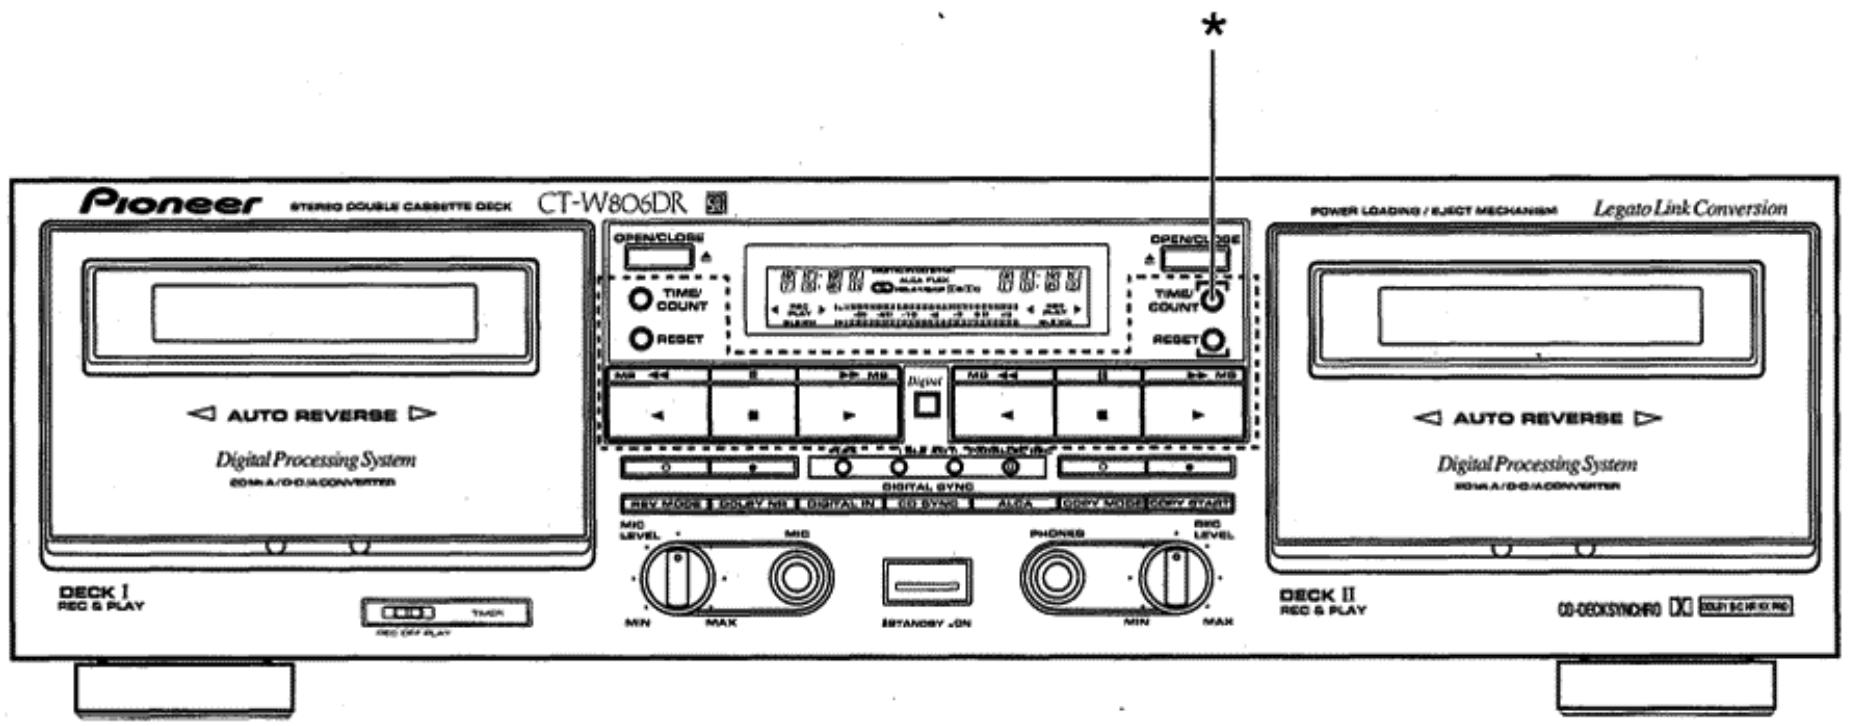
About the Demo mode (^*)
Press the DECK II counter reset button (RESET) and the DECK II time counter button (TIME/COUNT) simultaneously to set the demonstration mode. To cancel the demonstration mode, press any one of the buttons enclosed in the dotted lines above.
Notas sobre el modo de demostracion (^*)
Presione el botón de reposión del contador de la plastina II (RESET) y el botón del控制器 de tiempo (TIME/COUNT) simultáneamente paraaabstar el modo de demostración. Para cancelar el modo de demostración, presione cualesera de las teclas encerradas en las lineas punteadas de la ilustración de arriba.
Published by Pioneer Electronic Corporation.
Copyright © 1997 Pioneer Electronic Corporation.
All rights reserved.
PIONEER ELECTRONIC CORPORATION 4-1, Meguro 1-Chome, Meguro-ku, Tokyo 153-8654, Japan
PIONEER ELECTRONICS [USA] INC. P.O. BOX 1540, Long Beach, California 90801-1540
PIONEER ELECTRONICS OF CANADA, INC. 300 Allstate Parkway, Markham, Ontario L3R OP2, Canada
PIONEER ELECTRONIC [EUROPE] N.V. Haven 1087, Keetbergraan 1, 9120 Melsele, Belgium TEL: 03/570.05.11
PIONEER ELECTRONICS AUSTRALIA PTY. LTD. 178-184 Boundary Road, Braeside, Victoria 3195, Australia, TEL: [03] 9586-6300
PIONEER ELECTRONICS DE MEXICO S.A. DE C.V. San Lorenzo Num 1009 3er piso Desp. 302 Col. Del Valle, Mexico D.F. C.P. 03100 TEL: 5-688-52-90
- CT-W8O6DR
- STEREO DOUBLE CASSETTE DECK GRABADORA DE DOBLE CASETÉ ESTEREOFONICA
- WARNING: TO PREVENT FIRE OR SHOCK HAZARD, DO NOT EXPOSE THIS APPLIANCE TO RAIN OR MOISTURE.
- ADVERTENCIA: PARA EVITAR RIESGOS DE INCENDIOS O DESCARGAS ELECTRICAS, NO EXPONGA Este APARATO A LA LLUVIA NI A LA HUMEDAD.
- IMPORTANT 1
- CAUTION
- CONTENTS
- INDICE
- Information to User
- IMPORTANT 2
- FOR USE IN THE UNITED KINGDOM
- NOTE
- [FOR USE IN THE UNITED KINGDOM] INFRINGEMENT OF COPYRIGHT
- LINE VOLTAGE SELECTOR SWITCH
- INSTALLATION
- HANDLING CASSETTE TAPES
- Do not use tapes longer than 90 minutes in length
- TIPS ON CASSETTE TAPES
- INTERRUPTOR SELECTOR DE VOLTAJE DE LINEA
- INSTALLACION
- MANIPULación DE LAS CINTAS DE CASETE
- No utiliseCNTAs de mas de 90 minuto de duracion
- CONSEJOS SOBRE EL EMPLEO DE LAS CINTAS DE CASETE
- CHECK CASSETTE BEFORE USE
- Is the tape loose, or is some of the tape outside the cassette?
- Are the accidental erasure prevention tabs intact?
- NOTES:
- AUTOMATIC TAPE SELECTOR FUNCTION
- 4
- COMPRUEBE EL CASETE ANTES DE UTILIZARLO
- ¿Está la cinta floja o sale fuera del casete?
- ¿Están interactas las lengüetas de protección contra el bomrado?
- NOTAS:
- FUNCION DEL SELECTOR AUTOMÁTICO DE CINTAS
- CLEANING THE HEADS, PINCH ROLLERS AND CAPSTANS
- NOTE:
- DEMAGNETIZING THE HEADS
- CLEANING THE FRONT PANEL
- CONDENSATION
- LIMPIEZA DE LAS Cabezas, RODILLOS DE PRESION Y EJES DE ARRASTRE
- NOTA:
- DESMAGNETIZACION DE LAS Cabezas
- LIMPieZA DEL PANEL FRONTAL
- CONDENSACION DE HUMEDAD
- CONNECTIONS
- CONEXIONES
- PIONEER SYSTEM REMOTE CONTROL (1)
- CONTROL IN jack
- CONTROL OUT jack
- CONTROL REMOTO DEL SISTEMA PIONEER (1)
- Toma de entrada de control (CONTROL IN)
- Toma de salute de control (CONTROL OUT)
- CONNECTING THE RECORDING AND PLAYBACK CORDS (3, 4)
- CD-DECK SYNCHRO RECORDING (2)
- CONNECTING THE DIGITAL SIGNAL (11, 12)
- OPTICAL FIBER CABLE (15) (except for UK model)
- Precautions concerning use of optical fiber cables
- CONEXION DE LOS CABLES DE GRABACIOn Y REPRODUCCION (3, 4)
- GRABACION SINCRONIZADA PARA DISCOS COMPACTOS-GRABADORA (2)
- CONEXION DE LA SENAL DIGITAL (11, 12)
- CABLE DE FIBRA ÖPTICA (15)
- (excepto el modelos para Gran Bretaña)
- Precauciones relacionadas con el empleo de cables de fibra optica
- CONNECTING THE POWER CORD (13)
- FRONT PANEL FACILITIES
- CONEXION DEL CABLE DE ALIMENTACION (13)
- DISPOSITIVOS DEL PANEL FRONTAL
- ① STANDBY/ON switch
- ② DECK I operation buttons
- ① Interruptor de la alimentación (STANDBY/ON)
- ② Botones de operación de la platina I (DECK I)
- DOLBY* NR button (OFF/B/C)
- DIGITAL IN button
- CD-DECK SYNCHRO recording button (CD SYNC)
- ALCA button
- COPY MODE button
- COPY START button
- DIGITAL TDNS SYSTEM
- Botón del sistema DOLBY* NR (OFF/B/C)
- Botón de entrada digital (DIGITAL IN)
- Botón de grabación sincrúnizada de disco CD a grabadora (CD SYNC)
- Botón del sistema ALCA
- Botón del modo de copiado (COPY MODE)
- Botón de inizio de copiado (COPY START)
- SISTEMA TDNS DIGITAL
- REVERSE MODE (REV MODE)
- One way mode position
- Two way mode position
- Repeat mode position (RELAY/SKIP)
- DIGITAL FLEX SYSTEM
- MODO DE INVERSION (REV MODE)
- Posicion de un sentido
- Posicion de dos sentidos
- Posicion 已 del modo de repetition (RELAY/SKIP)
- SISTEMA DIGITAL FLEX
- DIGITAL-NR
- DOLBY NR & DOLBY HX PRO
- Dolby NR Systems
- Dolby HX PRO Headroom Extension System
- SISTEMA DE REDUccion DE RUIDO DIGITAL
- SISTemas DE SONIDO DOLBY NR Y DOLBY HX PRO
- Sistemas DOLBY NR
- ■ Sistema de extension sonora DOLBY HX PRO
- DIGITAL SUPER AUTO BLE XD
- DIGITAL SUPER AUTO BLE
- DIGITAL ALCA
- DIGITAL ALCA: Auto Level Control with tape Analysis (hereafter abbreviated to ALCA)
- SISTEMA SUPER AUTO BLE XD DIGITAL
- SISTEMA SUPER AUTO BLE DIGITAL
- SISTEMA DIGITAL ALCA
- LEGATO LINK CONVERSION
- OPERATION OF DECK I WITH A REMOTE CONTROL UNIT NOT DESIGNED FOR DOUBLE DECKS (SYSTEM REMOTE CONTROL)
- Selecting DECK I
- Switching to DECK II
- CONVERSION DE ENLACE DE LIGADO
- OPERACION DE LA PLATINA I EMPLEANDO UNA UNIDAD DE CONTROL REMOTO NO DISENADA PARA GRABADORAS DOBLES (CONTROL REMOTO DEL SISTEMA)
- Selección de la plastina I
- Operación de cambio a la platina II
- TAPE TRANSPORTATION MODE INDICATORS
- INDICADOS DE MODO DE TRANSPORTE DE LA CINTA
- TWO MODES COUNTER
- Counter Mode button (TIME/COUNT)
- Tape counter
- Time counter
- Counter reset button (RESET)
- Counter indicator during music search
- CONTADOR DE DOS MODOS
- Botón de modo de captador (TIME/COUNT)
- Contador de la cinta
- Contador de tiempo
- Botón de reposión del contador (RESET)
- Indicación del contador durante la búsqueada musical
- PLAYBACK
- REPRODUCCION
- To improve high frequency sound during playback in tapes with poor recordings
- To stop playback temporarily
- To fast forward or rewind tape
- To stop playback
- BLANKSKIP
- RELAY PLAYBACK
- Para melhorar el sonido de altas Frequencias durante la reproduccion deCNTAs con grabaciones deficientes
- Para detener momentáneamente la reproducción
- Para realizar el avance rápido o el rebobinado de la cinta
- Cuando se termina la reproduccion
- SALTOS DE ESPACIOS EN BLANCO
- REPRODUCCION POR RELEVOS
- PLAYBACK SEQUENCE WITH REV MODE BUTTON SETTING
- Para detener temporalmente la reproduccion
- SECUENCIA DE REPRODUCCION CON EL AJUSTE DEL BOTON REV MODE
- MUSIC SEARCH
- During forward playback
- During reverse playback
- From the stop mode
- How Selections are counted
- BUSQUEDA DE CANCIONES
- Durante la reproduccion en la direction de avance
- Durante la reproduccion en la direction de inversionion
- Cuando está en el modo de parada
- Reciento del numero de las canaciones
- ADJUSTING THE RECORDING LEVEL
- Precautions when recording from digital sources
- DIGITAL ALCA SYSTEM
- ALCA: Auto Level Control with tape Analysis
- AJUSTE DEL NIVEL DE GRABACION
- Precauciones para grabar de fuentes digitales
- ALCA: Control automático del nivel con análisis digital
- MECHANISM OF ALCA OPERATION
- DIGITAL SUPER AUTO BLE XD TUNING
- MECANISMO DE LA OPERACION DEL SISTEMA ALCA
- AJUSTE DEL SISTEMA SUPER AUTO BLE XD DIGITAL
- Error display
- Turning XD ON/OFF
- RECORDING MUTE
- Visualización de error
- Activación/desactivación (ON/OFF) de XD
- SILENCIAMIENTO EN GRABACION
- ERASING A TAPE
- RECORDING USING A MICROPHONE
- DIGITAL SYNCHRO RECORDING
- BORRADO DE UNA CINTA
- GRABACION EMPLEANDO UN MICROFONO
- GRABACION SINCRONIZADA DIGITAL
- CD-DECK SYNCHRO RECORDING
- GRABACION SINCRONIZADA DE DISCOS CD EN LA GRABADORA
- Press the CD SYNC button.
- When the compact disc finishes playing:
- When the CD player changes discs (twin tray or multi CD players):
- When the end of the tape is reached while the CD player is still playing:
- If the auto-reverse function operates while the CD is still playing:
- 10.Presione el botón de parada (■) de la grabadora de casete y del reproductor de discos CD.
- 11.Presione el botón CD SYNC.
- Cuando se termina la reproduccion del disco compaco:
- Cuando el reproductor de discos compactos cambia de disco (con reproductores de dos bandejas o de multidiscos):
- Cuando se时代的 al final de la cinta,msteads el reproductor de discos compactos está toda reproduciendo:
- Si opera la función de inversionión automatica de la cinta,mientras el disco compacto todas se está reproduciendo:
- When performing Relay Recording:
- RELAY RECORDING (from DECK I to DECK II)
- To stop recording temporarily
- To stop recording
- Cuando efectue la grabacion por relevos:
- GRABACION POR RELEVOS (DeSde la platina I a la platina II)
- Para detenermomentaneamente lagrabacion
- RELAY RECORDING SEQUENCE
- PARALLEL RECORDING
- Para terminar la grabación
- SECUENCIA DE GRABACION POR RELEVOS
- GRABACION EN PARALELO
- COPIADO DE CINTAS
- Load a tape for playback into DECK I and a tape for recording into DECK II.
- Select the reverse mode with the REV MODE button.
- Set the tape transport direction.
- Inserte una cinta grabada en la platina y una cinta para grabar en la platina II.
- Selección el modo de inversion con el botón REV MODE.
- Seleectione la direc tion de transporte de la cinta.
- Press the COPY MODE button to select either NORMAL or HIGH speed or TDNS.
- Press the COPY START button.
- To stop copying
- LAST MEMORY FEATURE
- To clear all the memorized data and set the unit to its original data settings
- Presione el botón COPY MODE para selección la velocidad NORMAL o HIGH or TDNS.
- Presione el botón COPY START. Para detener la copia
- MEMORIA DE LOS ULTIMOS AJUSTES
- Para barrar todos los datos memorizados yponer la unidad en sus ajustes de datos originales.
- UNATTENDED RECORDING
- GRABACION CON TEMPORIZADOR
- WAKE-UP PLAYBACK
- REPRODUCCION DE DESPERTADOR
- TROUBLESHOOTING
- When troubles occur:
- Function display of the cassette deck
- SOLUTION DE PROBLEMAS
- Cuando se produzcan problemas...
- Visualizador de sistemas de la platina
- SPECIFICATIONS
- Miscellaneous
- Subfunctions
- Accessories
- POWER-CORD CAUTION
- ESPECIFICACIONES
- Misceláneos
- Funciones secundarias
- Accesorios
- PRECAUCIONES CONCERNIENTES A LA MANIPULACION DEL CABLE DE ALIMENTACION
- About the Demo mode (*)
- Notas sobre el modo de demostracion (*)
Marque : PIONEER
Modèle : CT-W806DR
Catégorie : Enregistreur de cassette