
YT100 - Accordeur YAMAHA - Notice d'utilisation et mode d'emploi gratuit
Retrouvez gratuitement la notice de l'appareil YT100 YAMAHA au format PDF.

| Marque | YAMAHA |
| Modèle | YT100 |
| Type de produit | Accordeur automatique pour guitare et basse |
| Dimensions (L x H x P) | 97 x 50 x 18 mm |
| Poids | Environ 50 g (sans piles) |
| Alimentation | 2 piles AAA (R03/LR03) |
| Types d'instruments | Guitare (6 cordes) et basse (4 cordes) |
| Notes de référence | Guitare : 7B, 6E, 5A, 4D, 3G, 2B, 1E ; Basse : LB, 4E, 3A, 2D, 1G, HC |
| Fréquence standard | La4 = 440 Hz (fixe) |
| Entrée | Jack 6,35 mm mono (pour guitare électrique) et microphone intégré |
| Affichage | Indicateur de note et guide d'accordage (LED) |
| Fonctions principales | Détection automatique de la note, accordage précis par guide lumineux |
| Nettoyage | Chiffon doux et sec ; ne pas utiliser de solvants |
| Précautions d'usage | Éviter l'exposition au soleil direct, aux températures extrêmes et à l'humidité |
| Remplacement des piles | Ouvrir le couvercle au dos, insérer deux piles AAA en respectant la polarité |
FOIRE AUX QUESTIONS - YT100 YAMAHA
Questions des utilisateurs sur YT100 YAMAHA
0 question sur cet appareil. Repondez a celles que vous connaissez ou posez la votre.
Poser une nouvelle question sur cet appareil
Téléchargez la notice de votre Accordeur au format PDF gratuitement ! Retrouvez votre notice YT100 - YAMAHA et reprennez votre appareil électronique en main. Sur cette page sont publiés tous les documents nécessaires à l'utilisation de votre appareil YT100 de la marque YAMAHA.
MODE D'EMPLOI YT100 YAMAHA
GUITAR/BASS AUTO TUNER
OWNER'S MANUAL
Thank you for purchasing the YAMAHA YT-100 Guitar/Bass Auto Tuner.
Please read this manual thoroughly and keep it in a safe place for future reference.
PRECAUTIONS
◆ To prevent damage, do not use the tuner in the following locations:
- places where the unit will be in direct sunlight;
- places subject to temperature and humidity extremes;
- places that are sandy or dusty.
◆ Use only two AAA (R03/LR03) batteries to power this tuner.
◆ For maximum battery life, always be sure the tuner is turned OFF when not in use.
If an exhausted battery is left in the unit for an extended period of time, it may leak and cause malfunctioning of the unit. When the battery becomes exhausted, always remove it and replace it as soon as possible.
◆ Do not subject the tuner to strong physical shock or vibration. Do not use excessive force on any of the controls.
◆ Never use solvents such as benzene or thinner to clean the tuner. Wipe clean with a soft, dry cloth.
◆ After reading the owner's manual, keep it in a safe place for future reference.
Never dispose of used batteries by burning them.
Also make sure to keep batteries away from children.
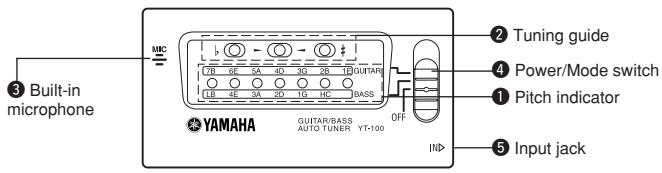
COMPONENTS
TUNING PROCEDURES
The tuner will automatically select the closest note name (string name) to the pitch of the plucked string.
- For electric guitars/basses, connect the guitar cable to the Input jack ⑤.
* The built-in microphone ③ will not operate when a cable is plugged into the Input jack ⑤. - Slide the Power/Mode switch ④ to select the type of instrument (GUITAR or BASS) you want to tune. (The center green LED of Tuning guide ② will flash.)
- To tune an acoustic guitar, place the tuner's built-in microphone ③ as close as possible to the guitar's sound hole.
- Pluck the string you want to tune. (Do not pluck more than one string at a time.)
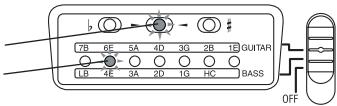
First, adjust the string so that the appropriate string name pitch indicator ① lights.
- Next, fine-tune the string until the tuning guide's ② green lamp lights.
When the b lamp on the tuning guide flashes, tighten the string to raise its pitch. When the # lamp flashes, loosen the string to lower its pitch.
example) To tune the "E" string on a six string guitar.
When this LED lights, the string is tuned correctly.
The string name of the plucked string lights.
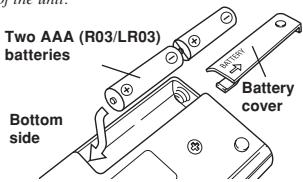
INSTALL/REPLACE THE BATTERY
- Press down on the battery cover (located on the back of the tuner) and slide it in the direction of the arrow.
- Install two AAA (R03/LR03) batteries in the battery compartment, making sure that the batteries are correctly aligned so that their polarity settings match the markings on the battery compartment.
Always slide the Power/Mode switch ④ to "OFF" before changing the battery.
* Make sure that the batteries are aligned so that their polarity markings (+, -) match those on the battery compartment. Incorrect installation may result in breakdown of the unit.
- Slide the battery cover back into place.
As the batteries age, the indicator will dim. Using weak batteries may result in irregular operation of the device.
Please exchange worn batteries with new ones (two AAA (R03/ LR03)) as soon as possible.
Do not leave a depleted battery in the tuner for an extended period of time as damage to the tuner caused by leaking batteries, etc may result.
SPECIFICATIONS
Indicators
Tuning Notes
: Pitch indicator, Tuning guides
:GUITAR 7B, 6E, 5A, 4D, 3G, 2B, 1E
BASS LB, 4E, 3A, 2D, 1G, HC
Standard Pitch
Input
Power Source
Dimensions (W x H x D)
:A4=440Hz (fixed)
: Input jack (6 φ monaural), Built-in microphone
: Two AAA (R03/LR03) batteries
:97 x 50 x 18 mm (3.8" x 2.0" x 0.71")
* Specifications and external appearance are subject to change without notice.
FCC INFORMATION (U.S.A.)
- IMPORTANT NOTICE: DO NOT MODIFY THIS UNIT!
This product, when installed as indicated in the instructions contained in this manual, meets FCC requirements. Modifications not expressly approved by Yamaha may void your authority, granted by the FCC, to use the product.
2. IMPORTANT: When connecting this product to accessories and/or another product use only high quality shielded cables. Cable/s supplied with this product MUST be used. Follow all installation instructions. Failure to follow instructions could void your FCC authorization to use this product in the USA.
3. NOTE: This product has been tested and found to comply with the requirements listed in FCC Regulations, Part 15 for Class "B" digital devices. Compliance with these requirements provides a reasonable level of assurance that your use of this product in a residential environment will not result in harmful interference with other electronic devices. This equipment generates/uses radio frequencies and, if not installed and used according to the instructions found in the users manual, may cause interference harmful to the operation of other electronic devices. Compliance with FCC regulations does not guarantee that interference will not occur in all installations. If this product is found to be the source of interference, which can be determined by turning the unit "OFF" and "ON", please try to eliminate the problem by using one of the following measures:
Relocate either this product or the device that is being affected by the interference.
Utilize power outlets that are on different branch (circuit breaker or fuse) circuits or install AC line filter/s.
In the case of radio or TV interference, relocate/reorient the antenna. If the antenna lead-in is 300 ohm ribbon lead, change the lead-in to co-axial type cable.
If these corrective measures do not produce satisfactory results, please contact the local retailer authorized to distribute this type of product. If you can not locate the appropriate, please contact Yamaha Corporation of America, Electronic Service Division, 6600 Orangethorpe Ave, Buena Park, CA 90620
The above statements apply ONLY to those products distributed by Yamaha Corporations of America or its subsidiaries.