
D85 - Orgue électronique YAMAHA - Notice d'utilisation et mode d'emploi gratuit
Retrouvez gratuitement la notice de l'appareil D85 YAMAHA au format PDF.

| Type de produit | Orgue électronique console |
| Marque | YAMAHA |
| Modèle | D85 |
| Claviers | 3 claviers : Solo (37 touches), Supérieur (49 touches), Inférieur (49 touches) + pédalier (13 touches) |
| Polyphonie | Clavier supérieur et inférieur : jusqu'à 7 notes simultanées ; Solo et pédalier : monophonique (note la plus haute prioritaire) |
| Génération sonore | Synthèse numérique avec tirettes pour harmoniques (16', 8', 4', etc.) |
| Préréglages | 19 voix pour le clavier supérieur, 10 pour le clavier inférieur, 5 pour le pédalier, 12 voix solo, presets spéciaux et voix personnalisées |
| Rythmes automatiques | 16 motifs rythmiques, 3 variations, 6 breaks, séquenceur de variations (8/16 mesures) |
| Fonctions avancées | Auto Bass/Chord, Arpège, Chœur Symphonique, Trémolo, Portamento, Modulation, Transposition, Vibrato avec délai |
| Alimentation | 100-240 V, 50/60 Hz (vérifier la tension locale) |
| Dimensions (approx.) | 1300 mm (L) x 700 mm (P) x 1000 mm (H) (estimation pour orgue console) |
| Poids (approx.) | 90 kg (estimation) |
| Entretien et nettoyage | Nettoyer le meuble avec un chiffon humide (détergent neutre) ; utiliser un chiffon sec et doux pour les claviers ; ne jamais utiliser de solvants, alcool ou diluant |
| Sécurité | Éteindre après usage ; ne pas ouvrir l'appareil (aucun composant réparable par l'utilisateur) ; éviter l'exposition au soleil, à l'humidité et à la chaleur ; ne pas poser d'objets lourds sur le couvercle |
| Pièces détachées et réparabilité | Contacter un technicien agréé Yamaha pour toute réparation ; pièces détachées disponibles auprès des revendeurs agréés |
| Accessoires inclus | Notice d'utilisation, câble d'alimentation (non mentionné, mais standard) |
FOIRE AUX QUESTIONS - D85 YAMAHA
Questions des utilisateurs sur D85 YAMAHA
0 question sur cet appareil. Repondez a celles que vous connaissez ou posez la votre.
Poser une nouvelle question sur cet appareil
Téléchargez la notice de votre Orgue électronique au format PDF gratuitement ! Retrouvez votre notice D85 - YAMAHA et reprennez votre appareil électronique en main. Sur cette page sont publiés tous les documents nécessaires à l'utilisation de votre appareil D85 de la marque YAMAHA.
MODE D'EMPLOI D85 YAMAHA
GUID TO YOUR
YAMAHAF ELECTONE ORGAN
D-85
Contents
Welcome to the YAMAHA world of music.
You are now a member of the select group of proud YAMAHA ELECTONE owners. We are confident that your selection of the D-85 Electone organ marks the beginning of a lifelong partnership in musical creativity.
Please read this manual carefully to familiarize yourself with all of the unique features of this instrument and thus realize the Electone organ's full potential.
Cautions (To be Read before You Start Playing). 1
YourYAMAHA D-85 Electone Organ 2
Keyboards and Pedals 3
Preparing to Play 4
Setting the Tone Levers 5
Solo Keyboard 8
Effects and Functions 10
How to Use the Auto Rhythm Functions 15
Digital Display 17
Rhythm Sequence Programmer 18
Rhythmic Chords 20
Auto Bass/Chord 20
Auto Arpeggio 23
Symphonic Chorus and Tremolo 25
Coupler, Foot Switch, Reverb and Sustain Controls 26
ToObtain MaximumEnjoyment from Your D-85 29
Trouble Shootings 30
Specifications 32
This manual has been carefully prepared in order that you may become acquainted with the various functions and effects found in your New YAMAHA ELECTONE. Many of these functions are totally new and many interact with each other. Improper operation or lack of knowledge relating to how a function works when the unit is functioning as designed is not covered by the manufacturer's warranty. Please study the manual carefully (especially pages 30 and 31) before you request that a service technician check the unit.
Cautions (To be Read before You Start Playing)
Always treat your Electone Organ with the same care you would any fine musical instrument. The following points are suggested to ensure the best performance of the Electone Organ.
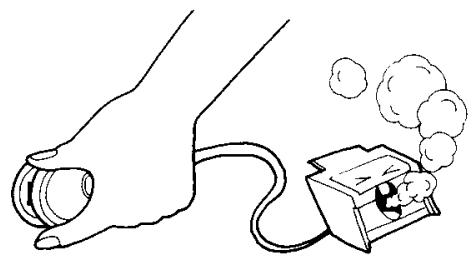
1 Check for correct power voltage. Consult your Yamaha serviceman regarding any changes.
As to the British-Standard model, information is provided in 'Specifications' on the last page.
2 Your Electone contains no user serviceable components. Refer all service to qualified service technicians only.

Always turn the power switch OFF after playing. This Electone Organ sliding lid contains a switch. Even if you forget to turn off the power switch, just close the lid and the power is automatically switched off.
Clean the Electone Organ cabinet with a damp cloth containing a neutral cleaning agent. Use only soft and dry cloth on the keyboards. Never use paint thinner, alcohol or other chemicals on either the keys or the cabinet.

5 Keep the Electone Organ in a position away from direct sunlight, excess humidity and heat to protect the cabinet finish.

6 Do not hit or scratch the cabinet with a hard object.
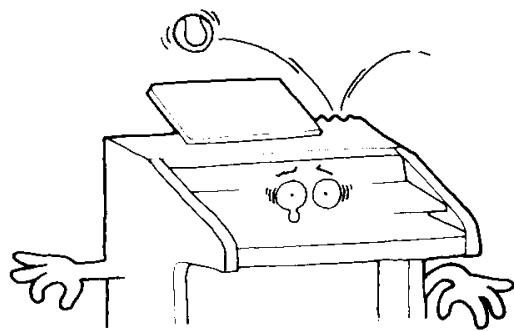
7 Do not set heavy objects on the rolltop fallboard.
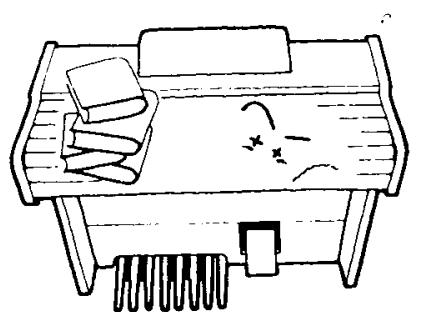
The finish on your Electone Organ may undergo a chemical reaction if placed in direct contact with polyvinyl products. Do not set vinyl items on the surface or use polyvinyl material to cover the organ for any extended period of time.
Your YAMAHA D-85 Electone Organ
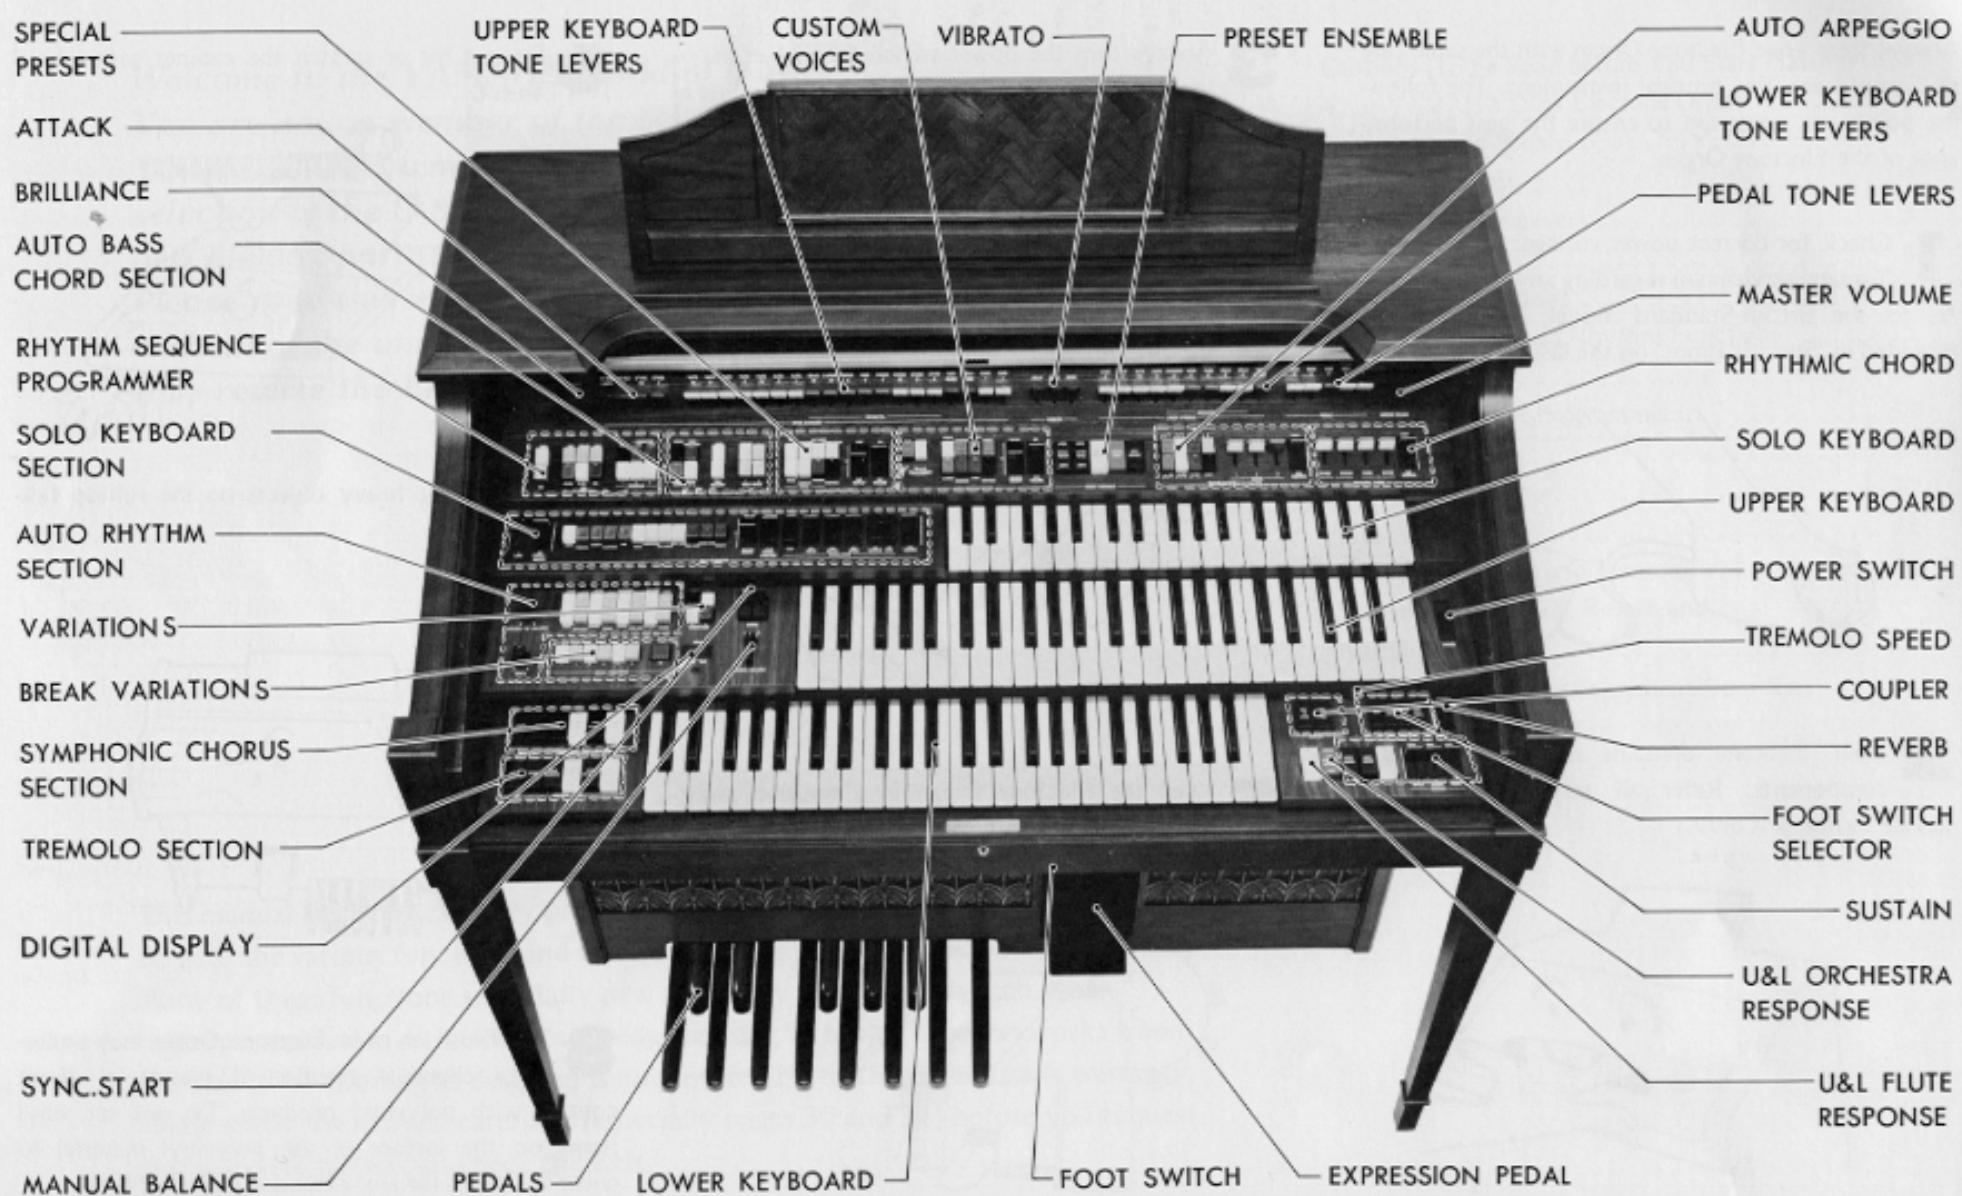
Keyboards and Pedals
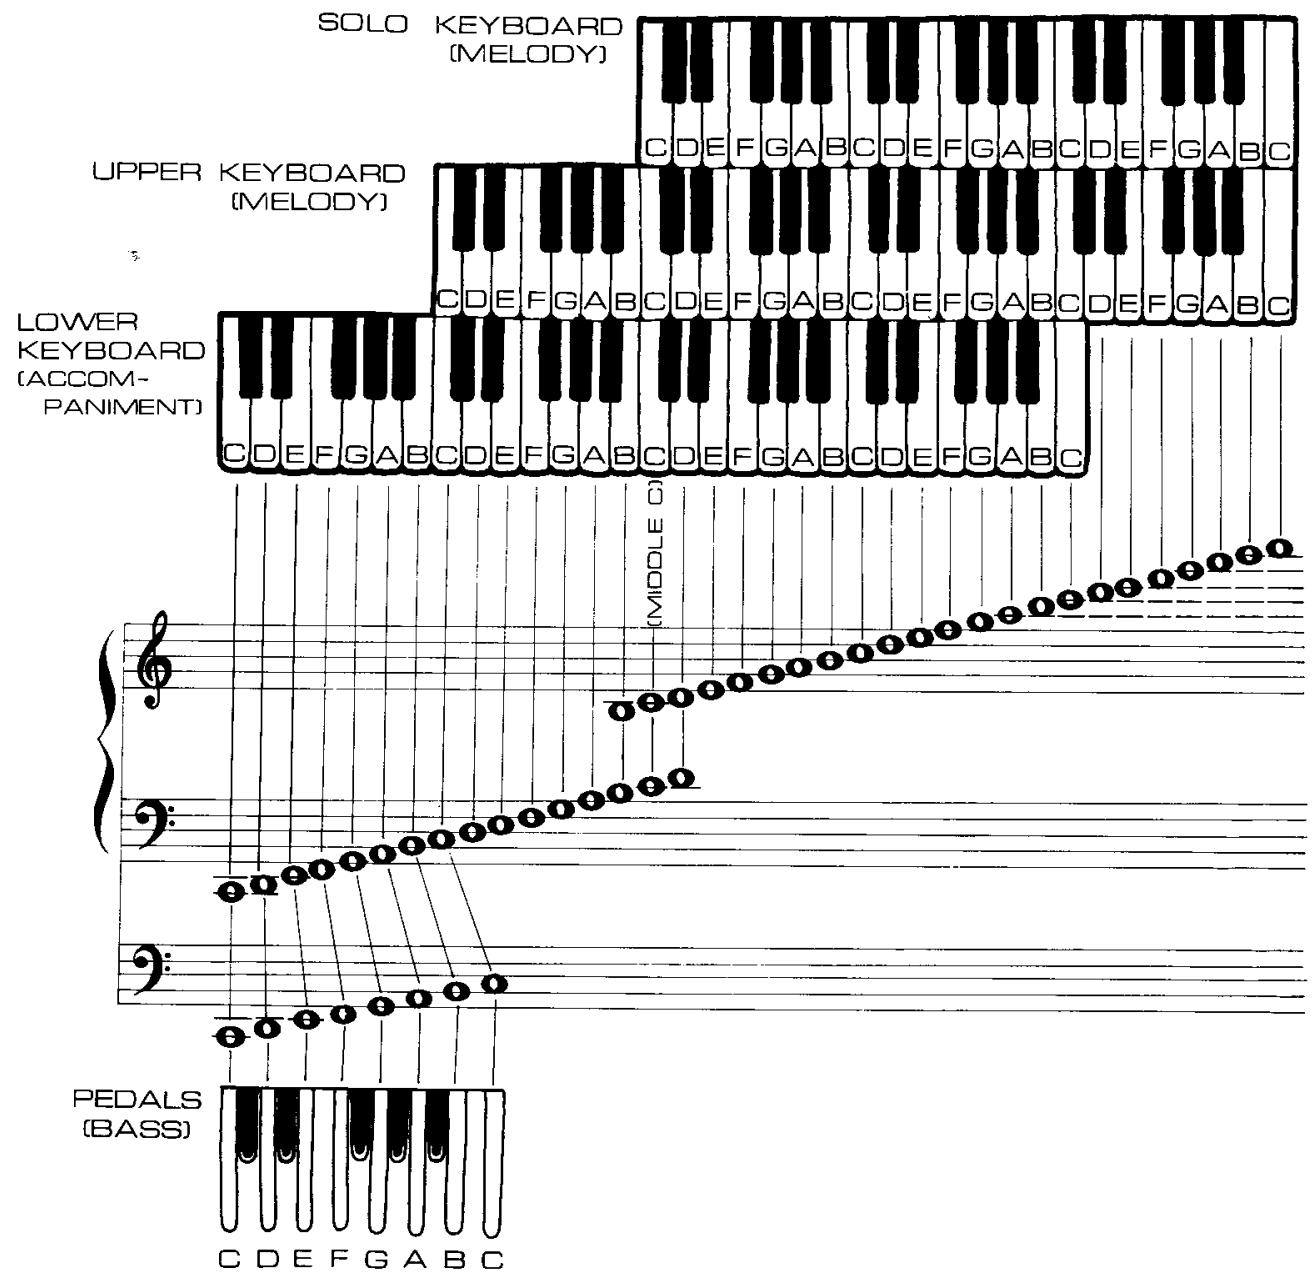
Keyboards
This Electones Organ has three sets of keys, the solo keyboard, upper keyboard, lower keyboard, a set of pedals.
Solo 37 keys (3 octaves)
Upper Keyboard 49 keys (4 octaves)
Lower Keyboard 49 keys (4 octaves)
Pedals 13 keys (1 octave)
The solo and upper keyboards are for the melody played with the right hand, the lower keyboard is for chords with the left hand and the pedals are for producing bass notes with the left foot.
Solo keyboard: Even when a number of keys have been depressed simultaneously, the highest note key depressed will have priority (the key to the right sounds).
Upper keyboard: Up to 7 notes can be sounded simultaneously.
Lower keyboard: Up to 7 notes and 3 auto arpeggio notes can be sounded simultaneously.
Pedals: Even when a number of keys have been stepped on simultaneously, the highest note key depressed will have priority (the key to the right sounds).
Preparing to play
First, have a go at making the sound of the flute on the upper keyboard.
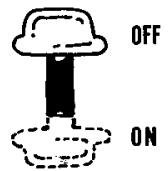
Set all the tone levers, push switches, tablets and sliding controls to the OFF or normal position, as illustrated in the figure.
Push down the white flute 8^ lever which is the seventh from the left.
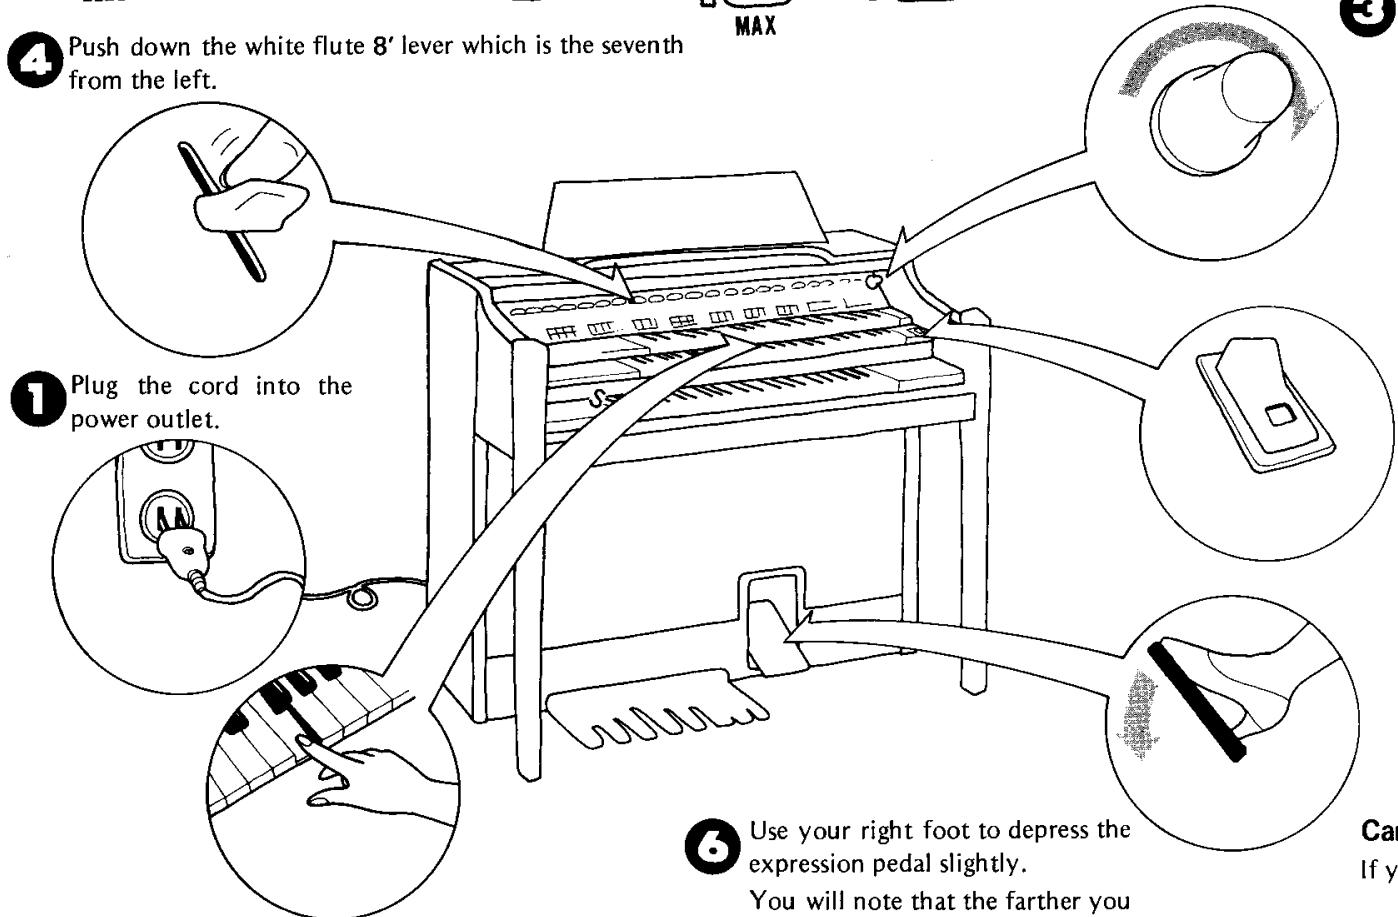

Depress the keys on the upper keyboard with your fingers.
Use your right foot to depress the expression pedal slightly.
You will note that the farther you push the pedal down, the louder the sound becomes.

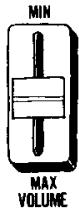
Rotate the MASTER VOLUME control to the right (clockwise).
This control sets the maximum sound level that will be available from the organ.

Turn on the power switch. The lamp now lights.
Note: It takes about 5 seconds for the lamp to light after the power has been switched on. This is a normal design function.
Can you hear the sound?
If you can't hear any sound, refer to page 30.
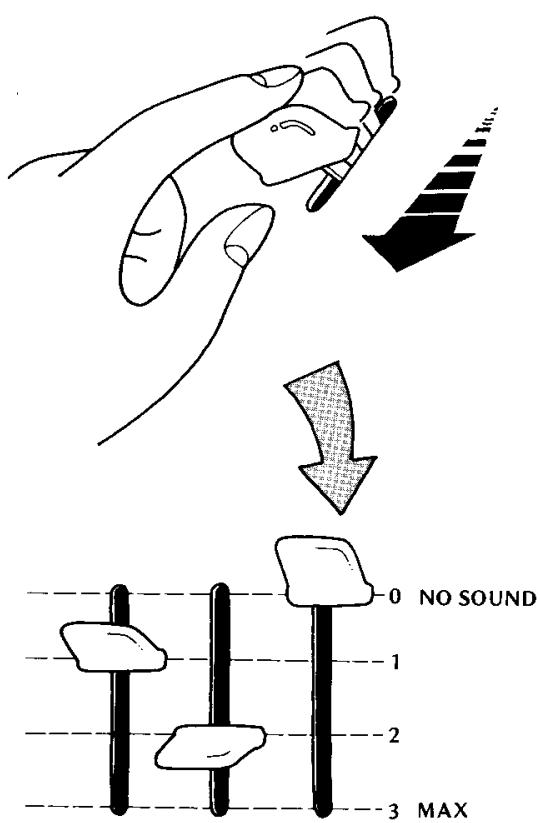
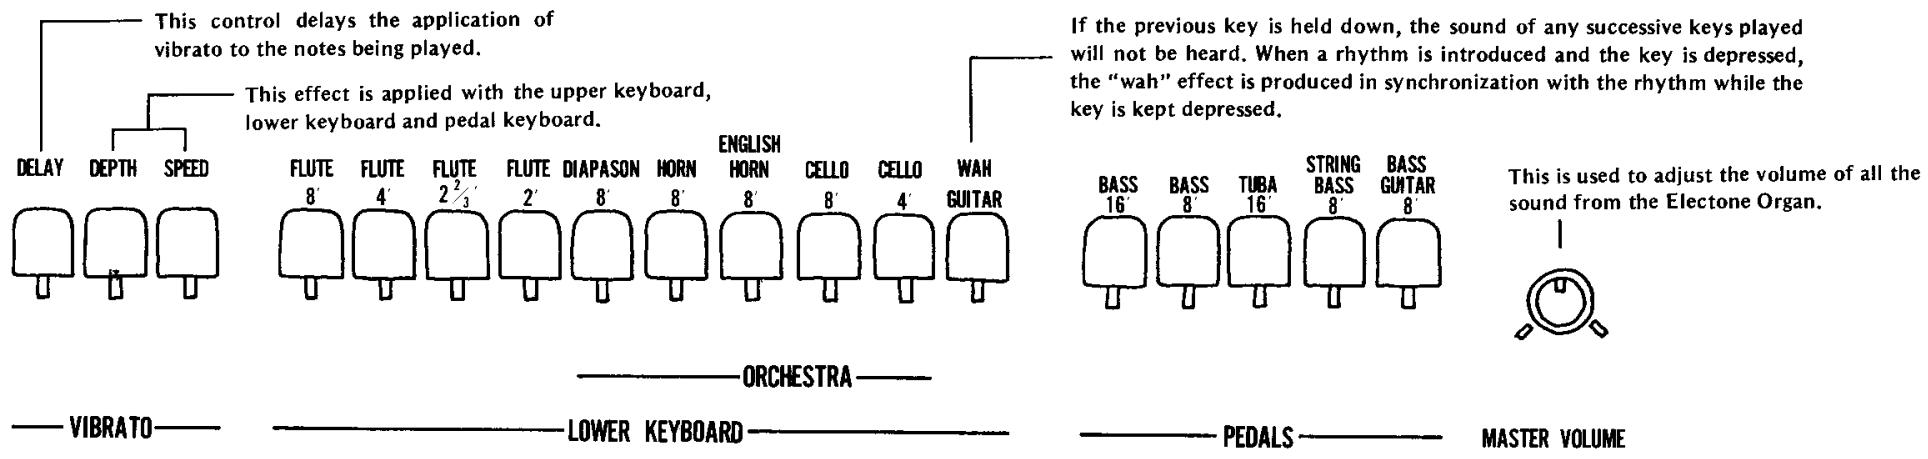
Setting the Tone Levers
The tone levers are located at the very top. They are used to produce the tone color of your preference. The sound level can be adjusted as required with these tone levers and to facilitate adjustment, each lever has three click-stop positions. You can add greater expression to tunes by combining a number of these levers, rather than producing a tone color with just one lever. Try out a number of combinations and see for yourself.
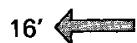
What's 16', 8', 4' ... all about?
16^,8^,4^ and so on indicate musical intervals. The Electone's musical scale is based on an 8^ tone which corresponds to the musical intervals in the score. 16^ is the tone of one octave below 8^ - 4^ is the tone of one octave above 8^ . (Refer to page 3)
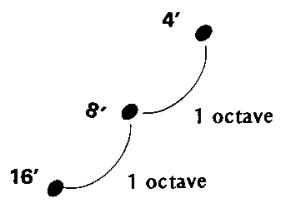
| Upper, lower keyboards | Footage | Actual sound | Example of use |
| 16' | Notes one octave below | This enriches the sound. | |
| 8' | Interval identical to that of depressed keyboard | Basic sound. | |
| 5-1/3' | Notes 5 tones above these depressed on the keyboard | This adds brightness. | |
| 4' | Note one octave above | This adds brightness, force. | |
| 2-2/3' | One octave and 5 tones above | This makes the sound harsher. | |
| Pedals | 16' | Interval identical to that of depressed keyboard | Basic fundamental sound. |
| 8' | One octave above | This adds pitch definition, brightness and a faster, more forceful attack characteristic. |
- In addition, the 2' stop provides notes two octaves above the basis 8' range and the 1' stop provides notes three octaves above.
- As indicated in the above table, the 16' note corresponds to the musical interval in the score for the pedal keyboard.
For instance, when 16' , 8' , and 4' are struck simultaneously, three notes, each of a different octave, will be sounded at the same time despite the fact that only one key is depressed. (This is known as the coupler effect.)
You can give your music a great deal of expression if you use this effect to advantage. Take a look at the table and familiarize yourself with it.
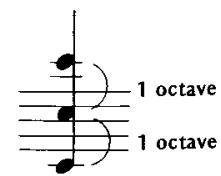
Coupler Effect
Tone Levers
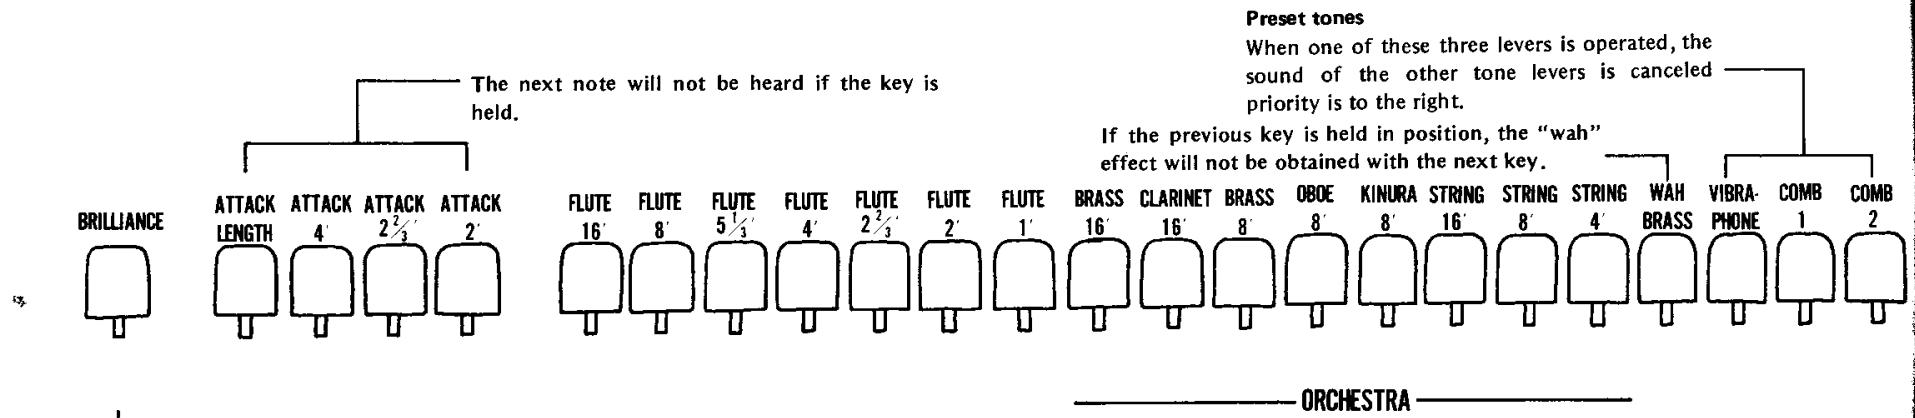
This control adds brilliance to the upper and lower keyboard tones only.
The solo and pedal voices will remain unaffected by this control.
Make a sound with the upper keyboard
A total of 19 different tone colors, as listed in the table below, can be produced by the tone levers which are used with the upper keyboard.
FLUTE 16', FLUTE 8', FLUTE 5-1/3', FLUTE 4', FLUTE 2-2/3', FLUTE 2', FLUTE 1', BRASS 16', CLARINET 16', BRASS 8', OBOE 8', KINURA 8', STRING 16', STRING 8', STRING 4', WAHBRASS, ATTACK 4', ATTACK 2-2/3', ATTACK 2'
Preset tones
By operating one of these three levers, it is possible to produce a preset tone color.
Vibraphone: The tone color resembles that of a vibraphone.
Combination 1: A well-modulated contemporary jazz type tone is produced.
Combination 2: A traditional, classic type set of tones is produced.
Note: When one of these three levers is operated, the sound of the other tone levers is canceled out. If more than one of the preset tone levers are on, the control farthest to the right will have priority.
Make a sound with the lower keyboard
A total of 10 different tone colors, as listed below, can be produced by the tone levers which are used with the lower keyboard.
FLUTE 8', FLUTE 4', FLUTE 2-2/3', FLUTE 2', DIAPASON 8', HORN 8', ENGLISH HORN 8', CELLO 8', CELLO 4', WAH-GUITAR
Make a sound with the pedals
A total of 5 different tone colors, as listed below, can be produced by the tone levers which are used with the pedals.
The pedal sound can be played automatically by striking the Auto Bass/Chord (A-B-C) buttons. (For details, refer to page 20.)
BASS 16', BASS 8', TUBA 16', STRING BASS 8', BASS GUITAR 8'
- Priority is given to the high note. The string bass and bass guitar notes are decay after being struck.
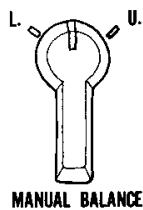
Manual balance control
The manual balance control is located at the bottom right of the auto rhythm section panel. This may be used to attain a balance between the volume of the upper keyboard and the volume of the lower keyboard.
The sound of the upper keyboard increases when the control is rotated clockwise.
The sound of the lower keyboard increases when the control is rotated counterclockwise.
MANUAL BALANCE
Note: Unusually heavy registrations on either manual may exceed the range of this control.
What's "Brilliance" all about?
As this lever is pulled downward, the sound takes on more and more brilliance. This is particularly effective with reed instruments (clarinet, tenor saxophone, etc.) and with stringed instruments (violin, viola, etc.) when added to their tone color.
The pedal keys, the solo keys and the tremolo are unaffected by the brilliance lever.
What's "attack length" all about?
The decay time of the attack sound becomes longer as this lever is pulled down when you are playing one or more of the upper keyboard's attack voices (i.e., 4' , 2 - 2/3' or 2' ).
What's "vibrato" all about?
This is an effect which makes the sound vibrate by moving the pitch of the sound by a fraction. With stringed instruments, this rapid regular fluctuation can be produced by the fingers and with wind instruments by the lips. The vibrato function allows the Electone Organ to yield exactly the same effect. In fact, this Electone organ can produce two types of vibrato effect with the delay and depth levers.
(1) Ordinary vibrato
The vibrato effect is produced by pulling the depth lever down. The variation in the sound can be controlled with this lever.
- There will no vibrato effect unless the depth lever is pulled down.
- The speed of the vibrato can be controlled with the speed lever. As this lever is pulled down, the vibrato speed increases.
(2) Delay vibrato
When keys on the upper keyboard are depressed, the vibrato effect is produced after a short delay instead of immediately.
The delay effect is produced when the depth lever is pulled down, the delay lever is moved downward and the keys on the upper keyboard are depressed. The delay time increases (time until the vibrato effect is produced) as the delay lever is moved downward.
- The delay effect produced by the upper keyboard keys affects the lower keyboard and pedal keyboard vibrato.
Solo Keyboard
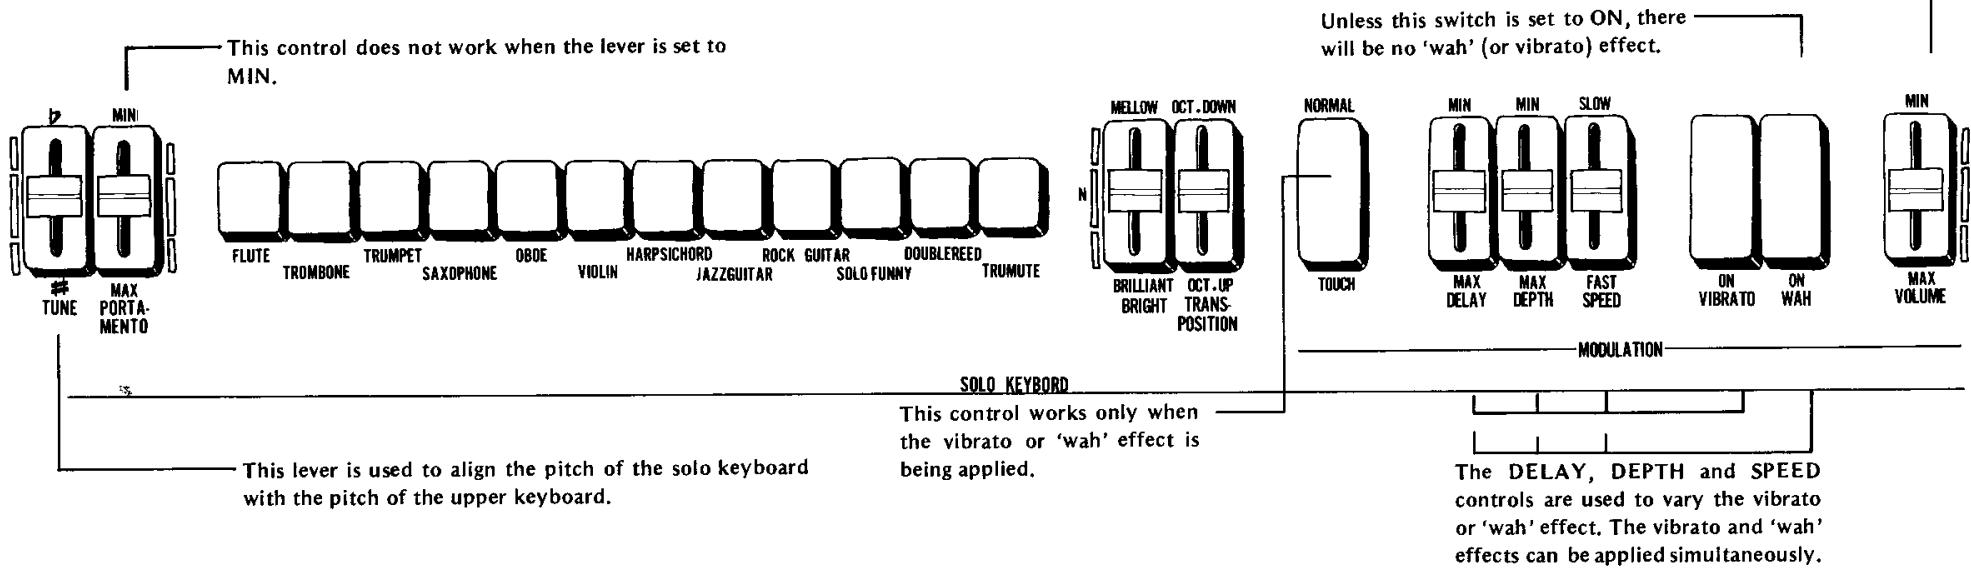
As its name indicates, the solo keyboard contains the keys for playing the main melody of a tune. In particular, it features a synthesizer system to reproduce faithfully the characteristic tone colors of various instruments. In effect, this keyboard comes with a number of special functions.
What tone colors can be produced by the solo keyboard?
A total of 12 tone colors, as listed below, can be provided with the solo keyboard.
FLUTE, TROMBONE, TRUMPET, SAX, OBOE, VIOLIN, HARPSICHORD, JAZZ GUITAR, ROCK GUITAR, SOLO FUNNY, DOUBLE REED, TRU-MUTE
The solo keyboard is monophonic
This simply means that if two or more keys are depressed on the keyboard, only the higher (the key farthest to the right) will sound.
What's the tune control all about?
This control is used to adjust the musical pitch of the solo keyboard with the pitch of other keyboards. It can also be used to shift the pitch of the solo keyboard and those of other keyboards.
How to use the tune control
(1) Set the solo keyboard's tone color to FLUTE. Set the portamento and modulation controls to OFF and set the transposition control to its center position.
(2) Operate the upper keyboard's flute 8^ tone lever only.
(3) Hold down at the same time a key near the center of the solo keyboard and a key ON the upper keyboard near this solo key.
(4) Adjust the solo keyboard's volume control so that the volume of the solo keyboard and that of the upper keyboard are made identical.
(5) Adjust the TUNE control so that there is no longer and resonance beating' sound.
What's the portamento control all about?
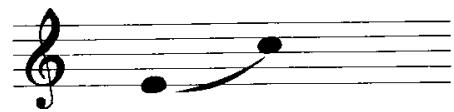
Portamento involves the 'carrying' of a sound and it is a function which entails the transition from one note to another without any break in the sound.
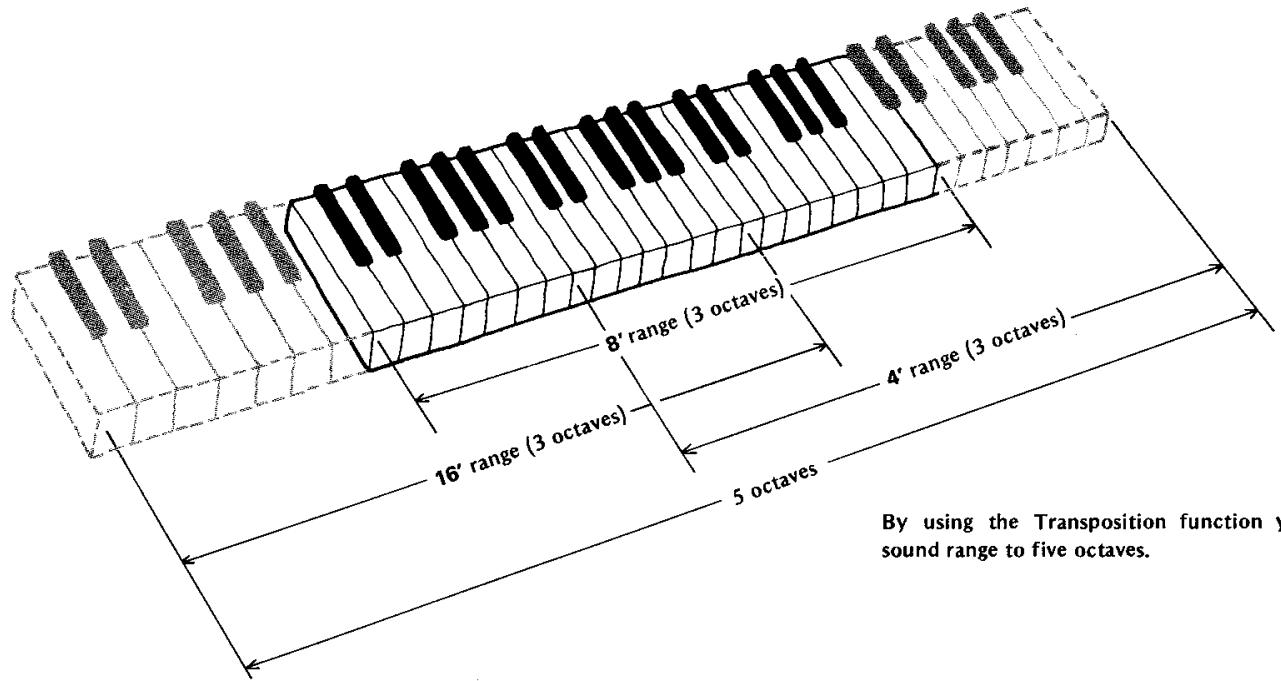
By using the Transposition function you can extend the sound range to five octaves.
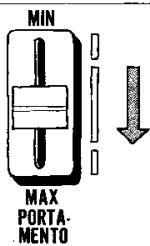
No portamento effect.
Depress the lever for longer variation times.
What's the bright control used for?
This control is used to make the tone color more mellow or more brilliant in line with the expression of the tune.
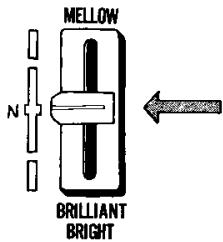
A "click-stop" is provided to indicate the normal or center position.
What's the transposition control all about?
This control is used to vary the whole musical interval by one octave above or below. If the ranges extended above and below are included, it is possible for the solo keyboard to sound the notes in five octaves.
OCT.DOWN
The musical interval is brought down by 1 octave.
Standard sound
The musical interval is taken up by 1 octave.
This is a 3-position switch
What's the modulation control all about?
The vibrato and 'wah' effects can be applied to the sound produced by the solo keyboard.
If the vibrato and/or 'wah' effects are selected, the speed, depth and delay adjustments are the same as those for the upper keyboard. (Refer to page 7.)
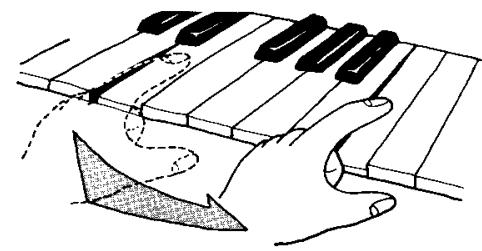
What's the touch control all about?
When this botton is ON, vibrato and wah effects are produced by the lateral movement of a solo key.
The depth of the effect can be adjusted with the DEPTH lever. (Unless the lever is pulled down from the MIN position, there will be no vibrato or 'wah' effect.)
The DELAY and SPEED levers cease to have any bearing on the play since you can adjust both the delay and speed yourself.
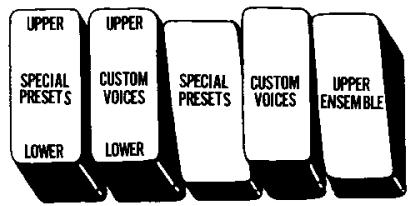
Effects and Functions Special Presets
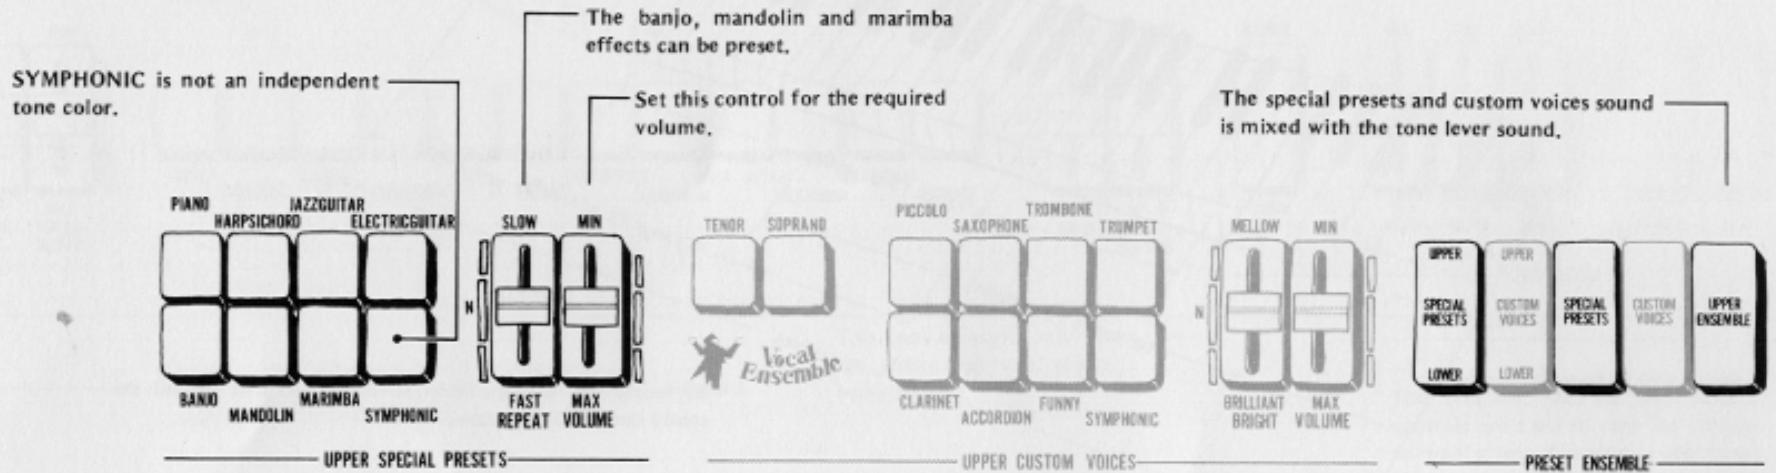
What are the upper special presets controls?
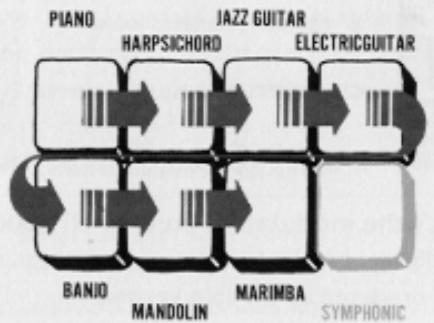
When the tone colors of up to seven different instruments have been set and then the preset ensemble's special preset tablets are operated, it is possible to produce the tone colors of your preference selected from the upper or lower keyboard with the selector button.
Tone colors for setting
PIANO, HARPSICHORD, JAZZ GUITAR, ELECTRIC GUITAR, BANJO, MANDOLIN, MARIMBA
- Unless the yellow tablet at the center of the five preset ensemble tablets is set to ON, there will be no special preset tone colors.
Only one tone color with the special preset function
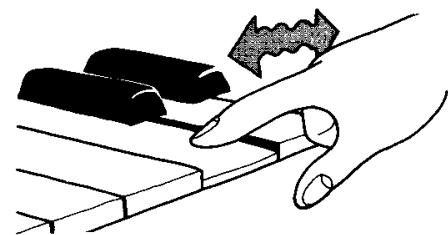
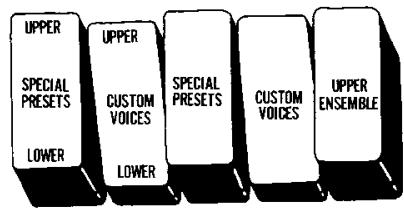
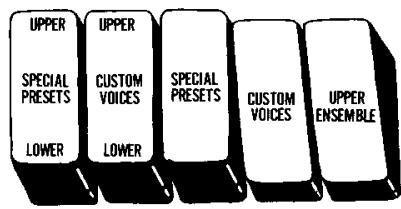
Depress just one of the tone color selector buttons. If you depress two or more buttons, the button on the right or below takes priority and only one tone color is obtained. (Refer to the illustration.)
The special preset controls come with special functions.
If the SYMPHONIC button is depressed:
The special preset sound can be delivered simultaneously through the 3-channel speakers and the sound is given greater ambience and dimension. (Refer to "symphonic chorus" on page 25.)
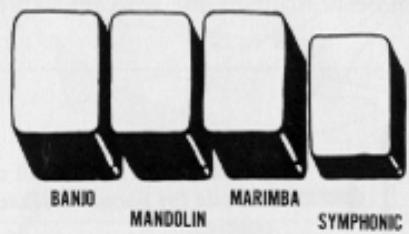
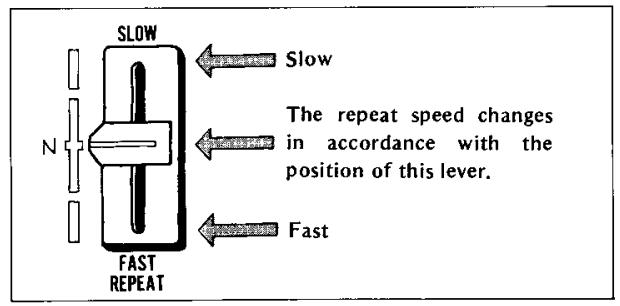
If the REPEAT lever is operated:
a) The repeat speed can be varied with the banjo, mandolin and marimba tone colors only and play can be made to suit the expression of the music. (Repeat effect)
b) When a key has been depressed for just one note with mandolin or marimba tone colors, the repeat effect is produced. However, when keys are depressed for two or more notes, the highest note and the other note(s) are struck alternately. (Twin mallet effect)
Special presets can be transferred to the lower keyboard.
Set the UPPER/Lower special preset tablet at the far left to ON together with the SPECIAL PRESETS preset ensemble tablet. The special preset sound can now be obtained with the keys of the lower keyboard. In this case, however, notes of one octave above are struck when a key with the same musical interval of the lower keyboard key is depressed.
- The special preset sound will not be heard if the FINGER CHORD, SINGLE FINGER CHORD or CUSTOM A-B-C (Auto Bass Chord) function switches are set to ON. (Refer to the table on page 14.)
- The sound is mixed (ensemble) with the sound of the lower keyboard tone levers.
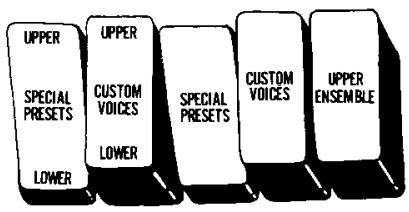
The special preset sound can be combined with the sound of other tone levers.
Set the UPPER ENSEMBLE tablet at the far right of all the preset ensemble tablets to ON. You can now combine the tone colors of the upper or keyboard tone levers with the special preset tone colors. (Refer to the table on page 14.)
There's a special volume control, too.
This control can be used to adjust the volume of the tone colors selected with the special preset tablets. Attain a balance in the volume with the other tone colors.
- When the special preset sound is produced from the upper keyboard, the volume will be at its maximum when the manual balance volume control is rotated to the upper keyboard side as far as it will go. The maximum volume is obtained with sound from the lower keyboard when this control is rotated to the lower keyboard side as far as it will go.
Custom Voices
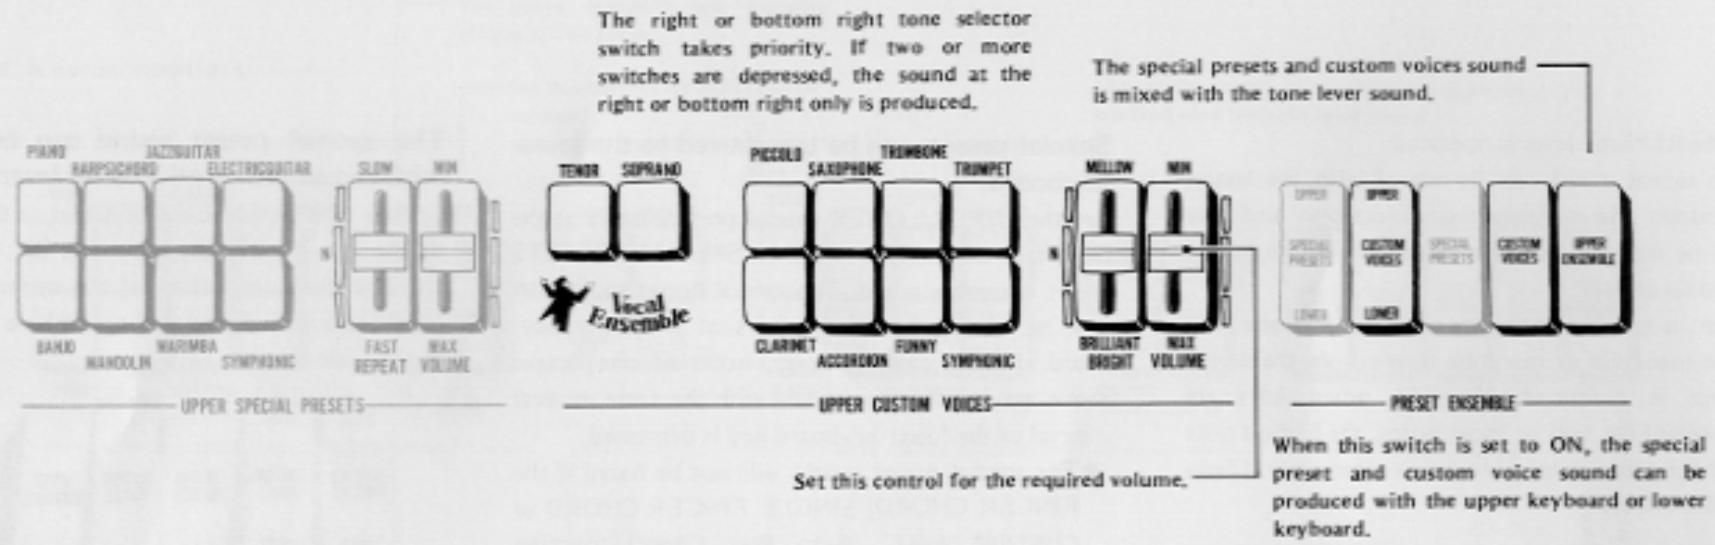
What's custom voice all about?
Once the CUSTOM VOICE preset ensemble tablet is set to ON, it is possible to produce seven types of tone colors and two types of vocal ensemble tone colors in a one-touch operation by depressing the keys on the upper or lower keyboard.
Tone colors for setting
VOCAL ENSEMBLE (Tenor, Soprano), PICCOLO, SAXOPHONE, TROMBONE, TRUMPET, CLARINET, ACCORDION, FUNNY
Only one custom voice tone color can be produced at a time.
Depress just one selector button corresponding to the tone color which you want reproduced. If two or more buttons are depressed, the right-hand or bottom button inclusive of the vocal ensemble buttons takes priority and only one tone color will be produced. (Refer to the illustration.)
The custom voice controls come with special functions
- When the SYMPHONIC button is depressed: The custom voice sound can be delivered through the 3-channel speaker system, adding ambience and dimension to the effect. (Refer to "symphonic chorus" on page 25.)
BRIGHT control:
This can be used to make the tone color mellow or brilliant. This control does not modify the harmonic content of the vocal ensemble voices (tenor, soprano).
BRIGHT BRILLIANT

The sound melfows.

The sound takes on brilliance.
The custom voice tones can be produced with the keys on the upper or lower keyboards.
a) To produce the sound from the upper keyboard: Set the CUSTOM VOICE preset ensemble tablet to ON. The custom voice tone color can now be produced by playing the upper keyboard.
b) To produce the sound from the lower keyboard: Set the CUSTOM VOICE and UPPER/Lower CUSTOM VOICE preset ensemble tablets to ON. The custom voice tone color can now be produced by playing the lower keyboard. In cases like this, however, the sound of one octave above is produced when the key in the same position as the upper keyboard.
The custom voice sound when the lower keyboard keys are depressed even if the A-B-C function switches are operated. (Refer to the table on page 14.)
The sound of the lower keyboard's tone levers is mixed.
The sound of other tone levers on the upper keyboard can be mixed with the custom voice tone colors.
Set the rightmost UPPER ENSEMBLE preset ensemble tablet to ON.
You can now mix the upper keyboard tone levers' tone colors with the custom voice tone colors.
(Refer to the table on page 14.)
There's a special volume control, too.
This control can be used to adjust the volume of the tone colors selected with the custom voice tablets. Attain a balance in the volume with the other tone colors.
- When the custom voice sound is produced from the upper keyboard, the volume will be at its maximum when the manual balance volume control is rotated to the upper keyboard side as far as it will go. The maximum volume is obtained with sound from the lower keyboard when this control is rotated to the lower keyboard side as far as it will go.
Relationship between preset ensemble Tablets & A-B-C function switches,
Relationship between preset ensemble tablets and A-B-C function switches, and upper keyboard tone lever, lower keyboard tone lever, special preset and custom voice tone colors.
| *Special U to L | Custom U to L | Special Presets | Custom Voices | Ensemble | A-B/C | Sound produced by Upper keyboard keys | Sound produced by Lower keyboard keys |
| - | - | ON | - | - | - | Special Presets | Tone Lever |
| - | - | - | ON | - | - | Custom Voices | Tone Lever |
| - | - | ON | ON | - | - | Special Presets Custom Voices | Tone Lever |
| ON | - | - | - | - | - | Tone Lever | Tone Lever |
| - | ON | - | - | - | - | Tone Lever | Tone Lever |
| ON | - | ON | - | - | - | Tone Lever | Special Presets Tone Lever |
| - | ON | - | ON | - | - | Tone Lever | Custom Voices Tone Lever |
| ON | - | ON | - | - | ON | Tone Lever | Tone Lever |
| - | ON | - | ON | - | ON | Tone Lever | Custom Voices Tone Lever |
| - | - | ON | - | ON | - | Special Presets Tone Lever | Tone Lever |
| - | - | - | ON | ON | - | Custom Voices Tone Lever | Tone Lever |
| - | - | ON | ON | ON | - | Custom Voices Special Presets Tone Lever | Tone Lever |
How to use the Auto Rhythm Functions
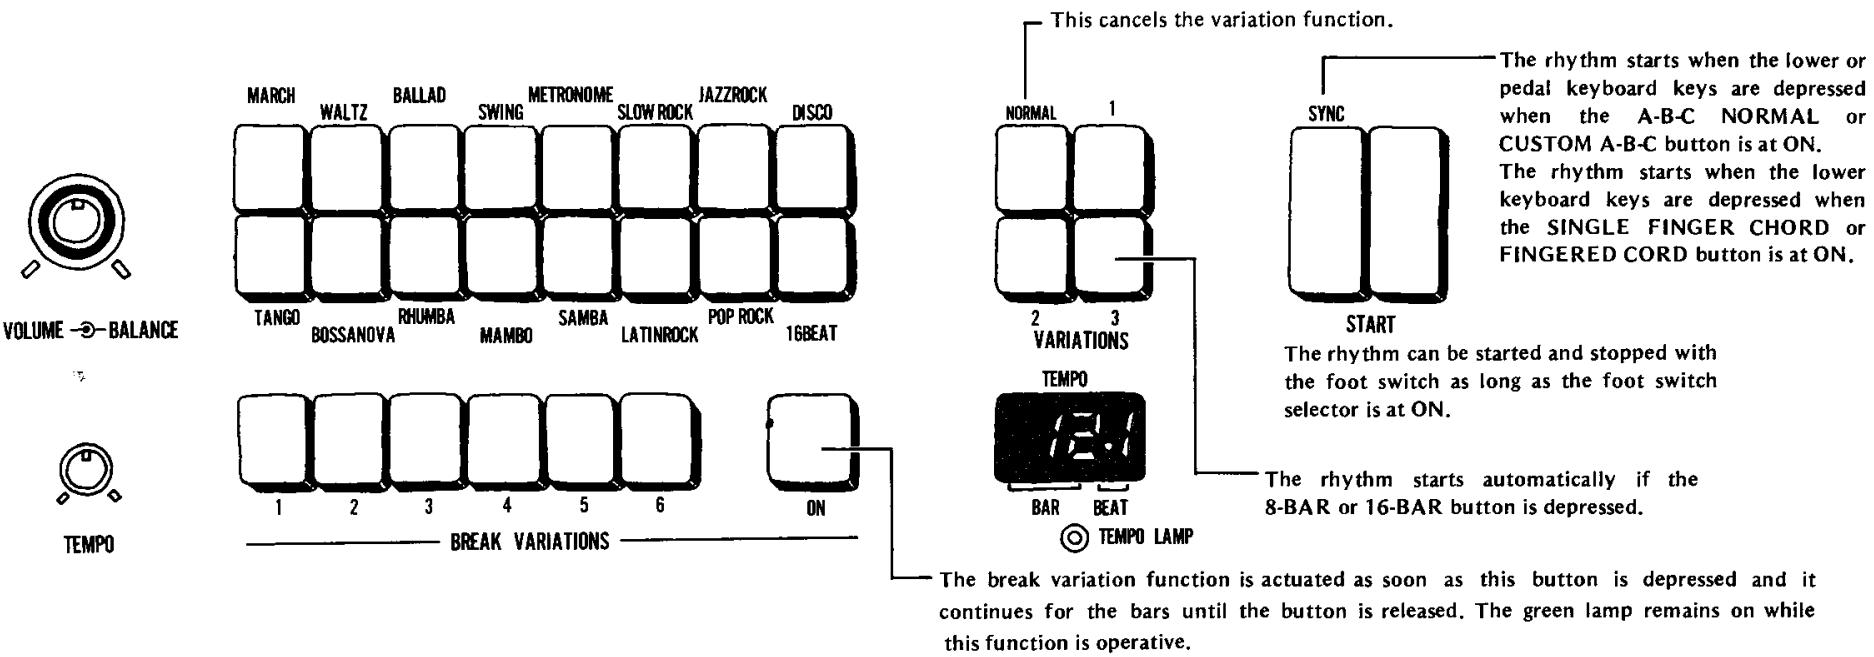
Description of functions
a) Rhythm selectors
These selectors can deliver a total of 16 different rhythm patterns. If two or more buttons are depressed together, you can create combinations of rhythms or rhythms with that "something different."
b) Variations.
These are used to add variation to the rhythm patterns selected by the rhythm selectors. Three types of variation are available, and it is also possible to combine variations 1 through 3.
- The selector switch section of the rhythm sequence programmer has 8-BAR and 16-BAR variation buttons.
When the 8-BAR button is depressed, the rhythm pattern of the rhythm variation is automatically added at every eighth bar. The same effect is produced at every 16th bar when the 16-BAR button is depressed.
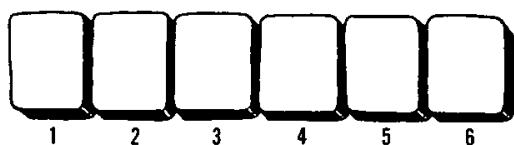
c) Break variation buttons
A total of 6 different types of irregular rhythm are available for adding accent to the rhythm. When the break variation switch is set to ON, the break variation rhythm pattern breaks in at the moment when the switch was depressed.
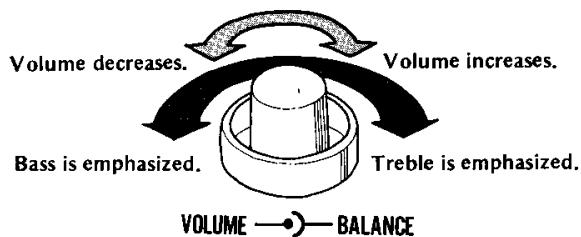
d) Volume, balance controls
The volume control is for adjusting the rhythm volume only. Attain a balance with the keyboard sound volume.
The balance control is for attaining a balance in the treble and bass sound in the rhythm. When rotated to the left, the bass sound of the double bass and drums, etc. is emphasized while when rotated to the right, the treble sound of the cymbals and high-hat cymbals is emphasized.
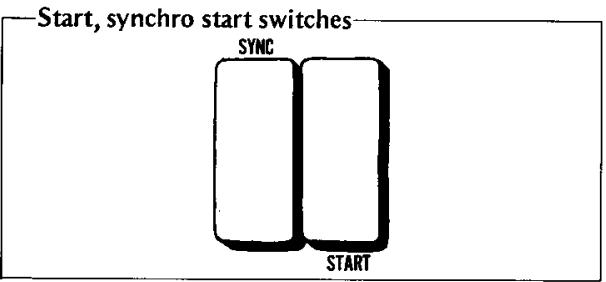
e) Start, synchro start switches
- Right-side START switch: As soon as this is depressed, the rhythm starts from the first beat. The rhythm continues until the button is set to OFF.
- Left-side SYNC start switch: When this is kept in the depressed position, the rhythm starts from the first beat only when the lower or pedal keyboard keys are depressed.
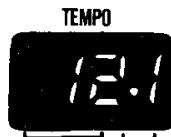
f) Tempo control, tempo lamp
The TEMPO control is used to control the speed of the rhythm. The tempo increases as the control is rotated clockwise.
The tempo lamp lights in synchronization with every quarter note or bar of the rhythm. This is useful as a timing guide during play.
(1) When the START switch is at ON, the lamp lights in synchronization with the first beat of the rhythm of each bar.
(2) When the SYNC start switch is at ON, the lamp lights at every quarter note if the rhythm has not started, and while the rhythm is starting, it lights in synchronization with the first beat of each bar.
(3) When the START and SYNC start switches are both at ON, the lamp lights in synchronization with the first beat of each bar when the rhythm is starting, and it lights at every quarter note when the rhythm is stopped with the foot switch.
Try out the break variation function!
How to operate the BREAK VARIATION buttons
(1) Set the rhythm START switch to ON. (The rhythm which has been selected by the rhythm selector button now starts.)
(2) Select one of the BREAK VARIATION buttons (1 through 6).
(3) Depress the green button on the right. The break variation rhythm results as soon as the button is depressed.
- While the break variation function is operative, the green ON button remains lighted.
(4) While the green button is depressed, the break variation rhythm continues. Once the button is released, the break variation continues up to the end of the bar and then the original rhythm is resumed from the next bar.
- If the button is depressed in the middle of a bar and then released immediately, the break variation rhythm continues only from the instant the button was depressed until the end of the bar.
TEMPO CONTROL

TEMPO
BREAK VARIATIONS
ON
BAR
BEAT
TEMPO LAMP
- GUID TO YOUR
- YAMAHAF ELECTONE ORGAN
- D-85
- Contents
- Cautions (To be Read before You Start Playing)
- Your YAMAHA D-85 Electone Organ
- Keyboards and Pedals
- Keyboards
- Preparing to play
- Setting the Tone Levers
- Tone Levers
- Make a sound with the upper keyboard
- Preset tones
- Make a sound with the lower keyboard
- Make a sound with the pedals
- BASS 16', BASS 8', TUBA 16', STRING BASS 8', BASS GUITAR 8'
- Manual balance control
- What's "Brilliance" all about?
- What's "attack length" all about?
- What's "vibrato" all about?
- Ordinary vibrato
- Delay vibrato
- Solo Keyboard
- What tone colors can be produced by the solo keyboard?
- The solo keyboard is monophonic
- What's the tune control all about?
- How to use the tune control
- What's the portamento control all about?
- What's the bright control used for?
- What's the transposition control all about?
- OCT.DOWN
- What's the modulation control all about?
- What's the touch control all about?
- Effects and Functions Special Presets
- What are the upper special presets controls?
- Tone colors for setting
- Only one tone color with the special preset function
- The special preset controls come with special functions.
- Special presets can be transferred to the lower keyboard.
- The special preset sound can be combined with the sound of other tone levers.
- There's a special volume control, too.
- Custom Voices
- What's custom voice all about?
- Relationship between preset ensemble Tablets & A-B-C function switches,
- How to use the Auto Rhythm Functions
- Description of functions
- a) Rhythm selectors
- b) Variations.
- c) Break variation buttons
- d) Volume, balance controls
- Try out the break variation function!
Marque : YAMAHA
Modèle : D85
Catégorie : Orgue électronique