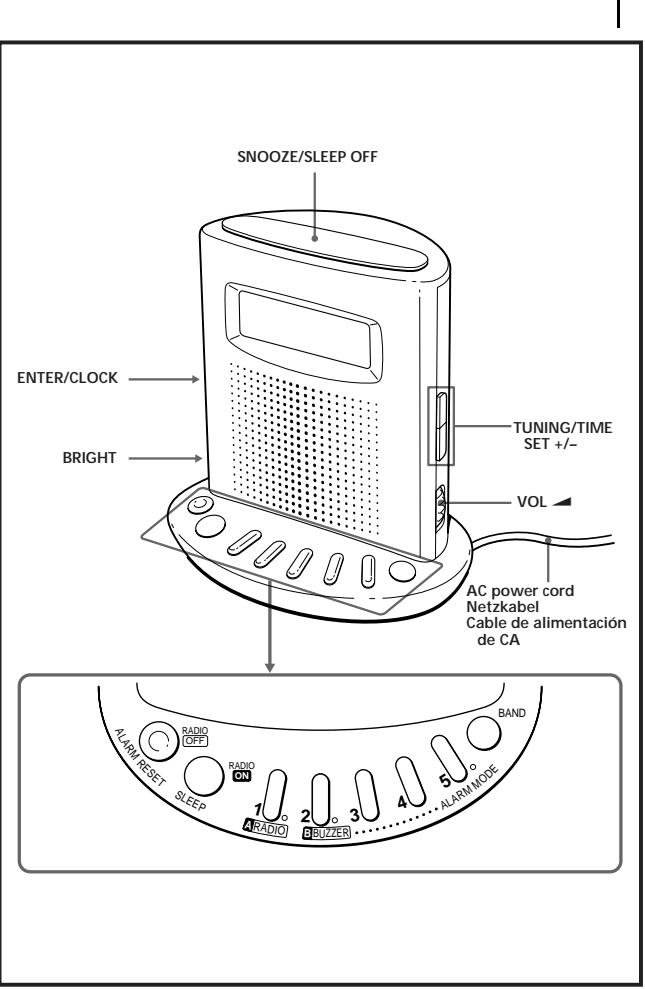
MODE D'EMPLOI ICF-C713 SONY
Operating Instructions
Bedienungsanleitung
Manual of Instruction Cebuinkonsuming (
Gebruiksaanwjzig (achterzijde)
Manual de instruções (lado inverso)
ICF-C713
Sony Corporation © 1997 Printed in Malaysia
English
WARNING
To prevent fire or shock hazard, do not expose the unit to rain or moisture.
To avoid electrical shock, do not open the cabinet Refer servicing to qualified personnel only. Do not install the appliance in a confined space, such as a bookcase or built-in cabinet. To prevent fire or shock hazard, do not place objects filled with liquids, such as vases, on the apparatus.
Before You Begin
Thank you for choosing the Sony clock radio. This will give you many hours of reliable service and listening pleasure. Before operating the clock radio, please read these instructions thoroughly and retain them for future reference.
Features
- Dual alarm FM/AM PLL (phase locked loop)
- matched closed-loop
synthesized clock radio 5 random memory presets
Radio and buzzer alarms with the snooze
function LCDdlwwithhcklightwhichhas
-
LCD display with backlight which has a brightness switch
-
Self power back-up: Even if the power supply is interrupted, the time setting and the memory will be back up for half an hour without batteries.
3-860-216-13 (1)
English
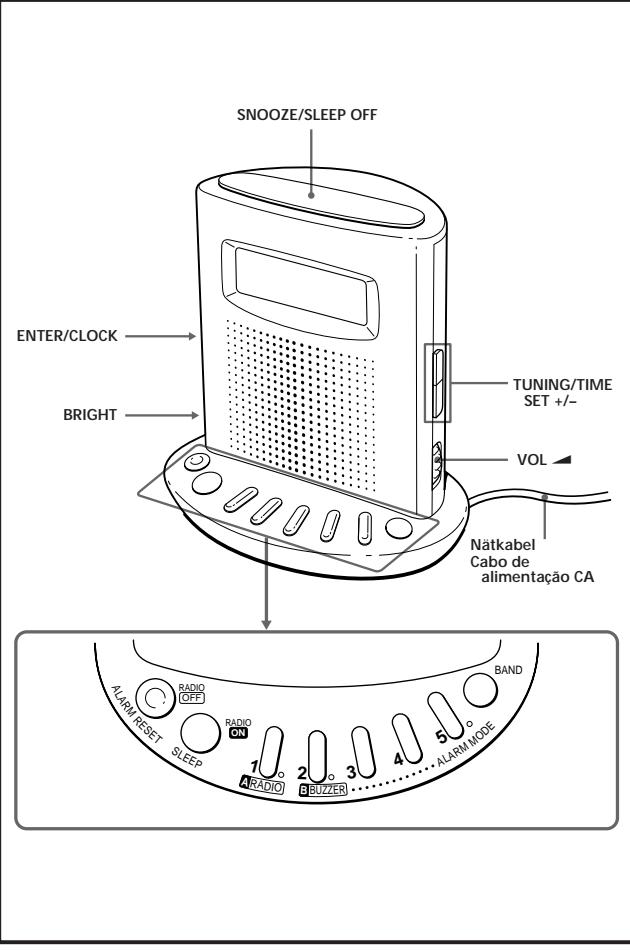
Operating the Radio Manual Tuning
1 Press RADIO ON to turn on the radio. The band and frequency will appear in the display for a few seconds. Then the current time indication returns to the display.
2 Press BAND repeatedly to select the desired band.
3 Use TUNING/TIME SET + or - to tune in the desired station.
The FM channel step is set to 0.1MHz and the AM channel step is set to 10kHz for the model for the North and South America. The FM channel step is set to 0.05MHz and the AM (MW) channel step is set to 9kHz for the model for other countries. A beep sounds and the tuning stops when the upper or lower extremity of the band range is reached.
4 Adjust volume using VOL.
To turn off the radio, press RADIO OFF.
- To improve reception
FM: Extend the AC power cord fully to increase FM reception sensitivity, since the cord acts as an FM wire antenna.
AM: Rotate the unit horizontally for optimum
reception. A ferrite bar is built in to the unit.
- To check the current station, press the + button lightly. The band and frequency are displayed for a few seconds, after which the current time indication returns to the display.
- If the radio alarm A RADIO comes on while the radio is playing, the station switches to the frequency set under preset number 1 (the wake-up frequency).
To set the brightness of the backlight Set BRIGHT to HIGH or LOW to make the display visible.
Preset Tuning
You can preset up to five stations for one-touch tuning, one under each of preset buttons 1 to 5.
Presetting a station
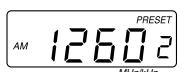
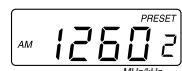
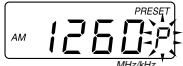
Example: To set AM 1260kHz in preset button 2.
1 Tune in the station you want to preset (See "Manual Tuning")
2 Press ENTER/CLOCK.
"P" flashes in the display for a few seconds.
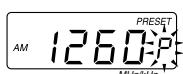
3 Press the preset button under which you wish to store the station while the "P" indication is flashing. Two beeps sound to indicate successful presetting.
- When using the radio alarm, preset the station you wish to serve as the alarm (the wake-up frequency) under preset button 1.
To change a preset station
Press the preset button again after tuning manually to a different station. The previous station is replaced by the new one.
Tuning in a preset station
1 Press RADIO ON to turn on the radio.
2 Press the preset button under which the desired station is stored.
Setting the Alarm
You can set the radio and buzzer alarms at the preset time. Before setting the alarm, be sure to set the clock (See "Setting the Clock") and preset a radio station under preset button 1 (See "Preset Tuning").
1 Turn off the radio.
2 While holding down A RADIO or B BUZZER, press either TUNING/TIME SET + or - until the desired time appears in the display.
At this time, the "A RADIO" or "B BUZZER"
indication flashes in the display.
3 Release A RADIO or B BUZZER.
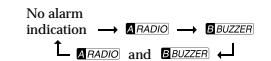
4 Press ALARM MODE until the alarm you want flashes in the display. Each time you press ALARM MODE, the alarm indication changes as follows.
When the alarm time is reached, the radio or buzzer sounds for 60 minutes or until turned off.
To stop the alarm
Press ALARM RESET while the alarm is activated. The alarm will function at the same time the next day.
To cancel the alarm
Press ALARM MODE until neither the "A RADIO" nor "B BUZZER" indication is displayed.
Notes
- The alarm does not function, unless you set the clock, A RADIO and B BUZZER function.
- If both the radio and buzzer alarm are set for the same time, the radio alarm takes precedence.
- You can check the alarm time setting by pressing A RADIO or B BUZZER.
To doze for a few more minutes
1 Press SNOOZE/SLEEP OFF. The radio or buzzer will shut off but will automatically come on again after about 8 minutes. You can use the snooze alarm repeatedly in this manner for about one hour.
- The alarm indicator flashes continuously during the snooze function.
Setting the Sleep Timer
You can enjoy falling asleep to the radio using the built-in sleep timer that turns off the radio automatically after a preset duration.
1 Press SLEEP
The radio turns on. It will go off after the preset time has passed. You can set the sleep timer to 90, 60, 30, or 15 minutes. Every push changes the display as follows.
Current time On 90(min)
15 30 60
The radio will play for the time you set, then shut off.
- Turn off the radio before the preset time, press SNOOZE/SLEEP OFF.
To Use Both Sleep Timer and Alarm
You can fall asleep to the radio sound and you will be awakened by the radio or buzzer alarm at the preset time.
1 Set the alarm. (See "Setting the Alarm.")
2 Set the sleep timer.(See "Setting the Sleep Timer").
1 Set the alarm. (See "Setting the Alarm".)
2 Set the sleep timer.(See "Setting the Sleep
Troubleshooting
Should any problem occur with the unit, make th following simple checks to determine whether or not servicing is required.
If the problem persists, consult the nearest Sony
d dealer.
The clock does not show the correct time.
- Has an electrical power outage lasting more than an hour occurred?
following simple checks to determine whether or not servicing is required.
If the problem persists, consult the nearest Sony
The clock does not show the correct time.
- Has an electrical power outage lasting more than 1 year.
Should any problem occur with the unit, make the
The clock does not show the correct time.
- Has an electrical power outage lasting more than an hour occurred?
The radio or buzzer alarm does not sound at the preset alarm time.
- Has the desired radio and/or buzzer alarm mode?
been activated with the ALARM MODE button ("A RADIO" and/or "B BUZZER" indication shown in the display)?
The radio or buzzer alarm does not sound at the preset alarm time.
- Has the desired radio and/or buzzer alarm mode?
been activated with the ALARM MODE button ("A RADIO" and/or "B BUZZER" induction.
(A RADIO and/or "B BUZZER" indication shown in the display)?
Precautions
- Operate the unit on the power sources specified in "Specifications".
- The nameplate indicating voltage, etc. is located on the AC power adaptor.
- Disconnect the cord by grasping the plug. Never
pull it by the cord.
Do not leave the unit in a location near a heat.
source such as a radiator or airduct, or in a place
subject to direct sunlight, excessive dust, mechanical vibration, or shock.
Do not place the unit on surfaces (rugs, blankets, etc.) or near materials (curtains, draperies) that
etc.) of near materials (carnels, droplets) that block the ventilation holes.
- Should any liquid or solid object fall into the unit unplug the unit and have it checked by qualified personnel.
- When the casing becomes soiled, clean it with a
soft cloth dampened with a mild detergent solution. Neurons are active elements of chemical
solution. Never use abrasive cleaners or chemical solvents, as they may mar the casing.
- The unit is not disconnected from the AC power supply.
source (mains) as long as it is connected to thewall outlet, even if the unit itself has been turned
off.
If you have any questions, please consult your
Nearest Sony dealer.
- The nameplate indicating voltage, etc. is located
on the AC power adaptor. Disconnect the cord by grasping the plug. Never
- Disconnect the cord by grasping the plug. Never pull it by the cord.
- Do not leave the unit in a location near a heat source.
source such as a radiator or airduct, or in a place subject to direct sunlight, excessive dust.
subject to direct sunlight, excessive dust, mechanical vibration, or shock.
- Do not place the unit on surfaces (rugs, blankets,
etc.) or near materials (curtains, draperies) that block the ventilation holes.
- Should any liquid or solid object fall into the unit
unplug the unit and have it checked by qualified
personnel before operating it further. When the casing becomes soiled, clean it with a
When the dacing becomes soiled, clean it with a soft cloth dampened with a mild detergent
solution. Never use abrasive cleaners or chemical agents, such as the cleaning agent
solvents, as they may mar the casing. The unit is not disconnected from the AC power
the authors' contributions from the 10-year power source (mains) as long as it is connected to the
wall outlet, even if the unit itself has been turned off.
If you have any questions, please consult your
nearest Sony dealer.
Specifications
Time display
North and
South America 12 hour Other countries 24 hours
Other countries 24 hour
Frequency range
Model for North and South America Band Channelst
Band Channel Step FM:87.5,108MHz 0.1MHz
PM:87.3-108MHz 0.1MHzAM:530-1710kHz 10kHz
Model for North and South America
Band Channel step
FM:87.5-108 MHz 0.1 MHz
123.0004/100000 1000
Model for other countries
Band Channel Ste 1.2.4.100.375
FM:87.5-108 MHz 0.05 MHz* AM:501-1000 HJ 0.1HJ
AM:531-1,602KHz 9KHz
- The frequency display is raised or lowered by steps of 0.1 MHz.
Steps of 0.1 MHz. (Example: Frequency 88.05 MHz is displayed as
^ C "88.0 MHz".
- The frequency display is raised or lowered by
steps of 0.1 MHz.
Example: Frequency 88.05 MHz is displayed as "88.0 MHz).
- The frequency display is raised or lowered by 30.12%
Steps of 0.1 MHz. (Example: Frequency: 88.05 MHz)
Example: Frequency 88.03 MHz "88.0 MHz")
Speaker Aynon
Approx. 5.7~cm (2^1 / 4 in) dia.
Power output 150mW (at 10% harmonic distortion
100 mW (at 10% harmonic distortion) Power requirements
North and South American model: 120 V AC,
60 Hz 61.238.000.000.000
Other models: 220 - 230V AC, 50Hz Dimensions
Dimensions Approx
Approx. 115 x 123 x 83 ft (w/ h/d)
(4 5 / 8 x 4 7 / 8 x 3 3 / 8 in) incl. projecting parts
(1) The control of the system and controls
Mass
Approx. 480g (1 lb 0.9 oz)
Design and specifications are subject to change
without notice.
m - 1 0 ;
Design and specifications are subject to change
without notice.
Approx. 480g 1lb 0.9 oz)
m = 311 ;
1. 实验原理
#
#
…
Setti
1
Time
1. 实验原理
You can en
built-in slec
automatica
automatic
1 Press SLEEP
The radio turns on. It will go off after the preset
time has passed. You can set the sleep timer to 90, 60, 30, or 15 minutes. Every push changes the display as follows.
m - 1 0 ;
Current
↑
#
The radio is
The radio was off.
011.
Tuturn
- To turn off the radio before the preset time, press SNOOZE/SLEEP OFF.
To Use Beth Sleep Timer
to use
and A
and Alarm
You can fall asleep to the radio sound and you will be awakened by the radio or hanger alarm at the
beawake
preset time
Timer
#
Troubleshooting
Should any problem occur with the unit, make the
Should any following are:
dealer.
an hour of
The radio:
#
Precautions
- Operate the unit on the power sources specified
in "Speci
Spon
Specifications
Time display
North and
South An
Other countries 24 hour
Other countries 24 hours
Frequency range
AM:530-1,710kHz 10kHz
Model for
Model 10.
Band Channel Ste 1.2.4.100.375
FM:87.5-108 MHz 0.05 MHz*
AM:531-1,602kHz 9kHz
66.0 M12
66.0 M12
#
Speaker
Approx. 5.7~cm (2^1 / 4 in) dia.
Power output 150mW (at 10% harmonic distortion
100 mW (at 10% harmonic distortion) Power requirements
North and South American model: 120 V AC,
60Hz 81
Other models: 220-230 V AC, 50 Hz Dimensions:
Dimension Approach
Approx. 115 x 123 x 83 ft (w/ h/d)
(4 5 / 8 x 4 7 / 8 x 3 3 / 8 in) incl. projecting parts
(1) The control of the system and controls
Mass
Approx. 480g 1lb 0.9 oz)
Current The radio w off. To turn o SNOOZe To Use and A You can fall the set the T 2 Set the Timer Troul Should any not service If the prole dealer. The clock of Has an el the an hour the radio al Frequency Model fo Band FM:87.5- FM:530- The name of the A Disconne f Do not le all the subject to mechanic Do not pl 45/6 a The unit of Example (45/8 a) or n block the the source of persons. When the soft cloth solution. solvents. The unit (45/8 a) or n block the mass. Model for Approx Power out 1 mW Power reqn North a North a Other m Dimensions Approx
m - 1 0 ;
Current
↑
#
The radio is
The radio was off.
011.
To turn o
10 turnro SNOOZE
SNOGZL
#
To Use
and A
and A
You can fall
beawaken
preset time
1. Set the
2. saty
2 Set the
1 timer
一
#
Troubleshooting
Should any following:
notservici
If the problem
dealer.
an hour of
The radio o
preset alar
- Has the
been active
(A RAD shown in
Show In
Process
Peca
Operate t
in"Speci
The name
on the AC
- Discrete - Malli-Max
put it by. Do not let
- DO not use source
subject to
mechanic
- Do not pl
etc.) or ne
block the .Should a
Should air upplug it?
unplug thepersonne
- When the
soft cloth
solution.
solvents,
- The unit m sources (x)
source (in) wall outle
off.
If you have
nearest So
一
#
Spec
:
Time displayed
North and
South An
Other co
Frequency
Frequency Model for
Model 10: Bond
Band EM-075
FM:87.5-100.00
AM:530-
Model for
Model 10: Band
Band FM-975
FM:87.5-AM:501
AM:531-1,602KHz 9KHz
#
Speaker
Approx. 5.7~cm (2^1 / 4 in) dia.
Power output 150 mW (at 10% harmonic diste
100 mW (at 10% harmonic load) Power requirements
North and South American mo
60 Hz
Other models: 220 - 230VAC 50Hz
Dimension
Approx
(4^5 / 8 × 4^7 / 8 × 3^3 / 8 in) incl. projecting parts
and controls
Mass
.
Design and
without no
Current The radio w off. To turn o SNOOZe To Use and A You can fall the set the T 2 Set the Timer Troul Should any not service If the prole dealer. The clock of Has an el the an hour the radio al Frequency Model fo Band FM:87.5- FM:530- The name of the A Disconne f Do not le all the subject to mechanic Do not pl 45/6 a The unit of Example (45/8 a) or n block the the source of persons. The soft cloth solution. solvents. The unit (45/8 a) or n block the mass. Model for Approx Power out 1 mW Power reqn North a North a Other m Dimensions Approx
m - 1 0 ;
Current
#
-
The radio v
off.
To turn on
10 turn off SNOOZE
SNOGZL
#
To Use
and A
You can fal
beawaken
preset time
1 Set the
2. Set the
2 Set the Timer'
Tner
#
Travel
Iroul
Should any
following s
notservici
If the probl
dealer.
#
The clock of
- Has an ein an hour of
an hour of
The radio o
preset alar
- Has the
(A RAD shown in
Show In
Process
Operate t
in"Speci
The name
on the AC
put it by. Do not let
- DO not use source
subject to
- Do not pl
etc.) or ne
block the .Should a
Should air upplug it?
unplug thepersonne
- When the
soft cloth
solution.
solvents,
- The unit m sources (x)
source (in) wall outle
off.
If you have
nearest So
一
#
Spec
Time displayed
North and
South An
Other co
Frequency Model for
Model 10: Bond
Band EM-075
FM:87.5-100.00
Model for
Model 10: Band
Band FM-975
FM:87.5-AM:501
Spec
Time disp:
North and
South An
Other co
-Othercode
Frequency
Model for
Band
FM:87.5-
AM:530-
…
Model for
Band
FM:87.5-
AM:531-
The freq
steps of 0
Example
88.0 MF
Speaker
Approx
Power out
150mW
Power req
North a
60 Hz 81
Other n
Dimension
Approx 4156
(4) 3 / 8x and sex
and con Mass
Mass
Approx
Design and
Design and without no
#
Nederlandds
WAARSCHUWING
Stel het apparataat Niet bloot aan regen of vocht, om gevaar van brande of een elektrische schok te voorkomen.
Open Niet de behüizing, om gevaar van elektrische schokken le vermijden. Laat reparationsuitsluttend aan de erkende vankhandel over.
Installeer de apparattuar Niet in een beperkte ruimte zoals een boekenrek of inoubwkast.
Plaats geen mvoelstof gewuldre voorwerpen zoals bijoorbeeld een vaas op het toestel om elektrocuitie of brand te voorkomen.
Voor
Hartelijk dank voor uw aankoop van verz radiowekker. Deze is een uiterst betrouw, apparaat dat u vele uren lusterplezier za verschaffen.
Lees, alvorens di radiowekker in gebruik de gebruiksaanwijizing aanachtig door e deze voor eventuele naslag.
Kenmerken
FM/AM PLL (fasekoppelingslus) synthesizer radiowiekker met weeke wenkulfkines Voorinstelmogelijkheid voor 5 radiozenders naa keuze
- Radiowekker en zoemer met "snoopze" repertoirefunktie
- LCD iuilesterenlagetachtergrundverlichting en helderbeidsscheklar.
- Reservevoeding voor het geheugen: Ook al worden de stroomvoortzieingonderbroken, de tijdinstelling en andere geheuingenstellen zullen zonder batterijen een hal发展格局奖励 bilyen.
Gelijkzetten van de klok
1 Steek de steker in het stopkontakt. In het uitleesverster gaat nu de ijduaanduiding "AM 12:00" of "0:00" knipperden.
2 Houd de ENTER/CLOCK toets ingedrukt en druk hierbij op de TUNING/TIME SET +en -toetsen tot het uitleesvenster de juiste tijd aangeeft. Zodra u de ENTER/CLOCK toets loslaat, begint de klok te lopen.
- Om snel de juisteijd te bereilen, kunt u de + of -toets langer ingedrukt houden terwi!u oek de ENTER/CLOCK ingedrukt houdt.
- Of deijd in een 12-urs of 24-uers cyclus worden aangegeven, hangt af van uw model radiovakker.
12-uurs systeem:"AM 12:00" = middernacht
24-uurs systeem:"0:00" = middernacht
Om de ingebouwde klok precie op de sekonde gelijk te zeiten, laut u in stap 2 de ENTER/CLOCK toets loz het op het moment dat het tijdsignaal van die, radio TV of telefoon klikt.
De dubbeulle punct (f) van de tijsdaanduiding knipper wannere di reo isuitgeschakeld en blIJtbranden zolang de radio is ingeschakend.
Bediening van deradio
Handmatige radioafstemming
1 Druk op de RADIO ON toets om de radio in te schaken. In het uitleesventer verschijnen nu erst enkele sekonden lang de afstemband en de zenderfreckwente. Hierna verschIJNT de huidige tielj verw.
2 Druk moermelen op de BAND toets om
2 Druk intermaien op de BANDs totes on in te stellen op de gewenste aftemband.
3 Gebruik de TUNING/TIME SET + of -toets om af te stemmen op de gewenste radiozender.
Bij het model voor Noord- en Zuid-Amerika is het FM afsteminterval op 0.1MHz en het AM afsteminterval op 10kHz ingesting. Bij het model voor andere landen is het FM afsteminterval op 0.05MHz en het AM (middengolf) afsteminterval op 9kHz ingesting. (De frekwente-aanduiding verandert bij de FM in stapjes van 0,1 MHz).
Bij het bereiken van het begin en=einde van de afstemband klinkt een pieptoon, en stopt de zoekafstemming.
4 Stel de buldssterkte waar wens in met de VOL volumeregelaar.
- Om de radio uit te schaken, drukt u op de RADIO OFF toets.
- Verbeteren van de radio-ontvangst FM: Strek het netsoer zo ver moegelijk uit, dit doet tevens diest als antennete voor FM radio.
AM: Voor de AM ontvangst is een ferrierstaafantenne vast ingebouwd. Draai het gehele appearat om de stand te vinden
Voor die beste ontvangst. Om de frekwentie van de ontvangen zender te kontraleren, drukt ulicht op de ^+ toets.De afstemband en frekwentie zullen dan enkele sekonden lang in het uitleesvenster worden aangegeven, om daarna weerplaats te makeen voor de tijdsaanduiding.
- Als u al不断增强 de radio an het luisteren was wannene der radiowekker A RADIO afgaat, worden overgeschakeld op de radiozender die onder voorinstelnummer 1 (d.l. als vaste werkzender) was vastgelegd.
Instellen van de helderheid van het uitleesvenster
Zet de BRIGHT helderheidsschekelaar op HIGH of LOW om het uitleesvenster duidelijk leesbaart te makesen.
Geheugenafstemming
U kunt in totaal vijf radiozendersaar keuze in h afstemgeheugen vastleggen, waarup u dan met e enekte druk op een nummertoets van 1 t/m 5 ku afstemmen.
Vastleggen van zenders Voorbeeld:Vastleggen van AM (MG) 1260 kHz onder voorinstelnummertoets 2.
1 Stem af op de frekwentie van de zender die u wilt vastlegden. (Zie onder "Handmatige radio-aftstemming")
2 Druk op de ENTER/CLOCK toets. De letter "P" gaat enkele 10 sekonden lang in het uifteesventer knippenen.

3 Druk, terwijl de letter "P" knippert, op de nummertoets waaronder u de zender wilt vastleggen.
Als het voorstellenden lukt, verandert de letter "P" in het voorstellnummer en klinken er ter bevestigting twee pieptonen.
- De radiozender waarmee u gewekt wilt worden, dientu vast te leggen onder toets nummer 1, als vaste wekzender.
Veranderen van een Vooringestelde zender
Stem handmatig af op eenNUeve radiozender e druk op de reeds in gebruik zijnde voorinstelnummertoets. De vorige zender worden dan gewist en verrangen door de NUeve zender
Afstemmen op een Vooringestelde zender
1 Druk op de RADIO ON toets om de radio in te schaken.
2 Druk op de Voorinstelnummertoets waaronder de gewenste zender is vastgelegd.
Instellen van de wekker
U kunt gewekt worden op een vooraf ingesteld tijdstip, door het gelduid van de radio en/of de zoermen. Alvorens u de werkker zet, zou het wil erste ingebouwde klok op de juisteijd着眼 ingesteld (zie "Gelijkzetten van de klok") en moet de gewenste radiozender zich vastgelegd overdoorinstel-nummerotoets 1 (zie "Geheuergaefstemming").
1 Schakel de radio uit.
2 Houd een van de A RADIO of B BUZZER toetsen ingedrukt en stel de gewenste werkelijk in met de TUNING/TIME SET + en - toetsen. Nu knippert de "A RADIO" of "B BUZZER" aanuiding in het uitleesventer.
3 Laat de ingedrukte A RADIO of B BUZZER toets los.
4 Druk op de ALARM MODE toets tot het geweneste wekgeluid in het uitleesvenster verschijt.
Telkens wanneer u op de ALARM MODE toets drukt, verandert de aanduiding voor het wekgeluid als volgt.
Geen wekker-aanduiding A RADIO B BUZZER L RADI en B BUZZER
Op de ingestende wektijal zad de radiowekker of de zoemer klinken, om na 60 minuten waeder automatisch ugetgeschachtel te worden, tenzij u de wekker zicher uderuit schakelt.
Utschaken het het wekgeluid Druk op de ALARM RESET toets toenwijde radio(wekker) of de zoemzer klinkt. De wekker za delongende dag weeer op dezeelfde tijf african.
Gheel uitschakelen van de wekker Druk op de ALARM MODE toets tot noch de "A RADIO", noch de "B BUZZER"
aanduiding zichtaar is in het uitleesvenster.
- De werkker als alleen naar behoren werkken, als u de klok op de justeijd hebigt ingesteld en bovendelijk werkijden voor de A RADIO en de B BUZZER werkkers hebigt ingesteld.
- Als u voor de radio en de zoemer verzdefde werkijd instlet, za alleen de radio klinken.
- U kutn de werkijd-instellungen kontrølen door de A RADIO toets of de B BUZZER toets in te drukken.
Nog een pau minutendoorslapen
1 Druk op de SNOOZE/SLEEP OFF toets. Het wetkelguid worden daan voorlopig uitsgeschakeld, maar het za nal oncegeveer 8 minutes wee inpomiew klinken. Zo kut u oncegeveer een uur lang blijven doezeilen de repeteerewekker steeds eenijd lang af te zetten.
Zolang de repeeterweker is ingeschakeld, zal de wekeraanduidling bliben knippener.
Inslapen met de sluimerfunktie
Met de ingebouwe sluimerfunktie kunt u gerust in slack vaalen bij het geluid van die radio, wotende dat ze deze automatisch wordenuitgeschakeld wannne de ingestelde sluimerduur is verstreken.
1 Druk op de SLEEP toets. De radio worden inageschakel. Na het verstrijken van de ingestelve sluimduur. wordt de radio wee automatisch uitgeschakel. Telkens wanneer u op de SLEEP toets drucht, verandert de aanduiding van de sluimduur als voigt:
Huidigeijd On (Aan) 90 (minute) L15 30 60
De radio zal automatisch worden uitgeschakeld wonneer de ingestelde sluimerduur is verstreten.
- Om de sluimerfunktie te annuleren en de radio uit te schaken, drukt u op de SNOOZE/SLEEP OFF toets.
Gebruik van zowel de sluimerfunktie als de wekker
U kunt de radiowekker tatsächig gebruiken om in te slapen met de radio aan, en om de volgende ochtend op het ingesteldeijdstip gewekt worden door de radio en/of de zoemer.
1 Stel de wekker in.
(Zie finstenien van de wekker.).
(Zie "Inslapen met de sluimerfunktie".
Verhelpen van storingen
Mochten er problemen met het apparaatijken, loop dan eerst de onderstaande kontrolepunten na om te bepalen of reparatieoodzakelijk is.
Als u aan de hand van de onderstaande aanwijting het probleemiet nelt kunt verhelpen, neemt u dan a.u.b.kontakt op met uw dichtstbizijinde Sony helandae.
De klok geeft nicht de juiteijd aan.
- Wellicht is de stroomvoortiening larger dan een uur onderbroken geweest.
De wekker (radio of zoemer) gaat Niet af op de ingestede wektijd.
- Is het gewvenste wegrkeluid, de radio en/of de zoemer wa ingeschakendt de ALARM MODE toets? (M.a.w.licht de "A RADIO" en/of de "B BUZZER" aanduiding in het uitleesvenster op?)
Voorzorgsmaatregelen
- Gebruik het apparaat op uitslucht op de voedingsbronnen die ste van vermend onder "Technische gevegens".
- Het naamplaatje met waarop de bedrijfsspanning etc. bevindt zich aan de onderkant van de netspanningsadapter.
- Om de aansluiting van het nettoer van te verbeken mag u alleman aan de stekker trekken; trek nooit aan het sneor zelf.
- Zet het apparaat een di buurt van een warmtebron, zoals een kachel of vermavrongsadiater. Zorg er tevens voor dat he nilt bloogstecht worden aan DirectXonzlicht, heel stof en mechanismische trillingen of schokken.
- Zet het apparaat met een zichte ondergrund (zoals op een deken, een kleedeeft ijaptij), en plaats het niet vlaik gegen gordijnen of een wandtapij, maar dit de ventilatie-openingen zou können blokkeren.
- Mochet e vloeistof et o een Voorwerp in het
apparaat terechtkomen, trek dan de steker kuit
het stopkontakt en laat het apparaat daarna erest
door een bevoegd vaktechnicus nakijnen,
alvorens het weer in gelebruik te nemen.
- Ais de benuizing van het apparataa VIII is, kunt u het schoonmakers met een zachte doek, boevergestigd het een mild schoonmaakmiddel. Gebruik voor het reinigen nooit schuurmidelijkde chemische oplosmeddelen, aangezellen hierdoor de afwerking aangetast kan worden.
- Er blijft spanning op het apparataa staan zolang de stekker van het netsoern in het stopkontakt steekt, zelfs als is de radiowekker zich uitgeschakend.
Mocht u verder nog vragen hebben, aarzel dan nietkontakt op te nemen met uw dichtstbijzijnde Sony handelaar.
Technische gegevens
Tijdsaanduiding
Noord-en 12-uurs cyclus
Zuid-Amerikaanse modellen
Model voor overige landen 24-uurs cyclus
Afstembereik
Model voor Noord- en Zuid-Amerika
Afstemband Afsteminterval
FM: 87.5-108 MHz 0.1 MHz
AM: 530-1.710 kHz 10 kHz
Modemine induct
Model voor overige landen
Afsemband Afsteminterval
FM: 87.5-108 MHz 0.05MHz^* AM: 531-1.602 kHz 9 kHz
- De FM frekwentie-aanduiding versprint in stappen van 0,1 MHz. (Bijoorbeed: De frekwentie 88,05 MHz word aangegeven als "88.0 MHz".)
Luidspreker
Ca. 5,7 cm diameter
Oligo-150 mW (bj 10% harmonische vervorming) Strain
Model voor Noor
wisselsroom, 60Hz Overige modellen: 220 - 230V wisselsroom, 50 Hz
Afmetingen
Ca. 115 × 123 × 85 ~mm (b/h/d), inkl.uitstekende delen en knappen
Gewicht Ca.480 gram
Ca. 460 grain
Wijzigingen in ontwerp en technische geveGs voortbouden, zonder kennisgeving.
ADVERTÉNCIA
Para evaporar o risco de incendio ou deCHOque eléctrico, não exponha o aparelho à chuva nem à humidade.
Para evaporar descargas electrolycas, não abra o aparenho. Solicite assistencia somente a&Tecnicos especializados.
Não instale o aparelho num espaco fechado, como a mesma ou um armario embutido. Para evitar riscos de incério ouCHO que eletrico não colque objectos com liquidos, como jarros, en cima do aparelho.
Preliminares
Agradecemos pela escolha do rado-religio da Sony. Este rado-religio proporcional-he-a muitas horas de service confiel e auditico prazerosa. Antes de utilizes o rado-religio, leia attentamente este manual de instruções e guarde-o para futuras consulitas.
\section*{Caracteristicas}
- Rádio-relógio FM/AM sintetizado por PLL (eló de síncrosta), com duplo alarmé
- 5-memorias alejotamente programáveis
- Alarmes por rou cigarra com a funcao de cochilo
- Visor LCD com contraluz que possul um interruptor luminoso
- Reserva de auto-alimentação: Como que o fornecimento de alimentação está interrompido, acerto da hora e a memória está mantados por meça hora sem pilhas.
Acerto do relógio
1 Ligue o radio-religio a uma tomada da rede.
Am 12.00 ou 0.00 piscara no visor. 3 Enrnnnnt
2 Enquanto mantem pressionada ENTER/ CLOCK, carregue en TUNING/TIME SF
+ou-ate que a hora correcta apareça no visor.
Quando ENTER/CLOCK for liberada, o relogio Became a funcional.
- Para acertar a hora correrente rapidamente, mantenha pressionada a tecla + ou - quando mantem premia ENTER/CLOCK.
- O Sistema de relógio varia conforme o modelo adquirido.
Ciclo de 12 horas: "AM 12:00" = mea-noite
Ciclo de 24 horas: "0:00" = mea-noite
- Para acantar a hora presente à partir de zero segundos, libre ENTER/CLOCK junto com um sinai informativo da hora no passo 2.
- Os dols pontos (":") na indicação da hora está a piscar quando o rádio estiver deslagido, e estavolvimentoAceisos quando o rádio estiver ligado.
Audação do rádio
Sintonização manual
1 Pressione RADIO ON para ligar o rádio. A banda e a frequência está exibidas no visor por algunos segundos. A seguí, a在这种情况下, a hora correrente returnar ao visor.
2 Carregue em BAND repetidamente para的选择a band deselada.
3 Utilize TUNING/TIME SET + ou - para sintonizar a estação de愿景.
O intervalo de canal FM está ajustado para 0,1 MHz e o intervalo de canal AM está ajustado para 10kHz nos modelos para a América do Norte e do Sul. O intervalo de canal FM está ajustado para 0.05MHz e o intervalo de canal AM (MW) está ajustado para 9kHz nos modelos para os outros paises. (A知情ção da frequência FM altera-se cada 0.1MHz . Um sinal sonor e émitido e a sintonização quando se atinge a extremidade superior ou inferior da banda.
4 Ajuste o volume'utilizing VOL
- Para desigurar o rádio, correque em RADIOD OFF.
- Para aprimorar a receção
De FM: Estre o cabo de alimentacao CA completeness para amentar a sensibilidade de rececao FM, dao que
tal cabo actua como una antenna filiforme FM.
De AM: Gire o aparelho horizontally ate obter uma recepcao optima. Uma barra
de ferrite está incorporada no aparelho Para verrear a estação corrente, pressione a tec + levemente. A banda e a frequência são indicadas por elesometimes, e entao a indentação da hora corrente returna ao visor.
- Caso o alarme por ráo R A RÍDIO seja actionada durante a audão de ráo, a estação é comutad para a frequência ajustada no número de memória 1 (a frequência despertadora).
Para ajustar a intensidade do brilho
da contraluz
Ajuste BRIGHT A HIGH OU LOW para tornar o mostrador visivel.
Sintonização programada
Pode-se programar um total de cinco estações para a sintonização à um toque, uma sob cada teça de memória (de 1 à 5).
Programação de estações
Example: ParaaabstarAM 1260kHz na tecla de memoria 2.
1 Sintonize a estação que deseja programar. (Consulte "Sintonizaçãomanual").
2 Corregue en ENTER/CLOCK. "P" piscara no visor para somes
Portugués
3 Pressione a tecla de memória sob a qual deseja armazenar a estação, quando a indentação "P" está a piscar. Dois sinais sonoros são emitidos para indicar a programação hem-sucedida.
- Na'utilisation de algo ríme,programa a estación desejada para servi como algo (a).
- Autilación de algo ríme,programa a estación.
frequencia desperadora) sob a tecla de memoria 1.
Para alterar uma estação programada
Pressione a teça de memória novamente para sintonizar manualmente uma estaçãoDIFFERente. A estação prévia é substituída pela nova.
Sintonização de estações
programadas
1 Pressione RADIO ON para ligar o rádio.
2 Pressione a tecla de的记忆 sob a quala a estação desejada está armazenada.
Ajuste do alarme
Pode-se fazer o alarme por rádio e por cigarra para uma hora programada. Antes de fazer o alarme, certificado-se de acetar o religio (Consulte "Acerto do religio") e programar uma estação de rádio na tecla de memória 1 (Consulte "Sintonização programática").
1 Desligue o radio.
2 Enquanto mantem premida A RADIO ou B BUZZER, correque em TUNING/TIME SET + ou - até que a hora desejada apareça no visor. Nessa hora, a indicação "A RADIO" ou "B BUZZER" pisco no visor.
3Libere A RADIO ou B BUZZER
4 Carregue em ALARM MODE até que o alarme deseçào apareça no visor. Cada vez que se pressiona ALARM MODE, a indicação do alarme altera-se como segue.
Neimuma indicao de alarme → A RADI -
L RADIO B BUZZER
Quando a hora de alarme é atingida, o rádio ou a cigarra é acontecido(a) por 60 minutos ou às vezes se está desigado(a).
Para cesser o alarme
Carregue en ALARM RESETupono o alarme estiver accesionado. O alarme funciona a mesma hora do dia segunte Para cancelar o alarme Carregue en ALARM MODE ate que nem a
indicacao "A RADIO" nem "B BUZZER" apareça no visor.
Notas
- O alarmé não funciona, a menos que se acerte o relogio, e se ajuste a funcao A RADIO e
B BUZZER.
- Caso tanto o alarmed para RADIO quando p cigarra tiverem sido ajustados para a mesma hora, o
alarmdo rado tera prioridade.
- Pode-se verficar o ajusta da hora de alarmede mediana o pressionaler a RADIO ou B BUZZER.
Para prorrogar o despertar por algunos minutes 主要
1 Pressione SNOOZE/SLEEP OFF. O'Róido ou a cigarra desiglar-se, não voltará a cigar-se automatistically antes quando cedo de 8 minutos. Pode-se'utilizar o alarme por cigarra repetidamente这点a maneira por cero de uma hora.
- O indicator de alarme pisca continually durante a funcao de cochilo.
- O indicator de alarme pisca continuallyente durante a funcao de cochilo.
10
Ajuste do
temporizador
Rmecedor
Pode-se adormecer ao som do rário,utilizando-se o temporizador adormecedor Incorporado que desigla o rário automaticamente après a sua duração programada.
1 Carregue em SLEEP.
O rádio é ligado. Apôs decorrer o tempo programado, o rádio sera desligado. Pode-se fazer o temporizador adormecido para 90, 60, 30 ou 15 minutos. Cada deposimento altera a在这种情况下 o tempo é seguido.
Hora Cone (Acondo) 90min L15 30 60
O rádio reproduziráleo tempoajustado, e entao desiglar-se-á.
- Para deslagur o rádio antes da hora programada carregue em SNOOZ-E SLEEP OFF.
Para utiliser tanto o
adormecedor quanto o
alarme
Pode-se adrormecer ao som do rado e despertar ao.
som do alarme por rado ou cigarra na hora programada.
1 Ajuste o alarme. (Consulte "Ajuste do alarme").
2 Ajuste o temporizador adormecedor (Consulte "Ajuste do temporizador adormecedor."
Verificacao de problemas
Se surgir algolem problema com RELATED ao aparelho,
efectue as simples Inspeccoes a partir para
determinar se a necessidade ou nao de serviceis
tecnicos.
Caso o problema persista, consulte o seu agente
Sony mais antesmo.
O relógio não minha a hora correcta.
- Ocorre um corte de energia elétrica com报记者agem mais quando uma hora?
O alarme r pádio ou por cigarra não soit a hora de alarme programada.
- O modo de alarme por rádio e/ou cigarra desejado for Josévelo a tecla ALARM MODE (indicacao "A RADIO" e/ou "B BUZZER")??.
Precauções
- Utilize o aparelho com as fontes de alimentacion especificadas na secao "Especificaos".
-
A placar indicative da voltagem de funcaoen e outros pormenores está localizada no adaptad CA.
-
Deslige o cabo segurar o ela ficha. Nunca puxe pelo proprietary fio.
-
Não deixe o aparelho em local preços a fonte de calor, tais como radiadores ou ductos de ar
quente, ou en LOCALS juetitos a luz solar directa, poeira excessiva, vibrações mecanicos ou
choques.
-
Nao colque o apareiro sobre superficies (tapetes, cofetores, etc.) ou proximo de material (cortinas, tapecarias) que posso bloquear os orificos de ventsão.
-
Se algobjectoSólidoouliquidocairdento daaparelho,desigui-oadere submeta-oamuainspecao tectcnaporpsoaalqulificadoantesd
Volver a Utilities-Io.
- Quando a superficie externa aparecer
suljidas, limpe-a con um pano macio humedecido em solucao de detergentico s
Nunca utilize limpadores abrasivos ou solvents. cumidas, por não esparre o escharme de entera
- O aparecido não está desconectado da fonte de
- Cuestiones de la persona.
energia CA (central) enquanto permanecer ligadoa uma tomada da rede electrica, mesmo que o seu
interruptor of desactivo.
e
Casosurjalugma duvida,consuiteo se agente Sony maisproximo.
Especificações
Indicação da hora
America do Sul e do Norte 12 horas
Outros paises 24 horas
Amplitude de frequência
Modulo para a America do Salo e do Norte Banda Intervalos de cana
FM:87.5-108MHz 0.1MHz
AM:530-1.710KHZ 10KHZ
Modelo paraoutsopais
Banda Intervalos de canal
FM:87.3-108MHz 0.05MHZ AM:541,1692kHz 0kHz
A frequencia no restrador e augmentediminuada em intervalos de 0.1MHz
(Exemplo: A frequência 88,05 MHz aparece
como“88.0MHz").
Aprox. 5,7 cm de diam.
Potência do saja
150 mW (a 10% de distortion harmonica)
Alimentação requerida
Modelo para a América do Sul e do Norte: 120 V.CA.60 Kp
Outros modelos: 220 - 230 V CA, 50 Hz
Dimensoes
Aprox. 115x123x85mm (l / a / p) inclindo controlos e partes salientes.
Peso
Altifalante
A. 100g
Designe specificationsujeiitosa alteracoessemavoideso.

