WS624D - Høyttaler Audac - Gratis bruksanvisning og manual
Finn enhetens veiledning gratis WS624D Audac i PDF-format.

Brukerspørsmål om WS624D Audac
0 spørsmål om dette apparatet. Svar på dem du kjenner, eller still ditt eget.
Still et nytt spørsmål om dette apparatet
Last ned instruksjonene for din Høyttaler i PDF-format gratis! Finn veiledningen din WS624D - Audac og ta den elektroniske enheten tilbake i hendene. På denne siden er alle dokumenter som er nødvendige for bruken av enheten din publisert. WS624D av merket Audac.
BRUKSANVISNING WS624D Audac
PROFESSIONAL AUDIO EQUIPMENT
In-Ceiling & In-Wall Speaker WS624
Installation Guide
Installation Procedure
1) Cut a hole in the wall or ceiling on the desired mounting location of the loudspeaker with measurements 245 x 158 mm. The included cutout template can be used for marking.
2) Provide the loudspeaker connection cable through the mounting hole.
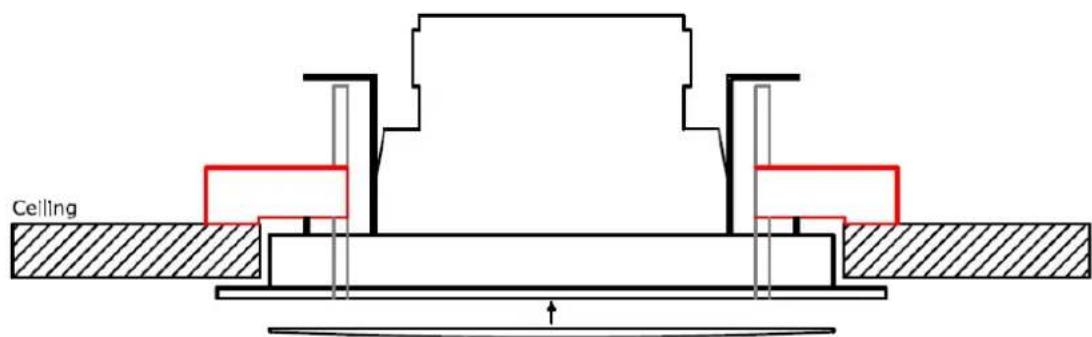
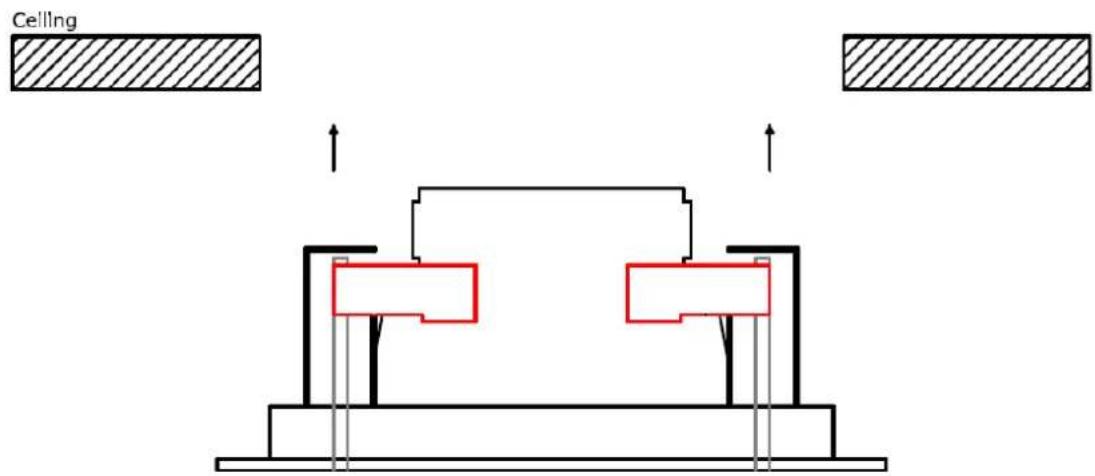
3) Take the loudspeaker, and remove the front grill. The front grill can be removed by rotating the mounting clips outwards and pushing them down. The fixing screws will push the front grill out.

natural_image
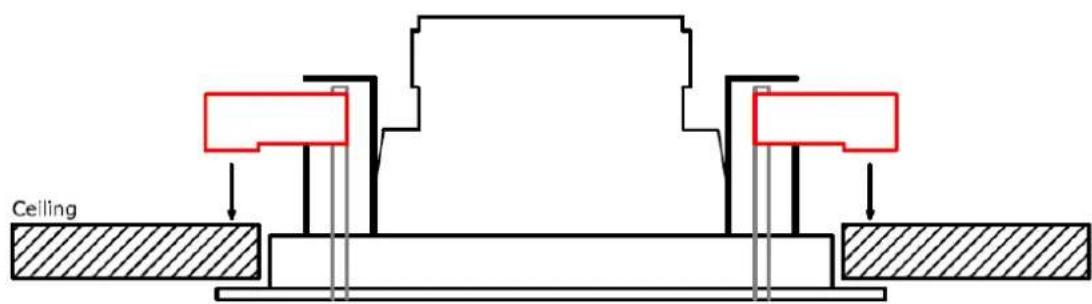
Pure mechanical cross-section diagram without any text, numbers, or symbols4) Pull the mounting clips up again, and rotate them inwards, making the speaker fit through the mounting hole in the ceiling.
5) Connect the loudspeaker connection cable with the power tap connection block. On this connection block, several connections can be made for different power taps. Depending of the desired power, connections can be made for 8 Ohm low impedance application, or 24 Watt / 12 Watt / 6 Watt for 100 Volt applications.
Press the locking mechanism of the desired power tap down, and insert the connection cable. After releasing the locking mechanism, the speaker connection cable is connected to the loudspeaker or transformer.
Always connect the common of the amplifier output to the C terminal, and the positive amplifier output to the desired terminal. (8 Ω For low impedance applications and the desired power terminal for 100 Volt applications).
6) Once the connections are made, the loudspeaker can be installed in the provided mounting hole. Insert the speaker in the provided mounting hole, and use a screwdriver for tightening the fixing screws. Once the screws are tightened by a quarter turn, the mounting clip will rotate outwards and will be locked behind the ceiling. From this moment, the loudspeaker cannot fall out the ceiling. To make the speaker equal with the ceiling, the fixing screws should be tightened.
7) Once the mounting screws are tightened, the front grill can be assembled to the loudspeaker. On locations where high vibrations may occur, it is recommended to push the included small rubber pieces into the groove where the grill fits in. 'This small rubber pieces makes sure that the grill won't come out by vibrations.