
V-C4440HTR - Støvsuger LG - Gratis bruksanvisning og manual
Finn enhetens veiledning gratis V-C4440HTR LG i PDF-format.


Brukerspørsmål om V-C4440HTR LG
0 spørsmål om dette apparatet. Svar på dem du kjenner, eller still ditt eget.
Still et nytt spørsmål om dette apparatet
Last ned instruksjonene for din Støvsuger i PDF-format gratis! Finn veiledningen din V-C4440HTR - LG og ta den elektroniske enheten tilbake i hendene. På denne siden er alle dokumenter som er nødvendige for bruken av enheten din publisert. V-C4440HTR av merket LG.
BRUKSANVISNING V-C4440HTR LG

LG
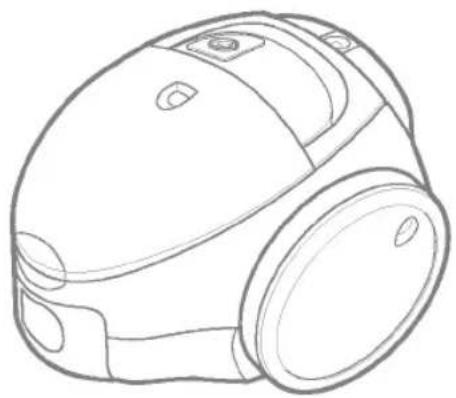
natural_image
Line drawing of a vacuum cleaner (no text or symbols)V-C4440HTB, V-C4440HTR
V-C4440HTO, V-C4440HTG
E | English
F Français
N | Nederlands
D | Deutsch
natural_image
Line drawing of a vacuum cleaner with attached tubing and two inset close-up views (no text or symbols)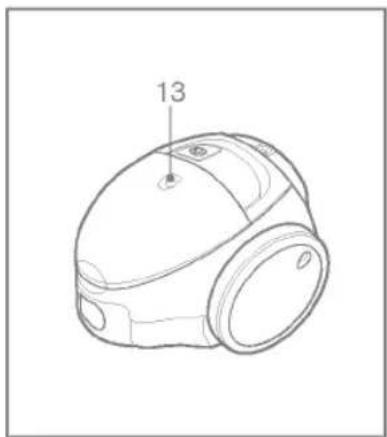
natural_image
Line drawing of a mechanical device with labeled component '13' (no text or symbols beyond label)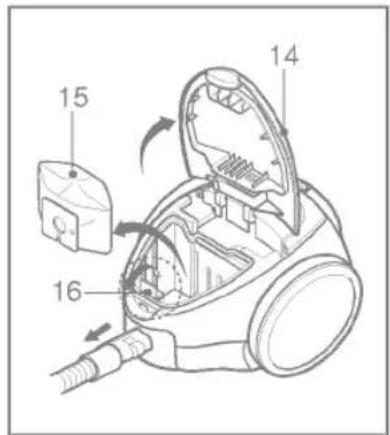
natural_image
Line drawing of a mechanical device with a coiled arm and base mount (no text or symbols)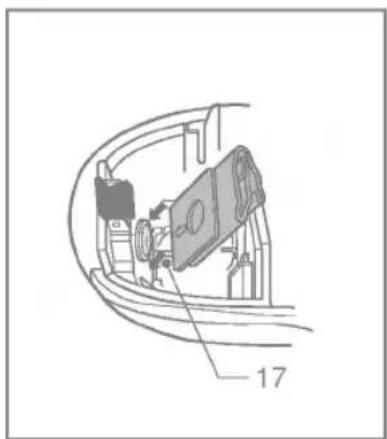
natural_image
Technical line drawing of a mechanical assembly with curved components and a numbered label (17), no readable text or symbols present.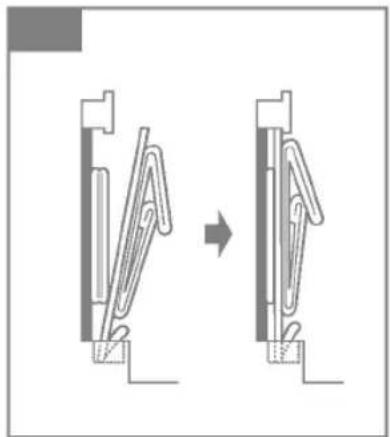
natural_image
Diagram showing a mechanical assembly before and after transformation, with no visible text or symbols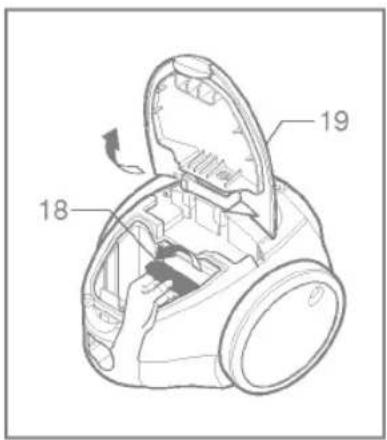
natural_image
Illustration of a hand holding a small object with an arrow pointing to it, next to a device with a cylindrical component and a stand (no text or symbols)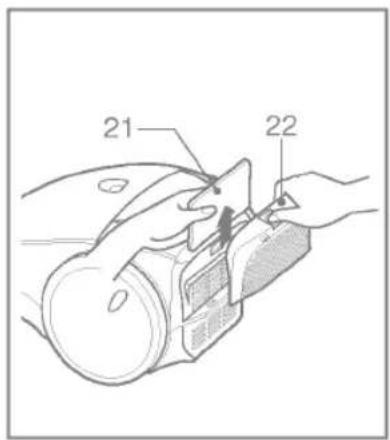
|E
Information for your safety
Please read all the following information, which contains important instructions for the safety, the use and the maintenance of the appliance.
This appliance complies with the following EC Directives: -73/23/EEC, 93/68/EEC-Low Voltage Directive-89/336EEC -EMC Directive.
■ Never allow children to use the appliance unsupervised.
■ Do not use the appliance if the supply cord is damaged or faulty.
■ If the supply cord is damaged, it must be replaced by an approved LG Electronics Service Agent to avoid a hazard.
■ Always switch the vaccum cleaner off before :
- changing the dust bag
- changing or cleaning the filters.
■ If no dustbag is inserted, the cover cannot be closed. Please do not use force!
■ Do not vacuum flammable or explosive substances(liquids or gases).
■ Do not vacuum hot ash, embers etc. nor sharp objects.
■ Do not vacuum water or other liquids.
■ Please make sure when using the carrying starp that it is securely fitted.
■ The use of radio trans mitting devices close to the appliance may interfere the function of the appliance, input power may be vary.
■ When you vacuum with an attachment appliance that has a rotating brush roller: do not reach into the running brush roller.
How to Use
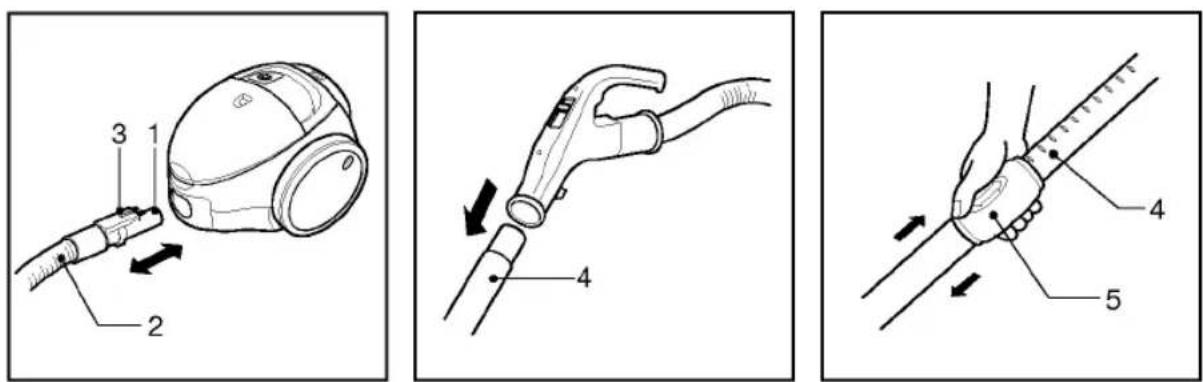
Connecting the flexible hose
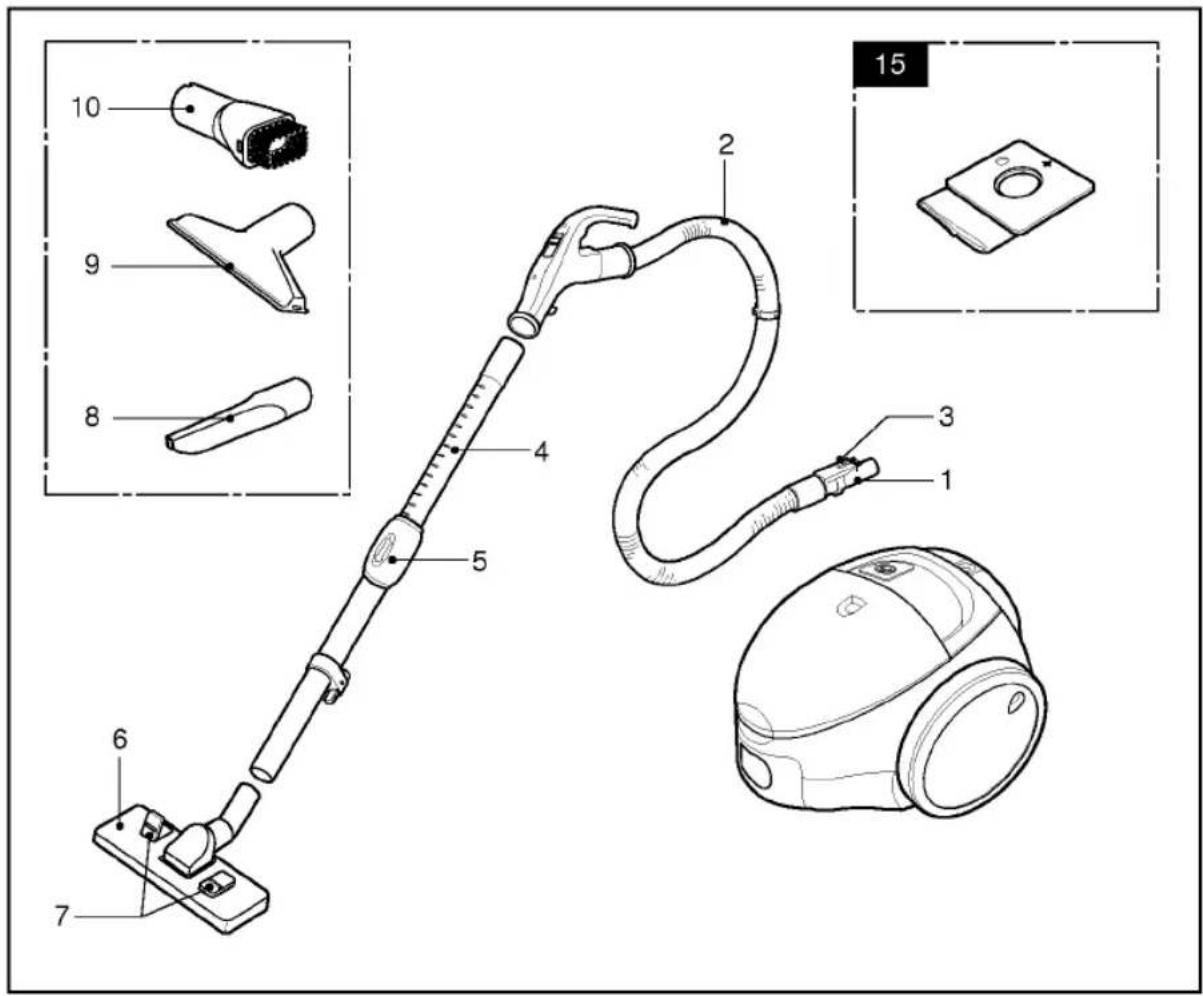
Insert the hose holder(1) into the suction opening.
When the hose(2) is to be disconnected from the appliance, press the release button(3) and pull the hose holder out of the suction opening.
Assembling the tubes
•Telescopic tube(4)
- Hold spring latch(5).
- Pull out tube to required length.
- Release spring latch to lock.
Using the cleaning head and Accessory Nozzles
Fit the large cleaning head onto the end of the tube.
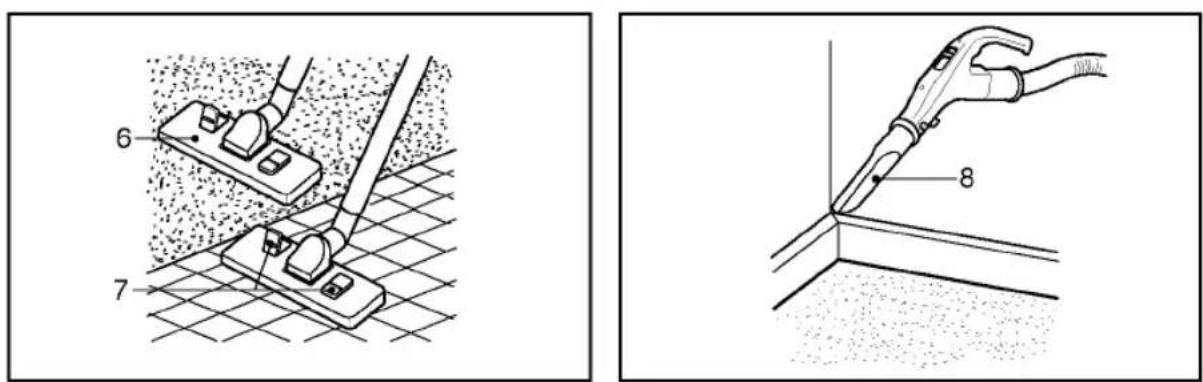
- The 2 position head(6) is equipped with a pedal(7) which allows you to alter its position according to the type of floor to be cleaned.
Hard floor position(tiles, parquet floors...). slide on the lever to lower the brush.
Carpet or rug position. slide on the lever to lift brush up.
- Crevice Tool(8)
For vacuuming in those normally inaccessible places i.e. reaching cobwebs, or down the side of a sofa!
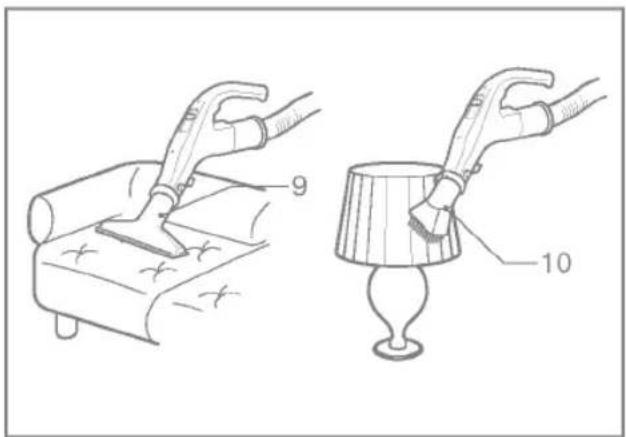
• Upholstery Nozzle(9)
For vacuuming upholstery, mattresses, etc. The thread collectors help to pick up the threads and fluff.
- Dusting brush(10)
For vacuuming picture frames furniture outlines, books and other uneven objects.
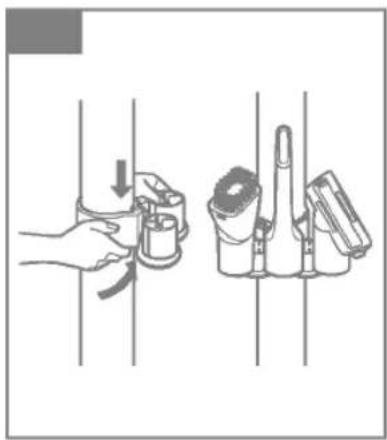
- Accessory Holder can be attached on the Extention wands using clamping hook.(20)
• Accessories can be stored in the holder.(20)
How to plug in and use
Pull out the mains lead to the desired length and plug into the socket.
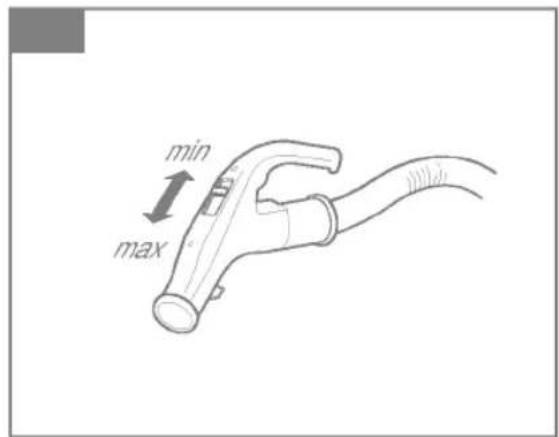
Adjusting the power level
•Electronic power control(11)
Suction capacity increases steplessly up to MAX.
String the cleaner
When you have switched off and unplugged the appliance, press on te button(19) to automatically rewind the cord.(depending on model)
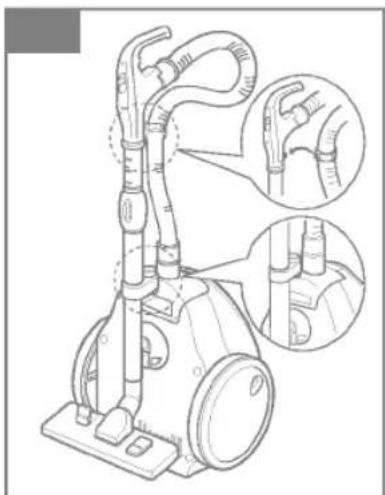
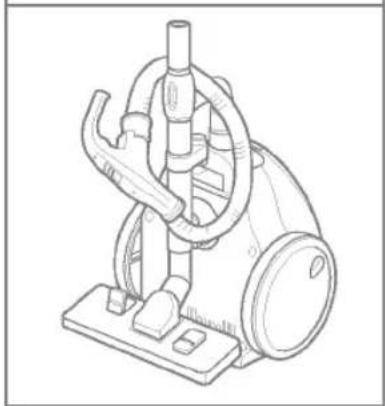
- Use storage clip as shown when storing the cleaner(12)
Changing the dust bag
The dustbag needs changing when the cleaner is set to maximum power and the cleaner head is off the floor but the "bag full" indicator window(13) is completely coloured red.
Even if the dustbag does not appear to be full at this stage, it should be changed.
It could be that a great deal of very fine dust has clogged up the pores of the dust bag.
- Turn off the appliance and unplug it.
- Remove hose.
- Open the cover (14)
Your appliance is equipped with a paper dust bag(15)
- Push the lever forwards in the direction of the arrow(16), and pull off the full paper filter bag towards the rear. Remove the bag and throw it away.
- Insert the new paper filter bag into the unit with the arrow pointing downwards(17)
Note: as the appliance is fitted with a safety device which checks that the bag is in place you cannot close the lid if the bag is not fitted correctly.
Cleaning the motor filter
The motor filter is situated inside the appliance between the dust bag and the motor. Each time that you change the air outlet filter we advise you to remove the motor filter(18)and to clean it by tapping to remove the dirt and then replacing it in the vacuum cleaner.
Cleaning the air outlet filters
Depending on the model you have chosen your appliance is equipped with different types of filters : foam filter or electrostatic filter or antiodour charcoal filter (21)
• To change these filters remove the cover of the filter compartment (22) situated at the rear of the appliance, by lifting the little catch.
- The foam filter, should be cleaned regularly by tapping it to remove the dirt.
- The electrostatic filter or anti-odour charcoal filter should be changed regularly (approximately every 6 bag changes)
What to do if your appliance does not work
Check that the appliance is correctly plugged in and that the electrical socket is working.
What to do when the suction performance reduces?
- Stop the appliance and unplug it.
- Check that the tubes, flexible hose and cleaning tool are not blocked.
- Check that the dust bag is not full. Replace it if necessary.
- Check that the air outlet filter is not blocked. Replace it if necessary.
Warranty Certificate For offer a 12-month warranty for this apparatus
During the 12-month warranty period, we will repair your apparatus at no cost to you or make available spare parts to your dealer free, if this apparatus fails due to manufacturing or material defects. Further claims are excluded. We are not liable for damages due to acts of providence or damages occurring during transport. The buyer assumes shipping and packaging costs. Your warranty conditions on the rear also apply!
Type of apparatus:
Serial number:
Name of buyer:
Purchase date: ____
Dealer's stamp and signature
Warranty conditions for vacuum cleaner
-
The warranty period begins on the purchase date and is valid for 12 months. Begin of warranty periodis proven if, the buyer submits purchase receipt together with the warranty card, filled in and signed by the seller. The serial number of the product must agree with the number entered onto the warranty card.
-
During the warranty period, we will correct any defects at no cost to you, if it can be proven that these are attributed to manufacturing or material defects.
-
Damages due to incorrect handling, non-compliance with instructions for use and normal wear are not covered by this warranty. Also, the warranty does not cover wear parts or easily broken parts (for example, viewing glass, light bulbs). The buyer is responsible for any damages during transport as well as shipping and packaging costs.
-
We decide whether to make repairs, exchange or replace parts. Exchanged or replaced parts are our property. The original warranty period is not prolonged if a refrigerator is repaired or certain parts are replaced.
-
The warranty is nullified if any person intervenes in the apparatus that are not authorised by LG Electronics, if the apparatus is used for commercial purposes.
-
Always keep the original packaging, so that if the apparatus requires servicing, it can be transported without damaging it.
-
If a repair is covered by this warranty, always contact your dealer or an authorised service centre.
-
Further claims are excluded. If parts of these provisions are invalid, they apply in the sense of the wording. The validity of the other provisions is not effected.
- LG
- |E
- Information for your safety
- How to Use
- Connecting the flexible hose
- Assembling the tubes
- •Telescopic tube(4)
- Using the cleaning head and Accessory Nozzles
- How to plug in and use
- Adjusting the power level
- •Electronic power control(11)
- String the cleaner
- Changing the dust bag
- Cleaning the motor filter
- Cleaning the air outlet filters
- What to do if your appliance does not work
- What to do when the suction performance reduces?
- Warranty Certificate For offer a 12-month warranty for this apparatus
- Warranty conditions for vacuum cleaner
Merke : LG
Modell : V-C4440HTR
Kategori : Støvsuger