1GBS/D2-667 - Adaptateur de données Centon - Gratis bruksanvisning og manual
Finn enhetens veiledning gratis 1GBS/D2-667 Centon i PDF-format.

Brukerspørsmål om 1GBS/D2-667 Centon
0 spørsmål om dette apparatet. Svar på dem du kjenner, eller still ditt eget.
Still et nytt spørsmål om dette apparatet
Last ned instruksjonene for din Adaptateur de données i PDF-format gratis! Finn veiledningen din 1GBS/D2-667 - Centon og ta den elektroniske enheten tilbake i hendene. På denne siden er alle dokumenter som er nødvendige for bruken av enheten din publisert. 1GBS/D2-667 av merket Centon.
BRUKSANVISNING 1GBS/D2-667 Centon
Centon Memory Installation Guide Desktop & Server Memory
natural_image
Interior view of a computer drive showing internal components like CPU socket, motherboard, and drive bays (no text or labels visible)1. GENERAL INFO
Check System Manual for Upgrade path & specific information to your machine.
Before touching any electronic components, make sure you are properly grounded. By wearing a wrist strap (or using some other type of static control device), you can prevent static electricity stored on your body or clothing from damaging your installation.
natural_image
Close-up of hands installing a computer motherboard with a green CPU socket and blue RAM slots (no visible text or symbols)2. UNPLUG
Disconnect your computer from its power source.
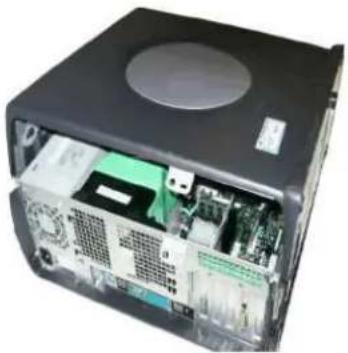
3. LOCATE MEMORY BAYS
Always exercise caution when removing the cover of your system. Please refer to your system manual for proper instructions.
4. LOCATE MEMORY BAYS (cont.)
Memory bays are comprised of single or multiple memory sockets. The location of the memory expansion socket may vary with each computer manufacturer. Please refer to your system manual for the location of the memory bays.
For systems supporting the Dual-Channel memory feature, be sure to follow the system manufacturer's guidelines for proper installation sequence.
natural_image
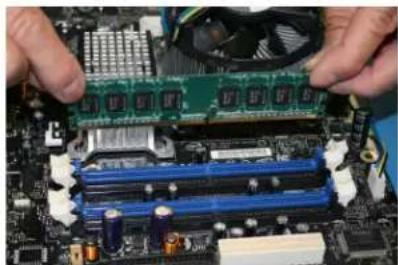
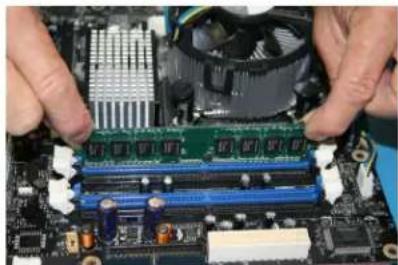
Close-up of hands installing a motherboard with a green CPU socket and cooling fan (no visible text or symbols)5. INSERT MEMORY UPGRADES
Memory sockets may vary with each manufacturer. Most systems require that the memory upgrade be seated within the socket at a 90-degree angle or upright position. Some systems require the memory upgrade within the socket at a 45-degree angle or tilted position. Please refer to your system manual for installation instructions.
To install the memory upgrade, hold it on both ends and position it in the socket. The DIMM will be notched to match the DIMM socket; the socket will have the key(s) to match the notch between the gold contacts on the DIMM. This notch/key ensures the module can be plugged into the socket only one way. Firmly push the memory upgrade directly down into the socket, making certain the module is completely seated in the socket. The ejector tabs at each end of the socket will automatically snap into the locked position. Repeat this procedure for any additional modules you are installing.

natural_image
Exterior view of a gray rectangular electronic device casing with a circular vent (no text or symbols visible)6. REPLACE COVER
Once you have installed your memory upgrade, please refer to your system manual for proper set-up configuration instructions. Some systems will automatically recognize the additional memory. Some systems may require that you run the system set-up configuration utility. Most systems will configure memory automatically.