Camedia C-770 Ultra Zoom - Camera OLYMPUS - Gratis gebruiksaanwijzing en handleiding
Vind de handleiding van het apparaat gratis Camedia C-770 Ultra Zoom OLYMPUS in PDF-formaat.

| Type de produit | Appareil photo numérique compact |
| Marque | Olympus |
| Modèle | Camedia C-770 Ultra Zoom |
| Résolution effective | 4,0 megapixels |
| Zoom optique | 10x (équivalent 38-380 mm) |
| Zoom numérique | 4x |
| Écran LCD | 1,8 inch, 134 000 pixels |
| Viseur | Électronique (EVF) |
| Stockage | xD-Picture Card, 16 MiB interne |
| Alimentation | Li-Ion accu (LI-10B) of 2x AA |
| Connectiviteit | USB 1.1, video uit (NTSC/PAL) |
| Afmetingen (B x H x D) | 108 x 66 x 74 mm |
| Gewicht (zonder batterij) | 340 g |
| Beeldstabilisatie | Nee |
| Functies | Automatisch, diafragmavoorkeuze, sluitertijdvoorkeuze, handmatig, scene modi, filmopname (320x240, 15 fps) |
| Onderhoud | Reinig lens met zachte doek; vermijd vocht en extreme temperaturen |
| Veiligheid | Niet in water dompelen; gebruik uitsluitend aanbevolen accessoires |
| Reparatie en onderdelen | Neem contact op met een erkend Olympus servicecentrum |
| Inhoud van de verpakking | Camera, accu, oplader, USB-kabel, polsbandje, lensdop, handleiding |
Veelgestelde vragen - Camedia C-770 Ultra Zoom OLYMPUS
Gebruikersvragen over Camedia C-770 Ultra Zoom OLYMPUS
0 vraag over dit apparaat. Beantwoord die u kent of stel uw eigen vraag.
Stel een nieuwe vraag over dit apparaat
Download de handleiding voor uw Camera in PDF-formaat gratis! Vind uw handleiding Camedia C-770 Ultra Zoom - OLYMPUS en neem uw elektronisch apparaat weer in handen. Op deze pagina staan alle documenten die nodig zijn voor het gebruik van uw apparaat. Camedia C-770 Ultra Zoom van het merk OLYMPUS.
GEBRUIKSAANWIJZING Camedia C-770 Ultra Zoom OLYMPUS
OLYMPUS®
CAMEDIA
DIGITAL CAMERA
APPAREIL PHOTO NUMÉRIQUE
DIGITALKAMERA
CÁMARA DIGITAL
C-770 Ultra Zoom
BASIC MANUAL
MANUEL DE BASE
EINFACHE ANLEITUNG
MANUAL BÁSICO
ENGLISH......2
FRANÇAIS .....44
DEUTSCH .....86
ESPAÑOL ....128

natural_image
Line drawing of a Olympus digital camera with lens and control buttons (no text or symbols on body)
natural_image
Pure geometric diagram with concentric circles and intersecting lines, no text or symbols presentbasic_e_d4209_7.fm Page 2 Thursday, December 25, 2003 1:36 PM
CONTENTS
GETTING STARTED 4
MENU FUNCTIONS....16
SHOOTING BASICS 24
Taking still pictures 26
If correct focus cannot be obtained (Focus lock) ....27
Recording movies 28
Zooming in on a subject (Optical zoom) .....28
Using the flash 29
Using the self-timer/remote control 30
En
ADVANCED SHOOTING....31
PLAYBACK....33
Playing back still pictures 33
Viewing movies....34
Protecting pictures 35
Erasing pictures 36
Formatting (CARD SETUP)....36
Playback on a TV 37
PRINT RESERVATION/DIRECT PRINT ....38
DOWNLOADING PICTURES TO A COMPUTER.....39
ERROR CODES....41
SPECIFICATIONS....42
These instructions are only for quick reference. For more details on the functions described here, refer to the "Reference Manual" on CD-ROM.
text_image
2 En

natural_image
Abstract geometric pattern with concentric circles and intersecting lines (no text or symbols)

natural_image
Pure geometric diagram with intersecting lines and a central circular pattern (no text or symbols)
natural_image
Pure geometric diagram with concentric circles and crosshairs, no text or symbols presentbasic_e_d4209_7.fm Page 3 Tuesday, January 6, 2004 2:45 PM
■ Before using your camera, read this manual carefully to ensure correct use.
We recommend that you take test shots to get accustomed to your camera before taking important photographs.
These instructions are only a basic manual. For more details on the functions described here, refer to the Reference Manual on the CD-ROM. For connection to the PC or installation of provided software, refer to the Software Installation Guide included in the CD-ROM package.
For customers in North and South America
For customers in USA
Declaration of Conformity
| Model Number | : C-770 Ultra ZoomRM-2 (Remote control) |
| Trade Name | : OLYMPUS |
| Responsible Party | : Olympus America Inc. |
| Address | : 2 Corporate Center Drive, Melville, New York11747-3157 U.S.A. |
| Telephone Number | : 1-631-844-5000 |
Tested To Comply With FCC Standards FOR HOME OR OFFICE USE
This device complies with Part 15 of the FCC rules. Operation is subject to the following two conditions:
(1) This device may not cause harmful interference.
(2) This device must accept any interference received, including interference that may cause undesired operation.
For customers in Canada
This Class B digital apparatus meets all requirements of the Canadian Interference-Causing Equipment Regulations.
For customers in Europe

"CE" mark indicates that this product complies with the European requirements for safety, health, environment and customer protection. "CE" mark cameras are intended for sales in Europe.
Trademarks
• IBM is a registered trademark of International Business Machines Corporation.
- Microsoft and Windows are registered trademarks of Microsoft Corporation.
• Macintosh is a trademark of Apple Computer Inc.
- All other company and product names are registered trademarks and/or trademarks of their respective owners.
- The standards for camera file systems referred to in this manual are the "Design Rule for Camera File System/DCF" standards stipulated by the Japan Electronics and Information Technology Industries Association (JEITA).
En
En
3


natural_image
Pure geometric diagram with concentric circles and intersecting lines, no text or symbols present


natural_image
Pure geometric diagram with intersecting lines and two circular patterns (no text or symbols)
text_image
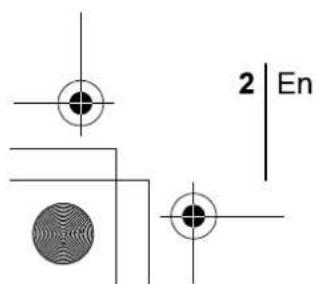
basie_e_d4209_7.fm Page 4 Thursday, December 25, 2003 1:36 PM GETTING STARTED NAMES OF PARTS Remote control receiver Zoom lever (W/T-●) Shutter button Mode dial Self-timer/Remote control lamp Flash Hot shoe En Olympus Strap eyelet Microphone Speaker Lens DC-IN jack USB connector A/V OUT jack (MONO) Connector cover 4 En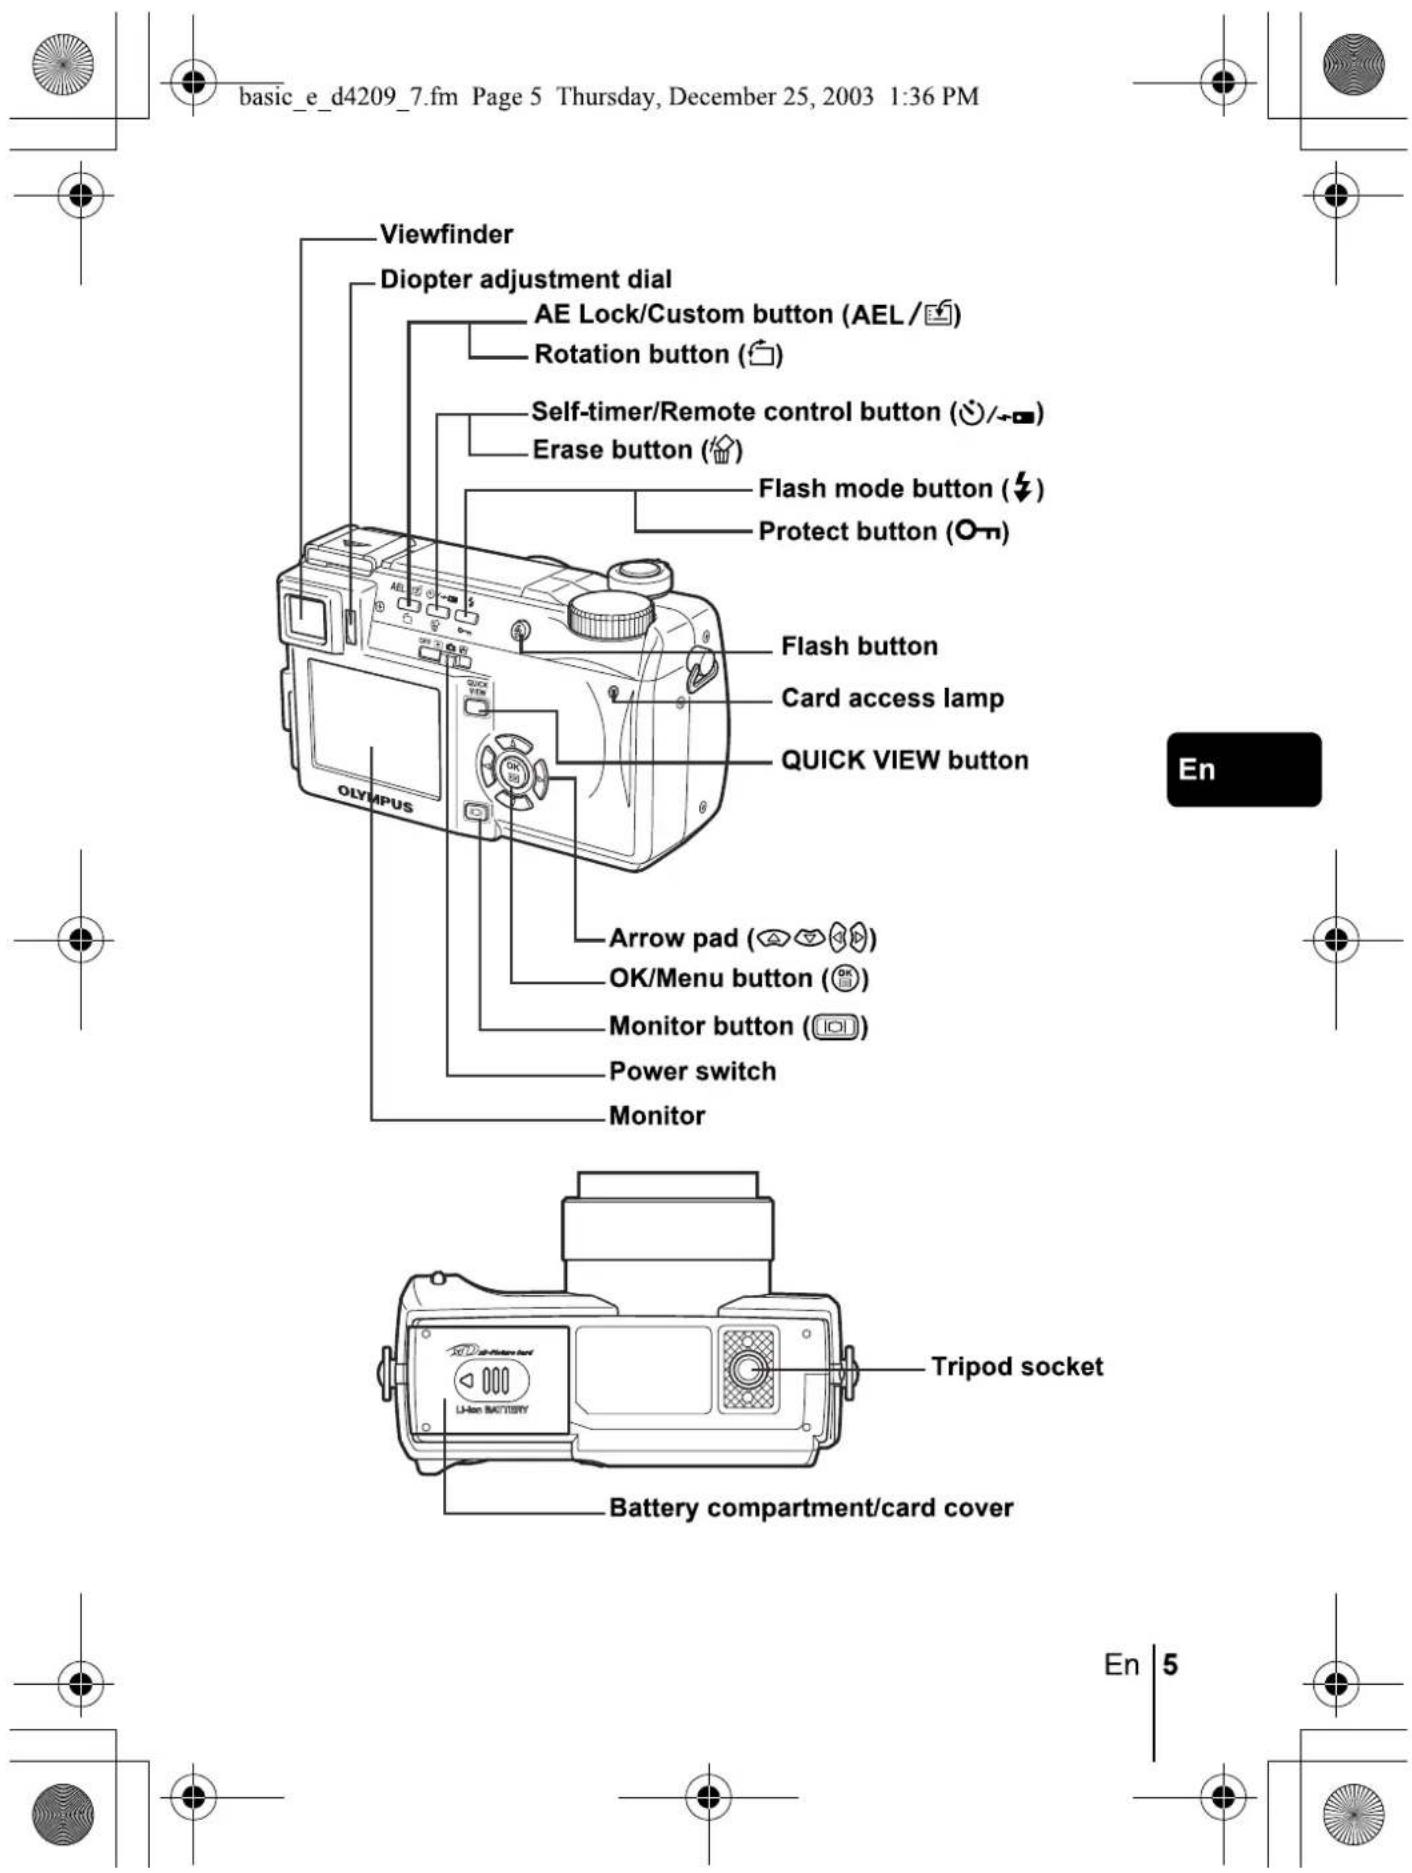
text_image
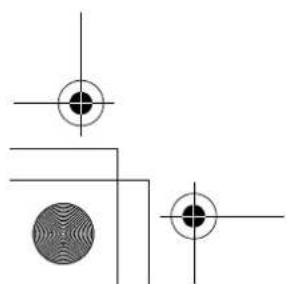
basic_e_d4209_7.fm Page 5 Thursday, December 25, 2003 1:36 PM Viewfinder Diopter adjustment dial AE Lock/Custom button (AEL/Ⓧ) Rotation button (Ⓧ) Self-timer/Remote control button (Ⓧ/→Ⓧ) Erase button (Ⓧ) Flash mode button (Ⓧ) Protect button (Ⓧ-π) Flash button Card access lamp QUICK VIEW button Arrow pad (Ⓧ♡♡♡♡) OK/Menu button (Ⓧ) Monitor button (Ⓧ) Power switch Monitor Tripod socket Battery compartment/card cover En 5
natural_image
Pure geometric diagram with concentric circles and crosshairs, no text or symbols presentbasic_e_d4209_7.fm Page 6 Thursday, December 25, 2003 1:36 PM
VIEWFINDER AND MONITOR INDICATIONS
Shooting modes
text_image
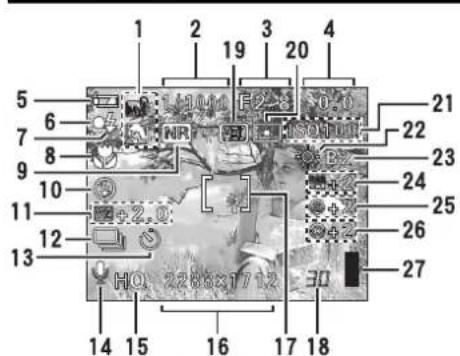
1 2 3 4 5 6 7 8 9 10 11 12 13 14 15 16 17 18 19 F2-2 HNR HNO HUR HQ 2265x1712 30 21 22 23 24 25 26 27Still picture
text_image
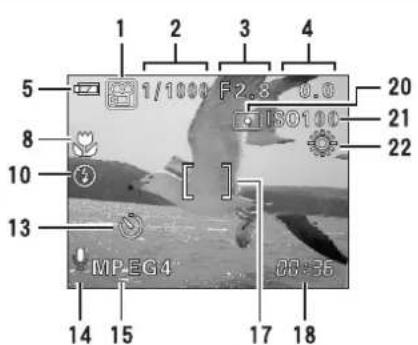
1 2 3 4 5 1/1000 F2.8 0.0 T180100 20 8 [ ] 21 10 22 13 MPEG4 00:36 14 15 17 18Movie
En
| Item | Indications | |
| 1 | Shooting modes | P, A, S, M, 📋, 📋, 📋, 📋, 📋, 📋, 📋, 📋, 📋, 📋, 📋, 📋, 📋, 📋, 📋, 📋, 📋, 📋, 📋, 📋, 📋, 📋, 📋, 📋, 📋, 📅, 📅, 📅, 📅, 📅, 📅, 📅, 📅, 📅, 📅, 📅, 📅, 📅, 📅, 📅, 📅, 📅, 📅, 📅, 📅, 📅, 📅, 📅, 📅, 📅, 📄, 📄, 📄, 📄, 📄, 📄, 📄, 📄, 📄, 📄, 📄, 📄, 📄, 📄, 📄, 📄, 📄, 📄, 📄, 📄, 📄, 📄, 📄, 📄, 📄, 📅, 📅, 📅, 📅, 📅, 📅, 📅, 📅, 📅, 📅, 📅, 📅, 📅, 📅, 📅, 📅, 📅, 📅, 📅, 📅, 📅, 📅, 📅, 📅, 📁, 📁, 📁, 📁, 📁, 📁, 📁, 📁, 📁, 📁, 📁, 📁, 📁, 📁, 📁, 📁, 📁, 📁, 📁, 📁, 📁, 📁, 📁, 📁, 📁, 📅, 📅, 📅, 📅, 📅, 📅, 📅, 📅, 📅, 📅, 📅, 📅, 📅, 📅, 📅, 📅, 📅, 📅, 📅, 📅, 📅, 📅, 📅, 📅, 📉, 📉, 📉, 📉, 📉, 📉, 📉, 📉, 📉, 📉, 📉, 📉, 📉, 📉, 📉, 📉, 📉, 📉, 📉, 📉, 📉, 📉, 📉, 📉, 📉, 📅, 📅, 📅, 📅, 📅, 📅, 📅, 📅, 📅, 📅, 📅, 📅, 📅, 📅, 📅, 📅, 📅, 📅, 📅, 📅, 📅, 📅, 📅, 📅, 📃, 📃, 📃, 📃, 📃, 📃, 📃, 📃, 📃, 📃, 📃, 📃, 📃, 📃, 📃, 📃, 📃, 📃, 📃, 📃, 📃, 📃, 📃, 📃, 📃, 📅, 📅, 📅, 📅, 📅, 📅, 📅, 📅, 📅, 📅, 📅, 📅, 📅, 📅, 📅, 📅, 📅, 📅, 📅, 📅, 📅, 📅, 📅, 📅, 📆, 📆, 📆, 📆, 📆, 📆, 📆, 📆, 📆, 📆, 📆, 📆, 📆, 📆, 📆, 📆, 📅, 📅, 📅, 📅, 📅, 📅, 📅, 📅, 📅, 📅, 📅, 📅, 📅, 📅, 📅, 📅, 📅, 📅, 📅, 📅, 📅, 📅, 📅, 📅, 📎, 📎, 📎, 📎, 📎, 📎, 📎, 📎, 📎, 📎, 📎, 📎, 📎, 📎, 📎, 📎, 📎, 📎, 📎, 📎, 📎, 📎, 📎, 📎, 📎, 📅, 📅, 📅, 📅, 📅, 📅, 📅, 📅, 📅, 📅, 📅, 📅, 📅, 📅, 📅, 📅, 📅, 📅, 📅, 📅, 📅, 📅, 📅, 📅, 📂, 📂, 📂, 📂, 📂, 📂, 📂, 📂, 📂, 📂, 📂, 📂, 📂, 📂, 📂, 📂, 📂, 📂, 📂, 📂, 📂, 📂, 📂, 📂, 📂, 📁, 📁, 📁, 📁, 📁, 📁, 📁, 📁, 📁, 📁, 📁, 📁, 📁, 📁, 📁, 📁, 📁, 📁, 📁, 📁, 📁, 📁, 📁, 📁, 📄, 📄, 📄, 📄, 📄, 📄, 📄, 📄, 📄, 📄, 📄, 📄, 📄, 📄, 📄, 📄, 📄, 📄, 📄, 📄, 📄, 📄, 📄, 📄, 📁, 📁, 📁, 📁, 📁, 📁, 📁, 📁, 📁, 📁, 📁, 📁, 📁, 📁, 📁, 📁, 📁, 📁, 📁, 📁, 📁, 📁, 📁, 📁, 📀, 📀, 📀, 📀, 📀, 📀, 📀, 📀, 📀, 📀, 📀, 📀, 📀, 📀, 📀, 📀, 📀, 📀, 📀, 📀, 📀, 📀, 📀, 📀, 📀, 📄, 📄, 📄, 📄, 📄, 📄, 📄, 📄, 📄, 📄, 📄, 📄, 📄, 📄, 📄, 📄, 📄, 📄, 📄, 📄, 📄, 📄, 📄, 📄, 📇, 📇, 📇, 📇, 📇, 📇, 📇, 📇, 📇, 📇, 📇, 📇, 📇, 📇, 📇, 📇, 📇, 📇, 📇, 📇, 📇, 📇, 📇, 📇, 📇, 📄, 📄, 📄, 📄, 📄, 📄, 📄, 📄, 📄, 📄, 📄, 📄, 📄, 📄, 📄, 📄, 📄, 📄, 📄, 📄, 📄, 📄, 📄, 📄, 📃, 📃, 📃, 📃, 📃, 📃, 📃, 📃, 📃, 📃, 📃, 📃, 📃, 📃, 📃, 📃, 📃, 📃, 📃, 📃, 📃, 📃, 📃, 📃, 📄, 📄, 📄, 📄, 📄, 📄, 📄, 📄, 📄, 📄, 📄, 📄, 📄, 📄, 📄, 📄, 📄, 📄, 📄, 📄, 📄, 📄, 📄, 📄, 📀, 📀, 📀, 📀, 📀, 📀, 📀, 📀, 📀, 📀, 📀, 📀, 📀, 📀, 📀, 📀, 📀, 📀, 📀, 📀, 📀, 📀, 📀, 📀, 📁, 📁, 📁, 📁, 📁, 📁, 📁, 📁, 📁, 📁, 📁, 📁, 📁, 📁, 📁, 📁, 📁, 📁, 📁, 📁, 📁, 📁, 📁, 📁, 📂, 📁, 📁, 📁, 📁, 📁, 📁, 📁, 📁, 📁, 📁, 📁, 📁, 📁, 📁, 📁, 📁, 📁, 📁, 📁, 📁, 📁, 📁, 📁, 📄, 📁, 📁, 📁, 📁, 📁, 📁, 📁, 📁, 📁, 📁, 📁, 📁, 📁, 📁, 📁, 📁, 📁, 📁, 📁, 📁, 📁, 📁, 📁, 📄, 📅, 📅, 📅, 📅, 📅, 📅, 📅, 📅, 📅, 📅, 📅, 📅, 📅, 📅, 📅, 📅, 📅, 📅, 📅, 📅, 📅, 📅, 📅, 📄, 📅, 📅, 📅, 📅, 📅, 📅, 📅, 📅, 📅, 📅, 📅, 📅, 📅, 📅, 📅, 📅, 📅, 📅, 📅, 📅, 📅, 📅, 📅, 📁, 📅, 📅, 📅, 📅, 📅, 📅, 📅, 📅, 📅, 📅, 📅, 📅, 📅, 📅, 📅, 📅, 📅, 📅, 📅, 📅, 📅, 📅, 📅, 📄, 📆, 📆, 📆, 📆, 📆, 📆, 📆, 📆, 📆, 📆, 📆, 📆, 📆, 📆, 📆, 📆, 📆, 📆, 📆, 📆, 📆, 📆, 📆, 📆, 📆, 📄, 📄, 📄, 📄, 📄, 📄, 📄, 📄, 📄, 📄, 📄, 📄, 📄, 📄, 📄, 📄, 📄, 📄, 📄, 📄, 📄, 📄, 📄, 📄, 📈, 📈, 📈, 📈, 📈, 📈, 📈, 📈, 📈, 📈, 📈, 📈, 📈, 📈, 📈, 📈, 📈, 📈, 📈, 📈, 📈, 📈, 📈, 📈, 📈, 📉, 📉, 📉, 📉, 📉, 📉, 📉, 📉, 📉, 📉, 📉, 📉, 📉, 📉, 📉, 📉, 📉, 📉, 📉, 📉, 📉, 📉, 📉, 📉, 📞, 📞, 📞, 📞, 📞, 📞, 📞, 📞, 📞, 📞, 📞, 📞, 📞, 📞, 📞, 📞, 📞, 📞, 📞, 📞, 📞, 📞, 📞, 📞, 📞, 📟, 📟, 📟, 📟, 📟, 📟, 📟, 📟, 📟, 📟, 📟, 📟, 📟, 📟, 📟, 📟, 📟, 📟, 📟, 📟, 📟, 📟, 📟, 📟, 📟, 📠, 📟, 📟, 📟, 📟, 📟, 📟, 📟, 📟, 📟, 📟, 📟, 📟, 📟, 📟, 📟, 📟, 📟, 📟, 📟, 📟, 📟, 📟, 📟, 📟, 📉, 📉, 📉, 📉, 📉, 📉, 📉, 📉, 📉, 📉, 📉, 📉, 📉, 📉, 📉, 📉, 📉, 📉, 📉, 📉, 📉, 📉, 📉, 📉, 📄, 📄, 📄, 📄, 📄, 📄, 📄, 📄, 📄, 📄, 📄, 📄, 📄, 📄, 📄, 📄, 📄, 📄, 📄, 📄, 📄, 📄, 📄, 📄, 📉, 📉, 📉, 📉, 📉, 📉, 📉, 📉, 📉, 📉, 📉, 📉, 📉, 📉, 📉, 📉, 📉, 📉, 📉, |


6
En


natural_image
Pure geometric diagram with intersecting lines and circles, no text or symbols present| Item | Indications |
| 15 Record mode | TIFF, SHQ, HQ, SQ1, SQ2, MPEG4 |
| 16 Resolution | 2288 × 1712, 1280 × 960, 640 × 480, 320 × 240 etc. |
| 17 AF target mark | [ ] |
| 18 Number of storable still pictures Time remaining | 30 00:36 |
| 19 AE lock AE memory | (AEL) (MEMO) |
| 20 Spot metering | ● |
| 21 ISO | ISO50, ISO100, ISO200, ISO400 |
| 22 White balance | ☀️, 🚙️, 🚩️, 🚫️, 🚫️, 🚫️, 🚫️ |
| 23 White balance adjustment | B1 – B7, R1 – R7 |
| 24 Saturation | RGB -5 – +5 |
| 25 Sharpness | ☒ -5 – +5 |
| 26 Contrast | © -5 – +5 |
| 27 Memory gauge | ☐, ☐, ☐, ☐ |

text_image
En 7
basic_e_d4209_7.fm Page 8 Thursday, December 25, 2003 1:36 PM
En
| Item | Indications | |
| 1 | Battery check | |
| 2 | Switch frame | |
| 3 | Print reservation, Number of printsMovie | × 10 |
| 4 | Sound record | |
| 5 | Protect | |
| 6 | Record mode | TIFF, SHQ, HQ, SQ1, SQ2, MPEG4 |
| 7 | Resolution | 2288 × 1712, 1280 × 960, 640 × 480, 320 × 240 etc. |
| 8 | Aperture value | F2.8 – F8.0 |
| 9 | Shutter speed | 15" – 1/1000 |
| 10 | Exposure compensation | -2.0 – +2.0 |
| 11 | White balance | WB AUTO, 🎨, 🎩, 🎪, 🎫, 🎬, 🎭, 🎮, 🎯 |
| 12 | ISO | ISO50, ISO100, ISO200, ISO400 |
| 13 | Date and time | '04.06.17 15:30 |
| 14 | File number, Frame numberPlaying time/Total recording time | FILE : 100 – 0030, 3000:00/00:20 |

text_image
8 En
natural_image
Pure geometric diagram with intersecting lines and a central circle, no text or symbols present
basic_e_d4209_7.fm Page 9 Thursday, December 25, 2003 1:36 PM
Memory gauge
The memory gauge lights up when you take a still picture. While the gauge is lit, the camera is storing the picture on the card. The memory gauge indication changes as shown below depending on the shooting status. The indication is not displayed during movie recording.
Battery check
If the remaining battery power is low, the battery check indication changes as follows when the camera is turned on or while the camera is in use.

text_image
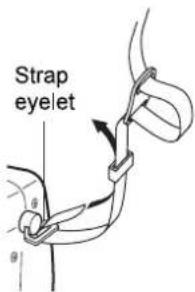
En 9ATTACHING THE STRAP AND LENS CAP
1
2
3

text_image
OLYMPUS®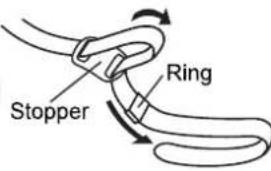
text_image
Stopper Ring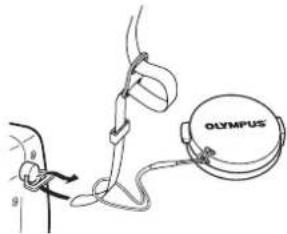
text_image
OLYMPUS4
5
text_image
Strap eyelet
natural_image
Anatomical line drawing of a human hand and wrist with an arrow indicating a specific anatomical point (no text or labels present)En
CHARGING THE BATTERY
This camera uses an Olympus lithium ion battery (LI-10B). The battery is dedicated to this camera and other batteries do not work. The battery is not fully charged when the camera is purchased. Fully charge the battery on the specified charger (LI-10C) before first use. For details, read the charger's instructions (provided).
1
Make sure that the and terminals of the battery shown in the illustration on the right are correctly oriented when loading the battery into the charger.
• The charge indicator will light red during charging.
- When charging is complete, the charger indicator will change from red to green.
- Charging normally takes approximately 2 hours.
Connection terminals

text_image
Lithium ion battery (LI-10B) Charging indicator10
En


natural_image
Pure geometric diagram with concentric circles and intersecting lines, no text or symbols presentbasic_e_d4209_7.fm Page 11 Thursday, December 25, 2003 1:36 PM

natural_image
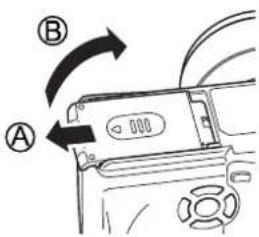
Pure geometric diagram with intersecting lines and circles, no text or symbols presentINSERTING AND REMOVING THE BATTERY AND CARD
1 Make sure the camera is turned off.
• The power switch is set to OFF.
• The monitor is off.
• The viewfinder is off.
• The lens is not extended.
2 Slide the battery compartment/card cover in the direction of Ⓐ, then lift in the direction of Ⓑ.
- Use the ball of your finger to slide the cover. Do not use your fingernail as this could result in injury.
text_image
Diagram showing car interior with labeled parts A and B, indicating directional movement or rotation around a vehicle door.3 Loading the battery Align the battery as shown and insert it into the battery compartment until the battery is locked in position with the battery lock knob.

text_image
SNDWATO Battery lock knobEn
Removing the battery Slide the knob in the direction of the arrow. When the battery is ejected, pull it out of the battery compartment.

text_image
Battery lock knobLow battery warning
The amount of power consumed varies considerably depending on the operations performed on the digital camera. If you use an exhausted battery, the camera may turn off without displaying the battery level warning.

natural_image
Pure geometric diagram with concentric circles and intersecting lines, no text or symbols presentEn
text_image
n 11
natural_image
Pure geometric diagram with concentric circles and intersecting lines, no text or symbols presentbasic_e_d4209_7.fm Page 12 Thursday, December 25, 2003 1:36 PM
Inserting a card
Insert the card in the appropriate direction.
- Insert the card while keeping it straight.
- Inserting the card the wrong way or at an angle could damage the contact area or cause the card to jam.
- If the card is not inserted all the way, data may not be written to the card.
Removing the card
Push the card all the way in to unlock it, then let it return slowly.
- The card is ejected a short way and then stops. Hold the card straight and pull it out.

text_image
Contact area NotchEn
4 Close the battery compartment/card cover in direction © and then slide it in the direction shown Ⓓ.
Notes for removing the card
Releasing your finger quickly after pushing the card all the way in may cause it to eject forcefully out of the slot.

text_image
12 En

natural_image
Pure geometric diagram with intersecting lines and a central circular pattern (no text or symbols)©

natural_image
Pure geometric diagram with concentric circles and crosshairs, no text or symbols presentbasic_e_d4209_7.fm Page 14 Thursday, December 25, 2003 1:36 PM
SELECTING A LANGUAGE
1 Slide the power switch to 📷 to turn the camera on.
- Set the mode dial to any setting except AUTO.
2 Press OK.
• The top menu is displayed.
3 Press 📋 on the arrow pad to select MODE MENU.
4 Press 🔒 to select the SETUP tab, then press 🔒.
5 Press 🔒 to select 🔒, then press 🔒.
- The green frame moves to the selected item.
6 Press 🔒 to select a language, then press OK.
7 Press OK again to exit the menu.
8 To turn the camera off, slide the power switch to OFF.
En

14
En

text_image
14 En

natural_image
Pure geometric diagram with intersecting lines and circles, no text or symbols present
natural_image
Pure geometric diagram with intersecting lines and a central circular pattern (no text or symbols)
natural_image
Pure geometric diagram with concentric circles and intersecting lines, no text or symbols presentbasic_e_d4209_7.fm Page 15 Thursday, December 25, 2003 1:36 PM

natural_image
Pure geometric diagram with intersecting lines and circles, no text or symbols presentSETTING THE DATE AND TIME
1 Slide the power switch to 📷 to turn the camera on.
2 Press OK.
• The top menu is displayed.
3 Press 🏠 on the arrow pad to select MODE MENU.
- When the mode dial is set to AUTO, press 📋 and go to Step 6.
4 Press 🔒 to select the SETUP tab, then press 🔒.
5 Press 🔒 to select ⏻, then press ⚡.
- The green frame moves to the selected item.
6 Press 🔒 to select one of the following date formats: Y-M-D (Year/Month/Day), M-D-Y (Month/Day/Year), D-M-Y (Day/Month/Year). Then press 🔒.
- Move to the year setting.
- The following steps show the procedure used when the date and time settings are set to Y-M-D.
7 Press 🔒 to set the year, then press 🔒 to move to the month setting.
• To move back to the previous setting, press 🔒.
• The first two digits of the year are fixed.
8 Repeat this procedure until the date and time are completely set.
• The time is displayed in the 24-hour format.
Consequently, 2 p.m. is displayed as 14:00.
9 Press OK.
- For a more accurate setting, press OK when the time signal hits 00 seconds.
10 To turn the camera off, slide the power switch to OFF.

Note
- The date and time settings will be returned to the factory default settings if the camera is left without the battery for approximately one day. The settings will be canceled more quickly if the battery was only loaded in the camera for a short time before being removed. Before taking important pictures, check that the date and time settings are correct.
En
En
15

text_image
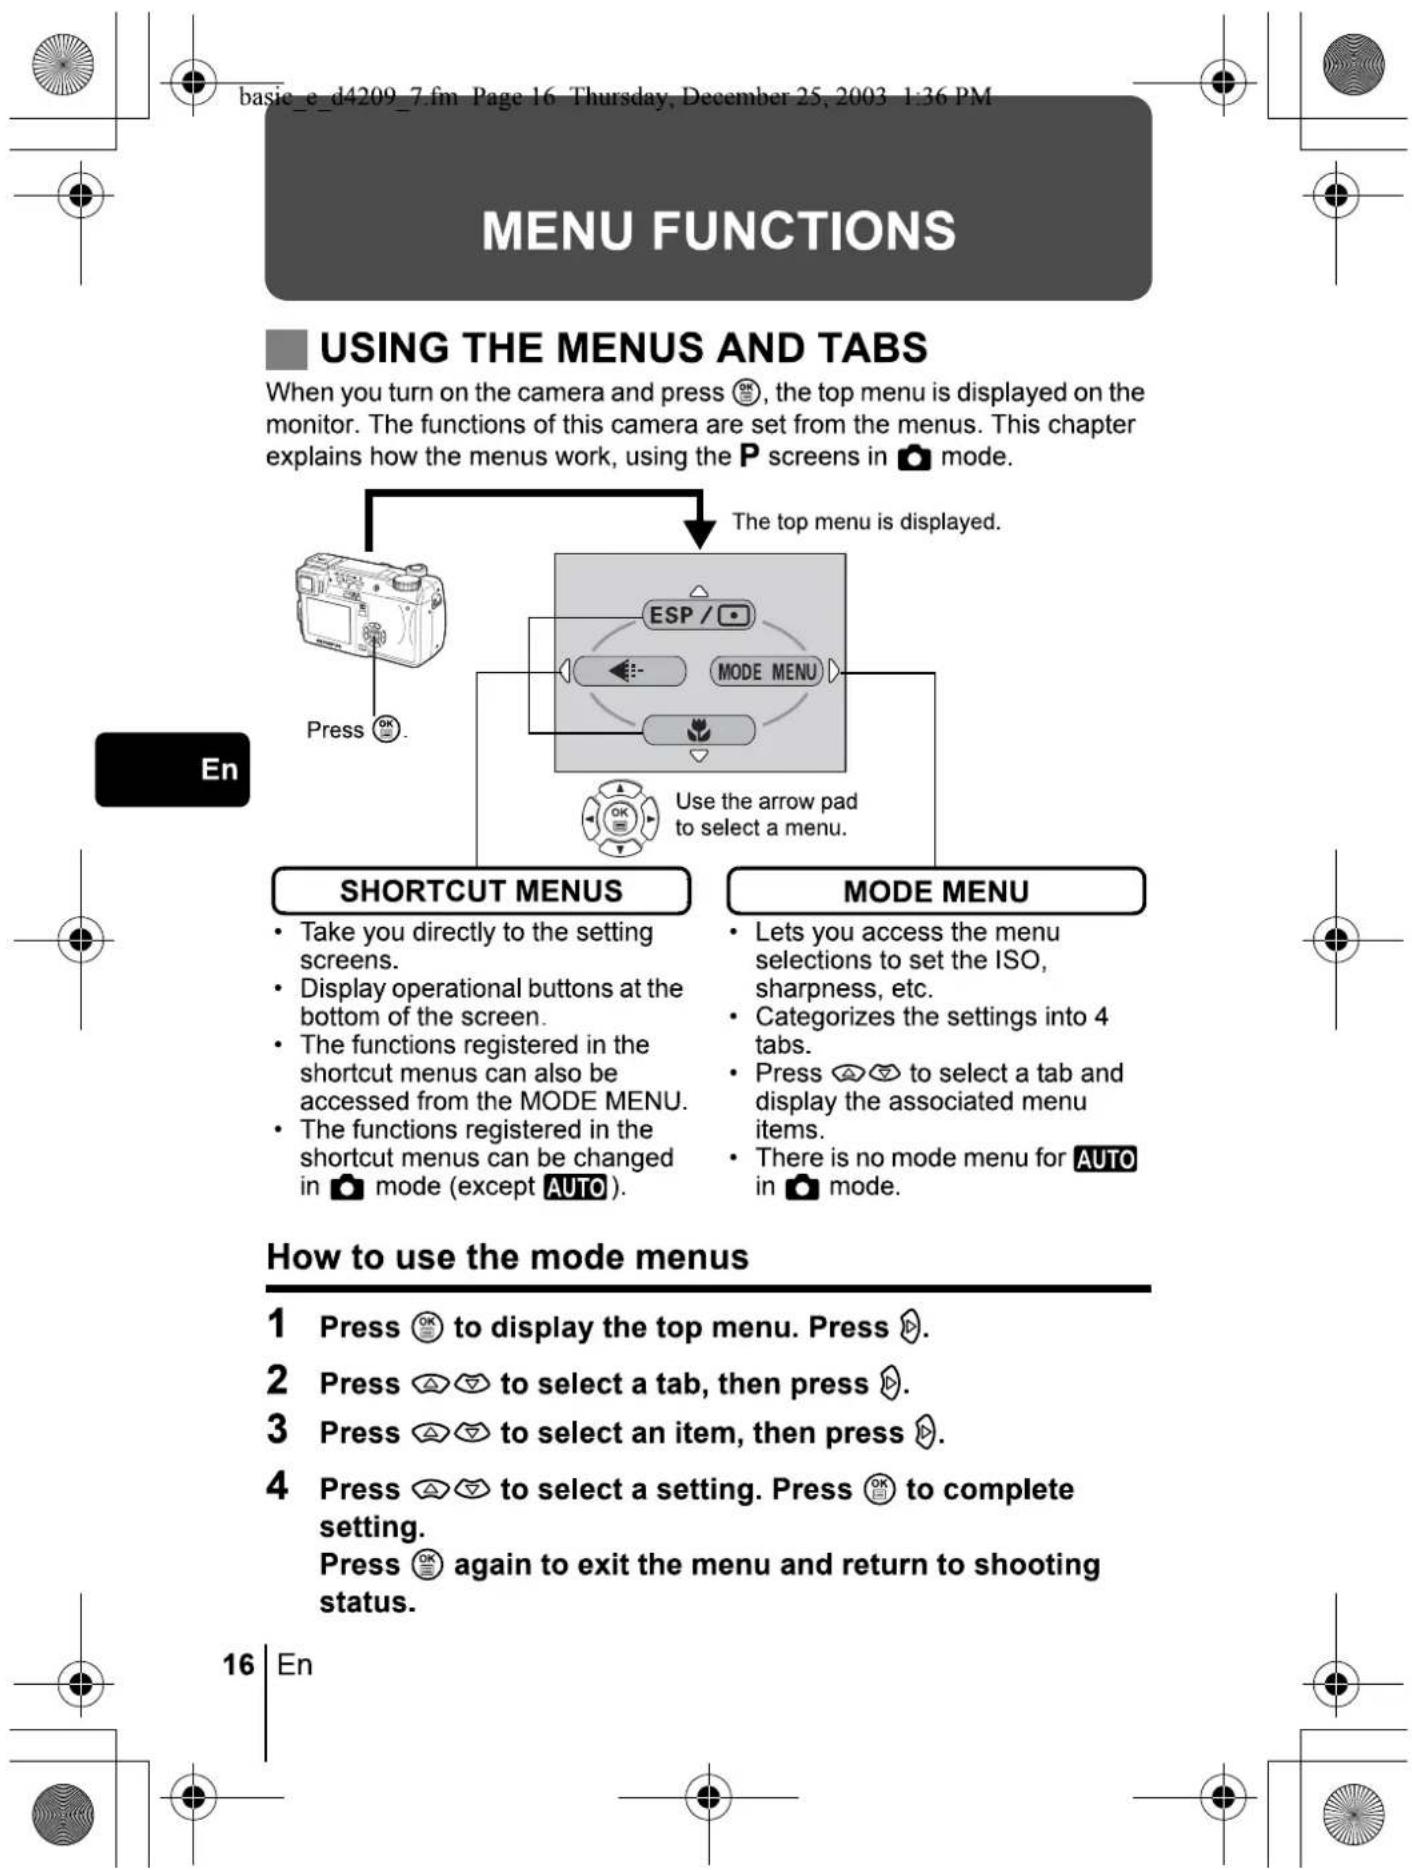
basic_e_d4209_7.fm Page 16 Thursday, December 25, 2003 1:36 PM MENU FUNCTIONS ■ USING THE MENUS AND TABS When you turn on the camera and press 📋, the top menu is displayed on the monitor. The functions of this camera are set from the menus. This chapter explains how the menus work, using the P screens in 🔒 mode. The top menu is displayed. Press ⬆. Use the arrow pad to select a menu. En SHORTCUT MENUS • Take you directly to the setting screens. • Display operational buttons at the bottom of the screen. • The functions registered in the shortcut menus can also be accessed from the MODE MENU. • The functions registered in the shortcut menus can be changed in 🔒 mode (except AUTO). MODE MENU • Lets you access the menu selections to set the ISO, sharpness, etc. • Categorizes the settings into 4 tabs. • Press 🔊 to select a tab and display the associated menu items. • There is no mode menu for AUTO in 🔒 mode. How to use the mode menus 1 Press 🔕 to display the top menu. Press 🔔. 2 Press 🔕 to select a tab, then press 🔔. 3 Press 🔕 to select an item, then press 🔔. 4 Press 🔕 to select a setting. Press 🔕 to complete setting. Press 🔕 again to exit the menu and return to shooting status. 16 En
text_image
basic_e_d4209_7.fm Page 17 Thursday, December 25, 2003 1:36 PM Shortcut menus mode DRIVE Selects a shooting mode from (single-frame shooting), (sequential shooting), HI (high speed sequential shooting), AF (AF sequential shooting) and BKT (auto bracketing). ESP/ESP Selects the metering method (ESP, or MULTI). Selects the image quality and resolution from TIFF, SHQ, HQ, SQ1 and SQ2. Used to take pictures of a close subject. Selects OFF, or s. Sets the date and time. CARD SETUP Formats a card. mode DIGITAL ZOOM Extends the maximum optical zoom, making possible up to approx. 40× zoom. Selects the image quality and resolution from MPEG4, SHQ, HQ and SQ. WB Sets the appropriate white balance according to the light source. En 17
text_image
basic_e_d4209_7.fm Page 18 Thursday, December 25, 2003 1:36 PM Run through all saved pictures one after another. MOVIE PLAY MOVIE PLAYBACK Plays back movies. INDEX Creates an index picture of a movie in 9 frames. EDIT Edits a movie. INFO Displays all the shooting information on the monitor. SWITCH FRAME Selects ALL to display all images or On to display only protected images. Mode menus The MODE MENU has 4 tabs. Press 🔗 to select a tab and display the associated menu items. These instructions are only for quick reference. For more details on the functions described here, refer to the "Reference Manual" on CD-ROM. CAMERA tab CAMERA tab ESP/□ ESP PICTURE tab OFF CARD tab DRIVE □ SETUP tab ISO AUTO 'A/S/M CAMERA tab ESP/□ Selects the metering method (ESP, □ or MULTI). Used to take pictures of a close subject. Selects OFF, 🤒, ⬢. 18 En
natural_image
Pure geometric diagram with concentric circles and crosshairs, no text or symbols presentbasic_e_d4209_7.fm Page 19 Thursday, December 25, 2003 1:36 PM
| DRIVE | Selects a shooting mode from □ (single-frame shooting), □ (sequential shooting), HI □ (high speed sequential shooting), AF □ (AF sequential shooting) and BKT (auto bracketing). |
| ISO | Selects the ISO sensitivity from AUTO, 50, 100, 200 and 400. |
| A/S/M | Selects a shooting mode from A (Aperture priority shooting), S (Shutter priority shooting) and M (Manual shooting). |
| M1/2/3/4 | Selects a mode to be activated when taking pictures in Mmode. |
| S2 | Adjusts the amount of light emitted by the flash. |
| SLOW | Selects from SLOW1 (1st curtain), SLOW1 (1st curtain with red-eye reduction) and SLOW2 (2nd curtain) when the flash mode is set to SLOW (slow synchronization). |
| NOISE REDUCTION | Reduces the noise that affects pictures during long exposures. |
| DIGITAL ZOOM | Extends the maximum optical zoom up to approximately 40× magnification. |
| FULLTIME AF | Keeps the image in focus at all times without having to press the shutter button halfway. |
| AF MODE | Selects the auto focus method (iESP or SPOT). |
| PANORAMA | Allows panorama pictures to be taken with Olympus CAMEDIA-brand cards. |
| 2 IN 1 | Combines two still pictures taken in succession and stores them as a single picture. |
| FUNCTION | Adds special effects to pictures (BLACK & WHITE, SEPIA, WHITE BOARD, BLACK BOARD). |
| AF AREA | Changes the position of the AF target mark using the arrow pad. |
| INFO | Selects whether to display all the information such as shutter speed and white balance, or only the minimum information. |
| Displays a histogram showing the luminance distribution of still pictures. | |
| (still pictures) | Sound can be recorded when taking still pictures. |
| SUPER ZOOM | Extends the optical zoom, making possible up to 14× zoom in 1600 × 1200 record mode. |
En
natural_image
Abstract geometric pattern with concentric circles and intersecting lines (no text or symbols)En
19


natural_image
Pure geometric diagram with concentric circles and crosshairs, no text or symbols presentbasic_e_d4209_7.fm Page 20 Thursday, December 25, 2003 1:36 PM
| PICTURE tab | |
| Selects the image quality and resolution from TIFF, SHQ, HQ, SQ1 and SQ2. | |
| WB | Sets the appropriate white balance according to the light source. |
| Makes fine changes to the white balance. | |
| SHARPNESS | This function adjusts the sharpness of the image. |
| CONTRAST | This function adjusts the contrast of images. |
| SATURATION | Adjusts the level of color depth without changing the tint. |
| CARD tab | |
| CARD SETUP | Formats a card. |
En
| SETUP tab | |
| ALL RESET | Selects whether to keep the current camera settings when you turn off the power. |
| Selects a language for on-screen display. | |
| PW ON/OFF SETUP | Selects the picture and sound that are output when the power is turned on or off. |
| REC VIEW | Selects whether to display pictures on the monitor while saving them to a card. |
| SLEEP | Sets the sleep timer. |
| MY MODE SETUP | Customizes settings which are activated in the My mode. |
| FILE NAME | Changes how file names are assigned. |
| PIXEL MAPPING | Checks the CCD and image processing functions for errors. |
| Adjusts the brightness of the viewfinder or monitor. | |
| Sets the date and time. | |
| m/ft | Sets the measurement unit (m/ft) used during manual focus. |
| VIDEO OUT | Selects NTSC or PAL according to your TV's video signal type. TV video signal types differ depending on the region. |
| SHORT CUT | Assigns frequently used functions as shortcut menus. |
| CUSTOM BUTTON | Assigns a frequently used function to the camera's custom button. |
| Sets the beep sound used for button operations and warnings, and adjusts the volume. | |
| SHUTTER SOUND | Sets the sound made when the shutter button is pressed and adjusts the volume. |
20
En
text_image
20 En
natural_image
Pure geometric diagram with concentric circles and intersecting lines, no text or symbols present
natural_image
Pure geometric diagram with intersecting lines and circles, no text or symbols present
natural_image
Pure geometric diagram with concentric circles and intersecting lines, no text or symbols presentbasic_e_d4209_7.fm Page 21 Thursday, December 25, 2003 1:36 PM
mode

text_image
CAMERA tab PICTURE tab CARD tab SETUP tab ESP / ISO FULLTIME AF FUNCTION ESP OFF AUTO OFF OFF| CAMERA tab | |
| ESP/☐ | Selects the metering method (ESP or ☐). |
| Used to take pictures of a close subject. Selects OFF, ☐, ☐. | |
| ISO | Selects the ISO sensitivity from AUTO, 50, 100, 200 and 400. |
| FULLTIME AF | Keeps the image in focus at all times without having to press the shutter button halfway. |
| FUNCTION | Adds special effects to pictures (BLACK & WHITE, SEPIA). |
| REDUCE FLICKER | Reduces the flickering that occurs when recording movies under fluorescent light. |
| PICTURE tab | |
| WB+Z | Makes fine changes to the white balance. |
| SHARPNESS | This function adjusts the sharpness of the image. |
| CONTRAST | This function adjusts the contrast of images. |
| SATURATION | Adjusts the level of color depth without changing the tint. |
| CARD tab | |
| CARD SETUP | Formats a card. |
| SETUP tab | |
| ALL RESET | Selects whether to keep the current camera settings when you turn off the power. |
| Selects a language for on-screen display. | |
| PW ON/OFF SETUP | Selects the picture and sound that are output when the power is turned on or off. |
En
21

En


natural_image
Pure geometric diagram with concentric circles and intersecting lines, no text or symbols present


natural_image
Pure geometric diagram with concentric circles and intersecting lines, no text or symbols presentbasic_e_d4209_7.fm Page 22 Thursday, December 25, 2003 1:36 PM
| FILE NAME | Changes how file names are assigned. |
| PIXEL MAPPING | Checks the CCD and image processing functions for errors. |
| Adjusts the brightness of the viewfinder or monitor. | |
| Sets the date and time. | |
| VIDEO OUT | Selects NTSC or PAL according to your TV's video signal type. TV video signal types differ depending on the region. |
| Sets the beep sound used for button operations and warnings, and adjusts the volume. |
mode
En

text_image
PLAY EDIT tab CARD tab SET UP tab PLAY OFFPLAY tab*1
| Stores the necessary information on the card to allow you to print the pictures taken. | |
| Displays a histogram showing the luminance distribution. | |
| Adds sound to a still picture already taken. |
^1 The PLAY tab is not displayed during movie playback.
EDIT tab ^2
| Makes the file size smaller and saves it as a new file. | |
| Crops part of a picture and saves it as a new file. |
^2 The EDIT tab is not displayed during movie playback.
CARD tab
| CARD SETUP | Erases all image data stored on the card or format the card. |
22
En

text_image
22 En
natural_image
Pure geometric diagram with intersecting lines and circles, no text or symbols present| SETUP tab | |
| ALL RESET | Selects whether to keep the current camera settings when you turn off the power. |
| Selects a language for on-screen display. | |
| PW ON/OFF SETUP | Selects the picture and sound that are output when the power is turned on or off. |
| SCREEN SETUP | Registers a stored picture for use as the picture displayed when the power is turned on and off. |
| Adjusts the brightness of the viewfinder or monitor. | |
| Sets the date and time. | |
| VIDEO OUT | Selects NTSC or PAL according to your TV's video signal type. TV video signal types differ depending on the region. |
| Selects the number of frames in the index display. | |
| Sets the beep sound used for button operations and warnings, and adjusts the volume. | |
| VOLUME | Adjusts the sound volume during playback. Also adjusts the volume of the sound selected in PW ON/OFF SETUP. |
En


natural_image
Pure geometric diagram with concentric circles and intersecting lines, no text or symbols presentEn
23


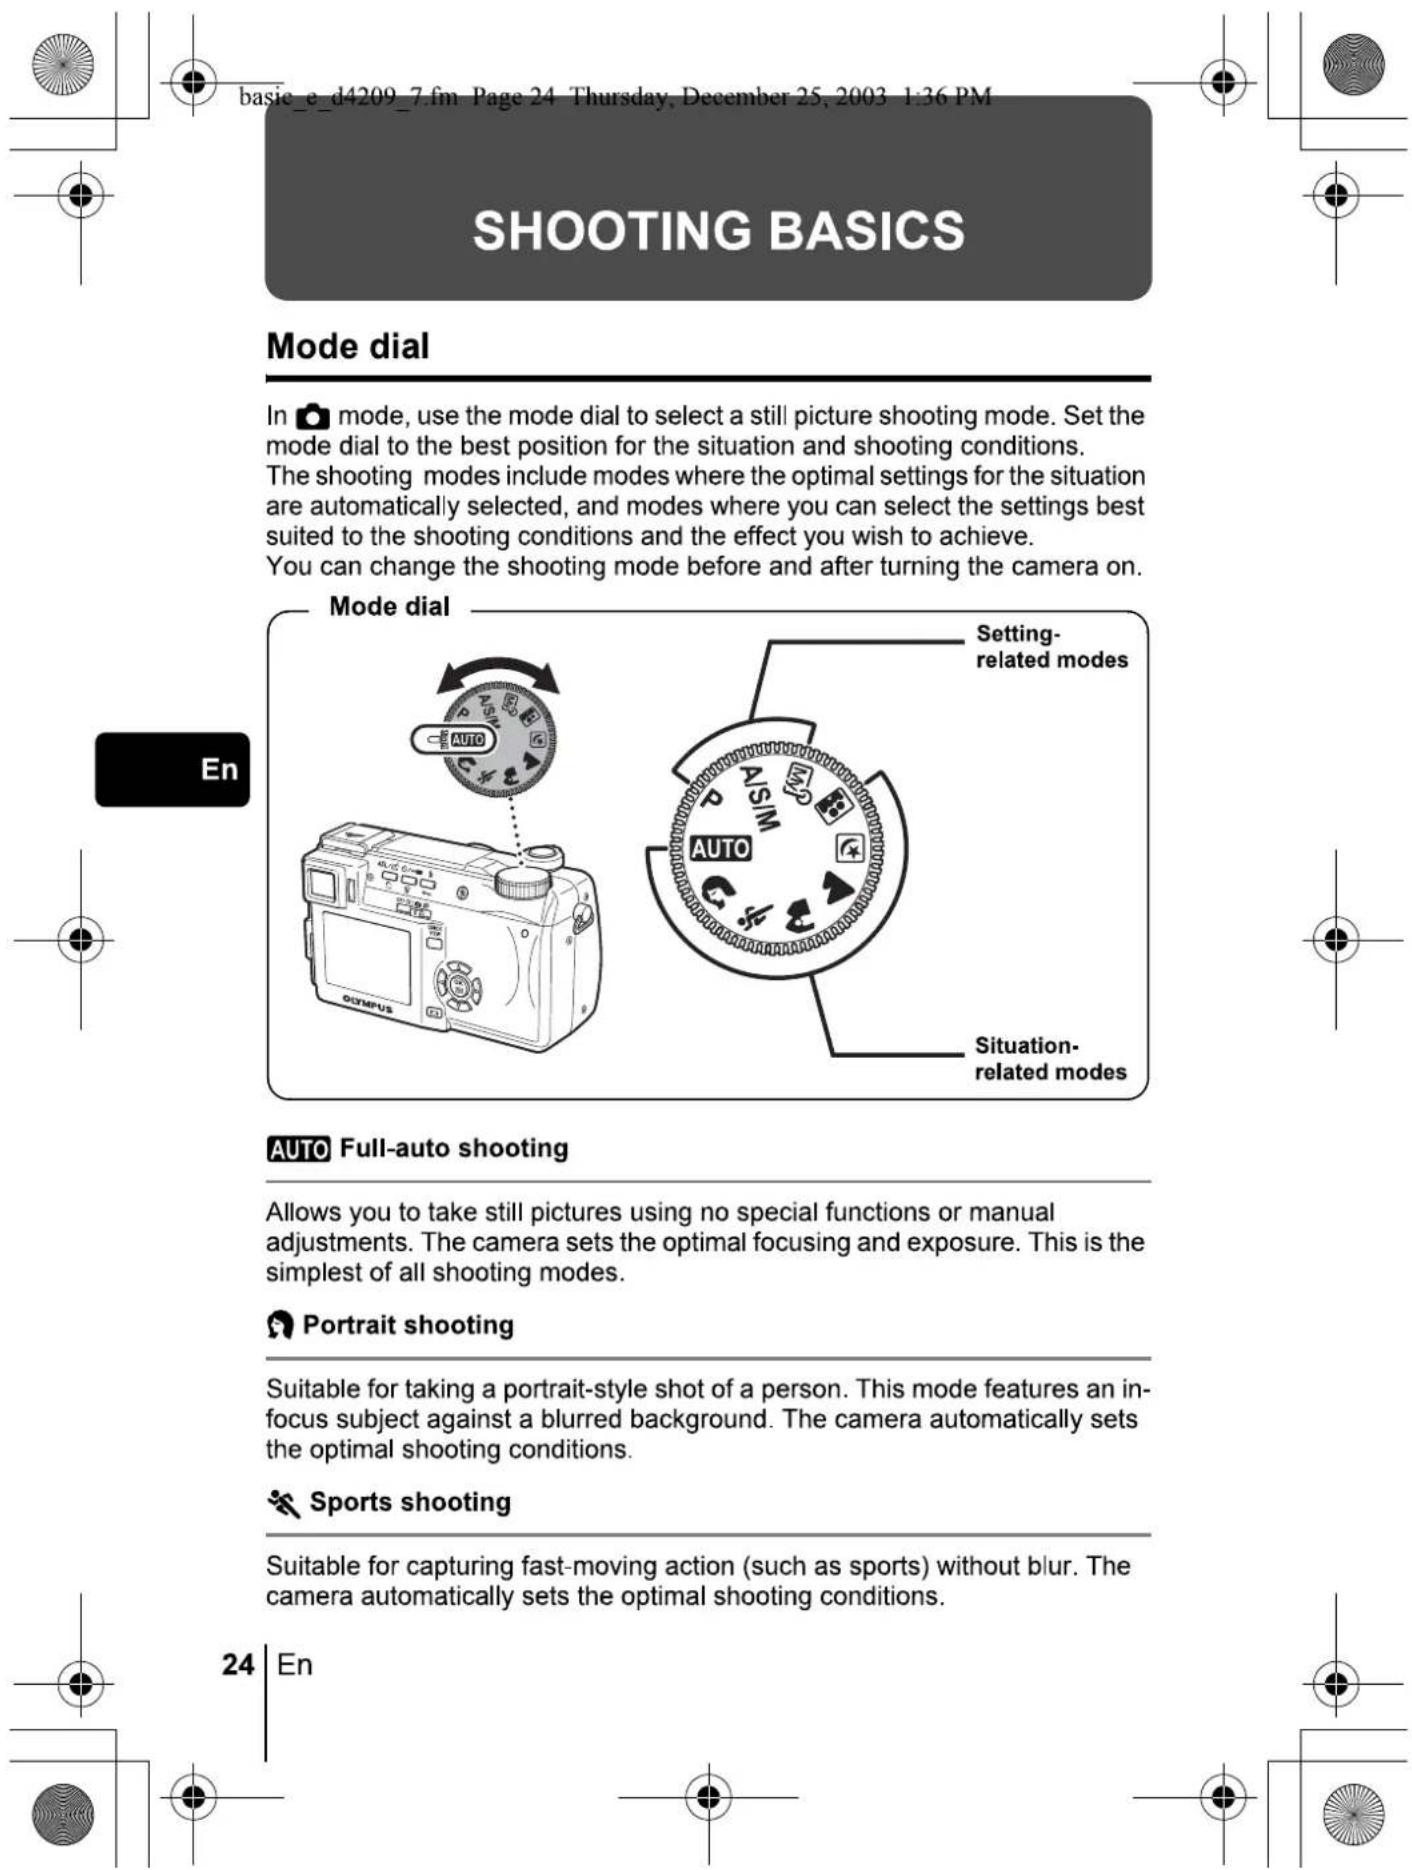
text_image
basie_e_d4209_7.fm Page 24 Thursday, December 25, 2003 1:36 PM SHOOTING BASICS Mode dial In mode, use the mode dial to select a still picture shooting mode. Set the mode dial to the best position for the situation and shooting conditions. The shooting modes include modes where the optimal settings for the situation are automatically selected, and modes where you can select the settings best suited to the shooting conditions and the effect you wish to achieve. You can change the shooting mode before and after turning the camera on. Mode dial Setting-related modes Auto Situation-related modes Auto Full-auto shooting Allows you to take still pictures using no special functions or manual adjustments. The camera sets the optimal focusing and exposure. This is the simplest of all shooting modes. Portrait shooting Suitable for taking a portrait-style shot of a person. This mode features an in-focus subject against a blurred background. The camera automatically sets the optimal shooting conditions. Sports shooting Suitable for capturing fast-moving action (such as sports) without blur. The camera automatically sets the optimal shooting conditions. 24 En
natural_image
Pure geometric diagram with concentric circles and crosshairs, no text or symbols presentbasic_e_d4209_7.fm Page 25 Thursday, December 25, 2003 1:36 PM
Landscape+Portrait shooting
Suitable for taking pictures of both your subject and the landscape. The picture is taken with the background as well as the subject in the foreground in focus. You can take pictures of your subject against a beautiful sky or landscape. The camera automatically sets the optimal shooting conditions.
▲ Landscape shooting
Suitable for taking pictures of landscapes and other outdoor scenes. Both the foreground and the background are in focus. Since blues and greens are vividly reproduced in this mode, it is excellent for shooting natural scenery. The camera automatically sets the optimal shooting conditions.
Night Scene shooting
Suitable for shooting pictures in the evening or at night. The camera sets a slower shutter speed than is used in normal shooting. For example, if you take a picture of a street at night in AUTO mode, the lack of brightness will result in a dark picture with the background underexposed and without details. In the Night Scene shooting mode, the true appearance of the street is captured. The camera automatically selects the optimal settings for this type of shooting condition. Since the shutter speed is slow, make sure you stabilize the camera by using a tripod.
Self-Portrait shooting
Enables you to take a picture of yourself while holding the camera. Point the lens towards yourself and the focus will be locked on you. The camera automatically sets the optimal shooting conditions. The zoom is fixed in the wide position and cannot be changed.
P Program shooting
Allows you to take still pictures. The camera sets the aperture and shutter speed. Other functions, such as flash modes and drive modes, can be adjusted manually.
A/S/M Aperture priority/Shutter priority/Manual shooting
When the mode dial is set to A/S/M, the following items can be set with the menus.
A Aperture priority shooting
Allows you to set the aperture manually. The camera sets the shutter speed automatically.
Press ⚠ to increase the aperture value (f number).
Press ☑ to decrease the aperture value (f number).

natural_image
Pure geometric diagram with concentric circles and intersecting lines, no text or symbols present
natural_image
Pure geometric diagram with concentric circles and crosshairs, no text or symbols presentbasic_e_d4209_7.fm Page 26 Thursday, December 25, 2003 1:36 PM

natural_image
Pure geometric diagram with intersecting lines and circles, no text or symbols presentS Shutter priority shooting
Allows you to set the shutter speed manually. The camera sets the aperture automatically.
Press 🔒 to set a faster shutter speed. Press 🔒 to set a slower shutter speed.
M Manual shooting
Allows you to set the aperture and shutter speed manually.
Press ⬆ to increase the aperture value (f number). Press ⬇ to decrease the aperture value (f number). Press ⬇ to set a faster shutter speed. Press ⬇ to set a slower shutter speed.
En

My Mode
Allows you to save your favorite settings as your own personal mode and use these customized settings when taking pictures. Current settings can also be saved for retrieving by this mode.

Note
- The available settings vary depending on the mode.
TAKING STILL PICTURES
You can take still pictures using either the monitor or the viewfinder. Both methods are easy as all you have to do is to press the shutter button.
1 Slide the power switch to 📷.
• The monitor turns on.
To shoot using the viewfinder, press 📄 to turn the viewfinder on.
2 Turn the mode dial and select a shooting mode.
3 Decide the composition of the picture.
4 Press the shutter button gently (halfway) to adjust the focus.

text_image
26 En

natural_image
Pure geometric diagram with intersecting lines and a central circular pattern (no text or symbols)
natural_image
Pure geometric diagram with concentric circles and intersecting lines, no text or symbols presentbasic_e_d4209_7.fm Page 27 Thursday, December 25, 2003 1:36 PM
- When the focus and exposure are locked, the green lamp lights (focus lock).
- The AF target mark moves to the focused position.
- The shutter speed and aperture value automatically set by the camera are displayed (except in M mode).
- blinks to warn of camera movement. Press the flash button to open the flash.
- When lights after the flash has popped up, the flash is ready to fire. The flash fires automatically when the shutter button is p

text_image
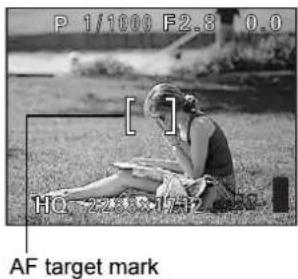
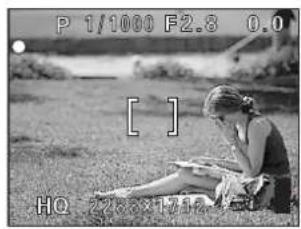
P 1/1000 F2.8 0.0 HQ 2288x1712 mark AF target Mark Green lamp5 Press the shutter button all the way (fully).
• The camera takes the picture.
- The card access lamp blinks while the picture is stored on the card.

Note
- The available settings vary depending on the mode.
En
IF CORRECT FOCUS CANNOT BE OBTAINED (FOCUS LOCK)
When the subject cannot be focused on, you can focus the camera on another point at roughly the same distance (focus lock) and take the picture as explained below.
1 Position the AF target mark on the subject you want to focus on.
- When shooting a hard-to-focus subject or a fast-moving subject, point the camera at an object about the same distance away as the subject.
2 Press the shutter button halfway until the green lamp lights.
- When the focus and exposure are locked, the green lamp lights.
• The AF target mark moves to the focused position. - When the green lamp blinks, the focus and exposure are not locked. Release your finger from the shutter button, re-position your subject and press the shutter button halfway again.
text_image
P 1/1000 F2.8 0.0 [ ] HQ -22.8 x 19.12 22.0 AF target markEn
27
natural_image
Pure geometric diagram with concentric circles and intersecting lines, no text or symbols present


natural_image
Pure geometric diagram with concentric circles and intersecting lines, no text or symbols presentbasic_e_d4209_7.fm Page 28 Thursday, December 25, 2003 1:36 PM
3 Keeping the shutter button pressed halfway, recompose your shot.
text_image
P 1/1000 F2.8 0.0 [ ] HQ 2288×1712.544 Press the shutter button fully.
RECORDING MOVIES
1 Slide the power switch to 📁.
• The monitor turns on.
- The available recording time on the card that you are using is displayed.
2 Decide the composition of the picture.
- You can use the zoom lever to enlarge your subject.
3 Press the shutter button fully to start recording.
- You can adjust the zoom during movie recording.
- The card access lamp blinks while the movie is stored on the card.
- During movie recording, lights red.
4 Press the shutter button again to stop recording.
- When the remaining recording time has been used up, recording stops automatically.
- When there is space in the card memory, the remaining recording time is displayed, and the camera is ready to shoot.

Note
- During movie recording, the flash and manual focus (MF) are disabled.
- It takes longer to store movies than still pictures.
- The remaining recording time varies depending on the record mode and the amount of space available on the card.
ZOOMING IN ON A SUBJECT (OPTICAL ZOOM)
In addition to the optical zoom, this camera is equipped with a super zoom and digital zoom for taking telephoto and wide-angle shots. You can increase the zoom magnification by combining the super zoom or digital zoom with the optical zoom. The super zoom and digital zoom cannot be used at the same time.
Camera movement is likely to occur at higher magnifications. Stabilize the camera with a tripod, etc. to avoid camera movement.
28
En


natural_image
Pure geometric diagram with concentric circles and crosshairs, no text or symbols presentbasic_e_d4209_7.fm Page 29 Thursday, December 25, 2003 1:36 PM

natural_image
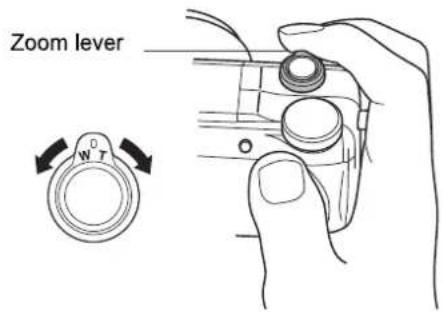
Pure geometric diagram with intersecting lines and circles, no text or symbols present1 Push or pull the zoom lever.
- Wide-angle: Push the zoom lever toward W to zoom out.
• Telephoto: Pull the zoom lever toward T to zoom in.
text_image
Zoom lever W T2 Take the picture.
USING THE FLASH
1 Press the flash button.
- The flash pops up.
2 Set the flash mode by repeatedly pressing ↗.
- The flash mode changes in the sequence shown below (when all modes are available).
En

flowchart
graph TD
    A["Auto (Auto-flash)"] --> B["→"]
    B --> C["(Red-eye reduction flash)"]
    D["SLOW (Slow synchronization)"] --> E["←"]
    E --> F["(Fill-in flash)"]
- To prevent the flash from firing, press down on the top of the flash to retract it.
3 Press the shutter button halfway.
• In conditions where the flash will fire, ↓ lights.
4 Press the shutter button fully to take the picture.

TIPS
Flash working range W (max.): Approx. 0.3 m - 4.5 m (1.0 ft. - 14.8 ft.) T (max.): Approx. 1.2 m - xx m (3.9 ft. - xx ft.)

natural_image
Pure geometric diagram with concentric circles and intersecting lines, no text or symbols present
En
29


natural_image
Pure geometric diagram with concentric circles and intersecting lines, no text or symbols presentbasic_e_d4209_7.fm Page 30 Thursday, December 25, 2003 1:36 PM
Auto-flash (No indication)
The flash fires automatically in low light or backlight conditions.
Red-eye reduction flash (○)
The red-eye reduction flash mode significantly reduces the red-eye phenomenon by emitting pre-flashes before firing the regular flash.
Fill-in flash (↓)
The flash always fires every time the shutter button is pressed.
Flash off (⚡)
The flash does not fire even in low light conditions.
Slow synchronization ↓SLOW1 ↓SLOW2 Ⓞ↓SLOW1
1st curtain (front curtain) ↘ SLOW1 (factory default setting):
Adjusts the flash for slow shutter speeds.
2nd curtain (rear curtain) ↘ SLOW2:
The 2nd curtain fires the flash just before the shutter closes.
1st curtain with red-eye reduction Ⓞ SLOW1:
Adjusts the flash for slow shutter speeds, and minimizes red-eye.
En
■ USING THE SELF-TIMER/REMOTE CONTROL
Self-timer : This function is useful for taking pictures with yourself included in the photograph.
Remote control : Shooting is possible using the remote control device (sold separately in some regions). This is useful when you want to take a picture with yourself in it or a night scene, without touching the camera.
1 Mount the camera on a tripod or place it on a stable, flat surface.
2 Select ⚙ (self-timer) or ⚠ (remote control) by pressing ⚡/←.
- The setting changes between ⏻/♦ OFF, ⏻ and ♣ each time ⏻/→■ is pressed.
3 Take the picture.
- When using the remote control device, point it at the remote control receiver on the camera and then press the shutter button on the device.
Self-timer : The self-timer/remote control lamp lights for about 10 seconds, then starts blinking. After blinking for about 2 seconds, the picture is taken.
Remote control: The self-timer/remote control lamp blinks for about 2 seconds before taking the picture.he picture is taken.

text_image
30 En

natural_image
Pure geometric diagram with intersecting lines and circles, no text or symbols present

natural_image
Pure geometric diagram with intersecting lines and circles, no text or symbols presentADVANCED SHOOTING
SEQUENTIAL SHOOTING
There are 4 sequential shooting modes: sequential shooting, high speed sequential shooting, AF sequential shooting and auto bracketing. Sequential shooting modes can be selected from the DRIVE mode menu. Sequential shooting cannot be performed when the record mode is set to TIFF.
Drive mode
Shoots 1 frame at a time when the shutter button is pressed. (Normal shooting mode, single-frame shooting) Focus, exposure and white balance are locked at the first frame. Approx. 8 frames at 1.3 frames/sec. (in HQ mode)
HI Pictures can be taken at a faster speed than normal sequential shooting. The sequential shooting speed varies depending on the record mode setting. 2 frames at 1.8 frames/sec.
AF Focus is individually locked for each frame. The AF sequential shooting speed is slower than for normal sequential shooting. BKT When auto bracketing is set, the exposure is changed automatically for each frame when you start shooting. The exposure differential and number of frames can be selected in the menus. The focus and white balance are locked at the first frame.
METERING
There are three ways of measuring the brightness of a subject.
ESP metering : Meters the center of the subject and the surrounding area separately.
Spot metering : Exposure is determined by metering within the AF target area. In this mode, a subject can be shot with optimal exposure regardless of the background light.
Multi-metering : Meters the brightness of the subject at up to 8 different points to set the optimal exposure based on the average brightness. This method is useful with a high contrast subject.
En


natural_image
Pure geometric diagram with concentric circles and intersecting lines, no text or symbols present
En
31


text_image
basis Tbasic_e_d4209_7.fm Page 32 Thursday, December 25, 2003 1:36 PM
AE LOCK
This function is suitable for situations when optimal exposure is difficult to achieve, such as when there is excessive contrast between the subject and the surroundings.
MACRO MODE SHOOTING
Focusing is usually slow when you get close to a subject (W: 7 cm/2.8" to 60 cm/2.0 ft., T: 1.2 m/3.9 ft. to 2 m/6.6 ft.). However, in the ⚙ mode focusing is performed quickly. When the optical zoom lever is at the maximum wide position and you are as close as 7 cm/2.8" to your subject, you can fill the entire frame with your subject.
SUPER MACRO MODE SHOOTING
This mode lets you shoot from as close as 3 cm/1.2" to your subject. In the mode, normal shooting is also possible, but the position of the zoom is fixed automatically and cannot be changed.
MANUAL FOCUS
If auto focus is unable to focus on a subject, use manual focus.

natural_image
Simple crosshair target symbol with concentric circles and intersecting lines (no text or labels)
text_image
32 En

natural_image
Pure geometric diagram with intersecting lines and circles, no text or symbols present
natural_image
Simple crosshair target symbol with concentric circles and intersecting lines (no text or labels)
natural_image
Pure geometric diagram with intersecting lines and circles, no text or symbols present
text_image
basic_e_d4209_7.fm Page 33 Thursday, December 25, 2003 1:36 PM PLAYBACKPLAYING BACK STILL PICTURES
1 Slide the power switch to ▶.
- The monitor turns on and displays the last picture taken. (Single-frame playback)
2 Use the arrow pad to play back other pictures.

text_image
Jumps to the picture 10 frames back. Displays the previous picture. Displays the next picture. Jumps to the picture 10 frames ahead.En
QUICK VIEW
This function lets you play back pictures while the camera is in the shooting mode. This is useful when you want to check shooting results and resume shooting quickly.
1 Press the QUICK VIEW button in the shooting mode.
2 Press the QUICK VIEW button again to return to the shooting mode.
Close-up playback
Pictures displayed on the monitor can be enlarged 1.5, 2, 2.5, 3, 3.5 or 4 times. This function is useful when you want to check the details of a picture.
1 Select the still picture you want to enlarge.
- You cannot enlarge pictures with 📄.

text_image
En 33
natural_image
Pure geometric diagram with concentric circles and intersecting lines, no text or symbols presentbasic_e_d4209_7.fm Page 34 Thursday, December 25, 2003 1:36 PM

natural_image
Pure geometric diagram with intersecting lines and circles, no text or symbols present2 Pull the zoom lever toward T.
• Each time you pull the zoom lever, the picture is enlarged gradually.
- To return the picture to the original size (1×), push the zoom lever toward W.
Index display
This function lets you show several pictures at the same time on the monitor. It is useful for quickly finding the picture you want to view. The number of pictures shown can be 4, 9 or 16.
1 In the single-frame playback mode, push the zoom lever toward W.
- Use the arrow pad to select the picture.
• To return to the single-frame playback, pull the zoom lever toward T.
En
VIEWING MOVIES
This function lets you play back movies. You can fast forward the movie, play it back one frame at a time or save selected frames as still pictures (capture).
1 Use the arrow pad to display the picture with ☐ you want to play back.
2 Press OK.
• The top menu is displayed.
3 Press 🔒 to select MOVIE PLAY.
4 Press 🔒 to select MOVIE PLAYBACK, then press OK.
The following operations can be performed during movie playback.
[♪] appears on movies that have sound recorded. Pressing ⚠️ ≡ lets you adjust the sound volume during playback.
: Increases the volume.
: Reduces the volume.
: Plays the movie at double the normal speed. Holding the button down increases the speed to 20 times the normal speed.
3: Plays the movie in reverse at double the normal speed. Holding the button down increases the speed to 20 times the normal speed.
OK : Pauses the movie and displays the MOVIE PLAYBACK menu.


text_image
34 En

natural_image
Pure geometric diagram with intersecting lines and circular shapes, no text or symbols present
natural_image
Pure geometric diagram with concentric circles and intersecting lines, no text or symbols presentbasic_e_d4209_7.fm Page 35 Thursday, December 25, 2003 1:36 PM

natural_image
Pure geometric diagram with intersecting lines and circles, no text or symbols present5 Press OK.
• The MOVIE PLAYBACK menu is displayed. PLAYBACK Plays back the entire movie again.
FRAME BY FRAME
PLAYS back the movie manually one frame at a time. CAPTURE Takes one frame from the movie and saves it as a still picture. If the movie is recorded in the record mode other than SHQ, this cannot be selected. EXIT Leaves the movie playback mode.
6 Press 🔒 to select PLAYBACK, FRAME BY FRAME, CAPTURE or EXIT, then press OK.
When FRAME BY FRAME is selected
: Displays the first frame of the movie.
: Displays the last frame of the movie.
: Displays the next frame. The movie can be played continuously by holding the button down.
: Displays the previous frame. The movie can be played continuously in reverse by holding the button down.
OK : Displays the MOVIE PLAYBACK menu.
If you selected CAPTURE
① Play back the movie one frame at a time until the frame you want to save as a still picture is displayed.
② Press OK.
③ Press 🔒 to select CAPTURE, then press OK.
④ Press 🔒 to select OK, then press OK.
• A still picture is created from the extracted movie frame and the display returns to the MOVIE PLAYBACK menu.
PROTECTING PICTURES
You are recommended to protect important pictures to avoid accidentally erasing them.
1 Use the arrow pad to display the picture you want to protect.
2 Press Oπ.
- To cancel protection, press O _n again.

Note
- Protected pictures cannot be erased by the single-frame/all-frame erase function, but they are all erased by formatting.
En
35


En

natural_image
Pure geometric diagram with concentric circles and crosshairs, no text or symbols presentERASING PICTURES
This function erases recorded pictures. Pictures can be erased either one frame at a time or all the pictures in the card.

- Once erased, pictures cannot be restored. Check each picture before erasing to avoid accidentally erasing pictures you want to keep.
Single-frame erase
1 Use the arrow pad to display the picture you want to erase.
2 Press ⏻.
• The ERASE screen is displayed.
3 Press 🔒 to select YES, then press OK.
- The picture is erased and the menu is closed.
All-frame erase
1 In the top menu, select MODE MENU → CARD → CARD SETUP, and press 🔒.
2 Press 🔒 to select 🔒 ALL ERASE, then press OK.
3 Press 🔒 to select YES, then press OK.
- All the pictures are erased.
FORMATTING (CARD SETUP)
This function lets you format a card. Formatting prepares cards to receive data. Before using non-Olympus cards or cards which have been formatted on a PC, you must format them with this camera.

- All existing data, including protected pictures, are erased when the card is formatted. Make sure that you save or transfer important data to a PC before formatting a card.
1 In the top menu, select MODE MENU → CARD → CARD SETUP, and press 🔒. Press 🔒 to select Ⓣ FORMAT, then press OK.
- The Ⓣ FORMAT screen is displayed.
2 Press 🔒 to select YES, then press OK.
- The BUSY bar is displayed and the card is formatted.
36
En


natural_image
Pure geometric diagram with intersecting lines and circles, no text or symbols present
text_image
36 En
natural_image
Pure geometric diagram with intersecting lines and a central circular pattern (no text or symbols)
natural_image
Pure geometric diagram with concentric circles and crosshairs, no text or symbols presentbasic_e_d4209_7.fm Page 37 Thursday, December 25, 2003 1:36 PM
natural_image
Pure geometric diagram with intersecting lines and circles, no text or symbols presentPLAYBACK ON A TV
Use the AV cable provided with the camera to play back recorded images on your TV.
1 Make sure that the TV and camera are turned off. Connect the A/V OUT jack on the camera to the video input terminal on the TV using the AV cable.

text_image
Connect to the TV's video input (yellow) and audio input (white) terminals. AV cable Connector cover A/V OUT jack (MONO)En
2 Turn the TV on and set it to the video input mode.
- For details of switching to video input, refer to your TV's instruction manual.
3 Slide the power switch to ▶ to turn the camera on.
- The last picture taken is displayed on the TV. Use the arrow pad to select the picture you want to display.
- The close-up playback, index display and slideshow functions can also be used on a TV screen.

Note
- You are recommended to use the optional AC adapter when using the camera with a TV.
- Make sure that the camera's video output signal type is the same as the TV's video signal type.

natural_image
Pure geometric diagram with concentric circles and intersecting lines, no text or symbols present
En
37


PRINT RESERVATION/DIRECT PRINT
PRINT RESERVATION
DPOF is short for Digital Print Order Format. DPOF is the format used to record automatic print information from digital cameras. If a card containing print reservation data is taken to a print shop that supports the DPOF format, the pictures can be printed according to the DPOF reservations. Or pictures can be printed out at home on a personal DPOF-compatible printer.
All-frame reservation
Use this feature to print all the pictures stored on the card. Select the desired number of prints and whether you want the date and time included.
Single-frame reservation
Use this feature to print only selected pictures. It is also used to change the reserved number of prints and the date/time settings. Display the frame to be printed and select the desired number of prints.
Resetting the print reservation data
This function allows you to reset all the print reservation data for pictures stored on the card.
DIRECT PRINT (PictBridge)
By connecting the camera to a PictBridge-compatible printer with the USB cable, you can print out recorded pictures directly without the use of a computer.
PictBridge is the standard for connecting digital cameras and printers of different makers and printing out pictures directly.
PRINT Prints the selected picture.
ALL PRINT Prints all the pictures stored on the card.
MULTI PRINT * Prints one picture in multiple layout format.
ALL INDEX * Prints an index of all the pictures stored on the card.
PRINT ORDER * Prints the pictures according to the print reservation data on the card. If no print reservations have been made, this option is not available.
* This option may not be available depending on the type of printer.
For more details, refer to the "Reference Manual" on CD-ROM.


flowchart
graph TD
    A["Identifying the OS"] --> B["Windows 98/98 SE (Second Edition)"]
    A --> C["Windows Me/2000/XP"]
    A --> D["Mac OS 9.0 - 9.2/OSX * For OS 8.6, see below."]
    B --> E["Installing the USB driver for Windows 98"]
    C --> F["Connecting the camera to the computer using the provided USB cable"]
    D --> G["Confirming the computer recognizes the camera"]
    E --> H["Downloading image files"]
    F --> H
    G --> H
    H --> I["Disconnecting the USB cable"]

flowchart
graph TD
    A["Start"] --> B{Is your OS one of the following?}
    B -->|Yes| C["Connect the camera directly to your computer using the provided USB cable."]
    B -->|No| D{Does your computer have a built-in PC card slot?}
    D -->|Yes| E["Use the optional PC card adapter. *Not supported by Windows NT4.0 or lower."]
    D -->|No| F["Consult your nearest Olympus representative."]
    C --> G["You can download images directly to your computer using a PC card adapter."]
    E --> G
    F --> G
text_image
40 En
natural_image
Pure geometric diagram with concentric circles and crosshairs, no text or symbols presentbasic e d4209 7.fm Page 41 Thursday, December 25, 2003 1:36 PM
ERROR CODES
| Monitor indication | Possible cause | Corrective action |
| !NO CARD | The card is not inserted, or it cannot be recognized. | Insert a card or insert a different card. If the problem persists, format the card. If the card cannot be formatted, it cannot be used. |
| !CARD ERROR | There is a problem with the card. | Use a different card. Insert a new card. |
| !WRITE-PROTECT | Writing to the card is prohibited. | The recorded image has been protected (read-only) on a PC. Download the image to a PC and cancel the read-only setting. |
| !CARD FULL | The card is full. No more pictures, movies or information such as print reservations can be recorded. | Replace the card or erase unwanted pictures. Before erasing, download important images to a PC. |
| NO PICTURE | There are no pictures on the card. | The card contains no pictures. Record pictures. |
| !PICTUREERROR | There is a problem with the selected picture and it cannot be played back on this camera. | Use image processing software to view the picture on a PC. If that cannot be done, the image file is damaged. |
| CARD-COVER OPEN | The battery compartment/ card cover is open. | Close the battery compartment/card cover. |
| The card is not formatted. | Format the card. All data on the card is deleted. |
En

natural_image
Abstract geometric pattern with concentric circles and intersecting lines (no text or symbols)En
41


SPECIFICATIONS
Product type : Digital camera (for shooting and displaying)
Recording system
Still picture : Digital recording, TIFF (non-compression), JPEG (in accordance with Design rule for Camera File system (DCF))
Applicable standards : Exif 2.2, Digital Print Order Format (DPOF), PRINT Image Matching II, PictBridge
Sound with still pictures : Wave format
Movie : MPEG-4, QuickTime Motion JPEG support
Memory : xD-Picture Card (16 - 512 MB)
Resolution : 3200 × 2400 pixels (ENLARGE SIZE: SHQ, HQ)
2288 × 1712 pixels (TIFF, SHQ, HQ)
2288 × 1520 pixels (3:2 TIFF, SHQ, HQ)
2048 × 1536 pixels (TIFF, SQ1)
1600 × 1200 pixels (TIFF, SQ1)
1280 × 960 pixels (TIFF, SQ1)
1024 × 768 pixels (TIFF, SQ2)
640 × 480 pixels (TIFF, SQ2)
No. of storable pictures
when using a 16 MB : Approx. 1 frame (TIFF: 2288 × 1712)
card (without sound) Approx. 5 frames (SHQ: 2288 × 1712)
Approx. 16 frames (HQ : 2288 × 1712)
Approx. 49 frames (SQ1: 1280 × 960 NORMAL)
Approx. 165 frames (SQ2: 640 × 480 NORMAL)
No. of effective pixels : 4,000,000 pixels
Image pickup device : 1/2.5" CCD solid-state image pickup, 4,110,000 pixels (gross)
Lens : Olympus lens 6.3 mm to 63 mm, f2.8 to f3.7, 11 elements in 7 groups
(equivalent to 38 mm to 380 mm lens on a 35 mm camera)
Photometric system : Digital ESP metering, spot metering system
Aperture : f2.8 to f8.0
Shutter speed : 15 to 1/1000 sec.

natural_image
Pure geometric diagram with concentric circles and crosshairs, no text or symbols presentbasic_e_d4209_7.fm Page 43 Thursday, December 25, 2003 1:36 PM
| Shooting range | : 0.6 m (2 ft.) to ∞ (W), 2 m (6.6 ft.) to ∞ (T) (NORMAL)0.07 m (0.2 ft.) to ∞ (W), 1.2 m (4 ft.) to ∞ (T) (macro mode) |
| Viewfinder | : 0.44" TFT color LCD display, 240,000 pixels |
| Monitor | : 1.8" TFT color LCD display, 118,000 pixels |
| Auto focus | : TTL system autofocusContrast Detection Method |
| Outer connector | : DC-IN jack, USB connector (mini-B), A/V OUT jack |
| Automatic calendar system | : 2000 up to 2099 |
| Operating environment | |
| Temperature | : 0°C to 40°C (32°F to 104°F) (operation)-20°C to 60°C (-4°F to 140°F) (storage) |
| Humidity | : 30% to 90% (operation) /10% to 90% (storage) |
| Power supply | : Only an Olympus LI-10B lithium-ion batteryAC adapter specified by Olympus (optional) |
| Dimensions | : 104.5 mm (W) × 60 mm (H) × 68.5 (D) mm(4.1" × 2.4" × 2.7") (excluding protrusions) |
| Weight | : 280 g (0.62 lb.) (without battery or card) |
SPECIFICATIONS ARE SUBJECT TO CHANGE WITHOUT ANY NOTICE OR OBLIGATION ON THE PART OF THE MANUFACTURER.
En

natural_image
Pure geometric diagram with concentric circles and intersecting lines, no text or symbols presentEn
43


natural_image
Pure geometric diagram with concentric circles and crosshairs, no text or symbols presentbasic_e_d4209_hyo4_7.fm Page 1 Thursday, December 25, 2003 11:48 AM
OLYMPUS®
http://www.olympus.com/
OLYMPUS CORPORATION
Shinjuku Monolith, 3-1 Nishi-Shinjuku 2-chome, Shinjuku-ku, Tokyo, Japan
OLYMPUS AMERICA INC.
Two Corporate Center Drive, Melville, NY 11747-3157, U.S.A. Tel. 631-844-5000
Technical Support (USA)
24/7 online automated help: http://www.olympusamerica.com/support
Phone customer support: Tel. 1-888-553-4448 (Toll-free)
Our phone customer support is available from 8 am to 10 pm
(Monday to Friday) ET
E-Mail: distec@olympus.com
Olympus software updates can be obtained at: http://www.olympus.com/digital
Olympus Europa GmbH
Premises/Goods delivery: Wendenstrasse 14-18, 20097 Hamburg, Germany
Tel: +49 40-23 77 3-0 / Fax: +49 40-23 07 61
Letters: Postfach 10 49 08, 20034 Hamburg, Germany
European Technical Customer Support:
Please visit our homepage http://www.olympus-europa.com
or call our TOLL FREE NUMBER*: 00800 - 67 10 83 00
for Austria, Belgium, Denmark, Finland, France, Germany, Italy, Luxemburg, Netherlands, Norway, Portugal, Spain, Sweden, Switzerland, United Kingdom
* Please note some (mobile) phone services/provider do not permit access or request an additional prefix to +800 numbers.
For all not listed European Countries and in case that you can't get connected to the above mentioned number please make use of the following
CHARGED NUMBERS: +49 180 5 - 67 10 83 or +49 40 - 237 73 899
Our Technical Customer Support is available from 9 am to 6 pm MET (Monday to Friday)
© 2004 OLYMPUS CORPORATION
Printed in Japan
1AG6P1PXXXX--
VTXXXXXX
natural_image
Pure geometric diagram with concentric circles and intersecting lines, no text or symbols present