GD-W232 - Televizor JVC - Besplatni korisnički priručnik
Pronađite besplatno priručnik za uređaj GD-W232 JVC u PDF formatu.

Pitanja korisnika o GD-W232 JVC
0 pitanje o ovom uređaju. Odgovorite na one koje znate ili postavite svoje.
Postavi novo pitanje o ovom uređaju
Preuzmite upute za vaš Televizor u PDF formatu besplatno! Pronađite svoj priručnik GD-W232 - JVC i uzmite svoju elektroničku napravu natrag u ruke. Na ovoj stranici objavljeni su svi dokumenti potrebni za korištenje vaše naprave. GD-W232 marke JVC.
KORISNIČKI PRIRUČNIK GD-W232 JVC
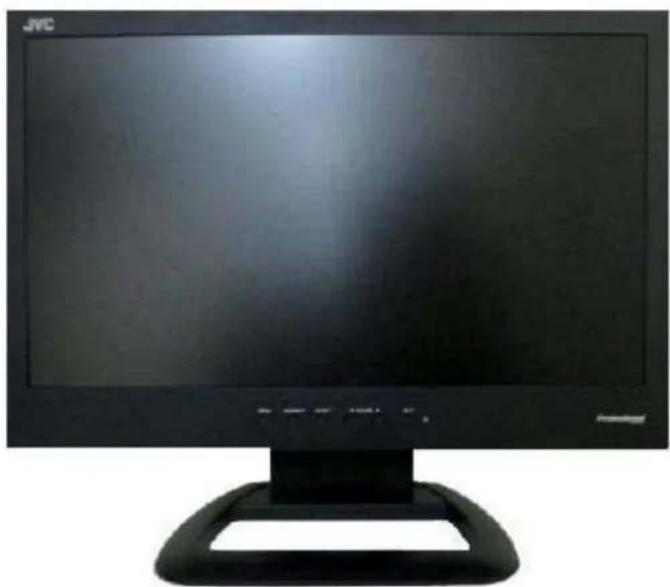
JVC
GD-W192
GD-W232
LCD DISPLAY MONITOR
INSTRUCTIONS
natural_image
Black JVC computer monitor with a blank screen and a curved base (no visible text or symbols)The illustration of the monitor above is GD-W192.
HDMI ^TM
HIGH-DEFINITION MULTIMEDIA INTERFACE
KM-LMU1823J Rev.00
P/NO. GEN0002
Dear Customer,
This apparatus is in conformance with the valid European directives and standards regarding electromagnetic compatibility and electrical safety.
European representative of JVC KENWOOD Corporation is: JVC Technical Services Europe GmbH
Postfach 10 05 04
61145 Friedberg Germany
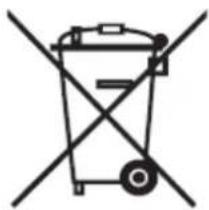
Information for Users on Disposal of Old Equipment
natural_image
Symbol of a trash bin crossed with a diagonal line, representing no waste or discharge (no text or labels)[European Union]
This symbol indicates that the electrical and electronic equipment should not be disposed as general household waste at its end-of-life.
Instead, the product should be handed over to the applicable collection point for the recycling of electrical and electronic equipment for proper treatment, recovery and recycling in accordance with your national legislation.
![JVC GD-W232 - [European Union] - 1](/content/2026/05/1103236/images/0e017ac9aa5eadbb61919913669b1b389b5488276aa2a1f6ced4e76b93d84d92.jpg)
Attention: This symbol is only valid in the European Union
By disposing of this product correctly, you will help to conserve natural resources and will help prevent potential negative effects on the environment and human health which could otherwise be caused by inappropriate waste handling of this product.
For more information about collection point and recycling of this product, please contact your local municipal office, your household waste disposal service or the shop where you purchased the product.
Penalties may be applicable for incorrect disposal of this waste, in accordance with national legislation.
(Business users)
If you wish to dispose of this product, please visit our web page http://www.jvc.eu/ to obtain information about the take-back of the product.
[Other Countries outside the European Union]
If you wish to dispose of this product, please do so in accordance with applicable national legislation or other rules in your country for the treatment of old electrical and electronic equipment.
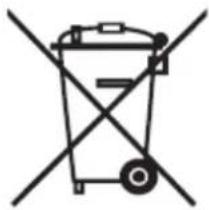
Informacija za korisnike gde da odlazu staru opremu
natural_image
Symbol of a trash bin crossed out by two diagonal lines (no text or labels)[Vazece sa se zemlje koje su usvojile skupljanje razlicitod odpada systems]
Ovi simboli znace da svaki uredjaj sa ovim simbolom ne bi trebalo da ostaju kao otpad u domacinstvu kada se istrosi. Umesto toga uredjaj treba da se preda na vazecim mestima gde se skuplja odpad za reciklazu elektricne I elektronske opreme za odgovarajuci tretman u skladu sa vasim zakonom
Odlaganje ovih proizvoda ispravno ,vi cete pomoci da se sprece negativne posledice na zivotnu sredinu | ljudsko zdralje koje bi inace moglo biti prouzrokovano neprikladnim rukovanjem ovim uredjajem
Za vise informacija omestima za skuoljanje uredjaju za reciklazu | reciklazu navedenih proizvoda kontaktirajte kontaktirajte lokalnu kancelariju,ili serviskoji skuplja vas odpad da odkupi uredjaj od prodavnice
Ako koristite uredjaj kojiima u sebi baterije,akomulator, molim vas odlozite ih odvojeno unapred prema lokalnim zahtevima
Attention: This symbol is only valid in the European Union
(Biznis korisnici)
Ako zelite da odlozite svoj uredjaj, molim vas kontaktirajte vaseg prodavca ili isporucioca za dalje informacije
SAFETY PRECAUTIONS
CAUTION
RISK OF ELECTRIC SHOCK DO NOT OPEN

CAUTION : TO REDUCE THE RISK OF ELECTRIC SHOCK, DO NOT REMOVE REAR COVER. NO USER SERVICEABLE PARTS INSIDE. REFER TO QUALIFIED SERVICE PERSONNEL.
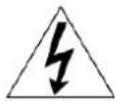
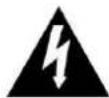
The lightning flash with arrowhead symbol, within an equilateral triangle is intended to alert the user to the presence of uninsulated "dangerous voltage" within the product's enclosure that may be of sufficient magnitude to constitute a risk of electric shock to persons.
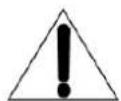
The exclamation point within an equilateral triangle is intended to alert the user to the presence of important operating and maintenance (servicing) instructions in the literature accompanying the appliance.
WARNING: TO REDUCE RISK OF FIRE OR ELECTRIC SHOCK, DO NOT EXPOSE THIS APPARATUS TO RAIN OR MOISTURE. NO OBJECTS FILLED WITH LIQUIDS, SUCH AS VASES, SHALL BE PLACED ON THE APPARATUS.
WARNING: This is a class A product. In a domestic environment this product may cause radio interference in which case the user may be required to take adequate measures.
WARNING: The monitor has to be connected to a grounded outlet Laite on liitettävä suojakoskettimilla varustettuun pistorasiaan. Apparatet må tilkoples jordet stikkontakt. Apparaten skall anslutas till jordat uttag.
IMPORTANT SAFEGUARDS
▶ NEVER REMOVE THE BACK COVER
Removal of the back cover should be carried out only by qualified personnel.
▶ DO NOT USE IN HOSTILE ENVIRONMENTS
To prevent shock or fire hazard, do not expose the unit to rain or moisture.
This unit is designed to be used in the office or home. Do not subject the unit to vibrations, dust of corrosive gases.
▶ KEEP IN A WELL VENTILATED PLACE
Ventilation holes are provided on the cabinet to prevent the temperature from rising
Do not cover the unit or place anything on the top of unit.
▶ AVOID HEAT
Avoid placing the unit in direct sunshine or near a heating appliance.
▶ TO ELIMINATE EYE FATIGUE
Do not use the unit against a bright back ground and where sunlight or other light sources will shine directly on the monitor.
▶ BE CAREFUL OF HEAVY OBJECT
Neither the monitor itself nor any other heavy object should rest on the power cord.
Damage to a power cord can cause fire or electrical shock.
CAUTION
● Make enough room for inserting and removing the power plug! Place this product as close to the outlet as possible!
- When the product is left unattended and unused for a long period of time, unplug it from the wall outlet and disconnect the cable system.
- Do not overload wall outlets, extension cords, or convenience receptacles on other equipment as this can result in a risk of fire or electric shock.
- Do not use any power cords or AC adapters other than those provided with this product!
● Use of power cords or AC adapters other than those provided may cause fire or malfunction.
- When several kinds of power cord are provided in the package, use the one which fits your AC outlet.
- Do not let the AC adapter hang down while using.
- Do not cover or wrap the AC adapter with clothes or sheets or the like.
- Leave space around the AC adapter to prevent overheating.
SAFETY PRECAUTIONS (cont.)
POWER CONNECTION
The power supply voltage rating of this product is AC 100 - 240 V (For European countries, Asian countries, and United Kingdom).
The power cord attached conforms to the following power supply voltage and countries. Use only the power cord designated to ensure safety and EMC regulations of each country.
- Not all types of power cords are supplied to this product.
For European and
Asian countries:
AC 100 - 240 V
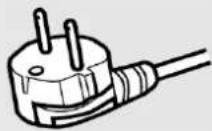
For United Kingdom:
AC 100 - 240 V
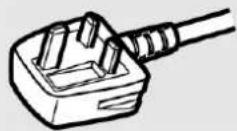
This plug will fit only into a grounded power outlet. If you are unable to insert the plug into the outlet, contact your electrician to install the proper outlet. Do not defeat the safety purpose of the grounded plug.
- This product should be operated only with the type of power source indicated on the label. If you are not sure of the type of power supply of your home, consult your product dealer or local electric power company.
Warning:
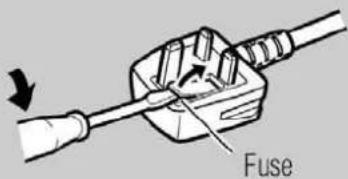
Note for United Kingdom power cord only
The plug of United Kingdom power cord has a built-in fuse. When replacing the fuse, be sure to use only a correctly rated approved type, re-fit the fuse cover. (Consult your dealer or qualified personnel.)
How to replace the fuse
Open the fuse compartment with the blade screwdriver, and replace the fuse.
text_image
FuseIMPORTANT SAFETY INSTRUCTIONS
- Read all of these instructions.
- Save these instructions for later use.
- Follow all warnings and instructions marked on the product.
-
Unplug this product from the wall outlet before cleaning. Do not use liquid cleaners or aerosol cleaners. Use a damp cloth for cleaning.
-
Do not use this product near water.
-
Do not place this product on an unstable cart, stand or table. The product may fall, causing serious damage to the product and persons nearby.
-
Slots and openings in the cabinet and the back are provided for ventilation: to ensure reliable operation of the product, these openings must not be blocked by placing the product on a bed, sofa, rug or other similar surface. This product should never be placed near or over a heat register. This product should not be placed in a built-in installation unless proper ventilation is provided.
-
This product should be operated from the type of power source indicated on the marking label. If you are not sure of the type of power available, consult your dealer or local power company.
-
This product is equipped with a 3-wire grounding type plug having a third (grounding) pin. This is a safety feature. If you are unable to insert the plug into the outlet, contact your electrician to replace your obsolete outlet. Do not defeat the purpose of the grounding-type plug.
-
Do not allow anything to rest on the power cord. Do not locate this product where persons will walk on the cord.
-
If an extension cord is used with this product, make sure that the total of the ampere ratings on the products plugged into the extension cord do not exceed the extension cord ampere rating. Also, make sure that the total of all products plugged into the wall outlet does not exceed 10 amperes.
-
Never push objects of any kind into this product through cabinet slots as they may touch dangerous voltage points or short out parts that could result in a risk of fire or electric shock. Never spill any kind of liquid on the product.
-
Do not attempt to service this product yourself, as opening or removing covers may expose you to dangerous voltage points or other risks. Refer all servicing to service personnel.
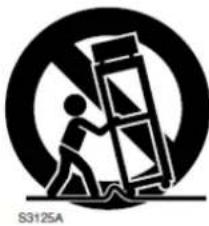
natural_image
Silhouette of a person lifting a ladder with a diagonal line, enclosed in a circular frame (no text or symbols)- Unplug this product from the wall outlet and refer servicing to qualified service personnel under the following conditions.
A. When the power cord or plug is damaged or frayed.
B. If liquid has been spilled into the product.
C. If the product has been exposed to rain or water.
D. If the Product does not operate normally when the operating instructions are followed.
Adjust only those controls that are covered by the operating instructions since improper adjustment of other controls may result in damage and will often require extensive work by a qualified technician to restore normal operation.
E. If the product has been dropped or the cabinet has been damaged.
F. If the product exhibits a distinct change in performance, indicating a need for service.
- The Main Plug is used as the disconnect device.
Make enough room for inserting and removing the power plug. Place the apparatus as close to the outlet as possible.
-
Be sure to install the monitor securely to prevent the monitor from falling over, which may cause damage to the monitor or injury.
-
Do not step on or hang on the product.
European Union only
EMC Supplement
This equipment is in conformity with the provisions and protection requirements of the corresponding European Directives. In order to keep the best performance and ensure electromagnetic compatibility, we recommend to use cable not exceeding the following length:
| Cable | Length |
| Power cord (attached cable) | 1.8m |
| Video signal cable (coaxial cable) | 1.8m |
| Audio signal cable (shielded cable) | 1.8m |
| RGB cable (shielded cable) with ferrite core | 1.8m |
CAUTION
In case where the strong electromagnetic waves or magnetism are near the audio cable or the signal cable, the sound or the picture will contain noise. In such cases, please keep the cable away from the sources of the disturbance.
TRADEMARK INFORMATION
- HDMI, the HDMI Logo, and High - Definition Multimedia Interface are trademarks or registered trademarks of HDMI Licensing LLC in the United States and other countries.
OPERATING PRECAUTIONS
The LCD panel and backlight have life expectancy. Due to the basic characteristics of the LCD panel, an afterimage or uneven display may occur. It is recommended that you change images occasionally, activate the power saving function, or often turn off the power to reduce the load on the LCD panel. Continuous operations of the LCD panel may accelerate the deterioration.
Maintenance
Screen
To avoid irreparable change in appearance of the screen such as uneven color, discoloration, scratches, be careful about the following:
- Do not paste or stick anything using any glues or adhesive tapes.
- Do not write anything on the screen.
- Do not strike the screen with a hard object.
- Avoid condensation on the screen.
- Do not wipe the screen with any liquid such as water. In addition, wiping the screen with water-diluted neutral detergent or solvent such as alcohol, thinner, or benzine may affect the anti-reflection treatment of the screen.
- Do not wipe the screen forcefully.
Wipe stains off the screen with a soft cloth.
Ventilation openings
Use a vacuum cleaner to get rid of the dust around the intakes (all the openings). If a vacuum cleaner is not available, use a cloth and wipe it off. Leaving the dust around the intakes may prevent proper temperature control and cause damage to the product.
Cabinet
To avoid the deterioration or damages of the cabinet such as its paint's peeling away, be careful about the following:
- Do not wipe the cabinet using solvent such as alcohol, thinner, or benzine.
- Do not expose the cabinet to any volatile substance such as insecticides.
- Do not allow any rubber or plastic in contact for a long time.
- Do not wipe the cabinet forcefully.
Wipe stains off the cabinet with a soft cloth. If the cabinet gets heavily stained, wipe it with a soft cloth soaked in water-diluted neutral detergent and wrung well, then wipe with a soft dry cloth.
CONTENTS
| SAFETY PRECAUTIONS | 3 |
| OPERATING PRECAUTIONS | 6 |
| CONTENTS | 6 |
| UNPACKING | 7 |
| CONNECTING WITH EXTERNAL DEVICE | 8 |
| CONTROLS AND FUNCTIONS | 9 |
| SPECIFICATIONS | 14 |
| TROUBLESHOOTING | 15 |
| DIMENSIONS | 16 |
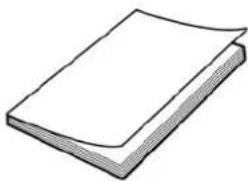
UNPACKING
Remove the package cover and place the product on a flat and secure surface or in the installation location. Check whether all the flowing device and accessories are included with the main system.
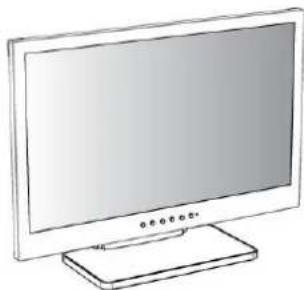
natural_image
Line drawing of a flat-screen monitor with a stand (no text or symbols)LCD Monitor
natural_image
Simple line drawing of a closed book with visible pages (no text or symbols)Instructions

natural_image
Line drawing of a cable with a terminal connector (no text or symbols)Power Cable
UK 1.8 m x 1
Continental 1.8 m x 1
CONNECTING WITH EXTERNAL DEVICE
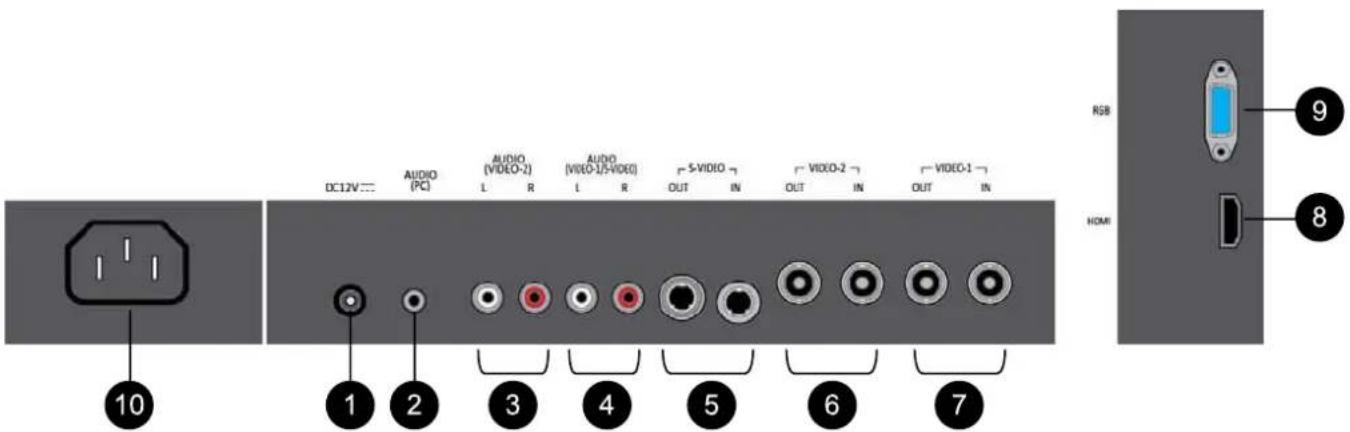
text_image
DC12V AUDIO (PC) AUDIO (VIDEO-2) AUDIO (VIDEO-2/VIDEO) S-VIDEO VIDEO-2 VIDEO-1 1 2 3 4 5 6 7 RGB HDMI 9 8DC12V
DC power supply input.
Connect the DC plug to the provided AC adapter.
AUDIO (PC)
Stereo Audio input for RGB PC or HDMI
When used for RGB PC, please set to HDMI AUDIO setting to "DIGITAL".
When used for HDMI, please set to HDMI AUDIO setting to "ANALOG" or "AUTO"
* HDMI AUDIO setting is in SETUP MENU 500mV(rms), high impedance
AUDIO (VIDEO-2)
Stereo Audio input for VIDEO-2
500mV(rms), high impedance
AUDIO (VIDEO-1 / S-VIDEO)
Stereo Audio input for VIDEO-1 or S-VIDEO
500mV(rms), high impedance
S-VIDEO IN / OUT
S-VIDEO signal input / looping out
Y:1V(p-p) C:0.286V(p-p) NTSC
Y:1V(p-p) C:0.3V(p-p) PAL
VIDEO-2 IN / OUT
VIDEO-2 signal input / looping out
VBS:1V(p-p)
VIDEO-1 IN / OUT
VIDEO-1 signal input / looping out
VBS:1V(p-p)
HDMI
HDMI signal input
HDCP Compliant
Audio L-PCM 2ch. Support
RGB
RGB PC signal input
R,G,B: 0.7V(p-p) 75Ω
SYNC: TTL
10 AC IN
AC power supply input.
Connect the provided AC power cord.
CONTROLS AND FUNCTIONS

KEY BUTTON
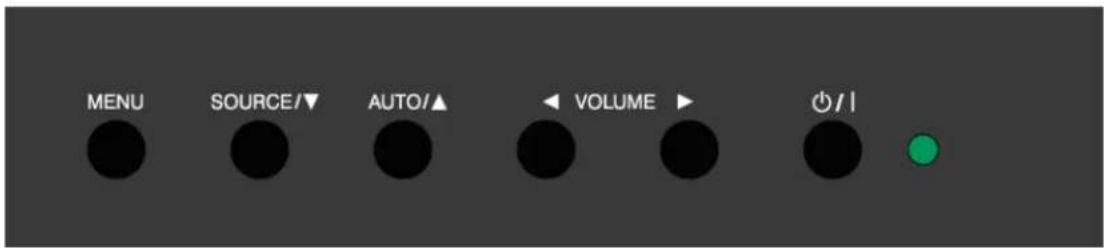
text_image
MENU SOURCE/▼ AUTO/▲ VOLUME ▶ Ø/∥| OSD Key | Function |
| MENU | Activates and exit the OSD. |
| SOURCE/▼ | When the menu is not displayed → Select input source.When the menu is displayed → Move the OSD menu to down side. |
| AUTO/▲ | When the menu is not displayed → Auto adjustment of RGB source.When the menu is displayed → (Adjust size and position of screen automatically.) |
| ◄ VOLUME | When the menu is not displayed → Decrease the level of audio volume.When the menu is displayed → Adjust the value. |
| VOLUME ► | When the menu is not displayed → Increase the level of audio volume.When the menu is displayed → Select the OSD menu.→ Adjust the value. |
| ∅/| | Turn the power ON or OFF. It will take about 10s before the picture appears. |
| POWER LED | Unlit: The monitor is completely off (the AC plug is not connected.)Light in Green: The monitor is ON.Light in Red: The monitor is off (on stand-by).Light in Orange: The monitor is in the POWER SAVING in RGB input. |
CONTROLS AND FUNCTIONS (cont.)

INPUT SOURCE SELECT
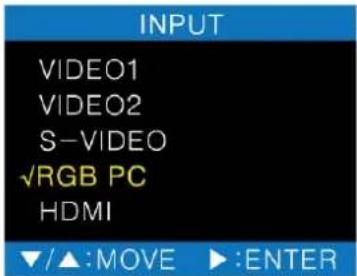
text_image
INPUT VIDEO1 VIDEO2 S-VIDEO ✓RGB PC HDMI ▼/▲:MOVE ▶:ENTER- Press the SOURCE button and then ▲/▼ button to move the source.
- Press the ▶ button to select the source.

VOLUME CONTROL

text_image
VOLUME 30- Sound volume can be adjust with ◀ / ▶ buttons.
CONTROLS AND FUNCTIONS (cont.)

PICTURE
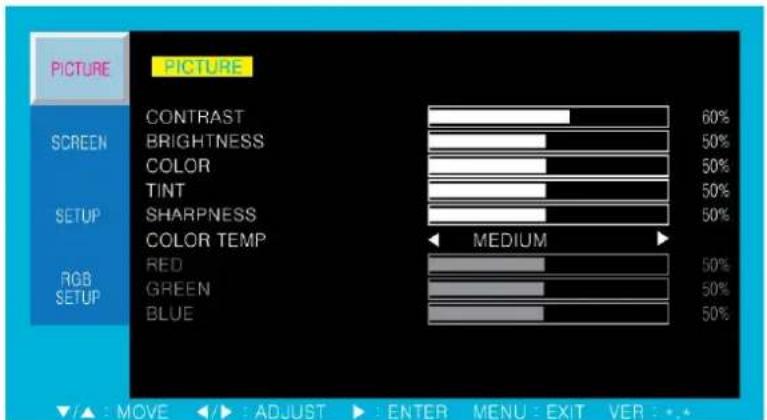
text_image
PICTURE PICTURE CONTRAST 60% SCREEN BRIGHTNESS 50% COLOR 50% TINT 50% SETUP SHARPNESS 50% COLOR TEMP MEDIUM RGB RED 50% SETUP GREEN 50% BLUE 50% ▼/▲: MOVE ◀/►: ADJUST ▶: ENTER MENU: EXIT VER: ••- Press the MENU button to access menu.
- Use the ▲/▼ button to highlight a selection.
- Press the ▶ button to choose an item.
- Use the ▲/▼ button to highlight a selection.
- Use the ◀ / ▶ button to adjust the setting on a selected item.
■ CONTRAST : Adjust the picture contrast.
■ BRIGHTNESS : Adjust the picture brightness.
■ COLOR : Adjust the picture color density. (Can not use RGB input)
■ TINT : Adjust tint the picture color tint.(Can not use RGB input)
■ SHARPNESS : Adjust the sharpness of picture. (Can not use RGB input)
■ COLOR TEMP : Select the color temperature of picture. (MEDIUM / WARM / USER/ COOL)
* USER - RED, GREEN, BLUE is adjustable from range of 0 to 100%

SCREEN
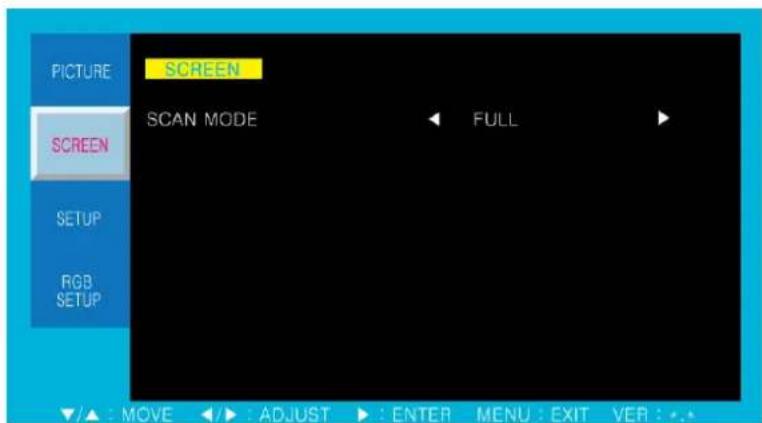
text_image
PICTURE SCREEN SCAN MODE FULL SETUP RGB SETUP /▲ : MOVE ◀️: ADJUST ▶: ENTER MENU: EXIT VER: .•- Press the MENU button to access menu.
- Press the ▶ button to choose an item.
- Use the ◀ / ▶ button to adjust the setting on a selected item.
■ SCAN MODE : Select the scan mode of the screen or Aspect ratio (FULL, REAL, UNDER, OVER and 4:3 aspect ratio).
FULL : It displays Full area.
REAL : REAL DOT
*When the resolution of input signal is bigger than the panel pixel, don't display.
UNDER : It displays small.
OVER : It displays large.
4:3 : Aspect ratio is 4:3
CONTROLS AND FUNCTIONS (cont.)

SETUP
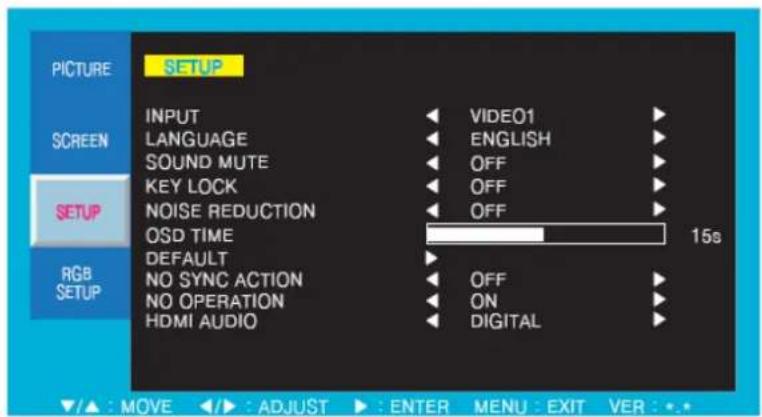
text_image
PICTURE SETUP INPUT LANGUAGE SOUND MUTE KEY LOCK NOISE REDUCTION OSD TIME DEFAULT NO SYNC ACTION NO OPERATION HDMI AUDIO VIDEO1 ENGLISH OFF OFF OFF OFF 15s RGB SETUP OFF ON DIGITAL /▲ : MOVE ◀️: ADJUST ▶: ENTER MENU : EXIT VER : ••- Press the MENU button to access menu.
- Use the ▲/▼ button to highlight a selection.
- Press the ▶ button to choose an item.
- Use the ▲/▼ button to highlight a selection.
- Use the ◀ / ▶ button to adjust the setting on a selected item.
■ INPUT : Select an input source for main screen (VIDEO1, VIDEO2, S-VIDEO, RGB PC, HDMI)
■ LANGUAGE : Set to different language mode (ENGLISH, ITALIAN, FRENCH, SPANISH, GERMAN)
■ SOUND MUTE : Turn on/off the sound
* While "SOUND MUTE" is "ON", displays
each changing the input source

* After turn off(stand-by mode), "SOUND MUTE" turns to "OFF".
■ KEY LOCK : Locking the button on the front panel. (Prevent operation)
* Press ▲ & ◀ buttons simultaneously for 5 seconds and turning "KEY LOCK" to "OFF".
* After turn off(no AC power supply), turning "KEY LOCK" to "OFF".
■ NOISE REDUCTION : Set a noise reduction mode
■ OSD TIME : Set a time duration of OSD menu (5s - 30s : Default setting is 15s)
■ DEFAULT : Factory default setting.
■ NO SYNC ACTION : Set the monitor to turn into Stand-by mode when no sync status continues for about 15 minutes
* NO SYNC ACTION item is for the VIDEO1 / VIDEO2 / S-VIDEO / HDMI input only
*Use "POWER SAVING" mode in RGB PC input
*When turn on, displays "No sync action worked" in a few seconds by this setting.
■ NO OPERATION : Set the monitor to turn into Stand-by mode when no operation status continues for about 4 hours.
*In case of continue to use over 4 hour, change to "OFF". (Default setting is "ON".)
*When turn on, a few seconds displays "No operation action worked" in this setting.
■ HDMI AUDIO : Set the output of HDMI AUDIO
DIGITAL – Output the digital audio signal on HDMI.
ANALOG - Output the input signal of AUDIO(PC) jack.
AUTO – Automatically detects the HDMI digital audio. When no detect, output the input signal of AUDIO(PC) jack.
* When AUDIO(PC) jack use in RGB PC, set to "DIGITAL".
CONTROLS AND FUNCTIONS (cont.)

RGB SETUP
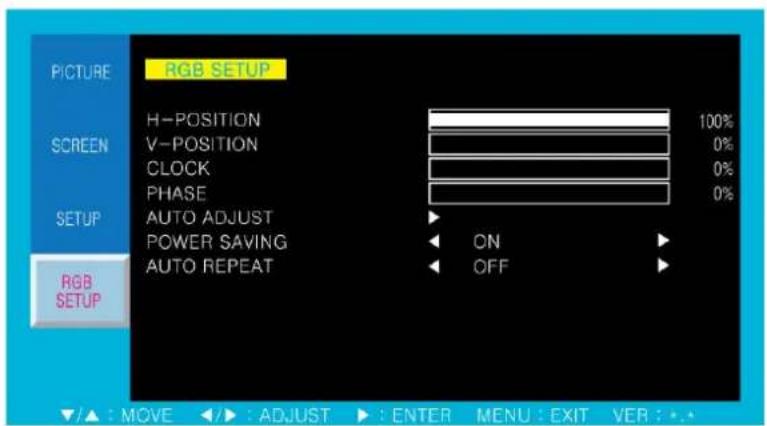
text_image
PICTURE RGB SETUP H-POSITION 100% SCREEN V-POSITION 0% CLOCK 0% PHASE 0% SETUP AUTO ADJUST POWER SAVING ON AUTO REPEAT OFF RGB SETUP /▲ : MOVE ◀️: ADJUST ▶: ENTER MENU : EXIT VER : *.*- Press the MENU button to access menu.
- Use the ▲/▼ button to highlight a selection.
- Press the ▶ button to choose an item.
- Use the ▲/▼ button to highlight a selection.
- Use the ◀ / ▶ button to adjust the setting on a selected item.
■ H-POSITION : Adjust the horizontal picture position.
■ V-POSITION : Adjust the vertical picture position.
■ CLOCK : Eliminates stripes or flickering by adjusting.
■ PHASE : Eliminates stripes or flickering by adjusting.
■ AUTO ADJUST : Adjust the size and position of picture automatically.
■ POWER SAVING : When no signal in RGB PC input, change to power saving mode at 5s. (POWER LED light to an orange.)
When signal comes in, turn on. (POWER LED light to a green.)
■ AUTO REPEAT : Operate "AUTO ADJUST" automatically, when the input signal source changes.

Available signals
| Signal type | Frequency | Input terminals | |||
| Horizontal(kHz) | Vertical(Hz) | VIDEO 1/2 /S-VIDEO | RGB | HDMI | |
| NTSC(3.58) | 15.734 | 59.94 | √ | — | — |
| PAL | 15.625 | 50.0 | √ | — | — |
| VGA | 31.469 | 59.94 | — | √ | √ |
| VGA TEXT | 31.469 | 70.00 | — | √ | √ |
| SVGA | 35.156 | 56.251 | — | √ | √ |
| 37.879 | 60.317 | — | √ | √ | |
| XGA | 48.363 | 60.004 | — | √ | √ |
| 60.019 | 75.024 | — | √ | √ | |
| SXGA | 63.981 | 60.020 | — | √ | √ |
| WXGA | 47.712 | 60.015 | — | √ | √ |
| 640×480p | — | — | — | — | √ |
| 720×480p | — | — | — | — | √ |
| 720×576p | — | — | — | — | √ |
| 1280×720p | — | — | — | — | √ |
| 1920×1080i | — | — | — | — | √ |
| 1920×1080p | — | — | — | — | √ |
√ : Acceptable — : Not acceptable
* Some signals may not be displayed normally even if its frequency is within the acceptable range.
* "NO SIGNAL" is displayed when no signal or not acceptable sinal come in.
SPECIFICATIONS
| GD-W192 | GD-W232 | ||
| Display | Screen Size | 18.5 " | 23.0 " |
| LCD Panel | active matrix TFT non-glare LED back light | active matrix TFT non-glare LED back light | |
| Effective screen size | Width: 409.8 mm Height: 230.4 mm Diagonal: 470.1 mm | Width: 509.1 mm Height: 286.4 mm Diagonal: 584.2 mm | |
| Resolution | 1366 x 768 pixels | 1920 x 1080 pixels | |
| Pixel Pitch | 0.300 x 0.300 mm | 0.265 x 0.265 mm | |
| Contrast Ratio | 1000:1 | 1000:1 | |
| Aspect Ratio | 16:9 | 16:9 | |
| Viewing Angle (H/V) | 170°/160° | 170°/160° | |
| Display Color | 1,670 (10 000) | 1,670 (10 000) | |
| Response Time | 5 ms | 5 ms | |
| Video System | NTSC/PAL | NTSC/PAL | |
| Dimension | Outline Dimension (w/Stand) | 448 x 182 x 367 mm | 552 x 165 x 419 mm |
| Net Weight | 5.0 kg | 6.8 kg | |
| Power | Energy Efficiency Class | B | C |
| On-mode Power Consumption | 20.7 W | 33.3 W | |
| Annual Energy Consumption, based on the power consumption of the television operating 4 hours per day for 365 days. The actual energy consumption will depend on how the television is used. | 30 kWh/year | 49 kWh/year | |
| Stand-by mode Power Consumption | 0.33 W | 0.33 W | |
| Electrical Ratings | AC 100~240 V (50Hz/60Hz) 1.2A | AC 100~240 V (50Hz/60Hz) 1.2A | |
| Circumstance | Operating Temperature | 0°C~40°C | 0°C~40°C |
| Operating humidity | 20%~80%(non-condensing) | 20%~80%(non-condensing) | |
| Mounts | VESA Mounts Size | 100 × 100 mm (M4, 8 mm) | 100 × 100 mm (M4, 8 mm) |
* Technical specifications are subject to change without notice.
TROUBLESHOOTING
| Troubleshooting | Troubleshooting Tip |
| The screen doesn't show up | 1. Make sure if the power supply is connected property.2. Turn on the power.3. Select the correct input signal with SOURCE button. . |
| The screen is too light or to dark | Control the BRIGHTNESS |
| The screen size is not fit for the PC signal | Press the AUTO key among keys in the front.(It is used only in the PC signal) |
| The screen color shows strange in the PC signal | In the FUNCTION menu of OSD menu,Perform the AUTO-ADJUST. |
| No sound | * Set "SOUND MUTE" in SETUP menu to "OFF".*.In case of RGB PC input, set"HDMI AUDIO"in SETUP menu to "DIGITAL". |
| Buttons on the monitor do not work. | Press ▲ & ◀ buttons simultaneously for 5s |
GD-W192
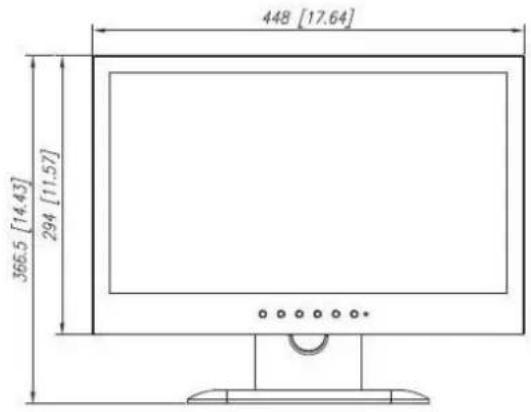
text_image
448 [17.64] 366.5 [14.43] 294 [11.57]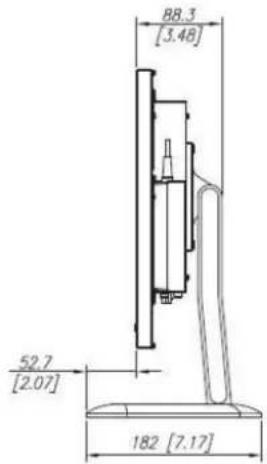
text_image
88.3 [3.48] 52.7 [2.07] 182 [7.17]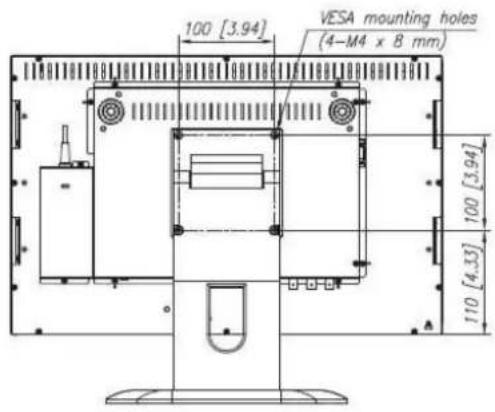
text_image
100 [3.94] VESA mounting holes (4-M4 x 8 mm) 100 [3.94] 110 [4.35]GD-W232
text_image
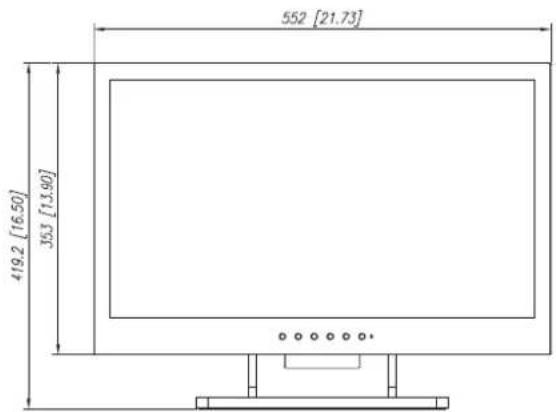
552 [21.73] 419.2 [16.50] 363 [13.90]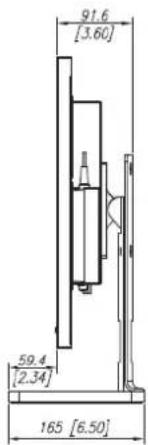
text_image
91.6 [3.60] 59.4 [2.34] 165 [6.50]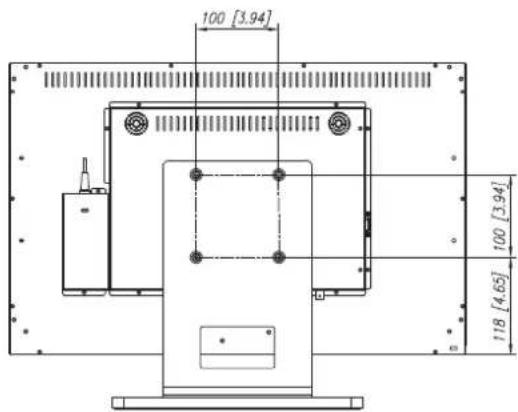
text_image
100 [3.94] 100 [3.94] 118 [4.65]- For easy understanding, pictures and illustrations are shown by being emphasized, omitted or composed, and may be slightly different from actual products.
- Design and specifications are subject to change without notice.
- All company names and product names mentioned herein are used for identification purposes only, and may be the trademarks or registered trademarks of their respective companies.