eXpo PSCHD90 - Video kamera Pyle - Besplatni korisnički priručnik
Pronađite besplatno priručnik za uređaj eXpo PSCHD90 Pyle u PDF formatu.

Pitanja korisnika o eXpo PSCHD90 Pyle
0 pitanje o ovom uređaju. Odgovorite na one koje znate ili postavite svoje.
Postavi novo pitanje o ovom uređaju
Preuzmite upute za vaš Video kamera u PDF formatu besplatno! Pronađite svoj priručnik eXpo PSCHD90 - Pyle i uzmite svoju elektroničku napravu natrag u ruke. Na ovoj stranici objavljeni su svi dokumenti potrebni za korištenje vaše naprave. eXpo PSCHD90 marke Pyle.
KORISNIČKI PRIRUČNIK eXpo PSCHD90 Pyle

Welcome!
Please read through the entire instruction manual to ensure correct use, proper care, optimum performance and long-lasting enjoyment with your Pyle eXpo. Please keep this instruction manual in a safe place for reference. Remember to practice safe and controllable behavior while capturing the action. Enjoy!
TABLE OF CONTENTS
| CAMERA CONTROLS – WHAT'S IN THE BOX | 1 |
| MOUNTING APPLICATIONS – INITIAL SETUP | 2 |
| BUTTON FUNCTIONS | 3 |
| ACCESS MENU – HDMI SETTINGS | 4 |
| USB – WIFI CONNECTION | 5 |
| DOWNLOADABLE APPLICATION | 6 |
| LED LIGHT STATUS | 7 |
| VIDEO SETTINGS | 8 |
| CAMERA – SD MEMORY SETTINGS | 9 |
| ADDITIONAL FEATURES | 10 |
| BATTERY – CAMERA HOUSINGS | 11 |
| WIFI REMOTE | 12 |
| SPECIFICATIONS | 13 |

What's in the Box:
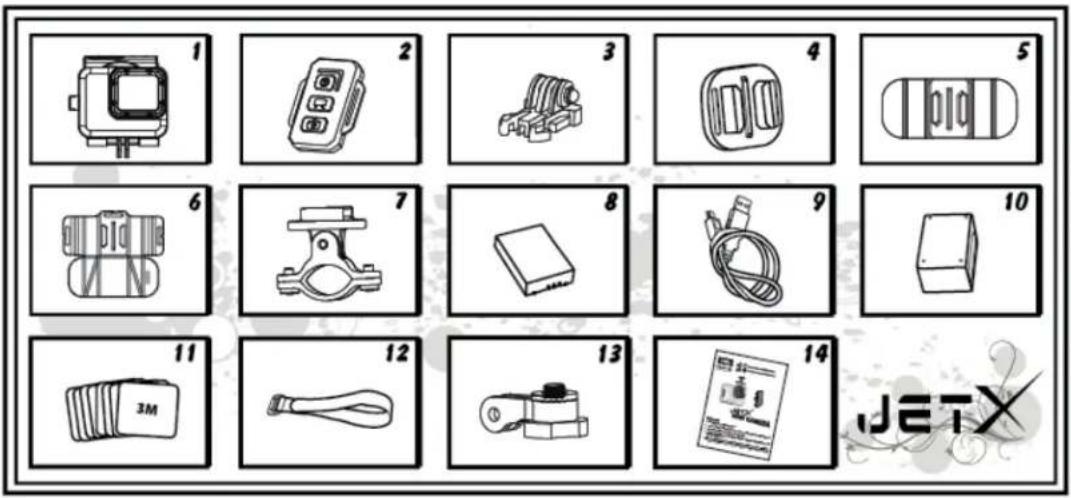
| 1. Waterproof Housing | 3. Buckle | 5. Curved Mount | 7. Roll Bar Mount | 9. USB Cable | 11. Adhesive Stickers | 13. Pivot Arm |
| 2. Remote | 4. Universal Mount | 6. Pad Mount | 8. Battery | 10. Battery Charge Dock | 12. Velcro Strip | 14. User Manual |
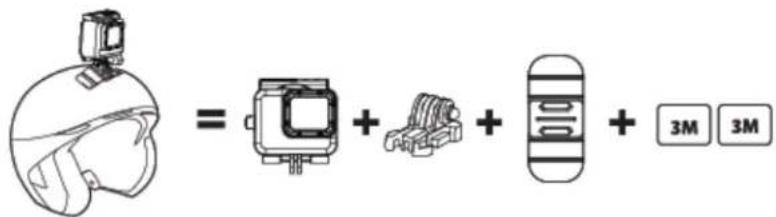
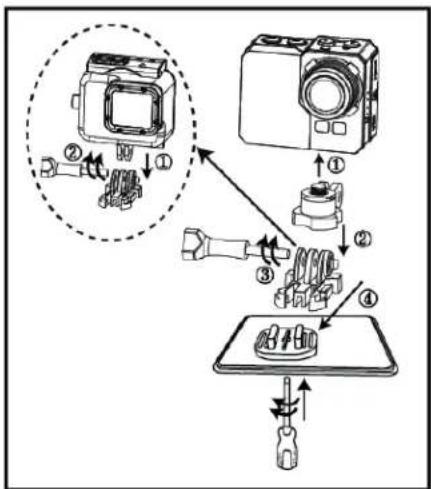
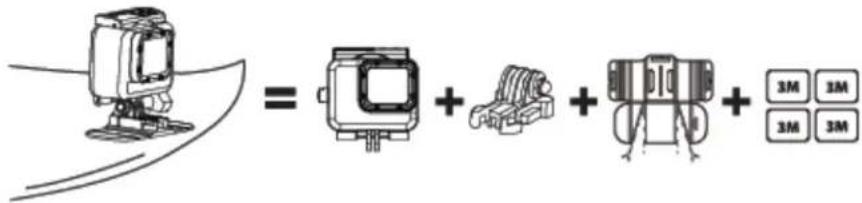
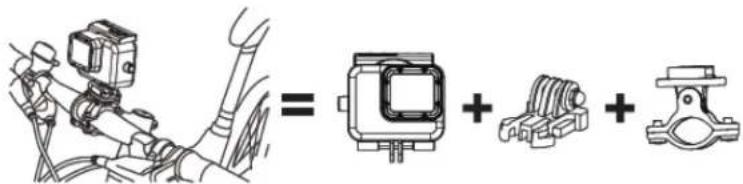
Mount Application
- Camera on any flat surface / tripod

- Camera on top of helmet
- Camera on any curved surface
- Camera on handlebar
Initial Setup
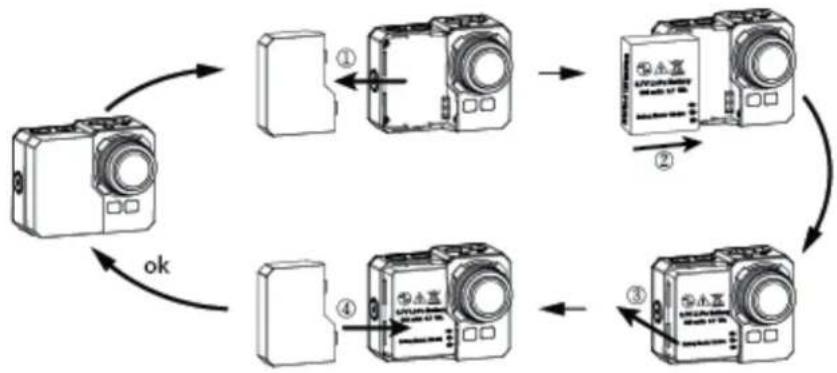
Install a micro SD memory card (max support for up to 64GB, works with class 6 or above) into the camera. Use your fingernail or the tip of a pen to insert and eject the micro SD card. The micro SD card will click into place once it is inserted past flush level.
* When using a micro SD memory card, there should be no data from other devices present on the card. If you are using a micro SD memory card for the first time in the camera, you should firstly try to format the card in your computer. Then insert the battery and you're ready to go!
Charging the Battery (2 Options)
The Lithium-Po battery comes partially charged and the kit includes AC Charger and charging cable.
- Use the included battery charging dock and USB cable, to connect to a USB port like the one found on your computer.
- Use the included USB charging cable to directly connect the eXpo to your computer. Then select 'AC Charge', followed by the power button on the eXpo, to begin charging.
Battery
3.7V Lithium-Po Rechargeable Battery
Battery Power: 1050mAh (3.885Wh)
Model: 103-004
Battery Life:
Wifi OFF and LCD OFF - 80 minutes
Wifi ON and LCD ON - 65 minutes
Wifi ON and LCD OFF - 70 minutes
Wifi OFF and LCD ON - 75 minutes
Power ON / OFF
| Turn ON | Turn on the camera by pressing the Power button LED flashes. Then the LCD screen will be ON. | for at least 3 seconds until the red |
| Turn OFF | Turn the camera off by pressing the Power button * To save power, the camera will automatically turn off if no button are pressed for more than 3 minutes in standby mode. | |
Record Video
| To Start | Press the video button 📁. The red status indicator light will flash while recording. |
| To Stop | Press the video button 📁 again to stop recording. |
| Video Capture | Take pictures while video recording. Press the photo button 📁.* 1080i is not compatible with video capture function. |
| Image Rotation | The camera can be mounted Upside Down and the files appear upright when viewing or editing.Press and hold 📁. Menu>Setting>Image rotation> Select OFF OR 180 Degrees |
The camera automatically stops recording when the memory card is full or the battery is out of power. Your video will be saved before the camera powers off.
Take Pictures
| To Start | Press the photo button. There will be a clicking sound. |
Take Still Pictures
| To Start | Press the photo button 📷. The red status indicator light will flash and you will hear a ‘camera snap’ sound while taking pictures. |
| To Stop | Press the photo button 📷 again to stop shooting. |
The camera automatically stops taking photos when the memory card is full or the battery is out of power. Your photos will be saved before the camera powers off.
Time Lapse
In time lapse mode the camera will take sequentially 1 frame per second, 1 frame per 2 seconds, 1 frame per 5 seconds, 1 frame per 10 seconds, 1 frame per 30 seconds or 1 frame per 60 seconds.
| To Start | Press and hold , Menu > Video Setting > Time LapsePress the video button . The red status indicator light will flash and there will be a clicking sound while recording. Light flashes each time a photo is taken. |
| To Stop | Press the video button again to stop recording. |
When using the Time Lapse, a micro SD card with a Speed Class 10 Rating is required. To capture a time lapse series, verify the camera is in time lapse mode.
Self Timer
| To Start | Press and hold <Menu > Photo Menu > Self timerSelect “OFF”, 3, 5, 10, 30 or 60 second intervals |
The camera can be configured to automatically start recording or take pictures.
Default Settings
The camera powers up with the following default settings:
Video resolution 1080p @30fps
Photo resolution 14.0 Megapixels (MP)
Photo Burst SINGLE
WiFi OFF
Display ON
Date & time stamp OFF
Access Settings Menu
To access the settings menu and make adjustments to picture and video calibration, hold in the left arrow button located on top of the eXpo. This takes you to the settings main menu screen. Now, press the left and right arrows to navigate between camera, video or settings adjustments. Press the camera and video options to navigate up and down these settings.
Once you scroll your way to the setting you wish to adjust, press the power button on the right side of the Expo to begin settings adjustment. Then, adjust setting values by pressing the camera and video buttons. Press the power button again to lock in your selected setting. When you are finished, and you have successfully made the desired adjustments, press and hold the left arrow to return to the camera ready display screen to start using the eXpo.
View/Play Media Files
| To Play Videos | Press and hold the photo button play. Select video icon,Press for OK.Press photo and video button to select more media files. Delete |
| To Play Images | Press and hold the photo button to play. Select image icon,Press for OK.Press photo and video button to select more media files. Delete |
| Logout Preview | Press and hold photo button to back to standby mode.Press and hold the same button again to logout. |
Transcript:
To view a previously recorded video or image taken on the LCD Digital Display, hold in the camera button on top of the eXpo. You are now in the camera and video media preview selection screen. Then press the video button on top of the eXpo to choose which type of file you would like to preview. Once highlighted, press the power button on the right side of the eXpo to go to your gallery. Choose the camera icon (to preview images taken) or choose the video camera icon (to preview videos taken).
Once you have chosen between the image or video files to view, you can press the camera and video buttons on top of the eXpo to browse through your captured media. To preview a selected media file, press the power button and the image or video will appear in full screen. To scroll between images in the full screen preview mode, press the camera and video buttons to navigate between your files.
To play a selected video file on the eXpo, press the power button when your desired video file is highlighted.
To exit the 'Image/Video Preview' screen and return to the camera ready display, hold in the camera button.
HDMI Connection - HDTV Playback
You can playback your photos and videos on the camera, with a HDTV. Playback is possible through the preview mode when camera is powered on and plugged into a HDTV. This HDMI port can transmit the images of this device to compatible and connected external HDTV display.
-
Plug the camera into a HDTV with the HDMI cable.
-
Power ON.
-
Previews of all videos and photos on HDTV display.
-
Press upward button

and downward button

select between media files.
USB Connection
Connect the camera using included USB cable.
Access Media Files on PC (Transcript)
To view images captured and video clips recorded, connect the eXpo via USB connection cable. Select 'Storage' on the eXpo camera following by pressing the power button to initiate access to the files. The screen will read, "USB connecting...". Your computer should then automatically recognize your device has been connected (if you have a compatible SD memory card inserted in the eXpo). The eXpo will then appear as a removable disk drive and you should be able to browse the captured media files.
On PC:
- Double click "My Computer" and locate "Removable Disk".
- If "Removable Disk" is not showing, close "My Computer" folder and reopen it. The "Removable Disk" icon should appear.
- Double click "Removable Disk" icon.
- Double click "DCIM" folder icon.
- Double click "100media" icon to view all video / photo files.
- Copy / move files to the computer or external hard drive.
On MAC:
- Connect the camera to MAC using included USB cable.
- Power on, select the "Mass Storage".
- The MAC recognizes the camera as an external hard drive.
- Double click icon for external drive to access files.
- Copy/move files to computer or external hard drive.
* When deleting files from the memory card, empty the trash before removing the memory card or unplugging the camera.
Wi-Fi Configuration
Wi-Fi camera allows you to connect to the smartphone/tablet via the App.
| Wi-Fi ON | Automatically turns on within 30 seconds*, Wi-Fi icon in green to indicates successful connection. Now go to your smartphone/tablet setting, turn on the wifi network and selectNetwork Name: eXpo Password: 00000000 |
| Wi-Fi ON / OFF | Press and hold <menu > Setting> Wifi>Select “ON” or “OFF”, Press ⏻ for OK. |
The App lets you control your camera remotely using a smartphone or tablet. Features include full camera control of all settings ^# , live video preview, streaming video, download and playback. The App is available for free at the Apple App Store and Google Play. Before you hit, see what your camera sees by viewing it on your smartphone or tablet's screen.
Wi-Fi Configuration Transcript:
Connecting Wi-Fi Remote
*Make sure the Wi-Fi setting in the eXpo is turned on prior to attempting to connect
- Hold the bottom Camera button located on the bottom of the Wi-Fi remote until remote lights green.
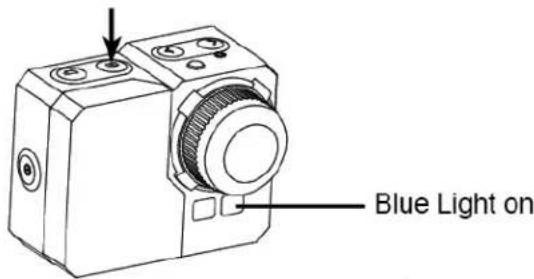
- Hold in the Camera button on the eXpo until the Blue LED light begins to blink.
- Power on the eXpo once the blue LED stops blinking and blue light remains on.
- Allow the eXpo to locate the Wi-Fi remote and will be ready for use once the signal bars on top of the eXpo LCD shine green.
- On the Wi-Fi remote, press the Camera button to take a picture, press the Video button to begin recording video.
*Hold in the Power (top) button on the wireless remote to wirelessly power off the eXpo.

Notice:
If the 'BUSY' icon appears on the LCD screen, please allow a few seconds for the camera to load.
1080i video format and video 'lapse mode' is not available during Wi-Fi recording.
Pyle eXpo Application
Downloadable App
Network Wi-Fi connection is capable for connecting the eXpo to your Smartphone. Unlock more features and control your eXpo directly from your Smartphone.

| Video Setting | |
| Resolution | 1080 30P |
| Video Quality | Fine |
| Video Stamp | Off |
| Photo Setting | |
| Size | 14M |
| Photo Quality | Fine |
| Photo Stamp | On |
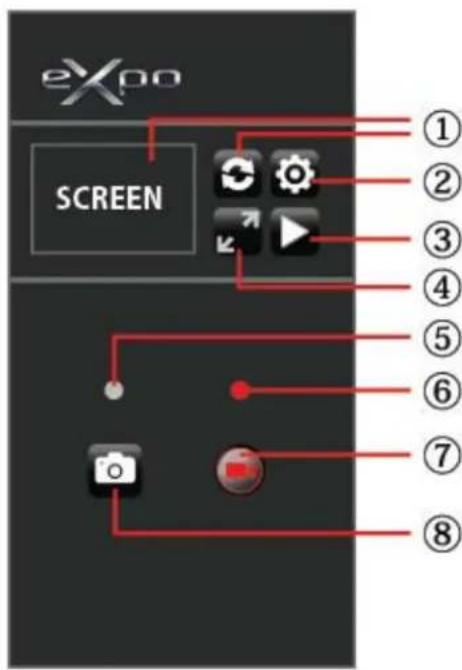
| 1. Refresh Button | 3. Playback Button | 5. Photos Status Light | 7. Start / Stop Recording |
| 2. Setting Button | 4. Enlarge Screen | 6. Recording Status Light | 8.Image Snap Button |
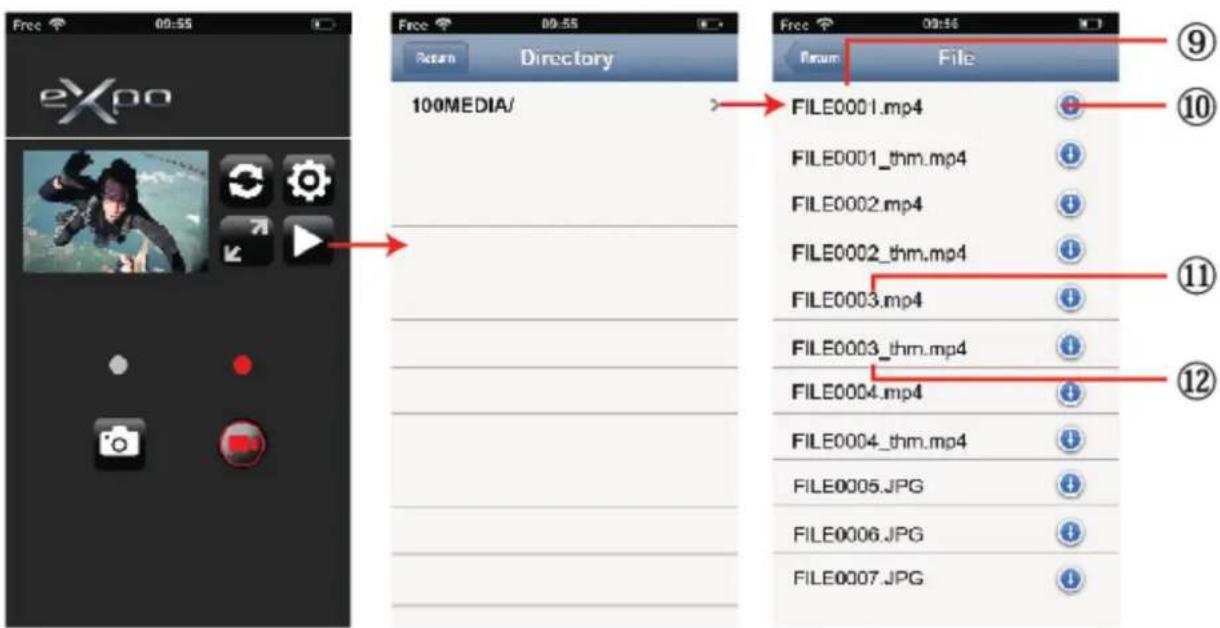
| 9. File Name 11. Original Size Video File |
| 10. Download Button 12. Compressed Video File |
Camera Settings
| Photo Size | 20MP (16:9)14MP5MP |
| Self Timer | OFF/3/5/10/30/60 Seconds |
| Burst Rate | OFF3 photos in 1 second5 photos in 1 second10 photos in 1 second10 photos in 2 seconds |
| Auto Shooting | OFF/1/3/5/10/30/60 Seconds |
| Date Stamp | ON / OFF |
| Quality | High / Medium / Low |
Image/Picture Taking Options (Transcript):
Choose Between 20, 14, 5 Mega Pixel Images
Automatic Self Timers: 60, 30, 10, 5, 3 Seconds
Burst Rates: 10, 5, 3 Picture Taken Per Second
Auto Shooting: 60, 30, 10, 5, 3, 1 Seconds
Quality Adjustment: High, Medium, Low
Resolution: up to 4283 x 3288
Add Date Stamp: On/Off
Video Settings
| Video Size | NTSC 1080i 1920x1080 @60fpsNTSC 1080p 1920x1080 @30fpsNTSC 960p 1280x960 @30fpsNTSC 720p 1280x720 @60fpsNTSC 720p 1280x720 @30fpsNTSC 480p 848x480 @60fpsPAL 1080i 1920x1080 @50fpsPAL 1080p 1920x1080 @25fpsPAL 960p 1920x960 @25fpsPAL 720p 1280x720 @50fpsPAL 720p 1280x720 @25fpsPAL 480p 848x480 @50fps |
| Quality | High / Medium / Low |
| Video Duration | 5 Min. / 10 Min. / 15 Min. / 20 Min. / 30 Min. |
| Date Stamp | ON / OFF |
| *Dual Streams | ON / OFF |
| Time Lapse | OFF1 frame per second1 frame per 2 seconds1 frame per 5 Seconds1 frame per 10 Seconds1 frame per 30 Seconds1 frame per 60 Seconds |
| Motion Detection | OFF / High / Medium / Low |
| Loop Recording | ON / OFF (10 minutes / video file) |
| Mic Volume | OFF / 100% / 90% / 80% / 70% / 60% / 50%(Default 80%) |
* The camera creates 2 video file while recording, first is the original file (FILE0001.mp4), the seconds is a small size VGA file (FILE0001.thm.mp4) which can be easier for streaming from camera to smartphones.
Video Taking Options (Transcript):
Video Resolutions, Choose Between: 1080i, 1080p, 960p, 720p, 480p
Frames Per Second: 60, 50, 30 or 25
Video Duration up to 30 Minutes
System Support: NTSC and PAL
Quality Adjustment: High, Medium, Low
Time Lapse: On/Off
Video Resolution Options
NTSC: 1080i (60 fps) - 1080p (30 fps) - 960p (30fps) - 720p (60fps) - 720p (30fps) - 480p (60fps)
PAL: 1080i (50 fps) - 1080p (25 fps) - 960p (25fps) - 720p (50fps) - 720p (25fps) - 480p (50fps)
eXpo Camera Settings
| Language Support | English、Deutsch、Español、Francais、Italiano |
| *Date | YYYY-MM-DD |
| Time | HH:MM |
| Video system | PAL / NTSC |
| Auto screen | OFF / 30 Seconds / 1 Min. / 3 Min. / 5 Min. |
| Auto Shutdown | OFF / 3 Min. / 5 Min. / 10 Min. |
| Image Rotation | OFF / 180° |
| Light Freq | 50Hz / 60Hz |
| Metering | Multi / Center / Spot |
| ISO | Auto / 100 / 200 / 400 / 800 / 1600 |
| White Balance | Auto / Incandescent / Daylight / Cloudy |
| #Color Setting | Rich / Natural |
| EV | -2.0 -1.7 -1.3 -1.0 -0.7 -0.3 0.0 +0.3 +0.7 +1.0 +1.3 +1.7 +2.0 |
| Buzzer | ON / OFF |
| #WiFi | ON / OFF |
| Format | SD Card |
*When selecting a new color setting and WiFi ON/OFF, the camera will need to be reboot automatically.
SD Memory Card
Compatible with all Micro SD memory cards up to 32GB (Class 6 or above). For 64GB SD Memory card compatibility, FAT32 format is required. Make sure to safely eject SD memory when disconnecting from your Mac or PC when in use.
*SD Memory Card not included
Memory Card / Storage Chart
Compatible with 2GB, 4GB, 8GB, 16GB, 32GB and 64GB capacity microSD, microSDHC and microSDXC memory cards. While all speed class ratings are compatible, it requires using an SD card with Speed Class Rating 10 or higher speed when recording, or when using the 1 fps time Lapse setting. We recommend using a higher quality, preferred brand name memory card for maximum reliability in high-vibration activities.
| Mode | Resolution 4GB 8GB 16GB | 32GB 64GB | ||||||
| Snap Picture | 5M 3945 7800 15600 31200 | 62400 | ||||||
| 14M 1450 2900 5800 11600 | 23200 | |||||||
| 20M(16:9) | 1440 2880 5760 11500 | 23000 | ||||||
| Record Video | 1080i/60 | 45min | 90 | 180 | 320 | 640 | ||
| 1080p/30 | 50min | 100 | 200 | 400 | 800 | |||
| 960p/30 | 55min | 110 | 220 | 440 | 880 | |||
| 720p/60 | 60min | 120 | 240 | 480 | 960 | |||
| 720p/30 | 85min | 170 | 340 | 680 | 1360 | |||
| 480p/60 | 90min | 180 | 360 | 720 | 1440 | |||
* Works with class 6 cards or above.
Delete Image/Video
To delete an image or video, hold in the camera button. You are now in the camera and video media preview selection screen. Then, press the video button to select between images or videos, and once you highlight your choice, press the power button to view those files. Now navigate through your files with the camera and video buttons until you highlight the file you wish to delete. Once highlighted, press the power button again to view the image in full screen. Then to delete the file, press the left arrow on the top of the eXpo, then the camera button and the power button to execute the delete. (Use the camera and video buttons to scroll left and right. Highlight the 'O' and press the power button to delete the file. Highlight the 'X' and press the power button to cancel deletion of the file).
Motion Detection Recording
Choose between motion detector sensitivity settings: low, medium or high. Once you select a desired motion detector setting level, you will know motion detection recording is activated when you see a 'sprinting man' icon on the top left of the LCD Display screen. Once you press the video button to record, the sprinting man icon will begin to blink, this does not mean the eXpo is recording. Based on your sensitivity settings, the eXpo will begin recording once some form is presented before the camera lens. It will then continue to record if the eXpo's camera lens is presented with movement.
The motion detector recording will automatically stop recording after approximately 30 seconds of no movement before the eXpo's camera lens. Motion detector recording will then automatically resume once movement is again reintroduced before the eXpo's camera lens.
Auto Shooting
Choose between 60, 30, 10, 5, 3 and 1 second intervals. Once the desired time is selected, press the camera button to begin to automatically take pictures. A countdown clock will appear on the top-middle portion of the LCD screen. Once the countdown timer hits '0', the eXpo will snap a picture. The eXpo will continually countdown and capture images until you press the camera button again to stop the auto shooting feature.
Burst Rate
Choose between 10, 5 or 3 images taken per second. Once the desired selection is made, return to the
Light/Color/Image/Picture Settings
Completely customizable picture and light settings. Make adjustments and fine-tune the image quality and make adjustments to settings like Light Frequency, Exposure, Balance and more.
• Color Setting Options: Rich or natural
• White Balance: Incandescent, daylight, cloudy and auto
• EV (Exposure Value) Settings: Adjusts camera shutter speed.
• Light Frequency Options: 50Hz, 60Hz
• Exposure Metering: Spot, Center and Multi
- ISO (International Standards Organization) is the standardization of sensitivity for camera sensors. When adjusting ISO settings you basically adjust your cameras sensitivity to light and helps determine the picture's exposure. ISO Settings: 100, 200, 400, 800, 1600 and Auto
LCD Digital Display
Bottom left on display indicates remaining memory available on your inserted SD Memory Card
*If no SD Memory Card is inserted, the display will read '0.0'
Bottom right on display indicates recording video quality
System Requirements
PČ:
The camera is compatible with Microsoft® XP (Service Pack 2 or later) and Mac OS X 10.8.4 or later.
Windows / Windows 7 / Windows 8
Windows XP (Service Pack 2 or later) or Vista
3.2GHz Pentium 4 or faster
DirectX 9.0c or later
Minimum 1GB of system RAM
Video card with minimum 256MB of RAM
Mac:
Mac OS® X 10.8.4 or later
2.0GHz Intel Core Duo or faster
Minimum 1GB of system RAM
Video card with minimum 128MB of RAM
Please Note: Due to the nature of this action camera, it is preferred for taking still images. Higher image quality and clarity can be achieved through holding the eXpo steadily or placing the camera in a fixed location.
Battery life
Battery icon will alert for low battery status. If recording is occurring when battery reaches 0%, the camera will save the file and power OFF.
To charge the battery:
- Connect the camera to a power source.
- The red status indicator Light remains on while the battery is charging.
- The red status indicator Light will turn OFF when the battery is fully charged. The battery will charge to 100% in 4 hours when using 500mAh USB-compatible A/C wall charger. Other chargers may charge at only half this rate. No damage will occur to the camera or the battery if used together prior to full charge.
To remove the battery:
- Remove the battery door by placing your thumb in the indentation in the battery door (on the back of the camera) and sliding it to the left.
- Allow the door to pop out. Grasp the battery pull-tab and remove from the camera.
flowchart
graph TD
    A["Camera"] -->|①| B["Camera with 100% output"]
    B -->|②| C["Camera with 50% output"]
    C -->|③| D["Camera with 50% output"]
    D -->|④| E["Camera with 50% output"]
    E -->|ok| A
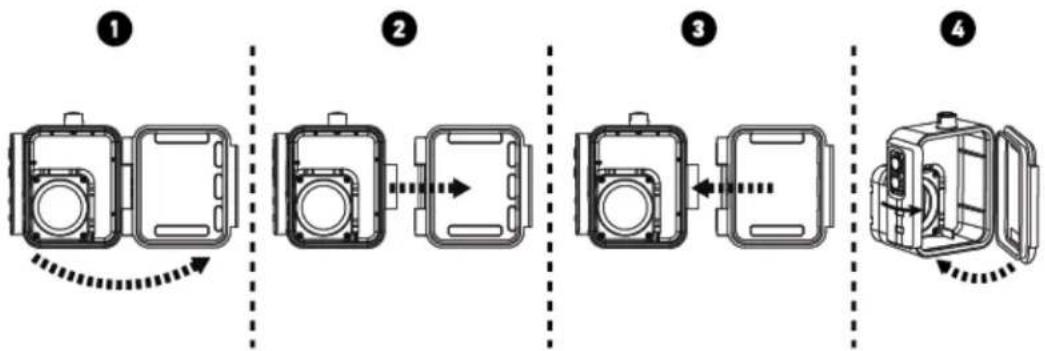
Assembling the camera
The camera comes with 2 types of removable backdoors – waterproof & sound/noise-reducing.
flowchart
graph LR
    A["Device ①"] --> B["Device ②"]
    B --> C["Device ③"]
    C --> D["Device ④"]
    style A fill:#f9f,stroke:#333
    style B fill:#f9f,stroke:#333
    style C fill:#f9f,stroke:#333
    style D fill:#f9f,stroke:#333
Waterproof Backdoor: Use waterproof backdoor to protect the camera from depths up to 197'/60m underwater. Sound Backdoor: (non-waterproof) reduces unwanted/wind noise. Provides better sound quality for more favorable effects.

Always proceed with caution when recording or using in/near water or with water spots.
To place the camera into the housing:

flowchart
graph LR
    A["Device ①"] --> B["Component ⑤"]
    B --> C["Component ④"]
    C --> D["Ok"]
Connecting the Wi-Fi Remote
*Make sure the Wi-Fi setting in the eXpo is turned on prior to attempting to connect.
- Hold the Camera button located on the bottom of the Wi-Fi remote until it lights green.
- Hold in the Camera button located on top of the eXpo, until the Blue LED of the camera begins to blink.
- Power on the eXpo.
-
Allow the eXpo a few seconds to locate the Wi-Fi remote and connect (Will be ready for use once the signal bars on the eXpo LCD screen shine green.)
-
You're set to go! Use the Wi-Fi remote and press the Camera button to take a picture, press the Video button to begin recording video. *Hold in the Power (top) button on the wireless remote to wirelessly power off the eXpo.
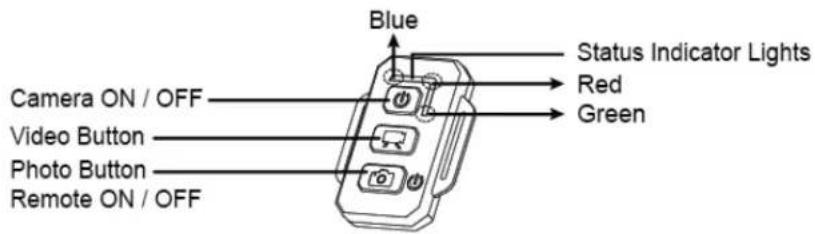
Wi-Fi Remote Controls
| Remote ON / OFF | Press and hold the photo button for 3 seconds |
| Camera ON / OFF | Press the power button |
| Take a Picture | Press the photo button |
| Take a Video | Press the video button |
* Power OFF both the camera & remote to shut down this function.
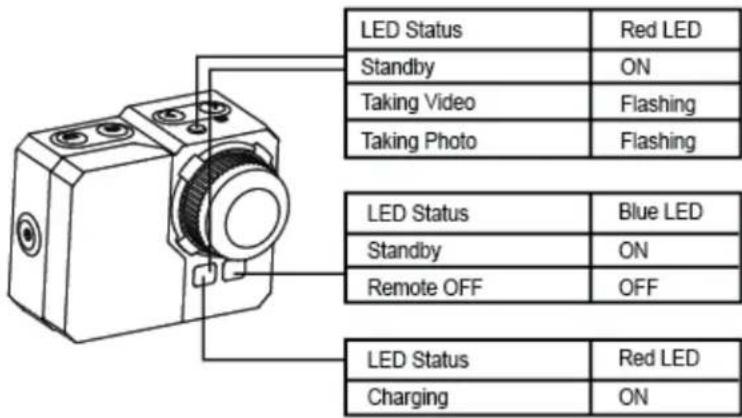
Remote Status Indicator Lights
| Green | Power ON |
| Red | Take a Picture |
| Blue | Take a Video |
| Red | Charging* |
* LED turns OFF when battery fully charged
Preventing Water Damage To Your Camera
- Keep the rubber seal clean and dry after every use.
- After every use in salt water, please rinse the housing with fresh water and dry.
- Please remember to clean the seal, rinse in fresh water and shake or pat dry.
* Failure to follow these steps each time you use the camera can result in leaks that may damage or destroy your camera. Your warranty does not cover water damage resulting from user error.
Technical changes and mistakes reserved!
Due to rapid technical development, products are under constant changes / improvements. Please check
www.PyleAudio.com for the latest updates!
Specifications
Model No.: PSCHD90
Pyle eXpo 1080p Hi-Res Action Camera/Camcorder Full HD 1080p Video, 20 Mega Pixel Camera, 2" LCD Screen
• Fully HD Hi-Resolution Mini Action Camera, Camcorder
• 2.0" Digital LCD Display
• Micro SD Card Slot (Supports up to 32GB)
• Motion Detector Recording Function
• HDMI Mini Connection Port
• Wi-Fi Remote: Wirelessly Snap Pics & Record Video
• Video Resolutions, Choose Between: 1080p, 1080i, 960p, 720p, 480p
- Frames Per Second: 60, 50, 30 or 25
• Image Resolution up to 4283 x 3288
- Choose Between 20, 14, 5 Mega Pixel Images
• Built-in Rechargeable Battery (1050mAh)
• Battery Life: Approximately 1.5 Hours
- Connect to PC and Share via USB
• Marine Grade Waterproof Case: Safe for Depths up to 190 Feet
- Includes (2) Removable Case Doors (Waterproof & Noise-Reducing)
• Self Timer, Burst Shots & Auto Shoot Features
• Works with Mac and PC
• Light Frequency Options: 50Hz, 60Hz
• Exposure Metering: Spot, Center and Multi
• ISO Settings: 100, 200, 400, 800, 1600 and Auto
• Light Frequency & Exposure Metering Settings
• Auto Screen Turn Off & Shutdown
• Multi-Language Support: English, French, German, Spanish, Italian
- Dimensions (L x W x H): 2.25" x 1.5" x 1.9"
- Also includes USB charging cable, removable battery, battery charging dock, bicycle mount
Warranty
As the warranty is included within this instruction manual, please ensure that the store name and date of purchase are filled in. Please read the warranty carefully and keep it in a safe place. This product is covered by a 365 days Limited Warranty on parts and labor from the date of original purchase, and purchases must be made through an authorized dealer. The warranty covers defects in workmanship and materials. The warranty does not apply to units, which have been damaged or abused intentionally or unintentionally. Purchase from individuals or unauthorized internet sites voids the warranty. The warranty does not apply to units where the rear cap was incorrectly installed or closed, cosmetic damage, modification of or to any part of the product.
Tampering with or altering the unit will void the warranty. Any unauthorized service will void the warranty. Original sales receipt must be produced for any warranty service and a return authorization must be obtained from our customer service points.
The warranty does not cover any damage that may occur during a sport activity. It is the user's responsibility to secure the camera securely to any sport equipment.
Temperature Warning:

The camera has become too hot and needs to cool down after 2 hours of repeated use. (Continuously recording). Simply let it sit and cool before attempting to use it again. Your camera will not allow itself to overheat, but will shut down if overheating or higher than usual temperatures are reached.
Note:
*Due to the nature of this action camera, it is preferred for taking still images. Higher image quality and clarity can be achieved through holding the eXpo steadily or placing the camera in a fixed location.
*It is the user's responsibility to mount the camera securely to any sport equipment. The screws of the mounts must be retightened from time to time for prevention of unwanted effects and performance. The warranty does not cover any damage that may occur during a malfunction during any sport activity. Please use the eXpo safely and enjoy!