MES301HP - Pećnica THERMADOR - Besplatni korisnički priručnik
Pronađite besplatno priručnik za uređaj MES301HP THERMADOR u PDF formatu.

Pitanja korisnika o MES301HP THERMADOR
0 pitanje o ovom uređaju. Odgovorite na one koje znate ili postavite svoje.
Postavi novo pitanje o ovom uređaju
Preuzmite upute za vaš Pećnica u PDF formatu besplatno! Pronađite svoj priručnik MES301HP - THERMADOR i uzmite svoju elektroničku napravu natrag u ruke. Na ovoj stranici objavljeni su svi dokumenti potrebni za korištenje vaše naprave. MES301HP marke THERMADOR.
KORISNIČKI PRIRUČNIK MES301HP THERMADOR
INSTRUCTIONMANUAL
ForBuilt-inSteamandConvectionOvens
Models
MES301HS
MES301HP
About This Manual 4
Safety 5
Getting Started 8
Your New Appliance 8
ControlPanel 8
Touchpads 9
Oven Modes 10
Oven and Accessories 11
Water Tank 13
Automatic Calibration 14
Getting Started 14
Setting the Clock 14
Adjusting the Water Hardness Level 14
Cleaning 15
Operation 16
Operating the Appliance 16
Turning On the Appliance 16
Turning Off the Appliance 17
After Each Use 17
Automatic Shutoff 17
Clock and Timer Settings 18
Setting the Timer 18
Setting the Cook Time 19
Changing the End Time 20
Setting the Clock 21
Automatic Programming - EasyCook 22
Setting a Program 22
Program Information 23
EasyCook - Program Charts 24
Favorites 28
Storing a Setting in Favorites 28
Starting a Favorites Setting 29
Deleting a Favorites Setting 29
Panel Lock 29
Basic Settings 30
GettingtheMostOutofYourAppliance32......
Cooking Tables and Tips 32
Steaming 32
True Convection 33
Vegetables 33
Side Dishes and Legumes 34
Meat, poultry, fish 35
Slow Cooking Meat 38
Soufflés, Casseroles, Additions to Soups, etc. 39
Desserts, compote 39
Cakes and Baked Goods 40
Reheating Food 43
Defrosting 44
Proofing Dough 44
Juice Extraction 45
Frozen Products 45
Cleaning and Maintenance 47
Cleaning 47
Cleaners 48
Steam Clean 49
Decalcify 50
Removing and Installing the Appliance Door 51
Cleaning the Rack Rail Frames 53
Cleaning the Door Glass 53
Maintenance 54
Replacing the Oven Bulb 54
Replacing the Door Gasket 55
Service 56
Before Calling Service 56
Customer Service 58
Model and Serial Numbers 58
Energy-Saving Tips 59
STATEMENT OF LIMITED PRODUCT WARRANTY 60
What this Warranty Covers & Who it Applies to 60
How Long the Warranty Lasts 60
Repair/Replace as Your Exclusive Remedy 60
Out of Warranty Product 61
Warranty Exclusions 61
AboutThisManual
HowThisManualisOrganized
Youcangetthemostoutofyournewovenbyreadingthismanualfrombeginning toend. Thiswayyouwillsystematicallygettoknowyourapplianceandbecome familiarwithitsoperationandfeatures.
Themanualconsistsofthefollowingsections:
- The "Safety" section provides information on how to safely operate your oven.
- “Getting Started” introduces you to the oven components and features.
- The “Operation” section offers you step-by-step instructions on how to operate youroven.
- In "Getting the Most Out of Your Appliance" you can find a list of many common foodswiththeappropriateovenmode,temperature,rackpositionandbake time.Thissectionalsoprovidesyouwithseveralbakewareandpreparationtips.
- “Cleaning and Maintenance” provides you with information on how to clean and careforthevariousovenparts.
- The “Service” section includes your warranty and do-it-yourself troubleshooting tips.
Payspecialattentiontotheimportantsafetyinstructionsinthe"Safety" section.
Safety

ImportantSafetyInstructions
READANDSAVETHESEINSTRUCTIONS

WARNING:
When properly cared for, your new oven has been designed to be safe and reliable. Read all instructions carefully before use. These precautions will reduce risk of burns, electric shock, fire and injury top or persons. When using kitchen appliances, basic safety precautions must be followed, including those on the following pages.
TransportingtheAppliance
ProperInstallation and Maintenance
Donotcarryorholdtheappliancebythedoorhandle. Thedoorhandlemay break off.
Havetheinstallershowyouthelocationofthecircuitbreakerorfuse.Labelitforeasyreference.
This appliancemustbeproperlyinstalledandgroundedbyaqualifiedtechnician. Connecttoaproperlygroundedoutletonly.RefertothelInstallationInstructionsfor details.
This appliance is intended for normal family household use only. It is not approved for outdoor use. Referto the warranty form more information. If you have any questions, contact the manufacturer.
Donotstoreorusecorrosivechemicals,vapors,flammablesornonfoodproductsinornearthisappliance.Itisspecificallydesignedforheatingorcookingfood.Useof corrosivechemicalswhenheatingorcleaningwilldamagetheapplianceandcould resultinjury.
Donotoperatethisapplianceifitisnotworkingproperlyorifithasbeendamaged. Contactanaauthorizedservicetechnician.
Donotobstructovenvents.
Donotrepairorreplaceanypartoftheapplianceunlessspecificallyrecommended inthismanual.Referallservicingtoafactoryauthorizedservicecenter.
Riskofshortcircuiting!Neverallowelectricalappliancecordstobecomepinchedin thehotappliancedoor.Thecord'sinsulationcanmelt.
FireSafety
Donotusealuminumfoilorprotectivelinerstolineanypartoftheappliance, especiallytheovenbottom.Installingtheselinersmayresultinriskofelectricshock orfire.
If materials inside an open should ignite, keep door closed. Turnoff the appliance, and disconnect the circuit at the circuit breaker box.
Use this appliance only for its intended purpose as described in this manual. For example, never use the appliance for warming or heating the room. Never use the appliance for storage.
Alwayshaveaworkingsmokedetectornearthekitchen.
Intheeventthatpersonalclothingorhaircatchesfire, dropandrollimmediately to extinguishflames.
Smotherflamesfromfoodfiresotherthangreasefireswithbakingsoda.Neveruse wateroncookingfires.
Haveanappropriatefireextinguisheravailable, nearby, highlyvisibleandeasily accessibleneartheoven.
BurnPrevention
DONOTTOUCHHEATINGELEMENTSORINTERIORSURFACESOFOVEN-
Heatingelementsmaybehoteveniftheyaredarkincolor.Interiorsurfacesofan ovenbecomehotenoughtocauseburns.Duringandafteruse,donottouch,orlet clothing,potholders,orotherflammablematerialscomeincontactwithheating elementsorinteriorsurfacesoftheovenuntiltheyhavehadsufficienttimetocool. Othersurfacesoftheappliancemaybecomehotenoughtocauseburns.These surfacesincludeovenventopenings,surfacesneartheseopeningsandoven doors.
Donottouchhotsurfaces.Usehandlesorknobs.
Exercisecautionwhenopeningtheappliance.Standingtotheside,openthedor slowlyandonlyslightlytolethotairand/orsteamescape.Keepyourfaceclear of theopeningandmakesuretherearenochildrenorpetsneartheunit.Afterthehot airand/orsteamisreleased,proceedwithyourcooking.Keepdoorsshutunless necessaryforcookingorcleaningpurposes.Donotleaveopendoorsunattended.
Donotheatorwarmsealedfoodcontainers.Build-upofpressuremaycausethecontainertoburstandcauseinjury.
Alwaysplaceovenracksindesiredlocationwhileoveniscool.Ifarackmustbe movedwhiletheovenishot,donotletpotholderstouchtheheatingelements.
Alwaysusedrypotholders.Moistordamppotholdersonhotsurfacesmayresultin burnsfromsteam.Donotletpotholderstouchhotheatingelements.Donotusea towelorotherbulkycloth.
Never prepare food with large quantities of high proof alcoholic beverages. Steam containing alcohol can ignite inside the appliance. Only uses small quantities of high proof alcoholic beverages, and use caution when opening the appliance door.
ChildSafety
Whenchildrenbecomeoldenoughtousetheappliance,itisthelegalresponsibility oftheparentsorlegalguardianstoensurethattheyareinstructedinsafeoperation oftheappliancebyqualifiedpersons.
Donotallowanyonetoclimb,stand,lean,sit,orhangonanypartofanappliance,especiallyadoor,warmingdrawerorstoragedrawer. This candamagethe appliance,andtheunitmaytipover,potentiallycausingsevereinjury.
Donotallowchildrentousethisapplianceunlesscloselysupervisedbyanadult. Childrenandpetsshouldnotbeleftaloneorunattendedintheareawherethe applianceisinuse. Theyshouldneverbeallowedtoplayinitsvicinity,whetheror nottheapplianceisinuse.
CAUTION-Itemsofinteresttochildrenshouldnotbestoredinanappliance, in cabinetsaboveanappliance,oronthebacksplash.Childrenclimbingonan appliancetoreachitemscouldbeseriouslyinjured.
BakingandSteamingSafety
CAUTION – Hot steam can escape during use. Do not touch the ventilation openings.
CAUTION – Hot steam can escape when opening the oven door. Hot water may drip from the door. Keep children away.
CAUTION – Use pot holders to remove inserted cooking accessories from the hot oven. Hotliquidmayspilloverwhenremovingthecookingaccessories.
Theovenbottomandtheevaporatordishmustalwaysremainclear.Alwaysplace ovenwareontherackorintheperforatedcookingpan.
Ovenwaremustbeheatandsteamresistant.Siliconebakingpansarenotsuitable forCombinationmode.
When using Steammodewithaperforated cooking pan, always slid the baking pan underneath. Thepan will catch any drippings.
Donotstoremoistfoodsforanextendedperiodoftimeintheclosedoven. Thefood could cause corrosion of the oven interior.
Do not overfill very juicy fruit tortes with fruit when using the baking pan. The fruit juicethatdripsoffthebakingpanleavesbehindstainsthatcannotberemoved.
When using aluminum foil in the oven, do not allow it to touch the glass on the door. This could cause permanent staining of the doorglass.
Donotplaceanythingontheopenappliancedoor. Thiscoulddamagethe appliance.
The useofaccessoryattachmentsnotrecommendedbytheappliance manufacturermaycauseinjuries.
CleaningSafety
Donotcleantheappliancewhileitisstillhot.Somecleanersproducenoxious fumeswhenappliedtoahotsurface.Wetclothsorspongescancauseburnsfrom steam.
Risk of severe burns! Do not clean the appliance immediately after turning it off. The waterintheevaporatordishisstillhot.Waituntiltheappliancehascooleddown.
The door will no longer close properly if the door gasket is heavily soiled. The face of adjacentfurnishingscouldbecomedamaged.Alwayskeepthedoorgasketclean andreplaceitifnecessary.
Theovencavityismadeofhighqualitystainlesssteel.Impropercaremayresultin corrosionoftheovencavity.Followthecareandcleaninginstructionsprovidedin themanual.Removefoodresidueandspillsfromthecavityimmediatelyafterthe appliancehascooleddown.
OvenwareSafety
Donotplacefooddirectlyonovenbottom.
Followthemanufacturer'sdirectionswhenusingcookingorroastingbags.
GettingStarted
YourNewAppliance
Thissectioncoversinformationonthefollowing:
•Controlpanel
- Ovenmodes
•Ovenandaccessories
ControlPanel
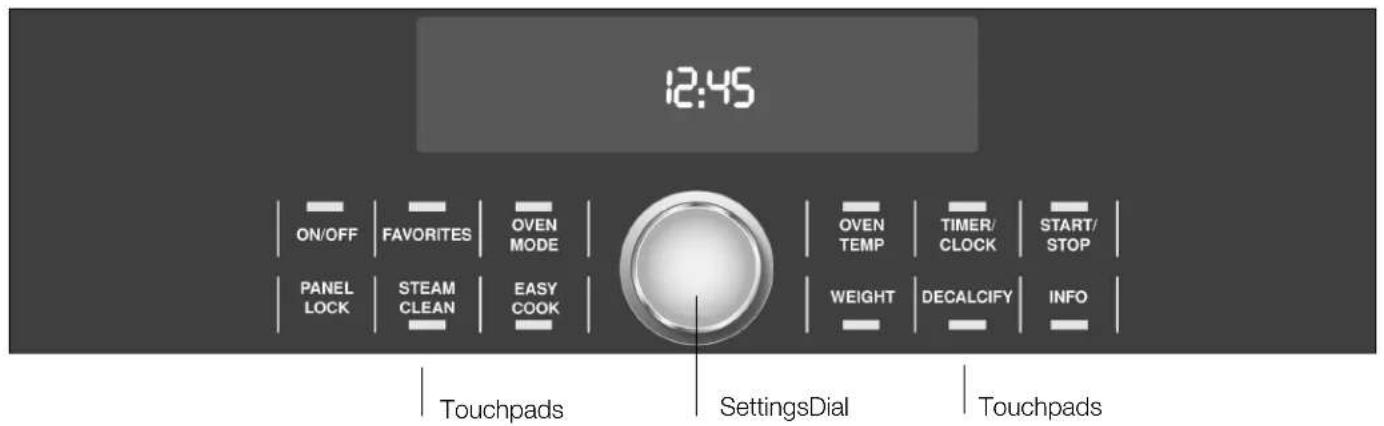
text_image
12:45 ON/OFF | FAVORITES | OVEN MODE | PANEL LOCK | STEAM CLEAN | EASY COOK | Touchpads SettingsDial OVEN TEMP | TIMER/CLOCK | START/STOP | WEIGHT | DECALCIFY | INFO | TouchpadsTouchpads
Sensorsarelocatedunderthetouchpads. Thesensorsrespondtothelighttouchof yourfingeronthepad.
| Touchpad | Padfunction |
| ON/OFFTurnsapplianceonandoff | |
| FAVORITESPressbrieflytoselectmemory | |
| Pressandholdlongertostoreinmemory | |
| OVENMODESetstheovenmode | |
| PANELLOCKActivates/deactivatesthepanellock | |
| STEAMCLEANSetsSteamCleanmode | |
| EASYCOOKSetsautomaticprogramming | |
| OVENTEMPSetsthetemperature | |
| TIMER/CLOCKSetsthetime | |
| START/STOPPressbrieflytostart/pauseoperation | |
| Pressandholdlongertocanceloperation | |
| WEIGHTSetstheweightforEasyCookautomaticprogramming | |
| DECALCIFYSetsDecalcifymode | |
| INFOPressbrieflytoviewthecurrentpreheatingtemperature | |
| Pressandholdlongertoopenorclosethebasicsettingsmenu | |
Oven Modes
UsetheOVENMODEtouchpadtoaccessthevariousovenmodesoftheappliance.
| Ovenmode | Temperature range | DisplaysymbolUse | |
| TrueConvection85-450°F(30-230°C) | ♣Formoistcakes,spongecakes,braisedmeat.Afanonthebackwalldistributestheheatevenlythroughout theoven. | ||
| Steam95-210°F(35-100°C) | ♥Vegetables,fish,sidedishes;extractingfruitjuice. | ||
| Combination250-450°F(120-230°C) | ♣+♣ | Fish, soufflés and baked goods.ConvectionandSteamarecombined. | |
| Reheat210-360°F(100-180°C) | ≡+♣+♣ | Plated dishes and baked goods.Cookedfoodisgentlyreheated.Theinflowofsteamkeepsthe foodmoist. | |
| Proof95-120°F(35-50°C) | ♣+♣ | Yeast dough and sourdough.Thedoughrisesmuchfasterthanatroomtemperature.Steam andConvectionarecombinedtokeepthesurfaceofthedough fromdryingout. | |
| Defrost95-140°F(35-60°C) | ♣ | Fruit,vegetables,meatandfish.SteamandConvectionarecombined.Thehumidityinthe steamerovengentlytransfersheattothefood.Thefooddoes notdryoutorloseitsshape. | |
| SlowCook | 140-250°F(60-120°C) | ♣+♣ | Roast beef, leg of lamb.Makesalltypesandcutsofmeatextratender. |
| DishWarming | 85-160°F(30-70°C) | ≡ | Forovenwareandplates.Foodinpreheatedovenwaredoesnotcooldownasquickly.Drinksstaywarmlonger. |
| KeepWarm | 140-210°F(60-100°C) | ♣ | Keepscookedfoodwarmforuptonehour. |

CAUTION:
Followtheseguidelineswhen usingKeepWarmmode:
- DonotuseKeepWarmmodetoheatcoldfood.
- Be sure to maintain proper food temperature. The USDA recommends holding hotfoodat140°F(60°C)orwarmer.
• DONOTwarmfoodlongerthanonehour.
OvenandAccessories
Theovenhasfourracklevels. Theracklevelsarenumberedfrombottomtotop.

WARNING: Do not use aluminum foil or protective liners to line any part of the appliance, especially the cavity bottom. Installing the seliners may result in risk of electric shock or fire.

CAUTION: Do not cover the evaporator dish. Do not place ovenware on the cavitybottom.

CAUTION: Do not slide any accessories in between the rack levels. The accessorymaytipover.
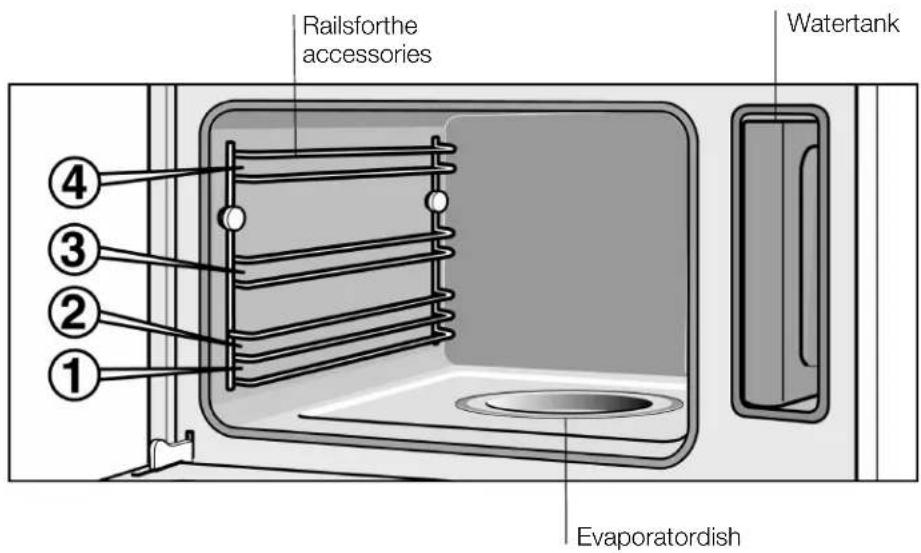
text_image
Railsforthe accessories Watertank EvaporatordishAccessories
Useonlyaccessoriesthatcamewiththeapplianceorthatwerepurchasedthrough customerservice.Theaccessoriesaredesignedspecificallyforyourappliance.
The following accessories comewith the appliance:
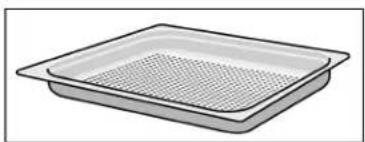
natural_image
Illustration of a rectangular container filled with a mesh pattern (no text or symbols)Perforatedcookingpan-fullsize
(CS2XLPH)
15/8"deep
Idealforsteamingfishorlargequantities of vegetables;foreextractingjuicefromberries and muchmore.

natural_image
Simple line drawing of a rectangular tray with a perforated interior (no text or symbols)Perforatedcookingpan-halfsize
(CS1XLPH)
15/8"deep
Idealforsteamingvegetables,extractingjuice fromberries,defrosting,andforsmaller quantitiesoffood.
natural_image
Illustration of a rectangular baking tray (no text or symbols)Cookingpan-halfsize
(CS1XLH)
15/8"deep
Useforsmallerquantities, rice, and cereals
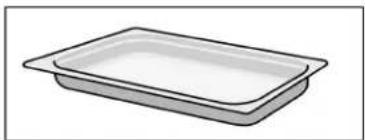
natural_image
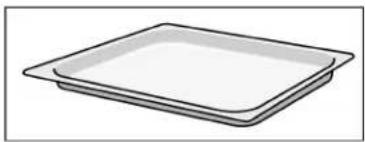
Simple line drawing of a rectangular tray or baking pan (no text or symbols)Bakingpan-fullsize
(CS2LH)
1 1/8"deep
Idealforbakingcakesandcatchingdripping liquidswhensteaming.
natural_image
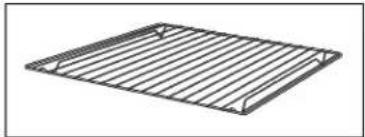
Simple line drawing of a rectangular metal grate or rack (no text or symbols)Wirerack
(CSRACKH)
Idealforbaking, cakepansandcasseroles.
Alsoidealforroastswhenusedwiththefullsize bakingpan.
The following additional accessories can be purchased in retail stores:
| Accessory | Orderno. |
| Perforated cooking pan - Full Size, 1 5/8" deep | CS2XLPH |
| Perforated cooking pan - Half Size, 1 5/8" deep | CS1XLPH |
| Cookingpan-FullSize,15/8"deepCS2XLH | |
| Cooking pan - Half Size, 1 5/8" deep | CS1XLH |
| Bakingpan-FullSize,11/8"deepCS2LH | |
| WirerackCSRACKH | |
| Powderdescaler310967 |
The cooking pans may become warped during baking. This is duetomajor temperature fluctuations affecting the accessory, which may occur food displaced on only one part of the accessory or a deep frozen items such as pizzahas been placed on the accessory.
WaterTank
Thewatertankislocatedontherightwhenyouopentheappliancedoor.
Useonlyfreshtapwaterorpurchasednon-carbonatedwatertofillthewatertank. If yourwaterisveryhard, werecommendusingsoftenedwater.
If the tapwater is highly chlorinated (>40mg/l), usenon-carbonated mineral water with low amount of chlorine. Contact your water utility company to find out what type of tap water you have.
Moistenthesealinthetanklidwithsomewaterpriortoinitialuse.

CAUTION: Do not fill the water tank with distilled water or any other liquids.
natural_image
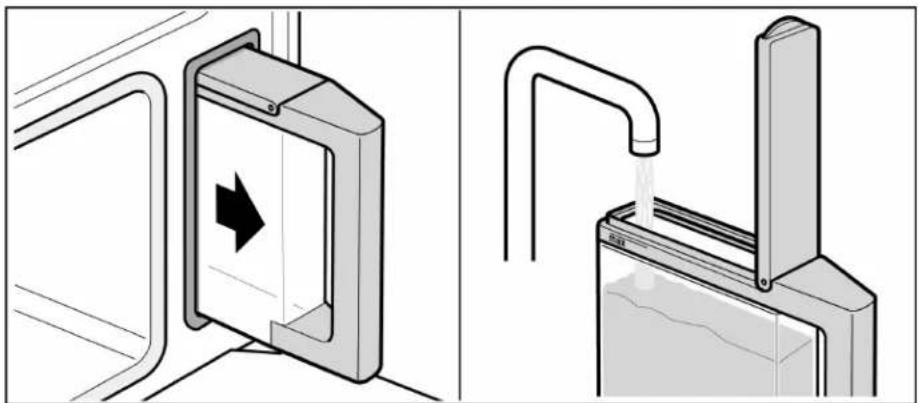
Two technical diagrams showing a door lock mechanism and a water drain system (no text or symbols present)BeforeEachUse
Fillwatertankbeforeeachuse.
- Fillthewatertankwithcoldwateruptothe"max"mark.
- Closethetankliduntilclearlysnapsinplace.
3.Slideinthewatertankuntilillocksintoposition.
AfterEachUse
Emptythewatertankaftereachuse.
- Keep the water tank level while slowly pulling it out of the appliance to ensure that noremainingwaterdripsdownandoutthroughthevent.
- Pouroutthewater.
- Thoroughly dry the seal of the tank lid and the slot where the tank resides in the appliance.
Appears
The 📊 display appears if you set the oven mode when the water tank is only half full.
If youthink that the amount of water in the watertank is sufficient for what you want to cook, you can start the appliance.
Ifthewaterlevelistoolow, thenfillthewatertankupto "max", slidethetankbackin and thenstarttheappliance.
Flashes
The 📊 display flashes when the water tank is empty. A beep sounds and operation is stopped.
- Carefully open the o vendoor. Steam willescape from inside.
- Removethewatertank, fillitandslideitbackin.
- PressSTART/STOP.
AutomaticCalibration
Thetemperatureatwhichthewaterwillboildependsontheairpressure.During calibration, the appliance is adjusted to the pressure conditions in the areawhere it has been installed. This takes place automatically the first timestep is used at 210 °F(100 °C). More steam than usual will be produced during calibration.
AfterMoving
Toensure that the appliance will automatically adjust to the new location, reset the appliance its factory settings (see Basic Settings).
GettingStarted
Thissectioncoversthefollowing:
- Setting the clock after plugging in the appliance
- Changingthewaterhardnesslevel,ifnecessary
•Cleaningtheappliancepriortoinitialuse
SettingtheClock
After plugging in the appliance, 00:00 flashes on the display.
Turnthesettingsdialtosettheclocktothecurrenttime. Thesettingisautomatically acceptedafterafewseconds.
ChangingtheTime
- PressTIMER/CLOCK repeatedly until the arrow appears after the clock symbol ⏻◀.
- Use the settings dial to set the current time.
- PressTIMER/CLOCKtoconfirm.
AdjustingtheWater HardnessLevel
DescaletheapplianceusingDecalcifymodeatregularintervals. This can prevent damagetotheappliance.
The appliance automatically informs whendescaling is required. The factory setting is water hardness level. Changetesetting if your water is softer or harder.
CheckingWaterHardness
Checkthewaterhardnessusingtheteststripsprovidedoraskyourwaterutility company.
SoftenedWater
Descalingisnotrequiredifyouonlyusesoftenedwater.Inthiscase,changethe waterhardnessleveltosoftened”—”.
ChangingtheWaterHardnessLevel
- PressandholdON/OFFuntiltheapplianceturnson.
- PressandholdINFOforapproximately4seconds.
The initial basic setting CO appears in the display.
- Press INFO repeatedly until C07 (water hardness level) appears in the display.
- Usethedialtochangethewaterhardnesslevel.
Options
-softened
1-softl
22-averagell
33-hardIII
44-veryhardIV
- PressandholdINFO for approximately 4 seconds.
Thechangeisstored.
Cleaning
Before initial use, heatup the appliance once while empty and clean the accessories.
HeatingUptheAppliance
- Fillandslideinthewatertank.
- PressandholdON/OFFtoturntheapplianceon.
OVENMODElightsuponthedisplay.
- Use the settings dial to set the oven mode to Steam 🙏.
- PressSTART/STOPtoturnontheappliance.
The appliance automatically heats up to 210^ F ( 100^ C) and turn so after 20 minutes. Abeepsounds.
- PressandholdON/OFFuntiltheapplianceturnsoff.
Leavethedooropenacrackuntiltheappliancehascooled.
CleaningAccessoriesBeforeUse
Cleantheaccessoriesthoroughlywithsoapywaterandaclothbeforeinitialuse.
Operation
OperatingtheAppliance
Thissectioncoversthefollowing:
•Turningtheapplianceonandoff
- Importantinstructionstofollowaftereachuse
TurningOnthe Appliance
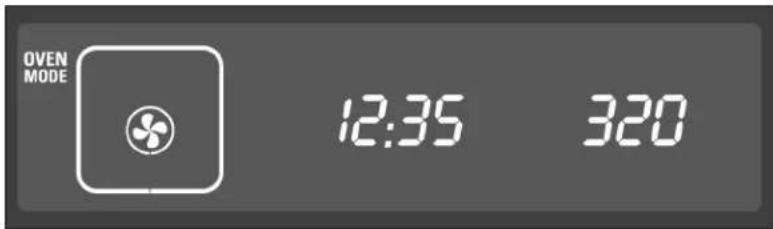
Exampleshownintheillustration:
SettheovenmodetoSteamat175°F(80°C).
- PressandholdON/OFFuntiltheapplianceturnson.
OVENMODElightsupinthedisplay. The first oven mode, True Convection ✅, appears in the display.
text_image
OVEN MODE 12:35 320- Use the settings dial to set the desired oven mode.
- PressOVENTEMPandusethesettingsdialtosetthetemperature.

text_image
OVEN MODE 20:00 |→|← ( 175 ) min- Press TIMER/CLOCK repeatedly until the arrow appears after the I→I◀ Cook Timesymbol.
- Use the settings dial to set the Cook Time (see Clock and Timer Settings).
- PressSTART/STOPtoturnontheappliance.
The appliance start to heatup. When using Steammode, the Cook Timesteps after the appliance is preheated.
ChangingtheTemperature
AfterCookTimestamps,youcanturnthesettingsdialatanytimetochangethe temperature.
ChangingtheEndTime
SeeClockandTimerSettings, ChangingtheEndTime.
TurningOfftheAppliance

WARNING: Riskofsevereburns! Hotsteammayescapewhenopeningtheappliancedoor.Carefullyopen thedooronlyaftercookingisfinished.
AttheEndofCookTime
If you set a cook time, the appliance will turn off automatically. Abeeps sounds. Press TIMER/CLOCK to stop the signal.
PressandholdON/OFFuntiltheapplianceturnsoff.Carefullyopentheappliance door.
PausingOperation
PressSTART/STOPoropentheappliancedoor.Theappliancepausesoperation. START/STOPflashes.
ClosetheappliancedoorandpressSTART/STOPtoresumeoperation.
If you activated Autostart, the appliance will not resume operation (see Basic Settings).
CancelingOperation
PressandholdON/OFFtocanceloperationandturnofftheappliance.
Thecoolingfanmaycontinuetorunwhenyouopentheappliancedoor.
AfterEachUse
EmptyingtheWaterTank
Emptythewatertank. Thoroughlydrythetanklidsealandthetankslotinthe appliance.
Donotdrythewatertankinthehotoven. This will damage the watertank.
DryingtheOven
Leavethedooropenacrackuntiltheappliancehascooled.

WARNING: Riskofsevereburns! Thewaterintheevaporatordishmaybehot.Letitcooldownbeforewiping itout.
Wipedowntheovencavityandtheevaporatordishwiththespongeprovidedand drywellwithasoftcloth.
Remove food residue and spills from the oven immediately after the appliance has cooled down. Burned on residue is very difficult to remove a latatertime.
Wipedryfurnishingsorhandlesifcondensationhasformedonthem.
AutomaticShutoff
The appliance features an automatic shutoff function. Automatic shutoff is activated when the settings haven not been changed over an extended period of time. The time when automatic shutoff is activated is based on the temperature selected.
ShutoffActivated
F8appearsinthedisplay.
Operationisinterrupted.
Pressanytouchpadtomakethedisplayindicatordisappear.Youcannowadjust thesettings.
ClockandTimerSettings
UseTIMER/CLOCKtoaccesstheclockandtimersettings.Thefollowingoptions areavailable:
If the appliance is off
- = setsthetimer
- Ⓛ=setstheclock
If the appliance is on - = setsthetimer
- I→I=setstheCookTime,ifapplicable
•→l=changestheEndTime,ifapplicable - =displaysthetime
ShortBeep
Ashortbeepwillsoundwhenyouarenotpermittedtochangeoradjustasetting.
SettingtheTimer
The timer functions separately from operation of the appliance. It can be used as a kitchen timer and can be set at any time.
- PressTIMER/CLOCK.
ThearrowappearsaftertheTimersymbol
- Usethesettingsdialtosetthetimer.
Thetimerissetfor"minutes:seconds".
Thetimerrunsonthedisplayforafewseconds.Itthenmovestothebackground. The symbolindicatesthatthetimerisrunning.
AccessingtheRunningTimer
PressTIMER/CLOCK. Thetimerappearsforafewseconds.
ChangingtheTimer
PressTIMER/CLOCK. Use the settings dial to changethetimer.
CancelingtheTimer
PressTIMER/CLOCKandturnthesettingsdialtoresetthetimerto00:00. Thetimer disappearsafterafewseconds.
AftertheTimerRunsOut
A beep sounds. 00:00 🔊◀ appears on the display. Press TIMER/CLOCK to cancel thesignal.
SettingtheCookTime
If you set Cook Time for your dish, operation automatically stops at the end of the programmed time. The appliance stops heating.
CookTimemustalwaysbesetwhenusingovenmodeswithsteam.
Exampleshownintheillustration: SetCookTimeto35minutes.
Requirement: Anovenmodeandtemperaturemustbeset.
- Press TIMER/CLOCK repeatedly until the arrow appears after the I→I◀ Cook Timesymbol.

text_image
OVEN MODE (20:00) min (2:10)- UsethesettingsdialtosettheCookTime.
TheCookTimeisacceptedafterafewseconds. Theparenthesestotheleftand rightoftheCookTimedisappear. Thel→↓ symbollightsup
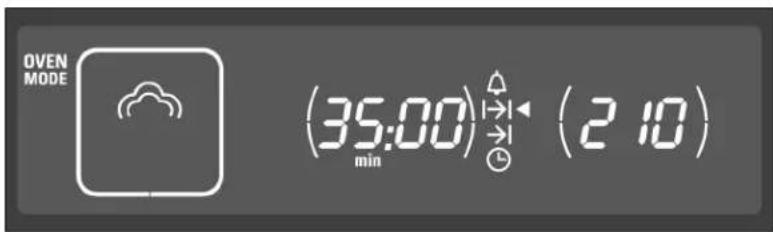
text_image
OVEN MODE (35:00) min → (2 10)- If operation has not yet started, press START/STOP.
TherunningCookTimeisvisibleinthedisplay.
WhenusingSteammode,theCookTimestampsaftertheapplianceis preheated.
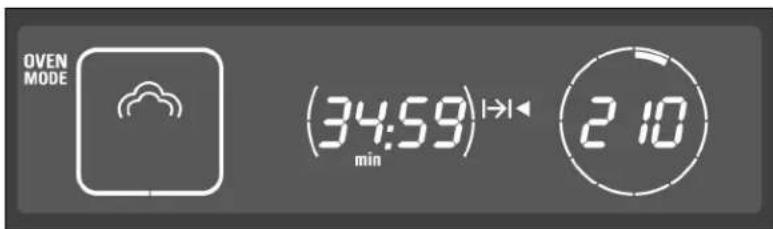
text_image
OVEN MODE (34:59)→1 min 2 10AttheEndofCookTime
Abeepsounds. The appliance stops heating. Press TIMER/CLOCK to stop the significantly.
Opentheovendoorandusepotholderstocarefullyremoveovenware. PressandholdON/OFFuntiltheapplianceturnsoff.
ChangingtheCookTime
PressTIMER/CLOCKrepeatedlyuntilthearrowappearsafterthel→l◀CookTime symbol.UsethesettingsdialtochangetheCookTime.ThechangedCookTime starts.
CheckingTimeSettings
UseTIMER/CLOCKtocheckallsettings.
ChangingtheEndTime
You can chan get the tim when the food will be done. The appliance starts automatically and turn so fat the preferred End Time.
If the appliance is set to 12-hour mode, the End Time can only be delayed for up to 12 hours (see Basic Settings).

CAUTION: To maintain food safety, do not leave food in the oven for more thanonehourbeforeandaftercooking.
SomeprogramsdonotallowtheEndTimetobechanged.
Thetimerequiredforpreheatingwhenusingsteammustbeconsideredwhen settingtheCookTime.ThesetEndTimecanbedelayedtomakeupforthetime requiredforpreheating.
The example is shown in the illustration:
Itis9:30 a.m. The food takes 45 minutestocook, but should not be ready until 12:45p.m.
DelayingtheEndTime
Requirement:
Thesetmodehasnotstarted.ACookTimehasbeenset.
- PressTIMER/CLOCK repeatedly until the arrow appears after the End Time symbol → ◀.
ThebarsinthedisplayindicatethattheEndTimehasnotbeenchanged.
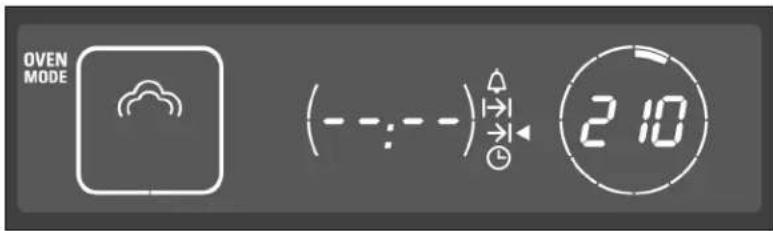
text_image
OVEN MODE (---:---)→← 2:10-
Use the settings dial to set the End Timeto al atertime.
-
PressSTART/STOPtoconfirm.
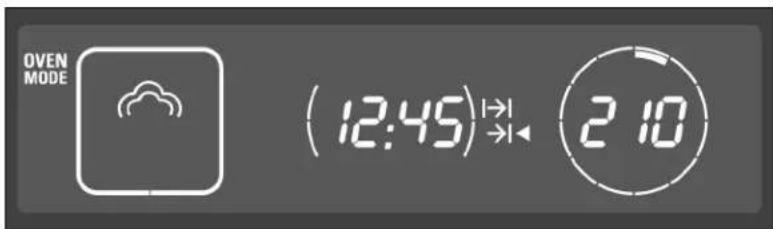
text_image
OVEN MODE (12:45)→1 2 10The setting is accepted. The appliance is in delayed mode. The End Time →◀ is displayed.
Operationstartsautomaticallyatthecorrecttime.Intheexample,operationstartsat 12:00p.m.TherunningCookTimel→lthenappearsinthedisplay.
AdjustingtheEndTime
TheEndTimecanbeadjustedaslongastheapplianceisindelayedmode. Todo this, useTIMER/CLOCKtoswitchtoEndTime andusethesettingsdialto adjusttheEndTime.
CancelingtheEndTime
TheEndTimecanbeadjustedaslongastheapplianceisindelayedmode. Todo this, use TIMER/CLOCK to switch to End Time →◀ and turn the settings dial to the leftuntil--:--appears.CookTimestampsimmediately.
| AttheEndofCookTime | Abeepsounds.Theapplianestopsheating.PressTIMER/CLOCKtocancelthe signalearly. |
| SettingtheClock | Theappliancemustbeoffinordertosetorchangetheclock. |
| AfteraPowerOutage | Afterapoweroutage,fourzerosflashinthedisplay.1.Usethesettingsdialtosetthecurrenttime.2.PressTIMER/CLOCK.Theclocksettingisaccepted. |
| ChangingtheTime | Example:Switchingdaylightsavingsonoroffontheclock.1.PressTIMER/CLOCKrepeatedlyuntilthearrowappearsaftertheClock symbol ⏻◀.2.Usethesettingsdialtochangethetime.3.PressTIMER/CLOCK.Thenewclocksettingisaccepted. |
| ChangingtheClockTimeDisplay Mode | Theclockcandisplaythetimein12-houror24-hourdisplaymode(seeBasic Settings). |
| HidingtheTime | Whentheapplianceisoff,thecurrenttimeappearsinthedisplay.Youcanalsohide thetime.Inthiscase,thetimeonlyappearswhentheapplianceisturnedon(see BasicSettings). |
AutomaticProgramming-EasyCook
Thissectioncoversthefollowing:
- Settingaprogramfromautomaticprogramming-EasyCook
•Informationandtipsontheprograms
•Availableprograms
Automaticprogrammingmakesiteasytopreparefood.Thereare16program groupswithatotalof40programs.
SettingaProgram
Select the appropriate program from the program chart. Read the information on the programs.
The example is shown in the illustration:
Toroast3lbs(1.4kg)offreshchicken(programP13):
-
PressandholdON/OFFuntiltheapplianceturnson.
-
PressEASYCOOK.
The first program P0 landas suggested weight appear in the display.

text_image
EASY 123 1.00 |→|(P0 1)- Usethesettingsdialtoselectthepreferredprogram.

text_image
EASY 123 2.00 |→|(P 13) lb- PressWEIGHT and usethesettingsdialtosettheweightofthefood.

text_image
EASY 123 ( 3.00)→← P 13 lb- PressSTART/STOPtostarttheappliance.
The running cook time of the program I→I ▲ appears in the display.

text_image
EASY 123 62:02 |→| min P 13
WARNING: Riskofsevereburns!
Hotsteammayescapewhenopeningtheovendoor.Carefullyopenthe dooronlyaftercookingisfinished.
ChangingtheEndTime
Someprogramsallowyoutodelaytheendtime.Theprogramstartslaterandends atthepreferredtime(seesection:ClockandTimerSettings).
ClearingSettings
Toclearallsettings,pressandhold
START/STOPforfourseconds.Youcannowsetanewovenmodeoranew program.
AttheEndofCookTime
Abeepsounds.PressTIMER/CLOCKtostopthesignalearly.
Opentheovendoorandusepotholderstocarefullyremoveovenware. PressandholdON/OFFuntiltheapplianceturnsoff.
CancelingaProgram
PressandholdON/OFFtocanceloperationandturnofftheappliance.
ProgramInformation
Allprogramsaredesignedforcookingononelevel.
Cooking results may vary depending on the amount and quality of the food.
Ovenware
Usetherecommendedovenware. Allmealshavebeentestedusingthisovenware. Cookingresultsmayvaryifdifferentovenwareisused.
Whencookingfoodinaperforatedcookingpan,alsoinsertthebakingpanatrack level1.Thepanwillcatchanydrippings.
Quantity/Weight
Addliquidandfoodmixturessuchasriceandwaternomorethan1.6inchesupthe sideoftheaccessory.
Automaticprogrammingrequirestheweightofthefood.Forindividualpieces,like piecesofchicken,alwaysentertheweightofthelargestpiece.Thetotalweight mustbewithinthepresetweightrange.
CookingTime
The cooking time appears after the program starts. You can change it during the first 10 minutes, since the preheattimedependson condition such as the temperature of the water and of the food being cooked.
EasyCook - Program Charts
Thissection covers all of the programs available for automatic programming. Read the instructions before using a program to prepare the food.
Vegetables
Waituntilaftercookingtoseasonvegetables.
| Program | NotesOvenware/accessoriesLevel | |
| P1*SteamcauliflowerfloretsFloretsofequalsizePerforatedcookingpan | 3 | |
| +bakingpan | 1 | |
| P2*Steamgreenbeans-Perforatedcookingpan | 3 | |
| +bakingpan | 1 | |
| P3*SteambroccolifloretsFloretsofequalsizePerforatedcookingpan | 3 | |
| +bakingpan | 1 | |
| P4*Steamgreenasparagus-Perforatedcookingpan | 3 | |
| +bakingpan | 1 | |
| P5Steammixedvegetables,frozen** | -Perforatedcookingpan | 3 |
| +bakingpan | 1 |
*Youcandelaytheendtimeforthisprogram
**Canbeusedwithallfrozenvegetables
Potatoes
Waituntilaftercookingtoseasonpotatoes.
| Program | NotesOvenware/accessoriesLevel | |||
| P6* | Unpeeled boiled potatoes | Medium-size, 1.6-2 in. diam. | Perforated cooking pan +bakingpan | 31 |
| P7*Boiledpotatoes | Medium-sized, quartered, individualweight1-1.4oz (30 -40 g) | Perforatedcookingpan +bakingpan | 31 | |
*Youcandelaytheendtimeforthisprogram
Cereals and grains
Weighoutthefoodtobecookedandaddthecorrectamountofwater:
Rice 1:1.5
Couscous 1:1
Enterthedryweight. Onecupofriceequals0.4lbs.
Stirthecerealorgrainaftercooking. This will help pit quickly absorb the remaining water.
To prepare risotto:
Addwatertotherisottoataratioof1to2.Entertheentireweight,includingthe water.Onecupofrisottoand2cupsofwaterequalapproximately1.5lbs.The message"stir"willappearafterapproximately15minutes.Stirtherisotto.
| Program | NotesLOvenware/accessoriesLLevel |
| P8Basmatiricemax.1.7lbs.(0.75 kg)Cookingpan2 | |
| P9Brownricemax.1.7lbs.(0.75 kg)Cookingpan2 | |
| P10Longgrainricemax.1.7lbs.(0.75 kg)Cookingpan2 | |
| P11Couscousmax.1.7lbs.(0.75 kg)Cookingpan2 | |
| P12Risotto,Arborioricemax.4.5lbs.(2kg)Cookingpan2 |
Poultry
Do not place pieces of chicken on top of each other in the ovenware. You can marinate the pieces of chicken before cooking.
| Program | NotesLOvenware/accessoriesLLevel | ||
| P13Wholechicken,fresh | Totalweight1.5-4.5lbs.(0.7 - 1.5 kg) | Wirerack+bakingpan | 2 |
| P14Chickenparts | Totalweight0.3-1.2lbs.(0.04 - 0.35 kg) | Wirerack+bakingpan | 2 |
Beef
A tall roast is recommended for roast beef.
| Program | NotesLOvenware/accessoriesLLevel | ||
| P15Sirloin,fresh,slowcook,medium** | Total weight 2 - 4.5 lbs. (1 - 2 kg) | Baking pan | 2 |
| P16* Pot roast (chuck), fresh | 1 - 3.5 lbs. (1 - 1.5 kg) | Baking pan | 2 |
* You can delay the end time for this program
** Sear the meat before cooking
Pork
Cut the rind from the center outward prior to cooking. The shoulder cut is the best cut for a roast with crust.
| Program | NotesLOvenware/accessoriesLLevel | |||
| P17* | Roast, fresh | 2 - 4.5 lbs. (0.8 - 2 kg) | Wire rack + baking pan | 2 |
* You can delay the end time for this program
Lamb
| Program | NotesLOvenware/accessoriesLLevel | |||
| P18 | Leg, fresh, boned, well done | 2 - 4.5 lbs. (1 - 2 kg) | Wire rack + baking pan | 2 |
| P19 | Leg, fresh, boned, slow cook, medium* | 2-4.5lbs.(1 - 2 kg) | Bakingpan | 2 |
* Sear the meat well beforehand
Fish
Greasetheperforatedcookingpantoprepareforthefish.
Donotplacewholefish,fishfilletsorfishsticksontopofeachother.Enterthe weightoftheheaviestpieceoffishandselectpiecesthatareapproximatelythe samesize.
| Program | NotesOvenware/accessoriesLevel | |
| P20Steamingwholefreshfish0.5-4.5lbs.(0.3 - 2 kg)Perforatedcookingpan | +bakingpan | 31 |
| P21Steamingfishfillets,freshmax.1in.thickPerforatedcookingpan | +bakingpan | 31 |
| P22Steamingfishfillets,frozenmax.1in.thickPerforatedcookingpan | +bakingpan | 31 |
| P23Oystersandclams-Perforatedcookingpan | +bakingpan | 2 |
Baked goods, desserts
Preparing fruit compote
Thisprogramissuitableforfruitswithstonesandpitsonly.Weighoutthefruit,add approximately 13 ofwaterandadd sugar andspicestotaste.
Preparing ricepudding
Weighoutthericeandadd2.5timesasmuchmilk.Addthericeandmilknomore than1inchupthesideoftheaccessory.Stiraftercooking.Theremainingmilkwill beabsorbedquickly.
| Program | NotesOvenware/accessoriesLevel | |
| P24* Fruitcompote | -Bakingpan | 2 |
| P25Ricepudding | -Bakingpan | 2 |
* Youcandelaytheendtimeforthisprogram
Bread, bread rolls
Useparchmentpaperonthebakingpanwhenbakingbreadandbreadrolls.
Baking bread
Theprogramsareforfree-formloavesonly.Bakingbreadinaloa fpanisnot recommended. Thedough should not betoosoft. Before baking, use asharp knife to make several slashes about 0.4 inches deep into the bread dough.
Letthe doughrise andthenbake
Abeepwillsoundafterapproximately20minutes.Makeslashmarksinthedough and thenpressSTART/STOP.
Baking freshbread rolls
Therollsshouldallweighthesame.Entertheweightoftheindividualbreadrolls.
| Program | NotesOvenware/accessoriesLevel | |||
| P26* | White bread, bake | 1 - 4.5 lbs. (0.4 - 2 kg) | Baking pan | 2 |
| P27 | White bread, proof and bake | Note the message | Baking pan | 2 |
| P28* | Multigrain bread, bake | 1.25 - 4.5 lbs. (0.6 - 2 kg) | Baking pan | 2 |
* Youcandelaytheendtimeforthisprogram
| Program | LevelO | |
| P29Multigrainbread,proofandbakeNotethemessageBakingpan2 | ||
| P30*Ryebread,bake1.25-4.5lbs.(0.6 -2 kg)Bakingpan2 | ||
| P31Ryebread,proofandbakeNotethemessageBakingpan2 | ||
| P32*Freshbreadrolls,bakeWeightperpiece0.1-0.3lbs.(0.05 - 0.1 kg) | Bakingpan2 | |
| P33Frozenbreadrolls,bakeTotalweight0.5-2.5lbs.(0.2 - 1kg) | Bakingpan2 | |
* You can delay the end time for this program
Reheat
| Program | Notes | Ovenware/accessories | Level | |
| P34* | Pizza, cooked, thin crust | - | Wire rack + baking pan | 3 |
| P35* | Pizza, cooked, deep dish | - | Wire rack + baking pan | 3 |
* You can delay the end time for this program
Defrosting
Freeze the food as flat as possible and in appropriate portions at -0 °F (-18 °C).
Do not freeze oversized portions. Defrosted food does not keep as long and spoils more quickly than fresh food.
Defrost food in the freezer bag on a plate or in the perforated cooking pan. Always slide the baking pan under the perforated cooking pan. This keeps the food from lying in the defrosted water and keeps the oven clean.
All defrost programs assume the food is raw.
If necessary, while the food is thawing, split it up or take pieces that have already thawed out of the appliance.
Let the food sit for another 5 to 15 minutes after it has thawed to complete defrosting.

WARNING: Health hazard!
When defrosting animal food products, make sure to remove the thawed liquid. The liquid must not come into contact with other food products.
Germs could be transferred to the other food.
After the food has thawed, heat up the steamer oven using True
Convection for 15 minutes at 360°F (180°C).
Defrost whole bird
Remove the packaging before defrosting.
Let the bird sit for some time after it has thawed. For large chickens, you can remove the giblets after resting for approximately 30 minutes.
Defrost meat
Use this program to defrost individual cuts of roast.
Thaw fruit only
If you only want to thaw fruit slightly, adjust the cooking results based on the individual fruit.
| Program | NotesOvenware/accessoriesLevel | ||
| P36Chickenpieces,bone-inmax.4.5lbs.(1.8kg) | Perforatedcookingpan | +bakingpan | 31 |
| P37Meatmax.weight3.5lbs.(1.5kg) | per piece | Perforatedcookingpan | 31 |
| +bakingpan | |||
| P38Berries-Perforatedcookingpan | +bakingpan | 31 | |
Specialitems
Cookingeggs
Pierce holes in eggs before cooking. If eggs are not pierced, they may burst during cooking. Donotplaceeggsontopofeachother. Onelargeeggweighsapprox. 2 oz.(57g).
| Program | NotesOvenware/accessoriesLevel | |||
| P39* | Soft-boiled eggs | Eggs, large, max. 2 lbs. (1 kg) | Perforated cooking pan +bakingpan | 31 |
| P40* | Hard-boiled eggs | Eggs, large, max. 4 lbs. (1.8 kg) | Perforated cooking pan +bakingpan | 31 |
* Youcandelaytheendtimeforthisprogram
Favorites
UseFAVORITEStostoreandaccess6customprogramsatanytime.FAVORITES isusefulifyoufrequentlyprepareparticulartypesofmeals.Youcanalsostorea mealfromautomaticprogramming.
Storing a Setting in Favorites
- Setthepreferredmode.Donotstarttheoven.
- Briefly press FAVORITES and use the settings dial to select the memory setting.

text_image
FAVS 40:00 |→1 185 (min ( F 2 )- Press and hold FAVORITES until the √ symbol appears after the memory setting. Thesettingisstoredandcanbestartedatanytime.
StoringaDifferentSetting
Enteranewsettingandstoreit. Thiswilloverridetheoldsetting.
CancelingaFAVORITESSetting
PressandholdSTART/STOP.
StartingaFavorites Setting
Youcanstartstoredsettingsatanytime.
-
BrieflypressFAVORITESandusethesettingsdialtoselectthememorysetting. Thestoredsettingsaredisplayed.
-
PressSTART/STOP. TheFAVORITESsettingstarts.
ChangingtheMemorySetting
Onceasettingisstarted, you cannot change it.
CancelingaFAVORITESSetting
PressandholdSTART/STOPuntilTrueConvectionmode♣appears. Youcannowadjustthesettings.
DeletingaFavorites Setting
If you change the basic setting CO1, CO9, C10 or C11 all FAVORITES settings are cleared(see:BasicSettings).
PanelLock
The appliance features a panel lock to prevent children from accidentally turning it on.
Activation
Turnofftheappliance.PressandholdPANELLOCKforapproximatelyfour secondsuntilthe—osymbolappears.
Thepanellockisactivated.
Deactivation
PressPANELLOCKuntilthe—osymboldisappears.
Thepanellockisdeactivated.
Note:
Youcanstillsetthetimerwhilethepanellockisactivated.
BasicSettings
The appliance features various basic settings preset in the factory. These basic settings can, however, be changed as necessary.
You can restore the factory setting store reverse changes.
Theexampleisshownintheillustration: TochangethebasicsettingfortheCookTimesignalfromshorttolong.
- PressandholdON/OFFuntiltheapplianceturnson.
- PressandholdINFOforapproximately4seconds.
ThefirstbasicsettingCO!appearsinthedisplay.

text_image
1 001- PressINFOrepeatedlyuntilthedesiredbasicsettingappears.
- Use the settings dial to change the basic setting.

text_image
3 cosNowyoucanpressINFOtoselectadditionalbasicsettingsandchangethem using thesettingsdial.
5. PressandholdINFOforapproximately4seconds.
Allchangesaresaved.
PressSTART/STOP.Thechangesarenotsaved.CancelingChanges
The following basic settings can be changed:
| BasicsettingFunction | Options | |
| C01*Nationalcode | Preselectionofunitsandclock displaymode:USA-°F,12-hourmode,lbs.Canada-°C,24-hourmode,kg | = none = USA = Canada |
| C02Clockdisplay | Whentheappliance isoff | = off = on |
| C03Time | Setscurrenttime | |
| C04Touchpadsound | Soundemittedwhen atouchpadispressed | = off = on |
| C05CookTimesignal | SignalafterCookTimeends = short | = medium = long |
| C06OvenAutostart | Autostartactivated:Ovendoesnot restartafteroven doorisopened | = off = on |
| C07Waterhardnesslevel | Waterhardnesslevelsettingfor theDecalcifyindicator | -=softened = soft = average = hard = veryhard |
| C08Calibration | Resetscalibration.Theapplianceisrecalibratedthe nexttimeSteammodeisusedat 210°F(100 °C) | = resetoff = reseton |
| C09*Temperatureunits | Temperaturesareindicatedin °F.Ifyouswitchto°C,"°C"alsoappearsinthedisplay. | = °F = °C |
| C10*Clockdisplaymode | Theclockinthedisplayappears in12-houror24-hourmode | = 12-hourmode = 24-hourmode |
| C11*Weightunits | Weightscanbedisplayedin lbs.orkg | = lbs. = kg |
| C12Displaybrightness | Setsthedisplaybrightness8levels: | (dark) - 7(bright) |
*If you changethe basic setting, all Favoritessettings are cleared (see: Favorites)
Adjustable display brightness:
GettingtheMostOutofYourAppliance
CookingTablesandTips
Thesetablescontainaselectionofdishesthatcanbeeasilypreparedinthe steameroven.Youcanfindoutwhichovenmode,accessoriesandcookingtime are best suited for your dish. If not specified otherwise, this information applies to dishesplacedinacoldappliance.

WARNING: Do not use aluminum foil or protective liners to line any part of the appliance, especially the oven bottom. Installing the seliners may result in risk of electric shock or fire.
Accessories
Usetheaccessoriesthatcomewiththeappliance.
When using steam with a perforated cooking pan, always slid the baking pan underneath. The baking pan will catch any drippings.
Ovenware
If you use ovenware, always place it in the center of the rack.
Theovenwaremustbeheatandsteamresistant.Thick-walledovenwareextends thecookingtime.
Usefoil to cover food that would normally be prepared in a water bath (such as when melting chocolate).
Steaming
Steamingisaparticularlygentlewaytocookfood. The steamenvelopesthefood, preventing the food from losing nutrients. No excess pressure is needed for cooking, allowing the food to maintain its shape, color and typical flavor.
CookingTimesandQuantities
Whensteaming, the cooking times are based on the size of the piece, not on the entire quantity of food. The appliance can steam up to 4.5 lbs. (2 kg) off food.
Note the sizes of pieces listed in the tables. The cooking time is shorter for smaller piecesandlongerforlargerpieces.Thequalityandageofthefoodalsoaffectthe cookingtime.Thevaluesprovidedthereforeserveonlyasaguideline.
DistributeFoodEvenly
Alwaysdistributethefoodevenlyintheovenware.Ifthefoodisplacedunevenlyin theovenware,itwillcookunevenly.
DelicateFood
Do not layer delicate foods too high in the cooking pan. It is better to use two pans in this case.
CookinganEntireMeal
YoucancookentiremealsatthesametimeinSteammodewithoutmixingthe flavorsofthedifferentfood.Placethefoodwiththelongestcookingtimeinthe appliance first and then add the remaining dishes at the appropriate time. This will ensurethatalldishesarereadyatthesametime.
The total cooking time will be longer when cooking an entire meal, since every time the appliance is opened, some steamescapes and the appliance has to reheat.
TrueConvection
TrueConvectionisparticularlysuitedforsweetandsavorybakedgoods,braised meatandvariouscakes.
Vegetables
Placevegetablesintheperforatedcookingpanandplacepanatracklevel3. Place thebakingpanunderneathitatatracklevel1.Thebakingpanwillcatchany drippings.
| Food | SizeAccessories | Ovenmode | Temperature | Cookingtime | |
| ArtichokesWholePerforated+ | bakingpan | Steam210°F(100°C)30-35min. | |||
| CauliflowerWholePerforated+ | bakingpan | Steam210°F(100°C)30-40min. | |||
| CauliflowerFloretsPerforated+ | bakingpan | Steam210°F(100°C)10-15min. | |||
| BroccoliFloretsPerforated+ | bakingpan | Steam210°F(100°C)8-10min. | |||
| Peas-Perforated+ | bakingpan | Steam210°F(100°C)5-10min. | |||
| Fennel | Slices | Perforated+bakingpan | Steam210°F(100°C)10-14min. | ||
| Stuffedvegetables (zucchini,eggplant, peppers) | Donotprecook vegetables | Bakingpan at level 2 | Combination | 320-360°F (160-180°C) | 15-30min. |
| Greenbeans | -Perforated+ | bakingpan | Steam210°F(100°C)15-20min. | ||
| Carrots | Slices | Perforated+bakingpan | Steam210°F(100°C)10-20min. | ||
| KohlrabiSlices | Perforated+ | bakingpan | Steam210°F(100°C)15-20min. | ||
| Leeks | Slices | Perforated+bakingpan | Steam210°F(100°C)4-6min. | ||
| Swisschard* | Shredded | Perforated+bakingpan | Steam210°F(100°C)8-10min. | ||
* Preheattheappliance
| Food | CookingtimeTemperature | |||
| Greenasparagus*WholePerforated+ | bakingpan | Steam210°F(100°C)7-12min. | ||
| Whiteasparagus*WholePerforated+ | bakingpan | Steam210°F(100°C)10-15min. | ||
| Spinach*-Perforated+ | bakingpan | Steam210°F(100°C)2-3min. | ||
| BrusselssproutsFlorets | Perforated+bakingpan | Steam210°F(100°C)20-30min. | ||
| Redbeets | WholePerforated+ | bakingpan | Steam210°F(100°C)40-50min. | |
| Redcabbage | Shredded | Perforated+bakingpan | Steam210°F(100°C)30-35min. | |
| Cabbage | Shredded | Perforated+bakingpan | Steam210°F(100°C)25-35min. | |
| Zucchini | Slices | Perforated+bakingpan | Steam210°F(100°C)2-3min. | |
| Peapods | -Perforated+ | bakingpan | Steam210°F(100°C)8-12min. | |
* Preheat the appliance
Side Dishes and Legumes
Addtheappropriateamountofwaterorliquid.
Example: 1 : 1.5 = for every 12 cup of rice, add 34 cup of water.
You can choose any rack level for the cooking pan.
| Food | Ratio/information | Accessories | Oven mode | Temperature | Cooking time |
| Unpeeledboiled potatoes | Mediumsize | Perforated(level3)+ bakingpan(level1) | Steam | 210°F(100°C) | 35-45min. |
| Boiledpotatoes | Quartered | Perforated(level3)+ bakingpan(level1) | Steam | 210°F(100°C) | 20-25min. |
| Potato gratin | - | Baking pan (level 2) | True Convection | 340 - 360°F (170-180°C) | 35-45min. |
| Brown rice | 1 : 2 | Cooking pan | Steam | 210°F (100°C) | 30 - 40 min. |
| Long grain rice | 1 : 2 | Cooking pan | Steam | 210°F (100°C) | 20 - 30 min. |
| Basmati rice | 1 : 1.5 | Cooking pan | Steam | 210°F (100°C) | 20 - 30 min. |
| Parboiled rice | 1 : 1.5 | Cooking pan | Steam | 210°F (100°C) | 15 - 20 min. |
| Lentils | 1 : 2 | Cooking pan | Steam | 210°F (100°C) | 30 - 45 min. |
| Canellini beans, pre-softened | 1 : 2 | Cooking pan | Steam | 210°F (100°C) | 65 - 75 min. |
Food
CookingtimeTemperature
| information | ||||
| Couscous1:1CookingpanSteam210°F(100°C)6-10min. | ||||
| Dumplings-Perforated(level3)+ | bakingpan(level1) | Steam205°F(95°C) | 20-25min. | |
Meat, poultry, fish
Insertrackandbakingpantogetheratthesameracklevel.
Oncetheroastisdone, letitrestin the closed steameroven for an additional 10 minutes after turning it off. This will help them eat retain its juices.
Using the Combination oven mode makes the meat particularly tender and juicy on theinsidewhileformingacrustontheoutside.
Poultry
| Food | Amount/weight | Accessories | Level | Oven mode | Temperature | Cooking time |
| Chicken, whole | 2.65 lbs (1.2 kg) | Wire rack + bakingpan | 2 | Combination | 360-375°F (180-190°C) | 50-60min. |
| Chicken, halved | per1lbs(0.4kg) | Wirerack+ bakingpan | 2 | Combination | 360-375°F (180-190°C) | 35-45min. |
| Chickenbreast | per0.33lbs (0.15kg) | Perforated+ bakingpan | 31 | Steam | 210°F(100°C) | 15-25min. |
| Chickenpieces | per2.65lbs (1.2kg) | Wirerack+ bakingpan | 2 | Combination | 360-390°F (180-200°C) | 20-35min. |
| Duck, whole | 4.5lbs(2kg) | Wirerack+ bakingpan | 2 | Combination | 340°F(170°C) | 60-80min. |
| True Convection | 410°F(210°C) | 15-20min. | ||||
| Duckbreast* | per0.77lbs (0.35 kg) | Wirerack+ bakingpan | 2 | Combination | 340-360°F (170-180°C) | 10-15min. |
| Turkey, whole, unstuffed | 8-11lbs | Wirerack+ bakingpan | 1 | Combination | 325°F (165°C) | 50 - 75 min. |
| Turkey, whole, unstuffed** | 12-14lbs | Wirerack+ bakingpan | 1 | Combination | 325°F (165°C) | 80 - 95 min. |
| Rolledturkeyroast | 3.5lbs(1.5kg) | Wirerack+ bakingpan | 2 | Combination | 300-320°F (150-160°C) | 70-90min. |
| TurkeyBreast | 2lbs(1kg) | Wirerack+ bakingpan | 2 | Combination | 300-320°F (150-160°C) | 60-80min. |
* Searfirst
** Use baking pan 1 5/8 " deep (see Additional Accessories)
Beef
| Food | Amount/weight | AccessoriesLevelOvenmodeTemperatureCookingtime | ||||
| Pot-roastedbeef*3.5lbs(1.5kg)Wirerack+ | bakingpan | 2Reheat285-300°F | (140-150°C) | 100-140min. | ||
| Filletofbeef, medium* | 2lbs(1kg)Wirerack+ | bakingpan | 2Reheat340-360°F | (170-180°C) | 20-28min. | |
| Thinsliceofroast beef,medium* | 2lbs(1kg)Wirerack+ | bakingpan | 2True | Convection | 340-360°F (170-180°C) | 40-55min. |
| Thickcutoffsirloin, medium* | 2lbs(1kg)Wirerack+ | bakingpan | 2True | Convection | 340-360°F (170-180°C) | 45-60min. |
* Searfirst
Veal
| Food | Amount/weight | AccessoriesLevelOvenmodeTemperatureCookingtime | ||||
| Veal,bone-in3.5lbs(1.5kg)Wirerack+ | bakingpan | 2Combination | 320-360°F | (160-180°C) | 50-70min. | |
| Vealloin* | 2lbs(1kg)Wirerack+ | bakingpan | 2Combination | 320-360°F | (160-180°C) | 15-25min. |
| Breastofveal, stuffed | 3.5lbs(1.5kg)Wirerack+ bakingpan | 2Combination | 285-320°F | (140-160°C) | 75-120min. | |
*Searfirst
Pork
| Food | Amount/weight | AccessoriesLevelOvenmodeTemperatureCookingtime | ||||
| Bone-inwithout rind | 3.5lbs(1.5kg)Wirerack+bakingpan | 2Combination | 340-360°F | (170-180°C) | 70-80min. | |
| Bone-inwithrind | 3.5lbs(1.5kg)Wirerack+bakingpan | 2 | Steam | 210°F(100°C) | 20-25min. | |
| Combination | 285-320°F(140-160°C) | 40-50min. | ||||
| True Convection | 410-430°F(210-220°C) | 20min. | ||||
| Porkchop, boneless* | 1.2lbs(0.5kg)Wirerack+bakingpan | 2Combination | 320-360°F | (160-180°C) | 20-30min. | |
*Searfirst
| Food weight | CookingtimeTemperat | |||||
| Filletinpuffpastry2lbs(1kg)Bakingpan2Combination360-390°F | (180-200°C) | 40-60min. | ||||
| Smokedporkon thebone | 2lbs(1kg)Wirerack+ bakingpan | 2Combination250-285°F | (120-140°C) | 60-70min. | ||
| Smoked pork ribs | Sliced | Baking pan | 2 | Steam | 210°F (100°C) | 15 - 20 min. |
| Rolledroast | 3.5lbs(1.5kg) | Wirerack+ bakingpan | 2Combination340-360°F | (170-180°C) | 70-80min. | |
* Searfirst
Other
| Food | Amount/weight | Accessories | Level | Oven mode | Temperature | Cooking time |
| Meatloaf | Madefrom1.2lbs(0.5kg)ground meat | Bakingpan2Combination340-360°F | (170-180°C) | 45-60min. | ||
| Bonedlegoflamb | 3.5lbs(1.5kg) | Wirerack+bakingpan | 2Combination340-360°F | (170-180°C) | 60-80min. | |
| Loinoflambonthe bone* | 3.5lbs(1.5kg) | Wirerack+bakingpan | 2Combination320-340°F | (160-170°C) | 15-25min. | |
| Wienersausages | - | Perforated+bakingpan | 31 | Steam | 175-185°F(80-85°C) | 12-18min. |
* Searfirst
Fish
| Food | Amount/weight | Accessories | Level | Oven mode | Temperature | Cooking time |
| Whole | per0.66lbs(0.3 kg) | Perforated+bakingpan | 31 | Steam | 175-195°F(80-90°C) | 15-25min. |
| Fillet | per3.5lbs(1.5kg) | Perforated+bakingpan | 31 | Steam | 175-195°F(80-90°C) | 10-20min. |
| Trout,whole | per0.5lbs(0.2 kg) | Perforated+bakingpan | 31 | Steam | 175-195°F(80-90°C) | 12-15min. |
| Codfillet | per0.33lbs(0.15 kg) | Perforated+bakingpan | 31 | Steam | 175-195°F(80-90°C) | 10-14min. |
| Food weight | CookingtimeTo | ||||
| Salmonfilletper0.33lbs(0.15 kg) | Perforated+bakingpan | 31 | Steam210°F(100°C)8-10min. | ||
| Clams,oysters0.33lbs(0.15 kg)Bakingpan2 | |||||
| Haddock,perch filet | per0.5lbs(0.2 kg) | Perforated+bakingpan | 31 | Steam175-195°F(80-90°C) | 10-20min. |
| Stuffedsoleroils | - | Perforated+bakingpan | 31 | Steam175-195°F(80-90°C) | 10-20min. |
| Shrimp,large | per1lb(0.4kg) | Perforated+ cookingpan | 31 | Steam210°F(100°C)8-13min. | |
| Shrimp,medium | per1lb(0.4kg) | Perforated+ cookingpan | 31 | Steam210°F(100°C)5-8min. | |
Roasting Tips
| Whenistheroastdone? | Useafoodthermometer(availableinstores)tomeasurethemeattemperature. |
| Theroastistoodarkandcrustis burnedinsomeareas. | Checktheracklevelandtemperature. |
| Theroastturnedoutwell,butthe sauceisburned. | Nexttime,useasmallerroastingpanoraddmoreliquid. |
| Theroastlooksgood,butthesauce istoolightandrunny. | Nexttime,usealargerroastingpanoraddlessliquid. |
Slow Cooking Meat
Slow cooking is ideal for cooking all tender cuts of meat that will be cooked medium rare. Themeatstaysverymoistandistender.
PlacethebakingpaninthecombinationovenandpreheattheovenusingSlow Cookmode.
Sear the meat well on all sides on the cooktop.
Placethemeatinthepreheatedcombinationovenandcontinuetoslowcook.
Afteritisdone, arrangeitonpreheatedplatesandaddawarmsauceontop.
| Food | Amount | Accessories | Level | Temperature | Cooking time |
| Bonedlegoflamb | 2-3.5lbs.(1-1.5 kg) | Baking pan | 2 | 175°F (80°C) | 140 - 160 min. |
| Roastbeef | 3.5-5.5lbs.(1.5-2.5 kg) | Baking pan | 2 | 175°F (80°C) | 150 - 180 min. |
| Food | CookingtimeTemperatureI | |||
| Porkfillets-Bakingpan2175-195°F | (80-90°C) | 50-70min. | ||
| Porkmedallions-Bakingpan2175°F(80°C)60-60min. | ||||
| Beefsteaksapprox.1.2in.thick | Bakingpan2175°F(80°C)40-80min. | |||
| Duckbreast-Bakingpan2175°F(80°C)35-55min. | ||||
Soufflés, Casseroles, Additions to Soups, etc.
| Food | Accessories | Level | Oven mode | Temperature | Cooking time |
| Lasagna | Baking pan | 2 | Combination | 320 - 340°F(160-170°C) | 35-45min. |
| Soufflés | Soufflédish+wire rack | 2 | Combination | 360-390°F(180-200°C) | 15-25min. |
| Semolina dumplings | Perforated+bakingpan | 31 | Steam | 195-205°F(90-95°C) | 7-10min. |
Desserts, compote
Compote
Weigh out the fruit, add approximately 13 of water and add sugar and spices to taste.
Rice pudding
Weigh out the rice and add 2.5 times as much milk. Add the rice and milk no higher than 1 inch up the side of the accessory. Stir after cooking. The remaining milk will be absorbed quickly.
Yogurt
Heat the milk on the cooktop to 195^ F ( 90^ C). Remove from heat and let cool to 105^ F ( 40^ C). Heating the milk is not required if using ultra high temperature (UHT) milk.
Stir in one to two teaspoons of plain yogurt, or the appropriate amount of yogurt starter per 100 ml of milk. Pour the mixture into clean glass jars and cover with lids.
After preparation, place the jars in the refrigerator to cool.
| Food | Accessories | Oven mode | Temperature | Cooking time |
| Yeast dumplings | Baking pan | Steam | 210°F (100°C) | 20 - 25 min. |
| Egg custard | Mold + wire rack | Steam | 195 -205°F (90-95°C) | 15-20min. |
* You can also use the relevant program (see Automatic Programming).
| Food | CookingtimeTemperature | |||
| Sweetbakeditems(suchasricepudding) | Ovenproofdish+ wire rack | Combination320-340°F(160-170°C) | 50-60min. | |
| Ricepudding*BakingpanSteam210°F(100°C)25-35min. | ||||
| YogurtPortion-sizedjars | +wirerack | Steam105°F(40°C)300-360min. | ||
| ApplecompoteBakingpanSteam210°F(100°C)10-15min. | ||||
| PearcompoteBakingpanSteam210°F(100°C)10-15min. | ||||
| Cherrycompote | BakingpanSteam210°F(100°C)10-15min. | |||
| Rhubarbcompote | BakingpanSteam210°F(100°C)10-15min. | |||
| Plumcompote | BakingpanSteam210°F(100°C)15-20min. | |||
* Youcanalsousetherelevantprogram(seeAutomaticProgramming).
Cakes and Baked Goods
Darkmetal bakingpans are recommended.
Thetemperatureandcookingtimedependonthequantityandconsistencyofthedough.Temperaturerangesarethereforeprovidedinthecharts.
Startwithalowertemperaturesetting.Thiswillprovideformoreevenbrowning.
Use ahighertemperaturesettingthenexttime, ifnecessary.
Donotoverfilltherackorbakingpan.
Cake in Molds or Springform Pans
| Food | Accessories | Level | Oven mode | Temperature | Cooking time |
| Sponge cake | 10-inch tube pan | 2 | True Convection | 300 - 320 °F(150-160°C) | 60-70min. |
| Sponge flan base | Ring | 2 | True Convection | 300 - 320 °F(150-160°C) | 30-45min. |
| Delicatefruitflan, sponge | Springform cake pan | 2 | True Convection | 300 - 320 °F(150-160°C) | 45-55min. |
| Spongebase (2eggs) | Ring | 2 | True Convection | 360 - 375 °F(180-190°C) | 12-16min. |
| Spongeflan (6eggs) | Springform cake pan | 2 | True Convection | 300 - 320 °F(150-160°C) | 25-35min. |
| Shortcrustpastry basewithcrust | Springform cake pan | 2 | True Convection | 300 - 320 °F(150-160°C) | 40-50min. |
| Swiss flan | Springform cake pan | 2 | True Convection | 360 - 375 °F(180-190°C) | 35-60min. |
| Bundt | Bundt cake pan | 2 | Combination | 300 - 320 °F(150-160°C) | 35-45min. |
| Food | CookingtimeTemperature | |||
| Savorycakes(suchasquiche) | Quichedish2TrueConvection360-375°F | (180-190°C) | 35-60min. | |
| AppletartFlanbasecakepan2TrueConvection340-375°F | (170-190°C) | 35-50min. | ||
Sheet Cakes
| Food | AccessoriesLevelOvenmode | Temperature | Cookingtime | ||
| Yeastcake | Bakingpan | 2 | Combination | 300-320°F(150-160°C) | 35-45min. |
| TrueConvection300-320°F(150-160°C) | 35-45min. | ||||
| Swiss roll | Baking pan | 2 | True Convection | 360 - 390°F(180-200°C) | 10-15min. |
| Braided loaf | Baking pan | 2 | Combination | 300 - 320°F(150-160°C) | 25-35min. |
| Strudel, sweet | Baking pan | 2 | Combination | 320 - 360°F(160-180°C) | 40-60min. |
| Onion tart | Baking pan | 2 | Combination | 340 - 360°F(170-180°C) | 30-40min. |
Bread, Bread Rolls
| Food | AccessoriesLevelOvenmode | Temperature | Cookingtime | ||
| Whitebread, 1.7lbs.(0.75kg) flour | Bakingpan+ parchmentpaper | 2 | Combination | 390-410°F (200-210°C) | 15-20min. |
| TrueConvection320-340°F (160-170°C) | 20-25min. | ||||
| Sourdoughbread 1.7lbs.(0.75kg) flour | Bakingpan+ parchmentpaper | 2 | Combination | 390-430°F (200-220°C) | 15-25min. |
| TrueConvection300-320°F (150-160°C) | 40-60min. | ||||
| Food | CookingtimeTemperature | ||||
| Multigrainbread1.7lbs.(0.75kg)flour | Bakingpan+parchmentpaper | 2 | Combination390-430°F | (200-220°C) | 15-20min. |
| TrueConvection320-340°F | (160-170°C) | 25-40min. | |||
| Wholegrainbread1.7lbs.(0.75kg)flour | Bakingpan+parchmentpaper | 2 | Combination390-430°F | (200-220°C) | 20-30min. |
| TrueConvection285-300°F | (140-150°C) | 40-60min. | |||
| Ryebread,1.7lbs.(0.75kg)flour | Bakingpan+parchmentpaper | 2 | Combination390-430°F | (200-220°C) | 20-30min. |
| TrueConvection300-320°F | (150-160°C) | 50-60min. | |||
| Breadrolls,0.15lbs.(70g)each, unbaked | Bakingpan+parchmentpaper | 2Combination375-390°F | (190-200°C) | 25-30min. | |
| Breadrollsmadewithsweetyeastdough,0.15lbs.(70g)each, unbaked | Bakingpan+parchmentpaper | 2Combination340-360°F | (170-180°C) | 20-30min. | |
Small Baked Products
| Food | AccessoriesLevelOvenmodeTemperatureCookingtime | ||||
| Meringue | Baking pan | 2 | True Convection | 175 - 195°F(80-90°C) | 120-180min. |
| Macaroons | Bakingpan | 2TrueConvection285-320°F | (140-160°C) | 15-25min. | |
| Puffpastry | Bakingpan | 2Combination340-375°F | (170-190°C) | 10-20min. | |
| Muffins | Muffinpan | 2TrueConvection340-360°F | (170-180°C) | 20-30min. | |
| Chouxpastry,such ascreampuffs | Bakingpan | 2TrueConvection340-375°F | (170-190°C) | 27-35min. | |
| Biscuits | Baking pan | 2 | True Convection | 300 - 320°F(150-160°C) | 12-17min. |
| Leavenedcake, suchasapplecake | Bakingpan | 2TrueConvection300-320°F | (150-160°C) | 15-20min. | |
BakingTips
| Ifusingyourownrecipe. | Lookatcakesorbakedgoodsinthetablethataresimilartoyourrecipe. |
| Thiswillhelptodetermineifthecake iscookedthrough. | About10 minutesbeforetheendofbakingtimeaccordingtoyourrecipe,sticka toothpickintothehighestpartofthecake.Thecakeisdonewhenthebatternolongerstickstothetoothpick. |
| Cake collapses. | Next time, use less liquid or set oven temperature 20°F (10°C) lower. Use the mixing timesspecifiedintherecipe. |
| Thecenterofthecakeishigherthan onthesides. | Donotgreasethesidesofthespringformorcakepan.Afterbaking,carefullyremove thecakefromthepanusingaknife. |
| Springformorloafcakeistoodarkin theback. | Donotplacethebakingpanupagainstthebackwalloftheoven.Placeitonthe centeroftherack. |
| Cake is too dry. | Use a toothpick to make small holes in the finished cake and pour drops of fruit juice oralcoholicbeverageoverthecake.Nexttime,setthetemperature20°F(10°C) higherandshortenthebakingtimeorusetheCombinationovenmode. |
| Thebreadorcakelooksgood,but is runnyinside(overlymoist,has streaksofliquidrunningthroughit). | Nexttime,uselessliquid.Bakealittlelongerandatalowertemperature.Prebake crustsforpiesandcakeswithjuicy/runnyfillings.Sprinklecrustwithalmondsor bread crumbs and then add the filling. Use the baking time specified in the recipe. |
| Cakesorbakedgoodsbrown unevenly. | Setthetemperaturealittlelowernexttime. |
Reheating Food
Reheatmodegentlyreheatsfood. The food tastes and looks as if it were freshly prepared. Baked goods from the day before can also be heated to their original crispness.
| Food | AccessoriesLevel | Ovenmode | Temperature | Cookingtime | |
| DinnerplateWirerack2 | Reheat250°F(120°C) | 12-18min. | |||
| Vegetables | Baking pan | 3 | Reheat | 210°F (100°C) | 12 - 15 min. |
| Noodles,potatoes, rice | Bakingpan | 3Reheat210°F(100°C) | 5-10min. | ||
| Breadrolls* | Wirerack2Combination | 340-360°F | (170-180°C) | 6-8min. | |
| Baguettes* | Wirerack2Combination | 340-360°F | (170-180°C) | 5-10min. | |
| Bread*Wirerack2Combination | 340-360°F | (170-180°C) | 8-12min. | ||
| Pizza | Wirerack+ bakingpan | 3Reheat340-360°F | (170-180°C) | 12-15min. | |
* Preheatfor5minutes
Defrosting
Freezethefoodasflataspossibleandinappropriateportionsat-0°F(-18°C). Do notfreezeoversizedportions. Defrostedfooddoesnotkeepaslongandspoils morequicklythanfreshfood.
Defrostthefoodinthefreezerbagonaplateorintheperforatedcookingpan. Alwaysslidethebakingpanundertheperforatedcookingpan. Thiskeepsthefood fromlyinginthedefrostedwaterandkeepstheovenclean.
UsetheDefrostmode.
If necessary, while the food is thawing, split it up or take pieces that have already thawed out of the appliance.
Letthefoodsitforanother5to15minutesafterithasthawedtoreachroom temperature.

WARNING: Healthhazard!
Whendefrostinganimalfoodproducts,makesuretoremovethethawed liquid. Theliquidmustnotcomeintocontactwithotherfoodproducts. Germscouldbetransferredtotheotherfood. Afterthefoodhasthawed,heatupthesteamerovenusingTrue Convectionfor15minutesat360°F(180 °C.).
Defrostingmeat
Thawcutsofmeatthatwillbebreadedjustuntilseasoningsandbreadcrumbscan sticktothemeat.
Defrostingpoultry
Remove from packaging before defrosting. Makes suretopouroutanydefrosted liquid.
| Food | Amount/weight | AccessoriesLevelTemperatureCookingtime | ||||
| Chickenparts,bone-in2lbs. | (1kg) | Perforated+bakingpan | 31 | 115-120°F(45-50°C) | 60-70min. | |
| Chickenparts,boneless1lbs. | (0.4kg) | Perforated+bakingpan | 31 | 115-120°F(45-50°C) | 30-35min. | |
| Block-frozenvegetables(suchasspinach) | 1lbs.(0.4kg) | Perforated+bakingpan | 31 | 115-120°F(45-50°C) | 20-30min. | |
| Berries0.66lbs. | (0.3kg) | Perforated+bakingpan | 31 | 115-120°F(45-50°C) | 5-8min. | |
| Fishfillets1lbs. | (0.4kg) | Perforated+bakingpan | 31 | 115-120°F(45-50°C) | 15-20min. | |
| Beef- | Perforated+ | 31 | 115-120°F(45-50°C) | 70-80min. | ||
ProofingDough
Thedoughrisesmuchfasterusingthismodethanatroomtemperature.
You can choose any rack level for the ackor carefully placetharack on the even bottom.
Warning: Donotscratchtheovenbottom!
Placethedough-risingbowlontherack.Donotcoverthedough.
Food
AmountOvenwareTemperatureCookingtime
Yeast dough2lbs.(1kg)Bowl+wire rack105°F(40°C)20-30min.
Sourdough2lbs.(1kg)Bowl+wire rack105°F(40°C)20-30min.
JuiceExtraction
Beforeextractingjuicefromberries, placetheberriesinabowlandaddsugar.
Let theberriessitforonehoursothatthejuiceisdrawnout.
Placeberriesintheperforatedcookingpanandplacepanatracklevel3.
Tocatchthejuice, placethenon-perforated cooking panatrack level 1.
When ready, pour the berries into a cheese cloth and squeeze out their remaining juice.
| Food | AccessoriesLevelOvenmodeTemperatureCookingtime | ||||
| Raspberries | Perforated+ cookingpan | 31 | Steam | 210°F(100°C) | 30-45min. |
| Redcurrants | Perforated+ cookingpan | 31 | Steam | 210°F(100°C) | 40-50min. |
FrozenProducts
Followthemanufacturer's instructions on the packaging.
Thespecified cooking times apply todishes placed in acoldoven.
| Food | AccessoriesLevel | Ovenmode | Temperature | Cookingtime | |
| Frenchfries | Bakingpan+parchmentpaper | 2 | TrueConvection | 340-375°F(170-190°C) | 25-35min. |
| CroquettesBakingpan+parchmentpaper | 2 | TrueConvection | 360-390°F(180-200°C) | 18-22min. | |
| Thinlyslicedfriedpotatoes | Bakingpan+parchmentpaper | 2 | TrueConvection | 360-390°F(180-200°C) | 25-30min. |
| Pasta,fresh,refrigerated* | Bakingpan+parchmentpaper | 2 | Steam | 210°F (100°C) | 5 - 10 min. |
| Lasagna,frozen | Bakingpan+wire rack | 2 | Combination | 375-410°F(190-210°C) | 35-55min. |
| Pizza,thincrust | Bakingpan+wire rack | 2 | TrueConvection | 360-390°F(180-200°C) | 15-23min. |
| Pizza,deepdish | Bakingpan+wire rack | 2 | TrueConvection | 360-390°F(180-200°C) | 18-25min. |
* Addalittleliquid
| Food | CookingtimeTemp | ||||
| Pizza,Frenchbread | Bakingpan+wire rack | 2TrueConvection360-390°F | (180-200°C) | 18-22min. | |
| ChilledpizzaBakingpan+parchmentpaper | 2TrueConvection340-360°F | (170-180°C) | 12-17min. | ||
| Herbbutterbaguettes,refrigerated | Bakingpan2TrueConvection360-390°F | (180-200°C) | 15-20min. | ||
| Breadrolls,baguettes,frozen | Bakingpan+wire rack | 2TrueConvection360-390°F | (180-200°C) | 18-22min. | |
| Pretzels,frozenBakingpan+parchmentpaper | 2TrueConvection360-390°F | (180-200°C) | 18-22min. | ||
| Partiallycookedbreadrollsorbaguettes,pre-baked | Bakingpan+parchmentpaper | 2TrueConvection300-340°F | (150-170°C) | 12-15min. | |
| Strudel,frozenBakingpan+parchmentpaper | 2Combination320-360°F | (160-180°C) | 45-60min. | ||
| Fishsticks | Bakingpan+parchmentpaper | 2TrueConvection380-400°F | (195-205°C) | 20-24min. | |
| Wholefish | Perforated+bakingpan | 31 | Steam | 175-210°F(80-100°C) | 20-25min. |
| Frozenfishfillets | Bakingpan+wirerack | 2Combination360-390°F | (180-200°C) | 35-50min. | |
| SalmonfilletsPerforated+cookingpan | 31 | Steam | 175-210°F(80-100°C) | 20-25min. | |
| Broccoli | Perforated+cookingpan | 31 | Steam | 210°F(100°C) | 4-6min. |
| Cauliflower | Perforated+cookingpan | 31 | Steam | 210°F(100°C) | 5-8min. |
| Greenbeans | Perforated+cookingpan | 31 | Steam | 210°F(100°C) | 4-6min. |
| Peas | Perforated+cookingpan | 31 | Steam | 210°F(100°C) | 4-6min. |
| Carrots | Perforated+cookingpan | 31 | Steam | 210°F(100°C) | 3-5min. |
| Mixedvegetables | Perforated+cookingpan | 31 | Steam | 210°F(100°C) | 4-8min. |
| Brusselssprouts | Perforated+cookingpan | 31 | Steam | 210°F(100°C) | 5-10min. |
* Addalittleliquid
CleaningandMaintenance
Cleaning
Thissectioncoversinformationonthefollowing:
•Careandcleaningoftheappliance
- Cleaningagentsandaids
- SteamCleanmode
•Decalcifymode

WARNING: Riskofburns!
Waituntiltheappliancehascooleddownbeforecleaning.

WARNING: Riskofshortcircuiting!
Neverusepressurewashersorsteamjetblowerstocleantheappliance.

CAUTION: Risk of damage to surfaces! Never use harsh or abrasive cleaning agents, ovencleaners, corrosive, chlorinated or aggressive cleaners. If one of these types of agents comes in contact with the front of the appliance, wipe it off immediately with water.
Remove food residue and spills from the cavity immediately after the appliance has cooled down. Burned on residue is very difficult to remove a later time.
Ifheavilysoiled,useSteamCleanmode(seeSteamClean).
Saltsareveryabrasiveandcancauserustspots.Removeresiduelleftbystrong sauces(ketchup,mustard)orsaltedfoodsimmediatelyaftertheovenhascooled down.
CleaningSponge
Thecleaningspongeprovidedisveryabsorbent. Usethecleaningspongeonlyto cleantheovencavityandtoremoveanyremainingwaterfromtheevaporatordish.
Washthecleaningspongethoroughlybeforeinitialuse. Thecleaningspongecan bewashedinadishwasher.
Cleaners
| Applianceexterior | Soapywater.Useasoftclothtodry. |
| aluminum front panel/handle | Mild window cleaner. Wipe using a soft window cloth or a lint-free microfiber cloth at a horizontalanglewithoutplacingpressureonthesurfaces. |
| stainlesssteelfrontpanel,trim,doorhandle | Soapywater.Useasoftclothtodry.Alwaysremovelimedeposits,grease,oil,starch andeggwhitestainsimmediately.Specialstainlesssteelcleanersareavailablethroughcustomerserviceoratretail stores. |
| OveninteriorWarmsoapywaterorvinegarandwatermixture | |
| Usethecleaningspongeprovidedorasoftdishwashingbrush.Neverusesteelwoolorabrasivepads!Theovencavitycanrust.Ifheavilysoiled,useanall-purposecleaner,suchasSimpleGreen.Followpackagedirections for mixing. Spray on soils, allow to work for 15 - 30 minutes, then wipe theentirecavitywithpapertowelsorcloth.RunSteamCleancycletosothecavityis rinsedthoroughly.Donotallowtheovenlight,bulbordoorgasketstocomeincontactwiththecleaner. | |
| EvaporatordishWarmsoapywaterorvinegarandwatermixture | |
| OutergasketonovenWarmsoapywater | |
| WatertankSoapywater.Donotcleanindishwasher! | |
| TankslotWipedryaftereachuse | |
| LidsealDrywellaftereachuse | |
| RackrailsUsewarmsoapywaterorwashindishwasher | |
| GlassindoorsGlasscleaner | |
| Accessories | Soak in warm soapy water. Clean with a brush or kitchen sponge or wash in dishwasher.Useawaterandvinegarmixtureforstainsordiscolorationcausedbystarchyfoods(suchasrice). |
SteamClean
SteamCleanusessteamtohelpdissolvefoodresidueandspillsintheoven. Residueandspillscanbeeasilyremovedafterward.
SteamCleantakesapproximately30minutes.
Note:
OperationoftheappliancewillbeblockedifSteamCleaniscanceled. The appliancecannotbeoperatedagainuntilafterthefirstandsecondcleaningcycleto ensurethatnodishwashingliquidremainsinside.
Preparation
Lettheovencoldownandremoveanyaccessories.Cleantheevaporatordish usingthecleaningspongeprovided.
Fillthewatertankwithwaterupto"max".Addadropofdishwashingliquidtothe evaporatordishontheovenbottom.
StartingSteamClean
- PressandholdON/OFFuntiltheapplianceturnson.
- PressSTEAMCLEANtoselectSteamCleanmode.
- PressSTART/STOP.
SteamCleanstarts. Thelightintheovenremainsoff.
CleaningCycle1
Abeepsoundsafterapproximately30 minutes. The (emptyevaporatordish) symbolappears.
- Removetherackrailsfromtheovenandclean(seeRemovingtheRackRails).
- Useasoftdishwashingbrushandthecleaningspongetowipeoutthepartially dissolvedfoodsoilfromtheovenandevaporatordish.
- Fillthewatertankwithwater, if necessary, and then slide it back in.
- PressSTART/STOP.
The appliance start the cleaning process.
CleaningCycle2
Afterashorttime, the symbolappearsforthesecondtime.
- Thoroughly wash out the cleanings sponge.
- Usethecleaningspongetoremoveanywaterremainingintheevaporatordish.
- PressSTART/STOP.
The appliance starts the cleaning process. After these second cleaning cycle, the symbol appears.
- PressandholdON/OFF.
RemovingResidualWater
CancelingSteamClean
Usethecleaningspongetoremoveanywaterremainingintheevaporatordish. Wipedowntheovenusingthecleaningspongeanddryafterwardsusingasoft cloth.
1. PressandholdON/OFF.
SteamCleanstops.
The appliance must be cleaned twice after Steam Clean is canceled to ensure that nodish washing soap remains inside.
2. PressON/OFF.
The symbolappears.
Nowfollowthesamestepsasunder"CleaningCycle1" described above.
Decalcify
RunDecalcifymodeatspecificintervalstoensurethattheappliancecontinuesto operateproperly. The indicatorwillremindyou.
Thedescalingprocesstakesapproximately30minutes.
Decalcifymodeisnotrequiredifyouonlyusesoftenedwater.
Note:
OperationoftheappliancewillbeblockedifDecalcifyiscanceled. The appliance cannotbeoperatedagainuntilafterthefirstandsecondcleaningcycletoensure thatnodescalingagentremainsinside.
DescalingAgent
Useonlythepowderdescalerrecommendedbycustomerservicetodescalethe appliance.
USA:itemno.310967atwww.thermador-eshop.com
Canada: For Atlantic provinces, Ontario or Québec, contact A.P. Wagner, 1-800-287-1627, www.apwagner.ca
ForanyoftheTerritories,Manitoba,Saskatchewan,AlbertaorBritishColumbia, contactReliableParts,1-800-941-9217,www.reliableparts.ca
Other descaling agentscandamagetheappliance.
-
Mix32ozwaterand1packetpowderdescalertoproduceadescalersolution.
-
Emptythewatertankandfillitwiththedescalingsolution.

CAUTION: Do not let the descaling solution come in contact with the controlpanelorthersensitivesurfaces.lfitdoes,immediatelyremoveit usingwater.
StartingDecalcifyMode
Theovencavity must be cooled down completely.
-
PressandholdON/OFFuntiltheapplianceturnson.
-
PressDECALCIFYtoselectDecalcifymode.
-
PressSTART/STOP.
Decalcifymodestarts. Thelightintheovenremainsoff.
CleaningCycle1
Abeepsoundsafterapproximately30 minutes. The (fillwatertank) symbol appears.
-
Washoutthewatertankthoroughly, fillitwithwaterandslideitbackin. The (emptyevaporatordish)symbolappears.
-
Use the cleanings sponge provided to remove any water remaining in the evaporator dish.
-
PressSTART/STOP. The appliance start the cleaning process.
CleaningCycle2
Afterashorttime, the symbolappearsforthesecondtime.
- Thoroughly wash out the cleanings sponge.
-
Usethecleaningspongetoremoveanywaterremainingintheevaporatordish.
-
PressSTART/STOP.
The appliance starts the cleaning process. After Decalcify mode is complete, appears.
- PressandholdON/OFF.
RemovingResidualWater
Usethecleaningspongetoremoveanywaterremainingintheevaporatordish. Wipedowntheovenusingthecleaningspongeanddryafterwardsusingasoft cloth.
CancelingDecalcifyMode
- PressandholdON/OFF.
Decalcifymodestops.
The appliancemustbecleanedtwiceafterDecalcifymodeiscanceledtoensure thatnodescalingsolutionremainsinside.
- PressON/OFF.
The symbolappears.
Nowfollowthesamestepsasunder"CleaningCycle1"describedabove.
DescalingOnlytheEvaporatorDish
YoucanalsouseDecalcifymodetodescaleonlytheevaporatordishintheoven cavitywithoutdescalingtheentireappliance.
The only difference in this procedure is as follows:
-
Mix 1½ cups water and 2 teaspoons powder descaler to produce a descaler solution.
-
Filltheevaporatordishcompletelywiththedescalingsolution.
-
Fill the watertank with water only.
-
Start Decalcify mode as described.
Youcanalsodescaletheevaporatordishmanually.
Removing and Installing the Appliance Door
Theappliancedoorcanberemovedforeasycleanling.

WARNING: Whenremovingthedoor:
- Make sure oven is cool and power to the oven has been turned off before removing the door. Failure todos could result in electrical shockor burns.
- The oven door is heavy and fragile. Use both hands to remove the oven door. The doorfrontisglass.Handlecarefullytoavoidbreaking.
- Grasp only the sides of the oven door. Do not grasp the handle, since it may swing in your hand and caused damage or injury.
- Failure to grasp the oven door firmly and properly could result in personal injury or productdamage.
- To avoid injury from hinge bracket snapping closed, be sure that both levers are securely in place before removing the door. Also, donotforced door open or closed—this could damage the hinge, potentially causing an injury.
- If the door is removed without turning both retainers until they stop, the hinge can snapback.Donotreachintothehingearea.Callcustomerservice.
- Lay the door on a flat smooth surface so that the door cannot fall over. Failure to dosomayresultinpersonalinjuryordamagetotheappliance.
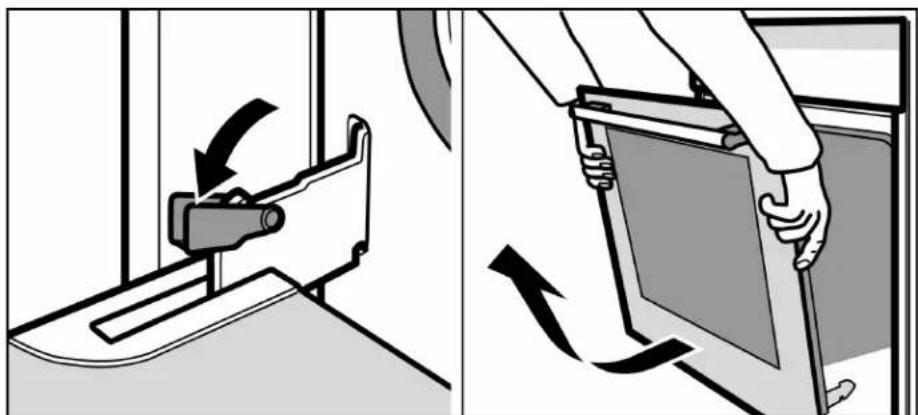
natural_image
Diagram showing two mechanical device states: one with a clamping mechanism and the other with a handle, both without any text or symbols.- Openthedooralltheway.
- Laythetwostopleversontherightandleftdownflat.
- Positionthedooratanangle.
Usebothhandstograsptheleftandrightsidesofthedoor.Closethedooralittle moreandthenremoveit.
InstallingtheDoor
Reattachthedooraftercleaning.
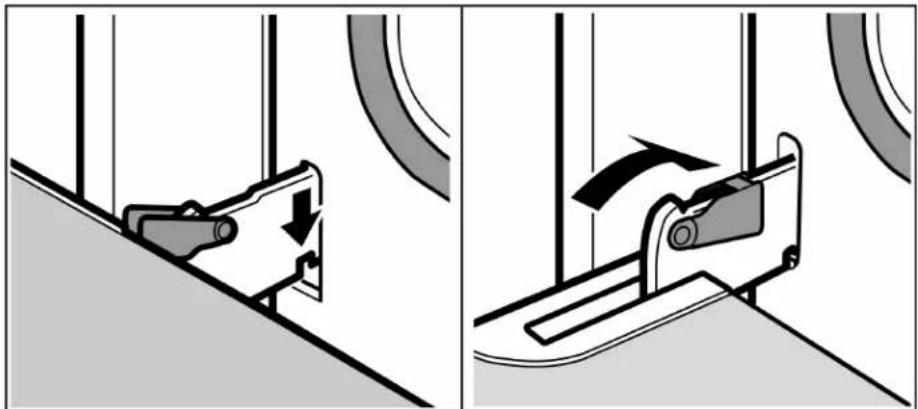
natural_image
Two-panel diagram showing a mechanical device with directional arrows, no text or symbols present.- Keep the door hinges straight while inserting them into the left and right oven openings. Thenotchonbothhingesmustlockinplaceonbothsides.
- Openthodoarallthewayandflipupthestoplever.
3.Closethedoor.
CleaningtheRackRail Frames
Therackrailframescanberemovedforcleaning.
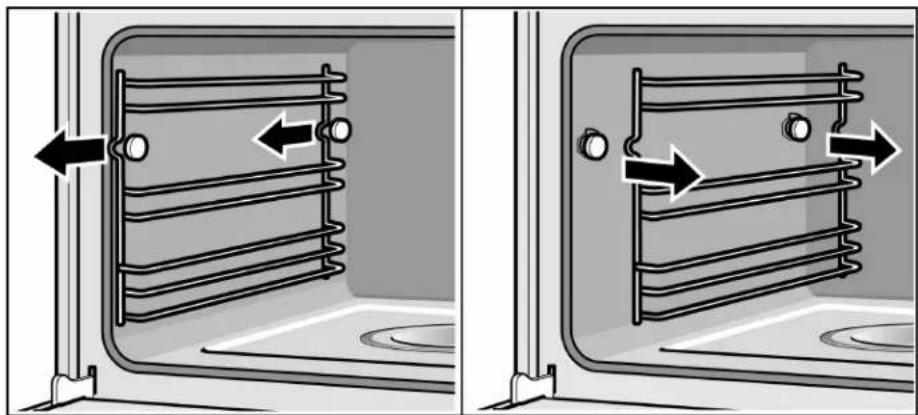
natural_image
Diagram showing two views of a coiled heating element with directional arrows indicating movement (no text or symbols present)Pulltherackrailframetowardyouandremove.
Usedishwashingsoapandakitchenspongeorbrushtocleantherackrailframes.
Therackrailframescanalsobewashedinthedishwasher.
InstallingtheRackRailFrames
Hangthebackandfrontpartsoftheframeandthenpushitbackuntillocksinto place.
Eachrackrailframeonlyfitsononeside.
CleaningtheDoorGlass
Theinnerdoorglassontheappliancecanberemovedforeasiercleaning.

WARNING: Do not use the appliance until the door glass and appliance doorhavebeenproperlyinstalled.
1.Removethedoorandplaceitonatowel,handlesidedown.

text_image
A B-
Unscrew the top cover on the door. To do this, loosen the left and right screws. (Fig.A)
-
Removethedoorglass.(Fig.B)
Cleanthedoorglassusingaglasscleanerandasoftcloth.
InstallingtheDoorGlass
- Reinsertthedoorglass.
Makesurethattheflatsurfacefacesoutwardandtheprintedsurfaceisonthe inside. - Put the cover in place and screw with back on.
- Reinstallthedoor.
Maintenance
ReplacingtheOvenBulb
Heat-resistant230V/25Watthalogenbulbswithsealscanbepurchasedthroughretailstoresorcustomerservice.Ifpurchasingthroughcustomerserviceprovidetheappliancemodelandserialnumbers.

WARNING:
- Make sure the appliance and lights are cool and power to the appliance has been turned off before replacing the light bulb(s). Failure todos could result in electrical shockor burns.
• The covers must be in place when using the appliance.
• The coverservetoprotectthelightbulbfrombreaking. - The covers are made of glass. Handle carefully to avoid breaking. Broken glasscouldcauseaninjury.
• Thelightsocketislivewhenthedoorisopen.
Alwaysuseadryclothtoremovethehalogenbulbfromitspackaging,otherwisethelifeofthebulbwillbeshortened.
- Turn off power to the appliance at the main power supply (fuse or breaker box) or unplugthepowercord.
- Turnthecovertothelefttoremove.
- Removethebulbandreplacewiththesametypeofbulb.
4.Slipthenewsealsandtensionringontotheglasscover.
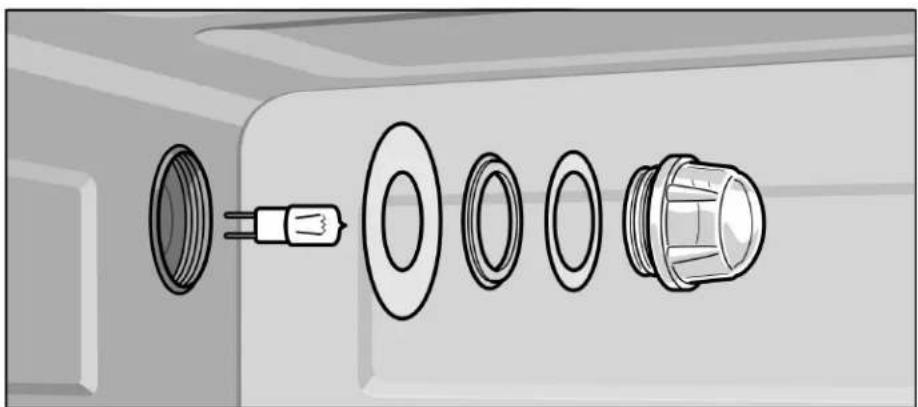
natural_image
Diagram showing a component assembly with five circular parts and a connector, no text or symbols present.5.Screwtheglasscoverwithsealsbackon.
6. Reconnecttheappliancetopowerandresettheclock.
Neveroperatetheappliancewithouttheglasscoverorseals.
ReplacingtheGlassCoverorSeals
Damagedglasscoversorsealsmustbereplaced.Providecustomerservicewith theappliancemodelandserialnumbers.
ReplacingtheDoor Gasket
If the outergasket on the ovendoor is defective, it must bereplaced. Replacement gaskets for the appliance can be obtained through customers service. Provide customers service with the appliance model and serial numbers.
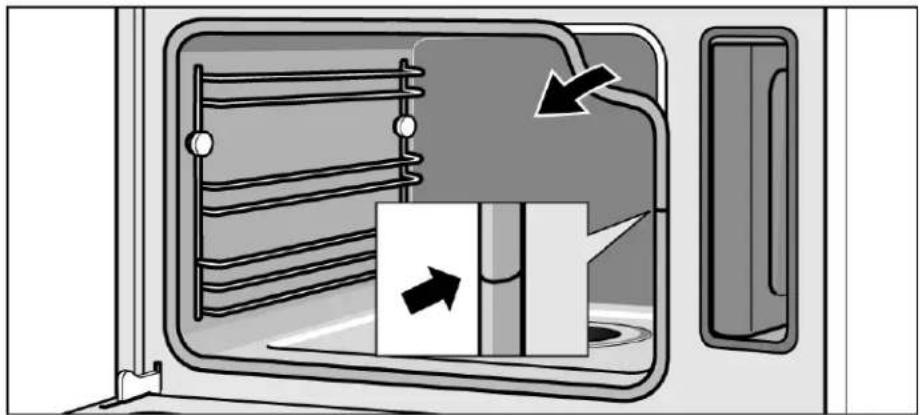
natural_image
Diagram of a door with internal structure and directional arrows indicating movement (no text or symbols)- Opentheappliancedoor.
- Removetheolddoorgasket.
- Insert the new door gasket and tuck it in all the way around the door. The seam must be on the side of the door.
- Check the fit of the door gasket again, particularly in the corners.
Service
BeforeCallingService
| Ifaproblemoccurs,itisusuallyjustminor.Readthefollowinginformationbefore callingcustomerservice.Repairsmustbemadebytrainedcustomerservicetechniciansonly.Improper repairsmadetotheappliancecanplaceyouatextremerisk. | ||
| Problem | PossiblecauseTip/Solution | |
| Applianceisnotworking | CordisnotpluggedinConnectappliancetopower | |
| PoweroutageCheckifotherkitchenappliancesare working | ||
| DefectivefuseCheckthefuseorbreakerboxtoseeif the breakerorfusetotheapplianceis working | ||
| FaultyoperationTurnoffpowertotheapplianceatthe mainpowersupply(fuseorbreakerbox) andturnitbackonafterapproximately 10 seconds | ||
| AppliancedoesnotstartAppliancedoorisnotclosedallthewayClosethedoor | ||
| Appliancedoesnotstart,00:40min.appearsandflashes inthedisplay | SteamCleanorDecalcifywascanceledCleantheappliancetwice (seeCancelingSteamCleanor CancelingDecalcifyMode) | |
| Four zeros appear in the display00:00 | Power outage | Set the current time using the settings dial andthenpressTIMER/CLOCK |
| Applianceisnotoperating.Acooktime appearsinthedisplay | Thesettingsdialwasturnedaccidentally | PressSTART/STOP |
| Afteradjustingthesetting,START/STOP wasnotpressed | PressSTART/STOP,orclearthesetting bypassingON/OFF | |
| Applianceisnotheatingup.Threeheat indicatorbarsappearinthedisplay | Atouchpadcombinationwaspressed | Disconnectfrompowerandreconnect afterapproximately20seconds. Within2 minutes,pressandholdPANEL LOCKfor4seconds |
| F8appears in the display | Automatic shutoff is activated | Press any touchpad |
| appears | Appliance has not been used for at least 2 daysandthewatertankisfull | Emptyandcleanthewatertank.Always emptythewatertankaftercooking |
| The indicatorappears,butthewater tankisfull | Water tank was not inserted correctly | Slide in water tank until it locks in place |
| Detectionsystemnotworking | Callcustomerservice | |
| Problem | Tip/SolutionPossiblecause | |
| The indicatorappears,butthewater tankisnotemptyyet,orthewatertankis empty,butthe indicatordoesnot appear | Watertankisdirty. Themovingwaterlevel detectorsarestuck | Shakeandcleanthewatertank.Ifthe componentsarestillstuck,obtainanew watertankthroughcustomerservice |
| Watertankemptieswithoutany apparentreason.Evaporatordishis overflowing | WatertankwasnotclosedproperlyClosethetankliduntilclearlysnapsinto place | |
| TanklidsealisdirtyCleantheseal | ||
| TanklidsealisdefectiveObtainanewwatertankthrough customerservice | ||
| Evaporatordishhasbeenboileddry eventhoughthewatertankisfull | WatertankwasnotinsertedcorrectlySlideinthewatertankuntilillocksinto place | |
| SupplylineiscloggedDescaleappliance.Verifythatthewater hardnesslevelissetcorrectly | ||
| A"plop"noisecanbeheardwhen cooking | Temperaturechangeaffectingfrozen foodandcausedbywatervapor | Thisisnormal |
| Anexcessiveamountofsteamis producedwhensteaming | Applianceisbeingcalibrated automatically | Thisisnormal |
| Anexcessiveamountofsteamis repeatedlyproducedwhensteaming | Appliancecannotbecalibrated automaticallywhencookingforshort periodsoftime | Resettheappliancetothefactorysetting (seeBasicSettings).Next,starttheSteam modefor20minutesat210°F(100°C) |
| Steamescapesfromtheventopenings whencooking | Thisisnormal | |
| Appliancenolongerproducessteam correctly | TheapplianceneedstobedescaledStartDecalcifymode | |
| Theerrormessage"E..."appearsinthe display | TechnicaldefectTurnthesettingsdialtoclearthe error messageandresettheclock, if necessary. Iftheerrormessagereappears,contact customerservice | |
| Theerrormessage"E011"appearsin thedisplay | Atouchpadwaspressedfortoolongoris stuck | Turnthesettingsdialtocleartheerror message. Pressalltouchpadsindividuallytocheckif theyareclean |
CustomerService
If the applianceneedstoberepaired, customerservicecanassistyou. Toreacha servicerepresentative, contact 1-800-735-4328 or www.thermador.com.
ModelandSerial Numbers
Alwaysprovidecustomerservicewiththemodelnumber(Eno.)andserialnumber(FDno.)ofyourappliance. Thedataplatewiththenumbersislocatedonthebottom leftsidewhenyouopentheovendoor. Toensurethatyoucaneasilyfindthe numbersintheeventofamalfunction, writedowntheapplianceinformationhere.
Modelno.Serialno.
CustomerService
Energy-SavingTips
Only preheat the appliance if specified in the recipe or in the tables and charts in this manual.
Keep the appliance closed as much as possible during the cooking process.
Baking
Usedark, black-coatedorenamelbakingdishes. They absorbheatwell.
Itisbesttobakeseveralcakesoneaftertheother. The combinationovenisstill warm, which shortensthebakingtimeforthesecondcake. Youcanalsoplace two loafpanssidebyside.
When baking for longer period so time, you can turn the combination oven off 10 minutes early and use the residual heat to finish baking the food.
Steaming
Foodcanbeplacedonmultipleracklevelstosteamcookatthesametime.
For foods with different cooking times, place the food with the longest cooking time intheovenfirst.
STATEMENTOFLIMITEDPRODUCT WARRANTY
Thermador®
WhatthisWarranty Covers&WhoitApplies to
ThelimitedwarrantyprovidedbyBSHHomeAppliancesThermadorinthis StatementofLimitedProductWarrantyappliesonlytotheThermadorappliance soldtoyou,thefirstusingpurchaser,providedthattheProductwaspurchased:
- For your normal, household (non-commercial) use, and has in fact at all times only been used for normal household purposes.
- New at retail (not a display, "as is", or previously returned model), and not for resale, or commercial use.
- Within the United States or Canada, and has at all times remained within the countryoforiginalpurchase.
ThewarrantiesstatedhereinapplyonlytothefirstpurchaseroftheProductandare nottransferable.
Pleasemakesuretoreturnyourregistrationcard;while not necessary to effectuate warranty coverage, it is the best way for Thermadorton notify you in the unlikely event of safety notice or product recall.
HowLongtheWarranty Lasts
ThermadorwarrantsthattheProductisfreefromdefectsinmaterialsand workmanshipforaperiodoftwelve(12)monthsfromthedateofpurchase. The foregoingtimelinebeginstorunuponthedateofpurchase, and shallnotbestalled, tolled, extended, or suspended, foranyreasonwhatsoever.
Repair/ReplaceasYour ExclusiveRemedy
During this warranty period, Thermadororone of its authorized service providers will repair your Product without charge to you (subject to certain limitations stated herein) if your Product provest have been manufactured with defect in materials or workmanship. If reasonable attempt store pair the Product have been made without success, then Thermador will replace your Product (upgraded models may be available to you, in Thermador's sole discretion, for an additional charge). All removed parts and components shall become the property of Thermador at its sole option. All replaced and repaired parts shall assum the identity of the original part for purposes of this warranty and this warranty shall not be extended with respect to such parts. Thermador's sole liability and responsibility here underisto repair manufacturer-defective Product only, using a Thermador-authorized service provider during normal business hours. Forsafety and property damage concerns, Thermador highly recommend that you donot attempt to repair the Product yourself, or use an un-authorized servicer; Thermador will havenoresponsibility or liability for repairs or work performed by an authorized servicer. If you choose to have someone other than an authorized service provider work on your Product, THIS WARRANTY WILL AUTOMATICALLY BECOME NULL AND VOID. Authorized service providers are those person or company is that have been especially trained on Thermador products, and who possess, in Thermador's opinion, as superior reputation for customers service and technical ability (not that they are independent entities and are not agents, partners, affiliates or representatives of Thermador). Notwithstanding the foregoing, Thermador will not incur any liability, or have responsibility, for the Product fit is located in a remote area (more than 100 miles from unauthorized service provider) or reasonably in accessible, hazardous, threatening, ortreacherous locale, surroundings, environment; in any such event, if you request, Thermador would still pay for labor and parts and ship the part sto
thenearestauthorizedserviceprovider, butyouwouldstillbefullyliable and responsible for any travel time or others special charges by the service company, assuming they agree to make the service call.
OutofWarrantyProduct
Thermadorisundernoobligation, atlawor otherwise, to provide you with any concessions, including repairs, pro-rates, or Product replacement, once this warranty has expired.
WarrantyExclusions
Thewarranty coverages described herein excludes all defects or damage that are not the direct fault of Thermador, including without limitation, one or more of the following:
- Use of the Product in anything other than its normal, customary and intended manner(includingwithoutlimitation,anyformofcommercialuse,useorstorage ofanindoorproductoutdoors,useoftheProductinconjunctionwithairor water-goingvessels).
- Any party's willful misconduct, negligence, misuse, abuse, accidents, neglect, improperoperation, failure to maintain, improper or negligent installation, tampering, failure to follow operating instructions, mishandling, unauthorized service (including self-performed “fixing” or exploration of the appliance’s internal workings).
- Adjustment, alterationormodificationofanykind.
- A failure to comply with any applicable state, local, city, or county electrical, plumbing and/or building codes, regulations, or laws, including failure to install the product in strict conformity with local fire and building codes and regulations.
- Ordinary wear and tear, spills of food, liquid, grease accumulations, or other substance that accumulate on, in, or around the Product.
- Any external, elemental and/or environmental forces and factors, including without limitation, rain, wind, sand, floods, fires, mudslides, freezing temperatures, excessivemoistureorextendedexposuretohumidity, lightning, powersurges, structuralfailuressurroundingtheappliance, andactsofGod.
InnoeventshallThermadorhaveanyliabilityorresponsibilitywhatsoeverfor damagetosurroundingproperty,includingcabinetry,floors,ceilings,andother structuresorobjectsaroundtheProduct.Alsoexcludedfromthiswarrantyare scratches,nicks,minordents,andcosmeticdamagesonexternalsurfacesand exposedparts;Productsonwhichtheserialnumbershavebeenaltered,defaced, orremoved;servicevisitstoteachyouhowtousetheProduct,orvisitswherethere is nothing wrong with the Product; correction of installation problems (you are solely responsibleforanystructureandsettingfortheProduct,includingallelectrical, plumbing or other connecting facilities, for proper foundation/flooring, and for any alterations including without limitation cabinetry, walls, floors, shelving, etc.); and resettingofbreakersorfuses.
TOTHEEXTENTALLOWEDBYLAW,THISWARRANTYSETSOUTYOUR EXCLUSIVEREMEDIESWITHRESPECTTOPRODUCT,WHETHERTHE CLAIMARISESINCONTRACTORTORT(INCLUDINGSTRICTLIABILITY,OR NEGLIGENCE)OROTHERWISE. THISWARRANTYISINLIEUOFALL OTHERWARRANTIES,WHETHEREXPRESSORIMPLIED.ANYWARRANTY IMPLIEDBYLAW,WHETHERFORMERCHANTABILITYORFITNESSFORA PARTICULARPURPOSE,OROTHERWISE,SHALLBEEFFECTIVEONLY FORTHEPERIODTHATTHISEXPRESSLIMITEDWARRANTYIS EFFECTIVE.INNOEVENTWILLTHEMANUFACTURERBELIABLEFOR CONSEQUENTIAL,SPECIAL,INCIDENTAL,INDIRECT,"BUSINESSLOSS",
AND/ORPUNITIVEDAMAGES,LOSSES,OREXPENSES,INCLUDING WITHOUTLIMITATIONTIMEAWAYFROMWORK,HOTELSAND/OR RESTAURANTMEALS,REMODELLINGEXPENSESINEXCESSOFDIRECT DAMAGESWHICHAREDEFINITIVELYCAUSEDEXCLUSIVELYBY THERMADOR,OROTHERWISE.SOMESTATESDONOTALLOWTHE EXCLUSIONORLIMITATIONOFINCIDENTALORCONSEQUENTIAL DAMAGES,ANDSOMESTATESDONOTALLOWLIMITATIONSONHOW LONGANIMPLIEDWARRANTYLASTS,SOTHEABOVELIMITATIONSMAY NOTAPPLYTOYOU.THISWARRANTYGIVESYOUSPECIFICLEGAL RIGHTS,ANDYOUMAYALSOHAVEOTHERRIGHTSWHICHVARYFROM STATETOSTATE.
Noattempttoalter, modifyoramendthiswarrantyshallbeeffectiveunless authorizedinwritingbyanofficerofBSH.
Thermador®