
Harmony DBD8010 - Hi-Fi Sustav PHILIPS - Besplatni korisnički priručnik
Pronađite besplatno priručnik za uređaj Harmony DBD8010 PHILIPS u PDF formatu.

Pitanja korisnika o Harmony DBD8010 PHILIPS
0 pitanje o ovom uređaju. Odgovorite na one koje znate ili postavite svoje.
Postavi novo pitanje o ovom uređaju
Preuzmite upute za vaš Hi-Fi Sustav u PDF formatu besplatno! Pronađite svoj priručnik Harmony DBD8010 - PHILIPS i uzmite svoju elektroničku napravu natrag u ruke. Na ovoj stranici objavljeni su svi dokumenti potrebni za korištenje vaše naprave. Harmony DBD8010 marke PHILIPS.
KORISNIČKI PRIRUČNIK Harmony DBD8010 PHILIPS
Register your product and get support at
www.philips.com/welcome
DBD8010
natural_image
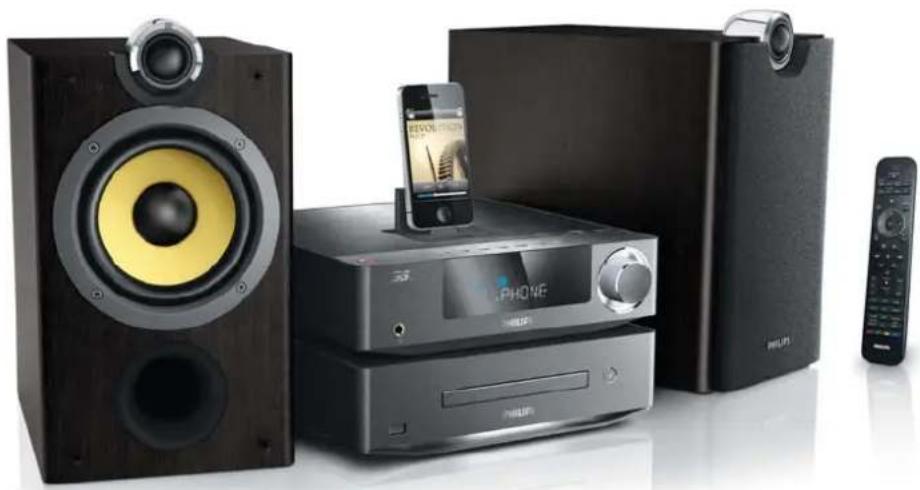
Product photo of a modern electronic audio amplifier with speaker, CD, and control unit (no visible text or symbols)EN User manual 3
ZH-CN 用户手册 47
PHILIPS
Contents
1 Important 4
Safety 4
2 Your Blu-ray Component Hi-Fi System 6
Feature highlights 6
playable media 6
Product overview 7
3 Before use 10
Place the product 10
Connect 10
Install/replace the batteries of remote control 14
4 Get started 14
Turn on 14
Demonstrate features 15
Set clock 15
Find the correct video input channel 15
Use the home menu 15
Navigate through a menu 16
Select a menu display language 16
Store FM radio stations automatically 16
5 Play a disc 17
Basic operations 17
Play a Blu-ray 3D video 17
Play copied files 18
6 Play from a USB storage device 20
Basic operations 20
Play a musical slideshow 20
Play DivX ^® videos 21
7 Optional control 21
Video 21
Music 22
Photo 22
8 Browse iPod/iPhone/iPad 22
Compatible iPod/iPhone/iPad 22
Load the iPod/iPhone/iPad 22
Use the playback interface of iPod/iPhone/iPad 23
Use the playback interface of this product 23
Charge the iPod/iPhone/iPad 24
Remove the iPod/iPhone/iPad 24
9 Use the network 25
Connect and set up 25
Access online media sources 27
Access local media sources 28
10 Listen to FM radio 28
Tune to a radio station 28
Program radio stations automatically 28
Program radio stations manually 29
Tune to a preset radio station 29
11 Setup 29
Video setup 30
Audio setup 30
Network setup 30
EasyLink setup 31
Preference setup 31
Advanced setup 32
12 Use Philips EasyLink 33
One-touch play 33
One-touch standby 33
Map the devices to the audio inputs 34
13 Upgrade the firmware 35
Register your product 35
Check the current software version 35
Upgrade firmware via the Internet 35
Upgrade firmware via the USB port 36
14 Adjust sound 36
Adjust volume level 36
Adjust bass level 36
Adjust treble level 36
Select automatic loudness control 36
Mute sound 37
Listen through headphone 37
15 Additional Information 37
Adjust the brightness of display panel 37
Set alarm timer 37
Set the sleep timer 38
Control by your iPhone 38
Care 38
16 Specifications 39
17 Troubleshooting 40
18 Notice 42
Disposal of your old product and batteries 42
Copyright notice 42
Trademark notice 42
19 Glossary 44
1 Important
Read and understand all instructions before you use this product. If damage is caused by failure to follow the instructions, the warranty does not apply.
Safety
Risk of electric shock!
- Never expose the product and accessories to rain or water. Never place liquid containers, such as vases, near the product. If liquids are split on or into the product, disconnect it from the power outlet immediately. Contact Philips Consumer Care to have the product checked before use.
- Never place the product and accessories near naked flames or other heat sources, including direct sunlight.
- Never insert objects into the ventilation slots or other openings on the product.
- Where the mains plug or an appliance coupler is used as the disconnect device, it shall remain readily operable.
- Disconnect the product from the power outlet before lightning storms.
- When you disconnect the power cord, always pull the plug, never the cable.
Risk of short circuit or fire!
- Before you connect the product to the power outlet, make sure that the power voltage matches the value printed on the back of the product.
- Avoid applying pressure on the power plugs. Loose power plugs can cause arcing or fire.
Risk of injury or damage to the product!
• To avoid exposure to laser radiation, do not disassemble.
- Do not touch the optical lens inside the disc compartment.
- Never place the product or any objects on power cords or on other electrical equipment.
- If the product is transported in temperatures below 5°C, unpack the product and wait until its temperature matches room temperature before connecting it to the power outlet.
Risk of overheating!
- Never install this product in a confined space. Always leave a space of at least four inches around the product for ventilation. Make sure that curtains or other objects never cover the ventilation slots on the product.
Risk of contamination!
- Remove the battery if flat or if the remote control is not to be used for a long time.
- Batteries contain chemical substances. They should be disposed of properly.
Risk of swallowing batteries!
- The product/remote control may contain a coin type battery, which can be swallowed. Keep the battery out of reach of children at all times!
Hearing safety
Listen at a moderate volume.
- Using headphones at a high volume can impair your hearing. This product can produce sounds in decibel ranges that may cause hearing loss for a normal person, even for exposure less than a minute. The higher decibel ranges are offered for those that may have already experienced some hearing loss. - Sound can be deceiving. Over time your hearing 'comfort level' adapts to higher volumes of sound. So after prolonged listening, what sounds 'normal' can actually be loud and harmful to your hearing. To guard against this, set your volume to a safe level before your hearing adapts and leave it there.
To establish a safe volume level:
- Set your volume control at a low setting.
- Slowly increase the sound until you can hear it comfortably and clearly, without distortion.
Listen for reasonable periods of time:
- Prolonged exposure to sound, even at normally 'safe' levels, can also cause hearing loss.
- Be sure to use your equipment reasonably and take appropriate breaks.
Be sure to observe the following guidelines when using your headphones.
- Listen at reasonable volumes for reasonable periods of time.
- Be careful not to adjust the volume as your hearing adapts.
- Do not turn up the volume so high that you can't hear what's around you.
- You should use caution or temporarily discontinue use in potentially hazardous situations.

Note
• The type plate is located on the bottom of the product.
2 Your Blu-ray Component Hi-Fi System
Congratulations on your purchase, and welcome to Philips! To fully benefit from the support that Philips offers (e.g. product software upgrade), register your product at www.philips.com/welcome.
If you contact Philips, you will be asked for the model and serial number of this product.
The model number and serial number are on the bottom or back of this product. Write the numbers here:
Model No. ____
Serial No. ____
Feature highlights
For optimal performance, it is recommended to regularly update the firmware.
High-Definition entertainment
Watch high-definition content disc with HDTV (High Definition Television). Connect it through a high speed HDMI cable (1.3 or category 2).
You can enjoy excellent picture quality up to 1080p resolution with the frame rate of 24 frames per second with progressive scan output.
BD-Live
Connect this player to the movie studios website via the LAN port or external Wi-Fi to access a variety of up-to-date content (e.g. refreshed previews and exclusive special features).
playable media
This product can play:
- Disc
• BD-Video, BD-R/RE2.0
• DVD, DVD-Video, Video CD, SVCD, Audio CD
- DVD+R/+RW, DVD-R/-RW, DVD+R/-R DL (Dual Layer), CD-R/-RW (Maximum number of files: 3000)
- File
- Video: .avi, .divx, .mkv, .wmv, .rm, .rmvb, .mpg, .mpeg
• Audio: .mp3, .wma, .aac, .mka
• Picture: .jpg, .jpeg, .gif, .png
- USB storage device
- Compatibility: Hi-Speed USB (2.0)
• Class support: MSC (Mass Storage Class)
• File system: FAT16, FAT32, NTFS
• Maximum number of albums/folders: 3000
• Maximum level of directory: 10
- iPod, iPhone, and iPad
- iPad 2
- iPad
- iPhone 4
- iPhone 3GS
- iPhone 3G
- iPod nano (4th, 5th, and 6th generation)
- iPod touch (2nd, 3rd, and 4th generation)
- iPod classic
Region codes
You can play discs with the following region codes.
DVD Blu-ray Countries


China
Product overview
Main unit
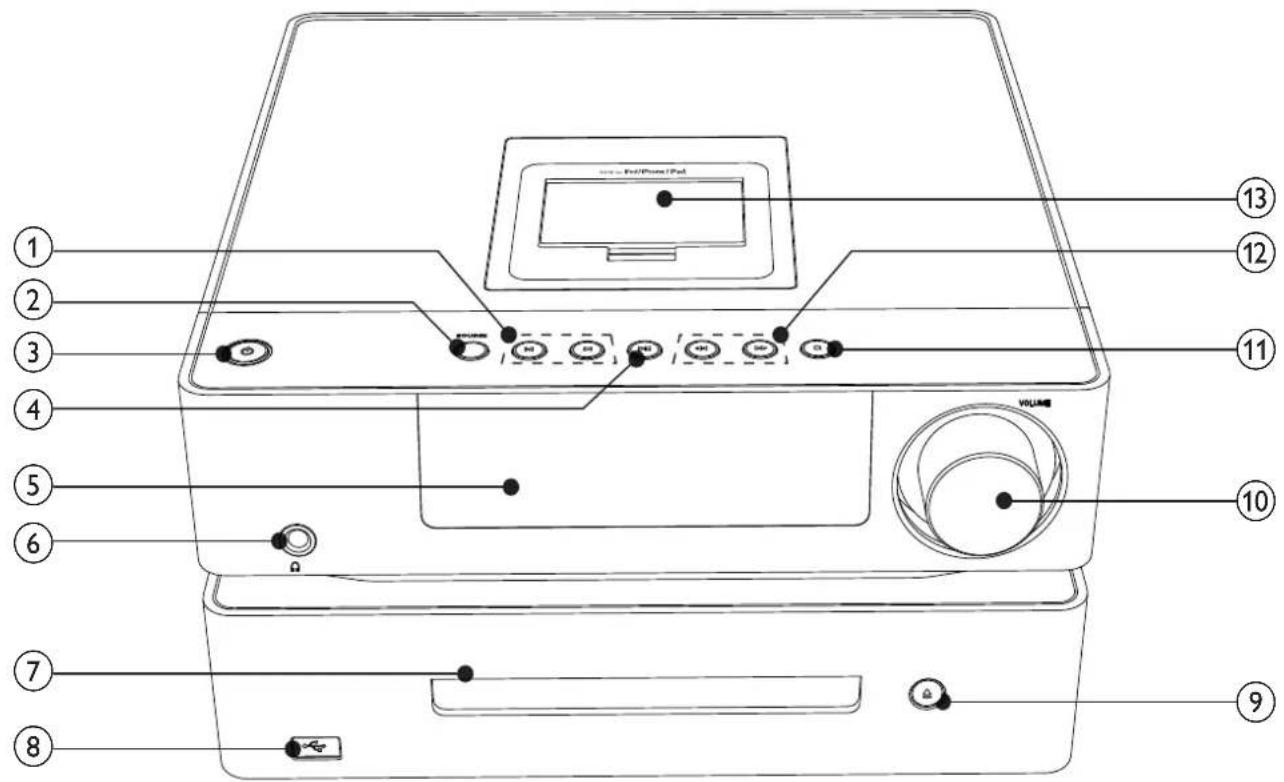
① |◀ ▶|
- Skip to the previous/next track, title, chapter, or file.
- Select a preset radio station.
② SOURCE
- Select a source.
③
- Switch this product between working mode, normal standby mode, and Eco Power standby mode.
④ ▶ II
- Start, pause, or resume play.
⑤ Display panel
• Display current status.
⑥
- Headphone socket.
⑦ Disc compartment
⑧
- USB socket.
⑨
- Eject or close the disc compartment.
⑩ VOLUME
- Adjust the time and volume level.
11
- Stop play.
12
- Search fast backward or forward.
⑬ DOCK for iPod/iPhone/iPad
- Connect to an iPod, iPhone, or iPad.
Remote control
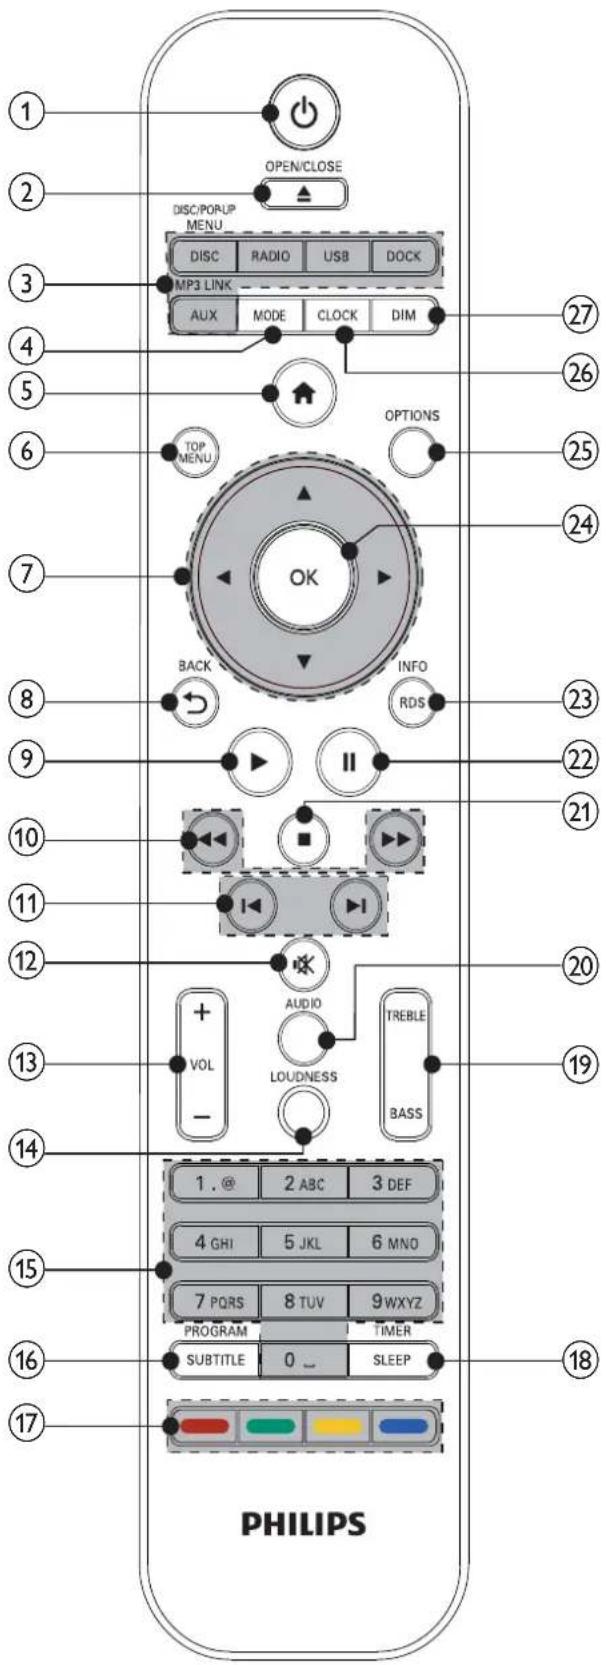
①
- Switch this product between working mode, normal standby mode, and Eco Power standby mode.
- When EasyLink is enabled, press and hold for three seconds to turn all connected HDMI CEC compliant devices to standby mode.
② ▲ OPEN/CLOSE
- Eject or close the disc compartment.
③ Source selection buttons
• DISC/POP-UP MENU: Play a disc; access or exit the pop-up menu of BD videos; access or exit the disc menu of DVD videos.
• RADIO: Listen to FM radio stations.
- DOCK: Browse media files stored on your iPod/iPhone/iPad.
• USB: Browse media files stored on a USB storage device.
- AUX/MP3 LINK: Select the audio input from the AUX IN sockets or the MP3 LINK socket.
④ MODE
- Select a play mode: normal play, repeat, or shuffle.
⑤
- Access the home menu.
⑥ TOP MENU
• BD: Display the top menu.
• DVD: Display the title menu.
⑦ ▲ ▼ ◀ ▶
- Navigate through the menus.
- Tune to a radio station.
• ▲▼. Adjust the bass or treble level.
⑧ ← BACK
- Return to the previous menu.
- Erase a program.
⑨ ▶
- Start or resume play.
10
• Search fast backward or forward.
⑪ ◀/▶
- Skip to the previous or next title, chapter, track, or file.
- Select a preset radio station.
⑫
- Mute or restore volume.
⑬ VOL +/-
- Adjust the time and volume level.
⑭ LOUDNESS
- Enable or disable the feature of automatic loudness control.
⑮ Keypad
- Select an item to play.
- Enter numbers, letters, and symbols.
⑯ PROGRAM/SUBTITLE
• Program radio stations.
- Select an available subtitle or hide the subtitle.
⑰ Color buttons
- For BD-Live, select tasks or options.
- Switch sources: the red button for disc source, the green one for iPod/ iPhone/iPad dock, the yellow one for help information, and the blue one for AUX IN or MP3 LINK.
⑱ SLEEP/TIMER
- Set the alarm timer or sleep timer.
⑲ TREBLE/BASS
- Activate the adjustment of treble/bass level.
⑳ AUDIO
- Select an audio channel or audio language.
21
- Stop play.
22
- Pause play.
②3 RDS/INFO
- Display the current status or the media information.
⑳ OK
- Confirm an entry or selection.
• In FM mode, switch the sound setting between stereo and monophonic.
⑲ OPTIONS
- Access the options of play control.
⑳ CLOCK
- Set the clock.
- Display the set clock.
27 DIM
- Select a brightness level for the display panel on the main unit.
3 Before use
Place the product
natural_image
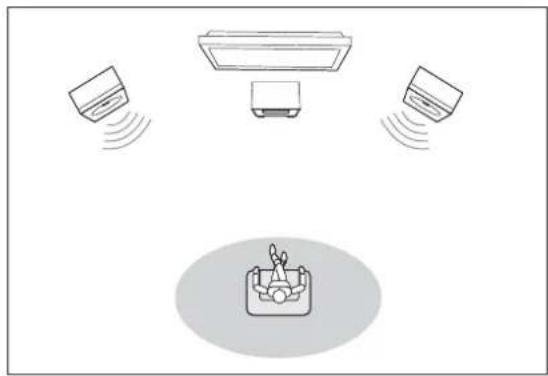
Diagram showing three air conditioning machines emitting sound waves from a central device (no text or symbols)1 Place the product near the TV.
2 Place the speakers at equal distance from the TV and at an angle of approximately 45 degrees from the listening position.

Note
- To avoid magnetic interference or unwanted noise, never place this product too close to any radiation devices.
Connect
Make the following connections to use this product.

Note
• Refer to the type plate at the back or bottom of the product for identification and supply ratings.
- Before you make or change any connections, make sure that all the devices are disconnected from the power outlet.
- The DEMO jack is only applicable to the demo unit that is not included in the apparatus. Do not attempt to connect any other device to the apparatus through this jack.
Connect speakers

Note
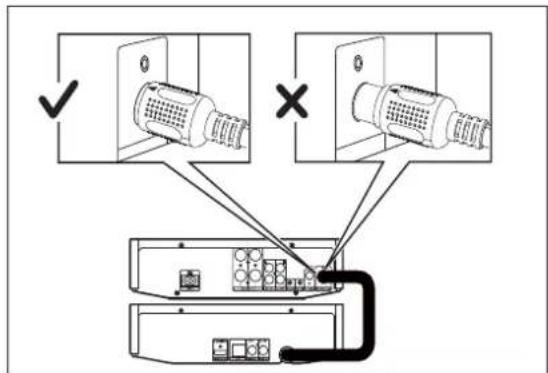
- Fully insert the stripped portions of each speaker cable into the connectors.
- For optimal sound, use the supplied speakers only.
- Connect speakers only with impedance that is the same or higher than that of the supplied speakers.
Two speaker cables are supplied. Each speaker cable has two strands.
- the golden brown strand for the connectors marked with "+"
- the silvery strand for the connectors marked with "-"
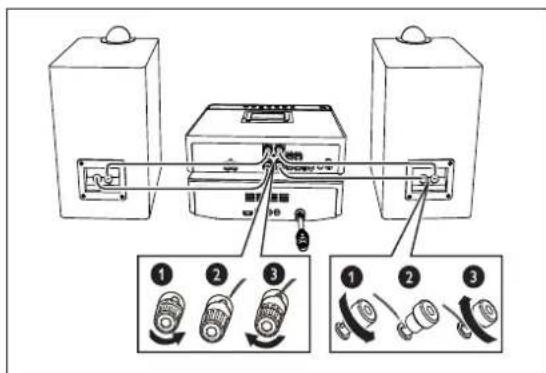
1 Unscrew the connectors for speaker cable on this product and the speakers.
2 Connect a speaker cable to the left speaker and the SPEAKER OUT L (+/-) connectors on this product.
3 Screw the connectors to secure the cable.
4 Connect the other speaker cable to the right speaker and the SPEAKER OUT R (+/-) connectors on this product.
5 Screw the connectors to secure the cable.
Connect the control cable
Connect the control cable connector to the CONTROL CABLE socket.

Note
- Connect the control cable correctly and tightly to avoid abnormal performance.
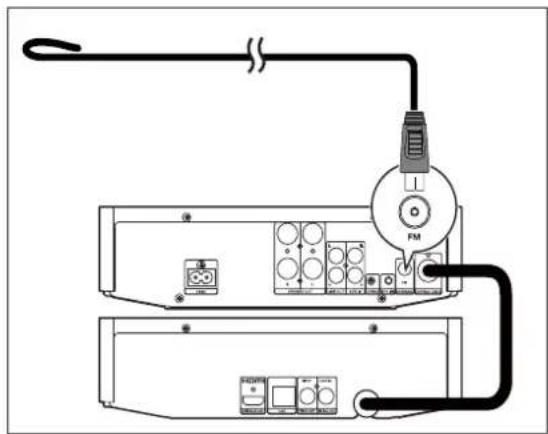
Connect the FM antenna

Tip
- For optimal reception, fully extend and adjust the position of the antenna.
- For better FM stereo reception, connect an outdoor FM antenna to the FM ANTENNA socket.
• This product does not support MW radio reception.
Connect the supplied FM wire antenna to the FM ANTENNA socket on this product.
natural_image
Pure electrical circuit lines without any symbolsConnect video/audio cables
Select the best video connection that the TV can support.
- Option 1: Connect to the HDMI jack (for an HDMI, DVI or HDCP-compliant TV).
- Option 2: Connect to the composite video jack (for a standard TV).
Option 1: Connect to the HDMI jack
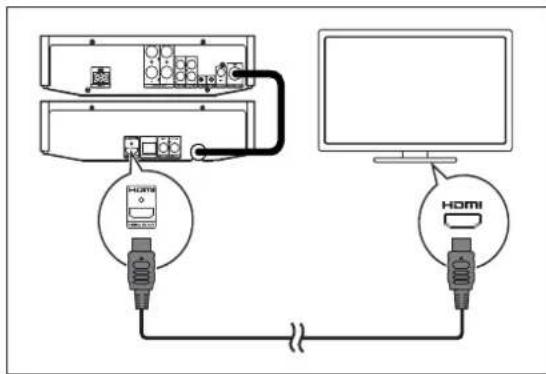
Connect an HDMI cable (not supplied) to:
- the HDMI (DIGITAL AV OUT) jack on this product.
• the HDMI input jack on the TV.

Tip
- If the TV has a DVI connector only, connect via an HDMI/DVI adaptor. Connect an audio cable for sound output.
- If this product connects to a TV compatible with 1080p or 1080p/24Hz, Philips recommends HDMI category 2 cable, also known as High Speed HDMI cable, for optimal video and audio output.
- This type of connection provides the best picture quality.
Option 2: Connect to the composite video jack
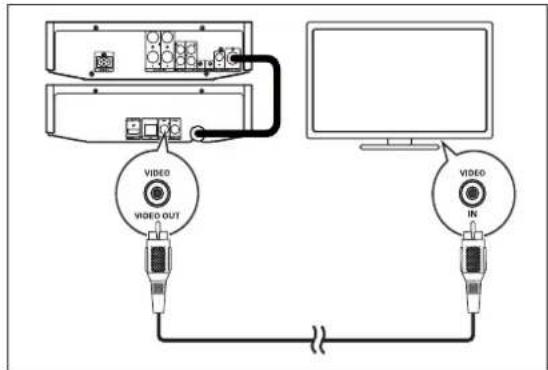
1 Connect a composite video cable to:
• the VIDEO (VIDEO OUT) jack on this product.
• the VIDEO input jack on the TV.
2 Connect the audio cables to:
• the LINE OUT L/R jacks on this product.
• the AUDIO input jacks on the TV.

Tip
- The video input jack on the TV might be labeled as A/V IN, VIDEO IN, COMPOSITE or BASEBAND.
Route audio to other devices
You can route the audio from this product to other devices.
Connect to an HDMI-compliant AV receiver/amplifier
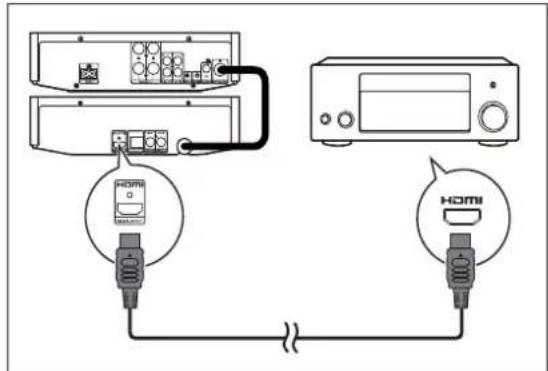
Connect an HDMI cable (not supplied) to:
• the HDMI (DIGITAL AV OUT) jack on this product.
• the HDMI jack input jack on the device.

Tip
• The HDMI connection provides the best audio quality.
Connect to a digital AV amplifier/receiver
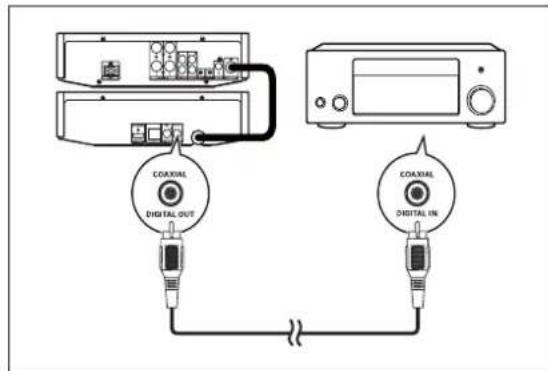
Connect a coaxial cable (not supplied) to:
• the COAXIAL (DIGITAL OUT) jack on this product.
- the COAXIAL/DIGITAL input jack on the device.
Connect an analogue stereo system
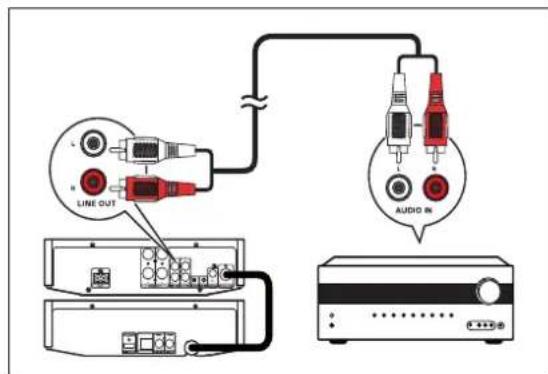
Connect the audio cable to:
• the LINE OUT L/R jacks on this product.
• the audio input jacks on the device.
Route audio from other devices
You can route audio from an external device to this product.
Connect an audio cable to:
• the AUX IN L/R sockets on this product.
- the audio output sockets on the external device (for example, audio player).
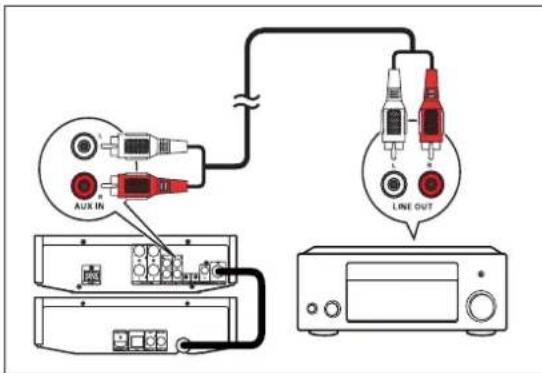
Connect an MP3 Link cable to:
• the MP3 LINK socket on this product.
- the headphone socket on the external device (for example, MP3 player).
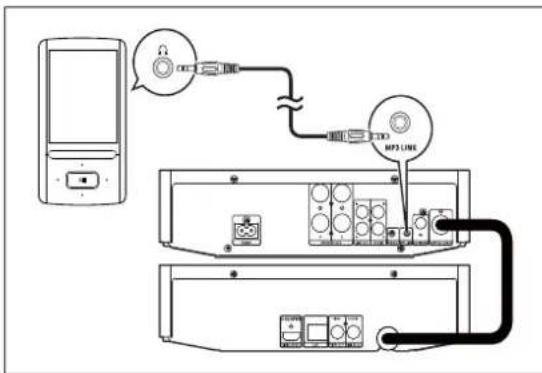
Press MP3 LINK/AUX to select the audio input through the MP3 LINK socket or the AUX IN L/R sockets.
Connect power

Caution
- Risk of product damage! Make sure that the power supply voltage corresponds to the voltage printed on the back or the underside of the product.
- Before you connect the AC power cord, make sure that you have completed all other connections.
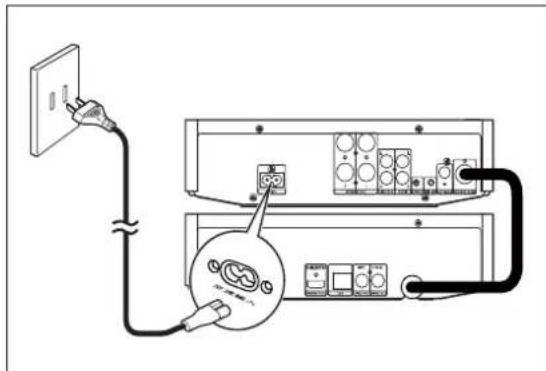
Connect the AC power cord to:
- the 交流输入 socket on this product.
• the wall power socket.
Install/replace the batteries of remote control

Note
- Risk of explosion! Keep batteries away from heat, sunshine or fire. Never discard batteries in fire.
- If the remote control is not to be used for a long time, remove the batteries.
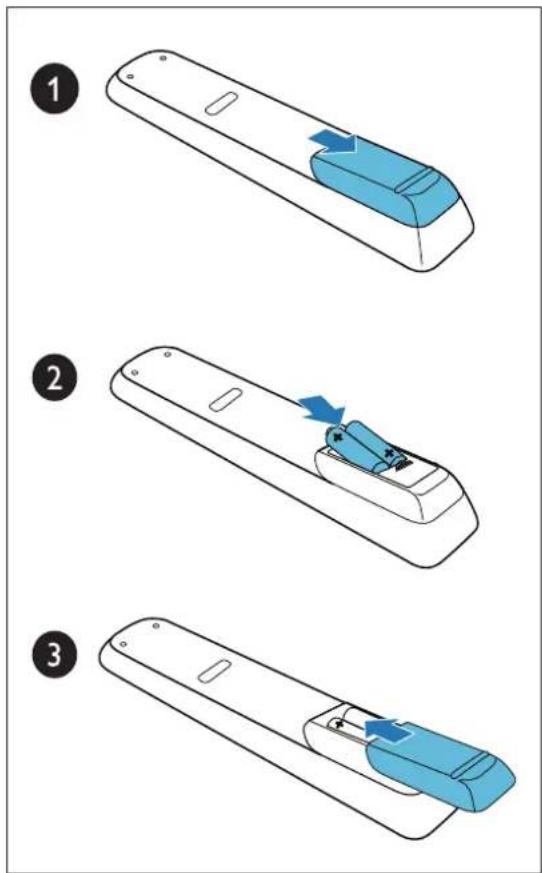
1 Press and push the battery compartment cover to slide it open.
2 Insert two AAA batteries with correct polarity (+/-) as indicated.
3 Push and slide back the battery compartment cover.
4 Get started
Turn on

Note
- Make sure that you have turned on the connected TV and switched it to the correct video input channel.
Press ⏻
→ [PLS WAIT...] (please wait) is displayed.
→Ten seconds later, this product switches to the last selected source.
For the first time use
After you turn on this product, an interface prompts you to select a language for on-screen menus.
1 Press ▲ / ▼ to select a language.
2 Press OK to confirm.

Tip
- You can select the language for on-screen menus later. (See "Get started" > "Select a menu display language")
Switch modes
Automatically switch the modes:
• After this product stays inactive for 30 minutes, it automatically switches to normal standby mode.
• After this product stays in normal standby mode for 10 seconds, it automatically switches to eco-power standby mode.
Manually switch the modes:
-
Press and hold ⏻ to switch this product:
• from working mode or normal standby mode to eco-power standby mode.
• from eco-power standby mode to normal standby mode. -
Press ⏻ to switch this product
- between working mode and a standby mode.
Demonstrate features
1 In normal standby mode, press and hold ■ for two seconds.
- [DEMO ON] is displayed, and then feature names scroll on the display panel one by one.
2 To exit the feature demonstration, press and hold ■ for two seconds.
Set clock
1 In standby mode, press and hold CLOCK to activate the clock setting mode.
→[CLOCK SET] is displayed, and then [CLOCK 24HR] (24-hour time format).
2 Press VOL +/- (or ▲▼) to select [CLOCK 24HR] or [CLOCK 12HR] (12-hour time format), and then press CLOCK to confirm.
→The hour digits begin to blink.
3 Press VOL +/- (or ▲▼) to set the hour.
4 Press CLOCK to confirm.
→The minute digits begin to blink.
5 Press VOL +/- (or ▲▼) to set the minute.
6 Press CLOCK to confirm.
→The set clock is displayed.
Find the correct video input channel
1 Turn on this product.
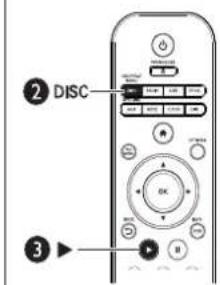
2 Press DISC to select the disc source.
3 Turn on the TV and switch to the correct video-in channel.

Note
- See your TV user manual on how to switch between video-in channels.
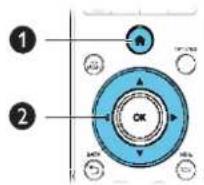
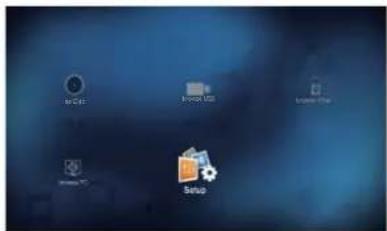
Use the home menu
1 Press ⬆ to display the home menu.
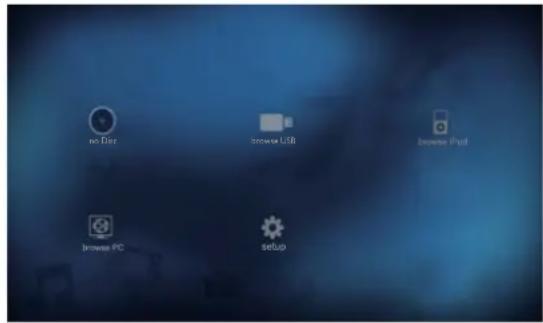
2 Press ▲▼ to select an icon, and then press OK.
• [play Disc]: Play a disc
• ■ [browse USB]: Browse media files stored on a USB storage device
• [browse iPod]: Browse iPod/iPhone/iPad content on TV
• [browse PC]: Browse media files that are shared on your computer
• ⚙ [Setup]: Access the setup menu
Navigate through a menu
When a menu is displayed, press the buttons on the remote control to navigate through.
| Button Action | ||
| ▲▼Move up or down. | ||
| Move left or right. | ||
| OK Access the lower-level menu, or confirm the selection. | ||
| Enter numbers, letters, and symbols. | ||
Select a menu display language

Note
- If this product is connected to an HDMI CEC compliant TV, skip this setting. It switches automatically to the on-screen menu language same as your TV setting (if the language set on TV is supported by this product).
1 In the home menu, select ⚙ [Setup] and press OK.
2 Select [Preference], and then press OK.
3 Select [Menu language], and then press OK.
 |
• The language options may vary from different regions.
4 Press ▲▼to select a language, and then press OK.
Store FM radio stations automatically
If no FM radio stations are stored, the product can store radio stations automatically.
1 Turn on this product.
2 Press RADIO.
→[PRESS PLAY--STOP CANCEL] (press the play button ▶ to start automatic installation, or press ■ to cancel) is displayed.
3 Press ▶. →The product automatically stores radio stations with sufficient signal strength. →After all available radio stations are stored, the first stored radio station is broadcast automatically.
5 Play a disc

Caution
- Risk of damage to the player! During play, never move the product.
- Never put any object other than a disc into the disc compartment.
• Never look at the laser beam inside the player. - Never play discs with accessories such as disc stabilizer rings or disc treatment sheets.
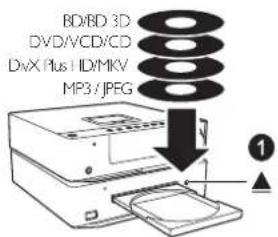
1 Load a disc with its label facing up.
2 Press DISC to select the disc source.
3 Press ▶ (the play button) if the play does not start automatically.

Note
- If is displayed after an operation, it indicates that this operation is unavailable for the current media or at the current time.
- Check disc/file formats supported (see "Your Blu-ray Component Hi-Fi System" > " playable media").
- If the password entry menu is displayed, enter the password before you can play the locked or restricted disc (see "Setup" > "Preference setup" > [Parental Control]).
- If you pause or stop a disc, the screen saver is activated after 10 minutes of inactivity. To deactivate the screen saver, press any button.
• After you pause or stop a disc and no button is pressed within 30 minutes, this product automatically switches to normal standby mode.
Basic operations
Button Function
▶ (play) Start or resume the play.
II Pause the play.
■ Stop the play.
◀ / ▶kip to the previous/next title, chapter, track, or file.
◀◀ / ▶▶ For videos and music, press repeatedly to select a speed for fast backward/forward search.
Play a Blu-ray 3D video
Before you start, make sure that:
- the TV is 3D compliant, and connected to this product through HDMI.
• the disc is a Blu-ray 3D disc. - you have 3D glasses compatible with the TV.
- you have enabled the 3D video output on this product.
1 Play a Blu-ray 3D video.
2 Put on the 3D glasses for 3D effects.
Enable the 3D video output
1 Press ↗.
2 Select ⚙ [Setup], and then press OK.
3 Select [Video] > [Watch 3D video] > [Auto], and then press OK.
- To disable the 3D video output, select [Off], and then press OK. After your disable the 3D video output, you can play a 3D video in 2D.
Play copied files
This product can play files that are copied onto a supported disc. (See "Your Blu-ray Component Hi-Fi System" > "Playable media" for supported disc/file formats)
1 Load the disc, and then press DISC/POP-UP MENU.
→The following interface is displayed.
Music starts play automatically.
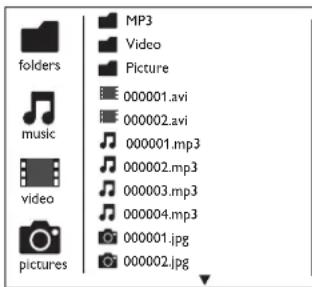
2 Press ▲▼to select an icon, and then press OK.
• : To display all supported folders and files (DivX subtitle files in the format of .srt, .sub, .ssa, .ass, or .sm are not displayed)
• ♪: To display all supported audio files
• ☐: To display all supported video files
• 📷: To display all supported photo files
3 Press ▲▼to select a file, and then press OK or ▶(the play button) to start the play.
Play a musical slideshow
This product can play music and photos simultaneously.

Note
• The disc must contain both music files and photos.
1 Play a music file.
2 Press ➔ BACK to return to the play interface.
3 Select a photo file.
• To display the photo on full screen, press OK.
4 Press ▶ (the play button) to start the slideshow.
5 Press ■ to stop the slideshow.
6 Press ■ again to stop the music.
Play DivX ^® videos
DivX ^® video is a digital media format that retains high quality despite of a high compression rate. You can play DivX ^® VOD (Video-on-Demand) videos that are rented or purchased from online stores. You can also play non-VOD DivX videos.
Play DivX VOD videos
To play DivX ^® VOD videos on this product, you need the DivX ^® VOD code on this product, the DivX Player installed on your computer, and a free DivX Account.
• Find the DivX ^® VOD code on your product.
1) Press
2) Select ⚙ [Setup] and press OK.
3) Select [Advanced] > [DivX ^ VOD Code], and then press OK.
- If no DivX Player is installed on your computer, download it from www.divx.com for free.
- If you have no DivX Account, create one for free through DivX Player that is installed on your computer.
On your computer through DivX Player
1 With the DivX ^® VOD code, register this product under your DivX Account.
• After the registration, previous videos that you rented or purchased with the same DivX Account can be played on this product.
2 Rent or purchase DivX ^® VOD videos with your DivX Account.
3 Transfer the DivX ^® VOD videos to a supported recordable disc or USB storage device.
On your product
Play the DivX® VOD videos from the disc or USB storage device.

Note
- Go to www.divx.com to learn more about downloading and playing DivX videos.
Play non-VOD DivX videos
1 Transfer the videos and subtitle files onto a supported recordable disc or USB storage device.
2 Play the video files from the disc or USB storage device.
Select a subtitle language
During play, press SUBTITLE repeatedly to switch between available subtitle languages.
- If the subtitle is not correctly displayed, change the character set that supports the DivX subtitle.
Change the character set
1 During play, press OPTIONS.
2 Select [Character Set] and press OK.
3 Select a character set and press OK.
Character set Languages
| [Standard] English, Albanian, Danish,Dutch, Finnish, French, Gaelic,German, Italian, Kurdish (Latin),Norwegian, Portuguese,Spanish, Swedish and Turkish |
| [Chinese] Simplified Chinese |
| [Chinese-Traditional] Traditional Chinese |
| [Korean] English and Korean |

Note
• To play DivX DRM protected files from a USB storage device, connect this product to a TV through HDMI.
- The subtitle filename has to be the same as the filename of the DivX video (the file extension excluded).
- The DivX video file and its subtitle file must be saved under the same directory.
- This product supports subtitle files in the following formats: .srt, .sub, .txt, .ssa, .ass, and .smi.
6 Play from a USB storage device
This product can play files that are copied onto a supported USB storage device:
- flash drive
- memory card reader
- HDD (This product can detect only a portable hard disc drive with USB power peak current no more than 500mA.)
For supported file formats, refer to "Your Blu-ray Component Hi-Fi System" > "Playable media".

Note
- Philips does not guarantee compatibility with all USB devices.
- Not all digital cameras are supported. Digital cameras that require PC program installation are not supported.
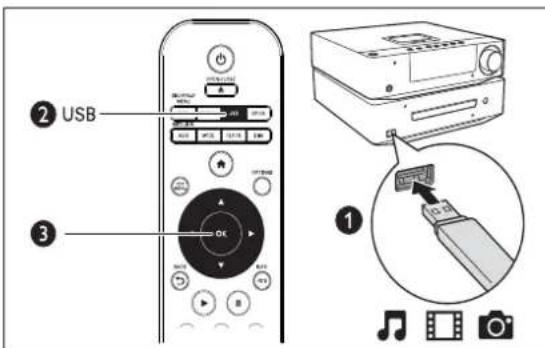
1 Connect the USB storage device to the ✉ (USB) socket.
2 Press USB. → The following interface is displayed. → Music starts play automatically.

3 Press ▲▼to select an icon, and then press OK.
- : To display all supported folders and files (DivX subtitle files in the format of .srt, .sub, .ssa, .ass, or .sm are not displayed)
• 🎶: To display all supported audio files
• ☐: To display all supported video files
• : To display all supported photo files
4 Press ▲▼to select a file, and then press OK or ▶(the play button) to start the play.
Basic operations
Buttons Functions
▶ (play) Start or resume the play.
|| Pause the play.
■ Stop the play.
◀/◀ Skip to the previous or next file.
◀◀ / ▶ For videos and music, press repeatedly to select a speed for fast backward/forward search.
Play a musical slideshow
This product can play music and photos simultaneously.

Note
- The USB storage device must contain both music files and photos.
1 Play a music file.
2 Press → BACK to return to the play interface.
3 Select a photo file.
• To display the photo on full screen, press OK.
4 Press ▶ (the play button) to start the slideshow.
5 Press ■ to stop the slideshow.
6 Press ■ again to stop the music.
Play DivX® videos
DivX ^® video is a digital media format that retains high quality despite of a high compression rate. You can play DivX ^® VOD (Video-on-Demand) videos that are rented or purchased from online stores. You can also play non-VOD DivX videos.

Note
- Refer to "Play a disc" > "Play recorded files" > "Play DivX® videos" for details.
7 Optional control
During play, press OPTIONS to access more options for play control.
Video
Access more options during video play.
• [Audio Language]: Select an audio language.
- [Subtitle Language]: Select a subtitle language.
- [Subtitle Shift]: Change the subtitle position on the screen. Press ▲▼to change the subtitle position.
- [Info]: Display play information. - [Character Set]: Select a character set that supports the DivX video subtitle (only for DivX videos).
- [Time Search]: Skip to a specific time via the numeric buttons on the remote control.
• [Titles]: Select a title.
• [Chapters]: Select a chapter.
• [Angle List]: Select a camera angle.
• [Menus]: Display a disc menu.
- [PIP Selection]: Display a picture-in-picture window (only for Blu-ray discs that support BonusView).
- [Zoom]: Zoom into a video picture. Press ◀▶ to select a zoom factor.
• [Repeat]: Repeat a chapter or title.
- [Repeat A-B]: Mark two points within a chapter for repeat play, or turn off repeat mode.
• [Picture Settings]: Select a predefined color setting.

Note
• Available video options depend on the video source.
Music
Press OPTIONS repeatedly to cycle through the following options.
• : Repeat the current track.
• / Repeat all the tracks in the current album/disc.
• : Play audio tracks in a random loop.
- Return to normal play.
Photo
Access more options during slideshow.
- [Rotate +90]: Rotate a photo 90 degrees clockwise.
• [Rotate -90]: Rotate a photo 90 degrees counter-clockwise. - [Zoom]: Zoom into a photo. Press ◀▶ to select a zoom factor.
• [Info]: Display available information about the current photo.
• [Duration per slide]: Set a time interval between two photos. - [Slide Animation]: Select a transition effect for photos.
• [Picture Settings]: Select a predefined color setting. - [Repeat]: Repeat photos in the current folder.
8 Browse iPod/iPhone/iPad
This product can play music and videos that are stored on iPod/iPhone/iPad. You can listen to music through the speakers and watch a video on the connected TV.

Note
- No audio output from the headphone jack in this situation.
Compatible iPod/iPhone/iPad
This product supports the following iPod, iPhone and iPad models.
- iPad 2
- iPad
- iPhone 4
- iPhone 3GS
- iPhone 3G
- iPod nano (4th, 5th, and 6th generation)
- iPod touch (2nd, 3rd, and 4th generation)
- iPod classic
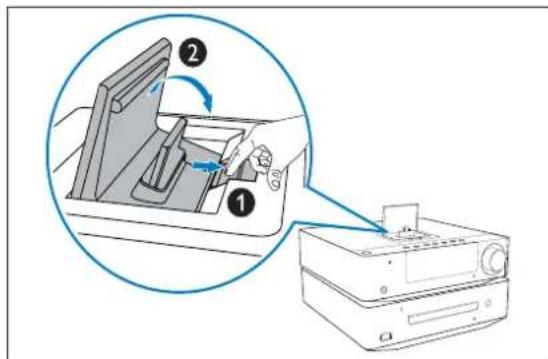
Load the iPod/iPhone/iPad
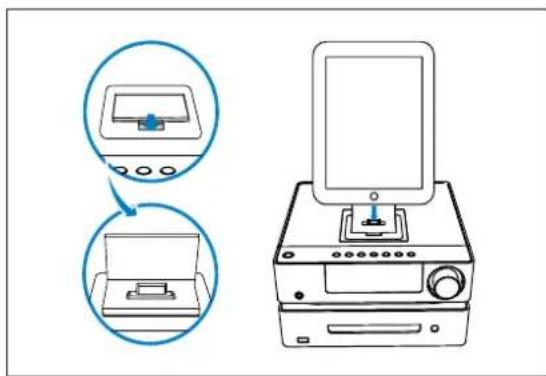
1 Release the dock on the top panel.
2 Connect the iPod/iPhone/iPad to the dock.

Note
- Before you connect the iPod/iPhone/iPad, remove accessories from it..
Use the playback interface of iPod/iPhone/iPad
You can use the playback interface of your iPod/iPhone/iPad to play music and video files.
Play music files
1 Load your iPod/iPhone/iPad securely.
2 Press DOCK to select the dock source.
3 Select and play a music file on your iPod/iPhone/iPad.
Control play
You can also control the play by the remote control of this product.
| Buttons | Functions |
| ▶ (play) | Start or resume play. |
| ■ | Pause play. |
| ■ | Stop play. |
| ◀◀ / ▶▶ | Search backward or forward fast. |
| ◀/ ▶Skip to the previous or next file. | |
| ↔ BACK Toggle through category icons on the playback interface of your iPod/iPhone/iPad. | |
| ▲ / ▼love the cursor up or down. | |
| OK | Confirm a selection. |
Play video files
1 Load your iPod/iPhone/iPad securely.
2 Press DOCK to select the dock source.
3 Select and play a video file on your iPod/iPhone/iPad.
4 Press OPTIONS.
→The video picture is displayed on the connected TV.
- To exit the TV display, press OPTIONS again.
Control play
You can also use the remote control to control the play of video files that are stored on iPod/ iPhone.
Buttons Functions
| ▶ (play) Start or resume play. | |
| ■ | Pause play. |
| ■ | Stop play. |
| ◀◀ / ▶Search backward or forward fast. | |
| ↔ BACK Toggle through category icons on the playback interface of your iPod/ iPhone. | |
OK Confirm a selection.

Note
- For iPad, you can only control the play of videos on the iPad screen in this case.
Use the playback interface of this product
You can use the playback interface of this product to play music and video files.
1 Load your iPod/iPhone/iPad securely.
2 Press DOCK to select the dock source.
3 Press DOCK again.
→The following playback interface is displayed on the TV screen.

4 Press ▲▼to select an icon, and then press OK.
- 🎥: To display all music categories - 📄: To display all video categories
5 Select a category and then press OK.
6 Repeat step 5 to display the file list.
7 Select a file and press OK to start play.
Control play
You can control play by the remote control and this product only.
Buttons Functions
| ▶ (play) Start or resume play. | |
| || | Pause play. |
| ■ | Stop play. |
| ◀◀ / ▶arch backward or forward fast. | |
| ◀ / ▶kip to the previous or next file. | |
| ↔ BACK Return to the previous menu. | |
| ▲ / ▼move the cursor up or down. | |
| OK Confirm a selection. | |
Charge the iPod/iPhone/iPad
When this product is connected to power, the docked iPod/iPhone/iPad begins to charge.
Remove the iPod/iPhone/iPad
1 Pull the iPod/iPhone/iPad out of the dock.
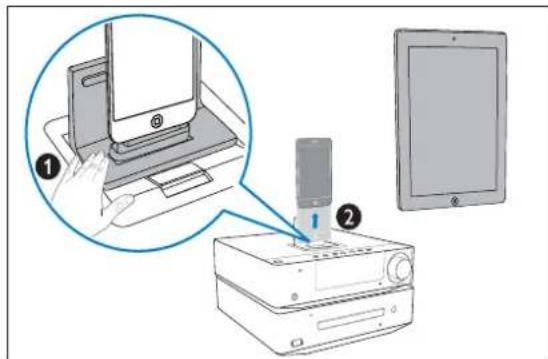
2 Hide the dock.
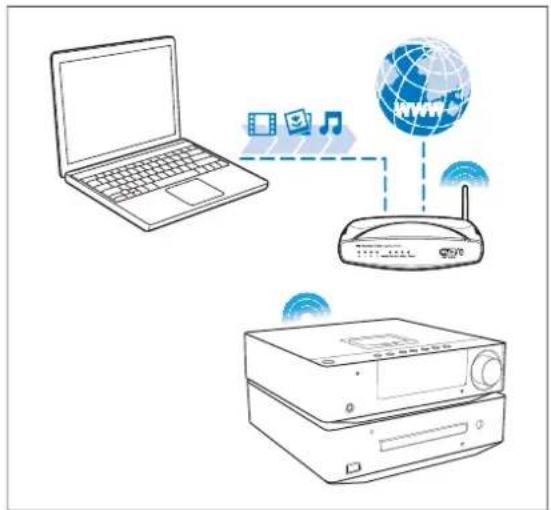
9 Use the network
Connect this product to a LAN (local area network) or the Internet to:
- Enjoy BD-Live: Access online bonus contents (applicable to Blu-ray discs that are BD-Live enabled).
- Browse PC (DLNA): Stream photos, music, and videos from your computer to this product.
- Update software: Upgrade the firmware of this player via the Internet. (Refer to "Upgrade the firmware" > "Upgrade firmware via the Internet")
Connect and set up

Note
• To access the media sources on your computer, connect this product and your computer via the router.
• To access online media sources, connect this product to the Internet via the router.
• After you complete the connection, perform the network setup.
Connect this product to the router through
• wired connection (a network cable), or
- wireless connection (the built-in Wi-Fi module).
Wired connection
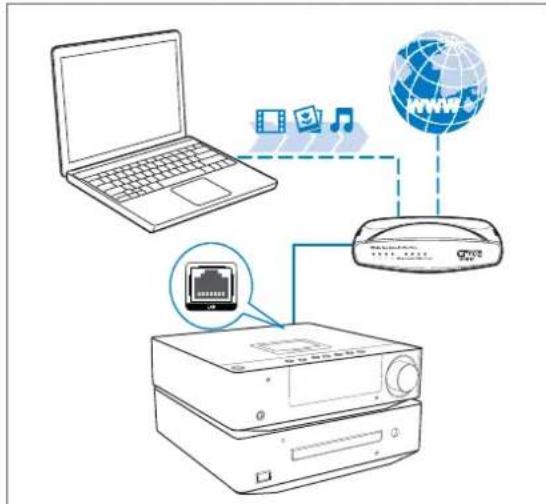
Connect a network cable to
• the LAN socket of this product, and
• a LAN port of the router.
Set up
1 Press ↗.
2 Select ⚙ [Setup], and then press OK.
3 Select [Network] > [Network Installation], and then press OK.
4 Select [Wired (Ethernet)], and then press OK.
5 Select [Auto (recommended)].
- You can also select [Manual (advanced)] to configure the network manually.
6 Press OK.
→If the setup succeeds, the message is displayed: [You have successfully established the network connection.]
7 Select [Finish], and then press OK.
Configure the network manually
1 Select [Manual (advanced)], and then press OK.
2 Select [IP address], and then press OK.
3 Enter the IP address of this product, select [Done], and then press OK.
4 Select [Netmask], and then press OK.
5 Enter the netmask of this network, select [Done], and then press OK.
6 Select [Gateway], and then press OK.
7 Enter the IP address of the router, select [Done], and then press OK.
8 Enter the IP address of DNS server if any.
9 Select [Continue], and then press OK.
→If the setup succeeds, the message is displayed: [You have successfully established the network connection.]
10 Select [Finish], and then press OK.

Tip
- For the netmask and IP addresses, check the router configuration or consult the network administrator.
Text entry
Repeatedly press an alphanumeric button on the remote control to enter a letter, number, or symbol.
| English | |
| 1 | .- / @ 1 , ' ? ! ” ( ) : _ ; + & % * = < > € S $ [ ] {} \ ~ ^ ` # | |
| 2 | a b c 2 A B C |
| 3 | d e f 3 D E F |
| 4 | g h i 4 G H I |
| 5 | j k l 5 J K L |
| 6 | m n o 6 M N O |
| 7 | p q r s 7 P Q R S |
| 8 | t u v 8 T U V |
| 9 | w x y z 9 W X Y Z |
| 0 | _ 0 |
• To enter a symbol, press repeatedly.
• To enter a space, press 0.
- To delete previous character, press ◀.
- To jump to the next entry field, press ▶ (the navigation button for right).

Tip
- For languages other than English, letters that an alphanumeric button corresponds to may vary.
Wireless connection

Note
- Make sure that the router supports Wi-Fi connection and the wireless connection is enabled.
Connect this product to the router through the integrated Wi-Fi component.
Set up
1 Press ↗.
2 Select ⚙ [Setup], and then press OK.
3 Select [Network] > [Network Installation], and then press OK.
4 Select [Wireless (Wi-Fi)], and then press OK.
→Available wireless networks are listed.
5 Select the target network, and then press OK.
• To connect to an encrypted network, enter the network access password, select [Done], and then press OK.
6 Select [Continue], and then press OK to start network configuration.
7 Select [Auto (recommended)].
- You can also select [Manual (advanced)] to configure the network manually.
8 Press OK.
→If the setup succeeds, the message is displayed: [You have successfully established the network connection.]
9 Select [Finish], and then press OK.

Tip
- Refer to "Use the network" > "Connect and setup" > "Wired connection" > "Configure the network manually" for manual setup.
Access online media sources

Note
• Make sure that the router directly connects to the Internet and no dial-up is required on the computer.
• Make sure that you have correctly connected this product to the router and configured the network connection.
• Philips bears no responsibility for content that is provided by any Internet content service provider.
Enjoy BD-Live
Access exclusive online services, such as movie trailers, games, ringtones, and other bonus contents.
This feature is only applicable to Blu-ray discs that are BD-Live enabled.
1 Connect a USB storage device to this product.
2 Play a disc that is BD-Live enabled.
3 On the disc menu, select the BD-Live icon, and then press OK.
→BD-Live starts to load. The loading time depends on the disc and the Internet connection.
4 On the BD-Live interface, select an item to access.

Note
• BD-Live services vary from discs and countries.
- When you use BD-Live, data on the disc and this product are accessible for the content provider
- Use a USB storage device with at least 1 GB of free space to store the download.
Access local media sources

Note
• Make sure that you have connected this product and your computer to the router and correctly configured the network connection.
Browse PC (DLNA)
With this DLNA-certified product that is connected to a LAN network, you can stream photos, music, and videos from a computer to this product.

Note
• To browse a PC, make sure that a DLNA media server software (such as Windows Media Player 11 or higher) is installed on the PC.
1 On the PC through the software of the DLNA media server (such as Windows Media Player 11 or higher),
1) Share my media to this player (see the "Help" document of the media server software).
2) Share files or add files to the library (see the "Help" document of the media server software).
2 Press ⬆, and then press OK.
3 Select 📄 [browse PC], and then press OK.
→A content browser is displayed.
4 Select a file, and then press OK to start play.
• You can control play with the disc features.
10 Listen to FM radio
The product can automatically search and store FM radio stations (see "Get started" > "Store radio stations automatically"). You can also search and store radio stations manually.
Tune to a radio station
1 Press RADIO.
2 Press and hold ↗. ►
→The radio tunes to a station with strong reception automatically.
3 To tune to a weak station, press ▲▼ repeatedly until you find optimal reception.

Tip
- [STEREO] (stereo) is the default sound setting for FM mode.
• In FM mode, you can press OK repeatedly to switch between [STEREO] (stereo) and [MONO] (monophonic).
Program radio stations automatically

Note
- You can program a maximum of 20 preset radio stations.
Press and hold PROGRAM to activate automatic programming.
→[AUTO] (auto) is displayed briefly.
All available stations are programmed in the order of waveband reception strength.
→The first programmed radio station is broadcast automatically.
Program radio stations manually

Note
- You can program a maximum of 20 preset radio stations.
1 Tune to a radio station.
2 Press PROGRAM to activate programming.
3 Press ◀ /▶ to allocate a number from 1 to 20 to this radio station, then press PROGRAM to confirm.
→The preset number and the frequency of the preset station are displayed.
4 Repeat the previous steps to program other stations.

Note
• To overwrite a programmed station, store another station in its place.
Tune to a preset radio station
Press ◀ ▶ to select a preset number that you want.
11 Setup

1 Press ↑.
2 Press ▲▼ to select [Setup].
3 Press OK.
→The setup menu is displayed.
- Press ▲▼to select a menu item or setting option.
- Press OK to access the lower-level menu or confirm the selected setting option.
- Press ← BACK to return to the previous menu.
- Press ↑ to return to the home menu.

Note
- When a menu item is highlighted in gray, it means that its setting cannot be changed at the current state.
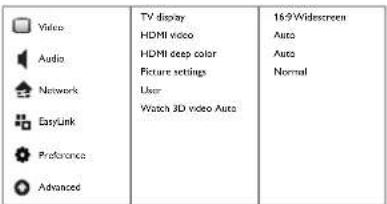
Video setup
| Video | TV display | 16:9 Widescreen | |
| HDMI video | Auto | ||
| Audio | HDMI deep color | Auto | |
| Network | Picture settings | Normal | |
| User | |||
| Watch 3D video Auto | |||
| EasyLink | |||
| Preference | |||
| Advanced |
[TV Display]
Select a picture display format to fit the TV screen.
[HDMI Video]
Select an HDMI video resolution.
[HDMI Deep Color]
Display colors with more shades and hues when the video content is recorded in Deep Color and the TV supports this feature.
[Picture Settings]
Select a color setting.
[User]
Customize color settings after you set [Picture Settings] as [User].
[Watch 3D video]
Set to 3D or 2D output when playing a Blu-ray 3D disc. The player must be connected to a 3D TV through HDMI.
![PHILIPS Harmony DBD8010 - [Watch 3D video] - 1](/content/2026/05/1099844/images/9fb6f0e11230317879005295632df3a6ab4a497014bb3c17d4e75b3c7108c9fb.jpg)
Note
- If you change a setting, make sure that the TV supports the new setting.
- For settings related to HDMI, the TV must be connected through HDMI.
- For the composite connection (via the VIDEO connector), select a video resolution of 480i/576i or 480p/576p under [HDMI Video] to enable video output.
Audio setup
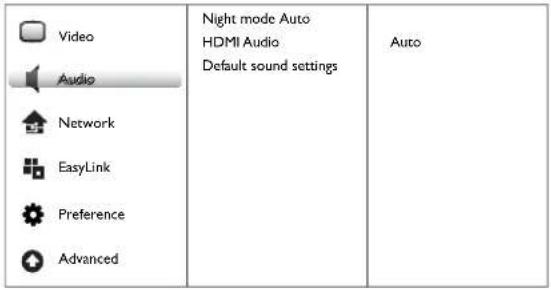 |
[Night Mode]
Equalize loud sound and soft sound. Enable this feature to watch DVD movies at a low volume at night.
[HDMI Audio]
Select an HDMI audio output when you connect this product and the TV/audio device with an HDMI cable.
- [Bitstream] - If the connected HDMI device supports the appropriate HD audio decoder, the original audio format on the disc is sent. Otherwise, LPCM is sent.
• [Auto] - Detect and select the best supported audio format automatically. - [Off] - Disable the audio output from the HDMI socket.
[Default sound settings]
Restore all the sound-related settings to the default values.
Network setup
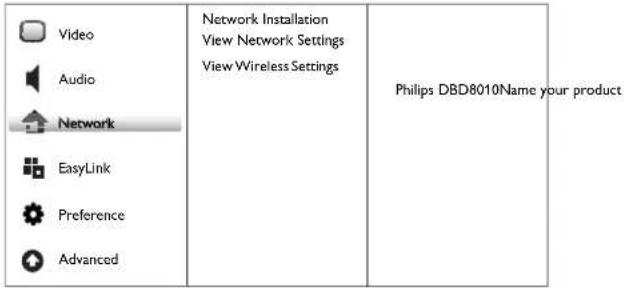 |
[Network Installation]
Configure the wired or wireless network connection between this product and the router.
[View Network Settings]
Display the current network status.
[View Wireless Settings]
Display the current status of wireless connection.
[Name your Product:]
Re-name this player for display when this player is connected to a network.
EasyLink setup
| EasyLink OnOne Touch PlayOne Touch StandbyAudio Input Mapping | ||
| Video | ||
| Audio | On | |
| Network | On | |
| EasyLink | OnSystem Audio Control | |
| Preference | ||
| Advanced |
[EasyLink]
Enable or disable the EasyLink feature.
[One Touch Play]
After you enable this feature, the connected HDMI CEC TV automatically switches to the HDMI input channel when you play a disc.
[One Touch Standby]
After you enable this feature, you can press and hold Ⓧ on the remote control of your player to switch all connected HDMI CEC devices to standby mode simultaneously.
[System Audio Control]
When you play audio that is routed from the connected device, this product switches to the corresponding audio source automatically.
- [On] - Enable System Audio Control. Then proceed to [Audio Input Mapping] to scan and map the connected device.
• [Off] - Disables System Audio Control.
[Audio Input Mapping]
Update the audio input mapping if you connect a new audio device.
![PHILIPS Harmony DBD8010 - [Audio Input Mapping] - 1](/content/2026/05/1099844/images/55f5c728a834f6fa3690a2ad835aed8825c3e60cd6a7c1893857a5bd6db3de55.jpg)
Note
- You must turn on the HDMI CEC operations on the TV/devices before you can enjoy the EasyLink controls. See the TV/devices manual for details.
• Philips does not guarantee 100% interoperability with all HDMI CEC compliant devices.
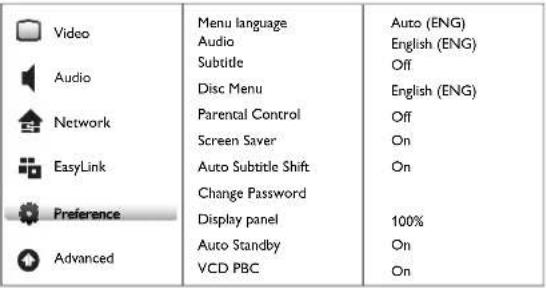
Preference setup
| [SETKX] | Video | Menu language Auto (ENG) | |
| Audio | English (ENG) | ||
| Subtitle | Off | ||
| [IMAGE] | Audio | Disc Menu | English (ENG) |
| Network | Parental Control | Off | |
| Screen Saver | On | ||
| [IMAGE] | EasyLink | Auto Subtitle Shift | On |
| Change Password | |||
| [IMAGE] | Preference | Display panel | 100% |
| Auto Standby | On | ||
| [IMAGE] | Advanced | VCD PBC | On |
[Menu language]
Select an on-screen menu language.
![PHILIPS Harmony DBD8010 - [Menu language] - 1](/content/2026/05/1099844/images/e09195c18000518762c90744d5d40aadb59087578aaf6c10aa8c720c6193b603.jpg)
Note
- If this product is connected to an HDMI CEC compliant TV using an HDMI cable, it switches automatically to the same menu display language as per your TV setting (if the language set on TV is supported by this product).
[Audio]
Select an audio language for disc play.
[Subtitle]
Select a subtitle language for disc play.
[Disc Menu]
Select a language for disc menu.
![PHILIPS Harmony DBD8010 - [Disc Menu] - 1](/content/2026/05/1099844/images/3c3757f8e333a3b6c9bbbb080162ef70653b7485073204737d36ce476adea08f.jpg)
Note
- If the language you have set is not available on the disc, the disc uses its own default language.
- For some discs, the subtitle/audio language can only be changed from the disc menu.
[Parental Control]
Restrict access to discs that are unsuitable for children. These types of discs must be recorded with ratings.
To access, enter your last set password or '0000'.
![PHILIPS Harmony DBD8010 - [Parental Control] - 1](/content/2026/05/1099844/images/c01342388200a634136bdf3ffd978b12bd703affa4e85d0f74c71b31bc4a47d6.jpg)
Note
- Rated discs above the level you set in [Parental Control] require a password to be played.
- The ratings are country-dependent. To allow all discs to play, select '8' for DVD-video and BD-Video.
- Some discs have ratings printed on them but are not recorded with ratings. This function has no effect on such discs.
[Auto Subtitle Shift]
Enable or disable subtitle shift. If enabled, the subtitle position is changed automatically to fit the TV screen (this feature works with some Philips TVs only).
[Screen Saver]
Enable this feature to protect the TV screen from damage due to over exposure to static image.
[Change Password]
Set or change the password.
1) Press the Numeric buttons to enter the password or your last set password behind [Current Password:]. If you forget the password, enter 0000.
2) Enter the new password behind [New Password:].
3) Re-enter the password behind [Confirm New Password:].
4) Select [Confirm] in the menu, and then press OK.
[Display Panel]
Select a brightness level of the front panel display.
[Auto Standby]
Turn on or off auto standby mode. It is an energy saving feature.
- [On] - Switch to standby after 30 minutes of inactivity (for example, in pause or stop mode).
• [Off] - Disable auto standby mode.
[VCD PBC]
Enable the PBC ( playback control) feature to display the index menu when you load a VCD 2.0 or SVCD.
[Sleep Timer]
Enable or disable the sleep timer.
Advanced setup
| BD-Live Security OffEnhanced AudioSoftware UpdateClear MemoryDivX®VOD CodeVersion Info.Restore default settings | ||
| Audio | On | |
| Network | ||
| EasyLink | ||
| Preference | ||
| Advanced |
[BD-Live Security]
Restrict or allow access to BD-Live (only for non-commercial, user-created BD-Live discs).
[Enhanced Audio]
Enable or disable the audio post-processing at the speaker output.
[Software Update]
Update the software of this product (if a latest version is available on Philips website) to enhance the performance of this product.
- [USB] - Update software from the USB device which is connected to this product.
- [Network] - Update software from the Internet.
![PHILIPS Harmony DBD8010 - [Software Update] - 1](/content/2026/05/1099844/images/c1158bc9c740f673a03c7cf308c414f4d85c95d2eaaf99921c2aa495fc7528b7.jpg)
Note
- For detailed software updating, see "Upgrade the firmware".
[Clear memory]
Delete the previous BD-Live download on the USB storage device. A “BUDA” folder is automatically created to store the BD-Live download.
[DivX® VOD Code]
Display the DivX ^® registration code and the deregistration code.
[Version Info.]
Display the software version and the MAC address of this player.
![PHILIPS Harmony DBD8010 - [Version Info.] - 1](/content/2026/05/1099844/images/651ea6a2bca524376efe2279d1bc7d9b899fd858c64d2140c436986434cc41bb.jpg)
Tip
- This information is needed for you to check if a latest software version is available at the Philips website so that you can download and install on this player.
[Restore default settings]
Reset all the settings of this player to the factory settings, except for [Parental Control] setting.
12 Use Philips EasyLink
This player supports Philips EasyLink which uses the HDMI CEC (Consumer Electronics Control) protocol. You can use one single remote control to control EasyLink-compliant devices that are connected through HDMI connectors.

Note
- To enable the EasyLink feature, turn on the HDMI CEC operations on the TV and on other devices connected to TV. Refer to the TVs/devices manual for details.
One-touch play
Press Ⓧ(standby) to turn on this product.
→The TV (if the TV supports one-touch play) automatically turns on and switches to the correct video-in channel.
→If a disc is loaded in this product, disc play automatically starts.
One-touch standby
Press and hold Ⓕ(standby) for more than 3 seconds.
→All the connected devices (if the device supports one-touch standby) automatically switch to standby.
Map the devices to the audio inputs

Note
- Before you start, ensure that the audio output of the HDMI TV and other HDMI devices have been connected to the audio input jacks on this product.
| Video | EasyLink | On |
| One Touch Play | On | |
| Audio | One Touch Standby | On |
| Network | System Audio Control | On |
| Audio Input Mapping | ||
| EasyLink | ||
| Preference | ||
| Advanced |
1 Press ⬆, select ⚙ [Setup], and then press OK.
2 Select [EasyLink], and then press (the navigation button for right).
- [One Touch Play] and [One Touch Standby] functions are enabled by default.
3 Select [System Audio Control] > [On].
4 Read the on-screen instructions and press OK to select [Continue].
→The product scans and displays the valid devices.
5 Press OK to select [Continue].
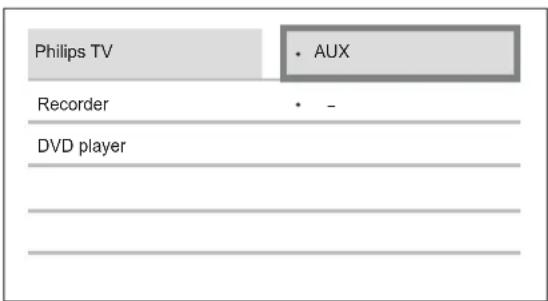
6 Select a connected device on the left of the menu, and then press▶.
7 Select the connector that is used for the device, and then press OK.
→Repeat steps 6 and 7 to map other devices.
8 Press to exit the menu.
Update audio mapping from connected devices
If you have already mapped audio from connected devices, you can use this procedure to update your mapping.
1 Press ⬆, select ⚙ [Setup], and then press OK.
2 Select [EasyLink] > [Audio Input Mapping], and then press OK.
3 Select a connected device, and then press ▶ (the navigation button for right).
4 Select the AUX input, and then press OK.

Note
- Philips does not guarantee interoperability with all HDMI CEC devices.
13 Upgrade the firmware

Note
- Power supply must not be interrupted during the upgrade.
- When the firmware upgrade succeeds, all settings are restored to the factory default status, except [Parental Control].
Register your product
1 Go to www.philips.com/welcome.
2 Click the link of "Register my product" (the exact wording of this link name may vary in different languages).
3 Log in with your account on the prompt web page.
- If you have no account for Club Philips, create one first on this web page.
4 Search your product using "DBD8010/93" as the keyword.
5 Click the link of search result to access the web page for registering your product.
6 Fill in necessary information about this product to complete the registration. →With the registration, you can get information about software update and product support at this website or via your mailbox that is registered as the account for Club Philips.
Check the current software version
1 Press ↗.
2 Select ⚙ [Setup], and then press OK.
3 Select [Advanced] > [Version Info.], and then press OK.
4 Write down the digits that are behind [System SW:], for example, 1.18.01.
→The version of current software is V1.18.01.
Upgrade firmware via the Internet
Make sure that you have correctly connected this product to the router and configured the network connection. (Refer to “Use the network” > “Connect and set up”)
1 Press ⬆, and select ⚙ [Setup].
2 Select [Advanced] > [Software Update] > [Network].
3 Follow the instructions on the TV screen to update the software.
When the update is complete, this player automatically restarts.
Upgrade firmware via the USB port
1 Go to www.philips.com/welcome.
2 Log in with your account for Club Philips.
→Support information about your registered product is displayed.
3 Check the latest software version.
4 Download the upgrade packet.
1) Unzip the download, and make sure that the unzipped folder is named "UPG_ALL".
2) Save the "UPG_ALL" folder in the root directory of a USB storage device.
5 Connect the USB storage device to the ✉ (USB) connector on this product.
6 Press ⬆, select ⚙ [Setup], and then press OK.
7 Select [Advanced] > [Software Update] > [USB], and then press OK.
8 Follow the instructions on the TV screen to complete the upgrade.
When the upgrade is complete, this product automatically restarts.
14 Adjust sound
You can adjust the following sound settings during play.
Adjust volume level
During play, press VOL +/- to increase/decrease the volume level.
Adjust bass level
1 During play, press BASS to enter bass adjustment.
2 Press ▲ / ▼ to adjust the bass level.
Adjust treble level
1 During play, press TREBLE to enter treble adjustment.
2 Press ▲ / ▼ to adjust the treble level.
Select automatic loudness control
During play, press LOUDNESS to turn on/off automatic loudness control.
The loudness feature enables the product to increase the treble and bass sound effect at low volume automatically (the higher the volume, the lower the treble and bass increase).
Mute sound
During play, press to mute/resume sound.
Listen through headphone
Plug a headphone into the ☑socket on the product.
15 Additional Information
Adjust the brightness of display panel
In normal standby mode, press DIM repeatedly.
Set alarm timer

Note
• Make sure that you have set the clock correctly.
1 In standby mode, press and hold SLEEP / TIMER.
→[TIMER SET] (set timer) is displayed, and [DISC SOURCE] blinks.
2 Press VOL +/- to select an alarm source: DISC SOURCE, USB DIRECT, IPOD SOURCE, FM RADIO, or PHI PLAYLIST.
3 Press SLEEP / TIMER to confirm.
→The hour digits begin to blink.
4 Press VOL +/- to set the hour.
5 Press SLEEP / TIMER to confirm.
→The minute digits begin to blink.
6 Press VOL +/- to set the minute.
7 Press SLEEP / TIMER to confirm.
→The volume level indicator begins to blink.
8 Press VOL +/- to set the volume level, then press SLEEP / TIMER to confirm.
→An alarm icon is displayed on the right of the display.
→To deactivate/activate the alarm timer, press SLEEP / TIMER repeatedly in normal standby mode.

Note
- When the alarm sounds, you can press VOL +/- to adjust volume.
- The alarm timer is not available in MP3 LINK mode.
- To use iPod/iPhone/iPad playlist as the alarm source, create a playlist named "PHILIPS" in your iPod/iPhone/iPad first.
- If no playlist named "PHILIPS" exists in the iPod/iPhone/iPad or the playlist includes no playable track, this product switches the alarm source to iPod/iPhone/iPad.
- If other alarm sources are unavailable, this product switches to FM mode automatically.
Set the sleep timer
In working mode, press SLEEP/TIMER repeatedly to select a set period of time (in minutes).
→The product turns off automatically after the set period of time.
Control by your iPhone
With an application installed on your iPhone, you can use it as the remote control for this product.
What you need
- Download the smartphone control application for Philips from the iTunes store to your iPhone.
- Connect this player to a home network (refer to "Use the network" > "Connect and set up").
- Connect your iPhone to the same home network (refer to the user manual of your iPhone for details).
Control play
1 Insert a disc or USB storage device into this player.
2 On the iPhone screen, tap the icon for the smartphone control application.
→After the search, the name of this product is displayed.
3 Select this product from the iPhone screen.
→The iPhone is enabled as a remote control for this product.
→The control buttons are displayed on the iPhone screen.
→The control functions can vary from play modes.
4 On the iPhone screen, touch the source tab, and then select the disc or USB option.
→The folders in the disc or USB storage device are displayed.
5 Open a folder, and then select a file to play.
6 Tap control buttons on the iPhone screen to control the play.
• To exit the application, press the home button on the iPhone.
Care

Caution
- Never use solvents such as benzene, thinner, cleaners available commercially, or anti-static sprays intended for discs.
Clean discs
Wipe the disc with a micro fibre cleaning cloth from the centre to the edge in a straight line movement.
16 Specifications

Note
- Specifications are subject to change without notice
Video
• Video DAC: 12 Bits
• Signal system: PAL / NTSC
• Video format: 4:3 / 16:9
• Video S/N: > 60 dB
- HDMI output: 480p, 576p, 720p, 1080i, 1080p, 1080p/24Hz
Audio line-out
• Output level: 1.9 Vrms +/- 2 dB
• Total harmonic distortion: > 65 dB (1 kHz)
• Frequency response: 20 Hz - 20k Hz
• S/N ratio: > 65 dBA
Audio amplifier
• Total output power: 2 × 80 W RMS
• Total harmonic distortion: > 65 dB (1 kHz)
• Frequency response: 20 Hz - 20 kHz
• S/N ratio: > 75 dBA
Headphone out
• Output level: 500 mV (RL=32 ohms)
• Total harmonic distortion: > 65 dB (1 kHz)
• Frequency response: 20 Hz - 20 kHz
• S/N ratio: > 65 dBA
S/PDIF digital audio output:
• Coaxial: IEC 60958-3
Main unit
• Power supply rating: 220 V\~, 50 Hz
• Power consumption: 55 W
• Power consumption in eco-power standby mode: < 0.5 W
- Dimensions (w × h × d): 270 × 143 × 279 (mm)
- Net weight: 4.8 kg
Speakers
• Speaker impedance: 6 Ohm
• Speaker driver: 5.25" woofer+3" tweeter
• Sensitivity: > 80 dB/m/W ± 4 dB/m/W
- Dimensions: (w × h × d): 180 × 320 × 282 (mm)
• Net weight: 4.65 kg
Accessories supplied
• Remote control and batteries
- AC power cord
- Audio cable
• Composite video cable
- MP3 link cable
- 2 × Speaker cable (3m)
- FM wire antenna
- User manual
Laser Specification
- LaserType:
• BD Laser Diode: InGaN/AlGaN
• DVD Laser Diode: InGaAlP
• CD Laser Diode:A IGaAs
- Wave length:
• BD: 405 + 7 nm/-7 nm
• DVD: 655 + 10nm/-10nm
• CD: 790 + 10nm/-20nm
- Output power:
• BD: Max. ratings: 20mW
• DVD: Max. ratings: 7mW
• CD: Max. ratings: 7mW
Tuner (FM)
• Tuning range: 87.5 - 108 MHz
- Tuning grid: 50 KHz
- Mono, 26dB S/N ratio: < 22 dBf,
- Stereo, 46dB S/N ratio: > 43 dBf
• Search selectivity: > 28dBf
• Total harmonic distortion: < 3%
• Signal to noise ratio: > 50dB
17 Troubleshooting

Warning
- Risk of electric shock. Never remove the casing of the product.
To keep the warranty valid, never try to repair the product yourself.
If you have problems using this product, check the following points before you request service. If you still have a problem, register your product and get support at www.philips.com/welcome.
| Problem Solution | |
| No reaction to the remote control. | Connect this product to the power outlet. |
| Point the remote control at the infrared sensor located on the front panel of this product. | |
| Insert the batteries correctly. | |
| Insert new batteries in the remote control. | |
| Timer does not work. | Set the clock correctly. |
| Switch on the timer. | |
| Clock/timer setting is erased. | Power has been interrupted or the power cord has been disconnected. |
| Reset the timer. | |
| No picture. See TV user manual for correct video input selection. | |
| No picture on HDMI connection. | If this product is connected to an unauthorized display device with an HDMI cable, the audio/video signal may not be output. |
| Make sure that the HDMI cable is faulty. Replace with a new HDMI cable. | |
| On the remote control, press ⬆ and then press “731” (numeric buttons) to recover picture display. | |
| No high-definition video signal on the TV. | Make sure that the disc contains high-definition video. |
| Make sure that the TV supports high-definition video. | |
| No sound or poor sound | Adjust the volume. |
| Disconnect the headphones. | |
| Make sure that the speakers are connected correctly. | |
| Make sure that the stripped speaker wires are clamped. | |
| No sound on HDMI connection. | You may not hear any sound from the HDMI output if the connected device is non-HDCP compliant or only DVI-compatible. |
| No secondary audio output for Picture-in-Picture feature. | When [Bitstream] under the [HDMI Audio] menu is selected, interactive sound, for example, the secondary sound for Picture-in-Picture feature, is muted. Deselect [Bitstream]. |
| Disc cannot be played. | Make sure that the disc is correctly loaded. |
| Make sure that this product supports the disc (see “Your Blu-ray Component Hi-Fi System” >“Playable media”). | |
| Make sure that this product supports the region code of the DVD or BD. | |
| For a recordable or rewritable disc, make sure that the disc is finalized. | |
| Clean the disc. | |
| Data files (JPEG, MP3, WMA) cannot be played or read. | Make sure that the data file was recorded in the UDF, ISO9660 or JOLIET format. |
| Make sure that the disc does not contain more than 9,999 files for DVD, and 999 files for CD. | |
| Make sure that the JPEG file extension is .jpg, .JPG, .jpeg or .JPEG. | |
| Make sure that the MP3/WMA file extension is .mp3 or .MP3, and .wma or .WMA for windows MediaTM Audio. | |
| DivX video files cannot be played. | Make sure that the DivX video file is complete and the file extension is correct. |
| DRM-protected video files that are stored on a USB storage device cannot be played through an analog video connection (for example, composite, component, and scart). Transfer the video content onto a supported disc, or use an HDMI connection to play these files. | |
| Cannot control the play by the remote control when I play videos stored on the connected iPad. | In simple mode, you can only control the play on the iPad screen. (see “Browse iPod/iPhone/iPad” > “Use the playback interface of iPod/iPhone/iPad” > “Play video files”) |
| To control the play by your remote control, press DOCK again to switch to the extended mode. (see “Browse iPod/iPhone/iPad” > “Use the playback interface of this product”) | |
| The contents of the USB storage device cannot be read. | The USB storage device is not compatible with this product. |
| The maximum size of memory supported is 160 GB. | |
| ‘No entry’ or Ⓑ is displayed on the TV. | The operation is unavailable at the current state. |
| EasyLink feature does not work. | Make sure that this product is connected to the Philips brand EasyLink TV and the [EasyLink] in the menu is set to [On]. |
| Unable to access BD-Live feature. | Make sure that the network has been connected and set up correctly (see “Use the network” > “Connect and set up”). |
| Delete previous BD-Live data on the connected USB storage device to free space (see “Setup” > “Advanced setup” > [Clear memory]). | |
| Make sure that the BD disc supports BD-Live feature. | |
| Poor radio reception Increase the distance between the apparatus and your TV or VCR. | |
| Fully extend the FM antenna. | |
| Connect an outdoor FM antenna instead. | |
| Wireless network is not found or distorted. | Microwave ovens, DECT phones or other wireless devices in your neighborhood might disturb the wireless network. |
| Make sure that the firewalls in your network allow access to the wireless connection of this product. | |
| If the wireless network does not work properly in your home, try the wired network connection (see “Use the network” > “Connect and set up”). | |
18 Notice
Disposal of your old product and batteries

Your product is designed and manufactured with high quality materials and components, which can be recycled and reused.
Never dispose of your product with other household waste. Please inform yourself about the local rules on the separate collection of electrical and electronic products and batteries.
The correct disposal of these products helps prevent potentially negative consequences on the environment and human health.
Your product contains batteries, which cannot be disposed of with normal household waste.
Please inform yourself about the local rules on separate collection of batteries. The correct disposal of batteries helps prevent potentially negative consequences on the environment and human health.
Please visit www.recycle.philips.com for additional information on a recycling center in your area.
Copyright notice

Be responsible Respect copyrights
This item incorporates copy protection technology that is protected by U.S. patents and other intellectual property rights of Rovi Corporation. Reverse engineering and disassembly are prohibited.
Open source software
Philips Electronics Hong Kong Ltd. hereby offers to deliver, upon request, a copy of the complete corresponding source code for the copyrighted open source software packages used in this product for which such offer is requested by the respective licenses.
This offer is valid up to three years after product purchase to anyone in receipt of this information. To obtain source code, please contact open.source@philips.com. If you prefer not to use email or if you do not receive confirmation receipt within a week after mailing to this email address, please write to “Open Source Team, Philips Intellectual Property & Standards, P.O. Box 220, 5600 AE Eindhoven, The Netherlands.” If you do not receive timely confirmation of your letter, please email to the email address above.
Trademark notice


'Blu-ray', 'Blu-ray Disc', 'Blu-ray Disc' logo, 'Blu-ray 3D' and 'Blu-ray 3D' logo are the trademarks of Blu-ray Disc Association.

'BD LIVE' is a trademark of Blu-ray Disc Association.
DIVX ^+ HD
ABOUT DIVX VIDEO: DivX® is a digital video format created by DivX, LLC, a subsidiary of Rovi Corporation. This is an official DivX Certified® device that plays DivX video. Visit divx.com for more information and software tools to convert your files into DivX videos.
ABOUT DIVX VIDEO-ON-DEMAND: This DivX Certified ^® device must be registered in order to play purchased DivX Video-on-Demand (VOD) movies. To obtain your registration code, locate the DivX VOD section in your device setup menu. Go to vod.divx.com for more information on how to complete your registration.
DivX ^® , DivX Certified ^® , DivX Plus ^® HD and associated logos are trademarks of Rovi Corporation or its subsidiaries and are used under license.
DivX Certified ^® to play DivX ^® and DivX Plus ^® HD (H.264/MKV) video up to 1080p HD including premium content.

HDMI, and HDMI logo, and High-Definition Multimedia Interface are trademarks or registered trademarks of HDMI licensing LLC in the United States and other countries.

DLNA ^® , the DLNA Logo and DLNA CERTIFIED ^® are trademarks, service marks, or certification marks of the Digital Living Network Alliance.

The Wi-Fi CERTIFIED Logo is a certification mark of the Wi-Fi Alliance.

Manufactured under license under U.S. Patent Nos: 5,956,674; 5,974,380; 6,226,616; 6,487,535; 7,392,195; 7,272,567; 7,333,929; 7,212,872 & other U.S. and worldwide patents issued & pending. DTS-HD, the Symbol, & DTS-HD and the Symbol together are registered trademarks & DTS-HD Master Audio | Essential is a trademark of DTS, Inc. Product includes software. © DTS, Inc. All Rights Reserved.

Manufactured under license from Dolby Laboratories. Dolby and the double-D symbol are trademarks of Dolby Laboratories.

Java and all other Java trademarks and logos are trademarks or registered trademarks of Sun Microsystems, Inc. in the United States and/or other countries.

"Made for iPod," "Made for iPhone," and "Made for iPad" mean that an electronic accessory has been designed to connect specifically to iPod, iPhone, or iPad, respectively, and has been certified by the developer to meet Apple performance standards. Apple is not responsible for the operation of this device or its compliance with safety and regulatory standards. Please note that the use of this accessory with iPod, iPhone, or iPad may affect wireless performance. iPod and iPhone are trademarks of Apple Inc., registered in the U.S. and other countries. iPad is a trademark of Apple Inc.
This apparatus includes this label:

19 Glossary
A
Aspect ratio
Aspect ratio refers to the width to height ratio of TV screens. The ratio of a standard TV is 4:3, while the ratio of a high-definition or wide TV is 16:9. The letter box allows you to enjoy a picture with a wider perspective on a standard 4:3 screen.
AVCHD
AVCHD is a format (standard) for high definition video cameras that can be used to record and play high-resolution HD images.
B
Blu-ray Disc (BD)
Blu-ray Disc is a next generation optical video disc capable of storing five times more data than a conventional DVD. The large capacity makes it possible to benefit from the features such as high-definition videos, multichannel surround sound, interactive menus and so on.
BONUSVIEW
BonusView, also known as "Profile 1.1". In addition to basic playback and interactive features, BonusView players introduced after 31st October, 2007 enables users to enjoy 'Picture-in-Picture' (PiP) and secondary audio features (useful when playing games that use additional audio stream while the movie is playing) on compatible BonusView discs.
D
Digital Audio
Digital Audio is a sound signal that has been converted into numerical values. Digital sound can be transmitted through multiple channels. Analogue sound can only be transmitted through two channels.
DivX Video-On-Demand
This DivX Certified ^® device must be registered in order to play DivX Video-on-Demand (VOD) content. To generate the registration code, locate the DivX VOD section in your device setup menu. Go to vod.divx.com with this code to complete the registration process and learn more about DivX video.
Dolby Digital
A surround sound system developed by Dolby Laboratories that contains up to six channels of digital audio (front left and right, surround left and right, center and subwoofer.)
DTS
Digital Theatre Systems. A surround sound system for providing 5.1 channels of discrete digital audio in consumer electronics products and software content. It is not developed by Dolby Digital.
H
HDCP
High-bandwidth Digital Content Protection. This is a specification that provides a secure transmission of digital contents between different devices (to prevent unauthorized copyright.)
HDMI
High-Definition Multimedia Interface (HDMI) is a high-speed digital interface that can transmit uncompressed high definition video and digital multichannel audio. It delivers high quality picture and sound quality, completely free from noise. HDMI is fully backward-compatible with DVI.
As required by the HDMI standard, connecting to HDMI or DVI products without HDCP (High-bandwidth Digital Content Protection) will result in no Video or Audio output.
J
JPEG
A very common digital still picture format. A still-picture data compression system proposed by the Joint Photographic Expert Group, which features small decrease in image quality in spite of its high compression ratio. Files are recognized by their file extension '.jpg' or '.jpeg.'
L
LAN (Local Area Network)
A group of linked devices in a company, school or home. Indicates the boundaries of a particular network.
M
MP3
A file format with a sound data compression system. MP3 is the abbreviation of Motion Picture Experts Group 1 (or MPEG-1) Audio Layer 3. With the MP3 format, one CD-R or CD-RW can contain about 10 times more data than a regular CD.
P
PBC
Playback Control. A system where you navigate through a Video CD/Super VCD with on-screen menus that are recorded onto the disc. You can enjoy interactive playback and search.
R
Region code
A system that allows discs to be played only in the region designated. This unit only plays discs that have compatible region codes. You can find the region code of your unit on the product label. Some discs are compatible with more than one region (or ALL regions.)
W
WMA
Windows Media™ Audio. Refers to an audio compression technology developed by Microsoft Corporation. WMA data can be encoded with Windows Media player version 9 or Windows Media player for Windows XP. Files are recognized by their file extension '.wma.'
| 部件名称Name of the Parts | 有毒有害物质或元素Hazardous/Toxic Substance | |||||
| 铅(Pb, Lead) | 汞(Hg, Mercury) | 镉(Cd, Cadmium) | 六价铬(Chromium 6+) | 多溴联苯(PBB) | 多溴二苯醚(PBDE) | |
| Housing外壳 | O | O | O | O | O | |
| DVD loaderDVD 光盒 | X | O | O | O | O | |
| PWBs电路板组件 | X | O | O | O | O | |
| Accessories(Remote control & cables)附件(遥控器,电源线,连接线) | X | O | O | O | O | |
| Batteries in Remote Control(ZnC)遥控器电池 | X | O | O | O | O | |
○:表示该有毒有害物质在该部件所有均质材料中的含量均在SJ/T11363-2006标准规定的限量要求以下。O: Indicates that this toxic or hazardous substance contained in all of the homogeneous materials for this part is below the limit requirement in SJ/T11363-2006.
×:表示该有毒有害物质至少在该部件的某一均质材料中的含量超出SJ/T11363 - 2006 标准规定的限量要求。X: Indicates that this toxic or hazardous substance contained in at least one of the homogeneous materials used for this part is above the limit requirement in SJ/T11363 - 2006.

环保使用期限 Environmental Protection Use Period
此标识指期限(十年),电子信息产品中含有的有毒有害物质或元素在正常使用的条件下不会发生外泄或突变,用户使用该电子信息产品不会对环境造成严重污染或对其人身、财产造成严重损害的期限。
This logo refers to the period (10 years) during which the toxic or hazardous substances or elements contained in electronic information products will not leak or mutate so that the use of these [substances or elements] will not result in any severe environmental pollution, any bodily injury or damage to any assets.
电池标识 Battery labeling logo

环保使用期限 Environmental Protection Use Period
此标识指期限(五年),电池中含有的有毒有害物质或元素在正常使用的条件下不会发生外泄或突变,用户使用该电池产品不会对环境造成严重污染或对其人身、财产造成严重损害的期限。
This logo refers to the period (5 years) during which the toxic or hazardous substances or elements contained in the battery will not leak or mutate so that the use of these [substances or elements] will not result in any severe environmental pollution, any bodily injury or damage to any assets.

- Contents
- Important 4
- Your Blu-ray Component Hi-Fi System 6
- Before use 10
- Get started 14
- Play a disc 17
- Play from a USB storage device 20
- Optional control 21
- Browse iPod/iPhone/iPad 22
- Use the network 25
- Listen to FM radio 28
- Setup 29
- Use Philips EasyLink 33
- Upgrade the firmware 35
- Adjust sound 36
- Additional Information 37
- Specifications 39
- Troubleshooting 40
- Notice 42
- Glossary 44
- Important
- Safety
- Risk of electric shock!
- Risk of short circuit or fire!
- Risk of injury or damage to the product!
- Risk of overheating!
- Risk of contamination!
- Risk of swallowing batteries!
- Hearing safety
- Listen at a moderate volume.
- To establish a safe volume level:
- Listen for reasonable periods of time:
- Be sure to observe the following guidelines when using your headphones.
- Note
- Your Blu-ray Component Hi-Fi System
- Feature highlights
- High-Definition entertainment
- BD-Live
- playable media
- Region codes
- Product overview
- ⑪ ◀/▶
- ⑫
- ⑬ VOL +/-
- ⑭ LOUDNESS
- ⑮ Keypad
- ⑯ PROGRAM/SUBTITLE
- ⑰ Color buttons
- ⑱ SLEEP/TIMER
- ⑲ TREBLE/BASS
- ⑳ AUDIO
- 21
- 22
- ②3 RDS/INFO
- ⑳ OK
- ⑲ OPTIONS
- ⑳ CLOCK
- DIM
- Before use
- Place the product
- Connect
- Connect speakers
- Connect the control cable
- Connect the FM antenna
- Tip
- Connect video/audio cables
- Option 1: Connect to the HDMI jack
- Option 2: Connect to the composite video jack
- Route audio to other devices
- Connect to an HDMI-compliant AV receiver/amplifier
- Connect to a digital AV amplifier/receiver
- Connect an analogue stereo system
- Route audio from other devices
- Connect power
- Caution
- Install/replace the batteries of remote control
- Get started
- Turn on
- Press ⏻
- For the first time use
- Switch modes
- Automatically switch the modes:
- Manually switch the modes:
- Demonstrate features
- Set clock
- Find the correct video input channel
- Use the home menu
- Navigate through a menu
- Select a menu display language
- Store FM radio stations automatically
- Play a disc
- Basic operations
- Button Function
- Play a Blu-ray 3D video
- Before you start, make sure that:
- Enable the 3D video output
- Play copied files
- Play a musical slideshow
- Play DivX ® videos
- Play DivX VOD videos
- On your computer through DivX Player
- On your product
- Play non-VOD DivX videos
- Select a subtitle language
- Change the character set
- Play from a USB storage device
- Press ▲▼to select an icon, and then press OK.
- Buttons Functions
- Play DivX® videos
- Optional control
- Video
- Music
- Photo
- Browse iPod/iPhone/iPad
- Compatible iPod/iPhone/iPad
- Load the iPod/iPhone/iPad
- Use the playback interface of iPod/iPhone/iPad
- Play music files
- Control play
- Play video files
- Press OPTIONS.
- Use the playback interface of this product
- Charge the iPod/iPhone/iPad
- Remove the iPod/iPhone/iPad
- Use the network
- Connect and set up
- Set up
- Configure the network manually
- Text entry
- Wireless connection
- Access online media sources
- Enjoy BD-Live
- Access local media sources
- Browse PC (DLNA)
- Listen to FM radio
- Tune to a radio station
- Program radio stations automatically
- Program radio stations manually
- Tune to a preset radio station
- Setup
- Video setup
- [TV Display]
- [HDMI Video]
- [HDMI Deep Color]
- [Picture Settings]
- [User]
- [Watch 3D video]
- Audio setup
- [Night Mode]
- [HDMI Audio]
- [Default sound settings]
- Network setup
- [Network Installation]
- [View Network Settings]
- [View Wireless Settings]
- [Name your Product:]
- [EasyLink]
- [One Touch Play]
- [One Touch Standby]
- [System Audio Control]
- [Audio Input Mapping]
- [Menu language]
- [Audio]
- [Subtitle]
- [Disc Menu]
- [Parental Control]
- [Auto Subtitle Shift]
- [Screen Saver]
- [Change Password]
- [Display Panel]
- [Auto Standby]
- [VCD PBC]
- [Sleep Timer]
- Advanced setup
- [BD-Live Security]
- [Enhanced Audio]
- [Software Update]
- [Clear memory]
- [DivX® VOD Code]
- [Version Info.]
- [Restore default settings]
- Use Philips EasyLink
- One-touch play
- One-touch standby
- Map the devices to the audio inputs
- Update audio mapping from connected devices
- Upgrade the firmware
- Register your product
- Check the current software version
- Upgrade firmware via the Internet
- Upgrade firmware via the USB port
- Adjust sound
- Adjust volume level
- Adjust bass level
- Adjust treble level
- Select automatic loudness control
- Mute sound
- Listen through headphone
- Additional Information
- Adjust the brightness of display panel
- Set alarm timer
- Set the sleep timer
- Control by your iPhone
- What you need
- Care
- Clean discs
- Specifications
- Audio line-out
- Audio amplifier
- Headphone out
- S/PDIF digital audio output:
- Main unit
- Speakers
- Accessories supplied
- Laser Specification
- Tuner (FM)
- Troubleshooting
- Warning
- Notice
- Disposal of your old product and batteries
- Copyright notice
- Be responsible Respect copyrights
- Open source software
- Trademark notice
- DIVX + HD
- Glossary
- A
- Aspect ratio
- AVCHD
- B
- Blu-ray Disc (BD)
- BONUSVIEW
- D
- Digital Audio
- DivX Video-On-Demand
- Dolby Digital
- DTS
- H
- HDCP
- HDMI
- J
- JPEG
- L
- LAN (Local Area Network)
- M
- MP3
- P
- PBC
- R
- Region code
- W
- WMA
- 环保使用期限 Environmental Protection Use Period
- 电池标识 Battery labeling logo
Marka : PHILIPS
Model : Harmony DBD8010
Kategorija : Hi-Fi Sustav