
HKN 8331 E - Pliit BEKO - Tasuta kasutusjuhend
Leidke seadme juhend tasuta HKN 8331 E BEKO PDF-formaadis.


Kasutajate küsimused teemal HKN 8331 E BEKO
0 küsimus selle seadme kohta. Vastake nendele, mida teate, või esitage oma.
Esita uus küsimus selle seadme kohta
Laadige alla juhend oma Pliit PDF-formaadis tasuta! Leidke oma juhend HKN 8331 E - BEKO ja võtke oma elektrooniline seade uuesti kätte. Sellel lehel on avaldatud kõik teie seadme kasutamiseks vajalikud dokumendid. HKN 8331 E kaubamärgi BEKO.
KASUTUSJUHEND HKN 8331 E BEKO
Blomberg
Oven
User Manual
Viryklé
Vartotojo vadovas


natural_image
Simple line drawing of a cupcake with frosting and toppings (no text or symbols)HKN 8331 E
EN / LT
285.3041.55/R.AF/14.09.2021/3-1
7785982825
Please read this user manual first!
Dear Customer,
Thank you for purchasing this Blomberg product. We hope that you get the best results from your product which has been manufactured with high quality and state-of-the-art technology. Therefore, please read this entire user manual and all other accompanying documents carefully before using the product and keep it as a reference for future use. If you handover the product to someone else, give the user manual as well. Follow all warnings and information in the user manual.
Remember that this user manual is also applicable for several other models. Differences between models will be identified in the manual.
Explanation of symbols
Throughout this user manual the following symbols are used:

Important information or useful hints about usage.

Warning of hazardous situations with regard to life and property.

Warning of electric shock.

Warning of risk of fire.

Warning of hot surfaces.
1 Important instructions and warnings for safety and environment 4
General safety....4
Electrical safety 5
Product safety....6
Intended use....9
Safety for children 9
Disposing of the old product 9
Package information.... 10
2 General information 11
Overview 11
Package contents 12
Technical specifications 14
3 Installation 15
Before installation.... 15
Installation and connection.... 16
Future Transportation 18
4 Preparation 20
Tips for saving energy....20
Initial use 20
Time setting....20
First cleaning of the appliance 21
Initial heating....21
5 How to use the hob 23
General information about cooking.....23
Using the hobs....24
6 How to operate the oven 26
General information on baking, roasting and grilling....26
How to operate the electric oven 27
Operating modes....27
Using the oven clock 28
Using the keylock 29
Using the clock as an alarm....30
Cooking times table....31
How to operate the grill....34
Cooking times table for grilling....35
7 Maintenance and care 36
General information 36
Cleaning the hob 36
Cleaning the control panel....37
Cleaning the oven....37
Cleaning the oven door....38
Removing the door inner glass 39
Replacing the oven lamp....39
8 Troubleshooting 41
1 Important instructions and warnings for safety and environment
This section contains safety instructions that will help protect from risk of personal injury or property damage. Failure to follow these instructions shall void any warranty.
General safety
- This appliance can be used by children aged from 8 years and above and persons with reduced physical, sensory or mental capabilities or lack of experience and knowledge if they have been given supervision or instruction concerning use of the appliance in a safe way and understand the hazards involved.
Children shall not play with the appliance. Cleaning and user maintenance shall not be made by children without supervision.
- The appliance is not to be used by persons (including children) with reduced physical, sensory or mental capabilities, or lack of experience and knowledge,
unless they have been given supervision or instruction. Children should be supervised and ensure they do not play with the appliance
- If the product is handed over to someone else for personal use or second-hand use purposes, the user manual, product labels and other relevant documents and parts should be also given.
- Never place the product on a carpet-covered floor. Otherwise, lack of airflow beneath the product will cause electrical parts to overheat. This will cause problems with your product.
• Installation and repair procedures must always be performed by Authorised Service Agents. The manufacturer shall not be held responsible for damages arising from procedures carried out by unauthorised persons which may also void the warranty. Before installation, read the instructions carefully.
- Do not operate the product if it is defective or has any visible damage.
- Ensure that the product function knobs are switched off after every use.
Electrical safety
- If the product has a failure, it should not be operated unless it is repaired by an Authorised Service Agent. There is the risk of electric shock!
- Only connect the product to a grounded outlet/line with the voltage and protection as specified in the “Technical specifications”. Have the grounding installation made by a qualified electrician while using the product with or without a transformer. Our company shall not be liable for any problems arising due to the product not being earthed in accordance with the local regulations.
- Never wash the product by spreading or pouring water onto it! There is the risk of electric shock!
• The product must be disconnected during installation, maintenance,
cleaning and repairing procedures.
- If the power connection cable for the product is damaged, it must be replaced by the manufacturer, its service agent or similarly qualified persons in order to avoid a hazard.
- Only use the connection cable specified in the "Technical specifications".
- The appliance must be installed so that it can be completely disconnected from the mains supply. The separation must be provided by a switch built into the fixed electrical installation, according to construction regulations.
- Rear surface of the oven gets hot when it is in use. Make sure that the electrical connection does not contact with the rear surface; otherwise, connections can get damaged.
- Do not trap the mains cable between the oven door and frame and do not route it over hot surfaces. Otherwise, cable insulation may melt and cause fire as a result of short circuit.
- Any work on electrical equipment and systems should only be carried out by authorised and qualified persons.
- In case of any damage, switch off the product and disconnect it from the mains. To do this, turn off the fuse at home.
• Make sure that fuse rating is compatible with the product.
Product safety
- WARNING: The appliance and its accessible parts become hot during use. Care should be taken to avoid touching heating elements. Children less than 8 years of age shall be kept away unless continuously supervised.
- Never use the product when your judgment or coordination is impaired by the use of alcohol and/or drugs.
-
Be careful when using alcoholic drinks in your dishes. Alcohol evaporates at high temperatures and may cause fire since it can ignite when it comes into contact with hot surfaces.
-
Food Poisoning Hazard: Do not let food sit in oven for more than 1 hour before or after cooking. Doing so can result in food poisoning or sickness.
- Do not place any flammable materials close to the product as the sides may become hot during use.
- During use the appliances becomes hot. Care should be taken to avoid touching heating elements inside the oven.
- Keep all ventilation slots clear of obstructions.
- Do not heat closed tins and glass jars in the oven. The pressure that would build-up in the tin/jar may cause it to burst.
- Do not place baking trays, dishes or aluminium foil directly onto the bottom of the oven. The heat accumulation might damage the bottom of the oven.
-
Do not use harsh abrasive cleaners or sharp metal scrapers to clean the oven door glass since they can scratch the surface, which may result in shattering of the glass.
-
Do not use steam cleaners to clean the appliance as this may cause an electric shock.
• (Varies depending on the product model.)
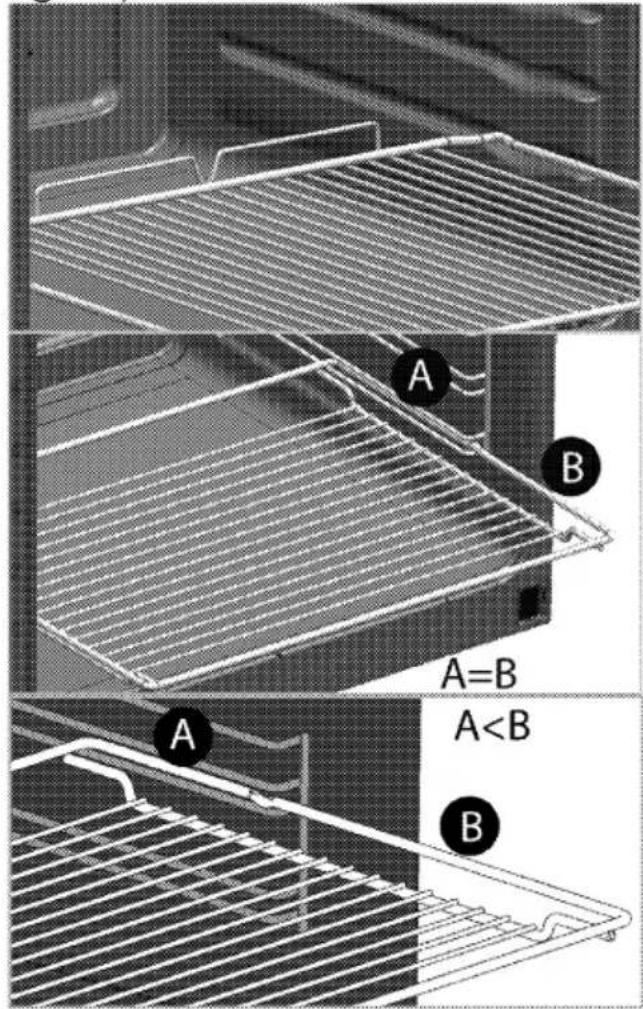
Placing the wire shelf and tray onto the wire racks properly It is important to place the wire shelf and/or tray onto the rack properly. Slide the wire shelf or tray between 2 rails and make sure that it is balanced before placing food on it (Please see the following figure).
Intended use
• This product is designed for domestic use. Commercial use will void the guarantee. - CAUTION: This appliance is for cooking purposes only. It must not be used for other purposes, for example room heating. - This product should not be used for warming the plates under the grill, drying towels, dish cloths etc. by hanging them on the oven door handles. This product should also not be used for room heating purposes. - The manufacturer shall not be liable for any damage caused by improper use or handling errors. • The oven can be used for defrosting, baking, roasting and grilling food.Safety for children
- WARNING: Accessible parts may become hot during use. Young children should be kept away. - The packaging materials will be dangerous for children. Keep the packaging materials away from children. Please dispose of all parts of the packaging according to environmental standards. • Electrical products are dangerous to children. Keep children away from the product when it is operating and do not allow them to play with the product. - Do not place any items above the appliance that children may reach for. - When the door is open, do not load any heavy object on it and do not allow children to sit on it. It may overturn or door hinges may get damaged.Disposing of the old product Compliance with the WEEE Directive and Disposing of the Waste Product:
 This product complies with EU WEEE Directive (2012/19/EU). This product bears a classification symbol for waste electrical and electronic equipment (WEEE). This product has been manufactured with high quality parts and materials which can be reused and are suitable for recycling. Do not dispose of the waste product with normal domestic and other wastes at the end of its service life. Take it to the collection center for the recycling of electrical and electronic equipment. Please consult your local authorities to learn about these collection centers.Compliance with RoHS Directive:
The product you have purchased complies with EU RoHS Directive (2011/65/EU). It does not contain harmful and prohibited materials specified in the Directive.Package information
\- Packaging materials of the product are manufactured from recyclable materials in accordance with our National Environment Regulations. Do not dispose of the packaging materials together with the domestic or other wastes. Take them to the packaging material collection points designated by the local authorities.2 General information
Overview
  1 Front door 2 Handle 3 Bottom drawer 4 Tray 5 Wire shelf 6 Control panel 7 Burner plate 8 Fan motor (behind steel plate) 9 Lamp 10 Grill heating element 11 Shelf positions  1 Warning lamp 2 Thermostat lamp 3 Function knob 4 Single-circuit cooking plate Rear left 5 Dual-circuit cooking plate Front left 6 Digital timer 7 Single-circuit cooking plate Front right 8 Extended cooking plate Rear right 9 Thermostat knobPackage contents
 Accessories supplied can vary depending on the product model. Not every accessory described in the user manual may exist on your product. 1.User manual 2. Standard tray Used for pastries, frozen foods and big roasts. natural_image
3D rendering of a rectangular baking tray with no text or symbols visiblenatural_image
3D rendering of a rectangular tray or container with a textured interior (no text or symbols visible)natural_image
Line drawing of a rectangular metal grate or rack structure (no text or symbols)natural_image
Two technical line drawings of a grid-like structure with horizontal slats, no text or symbols present.natural_image
Technical diagram of a mechanical assembly with two circular insets showing internal components (no text or symbols)natural_image
Technical line drawing of a structural frame with two circular insets showing internal components (no text or symbols)6. Rotisserie chicken
Used to grill meat, poultry and fish evenly from all sides. - Fix the food to be grilled to the turn spit with the forks. - Place the turn spit frame into the oven by aligning it with the turn spit driver. - Insert the sharp edge of the turn spit into the turn spit driver and place the turn spit onto the turn spit frame. - Remove the spit handle while grilling.  1 Turn spit frame 2 Plastic handle \* 3 Fork \* (Varies depending on the product model.) Technical specifications| GENERAL | |
| External dimensions (height / width / depth) | 850 mm/600 mm/600 mm |
| Voltage / frequency | 220-240 V 1N~/ 380-415 V 3N~50/60 Hz |
| Total power consumption | 9.9 kW |
| Cable type / section | min.H05W-FG 3 x 4 mm^2 / 5 x 2,5 mm^2 |
| HOB | |
| Burners | |
| Rear left | Single-circuit cooking plate |
| Dimension | 140 mm |
| Power | 1200 W |
| Front left | Dual-circuit cooking plate |
| Dimension | 210/120 mm |
| Power | 2200/750 W |
| Front right | Single-circuit cooking plate |
| Dimension | 180 mm |
| Power | 1700 W |
| Rear right | Extended cooking plate |
| Dimension | 170/265 mm |
| Power | 1500/2400 W |
| OVEN/GRILL | |
| Main oven | Multifunction oven |
| Inner lamp | 15–25 W |
| Grill power consumption | 2.2 kW |
Basics: Information on the energy label of electrical ovens is given in accordance with the EN 60350-1 / IEC 60350-1 standard. Those values are determined under standard load with bottom-top heater or fan assisted heating (if any) functions. Energy efficiency class is determined in accordance with the following prioritization depending on whether the relevant functions exist on the product or not. 1-Cooking with eco-fan, 2-Turbo slow cooking, 3-Turbo cooking, 4-Fan assisted bottom/top heating, 5-Top and bottom heating.
 Technical specifications may be changed without prior notice to improve the quality of the product.  Figures in this manual are schematic and may not exactly match your product.  Values stated on the product labels or in the documentation accompanying it are obtained in laboratory conditions in accordance with relevant standards. Depending on operational and environmental conditions of the product, these values may vary.3 Installation
Product must be installed by a qualified person in accordance with the regulations in force. The manufacturer shall not be held responsible for damages arising from procedures carried out by unauthorized persons which may also void the warranty.  Preparation of location and electrical installation for the product is under customer's responsibility.  The product must be installed in accordance with all local electrical regulations.  Prior to installation, visually check if the product has any defects on it. If so, do not have it installed. Damaged products cause risks for your safety.Before installation
To ensure that critical air gaps are maintained under the appliance, we recommend that this appliance is mounted on a solid base and that the feet do not sink into any carpet or soft flooring. The kitchen floor must be able to carry the weight of the appliance plus the additional weight of cookware and bakeware and food. If the range is placed on a base, measures have to be taken to prevent the appliance slipping from the base. The appliances must not be installed behind a decorative door in order to avoid overheating.  - The appliance corresponds to device class 1, i.e. it may be placed with the rear and one side to kitchen walls, kitchen furniture or equipment of any size. The kitchen furniture or equipment on the other side may only be of the same size or smaller. - It can be used with cabinets on either side but in order to have a minimum distance of 400mm above hotplate level allow a side clearance of 65mm between the appliance and any wall, partition or tall cupboard. - It can also be used in a free standing position. Allow a minimum distance of 750 mm above the hob surface. - (\*) If a cooker hood is to be installed above the cooker, refer to cooker hood manufacturer' instructions regarding installation height. If not defined any size in the hood manual, this height should be at least 650 mm. - Any kitchen furniture next to the appliance must be heat-resistant (100 °C min.).Safety chain
If your product has 2 safety chains;
The appliance must be secured against overbalancing by using the supplied two safety chains on your oven. Fasten hook (1) by using a proper peg to the kitchen wall (6) and connect safety chain (3) to the hook via the locking mechanism (2).  1 Stability hook 2 Locking mechanism 3 Safety chain (supplied and mounted to oven) 4 Firmliy fix chain to cooker rear 5 Rear of cooker 6 Kitchen wallIf your product has 1 safety chain;
The appliance must be secured against overbalancing by using the supplied one safety chain on your oven. Follow below steps in the picture to secure the safety chain to your product.  i Stability chain to be as short as practicable to avoid oven tilting forward and diagonal to avoid oven side tilting. Cooker stability chain for cookers is not designed with bracket engagement slot.Installation and connection
Product can only be installed and connected in accordance with the statutory installation rules. Do not install the product next to refrigerators or freezers. The heat emitted by the product will increase the energy consumption of cooling appliances. - Carry the product with at least two persons. - Product must be placed directly on the floor. It must not be placed onto a base or a pedestal. Do not use the door and/or handle to carry or move the product. The door, handle or hinges get damaged.Electrical connection
Connect the product to a grounded outlet/line protected by a miniature circuit braker of suitable capacity as stated in the "Technical specifications" table. Have the grounding installation made by a qualified electrician while using the product with or without a transformer. Our company shall not be liable for any damages that will arise due to using the product without a grounding installation in accordance with the local regulations.  The product must be connected to the mains supply only by an authorised and qualified person. The product's warranty period starts only after correct installation. Manufacturer shall not be held responsible for damages arising from procedures carried out by unauthorised persons.  The power cable must not be clamped, bent or trapped or come into contact with hot parts of the product. A damaged power cable must be replaced by a qualified electrician. Otherwise, there is risk of electric shock, short circuit or fire! The mains supply data must correspond to the data specified on the type label of the product. The rating plate is either seen when the door or the lower cover is opened or it is located at the rear wall of the unit depending on the unit type. Power cable of your product must comply with the values in "Technical specifications" table.  Before starting any work on the electrical installation, disconnect the product from the mains supply. There is the risk of electric shock!Connecting the power cable
 While performing the wiring, you must apply with the national/local electrical regulations and must use the appropriate socket outlet/line and plug for oven. In case of the product's power limits are out of current carrying capability of plug and socket outlet/line, the product must be connected through fixed electrical installation directly without using plug and socket outlet/line. 1. If a power cable is not supplied together with your product, a power cable that you would select from the table (Technical specifications, page 14) in accordance with the electrical installation at your home must be connected to your product by following the instructions in cable diagram. If it is not possible to disconnect all poles in the supply power, a disconnection unit with at least 3 mm contact clearance (fuses, line safety switches, contactors) must be connected and all the poles of this disconnection unit must be adjacent to (not above) the product in accordance with IEE directives. Failure to obey this instruction may cause operational problems and invalidate the product warranty.  Additional protection by a residual current circuit breaker is recommended. 2. Open the terminal block cover with a screwdriver. 3. Insert the power cable through the cable clamp below the terminal and secure it to the main body with the integrated screw on cable clamping component. 4. Connect the cables according to the supplied diagram. flowchart
```mermaid
graph TD
    subgraph_Single_phase["Single phase 220/230/240V AC"]
        A1["1"] --> B1["L1"]
        B1 --> C1["N5"]
        C1 --> D1["*"]
        D1 --> E1["4"]
        A2["2"] --> B2["L2"]
        B2 --> C2["N5"]
        C2 --> D2["*"]
        D2 --> E2["4"]
    end
    subgraph_Two_phase["Two phase 380/400/415V AC"]
        A3["3"] --> B3["L3"]
        B3 --> C3["N5"]
        C3 --> D3["*"]
        D3 --> E3["4"]
        A4["1"] --> B4["L1"]
        B4 --> C4["N5"]
        C4 --> D4["*"]
        D4 --> E4["4"]
    end
    subgraph_Three_phase["Three phase 380/400/415V AC"]
        A5["2"] --> B5["L2"]
        B5 --> C5["N5"]
        C5 --> D5["*"]
        D5 --> E5["4"]
        A6["3"] --> B6["L3"]
        B6 --> C6["N5"]
        C6 --> D6["*"]
        D6 --> E6["4"]
    end
    Note: * Copper bridge (EN) indicates the connection point between two phases. The diagram shows connections between phase nodes and junctions, with symbols indicating 'N' or 'L'.
Final check
1. Reconnect the product to the mains. 2. Check electrical functions.Future Transportation
- Keep the product's original carton and transport the product in it. Follow the instructions on the carton. If you do not have the original carton, pack the product in bubble wrap or thick cardboard and tape it securely. - To prevent the wire grill and tray inside the oven from damaging the oven door, place a strip of cardboard onto the inside of the oven door that lines up with the position of the trays. Tape the oven door to the side walls. \- Do not use the door or handle to lift or move the product. Do not place any objects onto the product and move it in upright position. Check the general appearance of your product for any damages that might have occurred during transportation.4 Preparation
Tips for saving energy
The following information will help you to use your appliance in an ecological way, and to save energy: - Use dark coloured or enamel coated cookware in the oven since the heat transmission will be better. - While cooking your dishes, perform a preheating operation if it is advised in the user manual or cooking instructions. \- Do not open the door of the oven frequently during cooking. \- Try to cook more than one dish in the oven at the same time whenever possible. You can cook by placing two cooking vessels onto the wire shelf. • Cook more than one dish one after another. The oven will already be hot. \- You can save energy by switching off your oven a few minutes before the end of the cooking time. Do not open the oven door. \- Defrost frozen dishes before cooking them. \- Use pots/pans with cover for cooking. If there is no cover, energy consumption may increase 4 times. \- Select the burner which is suitable for the bottom size of the pot to be used. Always select the correct pot size for your dishes. Larger pots require more energy. \- Pay attention to use flat bottom pots when cooking with electric hobs. Pots with thick bottom will provide a better heat conduction. You can obtain energy savings up to 1/3. \- Vessels and pots must be compatible with the cooking zones. Bottom of the vessels or pots must not be smaller than the hotplate. \- Keep the cooking zones and bottom of the pots clean. Dirt will decrease the heat conduction between the cooking zone and bottom of the pot. \- For long cookings, turn off the cooking zone 5 or 10 minutes before the end of cooking time. You can obtain energy savings up to 20% by using the residual heat. • Information on energy efficiency according to EU 66/2014 can be found on the product fiche given with the product.Initial use
Time setting
 Before you can use the oven, the time must be set. If the time is not set, oven will not operate.  While making any adjustment, related symbols on the clock will flash. Press „−“ or „+“ (5/6) keys to set the time after the oven in energized for the first time.  1 Program key 2 Cooking Time symbol 3 End of Cooking Time symbol\* 4 Alarm symbol 5 Minus key 6 Plus key 7 Screen brightness setting 8 Alarm volume 9 Current time 10 Key lock symbol 11 Adjustment key \* (Varies depending on the product model.) After setting the time, you can start and end the cooking by selecting the desired position with temperature button and function button.  If the current time is not set, time setting will start increasing/moving up from 12:00. Clock symbol '9' will be displayed to indicate that the current time has not been set. This symbol will disappear once the time is set.  Current time settings are cancelled in case of power failure. It needs to be readjusted.Changing the time of the day
To change the time of the day you have previously set: 1. Press (11) key to activate current time symbol '9'. 2. Press „-“ or „+“ (5/6) keys to set the current time.Changing screen brightness adjustment
1. Press (11) key to activate screen brightness symbol '7' for screen brightness adjustment. 2. Press '-' or '+' (5/6) keys to set the desired brightness. » Selected brightness level will appear as d-01, d-02 or d-03 on the display.First cleaning of the appliance
 The surface might get damaged by some detergents or cleaning materials. Do not use aggressive detergents, cleaning powders/creams or any sharp objects during cleaning. Do not use harsh abrasive cleaners or sharp metal scrapers to clean the oven door glass since they can scratch the surface, which may result in shattering of the glass. 1. Remove all packaging materials. 2. Wipe the surfaces of the appliance with a damp cloth or sponge and dry with a cloth.Initial heating
Heat up the product for about 30 minutes and then switch it off. Thus, any production residues or layers will be burnt off and removed.  Hot surfaces cause burns! Product may be hot when it is in use. Never touch the hot burners, inner sections of the oven, heaters and etc. Keep children away. Always use heat resistant oven gloves when putting in or removing dishes into/from the hot oven.Electric oven
1. Take all baking trays and the wire grill out of the oven. 2. Close the oven door. 3. Select Static position. 4. Select the highest grill power; See How to operate the electric oven, page 27. 5. Operate the oven for about 30 minutes. 6. Turn off your oven; See How to operate the electric oven, page 27Grill oven
1. Take all baking trays and the wire grill out of the oven. 2. Close the oven door. 3. Select the highest grill power; see How to operate the grill, page 34. 4. Operate the grill about 15 minutes. 5. Turn off your grill; see How to operate the grill, page 34 Smoke and smell may emit for a couple of hours during the initial operation. This is quite normal. Ensure that the room is well ventilated to remove the smoke and smell. Avoid directly inhaling the smoke and the smell that emits.5 How to use the hob
General information about cooking
 Never fill the pan with oil more than one third of it. Do not leave the hob unattended when heating oil. Overheated oils bring risk of fire. Never attempt to extinguish a possible fire with water! When oil catches fire, cover it with a fire blanket or damp cloth. Turn off the hob if it is safe to do so and call the fire department. - Before frying foods, always dry them well and gently place into the hot oil. Ensure complete thawing of frozen foods before frying. - Do not cover the vessel you use when heating oil. - Place the pans and saucepans in a manner so that their handles are not over the hob to prevent heating of the handles. Do not place unbalanced and easily tilting vessels on the hob. - Do not place empty vessels and saucepans on cooking zones that are switched on. They might get damaged. - Operating a cooking zone without a vessel or saucepan on it will cause damage to the product. Turn off the cooking zones after the cooking is complete. - As the surface of the product can be hot, do not put plastic and aluminum vessels on it. Clean any melted such materials on the surface immediately. Such vessels should not be used to keep foods either. - Use flat bottomed saucepans or vessels only. \- Put appropriate amount of food in saucepans and pans. Thus, you will not have to make any unnecessary cleaning by preventing the dishes from overflowing. Do not put covers of saucepans or pans on cooking zones. Place the saucepans in a manner so that they are centered on the cooking zone. When you want to move the saucepan onto another cooking zone, lift and place it onto the cooking zone you want instead of sliding it.Tips about glass ceramic hobs
- Glass ceramic surface is heatproof and is not affected by big temperature differences. - Do not use the glass ceramic surface as a place of storage or as a cutting board. - Use only the saucepans and pans with machined bottoms. Sharp edges create scratches on the surface. - Do not use aluminum vessels and saucepans. Aluminum damages the glass ceramic surface. natural_image
Diagram showing a steam rising above a building with a crossed-out X (no text or symbols present)natural_image
Diagram showing a particle arrangement with an arrow pointing to a surface, no text or symbols presentTurning on the ceramic plates
The hob control knobs are used for operating the plates. To obtain the desired cooking power, turn the hob control knobs to the corresponding level.| Cooking level | 1 | 2 — 3 | 4 — 6 |
| warming | stewing, simmering | cooking, roasting, boiling | |
| Cooking level | 1 | 2 | 3 |
| warming | stewing, simmering | cooking, roasting, boiling |
Turning off the ceramic plates
Turn the plate knob to OFF (upper) position.Using multi-segmented cooking zones
Multi-segmented cooking zones allows to cook with different size of saucepans on the same cooking zone. When these cooking zones are activated, first the inward cooking zone turns on. 1. To change the active cooking zone diameter, turn the control knob clockwise. 2.A "click" will be heard as soon as the hotplate radius changes. natural_image
Two circular mechanical components with internal grating and mounting holes, shown from different angles (no text or symbols visible)Turning off multi-segment cooking zones
1. Turn the knob counter clockwise to OFF (upper) position to turn off the oven. All segments of the cooking zone are turned off.  natural_image
Diagram showing two oval shapes labeled 1 and 2, with no readable text or symbols beyond labels6 How to operate the oven
General information on baking, roasting and grilling
 Hot surfaces cause burns! Product may be hot when it is in use. Never touch the hot burners, inner sections of the oven, heaters and etc. Keep children away. Always use heat resistant oven gloves when putting in or removing dishes into/from the hot oven.  Be careful when opening the oven door as steam may escape. Exiting steam can scald your hands, face and/or eyes.Tips for baking
- Use non-sticky coated appropriate metal plates or aluminum vessels or heat-resistant silicone moulds. - Make best use of the space on the rack. - Place the baking mould in the middle of the shelf. - Select the correct rack position before turning the oven or grill on. Do not change the rack position when the oven is hot. - Keep the oven door closed.Tips for roasting
- Treating whole chicken, turkey and large piece of meat with dressings such as lemon juice and black pepper before cooking will increase the cooking performance. - It takes about 15 to 30 minutes longer to roast meat with bones when compared to roasting the same size of meat without bones. • Each centimeter of meat thickness requires approximately 4 to 5 minutes of cooking time. - Let meat rest in the oven for about 10 minutes after the cooking time is over. The juice is better distributed all over the roast and does not run out when the meat is cut. - Fish should be placed on the middle or lower rack in a heat-resistant plate.Tips for grilling
When meat, fish and poultry are grilled, they quickly get brown, have a nice crust and do not get dry. Flat pieces, meat skewers and sausages are particularly suited for grilling as are vegetables with high water content such as tomatoes and onions. - Distribute the pieces to be grilled on the wire shelf or in the baking tray with wire shelf in such a way that the space covered does not exceed the size of the heater. - Slide the wire shelf or baking tray with grill into the desired level in the oven. If you are grilling on the wire shelf, slide the baking tray to the lower rack to collect fats. The baking tray to be slid must be of a size that covers the whole grilling area. This tray might not be provided with the product. Add some water in the baking tray for easy cleaning.  Foods that are not suitable for grilling carry the risk of fire. Only grill food which is suitable for intensive grilling heat. Do not place the food too far in the back of the grill. This is the hottest area and fatty food may catch fire.How to operate the electric oven
Before you can use the oven, the time must be set. If the time is not set, oven will not operate. Your oven is equipped with pop-out knobs that protrude when you press them. 1. Press inwards to protrude the knob and then turn it to make the desired setting.  2. When the cooking process is finished, press the knob inwards.Select temperature and operating mode
 1 Function knob 2 Thermostat knob 1. Set the Function knob to the desired operating mode. 2. Set the Temperature knob to the desired temperature. » Oven heats up to the adjusted temperature and maintains it. During heating, temperature lamp stays on.Switching off the electric oven
Turn the function knob and temperature knob to off (upper) position.Rack positions (For models with wire shelf)
It is important to place the wire shelf onto the side rack correctly. Wire shelf must be inserted between the side racks as illustrated in the figure. Do not let the wire shelf stand against the rear wall of the oven. Slide your wire shelf to the front section of the rack and settle it with the help of the door in order to obtain a good grill performance. (Varies depending on the product model.) Operating modes
The order of operating modes shown here may be different from the arrangement on your product.Top and bottom heating
 Top and bottom heating are in operation. Food is heated simultaneously from the top and bottom. For example, it is suitable for cakes, pastries, or cakes and casseroles in baking moulds. Cook with one tray only.Bottom heating
 Only bottom heating is in operation. It is suitable for pizza and for subsequent browning of food from the bottom.  This function must be used for easy steam cleaning as well.Fan supported bottom/top heating
 Top heating, bottom heating plus fan (in the rear wall) are in operation. Hot air is evenly distributed throughout the oven rapidly by means of the fan. Cook with one tray only.Operating with fan
 The oven is not heated. Only the fan (in the rear wall) is in operation. Suitable for thawing frozen granular food slowly at room temperature and cooling down the cooked food. The time required to thaw a whole piece of meat is longer than the food with grains.Fan Heating
 Warm air heated by the rear heater is evenly distributed throughout the oven rapidly by means of the fan. It is suitable for cooking your meals in different rack levels and preheating is not required in most cases. Suitable for cooking with multi trays. This function must be used for easy steam cleaning as well. "3D" function
 Top heating, bottom heating and fan assisted heating (in the rear wall) are in operation. Food is cooked evenly and quickly all around. Cook with one tray only.Grill+Fan
 Grilling effect is not as strong as in Full Grill - Put small or medium-sized portions in correct shelf position under the grill heater for grilling. - Turn the food after half of the grilling time.Full grill with turnspit
 Full grill and turnspit are in operation. It is suitable for grilling and making rotisserie with large pieces of meat.Using the oven clock
 1 Program key 2 Cooking Time symbol 3 End of Cooking Time symbol\* 4 Alarm symbol 5 Minus key 6 Plus key 7 Screen brightness setting 8 Alarm volume 9 Current time 10 Key lock symbol 11 Adjustment key \* (Varies depending on the product model.) i Maximum time that can be set for end of cooking is 5 hours 59 minutes. Program will be cancelled in case of power failure. You must reprogram the oven. While making any adjustments, related symbols will flash on the display. You must wait for a short time for the settings to take effect. If no cooking setting is made, time of the day cannot be set. i Cooking time will be displayed once the cooking starts.Cooking by specifying the cooking time:
You can set the oven so that it will stop at the end of the specified time by setting the cooking time on the clock. 1. To adjust the cooking time, Press Program key (1) and activate the Cooking Time symbol (2). 2. Press '-' / '+' (5/6) keys to set the cooking time. » Once the Cooking Time is set, Cooking symbol will be displayed continuously.If you want to set the end of cooking time to a later time:
After setting the cooking time on the clock, you can set the end of cooking time to a later time. 1. To adjust the cooking time, press Program key (1) and activate the Cooking Time symbol [2]. 2. Adjust the cooking time with Minus (5) and Plus (6) keys. » Cooking Time symbol remains lit (displayed continuously) after setting the cooking time. 3. To set the End of Cooking Time, Press Program key (1) and activate the Cooking Time symbol (3). 4. Press - (5) and + (6) keys to set the end of cooking time. » Once the End of Cooking Time is set, End of Cooking symbol and Cooking symbol will be displayed continuously. The End of Cooking Time symbol (3) will disappear as soon as the cooking starts. 5. Put your dish into the oven. 6. Select operation mode and temperature. » Oven timer automatically calculates the startup time for cooking by using the end of cooking time and the cooking period you have set. Selected operation mode is activated when the startup time of cooking has come and the oven is heated up to the set temperature. It maintains this temperature until the end of cooking time. 7. After the cooking process is completed, "End" appears on the displayed and the alarm will sound. 8. Alarm signal will sound for 2 minutes. To stop the alarm signal, just press any key. Alarm will be silenced and current time will be displayed. If you mute the alarm by pressing any key, the oven will restart operating. If you press any button at the end of the alarm period, the oven will restart operating. 9. Turn off the oven with the Temperature knob and Function knob.Using the keylock Activating the keylock
You can prevent digital timer from being used by activating the keylock function.  1 Program key 2 Cooking Time symbol 3 End of Cooking Time symbol\* 4 Alarm symbol 5 Minus key 6 Plus key 7 Screen brightness setting 8 Alarm volume 9 Current time 10 Key lock symbol 11 Adjustment key \* (Varies depending on the product model.) 1. Press the key (11) to activate keylock symbol (10). » "OFF" will appear on the display. 2. Press '+' key (6) to activate the keylock. » Once the keylock is activated, "On" appears on the display and the Keylock symbol (10) remains lit.  When the keylock function is activated, control panel buttons except for the key (11) cannot be used.Deactivating the keylock
1. Press Adjustment key (11) to activate Keylock symbol (10). » "On" will appear on the display. 2. Press '-' (5) to deactivate the keylock. » "OFF" will be displayed once the keylock is deactivated.Using the clock as an alarm
You can use the clock of the product for any warning or reminder apart from the cooking programme. The alarm clock has no influence on the functions of the oven. It is only used as a warning. For example, this is useful when you want to turn food in the oven at a certain point of time. Alarm clock will give a signal once the time you set is over.  1 Program key 2 Cooking Time symbol 3 End of Cooking Time symbol\* 4 Alarm symbol 5 Minus key 6 Plus key 7 Screen brightness setting 8 Alarm volume 9 Current time 10 Key lock symbol 11 Adjustment key \* (Varies depending on the product model.)Setting the alarm clock
1. Press Program key (1) to activate the alarm time symbol (4).  Maximum alarm time can be 23 hours and 59 minutes. 2. Adjust the alarm time using „+“ /„-” (5/6) keys. » Alarm symbol will remain lit and the alarm time will appear on the display once the alarm time is set. 3. At the end of the alarm time, Alarm Time symbol (4) will start flashing and the alarm signal is heard.Turning off the alarm
1. To stop the alarm, just press any key. » Alarm will be silenced and current time will be displayed.If you want to cancel the alarm:
1. To reset the alarm time, press Program key (1) to activate the alarm time symbol (4). 2. Press and hold the '-' (5) key until "00:00" is displayed.  Alarm time will be displayed. If the alarm time and cooking time are set concurrently, shortest time will be displayed.Changing alarm tone
1. Press Setting key (11) to activate the Alarm Tone symbol (8). 2. Adjust the desired tone using „+“ /„-” (5/6) keys. » Selected alarm tone will appear as "b-01", "b-02" or "b-03" on the display.Cooking times table
 The timings in this chart are meant as a guide. Timings may vary due to temperature of food, thickness, type and your own preference of cooking.Baking and roasting
 1st rack of the oven is the bottom rack.| Dish | Cooking level number | Accessory to use | Operating mode | Rack position | Temperature (°C) | Cooking time (approx. in min.) |
| Cakes in tray | One level | Standard tray* | 3 | 180 | 25 ... 30 | |
| Cakes in mould | One level | Cake mold on wire grill** | 2 | 180 | 40 ... 50 | |
| Small cakes | One level | Standard tray* | 3 | 160 | 25 ... 35 | |
| One level | Standard tray* | 3 | 150 | 30 ... 40 | ||
| 2 levels | 1-Pastry tray*3-Standard tray* | 1 - 3 | 150 | 35 ... 50 | ||
| 3 levels | 1-Standard tray*3-Pastry tray*5-Deep tray* | 1 - 3 - 5 | 150 | 35 ... 50 | ||
| Sponge cake | One level | Round springform pan with a diameter of 26 cm on wire grill** | 3 | 160 | 25 ... 35 | |
| One level | Round springform pan with a diameter of 26 cm on wire grill** | 2 | 150 | 30 ... 40 | ||
| 2 levels | 1-Round springform pan with a diameter of 26 cm on wire grill**4-Round springform pan with a diameter of 26 cm on pastry tray** | 1 - 4 | 150 | 35 ... 45 | ||
| Cookies | One level | Pastry tray* | 3 | 180 | 25 ... 30 | |
| 2 levels | 1-Pastry tray*3-Standard tray* | 1 - 3 | 180 | 30 ... 40 | ||
| 3 levels | 1-Pastry tray*3-Standard tray*5-Deep tray* | 1 - 3 - 5 | 180 | 35 ... 45 | ||
| Dough pastry | One level | Standard tray* | 2 | 200 | 30 ... 40 | |
| 2 levels | 1-Pastry tray*5-Standard tray* | 1 - 5 | 200 | 45 ... 55 | ||
| 3 levels | 1-Pastry tray*3-Standard tray*5-Deep tray* | 1 - 3 - 5 | 200 | 55 ... 65 | ||
| Rich pastry | One level | Standard tray* | 2 | 200 | 25 ... 35 | |
| 2 levels | 1-Pastry tray*3-Standard tray* | 1 - 3 | 200 | 35 ... 45 | ||
| 3 levels | 1-Pastry tray*3-Standard tray*5-Deep tray* | 1 - 3 - 5 | 190 | 45 ... 55 | ||
| Leaven | One level | Standard tray* | 2 | 200 | 35 ... 45 | |
| Lasagna | One level | Glass/metal rectangular pan on wire grill** | 2 - 3 | 200 | 30 ... 40 | |
| Pizza | One level | Standard tray* | 2 | 200 ... 220 | 15 ... 20 | |
| Beef steak (whole) / Roast | One level | Standard tray* | 3 | 25 min.250/max, then180 ... 190 | 100 ... 120 | |
| Leg of Lamb (casserole) | One level | Standard tray* | 3 | 25 min.250/max, then190 | 70 ... 90 | |
| One level | Standard tray* | 3 | 25 min.250/max, then190 | 60 ... 80 | ||
| Roasted chicken (1,8-2 kg) | One level | Standard tray* | 2 | 15 min.250/max, then180 ... 190 | 60 ... 80 | |
| One level | Standard tray* | 2 | 15 min.250/max, then180 ... 190 | 60 ... 80 | ||
| Turkey (5.5 kg) | One level | Standard tray* | 1 | 25 min.250/max, then180 ... 190 | 150 ... 210 | |
| One level | Standard tray* | 1 | 25 min.250/max, then180 ... 190 | 150 ... 210 | ||
| Fish | One level | Standard tray* | 3 | 200 | 20 ... 30 | |
| One level | Standard tray* | 3 | 200 | 20 ... 30 | ||
| It is suggested to perform preheating for all foods.* These accessories may not supplied with the product.** These accessories are not supplied with the product. They are commercially available accessories. | ||||||
Cooking table for test meals
Meals in this cooking table are prepared according to EN 60350-1 to make it easier for control institutes to test the product.| Dish | Cooking level number | Accessory to use | Operating mode | Rack position | Temperature (°C) | Cooking time (approx. in min.) |
| Shortbread | One level | Standard tray* | 3 | 140 | 20 ... 30 | |
| One level | Standard tray* | 3 | 140 | 20 ... 30 | ||
| 2 levels | 1-Standard tray*3-Pastry tray* | 1 - 3 | 140 | 20 ... 30 | ||
| 3 levels | 1-Standard tray*3-Pastry tray*5-Deep tray* | 1 - 3 - 5 | 140 | 25 ... 35 | ||
| Small cakes | One level | Standard tray* | 3 | 160 | 25 ... 35 | |
| One level | Standard tray* | 3 | 150 | 30 ... 40 | ||
| 2 levels | 1-Pastry tray*3-Standard tray* | 1 - 3 | 150 | 35 ... 50 | ||
| 3 levels | 1-Standard tray*3-Pastry tray*5-Deep tray* | 1 - 3 - 5 | 150 | 35 ... 50 | ||
| Sponge cake | One level | Round springform pan with a diameter of 26 cm on wire grill** | 3 | 160 | 25 ... 35 | |
| One level | Round springform pan with a diameter of 26 cm on wire grill** | 2 | 150 | 30 ... 40 | ||
| 2 levels | 1-Round springform pan with a diameter of 26 cm on wire grill**4-Round springform pan with a diameter of 26 cm on pastry tray** | 1 - 4 | 150 | 35 ... 45 | ||
| Apple pie | One level | Round black metal dish with a diameter of 20 cm on wire grill** | 2 | 180 | 50 ... 60 | |
| One level | Round black metal dish with a diameter of 20 cm on wire grill** | 2 | 170 | 50 ... 60 | ||
| 2 levels | 1-Round black metal dish with a diameter of 20 cm on wire grill**4-Round black metal dish with a diameter of 20 cm on pastry tray** | 1 - 4 | 170 | 50 ... 60 | ||
| It is suggested to perform preheating for all foods.* These accessories may not supplied with the product.** These accessories are not supplied with the product. They are commercially available accessories. | ||||||
Tips for baking cake
- If the cake is too dry, increase the temperature by 10^ C and decrease the cooking time. - If the cake is wet, use less liquid or lower the temperature by 10^ . - If the cake is too dark on top, place it on a lower rack, lower the temperature and increase the cooking time. - If cooked well on the inside but sticky on the outside use less liquid, lower the temperature and increase the cooking time.Tips for baking pastry
- If the pastry is too dry, increase the temperature by 10°C and decrease the cooking time. Dampen the layers of dough with a sauce composed of milk, oil, egg and yoghurt. - If the pastry takes too long to bake, pay care that the thickness of the pastry you have prepared does not exceed the depth of the tray. - If the upper side of the pastry gets browned, but the lower part is not cooked, make sure that the amount of sauce you have used for the pastry is not too much at the bottom of the pastry. Try to scatter the sauce equally between the dough layers and on the top of pastry for an even browning.  Cook the pastry in accordance with the mode and temperature given in the cooking table. If the bottom part is still not browned enough, place it on one lower rack next time.Tips for cooking vegetables
- If the vegetable dish runs out of juice and gets too dry, cook it in a pan with a lid instead of a tray. Closed vessels will preserve the juice of the dish. - If a vegetable dish does not get cooked, boil the vegetables beforehand or prepare them like canned food and put in the oven.How to operate the grill
 Before you can use the oven, the time must be set. If the time is not set, oven will not operate.  Close oven door during grilling. Hot surfaces may cause burns!Switching on the grill
1. Turn the Function knob to the desired grill symbol. 2. Then, select the desired grilling temperature. 3. If required, perform a preheating of about 5 minutes. » Temperature light turns on.Switching off the grill
1. Turn the Function knob to Off (top) position.  Foods that are not suitable for grilling carry the risk of fire. Only grill food which is suitable for intensive grilling heat. Do not place the food too far in the back of the grill. This is the hottest area and fatty food may catch fire.Turnspit function
When grill function is selected, turnspit motor will start turning.  The turnspit motor works with the grill function. Once the grill function is operated, the grill heater cuts in and out intermittently. Therefore, while the grill heater is enabled, the turnspit motor runs and when it is disabled the turnspit motor stops likewise. This is not a fault. • After selecting the Grill function, skewer the meat or chicken onto the spit by means of the fork (3). - Insert the turnspit into its slot in the rotation motor located at the rear wall of the oven. Place the turnspit onto the spit frame. - Place the frame to the relevant rack of the oven. - Place a tray to one of the lower racks in order to collect the fats. Put some water into the tray for ease of cleaning. - Do not forget to remove the plastic handle of the turnspit. ((Varies depending on the product model.)) - When cooking completes, attach the plastic handle and remove your food from the oven. ((Varies depending on the product model.))  1 Turnspit frame 2 Plastic handle \* 3 Fork \* (Varies depending on the product model.) Cooking times table for grilling Grilling with electric grill| Food | Accessory to use | Rack position | Recommended temperature (°C)** | Cooking time (approx. in min.) |
| Fish | Wire grill | 4...5 | 250/max | 20...25 min.# |
| Sliced chicken | Wire grill | 4...5 | 250/max | 25...35 min. |
| Lamb chops | Wire grill | 4...5 | 250/max | 20...25 min. |
| Roast beef | Wire grill | 4...5 | 250/max | 25...30 min.# |
| Veal chops | Wire grill | 4...5 | 250/max | 25...30 min.# |
| Toast bread* | Wire grill | 4 | 250/max | 1...3 min. |
| #depending on thickness*Preheat for 5 minutes**If the grill temperature of your product cannot be adjusted, the grill will work at the recommended temperature. | ||||
| Food | Accessory to use | Rack position | Temperature (°C) | Cooking time (approx. in min.) |
| Toast bread | Wire grill | 4 | 250/max | 1...3 min. |
| Meatballs (beef) - 12 pieces | Wire grill | 4 | 250/max | 25...35 min. |
| Turn the food after 2/3 of the total grilling time.It is suggested to perform 5 minutes preheating for all foods broiling. | ||||
7 Maintenance and care
General information
Service life of the product will extend and the possibility of problems will decrease if the product is cleaned at regular intervals.  Disconnect the product from mains supply before starting maintenance and cleaning works. There is the risk of electric shock!  Allow the product to cool down before you clean it. Hot surfaces may cause burns! - Clean the product thoroughly after each use. In this way it will be possible to remove cooking residues more easily, thus avoiding these from burning the next time the appliance is used. - No special cleaning agents are required for cleaning the product. Use warm water with washing liquid, a soft cloth or sponge to clean the product and wipe it with a dry cloth. - Always ensure any excess liquid is thoroughly wiped off after cleaning and any spillage is immediately wiped dry. - Do not use cleaning agents that contain acid or chloride to clean the stainless or inox surfaces and the handle. Use a soft cloth with a liquid detergent (not abrasive) to wipe those parts clean, paying attention to sweep in one direction.  The surface might get damaged by some detergents or cleaning materials. Do not use aggressive detergents, cleaning powders/creams or any sharp objects during cleaning. Do not use harsh abrasive cleaners or sharp metal scrapers to clean the oven door glass since they can scratch the surface, which may result in shattering of the glass.  Do not use steam cleaners to clean the appliance as this may cause an electric shock.Cleaning the hob
Glass ceramic surface
Wipe the glass ceramic surface (vitroceramic) with cold water, paying attention to leave no residual cleaning agents, and dry with a soft clothing. Residues may cause damage on the glass ceramic surface when using the hob for the next time. Dried residues on the glass ceramic surface (vitroceramic) should under no circumstances be scraped with hook blades, steel wool or similar tools. Remove calcium stains (yellow stains) with commercially available lime remover or a small amount of lime remover such as vinegar or lemon juice. If the surface is heavily soiled, apply the cleaning agent on a sponge and wait until it is absorbed well. Then, clean the surface of the hob with a damp cloth. Sugar-based foods such as thick cream and syrup must be cleaned promptly without waiting the surface to cool down. Otherwise, glass ceramic surface may get damaged permanently. Slight color fading may occur on coatings or other surfaces in time. This does not affect the operation of the product. Color fading and stains on the glass ceramic surface is a normal condition, and not a defect.Cleaning the control panel
Clean the control panel and knobs with a damp cloth and wipe them dry. If your product is equipped with buttons/knobs do not remove the control buttons/knobs to clean the control panel. Control panel may get damaged!Cleaning the oven
To clean the side wall (Varies depending on the product model.) (This feature is optional. It may not exist on your product.) 1. Remove the front section of the side rack by pulling it in the opposite direction of the side wall. 2. Remove the side rack completely by pulling it towards you. Catalytic walls
(This feature is optional. It may not exist on your product.) The inner side walls (A) and/or the rear wall (B) of your product may be coated with catalytic enamel. Catalytic walls have a light matte colour and a porous surface. Catalytic walls of the oven should not be cleaned. Thanks to their perforated structure, catalytic surfaces absorb grease and once the surface is filled with grease, they start to shine. In this case, it is recommended to replace the parts. natural_image
Two technical diagrams labeled A and B showing internal components with grid lines and a central circular feature (no text or symbols beyond labels)Easy Steam Cleaning
It ensures easy cleaning because the dirt (having waited not for too long) is softened with the steam that forms inside the oven and the water drops condensing on the inner surfaces of the oven. 1. Remove all accessories inside the oven. 2. Pour 500 ml of water into the oven tray and place the tray at the 2nd rack of the oven. natural_image
Illustration of a laptop with a screen showing a screen with abstract graphics (no text or symbols)Clean oven door
To clean the oven door, use warm water with washing liquid, a soft cloth or sponge to clean the product and wipe it with a dry cloth. Wipe the glass with vinegar and then rinse it against lime residues that may occur on the oven glass.  Don't use any harsh abrasive cleaners or sharp metal scrapers for cleaning the oven door. They could scratch the surface and destroy the glass.Cleaning the oven door
 Do not use harsh abrasive cleaners, metal scrapers, wire wool or bleach materials to clean the oven door and glass. You can remove your oven door and door glasses to clean them. How to remove the doors and windows is explained in the sections "Removing the oven door" and "Removing the inner glasses of the door". After removing the door inner glasses, clean them using a dishwashing detergent, warm water and a soft cloth or sponge and dry them with a dry cloth. Wipe the glass with vinegar and then rinse it against lime residues that may occur on the oven glass.Removing the oven door
1. Open the front door (1). 2. Open the clips at the hinge housing (2) on the right and left hand sides of the front door by pressing them down as illustrated in the figure.  1 Door 2 Hinge lock(closed position) 3 Oven 4 Hinge lock(open position) natural_image
Mechanical assembly diagram showing a clamping mechanism with labeled part 4 (no text or symbols beyond the number)natural_image
Diagram showing two mechanical components with directional arrows indicating motion (no text or symbols)Removing the door inner glass
(This feature is optional. It may not exist on your product.) The inner glass panel of the oven door can be removed for cleaning. 1.Open the oven door. natural_image
Simple line drawing of a rectangular object with a curved arrow indicating rotation or movement (no text or symbols)natural_image
Technical line drawing of a rectangular electronic component with mounting holes and a side bracket, showing internal structure and assembly (no text or symbols)Replacing the oven lamp
 Before replacing the oven lamp, make sure that the product is disconnected from mains and cooled down in order to avoid the risk of an electrical shock. Hot surfaces may cause burns! In this oven, an incandescent lamp with a power of less than 40 W, a height of less than 60 mm, a diameter of less than 30 mm or a halogen lamp with socket type G9, a power of less than 60 W is used. The lamps are suitable for operation at temperatures above 300 °C. Oven lamps can be obtained from Authorised Service Agents or technician with licence. Position of lamp might vary from the figure. The lamp used in this appliance is not suitable for household room illumination. The intended purpose of this lamp is to assist the user to see foodstuffs. The lamps used in this appliance have to withstand extreme physical conditions such as temperatures above 50 °C.If your oven is equipped with a round lamp:
1. Disconnect the product from mains. 2. Turn the glass cover counter clockwise to remove it. natural_image
Diagram of a mechanical component with three circular arrows indicating rotational or feedback motion (no text or symbols)natural_image
Two mechanical diagrams labeled A and B showing a rotating component with directional arrows, no text or symbols present.8 Troubleshooting
Oven emits steam when it is in use.
\- It is normal that steam escapes during operation. >>> This is not a fault.Product emits metal noises while heating and cooling.
\- When the metal parts are heated, they may expand and cause noise. >>> This is not a fault.Product does not operate.
- The mains fuse is defective or has tripped. >>> Check fuses in the fuse box. If necessary, replace or reset them. - Product is not plugged into the (grounded) socket. >>> Check the plug connection. - Buttons/knobs/keys on the control panel do not function. >>> Keylock may be enabled. Please disable it. (See. Using the keylock, page 29)Oven light does not work.
- Oven lamp is defective. >>> Replace oven lamp. - Power is cut. >>> Check if there is power. Check the fuses in the fuse box. If necessary, replace or reset the fuses.Oven does not heat.
- Might not be set to a certain cooking function and/or temperature. >>> Set the oven to a certain cooking function and/or temperature. - In models equipped with a timer, the timer is not adjusted. >>>Adjust the time. (In products with microwave oven, timer controls only microwave oven.) - Power is cut. >>> Check if there is power. Check the fuses in the fuse box. If necessary, replace or reset the fuses.(In models with timer) Clock display is blinking or clock symbol is on.
\- A previous power outage has occurred. >>> Adjust the time / Switch of the product and switch it on again. Consult the Authorised Service Agent or technician with licence or the dealer where you have purchased the product if you can not remedy the trouble although you have implemented the instructions in this section. Never attempt to repair a defective product yourself.Blomberg
Viryklé
Vartotojo vadovas  natural_image
Simple line drawing of a cupcake with frosting and toppings (no text or symbols)Pirmiausia jdėmiai perskaitykite šį vartotojo vadovą!
Gerbiamas pirkėjau, Ačiū, kad pasirinkote „Blomberg“ gaminj. Tikimės, kad šiuo gaminiu, kuris buvo pagamintas naudojantis aukščiausios kokybės moderniausią technologiją, liksite patenkinti. Todėl prieš naudojantis šiuo prietaisu prašome perskaityti visą šį vartotojo vadovą ir prie jo pridedamus dokumentus ir pasiliki tuos, jei jų prireiktų ateityje. Jeigu atiduotumėte šį gaminį kam nors kitam, kartu atiduokite ir šį vartotojo vadovą. Vadovaukitės visais šiame vartotojo vadove pateikiamais įspėjimais ir informacija. Atminkite, kad šis vartotojo vadovas taip pat taikytinas keletui kitų modelių. Šiame vadove nurodoma, kuo skiriasi įvairūs modeliai.Simbolių paaiškinimas
Šiame vartotojo vadove naudojami šie simboliai:  Svarbi informacija arba naudingi patarimai apie šio prietaiso naudojima.  Įspėjimai apie gyvybei ir / arba turtui pavojų keliančias situacijas ir sąlygas.  Įspėjimas dėl elektros smūgio.  lspéjimas dèl gaisro pavojaus.  Įspėjimas dėl įkaitusių paviršių.1 Svarbūs nurodymai ir įspėjimai dėl saugos ir aplinkosaugos 4
Bendrieji saugos reikalavimai....4 Elektros sauga....5 Gaminio sauga....6 Numatytoji naudojimo paskirtis....8 Vaikų sauga....9 Seno gaminio išmetimas....9 Pakavimo medžiagų išmetimas....92 Bendra informacija 10
Apžvalga 10 Komplekto turinys 11 Techniniai duomenys.... 133 Irengimas 15
Prieš jrengiant 15 Irengimas ir prijungimas 16 Būsimas transportavimas.... 184 Paruošimo Darbai 20
Patarimai, kaip taupyti energija 20 Naudojant pirmą kartą 20 Laiko nustatymas 20 Pirmasis prietaiso valymas 21 Pradinis šildymas....215 Kaip naudoti šią viryklę 23
Bendroji informacija apie maisto gaminima23 Kaitlenčių naudojimas 246 Kaip naudoti orkaite 26
Bendroji informacija apie kepimą, kepinimą ir kepimą grilyje....26 Kaip naudoti elektrinę orkaitę....27 Veikimo režimai 27 Orkaitės laikrodžio naudojimas....28 Mygtukų užrakto funkcijos naudojimas ....30 Laikrodžio naudojimas vietoje žadintuvo .. 30 Maisto gaminimo laiko lentelè....32 Kaip naudoti grilj....35 Maisto gaminimo grilyje laiko lentelé....367 Techninis aptarnavimas ir priežiūra 37
Bendroji informacija 37 Kaitlentės valymas....37 Valdymo skydo valymas....38 Orkaitės valymas 38 Orkaitės durelių valymas....39 Durelių vidinės stiklo plokštės išėmimas... 40 Orkaitės lemputės keitimas....408 Trikčių nustatymas 42
1 Svarbūs nurodymai ir įspėjimai dėl saugos ir aplinkosaugos
Šiame skyriuje pateikiamos saugos instrukcijos, kurių laikydamiesi apsisaugosite nuo susižeidimo ar materialinės žalos pavojų. Nesilaikant šių instrukcijų bet kokia prietaiso garantija nebegalios.Bendrieji saugos reikalavimai
\- Šj prietaisą galima naudoti vaikams nuo 8 metų amžiaus ir asmenims, turintiems psichinių, jutiminių arba protinių negalių arba patirties bei žinių trūkumo, jeigu jie yra prižiūrimi arba instruktuojami, kaip saugiai naudoti šj prietaisą, ir supranta atitinkamus pavojus. Neleiskite vaikams žaisti su šiuo prietaisu. Vaikams draudžiama valyti ir techniškai prižiūrėti šj gaminį, nebent juos prižiūrėtų suaugusieji. \- Šio prietaiso negalima naudoti asmenims (jskaitant vaikus), turintiems fizinių, jutimo ar psichinių negalių arba neturintiems pakankamai patirties ir žinių, nebent jie būtų prižiūrimi arba instruktuoti. Neleiskite vaikams žaisti su šiuo prietaisu. - Perduodant įrenginį kitam žmogui asmeniniam naudojimui ar atiduodant kaip panaudotą daiktą, taip pat būtina perduoti naudotojo vadovą, įrenginio etiketes ir kitus susijusius dokumentus. - Niekada prietaiso nestatykite ant grindų su kilimine danga. Tokiu atveju dėl nepakankamos oro tėkmės po prietaisu elektrinės dalys gali perkaisti. Tai sukels problemų naudojantis šiuo prietaisu. - Remonto ir techninės priežiūros darbus visuomet privalo atlikti įgaliotojo techninio aptarnavimo centro atstovai. Gamintojas nėra atsakingas už žalą, kilusią dėl darbų, kuriuos atliko neįgaliotieji asmenys; tokiu atveju garantija gali nebegalioti. Prieš montuodami atidžiai perskaitykite instrukcijas. - Nenaudokite prietaiso, jeigu jis turi defektų arba yra regimai pažeistas. \- Po kiekvieno naudojimo patikrinkite, ar išjungėte prietaiso valdymo mygtukus.Elektros sauga
\- Jeigu gaminys turi defektu, jo negalima naudoti, kol jo nepataisys igaliotojo techniniio aptarnavimo centro atstovas. Kyla elektros smūgio pavojus! \- Prijunkite ši gaminį prie jžeminto lizdo/elektros linijos, apsaugoto tinkamos kategorijos saugikliu kaip nurodyta skyriuje „Techniniai duomenys“. Ir naudojant su transformatoriumi, ir be jo, įsitikinkite, ar jžeminimo instaliavimą atliko kvalifikuotas elektrikas. Mūsų bendrovė nėra atsakinga už jokius nuostolius, patirtus naudojant gaminį, kuris nėra jžemintas pagal vietos reglamentus. - Niekada neplaukite gaminio, purkšdami arba pildami ant jo vandenji! Kyla elektros smūgio pavojus! - Atliekant montavimo, techninės priežiūros ir remonto darbus, šis gaminys privalo būti atjungtas nuo maitinimo tinklo. - Jeigu gaminio jungiamasis kabelis būtų pažeistas, jį privalo pakeisti gamintojas, techninės priežiūros specialistas arba kiti panašios kvalifikacijos asmenys, kad būtų išvengta pavjoaus. - Naudokite tik skyriuje „Techniniai duomenys“ nurodytą jungiamajį kabelį. - Prietaisą privaloma jrengti taip, kad prireikus jį galima būtų visiškai atjungti nuo tinklo. Nuo tinklo privaloma arba ištraukiant elektros kištuką, arba naudojant elektros sistemoje jrengtą jungiklj atsižvelgiant į statybos reglamentus. - Naudiojimo metu orkaitės galinis paviršius įkaista. Galiniame paviršiuje negalima prijungti elektros jungčių, nes jos gali būti pažeistos. - Neprispauskite jungiamujų laidų tarp orkaitės durelių ir korpuso; nenutieskite jo virš įkaitusių paviršių. Kitaip gali išsilydyti laido izoliacija ir dėl trumpojo jungimo kilti gaisras. • Darbus su bet kokiais elektriniais prietaisais ir sistemomis gali atlikti tik igaliotieji kvalifikuoti specialistai. - Esant gedimui, išjunkite prietaisą ir atjunkite jį nuo maitinimo tinklo. Norint tai padaryti, pirma išjunkite namų tinklo saugiklj. - Patikrinkite, ar saugiklio elektros saugos klasė yra tinkama šiam gaminiui.Gaminio sauga
\- ĮSPĖJIMAS: Prietaisas ir jo prieinamos dalys įkaista naudojimo metu. Būkite atsargūs ir neprisilieskite prie kaitinimo elementų. Neleiskite jaunesniems nei 8 metų amčiaus vaikams būti prie prietaiso, jeigu nuolat jų neprižiūrite. - Nesinaudokite virykle, kai jūsų dėmesys arba koordinacija yra susilpnėjusi dėl alkoholio ir/arba narkotikų vartojimo. - Būkite atsargūs, naudodami pateikaluose bet kokius alkoholinius gėrimus. Esant aukštai temperatūrai, alkoholis garuoja; prisilietęs prie karšto paviršiaus, jis gali užsiliepsnoti ir sukelti gaisrą. - Nelaikykite šalia buitinio prietaiso jokių degių medžiagų, nes jo šonai naudojimo metu įkaista. - Eksploatavimo metu prietaisas įkaista Būkite atsargūs ir neprisilieskite prie kaitinimo elementų orkaitės viduje - Pasirūpinkite, kad visos ventiliacijos angos būtų atviros. - Nešildykite orkaitėje maisto skardinėse ir stiklainiuose. Skardinėje/stiklainyje susidaręs slėgis gali juos susprogdinti. - Nedėkite kepimo skardu, indų ar aliuminio folijos tiesiai ant orkaitės dugno. Susikaupusi šiluma gali sugadinti orkaitės dugna. - Orkaitės durelių stiklo nevalykite šiurkščiu abrazyviniu valikliu ar aštriais metaliniais gremžtukais, nes galite subraižyti paviršių ir dėl to stiklas gali sudužti - Nevalykite prietaiso gariniais valymo prietaisais, nes galite patirti elektros smūgi. • (Gali skirtis priklausomai nuo gaminio modelio.) Kaip tinkamai ant bėgelių uždėti grilio groteles ir skardą Svarbu tinkamai padėti grilio groteles ir (arba) riebalų surinkimo skarda ant begelių. Įstumkite grilio groteles arba riebalų surinkimo skarda tarp 2 skersinių ir, prieš dėdami ant jų maistą, patikrinkite, ar jie yra stabilūs (žr. toliau esantį paveikslėlj).  - Nenaudokite prietaiso, jeigu jo priekinis durelių stiklas yra išimtas arba suskilęs. - Dėdami į orkaitę arba ištraukdami iš jos indus, visuomet mūvėkite šilumai atsparias pirštines. - Itieskite kepimo popierių į puoda ar patieskite ant skardos, grilio grotelių ar pan., sudėkite ant jo maistą ir jdėkite viską i įkaitintą orkaitę. Nuplėškite nereikalingus popieriaus kraštus, išsikišančius iš skartos, grilio grotelių ar puodo, kad jie neprisiliestų prie orkaitės kaitinimo elementų. Niekada nenaudokite kepimo popieriaus, kai temperatūra yra didesnei nei nurodyta kepimo popieriaus instrukcijose. Netieskite kepimo popieriaus tiesiai ant orkaitės pagrindo. • JSPÉJIMAS: Kad išvengtumėte galimo elektros šoko pavojaus, prieš keisdami lempą, patikrinkite, ar maitinimo laidas yra atjungtas nuo maitinimo lizdo ir (arba) srovės pertraukiklis - išjungtas. - Prietaiso negalima montuoti už dekoratyvinių durelių, kad neperkaistų. - Prietaisą būtina statyti tiesiai ant grindų. Jo negalima statyti ant pagrindo ar stovo. - JSPĖJIMAS: Neprižiūrimas maisto gaminimas ant kaitlentės su riebalais ar aliejumi gali būti pavojingas ir sukelti gaisrą. NIEKADA negesinkite gaisro vandeniu, bet išjunkite prietaisą ir tada uždenkite liepsną, pvz., dangčiu arba gesinimo apdangalu. \- DÉMESIO: Maisto ruošimo procesą reikia prižiūrėti. Trumpalaikį maisto ruošimo procesą reikia prižiūrėti nuolat. \- JSPĖJIMAS: Gaisro pavojus: Nelaikykite daiktų ant maisto gaminimo paviršių. \- JSPĖJIMAS: Jei paviršius įtrūkęs, prietaisą išjunkite, kad nepatirtumėte elektros smūgio \- Sudužus kaitvietės stiklui: nedelsdami išjunkite visus degiklius ir elektrinius kaitinimo elementus ir atjunkite prietaisą nuo elektros tinklo. Nelieskite prietaiso paviršiaus. Nebenaudokite prietaiso. \- Prietaisas neskirtas dirbti su išoriniu laikmačiu ar atskira nuotolinio valdymo sistema. \- Garų slėgis, kuris susidaro dėl ant viryklės paviršiaus arba puodo dugno esančios drėgmės, gali priversti puodą judėti. Todėl įsitikinkite, kad kaitlentės paviršius ir puodų dugnas visada yra sausi. • JSPĖJIMAS: Naudokite tik maisto gaminimo prietaiso gamintojo sukurtas arba prietaiso gamintojo naudojimo instrukcijoje nurodytas tinkamas apsaugas arba apsaugas, jrengtas prietaise. Naudojant netinkamas apsaugas, gali jvykti nelaimingų atsitikimų. Norėdami užtikrinti gaminio apsaugą nuo gaisro: \- Kištuką i elektros lizda privaloma jkišti taip, kad nekiltų kibirkščių. \- Nenaudokite pažeisto arba jpjauto kabelio, o taip pat ilginimo laido; naudokite tik originalų kabelį. \- Į elektros lizdą jokiais būdais negalima kišti drėgno arba sušlapusio kištuko.Numatytoji naudojimo paskirtis
\- Šis gaminys skirtas naudoti tik buityje. Jj draudžiama naudoti komercinei veiklai. • DÈMESIO: Šis prietaisas skirtas tik maistui gaminti. Prietaiso negalima naudoti kitiems tikslams, pavyzdžiui, patalpai šildyti. \- Šio prietaiso negalima naudoti lékštěms po kepimo grotelėmis šildyti, rankšluosčiams bei šluostėms ir pan. ant rankenos kabinti, daiktams džiovinti ir patalpoms šildyti. • Gamintojas neatsako už jokią żalą, patirtą netinkamai naudojant arba prižiūrint prietaisą. - Orkaitę galima naudoti maistui atšildyti, kepti, kepinti ir kepti grilyje.Vaikų sauga
• ĮSPĖJIMAS: Naudojimo metu pasiekiamos dalys gali labai įkaisti. Neleiskite prie jų būti mažamečiams vaikams. - Pakavimo medšiagos gali kelti pavojų vaikams. Saugokite pakavimo medžiagas nuo vaikų. Išmeskite visas pakuotės dalis atsižvelgdami į aplinkosaugos reikalavimus. \- Elektriniai prietaisai gali būti pavojingi vaikams. Gaminiui veikiant, neleiskite artyn vaikų ir neleiskite jiems žaisti su šiuo prietaisu. \- Virš prietaiso nelaikykite daiktų, kuriuos vaikai gali bandyti pasiekti. \- Ant atidarytų priekinių durelių nedėkite sunkių daiktų ir neleiskite vaikams ant jų sėdėti. Prietaisas gali apvirsti arba gali būti sugadinti durelių vyriai.Seno gaminio išmetimas
WEEE Direktyvos ir senų gaminių išmetimo taisyklių atitiktis:
 Šis gaminys atitinka ES WEEE Direktyvą (2012/19/ES). Šis gaminys paženklintas elektros ir elektroninės įrangos klasifikavimo (WEEE) ženklu. Šis gaminys pagamintas iš aukštos kokybės medžiagų ir dalių, kurias galima perdirbti ir pakartotinai panaudoti. Pasibaigus gaminio tarnavimo laikui, neišmeskite jo kartu su įprastomis buitinėmis atliekomis. Atiduokite jį i surinkimo punktą, kad elektros ir elektronikos įranga būtų perdirbta. Surinkimo punktų adresus sužinosite vietos savivaldybėje.RoHS direktyvos atitiktis:
Jūsų įsigytas gaminys atitinka ES RoHS Direktyvą (2011/65/ES). Jame nėra šioje Direktyvoje nurodytų kenksmingų ir draudžiamų medžiagų.Pakavimo medžiagų išmetimas
\- Pakavimo medžiagos gali būti pavojingos vaikams. Pakavimo medžiagas laikykite vaikams nepasiekiamoje vietoje. Šio gaminio pakavimo medžiagos pagamintos iš pakartotinai panaudojamų medžiagų. Tinkamai jas išmeskite ir išrūšiuokite, atsižvelgdami į atliekų perdirbimo instrukciją. Neišmeskite jų kartu su įprastomis buitinėmis atliekomis.2 Bendra informacija
Apžvalga
  1 Priekinès durelès 2 Rankena 3 Apatinis stalčius 4 Skarda 5 Grilio grotelès 6 Valdymo skydelis 7 Degiklio plokště 8 Ventiliatoriaus variklis (už plieno plokštės) 9 Lemputé 10 Grilio šildymo elementas 11 Lentynos padėtis  1 Jspèjamoji lemputė 2 Termostato lemputé 3 Funkciju parinkimo rankenėlė 4 Vienos grandinės kepimo plokštė Galinis kairysis 5 Dviejų grandinių kepimo plokštė Priekinis kairysis 6 Skaitmeninis laikmatis 7 Vienos grandinės kepimo plokštė Priekinis dešinysis 8 Pailginta kepimo plokštė Galinis dešinysis 9 Termostato rankenèlèKomplekto turinys
 Pateikti priedai gali skirtis priklausomai nuo gaminio modelio. Jūsų gaminyje gali būti ne visi vartotojo vadove aprašyti priedai. 1. Vartotojo vadovas 2. Standartinis padėklas Naudojama pyragaičiams, šaldytiems maisto produktams ir dideliems kepsniams kepti. natural_image
3D rendering of a rectangular baking tray with no text or symbols visiblenatural_image
3D rendering of a rectangular tray with a grid pattern, no text or symbols visiblenatural_image
Isometric line drawing of a rectangular grid structure with horizontal lines (no text or symbols)natural_image
Two technical line drawings of a grid-like structure with horizontal slats, no text or symbols present.natural_image
Technical diagram of a mechanical assembly with two circular views showing internal components (no text or symbols)natural_image
Technical line drawing of a mechanical assembly with two circular insets showing close-ups of components (no text or symbols)6. Itaisas viščiukui kepti ant iešmo
Naudojama iš visų pusių apkepti mėsą, paukštieną ir žuvį grilyje. - Uždėkite maisto produktą, kurį kepsite grilyje, ant sukamo iešmo su šakutėmis. - Jdėkite sukamojo iešmo rėmą j orkaitę, sulygindami jį su sukamojo iešmo sukimo mechanizmu. - Aštrujj sukamojo iešmo galą jkiškite i sukamojo iešmo sukimo mechanizmą ir dékite sukamąji iešką ant sukamojo iešmo rémo. - Nuimkite iešmo rankenėlę kepdami grilyje.  1 Sukamojo iešmo rémas 2 Plastikinė rankena \* 3 Šakutė \* (Gali skirtis priklausomai nuo gaminio modelio.) Techniniai duomenys| BENDRA INFORMACIJA | |
| Išoriniai matmenys (aukštis / plotis / gylis) | 850 mm/600 mm/600 mm |
| Jtampa/dažnis | 220-240 V 1N~/ 380-415 V 3N~50/60 Hz |
| Bendrosios energijos sanaudos | 9.9 kW |
| Saugiklis | 32 A / 16 A x 3 |
| Laido tipas/ skerspjūvis | min.H05W-FG 3 × 4 mm^2 / 5 × 2,5 mm^2 |
| VIRYKLĖ | |
| Degikliai | |
| Galinis kairysis | Vienos grandinės kepimo plokštė |
| Matmenys | 140 mm |
| Energija | 1200 W |
| Priekinis kairysis | Dviejų grandinių kepimo plokštė |
| Matmenys | 210/120 mm |
| Energija | 2200/750 W |
| Priekinis dešinysis | Vienos grandinės kepimo plokštė |
| Matmenys | 180 mm |
| Energija | 1700 W |
| Galinis dešinysis | Pailginta kepimo plokštė |
| Matmenys | 170/265 mm |
| Energija | 1500/2400 W |
| ORKAITĖ/GRILIS | |
| Pagrindinė orkaitė | Daugiafunkcė orkaitė |
| Vidaus lemputė | 15–25 W |
| Grilio energijos sanaudos | 2.2 kW |
3 Irengimas
Prietaisą jrengti turi kvalifikuotas specialistas, vadovaudamasis galiojančiais teisės aktais. Kitaip nebegalios gaminio garantija. Gamintojas nėra atsakingas už žalą, kilusią dėl darbų, kuriuos atliko neįgaliotieji asmenys; tokiu atveju nebegalios ir garantija.  Vartotojas yra atsakingas už vietos, elektros instaliacijos paruošimą šiam gaminiui.  Šis prietaisas turi būti jrengtas ir prijungtas atsižvelgiant j galiojančius vietos duju ir (arba) elektros prijungimo reglamentus.  Prieš pradedant instaliaciją, apžiūrėkite šį gaminį, ar jis neturi kokių nors defektų. Jeigu turi, neinstaliuokite jo. Sugadinti gaminiai kelia pajovų jūsų saugai.Prieš jrengiant
Siekiant užtikrinti, kad po šiuo gaminiu liktu būtinas tarpas orui cirkuliuoti, rekomenduojame statyti šj gaminj ant kieto pagrindo, kad jo kojelės nestovėtu ant jokių kilimų ar minkštos kiliminės dangos. Virtuvės grindys turi būti pakankamai tvirtos, kad išlaikytų prietaiso svorį ir papildomą svorį: virtuvės reikmenis, kepimo indus ir maisto produktus.  - Šis prietaisas atitinka 1 klasės prietaisų reikalavimus, t.y., jį galima statyti galine ir viena šonine sienele prie virtuvės sienų, virtuvės baldų arba bet kokio dydžio įrenginio. Iš kitos pusės virtuvės baldas ar įrenginys gali būti tik tokio paties dydžio arba mažesnis. - Šj prietaisą galima naudoti spintelėse bet kurioje pusėje, bet, kad virš kaitvietės liktų mažiausiai 400 mm tarpas, tarpas tarp prietaiso ir šoninės sienos, sienelės ar aukštos spintelės turi būti bent 65 mm. - Šj prietaisą galima statyti ir atskirai. Virš viryklės privaloma palikti mažiausiai 750 mm tarpą. - (\*) Jeigu virš viryklės bus montuojamas gartraukis, žr. gartraukio gamintojo instrukciją dėl tinkamo montavimo aukščio. Jei gaubto vadove nenurodytas joks dydis, šis aukštis turėtų būti bent 650 mm. - Bet koks prie šio prietaiso esantis virtuvės baldas privalo būti atsparus šilumai (bent iki 100 °C).Apsauginé grandiné
Jeigu jūsų gaminyje yra 2 apsauginės grandinės; Prietaisas turi būti apsaugotas, kad neapvirstu, pritvirtinant ji dviem su orkaite pateiktomis apsauginėmis grandinėmis. Pritvirtinkite kabliuką (1) tinkamu varžtu prie virtuvės sienos (6) ir užkabinkite apsauginę grandinę (3) ant kabliuko, naudodami fiksavimo mechanizmą (2).  1 Stabilumo kabliukas 2 Fiksavimo mechanizmas 3 Apsauginé grandiné 4 Tvirtai pritaisykite grandinę prie viryklės galinės pusės 5 Viryklès galinè pusè 6 Virtuvės sienaJeigu jūsų gaminyje yra 1 apsauginė grandinė;
Prietaisas turi būti apsaugotas, kad neapvirstų, pritvirtinant jį su orkaite pateikta apsaugine grandine. Vykdykite paveikslėlyje pavaizduotus veiksmus, kad pritvirtintumėte apsauginę grandinę prie gaminio.  Stabilumo grandinė turi būti kuo trumpesnė, kad apsaugotų viryklę nuo pasvirimo į priekį, į šonus ir įstrižai. Stabilumo grandinė viryklėms, kuriose nėra angos grandinės laikikliui jkabinti.Irengimas ir prijungimas
Ši prietaisą reikia jrengti ir prijungti atsižvelgiant i įstatymuose dėl prijungimo numatytas taisykles. Nestatykite šio buitinio prietaiso prie šaldytuvo ar šaldiklio. Šio prietaiso skleidžiama šiluma padidins šaldymo prietaisų energijos sąnaudas. - Prietaisą turi nešti bent du žmonės. - Prietaisą būtina statyti tiesiai ant grindų. Jo negalima statyti ant pagrindo ar stovo. i Nekelkite ir neperstatinėkite prietaiso, laikydami už jo durelių ir (arba) rankenos. Apgadinamos durelės, rankenos ar vyriai.Elektros jvadas
Prijunkite gaminj prie jžeminto lizdo, apsaugoto tinkamos kategorijos miniatiūriniu grandinės pertraukikliu, kaip nurodyta techninių duomenų lentelėje. Ir naudojant su transformatoriumi, ir be jo, įsitikinkite, ar jžeminimo instaliavimą atliko kvalifikuotas elektrikas. Mūsų bendrovė nėra atsakinga už jokią žalą, kuri gali atsirasti naudojant gamini, kuris nėra jžemintas atsižvelgiant į vietos reglamentus.  Prietaisą prie maitinimo tinklo gali prijungti tik įgaliotasis kvalifikuotas meistras. Prietaiso garantija galioja tik tinkamai ji prijungus. Gamintojas néra atsakingas už žalą, kilusią dėl darbų, kuriuos atliko nejgaliotieji asmenys.  Maitinimo laido negalima prispausti, sulenkti ar suspausti, jis neturi liestis prie jkaitusių prietaiso dalių. Pažeistą maitinimo laidą privalo pakeisti kvalifikuotas elektrikas. Kitu atveju kyla elektros smūgio, trumpojo jungimo ar gaisro pavojus! Maitinimo tinklo duomenys turi atitikti ant prietaiso esančioje kategorijos plokštelėje nurodytus duomenis. Kategorijos plokğtelæ pamatysite arba atidaræ dureles arba apatiná dangtá, arba ji bus ant galinës prietaiso sienelës, priklausomai nuo prietaiso modelio. Šio gaminio maitinimo laidas privalo atitikti techninių duomenų lentelėje nurodytus parametrus.  Prieš pradėdami bet kokius elektros prijungimo darbus, išjunkite gaminį iš maitinimo tinklo. Kyla elektros smūgio pavojus!Maitinimo kabelio prijungimas
 Atliekant elektros instaliaciją, privalote laikytis nacionalinių / vietos elektros taisyklių ir naudoti orkaitei tinkančius kištukinį lizdą / elektros liniją ir kištuką. Jeigu gaminio galios apribojimai viršija elektros linijos lizdo ir kištuko srovės perdavimo gebą, gaminį reikia jungti naudojant stacionariąją elektros instaliaciją tiesiogiai, nenaudojant elektros linijos kištuko ir lizdo. 1. Maitinimo laidas su šiuo buitiniu prietaisu nepateikiamas, maitinimo laidą prie buitinio prietaiso privalo prijungti įgaliotasis asmuo, kuris parinks laidą pagal lentelę (Techniniai duomenys, puslapis 13), remdamasis jūsų namo elektros instaliacija, vadovaudamasis laidų jungimo schema. Jeigu nejmanoma iš maitinimo tinklo išjungti visų polių, išjungimo prietaisai (saugikliai, grandinės apsaugos jungikliai, kontaktoriai) turi būti prijungti paliekant bent 3 mm tarpelius tarp konkaktų; visi poliai turi būti šalia (bet ne virš) viryklės, atsižvelgiant į IEE reglamentus. Nesilaikant šio nurodymo gali kilti naudojimo problemų ir gaminio garantija nebegalios.  Rekomenduojama papildoma apsauga, panaudojant elektros grandinės pertraukiklj. 2. Atsuktuvu atidarykite išvadų bloko dangtį. 3. Tieskite maitinimo laidą per laido spaustuką, esantį po išvadu, ir pritvirtinkite maitinimo laidą prie pagrindinio korpuso įtaisytu varžtu per laido spaustuką. 4. Prijunkite laidus pagal pateiktą schema.  5. Sujunge laidus, uždarykite įvado bloko dangtį. 6. Nuteiskite maitinimo kabeli taip, kad jis nesiliestu prie gaminio ir nebūtu suspaustas tarp gaminio ir sienos. i Saugos sumetimais, maitinimo kabelis neturi būti ilgesnis nei 2 metrai. - Pristumkite prietaisą prie virtuvės sienos. - Orkaitės kojelių reguliavimas Naudojant kylanti vibracija gali priversti prikaistuvius judėti. Šios pavojingos sitacijos galima išvengti tinkamai išlyginuts ir subalansavus prietaiso aukštį. Savo pačių saugumui pastatykite prietaisą tiesiai, reguliuodami keturias apačioje esančias kojeles, sukdami jas kairėn arba dešinėn, kad prietaisas būtų sulygintas su stalviršiu.Gaminiams su aušinimo ventiliatoriumi (Jūsų gaminyje jos gali nebūti.)
 1 Aušinimo ventiliatorius 2 Valdymo skydelis 3 Durelès Šis ventiliatorius aušina ir valdymo skydelj, ir prietaiso priekj. i Išjungus orkaitę, aušinimo ventilatorius veikia dar 20–30 minučių.Galutinis patikrinimas
1. Prietaisą vėl prijunkite prie elektros tinklo. 2. Patikrinkite elektros veikima.Būsimas transportavimas
\- Išsaugokite originalią prietaiso dėžę ir vežkite prietaisą jo originalioje pakuotėje. Vadovaukitės ant dėžės pateiktais nurodymais. Jeigu neturite originalios kartoninės dėžės, supakuokite gamini į plastikinę plėvelę su oro burbuliukais arba storą kartoną ir tvirtai apsukite jį lipnia juosta. \- Norėdami apsaugoti, kad viduje esančios grilio grotelės ir skardos nesugadintų orkaitės durelių, skardų padėties lygyje lipnia juosta prilipdykite kartono juostelę prie vidinės durelių pusės. Lipnia juostele priklijuokite dureles prie orkaitės korpuso. \- Nekelkite ir neperstatinėkite prietaiso, laikydami už jo durelių ir arba rankenos.  Nedėkite ant gaminio jokių daiktų ir neškite jį tik vertikalioje padėtyje.  Apžiūrėkite prietaisą ir įsitikinkite, ar jis nebuvo apgadintas gabenimo metu.4 Paruošimo Darbai
Patarimai, kaip taupyti energija
Ši informacija padės jums ekologiškiau naudoti šį buitinį prietaisą ir taupyti energiją. - Naudokite tamios spalvos arba emale padengtus prikaistuvius, nes jie geriau perduoda šiluma. • Gamindami patiekalus, jkaitinkite orkaitę, jeigu tai rekomenduojama vartotojo vadove arba pagal receptą. \- Gaminant maistą, dažnai nedarinėkite orkaitės durelių. \- Jeigu jmanoma, vienu metu orkaitėje stenkitės gaminti daugiau nei vieną patiekala. Galite gaminti, padėję du kepimo indus ant vielinių grilio grotelių. • Gaminkite daugiau nei vieną patiekalą vieną po kito. Orkaitė jau būtų įkaitusi. \- Galite sutaupyti energijos išjungdami orkaitę kelias minutes prieš kepimo pabaigą. Neatidarykite orkaitės durelių. \- Atšildykite užšaldytus maisto produktus prieš gamindami juos. \- Kepimui naudokite puodus/keptuves su dangčiais. Nenaudojant dangčių, energijos sąnaudos gali padidėti iki 4 kartų. \- Pasirinkite degiklj, labiausiai tinkamą pagal prikaistuvio, kurj naudosite, dugno dydj. Visuomet parinkite tinkamo dydžio prikaistuvius patiekalams ruošti. Didesniems prikaistuviams reikia daugiau energijos. \- Gamindami ant elektrinių kaitlenčių, būtinai naudokite prikaistuvius plokščiais dugnais. Puodai storais dugnais užtikrina geresnj šilumos laidumą. Taip galite sutaupyti iki 1/3 elektros energijos. \- Indai ir prikaistuviai privalo atitikti kaitinimo vietos dydj. Indu arba prikaistuvių dugnai neturi būti mažesni už kaitvietės skersmenį. \- Kaitinimo vietos ir prikaistuvių dugnai privalo būti švarūs. Purvas sumažins šilumos perdavimą iš kaitinimo vietos puodo dugnui. \- Gamindami ilgai, išjunkite kaitinimo vietą 5 arba 10 minučių iki gaminimo laiko pabaigos. Taip galite sutaupyti iki 20 % elektros energijos, naudodami likusią šilumą. \- Informacijos apie energijos vartojimo efektyvumą pagal ES 66/2014 galima rasti gaminio specifikacijoje, pateikiamoje kartu su produktu.Naudojant pirmą kartą Laiko nustatymas
Prieš pradedant naudoti orkaitę, būtina nustatyti laiką. Nenustačius laiko orkaitė neveiks. Atliekant nustatymus, žybčios atitinkami laikrodžio simboliai. Pirma kartą junge orkaitę, norėdami nustatyti laiką, spauskite mygtukus „-“ arba „+“ (5/6).  1 Programos parinkimo mygtukas 2 Kepimo laiko simbolis 3 Kepimo pabaigos laiko simbolis\* 4 Íspėjimo signalo simbolis 5 Mažinimo mygtukas 6 Didinimo mygtukas 7 Ekrano šviesumo nustatymas 8 Skambėjimo garsumas 9 Esamas laikas 10 Užrakto simbolis 11 Nustatymo mygtukas \* (Gali skirtis priklausomai nuo gaminio modelio.) Nustatę laiką, galite paleisti arba išjungti kepimą, parinkę norimą padėtį temperatūros ir funkcijų mygtukais.  Jeigu esamo laiko nenustatysite, laikas bus pradėtas skaičiuoti nuo 12:00. Ekrane bus rodomas laikrodžio simbolis „9“, rodantis, kad esamas laikas nebuvo nustatytas. Nustačius esamą laiką, simbolis dings.  Dingus elektros tiekimui, esamo laiko nustatymai išsijungia. Laiką reikia nustatyti iš naujo.Dienos laiko keitimas
Norėdami pakeisti pirmiau nustatytą paros laiką: 1. Spauskite mygtuką (11), kad būtų suaktyvintas laiko simbolis „9“ 2. Norėdami nustatyti dabartinį laiką, spauskite mygtukus „-“ arba „+“ (5/6).Ekrano ryškumo pakeitimas
1. Norėdami pareguliuoti ekrano šviesumą, paspauskite mygtuką (11), kad būtų suaktyvintas ekrano šviesumo simbolis „7“. 2. Norėdami nustatyti norimą šviesumą, spauskite mygtukus „-“ arba „+“ (5/6). » Parinktas šviesumo lygis bus rodomas ekrane kaip d-01, d-02 arba d-03.Pirmasis prietaiso valymas
 Tam tikros valymo priemonės ar valymo medžiagos gali apgadinti paviršių. Valydami nenaudokite èsdinančių valymo priemonių, valymo miltelių/pienelio ar kokių nors aštrių daiktų. 1. Nuimkite visas pakavimo medžiagas. 2. Nuvalykite prietaiso paviršius drėgnu skudurėliu ar kempine, tuomet sausai nušluostykite.Pradinis šildymas
Pakaitinkite prietaisą maždaug 30 minučių, tuomet išjunkite jį. Taip bus nudegintos ir pašalintos po gamybos likusios nuosėdos ir apsauginiai sluoksniai.  Karšti paviršiai gali nudeginti! Naudojamas prietaisas gali jkaisti. Niekuomet nelieskite karštu degikliu, vidiniu orkaitės daliu, šildytuvu ir pan. Neleiskite vaiku artyn. Dėdami i orkaitę ar ištraukdami iš jos indus, visuomet mūvėkite šilumai atsparias pirštines.Elektrinè orkaitè
1. Iš orkaitės išimkite visas kepimo skardas ir groteles. 2.Uždarykite orkaitės dureles. 3. Pasirinkite padėtį „Statinis“. 4. Parinkite didžiausią grilio galingumą; žr. Kaip naudoti elektrinę orkaitę, puslapis 27. 5. Pakaitinkite orkaitę mażdaug 30 minučių. 6. Išjunkite orkaitę; žr. Kaip naudoti elektrinę orkaitę, puslapis 27Orkaitė su griliu
1. Iš orkaitės išimkite visas kepimo skardas ir groteles. 2.Uždarykite orkaitės dureles. 3. Parinkite didžiausią grilio galingumą; žr. Kaip naudoti grilj, puslapis 35. 4. Pakaitinkite orkaitę maždaug 15 minučių. 5. Išjunkite grilj; žr. Kaip naudoti grilj, puslapis 35 Pirmą kartą naudojant orkaitę, porą valandų gali kilti dūmų ir sklisti nemalonus kvapas. Tai visiškai normalu Būtinai gerai išvėdinkite patalpą, kad joje neliktų dūmų ir nemalonaus kvapo. Stenkitės neįkvėpti dūmų ir jų skleidžiamo kvapo.5 Kaip naudoti šią viryklę
Bendroji informacija apie maisto gaminimą
 Aliejumi nepripildykite daugiau nei trečdalio keptuvės. Kaitindami aliejų kaitvietės nepalikite be priežiūros. Dėl perkaitusio aliejaus gali kilti gaisras. Niekuomet nebandykite gaisro gesinti vandeniu! Aliejui užsidegus, uždekite jį audiniu gaisrui gesinti ar drėgnu skudurėliu. Išjunkite kaitvietę, jei tai padaryti saugu, ir kvieskite ugniagesius. - Prieš kepdami maisto produktus, visada kruopščiai juos nusausinkite ir lėtai dékite į karštą aliejų. Prieš kepimą būtinai visiškai atšildykite užšaldytus maisto produktus. - Kaitinkdami aliejų, neuždenkite prikaistuvio. - Puodus ir keptuves ant kaitlentės dėkite taip, kad jų rankenos nebūtų virš kaitviečių ir neįkaistų. Ant kaitlentės nedėkite nesubalansuotų ir lengvai virstančių indų. - Nedėkite tuščių indų ir prikaistuvių ant jjungtų kaitviečių. Jie gali būti sugadinti. - Laikant jjungta kaitvietę be indo ar prikaistuvio, gaminys gali sugesti. Pabaigę gaminti, išjunkite kaitvietes. - Gaminio paviršius gali būti įkaitęs, todėl nedėkite ant jo plastikinių ir aliumininių indų. Jeigu tokios medžiagos ištirptų, nedelsdami nuvalykite paviršių. Tokiuose induose nereikėtų laikyti ir maisto produktų. - Naudokite tik prikaistuvius arba indus plokščiais dugnais. \- Į prikaistuvius ir indus dékite tinkamą maisto produktų kiekį. Tuomet nereikės bereikalingai valyti, nes patiekalai neišbėgs. Nedėkite ant kaitviečių puodu arba keptuvių dangčių. Prikaistuvius dékite taip, kad jie būtų kaitviečių viduryje. Jeigu norite perkelti priekaistuvį ant kitos kaitvietės, pakelkite ir padėkite jį ant kaitvietės, o ne traukite jį paviršiumi.Patarimai dėl stiklo keramikos kaitlenčių
- Stiklo keramikos paviršius yra atsparus karščiui ir dideliems temperatūrų skirtumams. - Ant stiklo keramikos paviršiaus nelaikykite jokių daiktų; nenaudokite jo vietoje pjaustymo lentos. - Naudokite keptuves ir puodus tik lygiais, glotniais dugnais. Aštrūs kraštai subraižo paviršių. - Nenaudokite aliumininių puodu ir keptuvių. Aliuminis gadina stiklo keramikos paviršių. natural_image
Diagram of a fire extinguisher with crossed-out electrical lines indicating resistance (no text or symbols)natural_image
Abstract diagram with a black arrow pointing to three dots on a textured gray background, no text or symbols present.Keraminių kaitviečių jjungimas
Kaitvietės valdomos viryklės valdymo rankenėlėmis. Norėdami nustatyti tinkamą virimo galingumą, pasukite viryklės valdymo rankenėles į atitinkamą lygi.| Virimolygis | 1 | 2 – 3 | 4 – 6 |
| pašildymas | troškinimas, létasvirimas | kepimas,skrudinimas,virinimas | |
| Virimolygis | 1 | 2 | 3 |
| pašildymas | troškinimas, lėtasvirimas | kepimas,skrudinimas,virinimas |
Keraminių kaitviečių išjungimas
Pasukite kaitvietės rankenėlę i išjungimo (viršutinę) padėtį.Kelių dalių kaitviečių naudojimas
Kelių dalių kaitvietės leidžia gaminti maistą naudojant skirtingo dydžio prikaistuvius ant tos pačios kaitvietės. Jungus šias kaitvietes, pirmiausiai jjungiama vidinė kaitvietės dalis. 1. Norėdami pakeisti kaitvietės skersmenį, pasukite valdymo rankenėlę pagal laikrodžio rodyklę. 2. Kaitvietės skersmens spinduliui pasikeitus, pasigirs spragtelėjimas. natural_image
Two circular electronic components with internal grating and mounting holes, shown from different angles (no text or symbols visible)Kelių dalių kaitviečių išjungimas
1. Norėdami išjungti viryklę, sukite rankenėlę prieš laikrodžio rodyklę i išjungimo (viršutinę) padėtį. Visos kaitvietės dalys bus išjungtos.  1 1 padètis 2 2 padètis 3 3 padètis natural_image
Diagram showing two concentric oval shapes labeled 1 and 2, with no text or symbols beyond labels6 Kaip naudoti orkaite
Bendroji informacija apie kepimą, kepinimą ir kepimą grilyje
 Karšti paviršiai gali nudeginti! Naudojamas prietaisas gali įkaisti. Niekuomet nelieskite karštu degikliu, vidiniu orkaitės daliu, šildytuvu ir pan. Neleiskite vaikų artyn. Dėdami į orkaitę ar ištraukdami iš jos indus, visuomet mūvėkite šilumai atsparias pirštines.  Atidarydami dureles, būkite atsargūs, nes pro jas gali išeiti garai. Karšti garai gali nudeginti rankas, veidą ir (arba) akis.Patarimai dèl kepimo
- Naudokite tinkamas nepridegančias metalines lékštes, aliumininius indus arba šilumai atsparias silicio formas. • Geriausiai išnaudokite grotelių vieta. - Kepimo formą dékite grotelių viduryje. - Prieš jjungdami orkaitę arba grilj, pasirinkite tinkamą grotelių padėtį. Nekeiskite grotelių padėties, kai orkaitė yra įkaitusi. \- Orkaitės durelės turi būti uždarytos.Patarimai dèl kepinimo
- Visa višta, kalakutas ir dideli mėsos gabalai iškeps geriau, jeigu prieš tai juos palaikysite marinatuose, pavyzdžiui, citrinų sulčių ir juodųjų pipirų. - Mėsai su kaulais iškepti reikia maždaug 15 - 30 minučių daugiau, nei kepant tokio paties dydžio kepsnį be kaulų. - Turétumète apskaičiuoti kepsnio kepimo laiką: vienas mėsos centimetras i aukštj iškepa per 4 - 5 minutes. - Mėsai iškepus, palikite ją orkaitėje dar maždaug 10 minučių. Sultys geriau pasiskirsto kepsnyje ir neišbėga, kai mėsa pjaustoma. - Šilumai atspariame inde gaminamą žuvį reikėtų dėti ant grotelių viduriniame arba apatiniame lygyje.Patarimai dėl kepimo grilyje
Kepant mėsą, žuvį ir paukštieną grilyje, mėsa greitai apskrunda, pasidengia gražia plutele ir nebūna sausa. Grilyje ypač tinka kepti kepsnius, ant iešmų kepamą mėsą ir dešreles bei daržoves, kuriose yra didelis kiekis vandens, pavyzdžiui, pomidorus ir svogūnus. - Paskirstykite gabalėlius, kuriuos kepsite grilyje, ant vielinės lentynos arba kepimo skardoje su vieline lentyna taip, kad padengtas plotas neviršytų šildytuvo dydžio. - Įtaisykite vielinę lentyną arba kepimo skardą su grotelėmis pageidaujamame orkaitės lygyje. Jeigu kepate grilyje ant vielinės lentynos, Įtaisykite kepimo skardą žemesniame lygyje, kad j ją nuvarvėtų riebalai. Įtaisoma kepimo skarda turi būti tokio dydžio, kad uždengtų visą kepimo grilyje sritį. Ši skarda su prietaisu gali būti nepateikta. Į kepimo skardą pripilkite truputį vandens, kad ją būtų lengviau išvalyti.  Dėl kepimui grilyje netinkamo maisto gali kilti gaisro pavojus. Grilyje kepkite tik tuos maisto produktus, kurie yra tinkami dideliam karščiui. Nedėkite maisto per giliai į grilį. Tai karščiausia grilio vieta ir riebus maistas gali užsiliepsnoti.Kaip naudoti elektrine orkaite
Prieš pradedant naudoti orkaitę, būtina nustatyti laiką. Nenustačius laiko orkaitė neveiks. Šioje viryklėje įrengtos įspaudžiamos rankenėlės, kurios iššoka, kai jas paspaudžiate. 1. Jspauskite rankenėlę, kad ji iššoktu, tuomet sukite ją ir nustatykite norimą nuostatą.  2. Pasibaigus kepimo procesui, nuspauskite rankenėlę.Temperatūros ir veikimo režimo parinkimas
 1 Funkciju parinkimo rankenėlė 2 Termostato rankenélè 1. Funkciju rankenèle nustatykite norimą darbo režimą. 2. Temperatūros rankenėle nustatykite norimą temperatūrą. » Orkaitė jkaista iki nustatytos temperatūros ir palaiko ją. Šildymo metu lieka degti temperatūros lemputė.Elektrinės orkaitės išjungimas
Pasukite funkciju ir temperatūros rankenėles i išjungimo (viršutinę) padėtį. Svarbu tinkamai padėti vielines groteles ant vielinių grotelių. Vielinės grotelės privalo būti įdėtos tarp grotelių taip, kaip parodyta paveikslėlyje. Neatremkite vielinių groltelių į orkaitės galinę sienelę. Pastumkite vielines groteles lentynos priekinės dalies link ir įtaisykite jas, naudodami dureles, kad grilis veiktų veiksmingiausiai. (Gali skirtis priklausomai nuo gaminio modelio.) Veikimo režimai
Čia parodyta veikimo režimų tvarka gali skirtis nuo jūsų prietaiso režimų išdėstymo tvarkos.Tradicinis kepimas
 Veikia abu šildytuvai – ir viršutinis, ir apatinis. Maistas šildomas tolygiai - ir iš viršaus, ir iš apačios. Tinka, pavyzdžiui, tortams, pyragaičiams arba tortams ir troškiniams tešloje kepti. Kepkite įdėję tik vieną skarda.Apat. Šildymas
 Veikia tik apatinis šildytuvas. Tinka picoms kepti ir paskesniam patiekalų apskrudinimui iš apačios. Šią funkciją taip pat reikia naudoti norint lengvai valyti garais. Apatinis/viršutinis kaitinimas su ventiliatoriumi
 Veikia viršutinis bei apatinis kaitinimo elementai ir ventilatorius (galinėje sienelėje). Ventiliatorius tolygiai paskirsto karštą orą orkaitėje. Kepkite įdėję tik vieną skardą.Veikia su ventiliatoriumi
 Orkaitė nešyla. Veikia tik apatinis ventiliatorius (galinėje sienelėje). Tinkama užšaldytam granuliuotam maistui lėtai atitirpdytis kambario temperatūroje ir iškeptam maistui atvėsinti.Laikas, kurio reikia atšildyti visą mėsos gabalą, yra ilgesnis negu maistas, kuriame yra grūdų.Vent. šildymas
 Ventiliatorius labai greitai ir tolygiai orkaitėje paskirsto karštą orą, kurį jšildo galinis šildytuvas. Kepant patiekalus, pravartu pasirinkti tinkamo lygio lentynas; daugeliu atvejų orkaitės iš anksto pašildyti nereikia. Tinkama kepti jdėjus kelias skardas. Šią funkciją taip pat reikia naudoti norint lengvai valyti garais. "3D" funkcija
 Veikia viršutinis bei apatinis kaitinimo elementai ir kaitinimas ventiliatoriumi (galinėje sienelėje). Patiekalas tolygiai ir gretai kepamas iš visų pusių. Kepkite įdėję tik vieną skardą.Grilis+vent.
 Kepimo drilyje efektas néra toks stiprus, kaip naudojant didjjj grilj. - Dékite mažas arba vidutinio dydžio porcijas tinkamoje lentynos padėtyje po grilio šildytuvu. - Praėjus pusei numatyto kepimo grilyje laiko, apverskite patiekalą.Stiprus grilis su sukamuoju iešmu
 Veikia stiprus grilis ir sukamasis iešmas. Tinka kepti didelius mėsos gabalus grilyje ir ant iešmo. Orkaitės laikrodžio naudojimas  1 Programos parinkimo mygtukas 2 Kepimo laiko simbolis 3 Kepimo pabaigos laiko simbolis\* 4 Íspėjimo signalo simbolis 5 Mažinimo mygtukas 6 Didinimo mygtukas 7 Ekrano šviesumo nustatymas 8 Skambėjimo garsumas 9 Esamas laikas 10 Užrakto simbolis 11 Nustatymo mygtukas \* (Gali skirtis priklausomai nuo gaminio modelio.) Maksimalus kepimo laikas, kurj galima nustatyti, yra 5 val. ir 59 min. Dingus elektros tiekimui, programa atšaukiama. Privalote iš naujo užprogramuoti orkaitę. Atliekant nustatymus, ekrane žybčios atitinkami simboliai. Truputį palaukite, kol nustatymai pradės veikti. Jeigu nepasirinkta jokia kepimo nuostata, paros laiko nustatyti nejmanoma. i Pradėjus kepti, bus rodomas kepimo laikas.Kepimas nurodant kepimo laika:
galite nustatyti, kad orkaitė būtų išjungta: nustatykite laikrodyje kepimo laiką ir nurodytam laikui pasibaigus, orkaitė bus išjungta. 1. Norėdami pareguliuoti kepimo laiką, spauskite programos nustatymo mygtuką (1) ir suaktyvinkite kepimo laiko simbolį (2). 2. Norédami nustatyti kepimo laiką, spauskite mygtukus '-' / '+' (5/6). » Nustačius kepimo laiką, ekrane rodomas kepimo simbolis.Jeigu kepimo pabaigos laiką norite atidėti:
nustatę laikrodyje kepimo laiką, kepimo pabaigos laiką galite nukelti vélesniam laikui. 1. Norėdami pareguliuoti kepimo laiką, spauskite programos nustatymo mygtuką (1) ir suaktyvinkite kepimo laiko simbolį (2). 2. Nustatykite kepimo laiką minuso ir pliuso mygtukais (5) ir (6). » Nustačius kepimo laiką, ekrane šviečia kepimo laiko simbolis. 3. Norėdami pareguliuoti kepimo pabaigos laiką, spauskite programos nustatymo mygtuką (1) ir suaktyvinkite kepimo laiko simbolį (3). 4. Norėdami nustatyti kepimo pabaigos laiką, paspauskite mygtukus - (5) ir + (6). » Nustačius kepimo pabaigos laiką, ekrane bus rodomi kepimo pabaigos ir kepimo simboliai. Pradėjus kepimo procesą, užges ekrane rodytas kepimo pabaigos laiko simbolis (3). 5. Idèkite patiekala j orkaite. 6. Pasirinkite veikimo režimą ir temperatūrą. » Orkaitės laikmatis automatiškai nustato kepimo pradžios laiką, naudodamas jūsų nustatytą kepimo pabaigos laiką ir kepimo laikotarpį. Atėjus kepimo pradžios laikui, jjungiamas parinktas darbo režimas ir orkaitė jšildoma iki nustatytos temperatūros. Nustatytoji temperatūra orkaitėje palaikoma iki pat kepimo laiko pabaigos. 7. Pasibaigus kepimo procesui, ekrane pasirodo pranešimas „Pabaiga“ ir pasigirsta įspėjamieji signalai. 8. Jspėjimo signalas skambės 2 minutes. Norėdami išjugti įspėjimo signalą, tiesiog paspauskite bet kurį mygtuka. Skambėjimas liausis ir bus rodomas esamas laikas.  Jei paspaudę bet kokį mygtuką garso signalą išjungsite, orkaitė vėl pradės veikti. Jei išsijungus garso signalui paspausite bet kokj mygtuka, orkaitė vėl pradės veikti. 9. Išjunkite orkaitę, pasukdami temperatūros ir funkcijos rankenėlę.Mygtukų užrakto funkcijos naudojimas
Mygtukų užrakto funkcijos jjungimas
Jungę mygtukų užrakto funkciją, galite neleisti naudotis orkaite.  1 Programos parinkimo mygtukas 2 Kepimo laiko simbolis 3 Kepimo pabaigos laiko simbolis\* 4 Íspėjimo signalo simbolis 5 Mažinimo mygtukas 6 Didinimo mygtukas 7 Ekrano šviesumo nustatymas 8 Skambėjimo garsumas 9 Esamas laikas 10 Užrakto simbolis 11 Nustatymo mygtukas \* (Gali skirtis priklausomai nuo gaminio modelio.) 1. Spauskite mygtuką (11), kad būtų suaktyvintas mygtukų užrakto simbolis (10). » Ekrane pasirodys „IŠJUNGTA“. 2. Norėdami jungti mygtukų užrakto funkciją, paspauskite '+' mygtuką (6). » ljungus mygtukų užraktą, ekrane rodoma „ljungta“ ir šviečia mygtukų užrakto simbolis (10).  Jungus užrakto funkcija, jokie mygtukai neveikia, išskyrus mygtuką (11).Mygtukų užrakto funkcijos išjungimas
1. Spauskite reguliavimo mygtuką (11), kad būtų suaktyvintas mygtukų užrakto simbolis (10). » Ekrane pasirodys „Jjungta“. 2. Norėdami išjungti mygtukų užrakto funkciją, paspauskite '-' mygtuką (5). » Išjungus mygtuku užraktą, ekrane bus rodoma „IŠJUNGTA“.Laikrodžio naudojimas vietoje žadintuvo
Šio gaminio laikrodį galite naudoti ne tik kepimo programoms nustatyti, bet ir kaip įspėjimo arba priminimo priemonę. Žadintuvas neturi poveikio orkaitės funkcijoms. Jis naudojamas tik kaip įspėjimo signalas. Pavyzdžiui, jis praverčia, kai reikia priminti, kad po tam tikro laiko reikia apversti orkaitėje kepamą patiekalą. Pasibaigus nustatytam įspėjimo laikui, pasigirs garso signalai.  1 Programos parinkimo mygtukas 2 Kepimo laiko simbolis 3 Kepimo pabaigos laiko simbolis\* 4 Íspėjimo signalo simbolis 5 Mažinimo mygtukas 6 Didinimo mygtukas 7 Ekrano šviesumo nustatymas 8 Skambėjimo garsumas 9 Esamas laikas 10 Užrakto simbolis 11 Nustatymo mygtukas \* (Gali skirtis priklausomai nuo gaminio modelio.)Žadintuvo nustatymas
1. Spauskite programų nustatymo mygtuką (1), norėdami jjungti skambėjimo laiko simbolį (4). Maksimalus įspėjimo signalo laikas gali būti 23 val. ir 59 min. 2.Nustatykite garso signalų skambėjimo laiką '-' / '+' (5/6) mygtukais. » Nustačius garso signalų skambėjimo laiką, švies žadintuvo simbolis ir ekrane bus rodoma, kada suskambės garso signalai. 3. Nustatytam laikui pasibaigus, ims žybčioti žadintuvo laiko simbolis (4) ir pasigirs garso signalai.Žadintuvo išjungimas
1. Norėdami išjugti įspėjimo signalą, tiesiog paspauskite bet kurį mygtuką. » Skambėjimas liausis ir bus rodomas esamas laikas.Norėdami išjungti garso signalus:
1. Norėdami išjungti garso signalų laiką, paspauskite programų nustatymo mygtuką (1), kad suaktyvintumėte žadintuvo laiko simbolį (4). 2. Paspauskite ir laikykite nuspaudę '-' (5) myguką tol, kol ekrane bus rodoma „00:00“. Ekrane bus rodomas žadintuvo skambėjimo laikas. Jeigu bus nustatytas ir žadintuvo, ir kepimo laikas, bus rodomas trumpesnis laikas.Garso signalų skambėjimo tono keitimas
1. Spauskite nustatymo mygtuka (11), norėdami jungti garso signalų skambėjimo tonų simbolį (8). 2. '-' / '+' (5/6) mygtukais nustatykite norimą skambėjimo toną. » Pasirinktas skambėjimo tonas ekrane rodomas kaip „b-01“, „b-02“ arba „b-03“.Maisto gaminimo laiko lentelè
 Šioje diagramoje parodytas laikas yra tik kaip orientyras. Laikas gali skirtis priklausomai nuo maisto temperatūros, storio, tipo ir jūsų pageidaujamo kepimo būdo.Kepimas ir kepinimas
 1-ieji orkaitès bégeliai yra apatiniai bégeliai.| Patiekalas | Skardos numeris | Priedas, skirtas naudoti | Darbo režimas | Grotelių padėti s | Temperat ūra (°C) | Kepimo laikas (apytikslis , min.) |
| Pyragėliai skardoje | Viena skarda | Standartinis padėklas* | 3 | 180 | 25 ... 30 | |
| Formose kepami pyragai | Viena skarda | Pyrago forma dėti ant grotelių** | 2 | 180 | 40 ... 50 | |
| Pyragėliai | Viena skarda | Standartinis padėklas* | 3 | 160 | 25 ... 35 | |
| Viena skarda | Standartinis padėklas* | 3 | 150 | 30 ... 40 | ||
| 2 skardos | 1-Skarda pyragaičiams*3-Standartinis padėklas* | 1 - 3 | 150 | 35 ... 50 | ||
| 3 skardos | 1-Standartinis padėklas*3-Skarda pyragaičiams*5-Gili kepimo skarda* | 1 - 3 - 5 | 150 | 35 ... 50 | ||
| Biskvitas | Viena skarda | Apvali forma, 26 cm skersmens, dėti ant grotelių** | 3 | 160 | 25 ... 35 | |
| Viena skarda | Apvali forma, 26 cm skersmens, dėti ant grotelių** | 2 | 150 | 30 ... 40 | ||
| 2 skardos | 1-Apvali forma, 26 cm skersmens, dėti ant grotelių**4-Apvali forma, 26 cm skersmens, dėti ant skardos** | 1 - 4 | 150 | 35 ... 45 | ||
| Sausainiai | Viena skarda | Skarda pyragaičiams* | 3 | 180 | 25 ... 30 | |
| 2 skardos | 1-Skarda pyragaičiams*3-Standartinis padėklas* | 1 - 3 | 180 | 30 ... 40 | ||
| 3 skardos | 1-Skarda pyragaičiams*3-Standartinis padėklas*5-Gili kepimo skarda* | 1 - 3 - 5 | 180 | 35 ... 45 | ||
| Tešlainiai | Viena skarda | Standartinis padėklas* | 2 | 200 | 30 ... 40 | |
| 2 skardos | 1-Skarda pyragaičiams*5-Standartinis padėklas* | 1 - 5 | 200 | 45 ... 55 | ||
| 3 skardos | 1-Skarda pyragaičiams*3-Standartinis padėklas*5-Gili kepimo skarda* | 1 - 3 - 5 | 200 | 55 ... 65 | ||
| Sviestiniai pyragaičiai | Viena skarda | Standartinis padėklas* | 2 | 200 | 25 ... 35 | |
| Patiekalas | Skardos numeris | Priedas, skirtas naudoti | Darbo režimas | Groteli y padėti s | Temperat üra (°C) | Kepimo laikas (apytikslis , min.) |
| 2 skardos | 1-Skarda pyragaičiams*3-Standartinis padėklas* | 1 - 3 | 200 | 35 ... 45 | ||
| 3 skardos | 1-Skarda pyragaičiams*3-Standartinis padėklas*5-Gili kepimo skarda* | 1 - 3 - 5 | 190 | 45 ... 55 | ||
| Mielinės tešla | Viena skarda | Standartinis padėklas* | 2 | 200 | 35 ... 45 | |
| Lazanija | Viena skarda | Stiklinė / metalinė stačiakampio formos skarda, dėti ant grotelių** | 2 - 3 | 200 | 30 ... 40 | |
| Pica | Viena skarda | Standartinis padėklas* | 2 | 200 ... 220 | 15 ... 20 | |
| Jautienos žlėgtainis (nepjaustytas ) / kepsnys | Viena skarda | Standartinis padėklas* | 3 | 25 min. 250/max, tada 180 ... 190 | 100 ... 120 | |
| Eriuko koja (troškinys) | Viena skarda | Standartinis padėklas* | 3 | 25 min. 250/max, tada 190 | 70 ... 90 | |
| Viena skarda | Standartinis padėklas* | 3 | 25 min. 250/max, tada 190 | 60 ... 80 | ||
| Keptas viščiukas (1,8-2 kg) | Viena skarda | Standartinis padėklas* | 2 | 15 min. 250/max, tada 180 ... 190 | 60 ... 80 | |
| Viena skarda | Standartinis padėklas* | 2 | 15 min. 250/max, tada 180 ... 190 | 60 ... 80 | ||
| Kalakutas (5.5 kg) | Viena skarda | Standartinis padėklas* | 1 | 25 min. 250/max, tada 180 ... 190 | 150 ... 210 | |
| Viena skarda | Standartinis padėklas* | 1 | 25 min. 250/max, tada 180 ... 190 | 150 ... 210 | ||
| Žuvis | Viena skarda | Standartinis padėklas* | 3 | 200 | 20 ... 30 | |
| Viena skarda | Standartinis padėklas* | 3 | 200 | 20 ... 30 | ||
| Siūlome iš anksto įkaitinti akmenį prieš kepant bet kokius patiekalus.* Šie priedai gali būti neparduodami su produktu.** Šie priedai neparduodami su produktu. Galima įsigyti papildomai. | ||||||
Ruošimo stalas bandomiesiems patiekalams
Patiekalai ant šio maisto ruošimo stalo ruošiami pagal EN 60350-1, kad būtų lengviau kontroliuoti reikalavimus, taikomus produktų bandymams.| Patieka las | Skardos numeris | Priedas, skirtas naudoti | Darbo režima s | Grotelių padėtis | Tempe ratūra (°C) | Kepimo laikas (apytikslis , min.) |
| Skrudint a duona | Viena skarda | Standartinis padėklas* | 3 | 140 | 20 ... 30 | |
| Viena skarda | Standartinis padėklas* | 3 | 140 | 20 ... 30 | ||
| 2 skardos | 1-Standartinis padėklas*3-Skarda pyragaičiams* | 1 - 3 | 140 | 20 ... 30 | ||
| 3 skardos | 1-Standartinis padėklas*3-Skarda pyragaičiams*5-Gili kepimo skarda* | 1 - 3 - 5 | 140 | 25 ... 35 | ||
| Pyragėlia i | Viena skarda | Standartinis padėklas* | 3 | 160 | 25 ... 35 | |
| Viena skarda | Standartinis padėklas* | 3 | 150 | 30 ... 40 | ||
| 2 skardos | 1-Skarda pyragaičiams*3-Standartinis padėklas* | 1 - 3 | 150 | 35 ... 50 | ||
| 3 skardos | 1-Standartinis padėklas*3-Skarda pyragaičiams*5-Gili kepimo skarda* | 1 - 3 - 5 | 150 | 35 ... 50 | ||
| Biskvitas | Viena skarda | Apvali forma, 26 cm skersmens, dėti ant grotelių** | 3 | 160 | 25 ... 35 | |
| Viena skarda | Apvali forma, 26 cm skersmens, dėti ant grotelių** | 2 | 150 | 30 ... 40 | ||
| 2 skardos | 1-Apvali forma, 26 cm skersmens, dėti ant grotelių**4-Apvali forma, 26 cm skersmens, dėti ant skardos** | 1 - 4 | 150 | 35 ... 45 | ||
| Obuolių pyragas | Viena skarda | Apvali juodo metalo forma, 20 cm skersmens, dėti ant grotelių** | 2 | 180 | 50 ... 60 | |
| Viena skarda | Apvali juodo metalo forma, 20 cm skersmens, dėti ant grotelių** | 2 | 170 | 50 ... 60 | ||
| 2 skardos | 1-Apvali juodo metalo forma, 20 cm skersmens, dėti ant grotelių**4-Apvali juodo metalo forma, 20 cm skersmens, pyragaičiams** | 1 - 4 | 170 | 50 ... 60 | ||
| Siūlome iš anksto įkaitinti akmenį prieš kepant bet kokius patiekalus.* Šie priedai gali būti neparduodami su produktu.** Šie priedai neparduodami su produktu. Galima jsigyti papildomai. | ||||||
Patarimai dėl tortų kepimo
- Jeigu tortas yra per sausas, padidinkite temperatūrą 10 °C ir sumažinkite kepimo laiką. - Jeigu tortas yra per šlapias, paruoškite tirštesnę tešla arba sumažinkite temperatūrą 10 °C. - Jeigu tortas per smarkiai apkepęs viršuje, dékite jį ant žemesnės lentynos, sumažinkite temperatūrą ir padidinkite kepimo laiką. - Jeigu jis gerai iškepęs viduje, bet lipnus viršuje, paruoškite tirstesnę tešlą, sumažinkite temperatūrą ir padidinkite kepimo laiką.Patarimai dėl tešlos gaminių kepimo
- Jeigu tešlos kepinys yra per sausas, padidinkite temperatūrą 10 °C ir sumažinkite kepimo laiką. Sudrėkinkite tešlos sluoksnius kremu, pagamintu iš pieno, aliejaus, kiaušinių ir jogurto. - Jeigu tešlos kepinys kepa pernelyg ilgai, pasirūpinkite, kad paruošto kepinio storis neviršytų formos gylio ir būtų lygus su formos kraštais. - Jeigu kepinio viršutinė pusė apskrunda, o apatinė dalis neiškepa, įsitikinkite, kad kremas, kurį naudojate kepiniui, nebūtų pernelyg arti kepinio apačios. Pabandykite vienodai paskirstyti kremą tarp ir ant tešlos sluoksnių, kad kepinys tolygiai keptų.  Kepkite tešlos gaminius atsižvelgdami i kepimo lentelėje rekomenduojamą kepimo režimą ir temperatūrą. Jeigu kepinio apačia vis tiek nepakankamai iškepa, kitą kartą kepinį dékite ant žemesnės lentynos.Patarimai dėl daržovių kepinimo
- Jeigu daržoviu patiekalas išdžiūsta ir tampa pernelyg sausas, kepkite inde su dangčiu, o ne skardoje. Uždaruose induose patiekalas išliks sultingas. - Jeigu daržovių patiekalas neiškepa, prieš tai apvirkite daržoves arba pamarinuokite jas, tuomet kepkite jas orkaitėje.Kaip naudoti grilj
 Prieš pradedant naudoti orkaitę, būtina nustatyti laiką. Nenustačius laiko orkaitė neveiks.  Naudodami grilj, uždarykite orkaitės dureles. Karšti paviršiai gali nudeginti!Grilio jjungimas
1. Pasukite funkciju rankenėlę ties norimu grilio simboliu. 2. Tuomet pasirinkite norimą kepimo grilyje temperatūrą. 3. Jeigu reikia, iš anksto pašildykite orkaitę 5–7 minutes. » Užsidega temperatūros lemputėGrilio išjungimas
1. Pasukite funkciju rankenėlę i išjungimo (viršutinę) padėtį.  Dėl kepimui grilyje netinkamo maisto gali kilti gaisro pavojus. Grilyje kepkite tik tuos maisto produktus, kurie yra tinkami dideliam karščiui. Nedėkite maisto per giliai į grilį. Tai karščiausia grilio vieta ir riebus maistas gali užsiliepsnoti.Sukamojo iešmo funkcija
Parinkus grilio funkcija, iešmo sukimo varikliukas pradeda sukti iešma.  Sukamojo iešmo variklis veikia su grilio funkcija. Jjungus grilio funkcija, grilio šildytuvas periodiškai jjungiamas ir išjungiamas Todėl, kol grilio šildytuvas jjungtas, sukamojo iešmo variklis veikia, o kai šildytuvas išjungiamas, sukamojo iešmo variklis taip pat sustabdomas. Tai nėra gedimas. - Pasirinkę grilio funkcija, užmaukite mėsą arba viščiuką ant iešmo, naudodami šakutę (3) - lešmo galą jkiškite i angą sukamojo iešmo variklyje galinėje orkaitės sienelėje. Dėkite sukamąjį iešmą ant sukamojo iešmo laikiklio. \- Dékite laikiklj i atitinkamą orkaitės lentyną. \- J vieną iš apatinių lentynų jdėkite skardą, kad j ją nutekėtų riebalai. J kepimo skardą pripilkite truputį vandens, kad ją būtų lengviau išvalyti. - Nepamirškite nuo sukamojo iešmo nusukti plastmasinės rankenos.((Gali skirtis priklausomai nuo gaminio modelio.)) - Pabaigę kepti, prisukite prie sukamojo iešmo plastmasinę rankeną ir ištraukite patiekalą iš orkaitės.((Gali skirtis priklausomai nuo gaminio modelio.))  1 Sukamojo iešmo rémas 2 Plastikinė rankena \* 3 Šakutė \* (Gali skirtis priklausomai nuo gaminio modelio.)Maisto gaminimo grilyje laiko lentelė
Kepimas elektriniame grilyje| Maisto produktas | Priedas, skirtas naudoti | Grotelių padėtis | Rekomenduojama temperatūra (°C)** | Kepimo grilyje laikas (maždaug) |
| Žuvis | Grilio grotelės | 4...5 | 250/max | 20...25 min.# |
| Pjaustytas viščiukas | Grilio grotelės | 4...5 | 250/max | 25...35 min. |
| Érienos žlėgtainiai | Grilio grotelės | 4...5 | 250/max | 20...25 min. |
| Rostbifas | Grilio grotelės | 4...5 | 250/max | 25...30 min.# |
| Veršienos kotletai | Grilio grotelės | 4...5 | 250/max | 25...30 min.# |
| Duonos skrebučiai * | Grilio grotelės | 4 | 250/max | 1...3 min. |
| # priklaisomai nuo storio*Pakaitinimas 5 minutes**Jei jūsu gaminio grotelių temperatūros negalima sureguliuoti, grotelės veiks rekomenduojamoje temperatūroje. | ||||
| Maisto produktas | Priedas, skirtas naudoti | Grotelių padėtis | Temperatūr a (°C) | Kepimo laikas (apytikslis, min.) |
| Duonos skrebučiai | Grilio grotelės | 4 | 250/max | 1...3 min. |
| Mėsos kukuliai (jautiena) - 12 gabaliukai | Grilio grotelės | 4 | 250/max | 25...35 min. |
| Apverskite ruošiamą maistą po 2/3 kepimo laiko.Prieš kepant maistą rekomenduojama 5 minutes jkaitinti orkaite. | ||||
7 Techninis aptarnavimas ir priežiūra
Bendroji informacija
Prietaisą reguliai valant, pailgėja gaminio naudojimo laikas ir sumažėja trikčių atvejų.  Prieš atlikdami techninę priežiūrą ir prieš valydami, prietaisą atjunkite nuo maitinimo tinklo. Kyla elektros smūgio pavojus!  Prieš valydami viryklę, leiskite jai atvėsti. Karšti paviršiai gali nudeginti! - Kruopščiai išvalykite gaminį po kiekvieno panaudojimo. tada gaminimo likučius bus lengviau pašalinti, jie nepridegs orkaitę naudojant kitą kartą - Prietaisui valyti nereikia jokių specialių valymo priemonių. Naudokite šiltą vandenį su trupučiu indų plovimo skysčio, minkštą skudurėlj ar kempinę gaminiui valyti ir sausą skudurėlj drėgmei iššluostyti. - Būtinai visada sausai nuvalykite bet kokius išsiliejusius arba po valymo likusius skysčius. - Nerūdijančio plieno paviršiams ir rankenai valyti nenaudokite valymo priemonių, kurių sudėtyje yra rūgšties ar chloro. Tokias dalis valykite skystoje valymo priemonėje (be šveičiamųjų medžiagų) sudrėkintu skudurėliu; būtinai braukite viena kryptimi.  Tam tikros valymo priemonės ar valymo medžiagos gali apgadinti paviršių. Valydami nenaudokite és dinančių valymo priemonių, valymo miltelių/pienelio ar kokių nors aštrių daiktų.  Šiam prietaisui valyti nenaudoktie garinių valymo prietaisų, nes gali kilti elektros smūgis.Kaitlentès valymas
Keraminio stiklo paviršius
Valykite stiklo keraminį paviršių (stiklo keramiką) šaltu vandeniu, pasirūpindami, kad ant jo neliktų valymo priemonių likučių, ir nusausinkite minkšta šluoste. Likučiai gali pažeisti stiklo keramikos paviršių naudojant kaitlentę kitą kartą. Ant stiklo keramikos (stiklo keraminio) paviršiaus pridžiūvusių likučių jokiais būdais negalima grandyti sulinkusiais peiliais, plieno drožlių šluostėmis ar panašiais įrankiais. Kalcio dèmes (geltonas dèmes) šalinkite naudodami parduotuvėse jsigyjamomis kalkių nuosėdų šalinimo priemonėmis arba nedideliu kiekiu kitos kalkių nuosėdų šalinimo priemonės, pavyzdžiui, actu arba citrinų sultimis. Jeigu paviršius labai suteptas, užpilkite valymo priemonės ant kempinės ir palaukite, kol ji visiškai susigers. Tuomet nuvalykite kaitlentės paviršių drėgnu skudurėliu.  Cukringą maistą, pavyzdžiui, tirštą saldų kremą ir sirupą reikia nedelsiant nuvalyti, nelaukiant, kol paviršius atvės. Kitaip stiklo keramikos paviršius gali būti nepataisomai sugadintas. Laikui begant danga ir kiti paviršiai gali išblukti. Tačiau tai neturi įtakos prietaiso veikimui. Spalvos išblukimas ir dėmės, atsiradusios ant stiklo keramikos paviršiaus, yra normalu ir nėra gedimas.Valdymo skydo valymas
Nuvalykite valdymo skydelj ir rankenėles drėgnu skudurėliu, paskui nušluostykite sausa šluoste.  Jei jūsų gaminyje įtaisyti mygtukai / rankenėlės, valydami valdymo skydelį, nenuimkite valdymo rankenėlių. Galite sugadinti valdymo skydelj!Orkaitės valymas
Norėdami išvalyti šoninę sienelę(Gali skirtis priklausomai nuo gaminio modelio.)
(Ši funkcija yra pasirinktinė. Jūsų gaminyje jos gali nebūti.) 1. Ištraukite priekinę šoninę grotelių dalį, traukdami ją šalin nuo šoninės sienelės. 2. Visiškai išimkite šonines groteles, traukdami jas link savęs. Kataliziniai paviršiai
(Ši funkcija yra pasirinktinė. Jūsų gaminyje jos gali nebūti.) Vidinės šoninės (A) ir (arba) galinė jūsų gaminio sienelė (B) gali būti padengta kataliziniu emaliu. Katalizinės sienelės yra šviesios matinės spalvos ir akyto paviršiaus. Katalizinių orkaitės sienelių valyti negalima. Dėl jų perforuotos konstrukcijos, kataliziniai paviršiai absorbuoja riebalus, o paviršiui užsipildžius riebalais, jie pradeda blizgėti. Šiuo atveju rekomenduojama pakeisti dalis. natural_image
Two technical diagrams showing internal components labeled A and B, with no readable text or symbols beyond labels.Lengvas valymas garais
Ši funkcija užtikrina lengvą valymą, nes laiku neišvalytus (jisisenėjusius) nešvarumus suminkština orkaitėje esantys garai ir nuo jų orkaitėje susidaręs vandens lašelių kondensatas. 1. Išimkite iš orkaitės visus priedus. 2. Pripilkite i orkaitės kepimo skarda 500 ml vandens, ir įstatykite skarda i 2-a orkaitės lentyną. natural_image
Illustration of a computer monitor with a stylized face and screen, no text or symbols presentOrkaitės durų valymas
Norėdami išvalyti orkaitės dureles, naudokite šiltą vandenį su trupučiu indų plovimo skysčio, minkštą skudurėlj ar kempinę gaminiui valyti ir sausą skudurėlj drėgmei iššluostyti. Nuvalykite stiklą su actu,tada nuskalaukite ir pašalinkite kalkių likučius nuo orkaitės stiklo. Orkaitės durelėms valyti nenaudokite jokių šiurkščių šlifuojamųjų valiklių arba sunkiųjų metalų grandyklių. Kitaip galite subraižyti paviršių ir sugadinti stiklą.Orkaitės durelių valymas
Orkaitės durims ir stiklui valyti nenaudokite šiurkščių abrazyvinių valiklių, metalinių grandiklių, vielinės vatos ar baliklių. Galite išimti orkaitės duris ir durų akinius, kad juos išvalytumėte. Kaip išimti duris ir langus, paaiškinta skyriuose „orkaitės durelių nuėmimas“ ir „Vidinių durų stiklų nuėmimas“. Nuėmę vidinius durelių stiklus, nuvalykite juos indų plovikliu, šiltu vandeniu ir minkšta šluoste arba kempine ir nusausinkite sausa šluoste. Nuvalykite stiklą su actu,tada nuskalaukite ir pašalinkite kalkių likučius nuo orkaitės stiklo.Orkaitės durelių išėmimas
1. Atidarykite priekines dureles (1). 2. Atlenkite spaustukus, esančius prie dešinės ir kairės priekinių durelių pusės vyrių korpusų (2), paspausdami juos žemyn, kaip parodyta paveikslėlyje.  1 Durelès 2 Vyris užrakintas(uždaryta pozicija) 3 Orkaitè 4 Vyris užrakintas(atidaryta pozicija) natural_image
Mechanical assembly diagram showing a clamp or bracket with a numbered component (4), no visible text or symbolsnatural_image
Technical illustration of a mechanical component with directional arrows indicating motion (no text or symbols)Durelių vidinės stiklo plokštės išėmimas
(Ši funkcija yra pasirinktinė. Jūsų gaminyje jos gali nebūti.) Vidinę orkaitės durelių stiklo plokštę galima išimti ir išvalyti. 1. Atidarykite orkaitės dureles. natural_image
Simple line drawing of a rectangular object with a curved arrow indicating rotation or movement (no text or symbols)natural_image
Technical line drawing of a rectangular electronic component with mounting holes and a side bracket, showing internal structure and assembly (no text or symbols)Orkaitės lemputės keitimas
 Prieš keisdami orkaitės lemputė, įsitikinkite, kad prietaisas yra išjungtas iš elektros tinklo ir atvėsęs, kad išvengtumėte galimo elektros smūgio. Karšti paviršiai gali nudeginti! i Šioje krosnyje naudojama kaitrinė lempa, kurios galia mažesnė nei 40 W, aukštis mažesnis nei 60 mm, skersmuo mažesnis nei 30 mm, arba halogeninė lempa, kurios lizdas yra G9, galia mažesnė nei 60 W. Lempos yra tinkamos naudoti esant aukštesnei nei 300 °C temperatūrai. Orkaitės lempas galima įsigyti iš įgaliotų techninės priežiūros agentų arba techniko, turinčio licenciją. i Lemputės padėtis gali skirtis nuo pavaizduotosios paveikslėlyje. i Šiame prietaise naudojama lempa netinkama kambarių apšvietimui. Ši lempa skirta naudotojui padėti geriau matyti maistą. i Šiame prietaise naudojamos lempos turi atlaikyti ekstremalias sąlygas, pavyzdžiui, didesnę nei 50 °C temperatūrą.Jeigu orkaitėje sumontuota apvali lemputė:
1. Ištraukite gaminio kištuką iš elektros tinklo. 2. Pasukite stiklinj gaubtelj prieš laikrodžio rodyklę ir nuimkite ji. natural_image
Diagram of a mechanical component with three circular arrows indicating rotational or feedback motion (no text or symbols)natural_image
Two mechanical diagrams labeled A and B showing a rotating component with directional arrows, no text or symbols present.8 Trikčių nustatymas
Naudojama orkaitė išleidžia garus.
• Tai normalu, nes viryklei veikiant pasišalina garai. >>> Tai néra gedimas.Kaisdamos ir vėsdamos metalinės prietaiso dalys skleidžia garsus.
\- Kai metalinės dalys kaista, jos gali plėstis ir kelti triukšmą. >>> Tai nėra gedimas.Prietaisas neveikia.
- Perdegė arba suveikė elektros tinklo saugiklis. >>> Patikrinkite saugiklius saugiklių dėžėje. Jeigu reikia, pakeiskite arba atitaisykite juos. - Gaminio laido kištukas nejkištas i (jžeminta) lizdą. >>> Patikrinkite kištumo jjungimą. - Neveikia valdymo skydelio mygtukai/rankenėlės/klavišai. >>> Gali būti jjungta mygtukų užrakto funkcija. Išjunkite ją. (Žr. Mygtukų užrakto funkcijos naudojimas, puslapis 30)Neveikia orkaitės apšvietimas.
- Perdegé orkaités lemputé. >>> Pakeiskite orkaités lemputę. - Nutrūko elektros tiekimas. >>> Patikrinkite, ar nenutrūko elektros tiekimas. Patikrinkite saugiklius saugiklių dėžėje. Jeigu reikia, pakeiskite arba vėl jjunkite saugiklius.Orkaitė nešyla.
- Gali būti nenustatyta tam tikra kepimo funkcija ir (arba) temperatūra. >>> Nustatykite tam tikrą orkaitės kepimo funkciją ir (arba) temperatūrą. - Modeliuose su laikmačiu nenustatytas laikmatis. >>> Nustatykite laiką. (Prietaisuose su mikrobangų krosnele laikmačio valdikliais valdoma tik mikrobangų krosnelė.) - Nutrūko elektros tiekimas. >>> Patikrinkite, ar nenutrūko elektros tiekimas. Patikrinkite saugiklius saugiklių déžėje. Jeigu reikia, pakeiskite arba vėl jjunkite saugiklius.(Modeliuose su laikmačiu) Žybčioja laikrodžio ekranas arba dega laikrodžio simbolis.
\- Prieš tai buvo nutrūkęs elektros tiekimas. >>> Nustatykite laiką / išjunkite ir vėl jjunkite gamini. Jeigu atlikus visus šiame skyriuje aprašytus nurodymus trikties atitaisyti nepavyksta, kreipkitės įjgaliotojo techninio aptarnavimo centro atstovą. Niekada nebandykite patys taisyti sugedusio gaminio.


- Blomberg
- Please read this user manual first!
- Explanation of symbols
- Important instructions and warnings for safety and environment 4
- General information 11
- Installation 15
- Preparation 20
- How to use the hob 23
- How to operate the oven 26
- Maintenance and care 36
- Troubleshooting 41
- Important instructions and warnings for safety and environment
- General safety
- Electrical safety
- Product safety
- Intended use
- Safety for children
- Disposing of the old product Compliance with the WEEE Directive and Disposing of the Waste Product:
- Compliance with RoHS Directive:
- Package information
- General information
- Overview
- Package contents
- Rotisserie chicken
- Basics: Information on the energy label of electrical ovens is given in accordance with the EN 60350-1 / IEC 60350-1 standard. Those values are determined under standard load with bottom-top heater or fan assisted heating (if any) functions. Energy efficiency class is determined in accordance with the following prioritization depending on whether the relevant functions exist on the product or not. 1-Cooking with eco-fan, 2-Turbo slow cooking, 3-Turbo cooking, 4-Fan assisted bottom/top heating, 5-Top and bottom heating.
- Installation
- Before installation
- Safety chain
- If your product has 2 safety chains;
- If your product has 1 safety chain;
- Installation and connection
- Electrical connection
- Connecting the power cable
- Final check
- Future Transportation
- Preparation
- Tips for saving energy
- Initial use
- Time setting
- Changing the time of the day
- Changing screen brightness adjustment
- First cleaning of the appliance
- Initial heating
- Electric oven
- Grill oven
- How to use the hob
- General information about cooking
- Tips about glass ceramic hobs
- Turning on the ceramic plates
- Turning off the ceramic plates
- Using multi-segmented cooking zones
- Turning off multi-segment cooking zones
- How to operate the oven
- General information on baking, roasting and grilling
- Tips for baking
- Tips for roasting
- Tips for grilling
- How to operate the electric oven
- Select temperature and operating mode
- Switching off the electric oven
- Rack positions (For models with wire shelf)
- Operating modes
- Top and bottom heating
- Bottom heating
- Fan supported bottom/top heating
- Operating with fan
- Fan Heating
- "3D" function
- Grill+Fan
- Full grill with turnspit
- Using the oven clock
- Cooking by specifying the cooking time:
- If you want to set the end of cooking time to a later time:
- Using the keylock Activating the keylock
- Deactivating the keylock
- Using the clock as an alarm
- Setting the alarm clock
- Turning off the alarm
- If you want to cancel the alarm:
- Changing alarm tone
- Cooking times table
- Baking and roasting
- Cooking table for test meals
- Tips for baking cake
- Tips for baking pastry
- Tips for cooking vegetables
- How to operate the grill
- Switching on the grill
- Switching off the grill
- Turnspit function
- Maintenance and care
- General information
- Cleaning the hob
- Glass ceramic surface
- Cleaning the control panel
- Cleaning the oven
- Catalytic walls
- Easy Steam Cleaning
- Clean oven door
- Cleaning the oven door
- Removing the oven door
- Removing the door inner glass
- Replacing the oven lamp
- If your oven is equipped with a round lamp:
- Troubleshooting
- Oven emits steam when it is in use.
- Product emits metal noises while heating and cooling.
- Product does not operate.
- Oven light does not work.
- Oven does not heat.
- (In models with timer) Clock display is blinking or clock symbol is on.
- Viryklé
- Pirmiausia jdėmiai perskaitykite šį vartotojo vadovą!
- Simbolių paaiškinimas
- Svarbūs nurodymai ir įspėjimai dėl saugos ir aplinkosaugos 4
- Bendra informacija 10
- Irengimas 15
- Paruošimo Darbai 20
- Kaip naudoti šią viryklę 23
- Kaip naudoti orkaite 26
- Techninis aptarnavimas ir priežiūra 37
- Trikčių nustatymas 42
- Svarbūs nurodymai ir įspėjimai dėl saugos ir aplinkosaugos
- Bendrieji saugos reikalavimai
- Elektros sauga
- Gaminio sauga
- Numatytoji naudojimo paskirtis
- Vaikų sauga
- Seno gaminio išmetimas
- WEEE Direktyvos ir senų gaminių išmetimo taisyklių atitiktis:
- RoHS direktyvos atitiktis:
- Pakavimo medžiagų išmetimas
- Bendra informacija
- Apžvalga
- Komplekto turinys
- Itaisas viščiukui kepti ant iešmo
- Irengimas
- Prieš jrengiant
- Apsauginé grandiné
- Jeigu jūsų gaminyje yra 1 apsauginė grandinė;
- Irengimas ir prijungimas
- Elektros jvadas
- Maitinimo kabelio prijungimas
- Gaminiams su aušinimo ventiliatoriumi (Jūsų gaminyje jos gali nebūti.)
- Galutinis patikrinimas
- Būsimas transportavimas
- Paruošimo Darbai
- Patarimai, kaip taupyti energija
- Naudojant pirmą kartą Laiko nustatymas
- Dienos laiko keitimas
- Ekrano ryškumo pakeitimas
- Pirmasis prietaiso valymas
- Pradinis šildymas
- Elektrinè orkaitè
- Orkaitė su griliu
- Kaip naudoti šią viryklę
- Bendroji informacija apie maisto gaminimą
- Patarimai dėl stiklo keramikos kaitlenčių
- Keraminių kaitviečių jjungimas
- Keraminių kaitviečių išjungimas
- Kelių dalių kaitviečių naudojimas
- Kelių dalių kaitviečių išjungimas
- Kaip naudoti orkaite
- Bendroji informacija apie kepimą, kepinimą ir kepimą grilyje
- Patarimai dèl kepimo
- Patarimai dèl kepinimo
- Patarimai dėl kepimo grilyje
- Kaip naudoti elektrine orkaite
- Temperatūros ir veikimo režimo parinkimas
- Elektrinės orkaitės išjungimas
- Veikimo režimai
- Tradicinis kepimas
- Apat. Šildymas
- Apatinis/viršutinis kaitinimas su ventiliatoriumi
- Veikia su ventiliatoriumi
- Vent. šildymas
- "3D" funkcija
- Grilis+vent.
- Stiprus grilis su sukamuoju iešmu
- Kepimas nurodant kepimo laika:
- Jeigu kepimo pabaigos laiką norite atidėti:
- Mygtukų užrakto funkcijos naudojimas
- Mygtukų užrakto funkcijos jjungimas
- Mygtukų užrakto funkcijos išjungimas
- Laikrodžio naudojimas vietoje žadintuvo
- Žadintuvo nustatymas
- Žadintuvo išjungimas
- Norėdami išjungti garso signalus:
- Garso signalų skambėjimo tono keitimas
- Maisto gaminimo laiko lentelè
- Kepimas ir kepinimas
- Ruošimo stalas bandomiesiems patiekalams
- Patarimai dėl tortų kepimo
- Patarimai dėl tešlos gaminių kepimo
- Patarimai dėl daržovių kepinimo
- Kaip naudoti grilj
- Grilio jjungimas
- Grilio išjungimas
- Sukamojo iešmo funkcija
- Maisto gaminimo grilyje laiko lentelė
- Techninis aptarnavimas ir priežiūra
- Bendroji informacija
- Kaitlentès valymas
- Keraminio stiklo paviršius
- Valdymo skydo valymas
- Orkaitės valymas
- Norėdami išvalyti šoninę sienelę(Gali skirtis priklausomai nuo gaminio modelio.)
- Kataliziniai paviršiai
- Lengvas valymas garais
- Orkaitės durų valymas
- Orkaitės durelių valymas
- Orkaitės durelių išėmimas
- Durelių vidinės stiklo plokštės išėmimas
- Orkaitės lemputės keitimas
- Jeigu orkaitėje sumontuota apvali lemputė:
- Trikčių nustatymas
- Naudojama orkaitė išleidžia garus.
- Kaisdamos ir vėsdamos metalinės prietaiso dalys skleidžia garsus.
- Prietaisas neveikia.
- Neveikia orkaitės apšvietimas.
- Orkaitė nešyla.
- (Modeliuose su laikmačiu) Žybčioja laikrodžio ekranas arba dega laikrodžio simbolis.
Kaubamärk : BEKO
Mudel : HKN 8331 E
Kategooria : Pliit