CCTV-205 - Camara de seguridad Steren - Manual de uso y guía de instrucciones gratis
Encuentra gratis el manual del aparato CCTV-205 Steren en formato PDF.


| Tipo de producto | Cámara de seguridad |
| Modelo | CCTV-205 |
| Marca | Steren |
| Resolución | 1920 x 1080 (Full HD) |
| Distancia focal del lente | 3.6 mm |
| Visión nocturna | Hasta 20 m con LED IR |
| Conectividad | Wi-Fi 802.11 b/g/n |
| Alimentación | DC 12V / 1A (adaptador incluido) |
| Dimensiones (An x Al x Pr) | 110 x 80 x 80 mm |
| Peso | 300 g |
| Clasificación de resistencia a la intemperie | IP66 (uso interior/exterior) |
| Detección de movimiento | Sí, con notificaciones push |
| Audio bidireccional | Sí (micrófono y altavoz incorporados) |
| Almacenamiento | Tarjeta microSD de hasta 128 GB (no incluida) |
| Ángulo de visión | 90° diagonal |
| Montaje | Soporte de pared o techo incluido |
| Sistemas compatibles | iOS y Android con la aplicación Steren |
| Mantenimiento | Limpie el lente con un paño seco suave; evite el agua directamente sobre la cámara. |
| Seguridad | No exponga a temperaturas extremas o humedad. Use solo el adaptador incluido. |
| Piezas de repuesto y reparabilidad | Comuníquese con el centro de servicio de Steren para obtener piezas de repuesto; no hay componentes reparables por el usuario en el interior. |
Preguntas frecuentes - CCTV-205 Steren
Preguntas de los usuarios sobre CCTV-205 Steren
0 pregunta sobre este aparato. Responde a las que conoces o haz la tuya.
Hacer una nueva pregunta sobre este aparato
Descarga las instrucciones para tu Camara de seguridad en formato PDF gratis! Encuentra tus instrucciones CCTV-205 - Steren y toma tu dispositivo electrónico nuevamente en la mano. En esta página están publicados todos los documentos necesarios para el uso de su dispositivo. CCTV-205 de la marca Steren.
MANUAL DE USUARIO CCTV-205 Steren
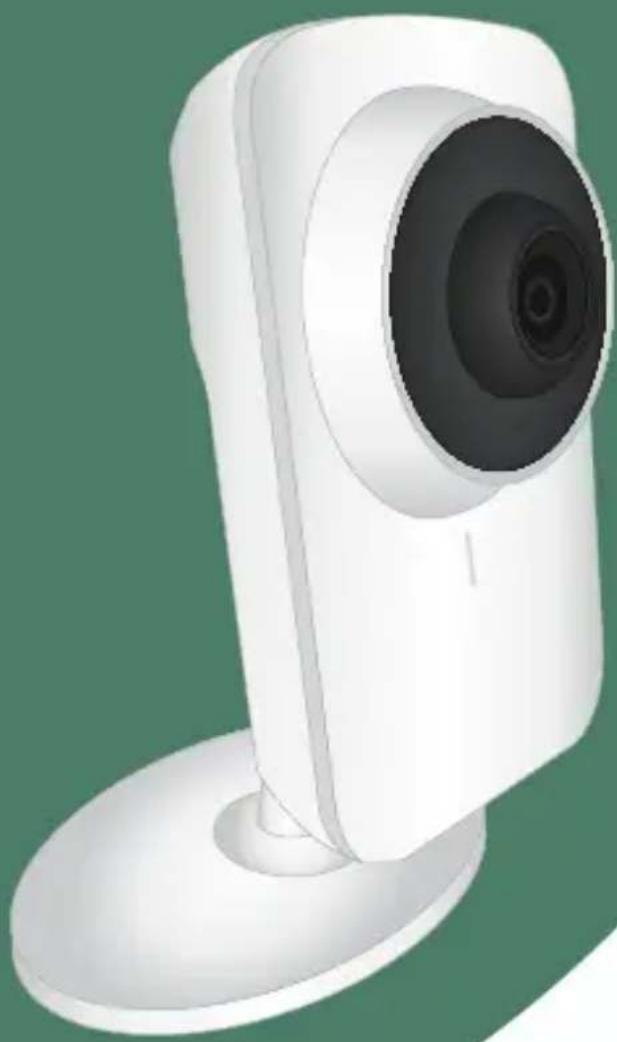
Cámara CCTV Wi-Fi para monitoreo por Internet
Manual de instrucciones
Antes de utilizar el producto, lea cuidadosamente este instructivo para evitar cualquier mal funcionamiento. La información presentada sirve únicamente como referencia sobre el producto. Debido a actualizaciones pueden existir diferencias.
Consulte nuestra página web www.steren.com para obtener la versión más reciente de este manual.
PRECAUCIONES
- Este producto NO es un juguete; manténgalo fuera del alcance de los niños.
- Cualquier reparación no autorizada puede ocasionar mal funcionamiento y anulará la garantía.
- Este producto no está destinado para ser utilizado por personas con capacidades diferentes, a menos que sean supervisadas o instruidas por una persona responsable de su seguridad.
- No extraiga la tarjeta micro SD mientras la cámara está grabando; puede provocar mal funcionamiento y pérdida de datos.
- No coloque objetos pesados sobre la cámara.
La operación de este equipo está sujeta a las siguientes dos condiciones: (1) es posible que este equipo o dispositivo no cause interferencia perjudicial y (2) este equipo o dispositivo debe aceptar cualquier interferencia, incluyendo la que pueda causar su operación no deseada.
ÍNDICE
PARTES 5
PREPARATIVOS 5
INSTALACIÓN DE LA APLICACIÓN 7
OPCIONES DE CONEXIÓN 8
Opción 1: Conexión Wi-Fi 9
Opción 2: Conexión directa (punto de acceso) 12
MONITOREO 15
Monitoreo remoto 15
CONFIGURACIÓN DE ALERTAS 16
Recibir notificaciones 16
Otras opciones de alerta 17
CONFIGURACIÓN GENERAL 17
VISUALIZACIÓN DE ARCHIVOS 18
INSTALACIÓN 18
PARTES
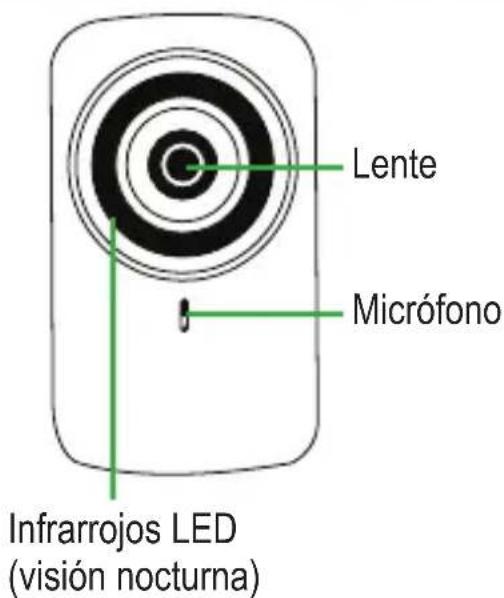
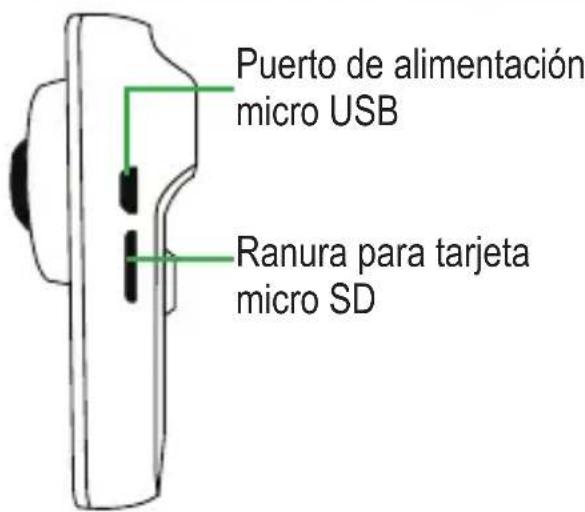
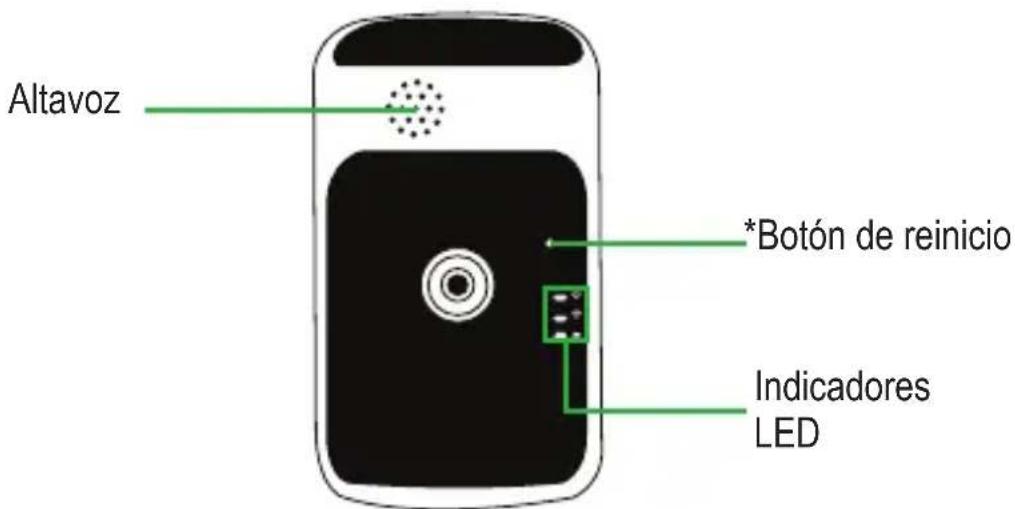
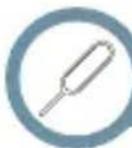
*Utilice el pincho o un clip para presionar este botón
PREPARATIVOS
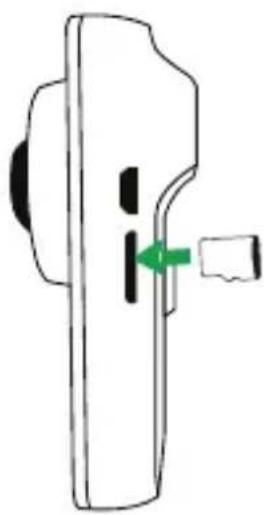
Inserte una tarjeta de memoria micro SD para almacenar videos y fotos.
La cámara comenzará a grabar auto- máticamente en cuanto se conecte a la energía eléctrica.
La cámara emitirá algunos mensajes de voz (en inglés) mientras se prepara para la conexión.
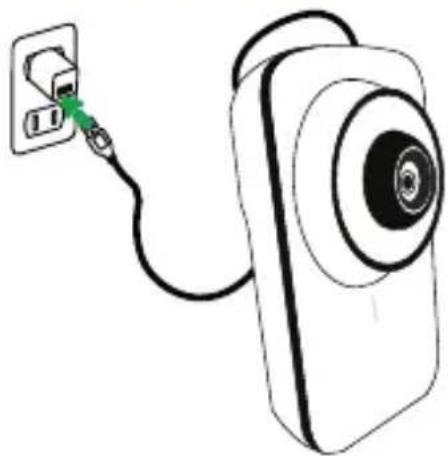
Conecte el cable de alimentación a la cámara y el convertidor a un contacto eléctrico
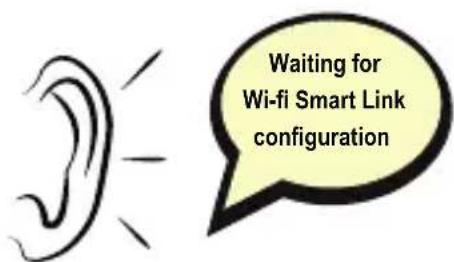
Cuando escuche este mensaje significa que la cámara está lista para vincularse vía Wi-Fi.
INSTALACIÓN DE LA APLICACIÓN
Para gestionar y monitorear el funcionamiento de la cámara, debe instalar una aplicación.
- Ingrese a la tienda de aplicaciones de su dispositivo (Android/iOS), y descargue V380.

Esta aplicación no es propiedad de Steren; la empresa no se hace responsable por su funcionamiento ni actualizaciones
-
Abra la aplicación V380. Seleccione la opción Local.
-
Elija el área (North America).
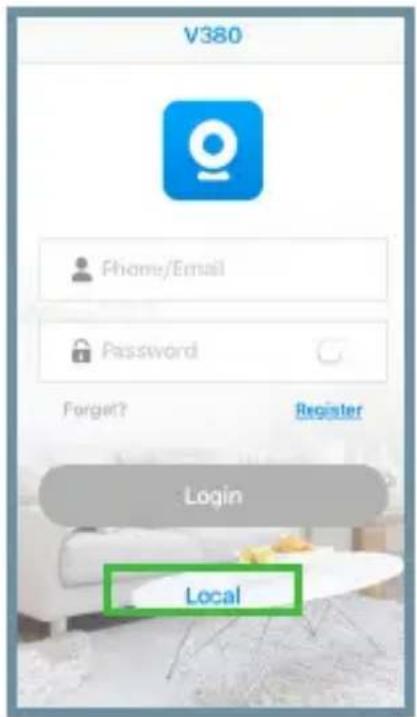
La opción de Registro de cuenta no está disponible para América
Se recomienda desinstalar la aplicación si ya no va a utilizar la cámara
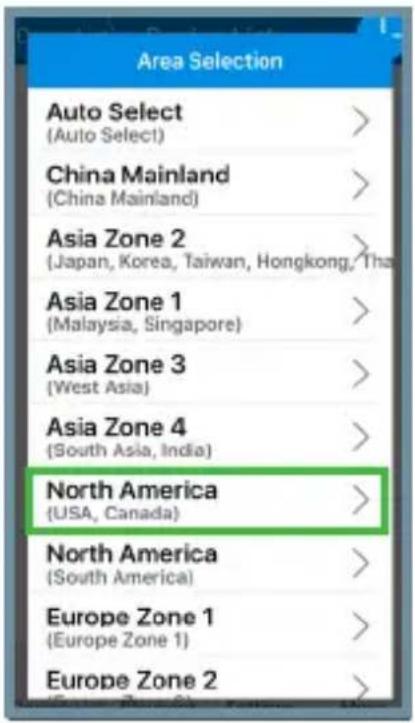
Las imágenes presentadas corresponden a un dispositivo con sistema operativo iOS y aplicación V380 (5.1). Los iconos, la configuración de la interfaz y las funciones pueden variar según la versión de la aplicación y el sistema operativo utilizados.
(Continuación de Instalación de la aplicación)
Una vez hecha esta configuración, aparecerá la pantalla principal para elegir el modo de conexión de la cámara.
Vea la siguiente sección de este manual para elegir una opción.
OPCIONES DE CONEXIÓN
La cámara tiene 2 formas de vincularse con el dispositivo móvil. Elija una opción de conexión, y diríjase a la sección correspondiente de este manual para ver el procedimiento.
Opción 1: Conexión Wi-Fi
Página 9 Página 12
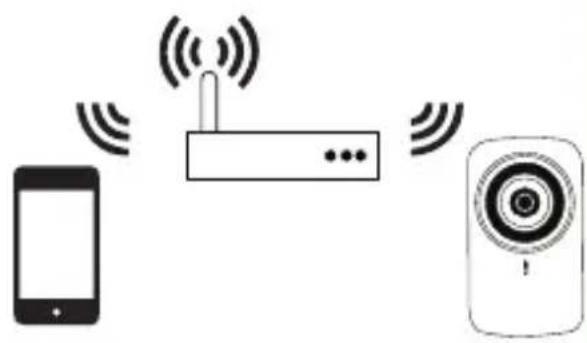
La cámara y el dispositivo móvil se conectan a la red de un módem.
Opción 2: Conexión directa (punto de acceso)
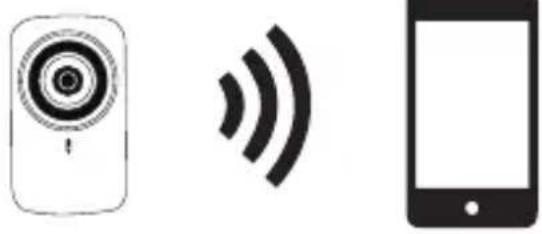
La cámara genera su propia red para conectar el dispositivo móvil.
OPCIÓN 1: Conexión Wi-Fi
- Conecte el dispositivo móvil a una red Wi-Fi.
-
Ingrese a la aplicación, y elija la opción WiFi Smart Link.
-
Introduzca la contraseña de la red Wi-Fi a la que está conectado el dispositivo móvil, y presione Next.
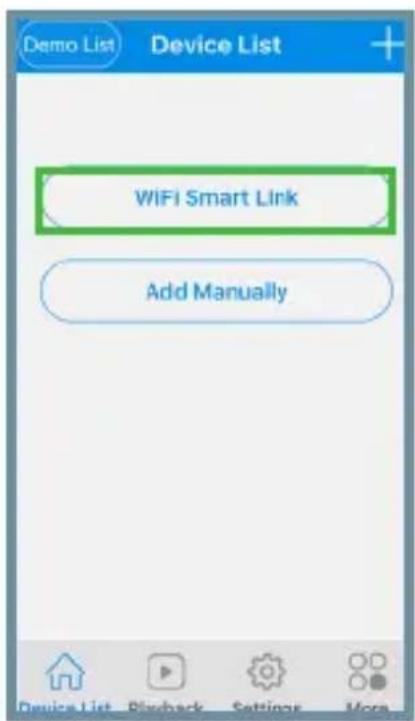
- Espere hasta que se establezca la conexión.

Asegúrese de que la cámara esté conectada a la energía eléctrica

La cámara emitirá un mensaje: "Wi-Fi connected" indicando que se está conectando.
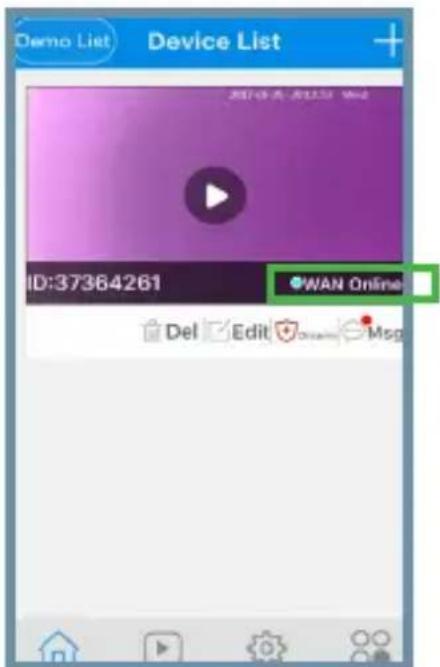
La cámara emitirá el mensaje de voz:

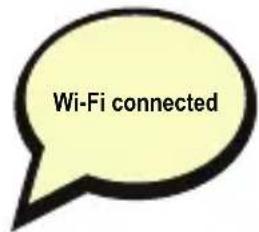
En caso de que la conexión sea fallida, mantenga presionado el botón de Reinicio hasta que la cámara emita el mensaje de voz: "Restore factory default settings". Luego, repita los pasos anteriores.
IMPORTANTE
En algunos dispositivos es necesario ingresar el número de identificación de la cámara para completar la vinculación Wi-Fi. Siga este procedimiento:
- En la pantalla principal de la aplicación, seleccione la opción Add Manually o Add Network device (dependiendo el equipo utilizado).
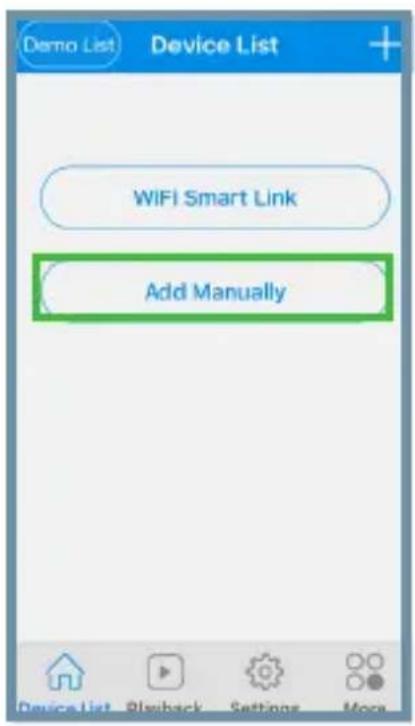
- En el campo Device ID introduzca el número de identificación que viene en la etiqueta pegada en la parte posterior de la cámara. También puede escanear el código QR.
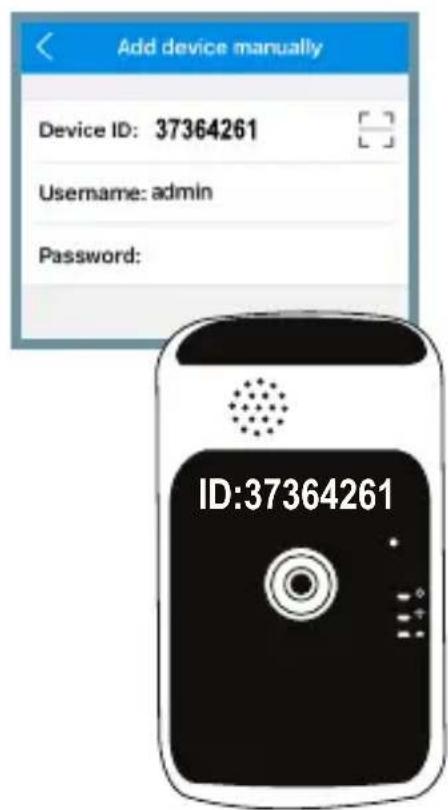
-
Seleccione la opción Lan Search, y espere hasta que finalice la búsqueda.
-
Seleccione el dispositivo encontrado y elija Add device (s).
Para algunos dispositivos es necesario pasar al punto 4, en caso contrario la cámara aparecerá en pantalla ya conectada.
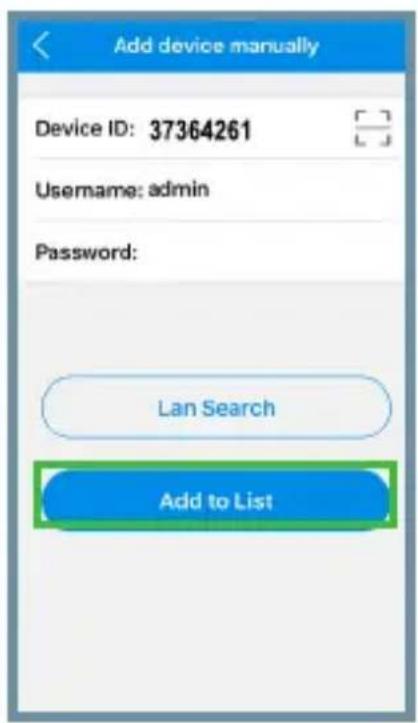
Diríjase a la página 15 para ver la sección de Monitoreo.
OPCIÓN 2: Conexión directa (punto de acceso)
- Con la cámara conectada a la corriente eléctrica presione una vez el botón Reset. Espere unos segundos hasta escuchar el mensaje de voz: "Access point established".
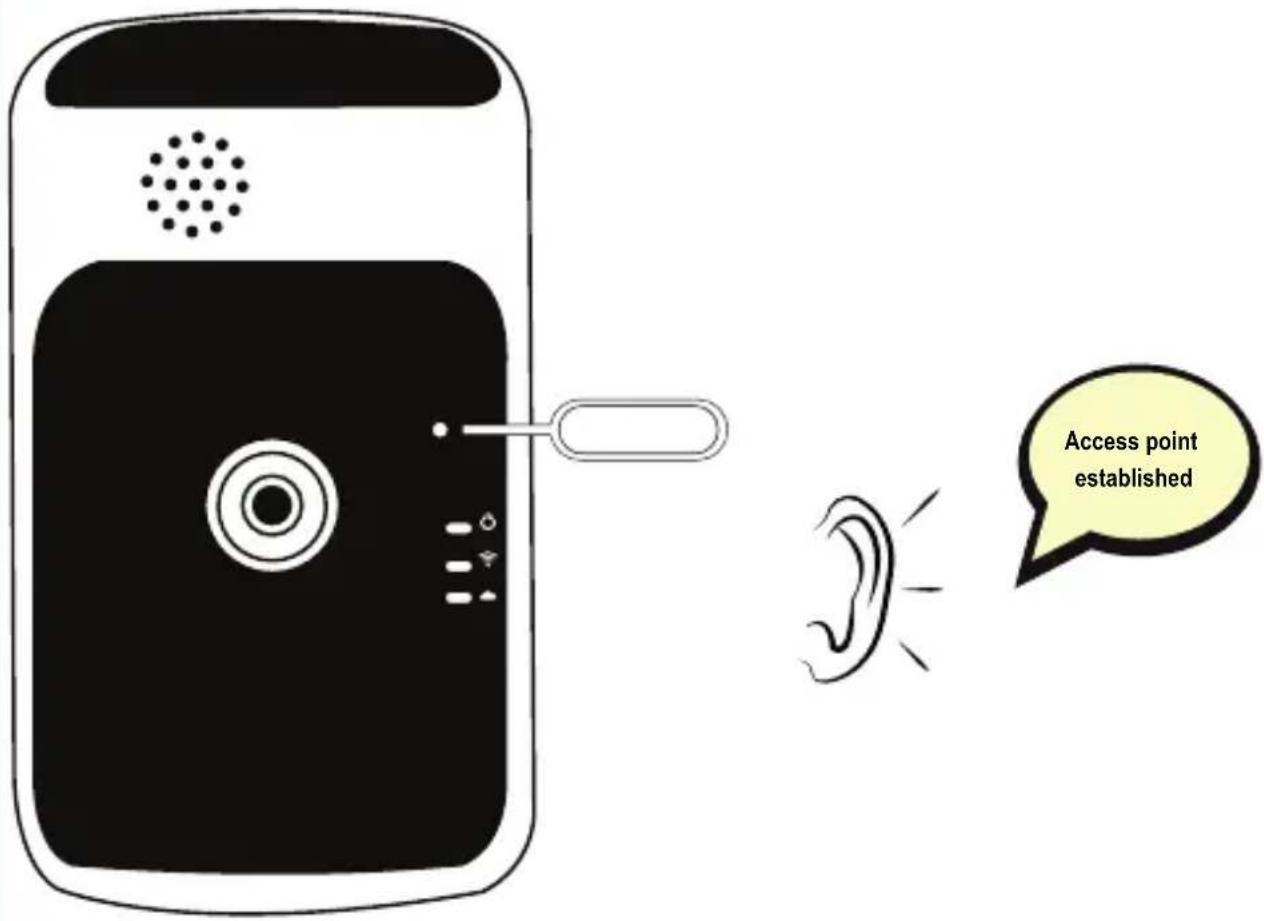
Si no puede escuchar este mensaje, mantenga presionado el botón de "Reinicio" hasta que la cámara emita el mensaje: "Restore factory default settings". Luego, presione nuevamente este botón una sola vez.
- En el dispositivo móvil ingrese a las opciones de configuración Wi-Fi. Busque y seleccione la red cuyo nombre está conformado por el prefijo "CCTV" y el número de identificación de la cámara. Ejemplo: CCTV37364261
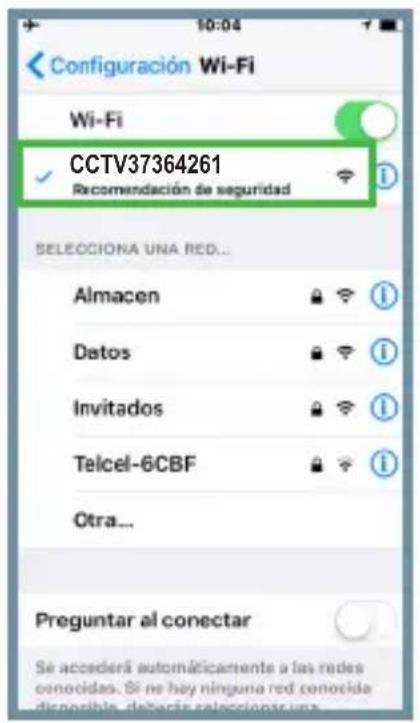
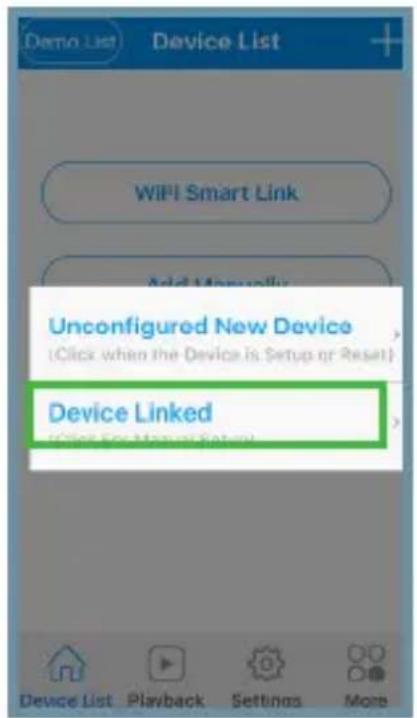
- Elija la opción Device Linked o Add Network Device (dependiendo del sistema de su teléfono).
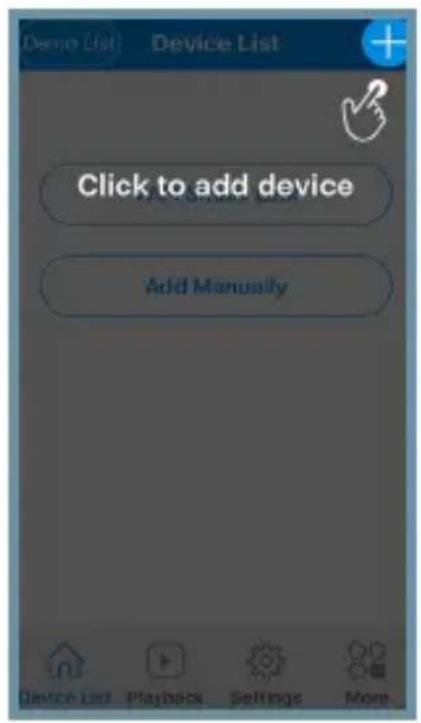
- Una vez establecida la conexión a la red Wi-Fi ingrese a la aplicación, y seleccione el icono +
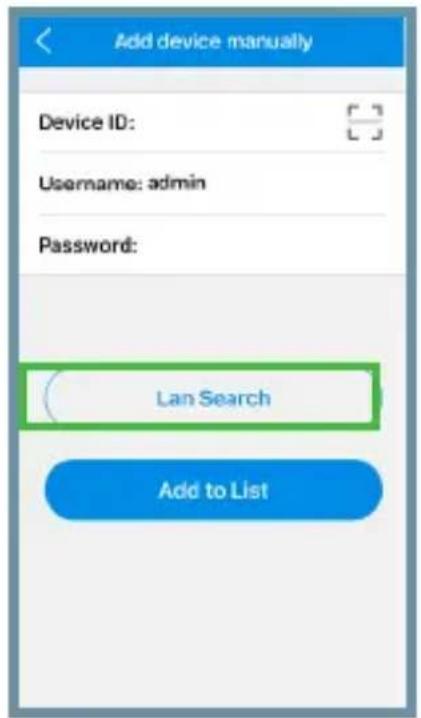
- Seleccione Lan Search y espere hasta que finalice la búsqueda.
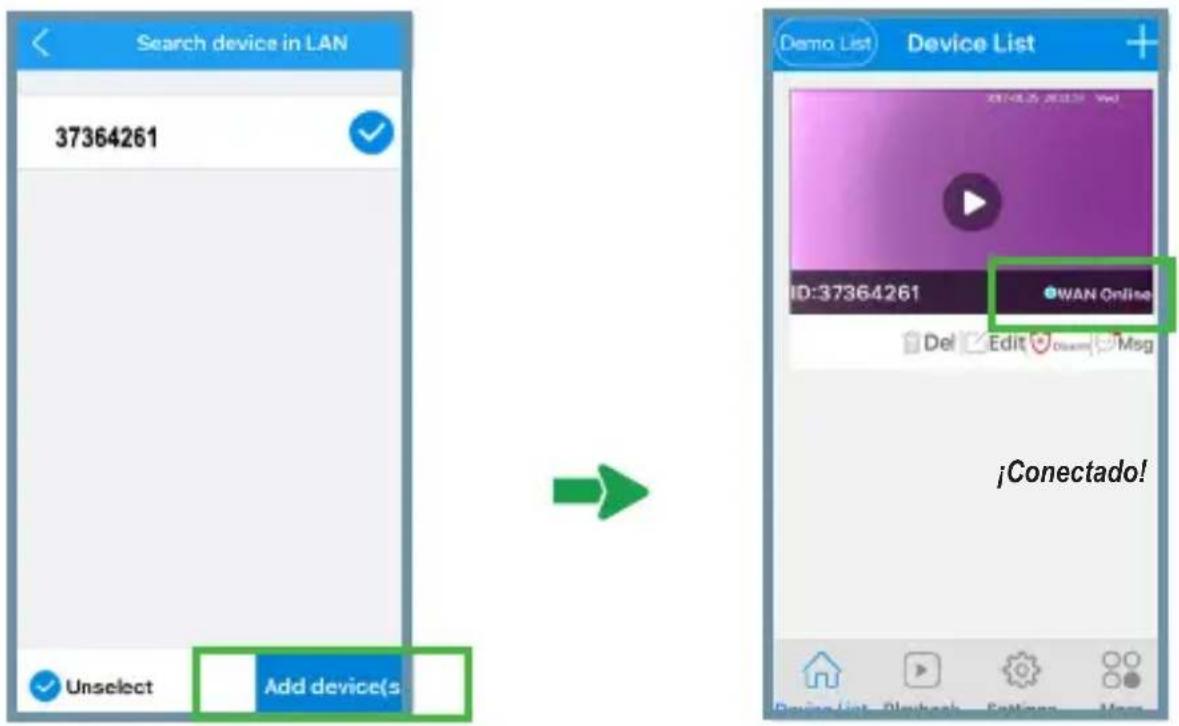
- En la lista de dispositivos encontrados seleccione Add device(s).
MONITOREO
Una vez establecida la conexión aparecerá la pantalla principal donde podrá editar las opciones del dispositivo conectado y empezar a monitorear desde el dispositivo móvil.
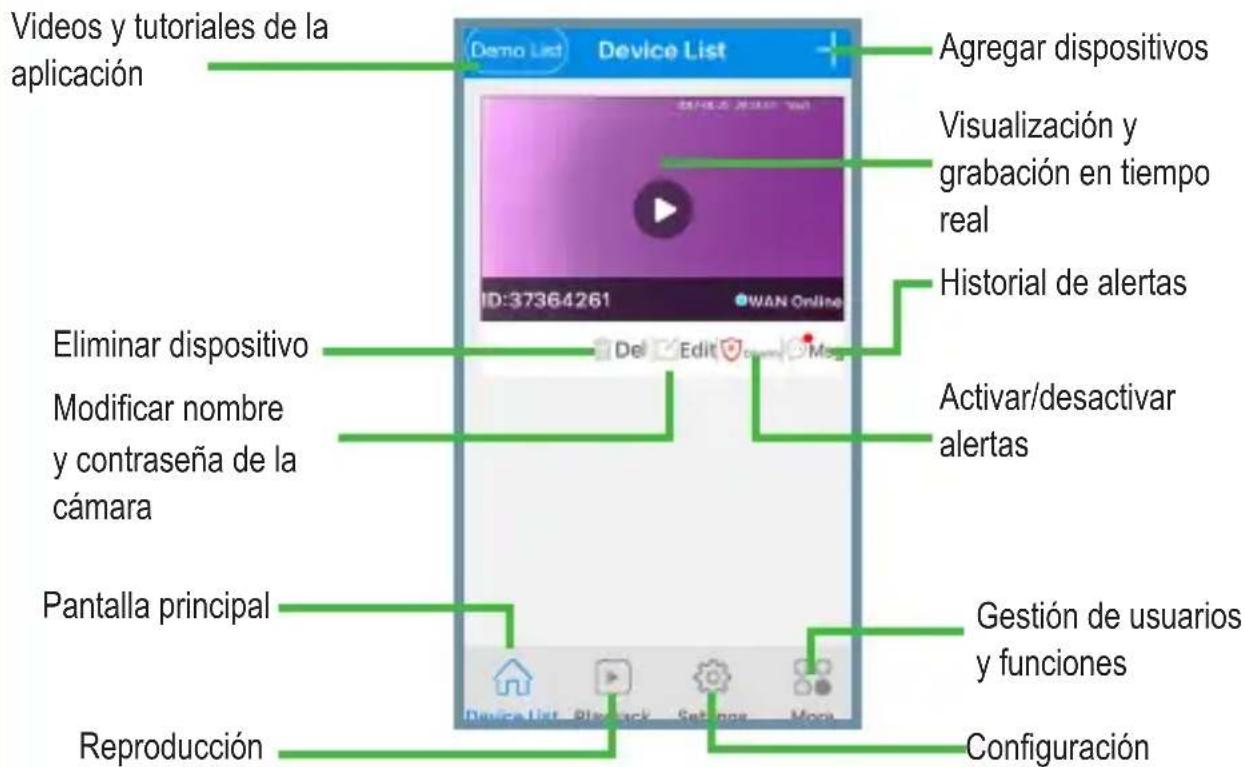
Monitoreo remoto
Cuando se encuentre fuera de la red local:
- Asegúrese de que el smartphone tenga conexión a internet.
- Abra la aplicación y espere unos segundos hasta que la cámara aparezca en línea.
- Selecciónela para visualizar.
En la pantalla principal presione ▶ para visualizar en tiempo real.
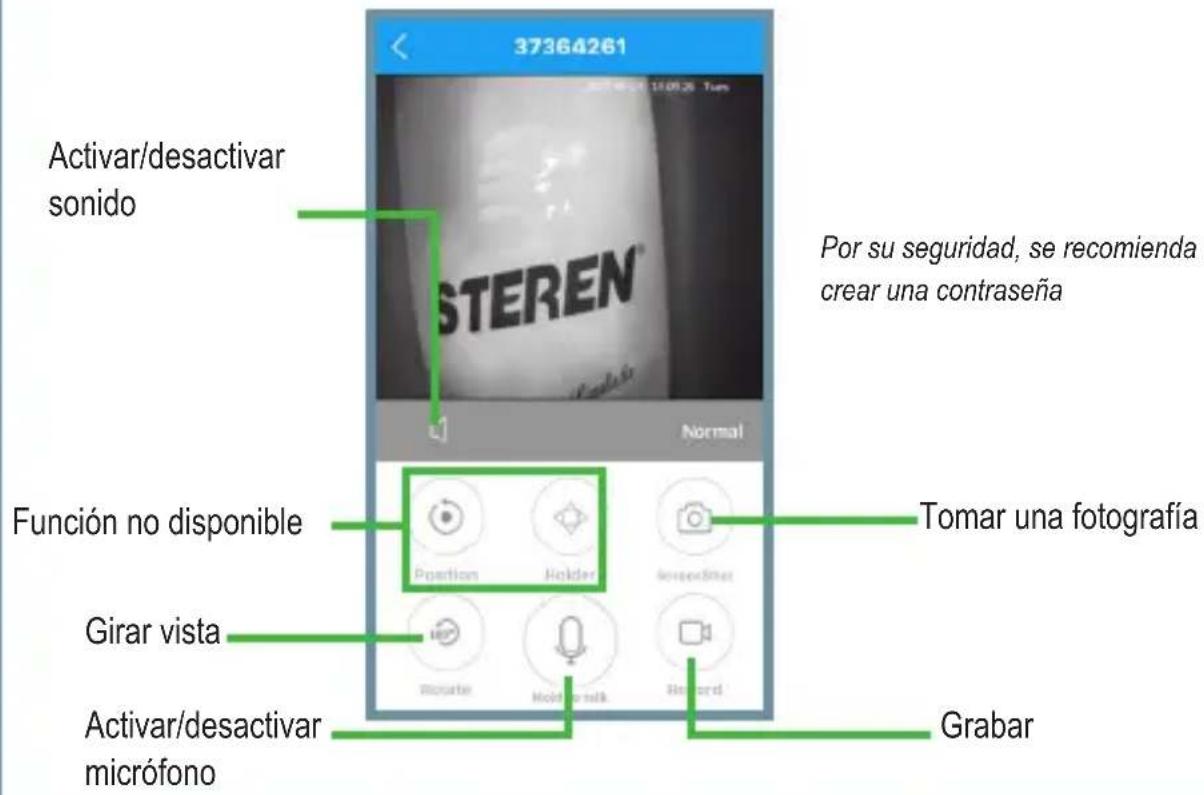
CONFIGURACIÓN DE ALERTAS
Esta función sólo está disponible en modo de conexión Wi-Fi
Recibir notificaciones
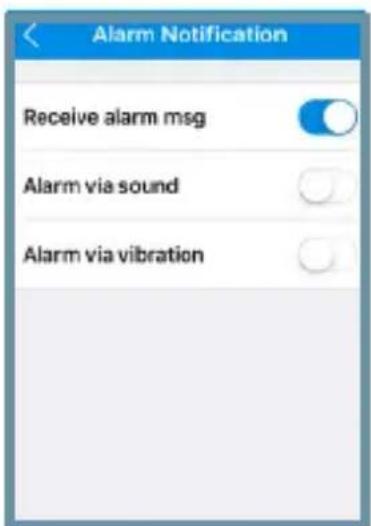
Cuando la cámara detecte movimento enviará una notificación al dispositivo móvil. Active o desactive las notificaciones de la siguiente manera:
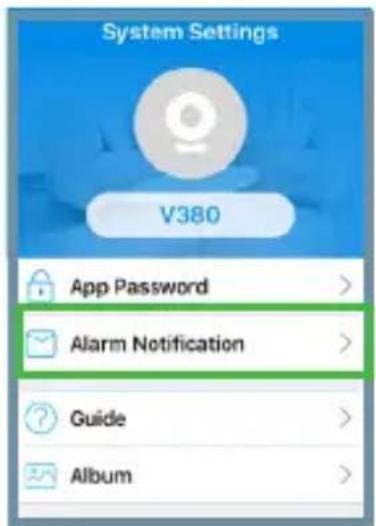
- En la pantalla principal de monitoreo ingrese al submenú (More) y seleccione la opción Alarm Notification. (o
AppNotification).
- Active o desactive las opciones de su preferencia.
Otras opciones de alerta
-
Ingrese al submenú y seleccione la opción Alarm Settings.
-
Active las opciones de su preferencia y presione Save para guardar los cambios.
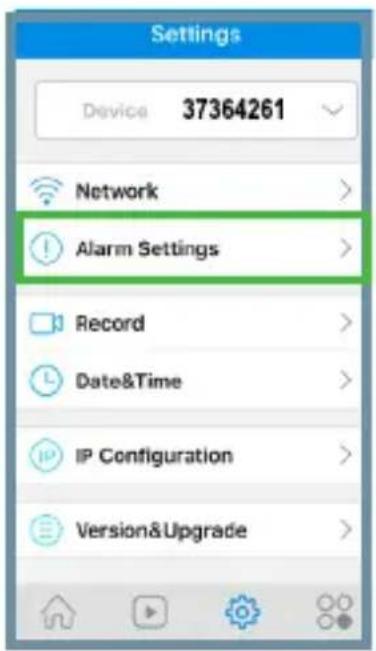
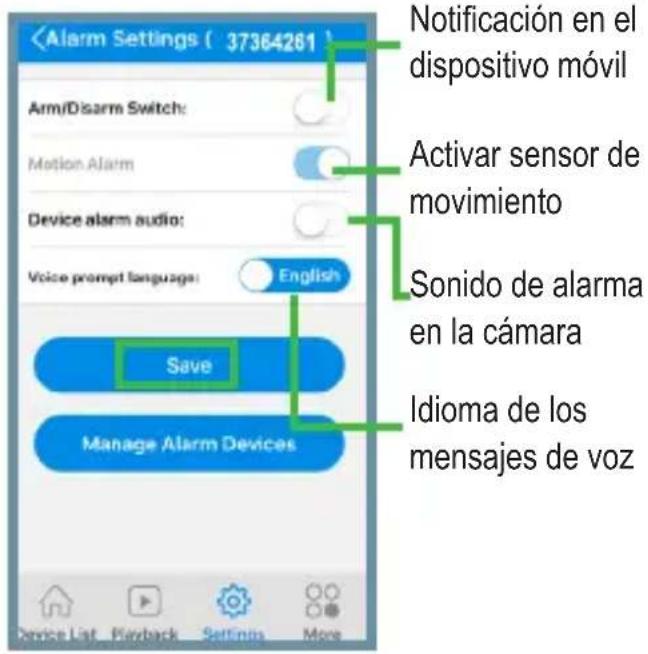
VISUALIZACIÓN DE ARCHIVOS
Para ver las fotografías tomadas desde la aplicación, diríjase al submenú (More) e ingrese a la opción Álbum. Estos archivos se almacenan en el dispositivo móvil.  Si desea ver los archivos de la tarjeta micro SD, debe extraerla para visualizarlos en una PC.INSTALACIÓN
Elija una superficie sólida y estable para instalar la cámara. Puede colocarla sobre una superficie plana (A) o fijarla a un muro con los tornillos (B). ESPECIFICACIONES
Alimentación: 5 V --- 1,6 A Red inalámbrica: 802.11 b/g/n Protocolo: TCP/IP Compresión de video: H.264 720p Iluminación mínima: 0,5 lux Capacidad máxima de tarjeta micro SD: 32 GBConvertidor CA/CC
Alimentación: 100-240 V \~ 50-60 Hz 0,3 A Salida: 5 V --- 1,6 A Las especificaciones pueden cambiar sin previo aviso Esta póliza garantiza el producto por el término de un año en todas sus partes y mano de obra y tres meses en la batería contra cualquier defecto de fabricación y funcionamiento a partir de la fecha de entrega.CONDICIONES
1.- Para hacer efectiva la garantía, presente esta póliza y el producto, en donde fue adquirido o en Electrónica Steren S.A. de C.V. 2.- Electrónica Steren S.A de C.V. se compromete a reparar el producto en caso de estar defectuoso sin ningún cargo al consumidor. Los gastos de transportación serán cubiertos por el proveedor. 3.- El tiempo de reparación en ningún caso será mayor a 30 días, contados a partir de la recepción del producto en cualquiera de los sitios donde pueda hacerse efectiva la garantía. 4.- El lugar donde puede adquirir partes, componentes, consumibles y accesorios, así como hacer válida esta garantía es en cualquiera de las direcciones mencionadas posteriormente.ESTA PÓLIZA NO SE HARÁ EFECTIVA EN LOS SIGUIENTES CASOS:
1.- Cuando el producto ha sido utilizado en condiciones distintas a las normales. 2.- Cuando el producto no ha sido operado de acuerdo con el instructivo de uso. 3.- Cuando el producto ha sido alterado o reparado por personal no autorizado por Electrónica Steren S.A. de C.V. El consumidor podrá solicitar que se haga efectiva la garantía ante la propia casa comercial donde adquirió el producto. Si la presente garantía se extraviara, el consumidor puede recurrir a su proveedor para que le expida otra póliza, previa presentación de la nota de compra o factura respectiva. DATOS DEL DISTRIBUIDOR Nombre del Distribuidor Domicilio Producto Marca Modelo Número de serie \_\_\_\_ Fecha de entrega ELECTRÓNICA STEREN, S.A. DE C.V. Biólogo Maximino Martínez No. 3408 San Salvador Xochimanca, Del. Azcapotzalco, Ciudad de México 02870, RFC: EST850628-K51 STEREN PRODUCTO EMPACADO S.A. DE C.V. Autopista México- Qro. Km 26.5 S/N Nave 3-A Col. Lomas de Boulevares Tlalnepantla de Baz, Estado de México, México CP. 54020 RFC: SPE941215H43  CENTRO DE ATENCIÓN A CLIENTES 01 800 500 9000CCTV-205
IP CAMERA natural_image
White digital camera with black lens and stand (no text or symbols visible)CCTV-205 Instruction manual
Before to use the product, please read carefully this manual to avoid any malfunction. The info in this manual is shown as reference. Due to updates can exist differences. Consult our website www.steren.com to obtain the current version of this manual.CAUTIONS
• This product is NOT a toy; keep it away from children. - Any reparation not authorized may cause malfunction and avoid the warranty. - This device cannot be used by people with different abilities, unless they have preparation and supervision. - No extraiga la tarjeta micro SD mientras la cámara está grabando; puede provocar mal funcionamiento y pérdida de datos. - Don't place heavy objects over the camera. The operation of this equipment is subject to the following two conditions: (1) it is possible that this equipment or device may not cause harmful interference and (2) this equipment or device must accept any interference, including interference that may cause its undesired operation.INDEX
PARTS 25
BEFORE USING 26
APP INSTALLATION 27
CONNECTION OPTIONS 28
Option 1: Wi-Fi connection 29
Option 2: Direct option (access point)
MONITORING 35
Remote monitoring
ALERT SETTINGS 36
To recieve notifications 36
Another alert settings 37
GENERAL SETTINGS 37
FILE PREVIEW 38
INSTALLATION 38
PARTS
    \*Use a clip to press the buttonBEFORE USING
natural_image
Diagram of a door handle with a green arrow pointing to the left side (no text or symbols)natural_image
Line drawing of a digital camera with cable and plug, no text or symbols presentAPP INSTALLATION
To manage the camera work, you must install the app. 1. Enter to the app store of your mobile device and download V380 app.  This app is not property of Steren; the company is not responsible for the the working or the updates. 2. Open the app. Select Local option. 3. Choose the area (North America).  The Account Register is not available for America.  Is recommended to uninstall the app if not use it for long period of time The showed images correspond to an iOS device and V380 (5.1) app. The icons, interface and the functions may vary depends the app version and the OS of the used device. (Continued the App installation section) Once make the configuration, in the screen appears the connection mode of the camera. See the next section of this manual to choose an option.CONNECTION OPTIONS
The camera has 2 ways to pairing with the mobile device. Choose a connection option and refers to the correspond section in this manual to see the corresponding process. Option 1: Wi-Fi connection Page 29 Page 32 natural_image
Diagram showing a smartphone, wireless router, and camera with signal waves (no text or symbols)natural_image
Three icons: a circular device with signal waves, a Wi-Fi symbol, and a smartphone (no text or symbols)OPTION 1: Wi-Fi connection
1. Connect your Smartphone to a Wi-Fi network. 2. Enter to the app and choose WiFi Smart Link option. 3. Enter the password of the Wi-Fi network and press Next.   4. Wait until the connection is ready.  Ensure that the camera is connected to the power supply  The camera will emit the message: "Wi-Fi connected".  The camera emits a voice message:   In case that the connection failed, press and hold the Reset button until the camera emits the voice message: "Restore factory default settings". Then repeat the process.IMPORTANT
In some devices is necessary to enter the ID number of the camera to complete the Wi-Fi pairing. Follow the next process: 1. In the main screen select Add Manually or Add Network device (depends on the used device) 2. In the Device ID field enter the ID number that it is localized it in the rear label of the camera, also you can scan the QR code.   3. Select Lan Search, and wait until the search finish. For some devices is necessary to pass to point 4, otherwise the camera will appears connected. 4. Select the founded device and select Add device (s).    Refers to page 35 to see the Monitoring section.OPTION 2: Direct connection (access point)
1. In the camera press once the Reset button. Wait for a few seconds until you can hear the voice message: "Access point established".  If you can't listen this message, press and hold the Reset button until the camera emits the message: "Restore factory default settings". Then, press this button again. 2. In the device enter to the Wi-Fi settings options. Search and select the network with the prefix "CCTV" and the ID number. Example: CCTV37364261 3. Once established the Wi-Fi connection enter to the app and press the + icon.  4. Choose Device Linked or Add networked device in some devices.  5. Select Lan Search and wait until the search is over.   6. In the found devices list select Add device(s).   MONITORING
Once established the connection will appear the main screen where you can edit the options of the connected device and start to record and monitoring from your mobile device. Remote monitoring
When you're out from the local network: 1. Ensure that the smartphone has connection to internet. 2. Open the app and wait few seconds until that the camera appears online. 3. Select it for visualizing. In the main screen press  to display in real time. ALERT SETTINGS
This function is only available in Wi-Fi modeTo receive notifications
When the camera detects motion, will send a notification to the mobile device. Activate or deactivate the notifications as following: 1. In the main screen of monitoring enter to ☐☐ submenu and select Alarm Notification. (or AppNotification) 2. Activate or deactivate the options that you want.  Another alert settings
1. Enter to 📍 submenu and select Alarm Settings.  2. Activate the options that you want and select Save. GENERAL SETTINGS
Enter to ☐ submenu to edit the general settings of the camera. flowchart
graph TD
    A["ID device"] --> B["Settings"]
    B --> C["Device 37364261"]
    B --> D["Network settings"]
    B --> E["Alarm settings"]
    B --> F["Recording settings"]
    B --> G["Date and hour"]
    B --> H["IP settings"]
    B --> I["Version&Upgrade"]
    B --> J["App info"]
FILE PREVIEW
To see the photos taken from the app, choose 🔵 and enter to Album, this files are stored in the mobile device.  If you want to see the files stored in the SD card, you must remove it from the camera and place it in your PC.INSTALLATION
Choose a stable and solid surface to fix the camera. You can place it into a flat surface (A) or fixed it over the wall (B).  Take into account the length of the power cord when doing the installationSPECIFICATIONS
Input: 5 V — 1.6 A Wireless network: 802.11 b/g/n Protocol: TCP/IP Video compression: H.264 720p Minimum light: 0.5 lux Maximum micro SD card capacity: 32 GBAC/DC converter
Input: 100-240 V \~ 50-60 Hz 0.3 A Output: 5 V = 1,6 A Specifications may change without notice This Steren product is warranted under normal usage against defects in workmanship and materials to the original purchaser for one year and three months in the battery from the date of purchase.CONDITIONS
1. This warranty card with all the required information, invoice or purchase ticket, product box or package, and product, must be presented when warranty service is required. 2. If the product is in the warranty time, the company will repair it free of charge. 3. The repairing time will not exceed 30 natural days, from the day the claim was received. 4. Steren sell parts, components, consumables and accessories to customer, as well as warranty service, at any of the addresses mentioned later. THIS WARRANTY IS VOID IN THE NEXT CASES: If the product has been damaged by an accident, acts of God, mishandling, leaky batteries, failure to follow enclosed instructions, improper repair by unauthorized personnel, improper safe keeping, among others. a) The consumer can also claim the warranty service in the purchase establishment. b) If you lose the warranty card, we can reissue it, if you show the invoice or purchase ticket.RETAILER INFORMATION
Name of the retailer Address Product Brand Serial number Date of delivery  CUSTOM SERVICE CENTER 01 800 500 9000 natural_image
Abstract geometric logo with white horizontal stripes on a green background (no text or symbols)STEREN
- Manual de instrucciones
- PRECAUCIONES
- ÍNDICE
- PARTES 5
- PREPARATIVOS 5
- INSTALACIÓN DE LA APLICACIÓN 7
- OPCIONES DE CONEXIÓN 8
- Opción 1: Conexión Wi-Fi 9
- Opción 2: Conexión directa (punto de acceso) 12
- MONITOREO 15
- Monitoreo remoto 15
- CONFIGURACIÓN DE ALERTAS 16
- CONFIGURACIÓN GENERAL 17
- VISUALIZACIÓN DE ARCHIVOS 18
- INSTALACIÓN 18
- PARTES
- PREPARATIVOS
- INSTALACIÓN DE LA APLICACIÓN
- OPCIONES DE CONEXIÓN
- OPCIÓN 1: Conexión Wi-Fi
- IMPORTANTE
- OPCIÓN 2: Conexión directa (punto de acceso)
- MONITOREO
- Monitoreo remoto
- CONFIGURACIÓN DE ALERTAS
- Recibir notificaciones
- Otras opciones de alerta
- CONFIGURACIÓN GENERAL
- VISUALIZACIÓN DE ARCHIVOS
- INSTALACIÓN
- ESPECIFICACIONES
- Convertidor CA/CC
- CONDICIONES
- ESTA PÓLIZA NO SE HARÁ EFECTIVA EN LOS SIGUIENTES CASOS:
- CCTV-205
- CCTV-205 Instruction manual
- CAUTIONS
- INDEX
- PARTS 25
- BEFORE USING 26
- APP INSTALLATION 27
- CONNECTION OPTIONS 28
- Option 1: Wi-Fi connection 29
- Option 2: Direct option (access point)
- MONITORING 35
- Remote monitoring
- ALERT SETTINGS 36
- To recieve notifications 36
- Another alert settings 37
- GENERAL SETTINGS 37
- FILE PREVIEW 38
- INSTALLATION 38
- PARTS
- BEFORE USING
- APP INSTALLATION
- CONNECTION OPTIONS
- OPTION 1: Wi-Fi connection
- IMPORTANT
- OPTION 2: Direct connection (access point)
- MONITORING
- ALERT SETTINGS
- To receive notifications
- Another alert settings
- GENERAL SETTINGS
- FILE PREVIEW
- INSTALLATION
- SPECIFICATIONS
- AC/DC converter
- CONDITIONS
- RETAILER INFORMATION
- STEREN
Marca : Steren
Modelo : CCTV-205
Categoría : Camara de seguridad